Xenon for Toyota Corolla
Xenon for Toyota Corolla can be purchased for low and high beam. Toyota Corolla xenon is selected according to the lamp base. If the high beam and low beam are in one lamp, it is bi-xenon. To install xenon, you do not need to change the headlights. Xenon can be installed in any Toyota Corolla headlights. If the on-board computer queries the performance of standard lamps, xenon must be purchased and installed only with decoys.
Xenon can be installed both in lenses, if they are already installed, and in simple reflectors. You can buy and install lenses and xenon in Toyota Corolla headlights from us. Headlight lenses are selected according to their diameter and distance to the headlight glass.
Lenses are available for low beam and high beam. You can also buy and install bi-xenon lenses with angel eyes.
If such lenses are placed on the low beam, then the high beam can either be dimmed, or it will work in parallel with the high beam from the lens.
If a standard xenon is installed on a Toyota Corolla, we can select an analogue of the standard xenon units, or replace the standard xenon with any other one. You can also buy standard used xenon units from us.
Cost of xenon and bi-xenon Toyota Corolla:
Xenon optionsXenon priceXenon Toyota Corolla, low beamXenon Toyota Corolla, high beam| from 3,500 rub. |
| from 3,500 rub. |
| from 4,500 rub. |
| from 3,500 rub. |
| from 5,000 rub. |
| from 6,000 rub. |
| from 1,000 rub. |
| from 1,200 rub. |
| from 1,000 rub. |
| from 4,500 rub. |
Sign up for installation of xenon Toyota Corolla
<\p>
The cost of xenon depends on whether it is new or used, the manufacturer, as well as on availability in our warehouse or delivery time to our store.
You can buy and install xenon in the PTF of Toyota Corolla. Xenon in fog lights is selected according to the base and the distance to the PTF glass. When installing xenon in a PTF, be sure to take a xenon kit with waterproof ignition units. Because they will be installed below, dirt, salt, and reagents fly there. If the ignition unit is ordinary, it will quickly fail.
Toyota Corolla xenon rating based on owner reviews:
1. Zumato (Japan) 2. Hella (Germany) 3. Philips (Germany) 4. Sho-Me (Taiwan)
5. Klunger (China)
When you need to buy xenon for a Toyota Corolla:
- the standard xenon ignition unit is out of order; - the dim light of the halogen lamps; - the old non-standard xenon is out of order.
Source: https://automagia.ru/xenon/auto/toyota/corolla
About xenon
-
- 111 messages
Here’s a question: are there any Raniks in 121 body types that have xenon lights installed at the factory??? that is, is it really possible to find headlights for 121 bodies that allow the installation of xenon lamps in them...
so that these headlights meet all the requirements that the traffic police came up with. It’s just that when I bought the car, home-made xenon was installed in the main headlights and foglights….then all this hype started with the “left” xenon and I took it off and installed simple halogens…. .
but they’re a total mess, I can’t see anything))) maybe I’m just used to xenon.....
-
- 1449 messages
there are xenon headlights. it will be sooooo expensive.
Tuning is an acute, highly wasteful disease, which is characterized by a sharp revaluation of life values with the most intense damage to the psyche and a sharp change in self-esteem.
-
Here’s a question: are there any Raniks in 121 body types that have xenon lights installed at the factory??? that is, is it really possible to find headlights for 121 bodies that allow the installation of xenon lamps in them...
so that these headlights meet all the requirements that the traffic police came up with. It’s just that when I bought the car, home-made xenon was installed in the main headlights and foglights….then all this hype started with the “left” xenon and I took it off and installed simple halogens…. .
but they’re a total mess, I can’t see anything))) maybe I’m just used to xenon.....
According to the catalogue, they started installing xenon on Allex/Ranx from 09.2002, that is, when the headlights became a little narrow. I looked at Corolla sedans and Fielders - similar. So it is unlikely that before 09.2002 there was a standard xen from the factory, most likely everything was installed after that.
Has anyone seen the first allexo/ranx with standard xenon and big headlights???
-
That's right, they started installing xenon on 09.2002.
-
All that remains is to find out what year of manufacture the author’s car is))
-
- 111 messages
2001))) damn))) but still thanks everyone for the info)
-
- 675 messages
Hi all !!! Today I watched the news on Ren TV...they say that for xenon, I will be deprived of my license for half a year..
-
- 43 messages
those.
It turns out that if my car is 2003, then I can safely install xenon and I will be happy? Or are the headlights different for xenon? and by the way, another question - xenon in the fog lights? How do guys feel about him? also deprivation or what? -
- 3292 messages
Vitaly, the same as the headlights (((
-
- 142 messages
Hi all !!! Today I watched the news on Ren TV...they say that for xenon, I will be deprived of my license for half a year..
We don’t touch xenon yet))
-
- 114 messages
But if you pass the technical inspection, then xenon is now allowed there and who to believe? ))
-
- 406 messages
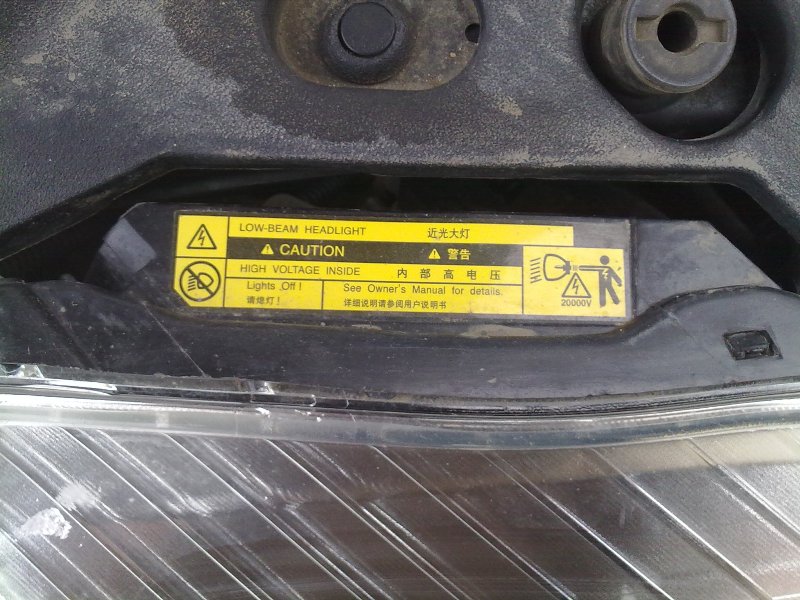
Xenon is prohibited if the headlight itself does not fit from the factory... if the factory xenon (there is a mark on the lampshade itself) then everything is ok :)...
-
- 675 messages
By the way, if the xenon is original, then nothing will happen..)) but it’s not so easy for the guys to determine where and by whom the xenon was installed. Again, I personally called a fellow guy, he said you can go..
-
- 1449 messages
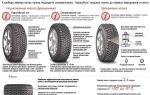
It can be determined very easily at the MOT, and in theory it can be determined from the outside if you have seen a regular headlight and a xenon one.
Tuning is an acute, highly wasteful disease, which is characterized by a sharp revaluation of life values with the most intense damage to the psyche and a sharp change in self-esteem.
-
- 36 messages
Hi all!
Does xenon exist for such an Alexa? About 4 years old, restyled -
- 142 messages
exists)) although in the photo the Corolla Hatch is left-hand drive
-
- 36 messages
When I was looking for a photo, I didn’t look at the steering wheel...
But you also need xenon from the left steering wheel -
- 675 messages
I have o4g. Restyled it's worth the original xenon..)
-
- 4 messages
Similarly, there is a regular one
-
- 99 messages
For 2001 there are lensed headlights, it’s better to buy them than to screw up the xenon ones.
-
- 36 messages
Then is it possible, the body number of the O4 year Restayl with xenon? Or the number from the headlight itself? Possible in PM..
-
- 36 messages
Up!
Look here please! -
- 1 messages
And if you don’t install xenon, then what lamps should you install? The light is complete rubbish! Nothing can be seen on a wet road...
-
- 142 messages
phillips premium or koito white beam, the first ones are cheaper, the second ones are more expensive)
-
- 75 messages
The second ones are better. These are the ones I use. What's in the fogs, what's in the head.
Source: http://AllexRunxClub.ru/forums/topic/568
Factory xenon, almost everything is as it should be — logbook Toyota Corolla 2007 on DRIVE2

I have been collecting spare parts for xenon installation for a long time.
Excerpt from the requirements of the technical regulations:
“1.3.14.6. Low-beam headlamps, the light source of which is a gas-discharge lamp, must be equipped with a headlight cleaning device and a functional automatic tilt adjustment device.”
Total: my car has headlight washers installed from the factory, but there is no automatic corrector, and the headlights from the factory are halogen reflector in the low and high beams.
Studying the tynets you can find several installation options.
For corrector options: 1. without a proofreader at all - complete achtung2. with a manual corrector - akhtung on pshsh3. regular proofreader - good and expensive
4. non-standard corrector (Silich, Hella, in my opinion also Horizon) - suitable and cheaper than the third option (if not Hella)
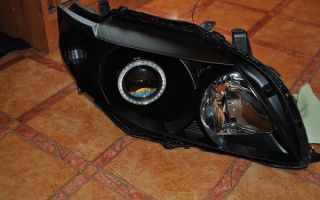
There are options for the headlight: 1. The standard halogen headlight is equipped with xenon, while in everyday life - collective farm xenon2. Lensed modules for halogen are installed in the standard headlight and xenon lamps are installed in them, see the first option3. Lensed modules for xenon are installed in the standard headlight; with auto-corrector this is a suitable option4. Non-standard (real Chinese) halogen or xenon headlights (with or without corrector)
5. Place a standard headlight under xenon in the low beam and halogen in the high beam - good
Each option has its own advantages and disadvantages, but for myself I decided to be as close as possible to the factory one, as little “collective farm” as possible, which means I’m looking for the original, but I want to save money, so the priority is on spare parts from disassembly, so I collected everything from the world piece by piece for several months.
Actually, it all started with the fact that I found a headlight level control unit with a bracket on an allegro, from a diesel Corolla: poziomu lamp ksenon TOYOTA 89960-12140 DENSO 35600-78788 klimat.automat.2007-2010r.wersja europ.
jasny błękit 8S1 (2.0D4D 126KM 4d.
sedan ABS)-jakość AThe block does not appear in the catalogs of exist, emex and all other online spare parts stores, it is not Googled, moreover, I downloaded all available Toyota EPCs from torrents and searched through them - there is no such block!
Zoom
This block does not hit catalogs at all
They delivered it to me by wallegro - this is not the first time I have driven them, I really like them for their attitude towards customers, their price, and their delivery time.
The block needs connector 90980-12404 - I couldn’t find it during disassembly, so I got a new one from exist. Try to buy a used unit with this connector right away and save money, and you already have all the terminals and the wires in the color according to the diagram.
Connector for automatic headlight level control unit
Next I was looking for a body height sensor - it fits from a Prius, I found it on Avito. When the sensor arrived, we checked its performance using the “Murzilka”. If you take it apart, take it with a mating connector; you can order a couple more connectors and assemble the missing trunk wiring yourself, thereby saving a couple of thousand rubles.
Zoom
These are the voltmeter readings at different angles
The car partially has the necessary wiring, a few pieces are missing, one of them is the wire from the height sensor 82163-12170, in my opinion it’s not possible to find it in disassembly, I got a new one from emex, but I advise you to assemble it yourself, for this you need to open the “Murzilka” ”, write down all the connectors - N1, NM1, EM3 and in the same “Murzilka”, but on another page find the part numbers of the connectors, if I’m not mistaken, then only N1 - 90980-12353 and NM1 - 90980-11011/90980 are needed -11452 and terminals, but check the correctness yourself :-), I took a new wiring harness for a non-humane price.
Here is a link to the album with the harness. The small white connector in the 5th and 6th photos is not used in my car; the rubber plug in the last 2 photos is already installed in any Corolla E15 from the factory. The black connector is for the height sensor, it is advisable to take the sensor already with it. 20 photos per entry is not enough for me :-).
Next were the headlights - new 81145-12A80, and 81185-12A80 for exist, in my opinion for pre-restayling they are cheaper than halogen ones. I ordered the headlights right away, but there are a few “jambs” - there are bubbles. The headlight comes with a corrector motor and an ignition unit gasket.
Zoom
Don't interfere - he'll kill you.
At the bottom of the headlight there is a place for installing the ignition unit, with a gasket 90075-68007 - it comes with the headlight, and at the back it should be covered with a cover 90075-66003, which includes power for the ignition unit, the cover will not come with the headlight - I will write about it below, when I’ll tell you about the ignition unit.
Zoom
The ignition unit and cover are already installed
Zoom
Places that need to be covered
Zoom
Headlight cover with internal connector
Zoom
External headlight cover connector, it is not compatible with what is on the Corolla from the factory, you need to look for a matching connector, suitable for RAV4
Next on the list are ignition units with wires 81125-12A90 and headlight covers 90075-66003.
Any square Koito KDLT003 ignition blocks should fit, but with the wires and the cover everything is not so simple. The block must have two wires: the first - from the block to the lamp, the second - from the headlight cover to the block (81125-12A90), but the second usually needs to be purchased separately.
I took the ignition blocks from disassembly, and the covers are new from emex. I found the blocks on the drome from this seller, the person provided a video of checking the blocks, sent them quickly and the blocks arrived with a full set of wires, but the connector from the cover to the block is not the same. I had to “collective farm”. I just picked up a suitable clamp in the store when installing it in thick heat shrink.
Zoom
The connector that came with the ignition unit
Now I would act differently - I would find ignition units from Toyota Allion/Premio in the 260 body by disassembling, judging by exist's catalogs, these models are equipped with the necessary covers 90075-66003 and ignition units, and therefore wires with the necessary connectors, the only one The point that I see is the length of the wires.
Also, judging by the catalogues, the required covers and ignition units were installed on the Corolla/Fielder E12 RHD. In short, it is better to look for a complete set from disassembly: ignition units with all the wires and headlight covers, and in addition to them, also the mating connectors - those that go into the headlight cover from the outside, because what is on the Corolla now does not fit.
I found these connectors on sale for 100 rubles. thing from RAV4.
Some kind of “crooked” paragraph came out :-), I hope I wrote it clearly.
I took the new Philips D4R lamps - this is what should be installed on the assembly line, the price is never “humane”.
Zoom
Philips 42406 VIC1
By the way, the seller of ignition units can sell used D4R lamps at a “humane” price, but I think he has them from Harrison - they install them in Japan, and he also has ignition units from the “correct” models.
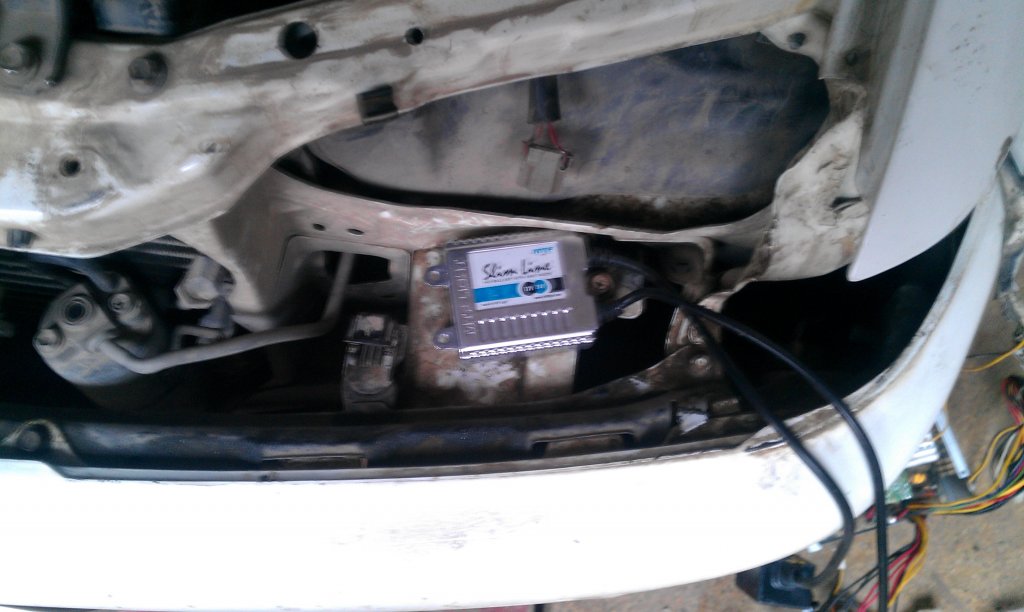
When everything was in hand, the test bench was assembled:
Zoom
Test bench
It was assembled by simply an excellent auto electrician from Autodom on Tarskaya. Thank you very much Kostya, I’m tired of it. Everything worked. On a table, without a speed signal, the time delay from changing the position of the height sensor to the activation of the correctors is approximately 4 seconds.
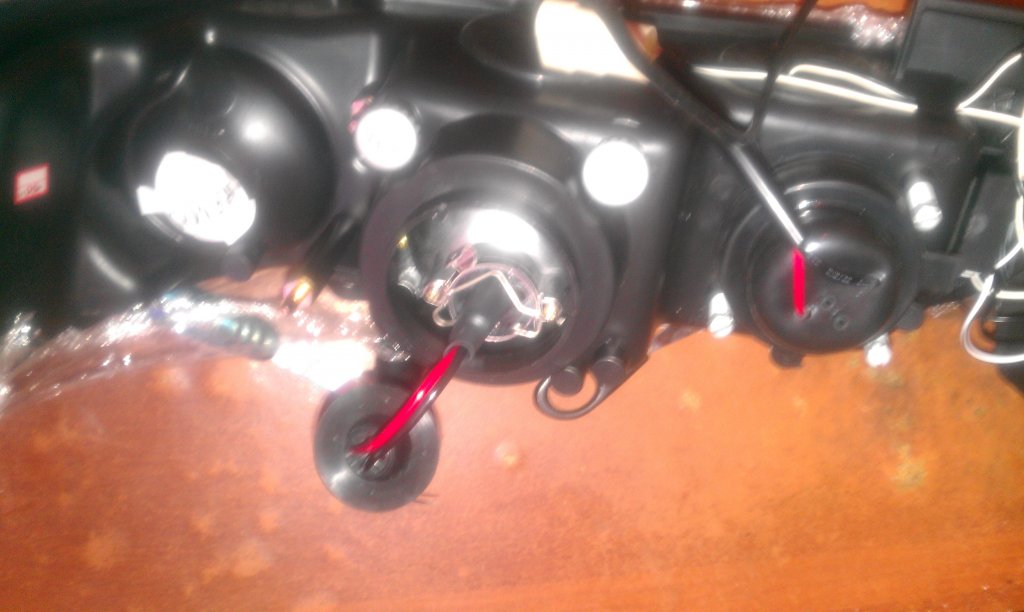
When installing the ignition unit on a headlight, there is one point - the wire from the unit to the lamp runs inside the headlight, while the connector for the lamp on this wire is very thick, you can probably disconnect this wire from the ignition unit and push it inside the headlight, but I didn’t look for easy ways : for one headlight I loosened the fastenings of this “knob” and removed it, after which I installed the block, pushed the wire and attached the knob back to it, for the second headlight I unscrewed the corrector all the way and the knob got through without dismantling, but not without causing some damage to mine side - the corrector began to work with a clicking sound, I had to completely remove it and put it back - everything became OK, I express my gratitude to Vitalik, if he had not shown how to remove the corrector, I would definitely have broken something.
Next was the installation, Kostya installed it, I ran around and got in the way, he fitted me with the missing bolts, screws and gave me several connectors from which I pulled out suitable terminals with wires of the right color (they tried to do all the wiring according to the “Murzilka” scheme, including wire color).
In the control unit we had to swap the contacts of the corrector motors, it seems the signal and plus ones were swapped.
One more point - for each corrector motor there are 3 wires from the control unit for a total of 6 wires, but for a car with a manual corrector only 3 wires come from the engine compartment to the cabin - both motors are paralleled, so it is not necessary to lay 3 more wires - height sensor one, both headlights are adjusted to the same angle, the control unit supports both correctors on the same channel, and if my memory serves me correctly, we rang the contacts of the control unit and they also turned out to be parallel.
Zoom
Sensor in place
I didn’t take a photo of how I installed the sensor wiring - I had to remove the side panel of the rear seat on the passenger side. The second part of the missing wiring is the height sensor wiring from the connectors near the front passenger’s right leg to the control unit.
Zoom
The lowest white connector - the wires from the suspension sensor come here, the top 3: red, yellow, brown
The headlight level control unit is placed to the left of the driver inside the panel, there you can get all the signals except the height sensor signals - they were stretched from the right leg of the front passenger, they also couldn’t get to the motor signals under the panel on the driver’s side (they didn’t want to remove the panel) - also pulled from the front passenger. Well, the power supply was not turned on according to the scheme - the system turns on when the ignition is on and the low beam is on.
Everything was assembled and tested - 2 people climbed into the trunk, the correction worked.
Zoom
Warning light on the instrument panel
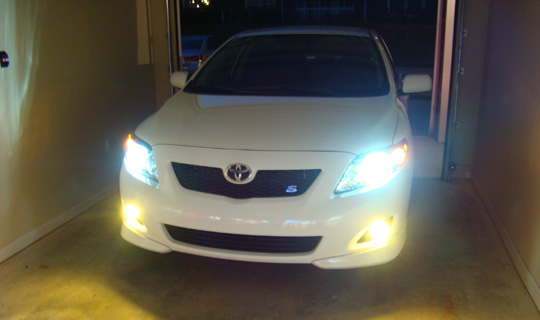
Zoom
On a gray-blue Corolle, the color temperature of xenon harmonizes very well with the color
There are also “jambs”:
1. The diagnostic software (not Toyota TechStream) does not see the headlight level control system, although all the wires are connected, the power supply was not turned on according to the diagram, maybe because of this.
Due to non-working diagnostics, it was not possible to perform the initial initialization according to the Murzilka. This was done by manually adjusting the “zero” of the corrector.
2.
The washer nozzle on the driver's side began to siphon, the bumper was removed when the headlights were changed, it looks like some kind of o-ring was lost.
Zoom
Photo of the STG, the border from the LED PTF is visible below
Sorry for the confusion. I'll edit over time.
PS Control units must fit from Corolla Fielder (RHD) E14 89960-12150 Corolla Auris/Blade (RHD) E15 89960-12090
They are easy to find parts.japancar.ru
PPS Well, yes, all this is very inexpensive in terms of cost. Look for everything on parsing and with mating connectors.
Useful links
1. Installation of automatic corrector
2. Spare parts for xenon
3. Operating instructions
4. BZ for installing xenon
5. Auto-corrector Silich No. 1
6. Auto-corrector Silich No. 2
Price tag: 100 500 ₽ Mileage 126000 km
Source: https://www.drive2.com/l/460297624780539070/
Toyota Corolla: spare parts, installation tips, cost
 Toyota Corolla: spare parts, installation tips, cost
There is nothing eternal and super-reliable in the world. No matter how much we praise Japanese Toyota cars, they will still have to be repaired. This is mainly routine repairs that concern the chassis and brake systems. But usually, on a new car, the first three years of expenses are associated with maintenance and service.
The most beloved and popular among car enthusiasts in the post-Soviet space is the Toyota Corolla. According to the owners' reviews, this is a reliable and high-quality car with modern equipment, a high level of comfort and an affordable price.
When repairing a Toyota Corolla, spare parts are not difficult to find and their cost is not high. If your car is still under warranty at a service center, then it is best to make repairs and buy spare parts there.
In other cases, you can choose any service center or private workshop, and purchase spare parts in auto stores or specialized disassembly centers.
Estimated cost of basic spare parts for a Toyota Corolla car
- Hood - 7000 rub.
- Headlight – 5000 rub.
- Wing – 3500 rub.
- Bumper – 4000 rub.
- Front door – 5000 rub.
- Air conditioner radiator – 4000 rub.
- Cooling radiator – 4000 rub.
- Steering rack – 6000 rub.
- Mirror – 4500 rub.
- Generator – 3000 rub.
- Front side glass – 1500 rub.
- Windshield – 4000 rub.
- Starter – 2500 rub.
- ABS unit – 5000 rub.
- Bumper amplifier – RUB 3,500.
- Subframe – 7000 rub.
- PTF – 2000 rub.
- Washer nozzles – 2500 rub.
Many drivers know that for a Toyota Corolla, spare parts are needed not only for repairs. Very often, owners try to refresh the appearance or improve technical characteristics with the help of tuning, or add additional options for convenience.
Most often this is the installation of xenons and parking sensors.
Xenon and BI-xenon for your car
Despite traffic police restrictions, xenon headlights are popular.
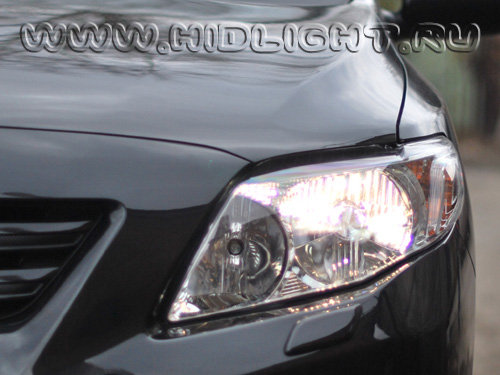
After all, xenon light provides excellent illumination of the road, markings and road signs, which allows you to correctly assess the road situation in any weather. This is especially true during fog or rain.
Even in such weather, xenon headlights do not create a “wall of light” in front of your eyes, but on the contrary, rays of light penetrate the curtain of fog or raindrops and well illuminate the road surface.
In addition, they consume less electricity and do not increase fuel consumption. BI-xenon is developed on the basis of xenon. It has the function of high and low xenon lighting.
So far, xenon headlights are not provided in any Toyota Corolla configuration, so owners install them at their own request.
A typical xenon installation costs about 1,500 rubles, fog lights – 2,000 rubles, bi-xenon installation – 2,000 rubles.
Prices for xenon kit (in rubles):
- Sho-me (H1) – 3200
- Sho-me (H4 Halogen) – 3700
- Sho-me (H4 Hi-Low) – 5500
- Sho-me (H7) – 3200
- Sho-me (9007 Hi-Low HB5) – 4400
Additional comfort when parking
Many people are familiar with the situation of parking a car in cramped parking lots near large stores or in other crowded places.
Sometimes it is very difficult to park, where there is very little space, cars are parked tightly, and even pedestrians appear unexpectedly.
Many people solve this problem simply - install parking sensors and you don’t have to worry about hitting a car standing next to you or running into a pedestrian. When approaching an object at a dangerous distance, the parking system warns the driver with an audible signal.
Even if you install parking sensors in the simplest configuration, the likelihood of damage to the car will be significantly reduced. Thus, you not only protect your car from damage, but also get rid of the hassle of damaging another vehicle or injuring a pedestrian who suddenly jumps out.
Installing parking sensors for 4 sensors costs 2,500 rubles, for 8 sensors – 4,000 rubles.
A parking radar kit for 4 sensors will cost you only 1,500 rubles, and for 8 sensors 3,200 rubles.
The money you spend on equipping your car will pay you back in peace of mind and safety.
I would be grateful if you share this article on social networks or write a comment:
Source: http://JustCarz.ru/autoparts/133-Toyota-Corolla-zapchasti-soveti-po-ustanovke-stoimost.html
How to activate bi-xenon, or Connection diagram for two different lamps
It's no secret that a conventional monoxenon light source cannot be installed in head optics with a single double-filament halogen lamp that combines low and high beam. For these categories of headlights, bi-xenon lamps with a corresponding three-pin H4 socket are designed.
The fundamental difference between the installation process of Bixenon and Xenon lamps
For bi-xenon lamps, the connection diagram is a little more complicated due to the presence of an additional high beam mode.
Since the latter is activated not by igniting the second filament, but by moving the metal screen, the lamp control algorithm is slightly adjusted by additional wiring (Note: you can read about the specifics of connecting Xenon lamps here).
In a more approximate format, the feature of the scheme is as follows:
- “+” and “–” are sent to the ignition unit when the low beam is turned on;
- When the high beam lighting is activated, “+” is sent to a device that changes the focus of the light.
The connection can be made according to one of two scenarios, the choice of which determines the type of kit:
- with a relay for each lamp or without an electronic key at all;
- with one common relay for two lamps.
We install bi-xenon instead of a regular H4 halogen lamp with our own hands
Inclusion in the circuit of a kit with individual relays
The mechanical part of the Bixenon lamp installation process is simple and absolutely repeats the monoxenon assembly method:
- form a hole in the headlight housing for supplying additional wiring;
- install a Bixenon lamp instead of the standard halogen one;
- secure the ignition units in the immediate vicinity of the headlights.
The first installation of bi-xenon H4 with your own hands often causes difficulties in organizing the connection diagram. The autonomous configuration does not provide for the presence of life support elements common to the two lamps - therefore, the installation process can be carried out sequentially. According to this principle:
- the lamp is connected and tested on one headlight;
- manipulations are carried out with the wiring on the second head lighting device;
- the final test is carried out.
A kit with an individual relay usually contains the following electrical elements :
- 2 ignition blocks;
- 2 relays;
- 2 switching harnesses with soldered diodes;
- 2 lamps.
According to the connection diagram for the bi-xenon kit with an individual relay, the procedure for carrying out the operation is as follows:
- a wiring harness with a diode is connected to the connector coming from the lamp and responsible for moving the screen;
- the standard wiring block, previously connected directly to the H4 socket, is connected to the three-pin connector coming out of the harness connected above;
- the connection harness is connected to the relay;
- the electronic key is connected to the network by attaching the positive terminal to the battery and the negative terminal to ground;
- The ballast (ignition unit) is connected to the relay;
- The power taps of the lamp are connected to the blocks of the ballast.
Inclusion in the circuit of a kit without relay devices
In kits without a relay, the diode is embedded directly into the three-pin power supply block. The connection diagram is absolutely identical, with the exception of operations associated with the electronic key: the power connector of the ignition unit goes directly from the connection with the standard block.
A little about the purpose of the diode
After installing and connecting the H4 bi-xenon with your own hands, the following malfunction is often discovered: the low/high lighting modes do not switch, but the lamp is on.
The reason is that when the low beam is on, the screen is already in the high beam position.
In order to eliminate the defect, the direction of the permissible charge flow through the diode is changed by changing its polarity.
If the location and polarity of the connector contacts for the bi-xenon installation do not match the pinout in the standard socket, the situation is corrected individually:
- diode position;
- An adapter that changes the polarity is inserted between the magnet control connector, which moves the screen from the low beam position to the high beam position, and the block from the switching harness or from the power connector (in the absence of a relay);
- In the power connector of the ignition unit, the contacts are swapped.
Bi-xenon connection diagram with a common relay for two lamps
Having such a kit, it is advisable to carry out the mechanical part of the installation process for both headlights at once. Electrical work should be carried out in full accordance with the drawings developed for this option.
Analyzing the connection diagram of this bi-xenon kit, it is easy to identify the main element - the common relay. This is where the electrification procedure should begin:
- secure the positive terminal to the battery;
- connect the three-pin connector to one of the standard power sockets for H4 halogen lamps;
- The 12 V voltage supply blocks coming from the relay are connected to the corresponding connectors on the ignition unit.
The following procedures are carried out in relation to each lamp:
- connecting high-voltage contacts coming from the ignition unit;
- connecting the screen position control connector output from the relay;
- securing the negative terminals to ensure the closure of the screen magnet control circuit.
Briefly about the process of connecting bi-xenon
The difficulty of installing a bi-xenon with an H4 base with your own hands lies in the correct organization of communication between standard lighting mode control devices, relays, ignition units, and dual-mode high-brightness gas-discharge lamps. The wiring supplied with Bixenon kits allows you to electrify the lamps quite quickly and correctly.
There are two types of wiring:
- autonomous, in which each lamp has its own power supply channel (can be with or without a relay);
- combined - here one common relay is used, on which the power supply system for each ballast and, accordingly, the lamp is “tied”.
Most manufacturers adhere to an autonomous wiring arrangement.
After installing any wiring, it is important to check that the lighting system is operating correctly. The inability to switch lighting modes in off-line mode with off-line wiring is often influenced by the direction of current passing by the diode.
Source: http://autoclub.su/ustanovka-biksenona-h4-svoimi-rukami/
Xenon kit Toyota Corolla 150
Toyota Corolla e 150 - standard xenon from Toyota - REAL, but SOOO expensive. The gasket comes complete with the headlights. The headlights came with a corrector, they work the same as before, they are no different in OSTROV-IRK.RU.
Xenon. Ignition blocks. Xenon kits. Eco-leather covers for Toyota Corolla E 150 Features of this model of covers: the most accurate matching of the covers to the shape of the car seats. – seat inserts are made of...
About the logo. The Toyota logo is a triple oval. Two internal ovals located perpendicularly symbolize the strong relationship between the client and the company. In addition, if you look closely and use your imagination a little, in these ovals you can see an image of all six letters of the brand name T, O, Y, O, T, A.
Toyota Corolla. 150 with xenon. Toyota Prius. Select a modification How to distinguish an original from a fake? The best xenon kit Xenon lamps d2s and d2r Xenon in fog lights How to recognize a fake?
To order Toyota Corolla, Toyota Corolla II, Toyota Spade... Catalog by car brands.
We are talking about the same xenon - which is allowed, no matter how much they argue, since all the conditions of the requirements for gas-discharge headlights are met; — the presence of a headlight washer — the presence of an automatic headlight level adjuster — the presence of appropriate markings on the headlight, allowing the use of gas-discharge lamps in it. This pad will easily solve your problem!….
Buy Toyota Corolla belt, Consumables and components – drive belt price, replacement, tuning
New Corolla – Technical Forum. Send by email…. Subscribe to this topic...
Tell me, please, has anyone looked into the possibility of installing xenon low beam on the latest Corolla? Color ash gray metallic.
Installation of “collective farm” xenon, that is, instead of halogen lamps is prohibited, deprivation of rights from half a year to one with a ban on using a car, that is, removal of license plates.
Yes, only a technical inspector at a stationary post can determine which xenon is installed. Only installation of legal xenon is allowed. To do this, you need to change the entire headlight assembly, and this is not cheap, we are talking about tens of thousands.
The reflector in a simple headlight is not designed for xenon, so it will not shine as much as you would like, hence the glare of oncoming cars.
And no one knows how a blinded driver will behave, at that moment on the road there are only you and the driver of the oncoming car whom you blinded, and who will guarantee that the blinded driver, not seeing the road, will not crash into you driving towards him?
In Ukraine, unfortunately, every second “bucket of nuts” has xenophobia. It is very annoying when such drivers drive to a meeting in complete darkness, you can see absolutely nothing, it blinds you and you are driving an autopilot from the memory that you managed to remember without turning the steering wheel anywhere. We can’t wait for real action from the traffic police to fine such drivers.
The standard low beams are not at all as cool as they shine. I tried changing the light bulbs, but it didn't help. As a result, I am satisfied, they shine well and do not dazzle. If you approach the selection and installation wisely, your expectations will be met. Although I never thought of installing it before.
Under the factory xenon, there is a special headlight, there is a different reflector and glass, this is precisely what is done in order to correctly distribute the flow of light and not blind oncoming drivers.
Has anyone, after installing xenon lamps on their own, tried to check them as expected on a bench?
Well, a regular xenon headlight won’t work no matter how you adjust it. Do you really think that the automaker is also Japanese, German, etc.?
We probably carried out dozens of tests, spending a lot of money, and eventually developed a special headlight for xenon light.
The Supreme Court of the Russian Federation recognized the deprivation of rights for non-factory xenon as lawful, so it will not be possible to sue for rights after deprivation. It's up to you to decide what light to drive with.
Choosing a car and first acquaintance. Interior and Exterior, Accessories. Suspension, braking system, steering. Maintenance and repair. TSB – service campaigns. Corolla Club by region. News and Proposals for the development of the project. Copying text, photos only with an active link to the site; for printed publications, the site address must be indicated.
Toyota Corolla E150 1.6
- RSS subscription
- Share Vkontakte
Source: http://ostrov-irk.ru/avto22/komplekt-ksenona-toyota-corolla-150.php