How to install a rear view camera on a car with your own hands
The basic equipment of most modern cars initially includes such a useful device as parking sensors. This device helps not only beginners, but also experienced car drivers to park anywhere in the city, even in particularly tight places, and also gives a feeling of complete confidence when reversing the car.
At the same time, the most useful data about the current situation is provided by the rear view camera. This device, working in conjunction with the display on the dashboard, gives a clear picture of what is happening behind the car. Owners of cars that do not have this device can always connect it themselves.
At the same time, everyone can cope with this task, the main thing is to strictly follow the instructions.
Today, rear view cameras come in a wide and varied selection. Moreover, each device differs in technical parameters, appearance, as well as cost and quality. But at the same time, each such device is made taking into account that its installation can be done by an ordinary car enthusiast, and not by a top-class mechanic. What you should pay attention to when buying a camera:
- First of all, take a closer look at the shape of the device, because how you will install it in your car directly depends on it. There are models that must be installed separately on special brackets. While other devices will have to be implemented into car parts, for example, lighting or a bumper.
- An important factor when choosing this device is the viewing angle. A viewing angle that is too narrow will not give you a complete picture of the situation behind you. But you shouldn’t go to the other extreme and give preference to the maximum direction of the video camera. Indeed, in this case you will be presented with information about many unnecessary objects. So you will have to think for a few seconds to concentrate on the main subjects.
Before installing a rear view camera on a car, you will need to remove several trim elements of your vehicle.
You should start working only if you have at least basic knowledge of electrical wiring.
It is especially important to remain calm when working with plastic elements, because haste in this matter can lead to unpleasant consequences.
Dismantling some parts
- First of all, you should inspect the trunk and find the best entry points for the wires from the device into the car interior. For this purpose, most cars have special additional plugs and can be used for this function. But it is better to run the wires with the wiring already present.
- Next, we decide on the location for installing the “eye” of the video camera. Typically this device is mounted in the license plate light or directly in the bumper. Choose where to connect the rear view camera that is most convenient for you. Sometimes for these purposes it is necessary to thoroughly dismantle the bumper, but you can limit yourself to minimal alterations. For example, remove the plastic strip from the license plate light. In addition, this device can be installed in the license plate frame, because most manufacturers of these parts add special grooves for mounting such devices.
- You will also have to disassemble some parts located in the front part of the car. In order to get access to the electrical wiring and connect the camera to the monitor, you will need to dismantle the bottom of the dashboard, as well as the dashboard. In addition, you have to remove the car radio.
After completing these preparatory work, you can proceed to the next stage of installation of this device.
The installation process of this device largely depends on the make of the car. But there are some general rules that apply to all cars. To work you will need:
- Screwdrivers.
- Electric drill.
- Soldering iron.
- Wires.
- Screwdriver.
- Glue.
- Insulating tape.
The installation process should begin by installing the peephole. If your car has special grooves for this device, then you need to pull out the plugs and insert the camera into the resulting hole.
If your vehicle does not have such “conveniences,” then make the required hole using an electric drill. Choose the best place to put the rear view camera yourself.
Then insert the peephole and secure it with sealant or glue.
At the next stage, you need to pull the wires leading from the device inside the trunk. Next, we connect the negative wire (black) to the machine ground. Any fastener connected to the body is suitable for these purposes.
Just remember to clean this area with sandpaper - this will ensure the most reliable connection. It is optimal to connect the wire with a positive charge (red) to the reversing light.
In this case, electricity will flow to the device only after reverse gear is engaged.
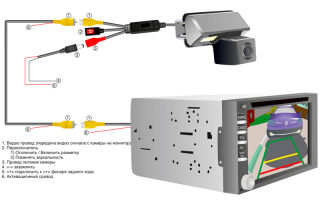
Connecting the camera to the monitor
At this stage, we will look at how to route the cable from the video camera to the monitor through the interior of the car.
Most often, this device is equipped with a wire of the optimal length, so it is quite possible that you will find the most aesthetic connection path.
Don't forget to secure the wire to the body in several places using electrical tape. This will allow you not to worry about accidental damage to the cable or its getting under the fasteners.
All that remains is to connect the monitor to the electrical wiring, after which you can install it on the dashboard. To do this, connect the cable with a negative charge (black) to the ground of the machine. This can be done in any convenient place.
And connect the positive one to the wire responsible for the operation of the rear light. You can find it under the dashboard, near the gearshift lever.
The device display can be attached to the control panel using screws, but it is better to use double-sided tape for these purposes.
Checking the work
Upon completion of all installation work, it is necessary to check the correct operation of the video camera. In order to do this, you need to connect the battery, then start the car and put it in reverse. If a picture from the camera appears on the display, you can begin assembling the interior trim. Otherwise, it is worth disconnecting the battery again and checking that the wiring is connected correctly.
Even a novice motorist can cope with such a task. At the same time, self-installation will help save a lot of money and time, because you will not need to go to a repair shop and wait for auto mechanics to be free.
Video instruction
Source: http://TopKin.ru/voprosy/avto-voprosy/kak-ustanovit-kameru-zadnego-vida-na-avtomobil-svoimi-rukami/
How to install a rear view camera. We connect it ourselvesAutocentre Autograph
Content:
Video cameras can be used in various systems of modern cars. The material will be useful to those who are planning to provide their vehicle with video surveillance.
Video cameras for vehicle driving safety
The active safety system is the main area of use for car video cameras. The following systems are equipped with similar equipment:
- automatic emergency braking;
- Lane keeping and lane change assistance;
- night vision and traffic sign recognition;
- emergency steering and pedestrian detection;
- all-round visibility and optical parking systems.
In addition, video cameras can be used in high beam control systems, anti-theft devices and video recorders. They are used in the development of automatic vehicle control systems, and only one device is often involved in the functioning of several systems.
The signal from the camera helps the driver receive the necessary and reliable information. In modern automotive systems, their electronic unit processes the signal using special programs, which makes it possible to issue warning commands to various mechanical components of the car.
Installation methods
Video cameras can be installed in various parts of the car; usually, the device is mounted behind the interior rearview mirror or behind the radiator grille. Also, such equipment is placed in the side mirror or at the rear - in the license plate light unit or on a bracket in the license plate frame.
Rear view cameras have several features:
- some transmit only the image;
- others are able to indicate parking boundaries,
In the second case, three zones are displayed on the monitor:
- blue if the object behind the vehicle is at a considerable distance;
- green if he is approaching;
- red – which is essentially a symbolic bumper of the car.
Black-and-white digital devices with significant resolution and sensitivity are more often used as rear-view cameras. In addition, such cameras are cheaper than equipment capable of transmitting images in color.
The basis of a digital camera is an image sensor, which is capable of transforming an optical image into an electrical signal and is an integrated circuit or matrix consisting of an array of light-sensitive elements. The number of these pixels determines the resolution of the device.
For rear view cameras, two types of matrices are used: CCD and CMOS.
CCD matrix requires quite significant costs for reading the signal and therefore they are used less and less to equip car cameras.
The CMOS matrix is capable of reading images from all elements simultaneously and therefore its operating speed increases significantly.
When equipping a car with rear view cameras, these features of the devices should be taken into account.
Self-installation of rear view cameras
Before installing a rear view camera, you will need:
- installation kit with camera;
- soldering iron;
- drill;
- cables
- self-tapping screws;
- screwdriver;
- insulating tape or tape.
In the case when a model is purchased that is installed in the license plate light, the standard part is replaced with an element with a camera of a suitable diameter. It is worth paying special attention to the dimensions of the structures being replaced, since the lampshades of hatchbacks differ from those of sedans.
The lampshade is installed using a latch and screwed with a self-tapping screw of a suitable size.
There are four wires coming from the lampshade. Black, negative - connects to the minus, red, positive - to the reverse lamp, and the second two need to be routed into the car interior, so that the signal from the camera to the radio will be sent through them.
The wires are pulled along the side of the roof or along the threshold, which will have to be disassembled.
Connection to radio
Before connecting the rear view camera, you must remove the radio from the socket and connect the wires to the additional channels. In this case, the image will be displayed on the screen when the reverse gear is engaged.
If the car is equipped with a built-in screen, then you should try to connect the rear view camera to this particular device; for this, the plugs coming from the camera are connected to the vehicle’s computer.
Connecting cameras to monitors
Rear view camera monitors are installed on the panel or under the ceiling of the cabin. In addition, special rear-view mirrors allow you to install a camera, since the devices are equipped with special claws that can securely mount the monitor.
Monitors and mirrors are provided with three plugs. One is responsible for the power supply of the device, the other two are responsible for the video signal.
There is a wireless way to connect a monitor, however, the modules that provide the connection are not suitable for radios or monitors that require an excitation wire.
For public transport, a method such as forced connection of rear view cameras is often used. In this case, power is supplied through the excitation wire or a parallel cable is laid.
Connecting a video camera to a tablet
Before connecting the rear view camera to the tablet, you need to install a special RFKWIFI program on the device, then, after installation is completed, when you launch the application and engage reverse gear, the gadget will be able to display the image.
Connecting a rear view camera to a tablet is possible, but, according to experts, to monitor movement, it is necessary to use special video servers. In this case, operation of the device may cause signal delays of up to fifteen seconds, which may affect driving safety.
Connecting the camera to the navigator
Purchasing wireless models allows you to connect them to both monitors and navigators, which in this case can replace monitors.
To make the connection, you need a 12V cable, a ground to the backlight and an output, which is usually called a “tulip”, which will allow you to create a connection as in the case of a rear-view mirror equipped with a monitor unit.
Modern video surveillance systems, including rear view cameras, can be installed on cars of any brand. In most cases, this requires basic knowledge of electrical engineering and careful work in the interior of your own car, and the result is to ensure driving safety and the safety of the vehicle.
Source: http://dmsto.ru/kak-ustanovit-kameru-zadnego-vida/
DIY rear view camera installation
In one of our articles (“How to install parking sensors with your own hands”), we already talked about control devices for the rear of a car during parking. But this option may seem unclear to some and, as a result, not effective.
Indeed, if there is a thin column between the sensors, then identifying it using parking sensors becomes problematic. It is much more clear to watch the full picture of what is happening through the rear view camera when you park in reverse.
We will talk about how to install and connect a reverse camera in order to have such objective visual information in this article.
Which reverse camera should I choose?
The answer to this question will be individual for everyone. It will all depend on what you have and what you want. So the simplest reverse cameras cost about $50. Of course, they will also help when parking your car, but we would like to talk about what they will offer you for a lot of money.
Firstly, I would like to talk about the camera resolution. So almost all, even the cheapest camera options, guarantee proper resolution, which is quite comfortable for viewing. Secondly, and more importantly, the camera must have good sensitivity. In fact, this is the ability of the reversing camera to work in low light conditions.
Thus, cameras are produced that operate only in sepia (b/w) mode, which makes the camera more sensitive, just for working at night. Thirdly, the camera viewing angle. So it starts from 120 degrees and goes up to 180 degrees.
Of course, with a larger viewing angle, you are able to control a larger area when parking, which will guarantee safer reversing. But, with an excessively large overview, a “panoramic effect” appears, which does not correspond to everyday perception, which may seem inconvenient to many.
Fourthly, the method of mounting the camera. So the cameras can be made separately or built, for example, into a frame under the state registration plate.
Fifthly, if you already have a multimedia radio (with an LCD screen), then you most likely will not need to take a monitor to display the image from the camera. If you do not have such a radio and do not plan to install it, then you will have to take the rear view camera with its own LCD monitor.
And so, in our case, we took the simplest rear view camera model RM116B. Camera viewing angle is 120 degrees. The primary task will be to mount the camera on the back of the car. It is necessary that the rear view camera be positioned in the middle, covering as much of the parking area to the left and right as possible.
If you push it too far inward, its edges may be “cut off” by the bumper. But you shouldn’t expose the camera too much.
In this case, the camera will get too dirty from flying splashes of dirt, besides, there are still many vandals in our country who are just looking for where and what they can “steal”, even if they don’t really need it.
In our case, the camera was placed on the frame of the rear license plate light.
The frame with the lampshades has been removed from the bumper. The mounting location for the rear view camera is shown.
The rear view camera is already in place. (a distance plate was placed under the camera so that its peephole would come out from behind the bumper)
If you move a little away from the car, the camera is almost completely invisible.
We pull the power and video signal wires from the rear view camera into the luggage compartment, through any plug, in the area of the spare wheel/rear bumper
The camera can be powered from the power cable of the reversing light. In this case, the easiest way is to disconnect the block that goes to the taillight, and by sorting through the contacts, find which of them is supplied with power when reverse is on.
Next, connect to this wire with a clip (see the article “Connecting to wiring in a car”) In our case, this is a red-white wire or green-white, one before the block, the other after it.
Now we pull the wiring to the radio/monitor located in front on the instrument panel. As a rule, the wiring is pulled along the left side, dismantling the sill trims and laying the wires under the interior carpet. After you have stretched the wires to the front of the car, we begin searching for power (if you have a monitor, you don’t need to do this for a radio) and searching for power for the reversing light. If you do not want to look for power for the reverse light in front, then you can, along with the video signal wire from the back, route it back to the instrument panel, or at least trace where it comes from the instrument panel, and connect it in front.
As a result, we get the following diagram for connecting power and all control signals when the rear view camera is operating.
In cases where the car is equipped with an automatic transmission, there may be a problem with turning on the rear view camera when driving away (since the automatic transmission mode selection lever passes through the “reverse driving” position)
In order to avoid unnecessary activation of the rear view camera, you can supplement the circuit with a delay device, which will turn on the camera and send a control signal to the radio/monitor after some time. More information about such a device can be found in the article “Delay in turning on the power supply for the reversing camera”
I would also like to say that this installation example and the reverse camera connection diagram are given for a specific case. There are cameras that transmit video signals via radio, and with a unit that supports several video cameras in a cyclic mode, such a connection will usually be more complicated, since it will require additional power for the radio communications unit.
Results of the rear view camera after DIY installation
Example 1
Picture from the rear view camera on the monitor
Actual distance
Example 2
Picture from the rear view camera on the monitor
Actual distance
Example 3
Picture from the rear view camera on the monitor
Actual distance
From the above examples you can see how much more comfortable and clear it has become to park a car, even with one of the simplest cameras. Perhaps the above result will be the final motivation for someone to install a rear view camera on their car.
Source: http://www.AutoSecret.net/tuning/elektro-tuning/1312-ustanovka-kamery-zadnego-vida
How to connect a rear view camera in a car
A rear view camera is a wonderful device that greatly simplifies the parking process not only for beginners, but also for experienced car owners.
With the help of such a device, residents of large cities can park correctly without the risk of damaging their or someone else's car.
Connecting a rear view camera is a fairly serious procedure, the nuances of which we will look at today.
Of course, it all depends on which model you have chosen, but we will talk about this procedure in general terms. So, read on to learn how to connect a car's rear view camera.
Warning! Before performing any work that involves electrical wiring, we recommend that you always remove the battery terminals.
Regardless of what device is used (standard or from third-party manufacturers), the connection diagram for the rear view camera is usually the same. Each camera has a video connector and a power port.
Power is connected from the taillight, so the camera only starts working when you put the car in reverse. Please note that parking cameras do not provide continuous video surveillance. But the rear view cameras work uninterruptedly, regardless of the duration of operation.
Connecting a rear view camera - highlights
The camera must be connected as follows. First, the red wire must be connected to the “plus” of the reversing light. True, it is better to do this only through a fuse. Many cameras are sold with a built-in fuse, so if you buy one, you don't need to use a separate fuse.
The fuse may be needed not only by those who want to know how to connect a rear view camera and do it. This small detail should be used in every case when connecting any equipment to the vehicle’s on-board network. Do not forget that the cost of a fuse cannot be compared with the cost of burnt electrical wiring.
After you connect the rear view camera, you need to connect the video cable and screen.
How to properly connect the cable for a rear view camera
Almost all cameras have a yellow tulip connector. This connector is used in many devices. In addition, the cameras are sold with a cable, the length of which is about 5 meters, which is enough to install the camera in a car.
If you connect a rear view camera in a large car, for example, a minibus, we recommend that you purchase an additional cable and find a special connecting element. After laying the cable inside the car, it must be connected to the monitor connector on the panel and the corresponding camera connector. During installation, you need to make sure that you use connections of the same color.
At this point, the process of connecting the camera has almost come to an end. You just need to connect the monitor power and use a fuse.
Before turning on the camera and testing it, you must carefully check all connections to prevent short circuits. Now you know how to connect a rear view camera. We advise you to try this convenient device and see how much it simplifies the life of a modern car enthusiast.
Source: http://avtopub.com/kak-podklyuchit-kameru-zadnego-vida-v-avto/
How to Connect a Rear View Camera to a TV
» What Do We Choose? Our Auto
The installation of the camera should provide a good overview, the parking lot markings should be visible for ease of parking.
There are usually only three wires in the rear view camera wiring harness. The black and red wires transmit power, and the yellow wire carries the image. The power wires are connected to the reverse speed light wiring. Thus, the camera will be activated only when the corresponding gear is turned on.
When connecting the camera, you must be especially careful. In case of an error, both the camera itself and the radio may fail. Protection against erroneous connection is present, but not on all models. In order to prevent damage to the camera, it is recommended to equip its positive wire with a fuse whose rating does not exceed 0.5 A.
Rear view camera connection diagram
One end of the yellow wire is connected to the camera, and the other end is connected to a special output on the radio. Help documentation and markings on the device itself will help you find the desired output. If a special output for the camera is not provided, then you can connect the wire to the VIDEO IN connector.
Skoda Fabia 1.2 HTP › Logbook › How to properly connect a rear view camera? (part 2)
Vitaly Vladimirovich, 38 years old
Previously, I asked people who are friends with auto electricians how to connect a rear view camera. Now I would like to get some practical advice on a specific camera model that I ordered and have already received CYCLON RC-SP CCD.
I took this particular camera because... I hoped that it would be possible to easily combine it with the previously installed multimedia head unit of the same company, Volkswagen UNIVERSAL CAN 7 Cyclon.
But after receiving the camera and examining it, I realized that I couldn’t do it without help.
General view of the camera with connection wires
KZV delivery set
Option 1 to + the rear entrance light (but for this you will have to pull another wire parallel to the video cable across the entire cabin) Option 2 - to the REVERSE wire of the radio (read other topics on connection).
But the fact is that on the diagram that is pasted on my radio, such a wire is indicated (REVERSE (GREEN AND WHITE)), but in fact it is not there, because
The radio is standard and is connected via a standard connector; there are only unused wires PARKING (brown-red) and black GND.
Scheme for ShGU
PARKING wire and ShGU video input tulip
There are also two thin branching green wires on the rear view camera cable, but they are most likely for the ability to switch between PAL/NTSC video standards; the manufacturer wrote on the website that the switching occurs by opening/closing the white wire (apparently the white wires ran out at the factory and the green ones ran out). They just didn’t indicate which of the connections of these wires (closed/open) corresponds to PAL and which to NTSC.
Green wires (most likely for switching the video standard)
It is still not clear why there is a 5.5mm plug (socket) on the KZV power wire, no adapters or wires went to it, so apparently you will have to cut it off to connect this wire to the power supply of the reversing light.
And the last question is for the most patient who read to the end. Is it possible to test the camera at home by connecting it to the video input of a TV and supplying +12V power from household power sources? And again, should + 12V be supplied to the red wire branching from the camera’s video output tulip?
Thank you in advance for your attention, even if you don’t answer the questions :)
How to connect a rear view camera
Connect the rear view camera to the TV. monitor or radio
Connect the rear view camera to the TV. monitor. or to the radio.
There are different models of rear view cameras; they can be installed anywhere, but they are connected in approximately the same way.
1.Red +
2.Black –
3.Yellow video
The diagram is as follows: let’s say you want to connect it to a radio. take a camera, + a positive wire from the battery, or from the radio, depending on how you want to make this system, for example, video surveillance in a car, then power it either constantly or when the ignition is turned on.
Wire and connector Yellow video to the central contact, Black - to the ground of the connector and battery (for example, or the ground of the car) Red + and other camera models are connected directly to the camera in a similar way.
Next, in order for your monitor to turn on automatically (if this model has this function), pull the wire from the reverse lamp (or find it in the car cash register) and connect it to a special wire on the radio; if something is not clear, write on our video surveillance forum.
How is the cable connected to rear view cameras?
Most cameras simply have lead wires that you can connect to
coaxial cable for video transmission and power cable.
You can also crimp the wire and connect it through connectors. Some cameras come with BNC (standard cinch) connectors:
Such a connector, for example, can be directly connected to the video input of a regular radio.
Power supply for rear view camera!
Power supply for cameras requires a rectified stabilized voltage of 12 V, a current of no more than 0.7 A. Recommended operating conditions: temperature range from +10.C to +40.C, relative air humidity up to 80%, BP-1A (BPM-1A) has electronic protection against short circuit at the output. more details
Coaxial cable is used to transmit the signal from the camera to the CCTV system or TV. This is a regular cable, the same one used to connect an antenna to a TV.
PHANTOM CA-2303 is a universal rear view video camera designed to make parking and reversing easier.
The rear view camera makes parking much easier in the dark, in bad weather conditions, and in limited space for maneuver. Also, this camera will be especially useful when driving in a large stream of cars or in a traffic jam.
The PHANTOM CA-2303 rear view camera will help you avoid accidents, scratches and damage to your and others’ cars.
PHANTOM CA-2303 is distinguished by its miniature dimensions, which do not exceed the dimensions of a conventional parking sensor. The camera diameter is only 18.5 mm, making it almost invisible. The camera produces clear color images and has a wide viewing angle of 170 degrees.
The camera allows you to see obstacles in poor lighting, when it is difficult for the driver to see objects behind the car. The light sensitivity of the PHANTOM CA-2303 camera is no less than 0.1 LUX.
The camera is waterproof and has parking lines that allow you to park quickly and easily by following them.
Diagrams for connecting the rear view camera to the monitor, GU (Head unit, to the TV to check functionality.
Rear view camera connection diagrams:
Connection diagram for a rear view camera to a 4.5 monitor on a car:
When you engage reverse gear, the monitor will turn on automatically.
If you connect a DVR, DVD, front camera, etc. to the additional AVI input.
The monitor will display video from the AVI 1 input, but will switch to the AVI 2 rear view camera when reverse gear is engaged. That is, when the reverse lamp is turned on.
Diagram for connecting a rear view camera to the head unit (GU) on a car:
On the head unit we find the CAMERA or Rear Camera plug and connect the yellow bell. We connect the red one to the Reverse wire. Further according to the scheme.
Diagram for connecting a rear view camera to a home TV for checking:
Everything is simple here, the main thing is that there is enough power to turn on the camera. I tried the charger, it didn't work. I used the old method. I put eight large batteries (thankfully there were) in series and everything worked.
Note. Not all TVs display color pictures. Depends on the system. Monitors and control units are multi-system.
The cameras in our store undergo pre-sale testing!
Connecting a rear view camera
September 18
What you need to connect
In order to connect a rear view camera, you need a device on which the image from it will be displayed. This could be a TV, a separate monitor, a radio or PG monitor, or another device that supports this feature.
Pinout of wires and connectors
The rear view camera has three wires. The “positive” wire has a red braid, the “negative” power wire is black. The third wire is yellow. But it transmits the video signal from the camera to the monitor.
1. When installing the camera, the red and black wires are connected to the reversing light (red to the signal wire, black to ground).
When connecting the camera to the reversing light, it will work exclusively when the reverse gear is turned on (which is what we actually need).
The need to connect in this way is also due to the fact that many camera models are designed for short-term use. If they are turned on constantly, this will lead to failure.
Rear view camera connection diagram
2. When connecting, do not forget about protecting the camera and radio from short circuits. This is achieved by “cutting” into the “positive” wire of the fuse. It is recommended to use a 0.5 A fuse for this purpose.
3. One end of the yellow wire is connected to the video output of the camera, the other to the video input of the monitor (radio tape recorder or other device). You can find the required connector using the instructions for the radio. If your playback device does not have a dedicated rear camera connector, you can use the output labeled VIDEO IN.
4. Many modern camera models transmit video signals using wireless communication. The kit of such a device must include a signal transmitter and receiver.
5. In this case, the transmitter is installed on a special output of the camera. And the receiver is connected to a specialized connector (or the same VIDEO IN) of the radio or monitor. You can check correct operation by engaging reverse gear. In this case, the camera image will automatically appear on the screen.
6. After the connection is made, it is necessary to perform high-quality insulation of the connection points. To do this, you can use electrical tape, overlapping it.
Then you need to test the camera in all operating modes.
Sources: http://drive-avtos.ru/avto-stati/podklyuchenie-kamery-zadnego-vida.html, http://www.drive2.ru/l/3703640/, http://www.kamera24.ru /instrukt/camera_zadnii_vid.shtml, http://onlyneeds.ucoz.com/forum/2-10-1, http://www.avtosvet96.ru/articles/raznoe/podkljuchenie-kamery-zadnego-vida-/
No comments yet!
Source: http://autopaor.ru/chto-my-vybiraem-nashe-avto/kak-podkljuchit-kameru-zadnego-vida-k-televizoru.html
Simple but effective tips for choosing and installing a rear view camera
Home » Assistive systems » Simple but effective tips for choosing and installing a rear view camera
How to properly install and connect the device to the monitor of a navigator or car radio?
In principle, there is nothing complicated about this, but first we suggest that you familiarize yourself with the basic parameters for choosing a KZV:
- First of all, you need to decide what type of KZV you are interested in, since this will determine where and how the device will be connected in the car. The device can be mounted in the rear bumper of a car, in a license plate, and some models are equipped with special mounts. Cameras are divided into wireless and wired. Naturally, the first option is considered more technologically advanced, since connecting the device does not require laying wires and cables throughout the cabin. But in this case, you should start from your financial capabilities.
- Select the device case type. Typically, device lenses are made in the shape of a square or rectangle, but there are also round devices. Before you buy and install the KZV, you should inspect the rear bumper - if the car is newer, it should have a place for installation.
- Decide on the basic parameters of the device; in particular, when purchasing, you should pay attention to the viewing angle of the device. If it is too small, visibility may be difficult. The higher the viewing angle, the more space behind the car the lens can capture and, accordingly, transfer it to the monitor.
Installation instructions
Before you begin installing and connecting the device, prepare all the necessary tools, and also check the kit for the presence of a diagram and all adapters. The presence of a diagram is very important, since it indicates the pinout, which the car owner must know when connecting.
Preparation
What is the preparation for installation:
- First you should check the luggage compartment. You will need to mark all the necessary places through which the wiring will be laid, if we are talking about wired devices. Typically, the luggage compartment lining contains all the necessary stowage plugs. If necessary, drill additional holes in the casing.
- Mounting the lens is allowed in the rear bumper or in the license plate; in this case, the choice of mounting depends on your preferences. You can find a KZV with a frame on sale; in this case, you will simply need to replace the frame on the license plate with a new one. If you decide to use a bumper, then you will need to dismantle it in order to drill the appropriate places for installation.
- In addition, in order to connect all the elements of the electrical circuit, you will most likely need to remove some of the facing elements in the car interior, on the center console. Usually it has to be completely removed, but this depends on the design features of the vehicle. If your car has a 2DIN radio and you plan to connect the KZV to its display, then the audio system will have to be removed in any case (the author of the video is the volodamdes channel).
Installation process
The procedure for installing the KZV is as follows:
- First you need to disconnect the battery and install the lens. As mentioned above, to do this you will need to either replace the license plate or make a corresponding hole in the bumper. If there are plugs in the bumper, then you can remove one of them, located in the center, and install the lens in the resulting hole. If there are no plugs, then remove the bumper and start drilling. When the hole is ready, install a peephole in it and fix this element with glue.
- After this, all the necessary wires are laid in the trunk.
First, you need to connect the ground cable, that is, the minus cable, to the vehicle body; usually this wire is painted black. You can connect the wire to an existing ground, or make a new hole. Before connecting, clean the bolt installation area from rust and dust to ensure good contact. The positive wire connects to the reverse light wires. This will ensure automatic activation of the equipment when reverse gear is engaged. - The next step will be to lay the wiring through the interior to the center console. To do this, you will have to remove the upholstery and lay the wiring underneath. It is important to prevent the camera's electrical circuit from coming into contact with moving parts of the body.
- When the wires are laid, the device is connected.
To do this, either an existing monitor is used, for example, from a GPS navigator or car radio, or a new display is installed. To connect to a standard screen, you will most likely need an adapter. If the monitor is made in the form of a rearview mirror, then it will need to be installed instead of the standard mirror. The connection procedure itself should not cause difficulties. If something is not clear to you, refer to the diagram that should come with the device. - If you are using an additional display, it will need to be connected to the vehicle's power supply and fixed to the center console. The negative wire is connected to the car body, that is, ground, and the positive wire is connected to the wiring of the reversing lights. Typically, the power wire to which you need to connect is located in the area of the transmission lever. The screen is fixed using self-tapping screws or double-sided tape (the author of the video is the Technomania channel).
Checking and setting up the camera
Performance diagnostics are performed as follows:
- Reinstall the battery terminals.
- Sit in the passenger compartment and turn on the ignition.
- Next, engage reverse gear.
- When you turn it on, a picture showing the rear view of the car should appear on the monitor screen. If this is the case, then the installation procedure can be considered successfully completed. Now you can put the upholstery back together. If the image does not appear, check the device connection.
- If necessary, adjust the position of the lens in the bumper.
Price issue
1. AVIS 980 CMOS camera (price - approximately 1900 rubles)2. One of the most expensive models is AVIS 180 Multiview (price - about 7,300 rubles) Loading...
Video “Review and testing of the Chinese camera”
The video below provides a review and testing of a Chinese-made rear view camera (the author of the video is the Just Package From China channel).
Do you have any questions? Specialists and readers of the AVTOKLEMA website will help you ask a question
Source: https://avtoklema.com/utilities/ustanovka-kamery-zadnego-vida-862/