We change the alternator belt on a Lada Priora car ourselves
Lada Priora differs from previous models in comfort and improved handling. But the main differences are under the hood. Everything here is located differently than in previous models.
As a result, not all specialists even know how to replace the belt and tension it. New models are equipped with additional systems.
Air conditioning and power steering (EUR) added comfort, but such changes complicated the approach to the generator.
In versions with power steering or air conditioning, the belt is longer when compared with the regular version of the car. As a result, we will look at how the change occurs in the first and second cases on models 16 and 8 valves.
Car Lada Priora
In what cases does a car need to be replaced?
Typically, the need to replace the alternator belt appears due to wear during its use and deterioration of adhesion to the roller surfaces. Also, tightening or changing is necessary if, as drivers say, it starts to whistle.
This video shows the generator drive whistling.
The instructions that come with the car indicate that the alternator belt should be replaced every 60 thousand km. If the car is used infrequently, then replacement should be carried out every two years.
Step-by-step instructions for replacing without power steering
Do-it-yourself replacement work on a Priora without power steering (EUR) and air conditioning is more convenient to carry out in the inspection pit.
Tools
- a set of keys;
- fender liner removal device;
- balloon wrench.
Stages
- First, loosen the nut with a wrench of the appropriate size.
- Unscrew the adjusting bolt.
- We move the generator towards the power plant.
- Remove the right front wheel.
- We remove the fender liner and get access to the old belt.
- We replace it with a new one and do not forget to tighten it.
- Checking the tension. It should not be weak, but tightening it on a model with power steering (EUR) is also dangerous. The generator bearings may be the first to suffer.
The nut that needs to be loosened. Unscrew the bolt. Install a new one.
Replacement instructions with power steering
Since the power steering pulley in this modification is at a low height, the creators ran the generator belt around the engine mount. This makes it a little more difficult to do the DIY change.
Tools
- tension key;
- a set of keys;
- jack;
- set of heads;
- WD40 liquid.
Stages
- Use WD40 liquid to moisten the bolts that secure the motor mount and bracket. These bolts need to be moistened with liquid
- After about a quarter of an hour, you can begin to unscrew the bracket nut.
- Let's jack up the wheel.
- Next, we place some object under the motor and remove the wheel.
- We lower the car a little.
- Unscrew the tension roller.
- Bend the belt.
- Now you can unscrew the bolts that secure the pillow.
These bolts need to be unscrewed
- Next, we lower the car so that the engine begins to hang out.
- The pillow moves towards the motor. Move the pillow
- Now you can change.
- Next, we lift the car with a jack so that the power unit lowers.
We do this carefully so that the belt and pillow do not move.
- Tighten the bolts and nuts.
- We put on the wheel and lower the car.
At this point, work on the model with power steering can be considered completed.
Tensioning and checking the belt
The belt in Lada Priora is tensioned as follows:
- The first step is to loosen the roller nut; to do this, the cage is held with a wrench.
- We rotate the roller cage by rotating the key.
- We tighten the roller nut.
- The tension is checked on the longest section between the pulleys.
- When pressed, the alternator belt should bend approximately 10 millimeters.
- On a model with power steering, the tension should be a little tighter. You can also test it by ear. If the tension is insufficient, a whistle will be heard and you need to tighten it. If it is too much, you will hear the hum of the bearings and the tightening will need to be loosened. Roller key
The work is not difficult, but a little troublesome due to the need to dismantle some components in models with power steering and air conditioning with your own hands, but it is doable even for a novice car enthusiast. But calculate how much such work costs at a service station and whether it would be better to use this money for other purposes.
Loading …
Video “How to quickly and correctly replace”
This video shows how a shift is carried out on a Priora with 16kL power steering.
Source: http://AvtoZam.com/vaz/lada-priora/zamena-remnya-generatora-svoimi-rukami/
Priora generator belt: replacement, tension
The new Priora can be easily compared with budget foreign cars. The updated Russian car received the necessary set of options, which raised comfort to a new level. This was facilitated by the installation of power steering (power steering) and air conditioning. The only disadvantage of this modernization is that it has become more difficult to get to the generator and its belt.
In this article we will tell you how to replace and tighten the belt in new versions of the VAZ 2170. After reading the article, the reader will know what malfunctions the belt has in the version with air conditioning and when it needs to be changed or tightened.
Description and location
The generator's job is to provide power to the vehicle's electrical equipment. Like other components in a car, the generator is powered by the engine; to ensure constant rotation of the rotor, pulleys are installed on the generator shaft and the crankshaft of the power plant. A belt is pulled between them. After starting the engine, the crankshaft begins to rotate, and the movement is transmitted through the belt to the rotor.
On the latest Priora models, this element operates the air conditioning and power steering. This material discusses the replacement and tensioning of the belt in a new model car, where additional equipment is installed.
The belt is a consumable item that requires replacement after 45-60 thousand kilometers . The size of the standard belt on a Priora with air conditioning is 1125 mm.
Open the hood, you will see a belt near the right wheel
Symptoms of malfunction and their elimination
You can determine whether a replacement is needed or whether you can simply tighten the power steering belt with air conditioning on the Priora 16 valves only after inspecting this component. To do this, just open the hood and examine the belt; it is located next to the right front wheel. There are signs that indicate it's time to check the alternator belt: something whistling and squeaking from under the hood.
The reasons may be the following:
- Antifreeze, oil or other working fluids have come into contact with the generator pulley or belt.
- The belt is worn out - you can tell by its appearance.
- The tension has dropped - in this case, the component must be tightened.
- The bearing in the generator is worn out.
When the belt whistles in a Priora with 16 valves, it’s time to carry out diagnostics. If there are cracks, tears or other serious damage on its surface, then replacement is required.
If the generator component with hydraulic booster and air conditioning looks normal, you should check its tension; the optimal level of deflection is 6-8 mm - you need to press the component in the middle between the generator and the pulleys.
Are there visible coolant or engine oil stains on the surface? If the contamination is not significant, they can be cleaned. If the liquid has penetrated into the material, cleaning will not bring any results; replacement is needed. If the component is well tensioned and no damage or stains are visible, then you should move on to checking the bearings. They may need to be changed.
If the quality of adhesion of pulleys, rollers and the surface of the generator belt decreases, the tension should be increased.
This procedure should also be carried out if the consumable has been used for more than 15-20 thousand km, but there is no damage (replacement is not required).
If you open the hood and see a frayed tape, then immediately proceed to the replacement instructions, then you will still have to retighten it. To carry out the work, you will need a special key for the roller and standard keys for 19 and 17.
Arm yourself with this roller adjustment wrench
Process and result verification
- We clamp the clip with a wrench and loosen the roller fastening nut;
- Now we need to clamp the eccentric collar and start cranking. The rotation of the tool should be minimal - this will allow for better tension of the component;
Tighten the nut to save the result
- After adjustment, the roller nut should be tightened.
As you can see, the process consists of only three steps, but the main stage is checking the tension on a Priora with air conditioning and power steering (or with these components separately). In this case, the tension should be stronger when compared with the basic version of the VAZ 2170 with 16 valves. In the longest section between the shaft and the pulleys, the material should bend by about 5-6 mm.
Replacement
Required Tools
We will prepare everything necessary for the repair:
- Lubricant WD-40.
- Keys to 19, 17.
- Two copies of the key for 13.
- Head for 10 and 17.
- Jack.
- Special key for tensioning.
- Lever arm.
The alternator belt on a modified Priora with air conditioning and power steering runs around the engine mount. The designers decided to carry out such a modification for the Priora 16 due to the fact that the power steering pulley is installed low. Hence there are additional steps that you need to be aware of.
Step-by-step instruction
- First of all, we need to wet the bolts that hold the bracket and motor mounts. Wait 10-15 minutes for the lubricant to spread over the surface;
Lubricate the nuts with WD-40 so that they can be easily unscrewed in the future.
- Now you can unscrew the bracket mounting nut, the next step is to lift the front right wheel. The operation is performed using a jack;
- Priora should be slightly released on the lift. Let's move on to the tension roller - now it can be easily removed;
- We need to unscrew the engine mount bolts; to do this, bend the belt so that it does not interfere with work;
Dismantling the alternator belt fasteners
- When the mounting bolts are removed, the Priora needs to be lowered so that the engine begins to hang out. It is not necessary to completely remove the cushion, just move it towards the motor. Now you can dismantle the alternator belt and install a new consumable;
Installing the new belt in its original place
- When the replacement is completed, we need to return the engine on the Priora to its original position, to do this we lift the Priora 16 on a lift. Monitor the position of the alternator belt and engine mount. Don't forget the bracket and pad mounts we removed at the beginning of the process;
- The final step is mounting the wheel.
The replacement is complete, all that remains is to adjust the alternator belt with power steering and air conditioning. The new consumables on the Priora will have to be tightened several times until you get the required tension. If the component whistles or there is a hum coming from under the hood, then it is necessary to carry out repeated adjustments until these defects are eliminated.
Source: https://VAZremont.com/remen-generatora-zamena-natyazhka
How to change the alternator belt on a Priora yourself?
Home » Alternator » How to change the alternator belt on a Priora yourself?
In what cases is it necessary to check and change the belt on a Lada Priora 8 or 16 valves, which belt is better to use, how to tighten the tensioner correctly?
First, let's look at the main signs of wear:
- First of all, the check is carried out if the strap begins to whistle. The whistle usually appears when starting the engine, increasing the speed, or activating electrical equipment. Sometimes fixing the problem involves tightening the strap by tightening the tension roller. If the tension is normal, there is a possibility that one of the drives, for example, a compressor or generator unit, is jammed. Also, the whistling may be due to wear of the bearing elements of the Conder clutch; all worn bearings must be replaced.
- With the motor turned off, you should carefully inspect the device. If it is clear that the strap has lost its elasticity or has become damaged in the form of cracks, delamination or tears, this indicates that it will soon have to be replaced.
- Looseness may also be due to wear on the tension roller.
- The car begins to shake when the electrical equipment is activated. This problem happens very rarely and usually in such cases car owners have no idea what to do. Reduced traction and shaking can be caused by high loads on the car's electrical network.
- The low battery indicator began to light up on the dashboard, and you are sure that the battery itself is functioning normally and is fully charged. But keep in mind that this problem may also be associated with wear of the component parts of the generator set, for example, brushes or rotor (video author - Vladimir Z).
Step-by-step instructions for replacing consumables on models without power steering and air conditioning
Briefly about how to disassemble the main elements and remove the strap in cars without air conditioning and power steering:
- First of all, it is necessary to loosen the nut of the generator unit bracket using a wrench, as well as the adjusting screw.
- Next, the unit should be moved as far as possible towards the engine.
- After this, you need to unscrew the bolts securing the front wheel (right) and remove it.
- Next, the fender liner is dismantled, so you can gain access to the installed strap.
- It should now be removed from the pulley and replaced.
- A new strap is installed, after which it is tightened. The tension is checked - note that the part should be normally tensioned, but not overtightened. Over-tightening can cause more accelerated wear of the bearing device.
Photo gallery “We change it ourselves”
1. Unscrew the nut on the bracket.2. Unscrew screw.3. Remove the old belt from the pulley and install a new one.
Guide to replacing a car with power steering or air conditioning
The size of the strap with power steering and air conditioning is 1125 mm.
Replacement is carried out as follows:
- First, you should treat the screws that secure the power unit cushion and the bracket with WD-40, this will allow you to unscrew them without any problems.
- Wait about 20 minutes, then unscrew the nuts that secure the bracket.
- Now the front wheel should be jacked up. Unscrew the bolts that secure it, then place a reliable support under the engine; the wheel itself can be removed.
- Lower the car slightly and unscrew the installation tension roller.
- After completing these steps, you can bend the strap a little and unscrew the screws that secure the pillow.
- After this, the car must be lowered slightly so that the power unit begins to hang out. Having done this, the pillow should be moved slightly towards the engine.
- Now you can start replacing the strap. The old belt is removed, its installation location on the pulley is cleaned, and a new one is installed.
- The vehicle is raised on a jack to lower the engine. You must be careful at this stage, otherwise it may cause the strap to become dislodged, as well as the cushion.
- Now all the screws and nuts should be screwed back in. The wheel is put in place, the bolts are tightened, the car is removed from the jack (the author of the video is the channel Diary of Mechanics).
Stretching and checking
To tension and check, follow these steps:
- First you need to loosen the nut that secures the roller, and the clip should be secured with a wrench.
- Rotate the wrench to turn the roller cage, after which its nut should be tightened.
- Now you need to check the tension on the longest section of the belt, between the pulleys.
- If you press on this section, the installation belt will bend; no more than 1 cm of deflection is allowed. This is true for models without power steering and air conditioner.
- As for a car with power steering, in this case the tension should be stronger; insufficient tension will be accompanied by a whistle. If it is too strong, there will be a hum from the bearing devices.
Loading …
Video “Features of belt tensioning on Priora”
The main features and nuances of this process are shown in the video below (author - channel A little bit of everything).
Do you have any questions? Specialists and readers of the AVTOKLEMA website will help you ask a question
Source: https://avtoklema.com/alternator/priora-zamena-remnja-generatora-811/
How to replace and tighten the alternator belt on Lada Priora
The Lada Priora car is very popular. This is another proof that Russian cars can be of high quality. They actually boast good comfort, handling, and attractive appearance.
The differences between the new model and previously released cars are primarily hidden in the engine compartment. Here everything is located completely differently. Therefore, even experienced craftsmen do not always know how to replace the alternator belt on a Priora, as well as how to tension it.
The new Priors are equipped with a large number of systems and are also available with an impressive list of additional equipment. Read more about the new generation Lada Priora 2014 in our article.
Although the installation of air conditioning and power steering on the Priora had a positive effect on comfort, as a result of such changes, access to the generator became quite difficult. The alternator belt of a Priora with power steering or air conditioning is longer than the regular version of the car, so we will consider the procedure for replacing the alternator belt for two modifications.
How to tension the alternator belt on a Priora
As a rule, the need to tension the generator belt arises due to its wear during use, as well as a decrease in the quality of adhesion of the belt surface to the planes of the generator rollers and pulleys.
https://www.youtube.com/watch?v=F1JGGPPl_g4
If the alternator belt on your beloved Lada Priora begins to whistle, you will have to start tightening it. You can tighten the alternator belt on the Priora using a 19mm wrench, as well as a special wrench for the pulley. He is shown in the photo below.
The belt tension is performed as follows:
- Loosen the roller nut; to do this, hold the roller cage with a wrench.
- Rotate the eccentric collar of the roller to tension the generator belt using a minimum rotation of the wrench, which will lead to better belt tension.
- Tighten the tension roller nut.
If the procedure is performed correctly in the basic version of the model, in the longest section between the pulleys the belt should bend by about 10 mm. In the case of a version equipped with air conditioning or power steering, you need to tighten the belt a little more.
As a rule, this procedure is trusted to specialists. If you do not have such an opportunity, we advise you to do everything “by ear.” If the belt is too loose, a squeal or slippage will occur. Otherwise, you will hear the hum of the generator bearings.
Replacing the Priora alternator belt (version without additional equipment)
According to official data, the belt should be replaced every 60 thousand kilometers traveled. If the car is used very rarely, the alternator belt on the Lada Priora needs to be changed every two years, and in this case it does not depend on the mileage.
Before replacing the belt, you must place the vehicle in an inspection pit. Next comes the preparation of the following tool:
- key to 10;
- key to 13;
- devices for dismantling the fender liner (it also needs to be removed);
- wheel wrench (we will use it to remove the right front wheel).
First you need to loosen the nut using a 13mm wrench (see photo).
Next, you need to unscrew the bolt intended for adjustment, using a 10mm wrench (more details in the photo below).
Next, we move the generator itself in the direction of the power unit. Unscrew the front right wheel and remove it. Then we perform similar actions with the fender liner. Only then can you remove the old alternator belt and replace it.
After installing the new belt, you must perform all steps in reverse order. Do not forget to correctly adjust the tension of the alternator belt on the Priora. If the belt is too loose, the battery may not charge fully, and if the belt is too tight, it will cause the alternator bearings to fail too quickly.
How to replace the alternator belt on a Priora with power steering and air conditioning
Since the power steering pulley in this modification of the model is installed at a low height, the designers decided to run the generator belt around the support of the car’s power unit. This means that in such a machine, replacing the alternator belt can only be carried out under appropriate conditions.
Next, we will look at the procedure for replacing the alternator belt on a Priora with air conditioning. First you need to prepare the following tool:
- wrench for tensioning the alternator belt;
- key to 17;
- keys for 13 (2 pcs.);
- head 10 (star or regular);
- head at 17;
- WD40;
- suitable lever.
First, we use WD40 to wet the engine mount and bracket mounting bolts.
After about 10-15 minutes, you need to unscrew the bracket nut, after which we lift the front right wheel using a jack. Then you need to place something suitable under the motor and remove the wheel.
Next, you need to slightly lower the car, unscrew the tension roller, bend the belt and unscrew the bolts that secure the airbag.
After this, you need to lower the car so that the engine begins to hang out. The cushion should be moved towards the engine, which is enough to remove the alternator belt and install a new one.
At the final stage, you need to jack up the car to lower the engine. During the procedure, it is necessary to control the position of the pillow, as well as the generator belt, which we replaced. Then do not forget to tighten the pillow bolts, as well as the nut that secures the bracket. Finally, you need to put on the wheel and lower the car completely.
As you can see, those who want to change the alternator belt on a Priora will have to work a little, but the reward will be the correct operation of all car systems.
Source: http://avtopub.com/kak-zamenit-i-natyanut-remen-generatora-na-lada-priora/
How to replace or tighten the alternator belt on a Priora - technology and features of belt replacement
Hello, dear motorists! Well, let's move on to specific cars and their lovers?
“PRIOROVODY” - this is what the owners of cars of one of the latest VAZ series called “Lada” - “Priora” call themselves.
Many people liked the stylish and modern car. The deep-rooted belief that domestic cars are worthless is gradually dispelling. The cars have indeed become more comfortable and attractive, and their technical equipment has improved significantly.
The differences between the Priora and previous modifications are noticeable immediately as soon as the hood is opened. The new owner of a brand new Lada will have to learn a lot all over again. Such a simple, at first glance, manipulation as replacing the alternator belt on a Priora will require considerable effort.
A distinctive feature of new car models is the ability to choose a car with additional equipment already included in the basic configuration. Thus, Priora can be equipped with power steering (power steering) or air conditioning.
Of course, driving such a machine becomes even more comfortable, but the price for comfort is a more complex design of the generator belt drive. The generator belt of a Priora with air conditioning or power steering is much longer, describes a different trajectory (alternator belt diagram), is serviced and changed according to completely different rules.
Tensioning the Priora generator belt - features
Checking the tension of the generator belt
Any car owner knows that sooner or later the moment will come when you have to tighten the Priora alternator belt. The belt drive is quite durable, but during operation the belt slightly stretches and the degree of adhesion of its surface to the planes of the pulleys and rollers decreases.
As soon as you hear that the alternator belt on the Priora is whistling, you need to immediately tighten it. This is not difficult to do. In order to tension the alternator belt on the Priora, you need to prepare an open-end or ring wrench 19 mm and a special double-open-end tension wrench for the roller.
It is easy to recognize - it is similar to the key that is used when replacing disks on an angle grinder. The alternator belt adjustment on the Priora is done as follows:
- holding the tension roller cage with a tension wrench, loosen the roller nut;
- by slightly rotating the tension wrench, we turn the eccentric ring of the tension roller of the Priora generator belt, increasing the belt tension;
- tighten the roller nut.
If you press on the belt at the longest gap between the pulleys, it should bend within 8-12 mm, but this rule applies only to the most modest configuration.
If the car is equipped with power steering or air conditioning, the belt describes a different trajectory, which leads to a decrease in the contact area of the belt surface with the pulleys.
To compensate for insufficient contact, you will have to tighten the alternator belt on the Priora a little more.
If it is not possible to use the services of qualified specialists, then you can try to adjust the tension of the Priora generator belt, which is called “by ear”.
If the tension is insufficient, the belt will slip and “whistle”, and if it is too tensioned, the generator bearings will begin to hum.
Replacing the Priora generator drive belt with a “surprise”
An experienced driver can replace the alternator belt on a car even with his eyes closed. The belt is quickly removed and installed on a machine that does not have additional equipment.
To do this, loosen the tension roller of the Priora generator belt, remove the old belt, put on a new one and tighten it. But if the car is equipped, for example, with power steering, you should be prepared for a very unpleasant discovery.
The additional pulley forced the designers to change the location of the generator, raising it up, and the hydraulic booster is located below. But the power steering pulley is located so low that I had to run the belt around the engine mount. In field conditions, it will no longer be possible to replace the belt, unless you happen to have a powerful bottle jack lying around in the trunk.
The algorithm for replacing the alternator belt on a Priora looks like this:
- the belt tension roller is weakened;
- the power steering pulley is unscrewed and removed (otherwise the engine mount bolt cannot be removed);
- the engine mount bolt is unscrewed and removed;
- using a jack, lift the engine until a gap is formed under the support sufficient to run the belt;
- The alternator belt is replaced and the entire structure is reassembled in the reverse order.
Such complications in the belt replacement procedure oblige drivers to take a more responsible approach to the issue of diagnostics and timely repair of both the generator itself and the generator drive belt.
Source: http://CarTore.ru/311-kak-zamenit-ili-natyanut-remen-generatora-na-priore.html
Replacing the alternator belt with power steering
 the VAZ alternator belt after 45-60 thousand km. mileage Cracks on the generator belt are also a sign that its life is coming to an end.
The replacement procedure is quite simple and requires 10 minutes of free time, but the situation changes significantly if the VAZ is equipped with power steering (power steering).
How to change the alternator belt in this case?
In this photo report, the alternator belt is replaced using the example of an internal combustion engine 21124, 1.6L, 16V with factory power steering.
Where a generator is installed in cars without power steering, in the case of power steering, a power steering pump is installed in this place, and the generator itself is located higher.
The generator belt goes like this: crankshaft pulley, tension roller, generator shaft, power steering pump shaft, crankshaft pulley.
Thus, the entire replacement procedure is complicated by the fact that the belt rotates around the left engine mount, so to replace it you need to unscrew the support, lift the internal combustion engine and only then remove the belt.
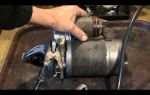
Loosen the generator belt and unscrew the engine mount. In theory, the support bolt should fall down, but its head rests against the power steering pulley and it takes literally a few mm to pull it out.
I had to unscrew the power steering pulley, then use a screwdriver and ratchet to unscrew the three bolts. We tap the edge of the pulley a little, and then remove the pulley by shaking it. Now it appears to pull out the engine support bolt. Raise the engine without removing the crankcase protection.
To do this, you will need a bottle jack, which we install through the hole in the protection to drain the oil. To avoid denting the edge of the crankcase, we place a piece of wood. To lift the engine with a wheel jack, you will need to remove the crankcase protection. Before removing the generator belt, do not forget to first remove the support nut.
Now we pull the belt through the support.
Install the alternator belt in reverse order.
Before you buy a VAZ 2110 generator belt with power steering, make sure that it has 6 grooves and is 1115 mm long. (6РК1115).
If you haven’t found one even in online stores (section “spare parts”), then you can use its analogue - Priora alternator belt with air conditioning , catalog number 2110-1041020.
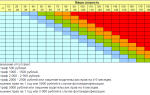
101010 The tension of the generator belt for tens is in the instructions, but in the case of power steering there are some peculiarities: The angle of the belt wrapping around the generator pulley is very small, and as practice has shown, if you do the tension “1 cm up and down,” the generator belt begins to slip. Therefore, the belt tension should be greater and it is worth performing this operation
- Or experimentally: we tighten the belt strongly and ride it a little, if the generator howls with the roller, then loosen the belt a little.
- Or according to the instructions from Priora, where an air conditioner is installed instead of power steering, but the essence is the same: The oscillation frequency of the belt branch between tension roller 1, Figure 3, and generator pulley 5 should be: for a new belt - (140±5) Hz, for used belt – (130±5) Hz. Adjust the tension of the drive belt of mounted units by turning the tension roller counterclockwise. After adjustment, tighten the tension roller bolt. Bolt tightening torque – 43…52 N.m (4.3…5.2 kgf.m)
If the alternator belt is broken , then replacing it in the field with power steering will be problematic.
But if, when replacing, you do not pull out the old belt, but wrap it around the engine mount (tighten it with ties so that it does not dangle), then the time savings on replacing it will be significant. By the way, do you know which alternator belt is better to choose and how to properly change the power steering oil?
Photo source:
- Replacing the alternator belt with power steering from the forum my2110.ru
Keywords:
- generator
- power steering
- DIY generator repair
Interesting site? Share with your friends
Source: http://xn--2111-43da1a8c.xn--p1ai/repear/630-zamena-rem-generatora-sg
Replacing the Lada Priora (VAZ Priora) alternator belt
The content of the article:
1. Replacing the alternator belt of a Lada Priora with air conditioning
2. Replacing the alternator belt on a Priora with Panasonic air conditioning
3. Replacing the alternator belt on a Priora with power steering
1. Replacing the alternator belt of a Lada Priora with air conditioning
A recent inspection revealed defects in the alternator belt. The decision to replace was not long in coming. At 99, the belt was changed within 1 minute. I spent about 1 hour here.
Process
Unscrew the two bolts securing the right engine mount. Here was the first ambush, the bolts were star-shaped, I had to buy an E10 head.
HERE THEY ARE OPENED
Jack up the wheel.
DONE
We place a stop under the hole in the standard protection, where the drain plug is, and lower the jack, hanging the engine. Under the hole formed between the right engine mount and the bracket, remove the old belt. First unscrew the tension roller with a 17 key.
OLD BELT, TRACES OF DEFECTS AND BELT SIZE VISIBLE
Here I would like to dwell in more detail. About the belt size. How to choose? In markets and shops, 90% said take 6rk1125, the remaining 10% 6rk1115. And one good person said the following and I advise you too
1. Look at the old belt, maybe the size is the same. 2. Take 2 belts, with the condition of returning one of them.
In my case, the first option worked. I purchased a belt from the German company “Continental” 6р1115
BELT
SAME BRAND
Just a note: according to the manual you had to buy 6rk1125.
We install the new belt in the reverse order, assemble the units, simultaneously check the tension roller for defects, and, if necessary, change it.
Adjusting the belt tension
MIRACLE MECHANISM
I forgot that I gave the key for such rollers to the owner of 99. I used a circlip remover to tighten it.
CONTROL OF TENSION
When properly tensioned, the belt should not flex more than 8 mm.
In fact, I expected big problems, but everything went like clockwork
2. Replacing the alternator belt on a Priora with Panasonic air conditioning
I will try to tell you in more detail about this rather simple process, as it seems at first glance, and for which some services are trying to rip off more money, they say, you need to remove the pillow, and all that. I carried out the replacement on the ground without a lift, and the car does not have crankcase protection, which, of course, will have to be removed when replacing.
We will need a belt (I will also write about them in more detail.) two jacks, preferably one, a rolling one or just a hydraulic one (since there is no special place to turn the usual handle under the car), a ratchet, a head for 17, a ratchet extension for 15, and a cardan , as well as a wrench for tensioning the roller and a screwdriver for unscrewing the boot (it depends on which screws are screwed on).
We remove the wheel.
Remove the tension roller.
Removing the boot
This view opens up to us
We roll the jack under the crankcase and push it a little. You don't need to lift it too much just yet.
Then we completely unscrew the nut number 17. There is absolutely no need to unscrew the mounting of the airbag to the body, as many people do, the metal there is thin, the thread can only be tightened once.
It will look like this
Next we unscrew the pillow bolt by 15. It is quite long, but there is no need to unscrew it all the way. About half, maybe a little more
For clarity, I took this photo for those who don’t know, it can be very useful. Between the pillow and the bracket there is an intricate nut that fits into the groove of the bracket, thereby we can easily unscrew the bolt from the bottom of the pillow.
Now the manipulations with the jacks begin. We lift the car body in order to get the distance to push the belt through the cushion.
But you shouldn’t get carried away as you might break the guitar. since the body goes to the top, and the engine remains below. We pick it up and look at the guitar: as soon as it becomes a pity, that means that’s enough. For convenience, you can look at the bottom one - they bend the same way.
We insert a belt into the gap that appears between the pillow and the bracket, lift the engine a little and pull it out from below.
We push the new one behind the cushion, lower the engine a little and push it into its place.
Raise the car and lower the engine slightly. You can do both, you can do one thing or the other, the main thing is to look at the guitar. We put the bracket back on this nut and make sure it fits into the grooves of the bracket
Next, tighten the pillow bolt all the way. If the bracket is not placed on the cushion, most likely the bolt will spin, and holding that nut is extremely inconvenient and a second person will be needed. Also, make sure that the pillow remains standing as it was, so that it does not turn. I don’t know what effect this will have, but I’m in favor of leaving it as it was.
Once we tighten the bottom bolt to 15, carefully lower the engine onto this bolt so that it looks like in the photo, and tighten the nut to 17 until it melts.
We put the belt with the roller in place. we pull. install the boot and wheel. The result should look like this.
Here it is not yet stretched.
It took me about 30 minutes to replace the belt and take pictures along the way. I spent another 30 minutes tightening it and checking the charging with and without load. In general, nothing complicated. Once you change it, it will be easier later. I seem to have described all the nuances.
And now about belts from personal experience: I installed a Contitech belt. This belt length is perfect for a Priora with Panasonic air conditioning. I haven’t encountered any problems with other air conditioning systems, so I can’t say anything. but you can also put 6pk1120, it’s a little shorter.
I also read that they stuff in 6pk1115, but there you already need to move the generator towards the engine. and it will be possible to tighten it, but it will be more difficult. This is one of the easy options. 25 and 20 I set the belt for myself. fit without problems. I didn’t see much point in making the belt shorter. Well, that seems to be all.
Marking 6pk1125.
And most importantly, we follow safety precautions, stop the car efficiently, so that such an embarrassment does not happen.
3. Replacing the alternator belt on a Priora with power steering
This post is about how to change the alternator belt on a Priora with power steering, which some smart person wrapped around the right engine mount without removing the engine protection, without a hole.
The reason why I went to change the belt was longitudinal cracks on the belt, which was only 20,000 km old. (in my opinion, not enough, the factory one was 58 thousand and was like new) after replacement. Changed it at 58,000 km. The guys advised me to change the timing belt along with the pump, and at the same time the belt.
I crawled under the hood the other day to look at the fluid levels, and here was such a surprise, although I bought the strap in a good store for 600 rubles. and the seller convinced that there was no better company (unfortunately, I don’t remember the name.
) Five thousand ago I changed the roller - the previous one rustled strongly and distinctly, I bought some in an octagonal yellow box - it seems to be Czech - the seller also convinced that there was no better company, but then in the photo you will see what happened to the belt for 20 thousand and with roller for 5 thousand mileage.
Surprise, the sidewalls of the roller flew off on both sides, and there were 2 longitudinal through tears on the belt.
How to change the belt: it took me about an hour, but this is the first time, it can actually be done in half an hour if you have some tools. We will need: 1. A head extended by 17 - without it there is no point in even starting. You can ask someone, you will need it once, then you can unscrew it with a regular head if you make a washer like this in advance
on the left is the washer that was under the nut, on the right under the nut there is a barrel washer, its height is 16-18 mm, the hole is 11 mm, the outer diameter is 22 mm.
Even if you give it to the station, I recommend making such a barrel and asking the person who will change the belt to supply it - saving 215 rubles. - the toad strangled me to buy such a head one time - I took it from the mechanics. Then you can even unscrew it with an open-end wrench if desired. 2. Tensioner pulley key - looks like this. They can also tighten the rail.
3. Head 13 to unscrew the bracket (those with sprockets, as in the photo, need to prepare in advance, and during assembly replace these two bolts with human ones and, preferably, take stronger bolts from the auto shop, and not raw meat from Uncle Vasya in the garage) . 4. Key 17 5. WD-40 So the procedure: First, spray WD-40 on the pillow bolts. Let them soak.
These are the sprockets - I advise you to change them under the head to 13 when assembling
Place a jack under the front right side and remove the wheel. Remove the tension roller and move the belt to the side. Using an extended 17mm socket, unscrew the cushion nut, and a 13mm socket (or if you have sprockets, then the required socket) unscrew the cushion mounting bracket.
We are trying to bring the belt as high and close to the engine bracket as possible. There is a hole in the engine protection for draining the oil. Through this hole I inserted a Priorov spark plug wrench with the narrow part facing up against the edge of the pallet flange - it fits perfectly. The key is a little short - I used half a brick and a piece of board.
here is the key
I don’t know how to rotate the photo, so we turn our heads to the left
We begin to slowly lower the car. Accordingly, the engine will begin to rise. BUT up to a certain limit until the power steering pulley rests on the engine mount bracket. That is why we first bring the belt to the cushion, and then we begin to lift the engine. Otherwise it won't work. The pillow will wobble, but that's exactly what we were going for. Move the cushion closer to the engine and remove the belt.
Do not cut the old belt under any circumstances; when you take out the old one, it will be clear how to insert the new one, I took out the old one in about three minutes, but I inserted the new one in 30 seconds.
We put it under the pillow and begin to lift the car so that a gap is formed between the power steering pulley and the bracket. At the same time, immediately while the pillow is still moving, we attach the bolts.
We push the belt into place, put a barrel washer under the cushion nut, tighten it, put the wheel, put the tensioner roller. I pull the roller clockwise, it’s more convenient for me.
Here head to the right. Now the pillow fastening nut can be unscrewed with a regular socket, and, if desired, with a short open-end socket.
I installed this belt for 280 rubles. well, and the video, respectively
We collect the tools, rejoice at the work done, everything is not as complicated as in the Murzilka it says “remove the protection, unscrew the power steering pulley” to remove the cushion. I repeat - the car was on the ground, and I did not unscrew the protection.
https://www.drive2.ru/l/4691767/, https://www.drive2.ru/l/5800061/, https://www.drive2.ru/l/4535421/
Welcome! Generator belt - most often the belt is combined with the crankshaft, and to be more precise, it is almost always connected to it, and additional gears (Pulleys) can also act as parts such as a water pump pulley (This is a pump, such a system is used on classics ), or on some cars (On the very first ones, mainly VAZ 2101 cars), in addition to all this, it is also connected to the cooling fan, so on these cars it spins constantly as soon as you start the car’s engine.
Note! To replace this belt with a new one, the following set of tools will be useful, namely: Wrenches, various screwdrivers, a jack and a wheel wrench to remove one of the wheels from the car!
Summary:
- Replacing the alternator belt
- Additional video clip
Where is the alternator belt located? In the photo below, the belt is all chewed up and severely deformed, this indicates that in some places it was rubbing, and it can rub for various reasons, from crookedly installed pulleys and rollers to weak belt tension, which causes the belt to hit the cushion , so from time to time we recommend that you look at the belt and, if necessary, change it to a new one, and if you bring it to the same condition as in the photo, then nothing good will come of it, but although at first the generator will work and there will be no problems you won’t see, but when the belt is completely chewed up and eventually breaks, then expect trouble, namely the battery will discharge (If you drive a car, this will happen in the next 2-3 hours, depending on how the battery is charged), but although if your alternator belt breaks on the road, you can try to use improvised means to at least somehow get to the auto repair shop (improvised means can be a tie, a man’s belt, and so on, which will have to be tightened instead of the alternator belt for a while).
When should you change the alternator belt? The factory says (Recommends) that the belt needs to be replaced every 60,000 thousand km.
, or after 2 years have passed since its installation, whether or not to adhere to these figures is up to you, but as always, we insist on our own and do not recommend following the recommendations, it is better to look at the belt from time to time and if you find cracks on it , particles of oil, severe abrasions or deformation of the rubber, then in this case it must be replaced.
How to replace the alternator belt on a VAZ 2170-VAZ 2172?
Removal: 1) Lada Priora is one of the few cars on which the belt is replaced by lifting the engine of the car (on all 16 valve engines), that is, to pull it out, you will have to lift the edge of the engine because otherwise the engine mount simply won’t let you pull out the belt and remove it, well, let's start, first lift the right side of the car and remove the wheel from the hub (For information on how to remove a wheel, read the article: “Replacing a wheel on a car”).
2) Now, using a wrench or a socket with a wrench, unscrew either two bolts that secure the cushion to the body (Indicated by blue arrows), or one central nut (Indicated by a red arrow) that secures the engine to the cushion and before all this turning, do not forget to place a jack under the car engine, thereby you will lift it a little and after unscrewing the bolts or nuts, the cushion or the engine will come off a little from the place to which it is screwed and thereby form a gap through which the generator belt can be carried when it will be removed from the car.
Note! Also, don’t forget to remove the fender liner if you have one, because without removing it, you won’t be able to remove the alternator belt normally, since you won’t be able to easily get to the bolts and nuts!
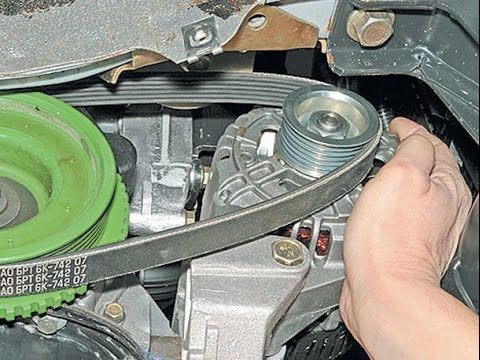
3) Let’s move on to removing the belt and by the way, there are several ways to remove it, the first of them is to loosen the bolt that secures the tension roller, it is also indicated by an arrow in the photo below, after the bolt is loosened, move the tension roller so that the generator belt is loosened and was able to get out of the car.
Note! The second method is the most reliable and this is what people mostly use, because when carrying out the first method, you will also need a special key for the tension roller with which you will need to hold this roller so that when you tighten the bolt, the roller does not scroll, so let’s return to the second method, To do this, use a wrench to slightly loosen the nut that secures the generator to the bracket (see photo 1) and then, turning out the adjusting bolt a little at a time, ensure that the generator moves towards the engine all the way as shown in the second photo and as soon as it reaches , remove the alternator belt from the car!
Installation: Installing a new belt in its place is done in the reverse order of removal; during installation, you will have to rotate the adjusting bolt, thereby adjusting the tension of the generator belt (And the tension will need to be determined depending on the deflection of the belt, that is, with a force of 100 N, “10 kg” of the hand deflection in the place shown in the photo below, it should be 8-12 mm).
Additional video clip: You can see detailed instructions for replacing the alternator belt on a car such as the Lada Priora in the video located just below:
https://www.youtube.com/watch?v=h8FNyHV8_X4
Source: http://avtozam.ru/vaz/zamena-remnya-generatora-lada-priora-vaz-priora.html