How to Check a Starter Yourself - 7 Starter Checks
The starter is responsible for starting the car engine and if it refuses to work, then starting the car becomes quite difficult.
As a rule, it does not fail instantly, but gradually, and by paying attention to its behavior, the fault can be determined based on its symptoms.
If this could not be done, then you will have to check the starter, either with improvised means or using a multimeter.
A quick check of the retractor relay or starter motor can be done without removing it from the car or by removing it from under the hood. For such a test you will only need a charged battery and a pair of power wires. And to check the armature, brushes or starter winding, you will have to disassemble it and run it with a multitester.
From this article you will learn:
How to test the starter with a battery
Let's start diagnostics of engine starting with the first question that many car owners ask - how to check the starter on the battery and what will such a test show?
This manipulation makes it possible to determine the correct functioning of the starter, since when it is on the engine, apart from clicks (if they are heard, of course), little can be said about the operation of the device.
Therefore, by closing the terminals with leads on the starter retractor and the starter housing, you can determine whether there is a malfunction in the retractor relay or the starter itself by seeing whether the relay operates and whether the starter motor turns.
Checking if the starter turns
Checking the starter in 3 simple steps
To test the starter for its ability to extend the gear and turn (as it should work when installed on the car), you can use the battery.
For the test, you need to securely fix the part, connect the “-” terminal to the body , and the “+” terminal to the upper terminal of the relay and its switching contact . During proper operation, the bendix should move out and the gear motor should rotate .
Let’s look at how to check each component of the engine starting device separately, clearly and in more detail.
How to check the solenoid relay
To check the starter solenoid relay, you need to connect the positive battery terminal to it , and the negative terminal to the device body . When the relay is working properly, the Bendix gear will move out with a characteristic click.
Checking the Solenoid Relay Using a Battery
Checking the retractor starter
The gear may not extend due to:
- burnt retractor contacts;
- jammed anchor;
- burnout of the starter winding or relay.
How to check starter brushes
Brushes can be checked in several ways, the simplest of which is checking with a 12 volt light bulb . To do this, connect one terminal of the light bulb to the brush holder, and the other to the body; if it lights up , then the brushes need to be replaced , since there are breakdowns in the protection.
Checking starter brushes for short circuit to ground
The second way to check the brushes - with a multimeter - can be done on a disassembled starter. The task will be to check for a short to ground (should not short). To check, the resistance between the main plate and the brush holder is measured with an ohmmeter - the resistance should tend to infinity .
Also, when dismantling the brush assembly, be sure to carry out a visual inspection of the brushes, commutator, bushings, windings and armature.
After all, when the bushings are worn out, there may be a drop in current during startup and unstable operation of the motor, and a damaged or burnt commutator will simply “eat” the brushes .
Broken bushings, in addition to contributing to armature misalignment and uneven wear of brushes, increase the risk of an interturn winding short circuit.
How to check bendix
The operation of the Bendix starter is also quite simple to check. You need to clamp the overrunning clutch housing in a vice (through a soft spacer so as not to damage it) and try to turn it back and forth, it should not rotate in both directions.
It turns - the fault lies in the overrunning clutch , because when you try to turn it in the other direction, it must stop. Also, the bendix may not engage, and the starter will turn idle if it is simply stuck or the teeth are eaten away.
Damage to the gear is determined by visual inspection, but the occurrence can only be determined by completely disassembling everything and cleaning the gearbox from dirt and dried lubricant inside the mechanism.
Indicator light for checking the starter winding
How to check the starter winding
The starter stator winding can be checked with a flaw detector or a 220 V light bulb . The principle of such a check will be similar to checking brushes. We connect a light bulb up to 100 W in series between the winding and the stator housing.
We attach one wire to the housing, the second to the winding terminal (from the beginning to one, then to the other) - it lights up, which means there is a breakdown .
There is no such control - we take an ohmmeter and measure the resistance - it should be about 10 kOhm .
The starter rotor winding is checked in exactly the same way - we turn on the control unit in a 220V network and apply one terminal to the commutator plate, and the other to the core - it lights up, which means that the winding needs to be rewinded or the rotor must be completely replaced.
How to check the starter armature
To check the starter armature, you need to apply 12V voltage from the battery directly to the starter, bypassing the relay. If it spins, then everything is fine with it , if not, then there is either a problem with it or with the brushes. It is silent, does not spin - you need to resort to disassembly for further visual diagnostics and checking with a multimeter (in ohmmeter mode).
Checking the starter armature with a battery
Checking the anchor on the PPYA
Basic anchor problems:
- breakdown of the winding to the housing (checked with a multimeter);
- wiring of collector terminals (can be seen upon detailed inspection);
- interturn short circuit of the winding (checked only with a special PPYa device).
Burnt-out lamellas due to poor contact between the cockerel and the tavern
Very often, a winding short circuit can be determined by a detailed visual inspection:
- chips and other conductive particles between the commutator lamellas;
- burnt out lamellas due to contact between the winding bar and the cockerel.
Also, very often, uneven wear of the commutator leads to brush wear and starter failure. For example: protrusion of insulation in the gap between the lamellas, due to the displacement of the commutator relative to the shaft axis.
The depth between the grooves of the armature commutator must be at least 0.5 mm.
Often, the average car owner does not have the opportunity to check with a test light or a flaw detector, so the most accessible methods of checking the starter are checking with a battery and a multimeter . We will check the brushes and windings of the starter for short circuits in the megger or continuity modes, and the relay windings for low resistance.
Checking the starter with a multimeter
Disassembling and checking all starter parts
So, how to check the starter with a multimeter - you just need to disassemble it and measure the resistance between :
- brushes and plate;
- winding and housing;
- collector plates and armature core;
- starter housing and stator winding;
- the ignition switch contact and a permanent plus, also known as the shunt bolt for connecting the excitation windings of the starter motor (the condition of the relay pull-in winding is checked). If working properly there should be 1-1.5 ohms;
- the ignition connection terminal and the traction relay housing (the holding winding of the traction relay is checked). It should be 2-2.5 ohms.
There should be no conductivity between the housing and the winding, the rotor shaft and the commutator, the ignition contact and the positive contact of the relay, and between the two windings.
It is worth noting that the resistance of the armature windings is negligible and cannot be determined with a conventional multimeter, so you can only ring the windings for the absence of a break (each lamella of the collector must ring with all the others) or check the voltage drop ( should be the same for all ) on adjacent lamellas when applied to them DC (about 1A).
Finally, we present for you a summary table that contains information on what methods can be used to check this or that part of the starter.
Tested items and methods Solenoid relay Armature Starter brushes Starter winding Bendix| Multimeter |
| Visually |
| Battery |
| Bulb |
| Mechanically |
I hope this information helped you learn how to test the starter yourself in a garage, having only a battery or a multimeter at your disposal.
As you can see, checking the starter for functionality may not require professional equipment or knowledge of electrical circuits. need basic skills in using an ohmmeter and a tester with a control light.
But for professional repairs, you also need a PYA - an anchor testing device.
https://www.youtube.com/watch?v=H7k6u1e25EU
Did not find an answer to your question?
Ask in the comments. We will definitely answer!
Source: https://etlib.ru/blog/471-kak-proverit-starter
Checking the starter and its performance on your own
All causes of malfunctions can be divided into two groups:
- Mechanical. These include breakdowns caused by wear and tear of parts. They wear out over prolonged use or when operating rules are violated. Mechanical damage is also possible due to electrical problems.
- Electrical. Such breakdowns include problems with power supply. To detect electrical problems, you need to check all the wiring, diagnose contacts and turn-to-turn short circuits. You should also check for burning of the closing plates and working surfaces, which are possible due to the passage of excess current through the contacts.
Diagnostics using the battery
Generally speaking, the following breakdowns of the engine starting device are possible:
- When you try to start the starter, the armature does not rotate and the traction relay does not operate. The main reason is insufficient power supply. This can be caused by a discharged battery, oxidation on the positive terminal or poor contact, loose terminals on the battery, electrical breakage, turn-to-turn short circuit and armature sticking.
- When the retractor relay is working properly, the armature rotates heavily when the starter is started. A possible reason is a short circuit between the commutator plates or its burning, freezing, brush wear, poor battery charging, wear of the armature bushings, displacement of the armature plates, winding breakage, interturn short circuit of the starter and armature.
- When the starter is running, the armature rotates, but the crankshaft does not rotate. The reason may be a breakdown of the buffer spring or clutch drive ring, slipping of the clutch's free play, poor movement of the armature, or a malfunction of the lever that disengages the clutch.
- The starter does not turn off after the engine starts - the solenoid relay or lever drive is stuck, the ignition switch return spring is faulty, the relay return springs are broken, the clutch is broken. In any of these cases, you need to turn off the ignition and disconnect the wire going to the relay.
- The appearance of extraneous noise indicates loosening of the device, wear of the bearing bushings, weakening of the starter buffer spring, damage to the flywheel ring or nicks in the drive teeth, and improper adjustment of the gear travel of the device.
Before starting repairs, you need to check the starter. You can do it yourself or using a stand for testing generators.
Generator diagnostic stand
Where should repair work begin?
To start repairs and carry out diagnostics without a stand for testing generators, you need to prepare:
- a set of keys;
- screwdrivers;
- special pullers;
- tester;
- control light;
- old rags.
Before checking the starter, it must first be removed and cleaned of dirt. Disassembly requires special tools. To make a thorough diagnosis, the device must be completely disassembled, down to the smallest parts. Then each part needs to be washed and dried.
Machine starter device
Diagnostics without a stand for generators consists of a sequence of actions:
- First of all, you should check that the device is functioning correctly.
- Check the solenoid relay.
- Perform brush and armature diagnostics.
- Call the power grid.
- Carry out a Bendix diagnostic, thanks to which the engine starts silently.
After performing the diagnostics, you should replace or repair the faulty parts.
Verification Guide
The device can be checked without removing it from the car. Removal is carried out in case of serious damage. No special knowledge is required for diagnosis. The device is checked in several stages. The most important thing is to check with thick wires; it won’t work on thin ones.
Stages
Checking the starter assembly. To do this, you need to remove the device from the car and clamp it in a vice, securely, but not too tightly, so as not to break it. Then you need to close the contact bolts located on the back side using a metal object or a piece of wire. If the starter is working, it will start spinning. In this case, the cause of the malfunction may be in the traction relay.
Checking the operation of the traction relay. To do this you need to use wires with low resistance. One wire needs to connect the positive terminal on the battery and the relay to ground, and the second wire must connect the negative terminal on the battery and the starter housing. If the relay is working properly, a characteristic click will sound and the armature will push out the gear (video author - altevaa TV)
Checking the anchor. To do this, you need to apply 12 V voltage directly bypassing the traction relay. We check with a test light. The armature is connected to the power supply, and the device body is connected to the light bulb. If the light bulb lights up or sparks, it means that the armature has a breakdown and needs to be replaced.
The tester should measure the resistance between the rotor housing and the windings; it should be several million Ohms. If the insulation resistance is from 0 to 2 ohms, the armature is faulty and requires replacement. Checking the inter-turn short circuit is done using a special stand for testing generators.
Checking the device on the stand
Checking the brushes is done using a 12 V light bulb, which is connected to the brush holder and the body of the device. A glowing light indicates a brush malfunction. In this case, they need to be replaced. The winding is also checked with a light bulb, only the winding and the housing are connected.
Call the electrical network. Using a tester, you can ring an electrical circuit to find breaks. To ring the electrical network, you must turn on the ignition.
Checking the Bendix. To check, you will need a soft gasket to protect the part from damage. The Bendix sprocket needs to be clamped in a vice and the clutch turned in one direction and the other.
If the part is working properly, the coupling will only turn in one direction. If it turns in the other direction, this indicates that it is faulty and needs to be replaced.
The teeth may be worn out, then the bendix just needs to be replaced.
Gouges in Bendix teeth
A visual inspection can reveal the following faults:
- winding breaks;
- insulation violation;
- wear of the collector plates;
- surface defects of the commutator and armature in the form of burrs, scratches, grooves, etc.
Small defects can be eliminated by sanding with fine-grained sandpaper. If as a result of these actions the anchor has decreased in diameter, spacers are installed. The same applies to the collector. If the parts are very worn, it is better to replace them. Replacement is required if the interturn insulation is faulty, brushes and bearings are worn out.
If you don’t know how to check the starter without removing it from the car, diagnostics can be done at service stations that are equipped with a special stand for diagnosing generators.
Sorry, there are no surveys available at this time.
Video “Starter diagnostics”
This video from HF Auto Electrician demonstrates how to test the starter yourself.
Source: https://labavto.com/elektronika/pusk/kak-proverit-starter/
How to check the starter? DIY repair
In the previous article we talked about the design of the starter, and today we’ll talk about how to check it for malfunctions and repair it.
If the starter fails, starting the car engine becomes quite problematic and, in most cases, impossible. Therefore, it is advisable for car owners to know the simplest ways to check and repair a car starter, which you can do yourself, without turning to car service professionals.
Pictured is a gear starter
Since the starter is an electromechanical product, its failure is caused by only two faults: mechanical or electrical.
To check, you will need a minimum set of tools, a list of which most car enthusiasts have. Namely:
• Multimeter;
• Soldering iron;
• Screwdrivers (plain and Phillips);
• Wrenches or sockets (mostly 13X14 and 17X19).
Checking the starter can be done both on the engine, without removing it, or on a workbench, after dismantling it.
Check on the car
Without removing the starter, you can check the following points:
• Availability of voltage to the power contact of the relay from the battery;
• Power supply to the relay control contact from the ignition switch;
• Reliability of the engine mass;
• How much comes from the battery and how much voltage is transmitted to the starter motor when the relay is activated at the moment the starter is turned on from the ignition switch;
• Starting speed (for example, the armature is spinning slowly);
• The state of heating of the stator housing and the smell of burnt bakelite, which is used to process the windings;
• The serviceability of the electric motor can be checked by supplying 12V from the battery bypassing the relay to the starter terminal (the second relay terminal going to the starter). If the engine turns over, then everything is in order.
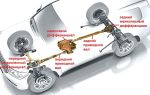
What does the starter consist of?
Checking on a removed product
After dismantling the starter, the following elements are checked:
• Stator winding. Using a multimeter, look for interturn or short circuits, or breaks, as well as traces of possible rubbing of the armature against the lamellas (poles) of the stator (for example, with severe wear of the armature bushings) or release of the poles from the housing.
Stator winding
If there is no flaw detector, you can check the stator winding using a 220V light bulb (up to 100W). A light bulb is connected in series between the stator housing and the winding. One wire is fed to the housing, and the second in stages to the terminals of the windings. The light coming on will “say” that there is a breakdown in the circuit of some winding.
Using a multimeter, check the resistance between the housing and the winding - there should be no conductivity.
• Armature winding. Similar to checking the stator, plus the condition of the commutator plates for wear and unsoldering.
Checking the anchor
The winding is checked in the same way as the stator winding. The control panel with the lamp is connected to a 220 V network and one end is fed to the collector plate, the other to the armature core. If the lamp comes on, it will indicate that the winding needs to be rewinded or the rotor needs to be replaced. A breakdown of the winding to the housing is detected using a multimeter. The wiring of the collector leads is determined by visual inspection.
On a working armature, there should be a depth of at least 0.5 mm between the grooves of the collector plates.
• Armature bushings. The gap between the armature shaft and the bushings.
Armature bushings
• Brush assembly. Condition of brushes, springs and freedom of movement of brushes in brush holders.
Brush assembly is in poor condition
The resistance between the brush holder and the main plate is checked, and the resistance should go to infinity. Depending on the design, the brushes can be attached to the body or soldered. In the latter case, you will need a soldering iron.
The connection is spot welded at the factory, so you just need to cut the wire from the old brush and solder the wire from the new one
• Overrunning clutch (Bendix) and gear. The coupling should turn only in one direction, in the other direction only together with the armature shaft. The gear should not have chipped or worn out teeth.
Old and new starter bendix
To check, the overrunning clutch (its body) is clamped through soft material in a vice. Next, try turning the Bendix gear back and forth; it should not rotate in both directions.
We check the bendix - it rotates or not.
• Solenoid relay. Windings for breaks or short circuits (provided that the relay is disassembled). Also the condition of the core return spring.
Checking the solenoid relay
To check, positive voltage is supplied from the battery, and the negative voltage of the battery is applied to the mass of the product. If the relay is working properly, the drive gear will move out with a clear click. The inability to extend the gear will “speak” of burnt relay contacts, jamming of the armature, breakage or burnout of the relay winding.
• Bendix fork. The integrity of the fork itself and the wear of its edges where they engage the bypass ring.
Bendix fork
• Reducer gears (gear starter). Integrity of external and internal gears.
Starter repair
• Stator. If faults are detected in the stator winding (insulation breakdown, break), either the pole windings are repaired or the stator is replaced. For repairs, it is necessary to unscrew the fastening of the poles to the body of the housing.
The stator winding is marked with arrows
If necessary, the old insulation is replaced, where tape made of varnished fabric has proven to be more reliable than tape made of cotton paper impregnated with varnish.
In a gear starter, the poles are made of permanent magnets, which are attached to the housing using glue or another method. Their reliability is checked. To restore magnets (if they fall off), it is recommended to use composite glue as it is more reliable.
• Anchor. If problems are identified with the winding of the armature or collector plates, they are restored or the armature is replaced.
• Bushings. In most cases, the bushings are replaced and then reamed to fit the shaft diameter.
• Brush assembly. The brushes are measured for their height and freedom of movement in the brush holders. Worn brushes are replaced with new ones.
New brushes
• Bendix. If any malfunction is detected, the bypass clutch must be replaced.
• Solenoid relay. In cases where the relay is collapsible, it is disassembled and the power contacts are cleaned or changed. If the return spring of the relay core breaks, it is replaced. When it is not dismountable, the relay assembly is replaced.
• Drive fork. Any wear on the fork requires replacement;
Bendix fork
• Reducer gears. In the event of a malfunction, the worn gears are replaced, or their entire set is assembled.
In cases where a crack is discovered in the front cover of the starter (rarely, but it happens), it is replaced.
Finally
As you can see, almost all starter repair work can be done with your own hands, saving your time on a trip to the service center, as well as your own finances.
With proper use and timely maintenance of the starter, its service life can be about 200 thousand kilometers, so for long-term operation we recommend periodically checking its condition.
Related materials:
The starter turns, but the engine does not start
Starter solenoid relay
Source: https://avtoexperts.ru/article/kak-proverit-starter-remont-svoimi-rukami/
Simple ways to independently check the starter for performance
Home » Starter » Simple ways to independently check the starter for performance
The starter is designed to start the power unit. This is an electromechanical device, so failures can be classified as electrical or mechanical.
Electrical problems are mainly related to the power supply. The cause may be a discharged battery, damaged wiring, interturn short circuits, burnt or oxidized contacts.
To identify electrical faults, you need to know how to ring the starter.
Mechanical failures occur mainly after long-term use, during which parts wear out and become unusable, as well as as a result of mechanical damage.
Mechanical damage can be caused by electrical problems. The parts of the starting unit experience heavy loads, especially during frosts, since the device has to deliver more power and a strong current passes through it.
The most vulnerable components:
- brushes;
- bushings and armature corrector;
- nickels;
- fork;
- gear;
- traction relay;
- damper spring.
Mechanical breakdowns are indicated by extraneous noise, unpleasant odor, and untimely operation.
The following are symptoms and causes of starter failure:
- Untimely response. In this case, the electric motor rotates constantly, but a metallic grinding noise is heard when starting. The cause may be a malfunction of the damper spring, wear of the gear or bushing. The exact cause can only be determined by removing and disassembling the assembly.
- The starter rotates constantly, but the crankshaft does not turn. There are no extraneous sounds. The cause is most likely a broken bushing.
- When starting, the trigger mechanism does not work. You need to gently tap the starter from behind with a hammer or other object; if the engine starts, it is possible that the brushes are very worn. They need to be replaced.
- After starting the engine, a metallic buzzing sound is heard. In this case, you must immediately turn off the engine. Possible reasons: the fork or gear is jammed, the traction relay is stuck. The exact cause can be determined after removing and disassembling the unit.
- The solenoid relay clicks, but the device does not operate. The cause may be insufficient battery charging. The incoming voltage is enough to trigger the traction, but the nickels are not closed using the contact plate, and power is not supplied to the electric motor of the unit. If the voltage at the battery terminals is normal, then it is possible that there is no voltage on the power cable or the coins are burnt.
- When the battery is fully charged, the starter rotates slowly. It is possible that the bushings are worn out or there is contamination in the electric motor.
- If burning is heard during startup, then the traction relay winding may burn out; more rarely, the armature windings will burn out. This entails overheating of the wires going to the device.
- The traction relay does not operate, the starter does not start. There may be problems with the electrical network. You should check the integrity of the wiring, the correct operation of the unit and other components included in the electrical network.
If the starting unit stops working, you should diagnose it, identify the parts that have become unusable and replace or repair them (the author of the video is Autoelectrics HF).
Troubleshooting methods
If the starter does not start when the ignition is turned on, it should be checked.
Below is a sequence of actions on how to check the starter without removing it from the car:
- Check battery charging. The voltage at its terminals must be at least 12 V. If the value is lower, it must be charged.
- The next step is to check the ground bus. To do this, the negative terminal of the battery is connected to the car body and the starter housing. It is better to perform the procedure with the ignition on. The voltage must be zero, otherwise there is a risk of breaking the connecting contacts.
- Before carrying out further actions, it is advisable to perform diagnostics on the computer. The operation of the starting device on modern cars can be blocked by an immobilizer. In this case, key binding will be required. Starting the starter may be prohibited if the automatic transmission is faulty.
- To carry out a complete diagnosis, electrical diagrams of components and component connections are required. The ignition system can be of two types. In early versions of cars, the traction relay received power from the ignition switch contact group. If it is faulty, no voltage is supplied to the relay. In this case, you should check the contacts using the connection diagram. On machines of the latest versions, a relay located in the mounting block is used to operate the starter. It is necessary to check its serviceability.
- At the next stage, you should ring the wiring going to the starting unit.
It consists of thick and thin wire. A thin conductor is needed to control the traction relay, a thick one is needed to start the electric motor. To restore the wiring, you need to strip the wires in a convenient place. If after completing the work, the starter still does not respond. The following problems are possible: broken windings, no contact in the connection of a thin wire, broken commutator lamellas, no grounding on the power unit housing. - If the starting unit does not spin when the relay is activated, you need to check the power supply at the output of the thick wire; it must be at least 12V. If the contacts are burnt, they need to be cleaned. The condition of the thick conductor should be checked at the positive terminal of the battery.
If the above methods do not resolve the problem, you need to remove the starter and diagnose it (author of the video - Made by hand).
Do-it-yourself diagnostics of the engine starting device
For accurate diagnostics, you need a stand for testing generators and starters, which service stations are equipped with. But you can diagnose the starter yourself.
To carry out diagnostics correctly, you should know the basic rules and sequence of work:
- First of all, the starting device is diagnosed;
- Next, the traction relay is checked;
- then the armature and brush assembly are checked;
- At the final stage, the Bendix is diagnosed.
For a general check of the starter, it must be dismantled and clamped in a vice. The unit must be securely fixed, but not tightly clamped, so as not to cause mechanical damage during testing. Then you need to take a piece of wire and close the contact bolts. A working mechanism will begin to move. In this case, there is a possibility that the solenoid relay is faulty.
You can check the starting unit using the battery by connecting it directly. To figure out how to connect the starter directly to the battery, you need to study the connection diagram.
The body of a securely fastened starter must be connected to the negative terminal of the battery, and the positive terminal to the switching contact of the device and the upper terminal of the solenoid relay.
If the device is working properly, the engine will turn the gear and the bendix will extend.
To check the retractor, you need to connect the relay and the positive terminal of the battery with one wire, and the body of the device with the negative terminal of the battery with the other. If the relay is working properly, the armature will advance the gear and a characteristic sound resembling a click will be heard.
The next thing to check is the device's armature. To do this, you need to apply 12V voltage directly to the starting unit, bypassing the traction relay. In this way, it is impossible to determine exactly what is faulty: the brushes or the armature windings. The cause of the malfunction can be determined visually by disassembling the unit. You can additionally check with a multimeter.
Bendix is a device responsible for the silent operation of the starting unit. To check, the dismantled bendix must be clamped in a vice. When doing this, use a soft cloth to avoid damaging the device. The Bendix clutch should only turn in one direction. If it rotates in both directions, then the cause of the malfunction is its breakdown. In this case, the part must be replaced.
Photo gallery
1. Checking the starter bendix2. Checking the armature and brushes3. Checking the brushes for ground4. Diagnostics on a special stand
Expert recommendations
If you have no experience in repair work, then you can contact a specialist who will tell you how to check the removed starter from the battery; the video can also help with this. If you carry out a comprehensive diagnosis and repair of the starting unit (replacing bushings, brushes, forks, bendix if necessary, cleaning internal surfaces), then it will last without repair for 3-4 years.
To extend the service life of the starter, you must adhere to the following rules:
- do not force the starter to operate continuously for 15 seconds;
- if extraneous noise is heard or the device periodically fails, you must immediately look for the cause of the malfunction and eliminate it;
- monitor the condition of the traction relay contacts; sparking and overheating of the contacts can destroy the part.
A working starter will ensure a comfortable trip and will not fail at the right time. It is better to correct minor problems in a timely manner than to make major repairs. The given tips on how to check the operation of a starter from a battery, the videos posted in the article will help to carry out a set of routine maintenance to restore the starter’s functionality.
Loading …
Video “Checking the starter using a battery”
How to check a starter on a battery, the video below demonstrates this process in detail (the author of the video is Util Shaw).
Do you have any questions? Specialists and readers of the AVTOKLEMA website will help you ask a question
Source: https://avtoklema.com/pusk/kak-proverit-starter-na-rabotosposobnost-2796/
We look for faults in the starter with our own hands
A car starter is part of the electrical equipment of modern cars. It provides the crankshaft speed required to start the engine. This is a DC motor that draws its energy from the battery.
Signs of a faulty starter
If you notice that the starter does not turn the engine or does not turn it fast enough to start, this indicates an electrical problem. Check by starting the entire circuit from the battery.
Mechanical symptoms will be indicated by the engine not running while the starter is running, a grinding noise during start-up and a hum during operation . Here you need to inspect: the overrunning clutch lever, the clutch ring, the buffer spring, the flywheel crown.
Signs that promise imminent failure: the starter does not work immediately - after a couple of attempts to turn the key; disengages late; works strained with a fully charged battery.
Important! Check the starter and related components for proper operation as often as possible. The starter can last up to 200 thousand km. mileage if you use it wisely. Timely diagnosis and prevention will significantly increase its lifespan.
Checking the starter without removing it
Let's look at how to check the starter without removing it.
The starter does not rotate when the key is turned - look at the position of the selector lever. It should be "park" or "neutral". Make sure that the wires are securely fastened to the terminals and to the starter relay. Check if the battery is charged.
When you turn the ignition key, the starter does not turn, but clicks of the traction relay are heard when the battery is charged - the relay contacts or the starter motor are faulty. If clicks are not heard, it means that the traction relay is broken or there is a break in the electrical circuit of the relay.
When the starter motor turns slowly , pay attention to the voltage - it should be at least 12 V.
How to remove the starter
In order to remove the starter, you will need an assistant and a lift. If there is neither one nor the other, carry out the procedure yourself, it will take about an hour of your time. Then proceed according to the following instructions:
- Disconnect the battery and remove the engine protection.
- Locate under the hood and remove the top starter mounting bolt.
- Then move under the car. Unscrew the nut securing the main positive wire to the solenoid relay, and then the relay control wire nut.
- Remove the nut securing the negative wires to the starter, then unscrew the lower starter mounting bolt.
- Now get out from under the car. Under the hood, locate and remove the top starter bolt. Remove the starter from the air filter side (the wiring will be in the way on the battery side).
Before removing, make sure the engine is cool. Otherwise, you risk getting burned.
How to check the starter using the battery, relay diagnostics
Before checking the starter without removing it from the car, make sure that the battery is in good condition. You can do this using a multimeter. If everything is fine with the battery, you can start checking. The operation will be carried out using a voltmeter.
Before checking the starter solenoid relay, locate its positive terminal. This is a thick wire that goes from the battery to the bolt on the starter. Place the probe of the red (positive) wire of the device onto this terminal, and connect the black wire to the vehicle ground.
For a successful check, invite an assistant to turn the ignition key at this stage. If there are no problems with the mechanism, the voltmeter needle will show a voltage of 12 V, and the starter will make clicks. If the device value is lower, then the problem is in the ignition switch since the battery has already been checked. You can check the starter with another device.
If you don't know how to test the starter with a multimeter, below is a short instruction. To check, place the device in a horizontal position and set the multimeter needle to zero. Determine the calibration of the voltage source and switch the device’s value switches to the modes you need.
Be sure to inspect all wires for integrity.
If everything is fine, close the ends of the device to the area being tested and observe the reaction of the arrows. If the device is digital, the values are visible on the display.
Remember! There must be no voltage in the area being tested before testing begins.
How to check the armature and brushes
To check if the brushes are intact, take a 12-volt light bulb. Connect its wires to the holder and to the mass of the brushes. If the light comes on, this is a sign of a breakdown, and the brushes will have to be replaced.
Working under heavy load can lead to a short circuit in the armature windings. How to determine the location of the short circuit, in addition to visual inspection, you can check the starter armature with a multimeter. The test consists of measuring the resistance between the housing and the windings.
To check the resistance value, the desired circuit is connected to the output terminals of a multimeter set to ohmmeter mode. A working core will show a resistance close to zero, and its insulation will show a value tending to infinity. This is the general rule for checking wires and cables.
Bendix diagnostics
If the starter turns on but the engine does not turn over, it's time to find out how to check the starter bendix. Bendix is usually not repaired, but replaced, but you need to know the reasons for its failure.
There are not many of them:
- the lubricant has dried out or thickened;
- the springs are worn out;
- Defects and abrasions have appeared on the rollers or diametrical wear has occurred.
Checking the Bendix is done without any difficulties.
Consider using a soft pad to wrap around the mechanism to prevent damage.
Then place it in a vice, with the device coupling turning one way. If there is rotation in both directions, the cause of the breakdown is a defective coupling. This part will have to be replaced. By following the exact procedure and instructions, you can easily check the starter and replace defective parts.<\p>
Source: https://auto.today/bok/5960-diagnostika-startera-svoimi-rukami.html