DIY airbrush on a car
Successful airbrushing on a car with your own hands is a source of special pride. The technique is in demand wherever you need to evenly apply color in thin layers to the surface. The paint is pressurized from a spray nozzle, which is why the method itself is called “air brush painting.”
Non-absorbent surfaces are sprayed with appropriate paint; sometimes the surfaces themselves must be prepared for finishing with a special primer.
This primarily includes airbrushing on cars, motor vehicles, water transport and other metal and composite objects.
Types of airbrushing
- Monochrome is classically done with a single color, which is diluted with white for different stages. The results are shades of different intensities.
- Colored - two or more colors are used.
In this case, airbrushing with close colors will create an image similar to monochrome, but more expressive.
- Laconic - minimum details, maximum content. Typically this style expresses a philosophical idea, such as a hieroglyph for "happiness", "health" or "wealth".
- Stylized - a generalized image in which there is a lot of detail, but emphasis is placed on some elements while simplifying others. Such airbrushing is often performed using stencils and patterns.
- Artistic airbrushing on a car is a complex multi-layered image that only an experienced master painter can do. Implementation of such work will not be cheap.
Idea! If you don’t have enough experience to fully implement the idea - enhance the contrasts, work out the nuances... You can complete the work to an affordable extent, then invite a professional to finalize it.
Do-it-yourself airbrush on a car. Video:
The most convenient gravity feed sprayer. The paint reservoir in such a device is located on top. You need to choose a spray gun with a double setting, which allows you to control the air supply and paint flow, that is, with pressure adjustment on the pneumatic device itself.
Airbrush
Sold in departments with goods for creativity, the thickness of the nozzle is 0.3 mm, intended for drawing strokes and lines.
Mini spray gun
Sold in automotive departments, nozzle thickness 0.8 mm, for creating backgrounds and gradients that do not require detailed drawing.
Compressor
Sources of compressed air are a compressor for an airbrush and a hose with corresponding connectors at the ends:
- spraying is most often carried out at a pressure of 2–2.5 Atm, which means that the compressor must provide this mode;
- The hose for the compressor is included in the kit, but if you need a longer one, you can always buy it separately.
Acceptable phase - the workshop capabilities must match the compressor settings; three-phase equipment will not operate from a two-phase current source.
Important! Oil and moisture eliminators will come in handy for the job.
Protection
You will need: painting glasses, a mask with carbon filters, a cap or bandana to cover your hair, and gloves.
Place
The worktop is equipped with a hinged protective box in which the hood is mounted. If there is no such device, then you will have to work in a cloud of paint. Additionally, an external air supply system is connected to the room.
For one-time work, you can consider the option of renting. A suitable facility would be a car repair shop, furniture production, carpentry (where frames are made and painted) or an art workshop.
Basic paints
There are car enamels on sale on different bases. Recently, a large assortment of acrylics has appeared. But it will be easier for a beginner to get his first experience with alkyds. They are more docile due to their plasticity and high covering ability.
The brands MOBIHEL and COLOMIX are good choices.
Colors and toners
There are three ways to get an assortment of paint:
- The most reliable. Buy a set of airbrush paints or buy cans of colors that you need a lot of. Then go to a store where car paints are tinted and purchase the necessary ready-made colors in 50–100 ml quantities. Their basics must be the same.
- Not for beginners.
Buy basic colors - white, yellow, red, black and blue. Then mix as needed. Ready-made mixtures can be stored in plastic bottles for some time.
- The most difficult. Add universal colors to the primary colors. Such compositions must be carefully filtered.
Lucky
Work performed on a car is covered with a two-component auto varnish, which consists of a base and a hardener. These varnishes are sold as a set and are accompanied by instructions with recommended mixing proportions. For mixing accuracy, you can use disposable syringes.
Important! Varnish mixed with hardener cannot be stored. After application, you must immediately disassemble and thoroughly rinse the spray gun with solvent, then keep it in acetone for some time.
Solvents
There are special solvents for car enamels, they are sold in the same tins as the paints themselves.
Universal solvents for alkyd enamels are No. 645 and 650; they are also used to rinse the spray bottle when changing color. Solvent No. 646 also does the job, but it is still intended for nitro enamels. Car enamels mixed with No. 646 will fly “drier” and apply “harder”.
Stencils and patterns
You can buy ready-made ones, order plotter or laser cutting, or do it yourself:
- disposable stencils are made from thin cardboard, thick paper, thin plastic, and unnecessary x-rays. But the best choice would be an adhesive film; it adheres tightly to the surface and prevents paint from getting onto the protected surface;
- A reusable stencil can be made by laminating a disposable one.
Airbrushing on cars. Video lesson for beginners:
- A simple disposable one is attached with masking tape. A strip of masking tape is applied in the middle to the edge of the stencil and the edges of the tape are folded inward. Nevertheless, when painting, such a stencil is pressed with your hand, because the air from the sprayer blows it.
- Disposable adhesive film will ensure high quality. This stencil is indispensable when you need airbrushing on motorcycles, and there is a little trick to position it as accurately as possible. The surface should be sprayed with water from a spray bottle, a stencil should be applied and straightened as required.
Then use a napkin to remove the water, smoothing the stencil from the middle to the edges.
If necessary, the surface is sanded with a machine or sanded by hand with the addition of polishing pastes, napkins and other auxiliary things, then primed. You can degrease the surface before painting with alcohol or an alkaline solution.
Preparing the Paint
Pigments that provide density and opacity settle to the bottom of the jar. Therefore, any paint must be mixed. It is convenient to do this with a drill at low speeds with a long drill bit or a thick wooden skewer.
Applying paint
If the surface needs to be primed, then this is done from a distance of 25–30 cm, so that the paint is applied perpendicularly. For gradient and artistic works, the angle of paint application changes.
Each master adjusts the pressure differently. Some people can paint evenly with low pressure at close range. Others find it convenient the other way around.
The part to be painted should be positioned horizontally
The basic application of paint is carried out in 1-2 layers, then the surface must dry.
Drying time depends on conditions including the specifications of the paint itself and can take up to 12 hours.
Ideal when the paint does not stick at all. If you continue to work on wet paint, a new layer, especially of a different color, will mix with the bottom one. The result will be a pale or muddy color.
Local pattern - here the layers dry quickly, in 10–15 minutes.
Principle
The paint is applied in layers starting from light colors. You can highlight details in the finished drawing. If the work involves a bright white color, then it is better to protect the desired area with a mask made of adhesive film or masking tape.
For example, the sequence of performing work in blue tones is structured like this:
White zones, then light blue or light gray, dark blue, blue, dark blue (for this, black is added to the blue) and, if necessary, black zones.
How do you get vibrant color?
Multi-color work is also done from light to dark, taking into account the colors. Task: we need fire. Sequence: white, light yellow, yellow, yellow with a drop of red, orange, red, dark red, brown, black.
Each subsequent layer is applied to a smaller area. The spray angle is varied to achieve different effects, including "transparency".
Attention! To apply an even layer, you need to move your hand smoothly without stopping!
In this case, spraying should begin following the area of the surface to be painted and also finish by moving the airbrush to the side. Otherwise, at the beginning of spraying, the paint will form a spot.
Applying varnish
It is important to dilute the varnish correctly. Since there are no exact recipes, you will have to select the “right” consistency by gradually adjusting the pressure and adding solvent. Be sure to try it on a test surface.
The varnish is applied perpendicularly. If the varnish “floods” the surface, most likely it is too liquid. When it appears in spots, it means it is too thick or there is too much pressure on the feed.
Cleaning when color changes
The procedure is quite simple. You need to wash the tank with a wire brush and solvent and wipe with a rag. Then add solvent and spray until the airbrush is thoroughly cleaned. When using dark and light colors, consider two or more airbrushes to prevent cross-contamination of colors.
Having finished working and washed the airbrush and spray gun, you can pour a little solvent into them and leave it until the next session.
Errors
Usually they relate to the proportions of paint or varnish and thinner:
- An excessively diluted composition will form streaks;
- not enough - a rough surface layer, an effect called “shagreen”.
“Shagreen” tends to form with other errors:
DIY powder coating of wheels. – there is more useful information here.
- suboptimal solvent;
- high temperature in the room (desirable 20–24 °C);
- large distance from the sprayer to the surface;
- strong pressure causing air to “spit” out.
All of these factors lead to paint particles drying out “in transit” and causing defects. Another cause is unfiltered ink or poorly mixed toner.
Mechanical problems can be easily prevented by choosing a sprayer with a built-in metal mesh filter. Chemical ones are eliminated experimentally - by step-by-step correction of parameters.
Necessarily! There should be a test surface for test spraying. It can be a sheet of cardboard or even a wall.
Airbrushing is characterized by some blurriness. If the drawing requires particularly detailed precision, this is achieved by drawing with oil paint and a thin brush. The disadvantage of oil is that it takes a long time to dry - up to two weeks or 4-5 days in a drying chamber at a temperature of 60 ° C.
A mixture of solvent (No. 646) and drops of vegetable oil added to the paint will help speed up the process. This technique will ensure quick drying within a day or two.
Important! When painting with oils, you should avoid using white; they dry longer than all other colors. Black colors dry the fastest.
- Infrared radiation and a drying chamber (with temperatures up to 60 °C), as well as low indoor humidity, help speed up the drying of alkyd enamels;
- Cool temperatures and high humidity slow down drying;
- if the painting work was carried out in a heated garage and was left to dry without heating, then at a temperature of +12 to +14 °C polymerization will not occur and the paint will remain sticky after a few days;
- The drying chamber can be equipped by making a small room and upholstering it from the inside with foil or tin. Heating occurs with an oil radiator;
- thickened toner can be “revitalized” with acetone;
- Some effects are possible using varnish to which a drop of toner has been added. Illuminated varnish looks beautiful on “night” scenes;
- interesting solutions are obtained from varnish and metallic;
- It is very difficult to obtain a high-quality extensive surface with chrome effect paint;
- The chameleon paint looks almost transparent. It should be applied to “your” color. If chameleon pink is applied to white, the result will be a barely noticeable shade. In this case, on a pink or red background the effect will be very noticeable.
Painting your car with auto enamel from a can is a bad idea. If only because the pressure can be anything, including very low. Considering that it is not adjustable, the result will be wasted money or large drops of paint on the element.
Source: https://autoot.ru/aerografiya-na-avtomobile-svoimi-rukami.html
DIY airbrush on a car step by step
Every car owner considers a car to be his reliable friend, and most cars outwardly do not stand out from the gray mass.
Of course, as an option, you can spend significant money and upgrade the car with wings, body kits and carbon fiber, but you can give preference to a cheaper, simpler and no less original method.
Airbrushing is considered an excellent way to breathe new life into a car and transform it beyond recognition.
Why do you need airbrush?
Airbrush design on the hood At first glance, the car will catch the eyes of passersby, regardless of who its owner is - a woman or a man, an athlete or a secretary, a romantic or a skeptic, a creative person or a strict pragmatist.
Do-it-yourself airbrushing on a car is the easiest way to decorate your car. Of course, you can give preference to a salon service and entrust the process to qualified specialists, but in this case the issue of finances will be decisive.
Do-it-yourself airbrushing is presented in the form of an artistic painting technique on any surface. Using this technique, you can create any drawings and effects that are often inaccessible to display using conventional art materials.
https://www.youtube.com/watch?v=CtllILoOzJI
This direction has long become relevant, because this is the only way to turn a car into a standard of individuality and originality, emphasizing the mood and character of the owner. If we perceive airbrushing as an art direction, but it is still too young and is just beginning to develop, more and more of its fans are appearing in society.
If you want to airbrush your car yourself, it's worth familiarizing yourself with the tools you might need.
Airbrush tools
- The drawing is often applied with an airbrush, in some cases with a brush or using a special pencil.
- Consumables include the necessary colors of nitro paints, solvent, and nitro varnish.
- In some cases, a chemical pencil, a knife, a respirator, several buckets, cotton swabs and cotton wool, a clean soft cloth and masking tape may be useful.
Airbrush selection basics
The main tool is an airbrush. Do-it-yourself aerography on a car involves the right choice of tools, and in particular an airbrush. To do this, you need to pay attention to the following parameters:
- The diameter of the paint nozzle is considered the most important parameter when choosing this tool.
In this case, it is worth taking into account the area that will need to be painted. An airbrush with a diameter of 0.35 mm is suitable for applying the background, and a tool with a diameter of 0.2 mm is suitable for applying the main details.
- The type of paint supply is selected depending on the location of the tank:
- Gravity feed. In this case, the tank is on top.
In this case, the paint is sprayed under the pressure of gravity and due to the vacuum in the nozzle. This type is relevant for compressors with low power.
- Siphon feed. In this case, the tank is placed on the side or bottom. Tools of this type make it possible to use wider potential when working with a slightly open needle.
The use of interchangeable tanks makes it easier to work with different colors. These types of airbrushes require more powerful compressors.
- Feed without tank. This type of tool involves applying paint with the tip of the brush directly to the needle using a special side slot.
This type of airbrush is ideal for frequently changing paint; it can also be used when working with small images.
- Gravity feed. In this case, the tank is on top.
- Particular attention should be paid to the type of trigger design.
- Single action airbrushes are lightweight and easy to use. They also have an attractive price.
The button in such devices only serves to control the air valve.
- A dual-action airbrush allows you to control the air supply more flexibly, and you can also change the position of the needle, which releases the flow of paint. This design is considered more complex, but most common among professional artists.
- Automatic airbrushes are equipped with a button with one degree of arching, thanks to which the needle can be controlled only after the air supply is directly opened.
- Single action airbrushes are lightweight and easy to use. They also have an attractive price.
If you are doing aerography yourself for the first time, it is recommended to give preference to any but not the cheapest double-action airbrush, the nozzle diameter of which is 0.2 mm. You can save money by purchasing sets with replacement nozzles. It is customary to change nozzles as they wear out. It is also worth purchasing additional accessories such as a hose, respirator, air filter, pressure limiter and stands.
A professional airbrush kit consists of an airbrush, a compressor, a hose, an airbrush stand that attaches to the table, and a respirator. It is advisable to first watch the DIY airbrush video or the step-by-step instructions given below.
Step-by-step instructions for drawing a picture
- First of all, you should choose a drawing or photograph based on your own taste preferences. The finished drawing on the car will be a source of pride if you do it yourself. It is worth remembering that the design you choose should be in harmony in size and color with the place where it will be applied.
As an example, you can view a photo of your own airbrush on the Internet.
- Decide on the location of the pattern on the car. This could be a door, a hood, or half of the entire surface of your car.
- Next, you need to examine the car for scratches and corrosion.
If such defects exist, they must be primed.
- Decide on a place to paint. The room should be closed and well lit, there should be no dust.
- Next comes the direct application of the design using nitro paints. This stage is considered the most responsible.
You can pre-prepare stencils if you are not confident in your artistic abilities. Apply the design in parts, carefully cover the unused surface of the machine with film.
- After the drawing is completed, wait until the surface is completely dry and coat the car with a special varnish.
As an option, you can give preference to another type of airbrush, when you use film with a drawing or photograph. This method is considered more common among amateurs; moreover, it does not require special skills in using a brush or creating drawings.
In this case, you need to prepare the car, remove all unnecessary elements and degrease the surface you will be working with. Next, the film with a photograph or design is carefully glued.
At the next stage, all removed elements must be attached in place. Applying a special coating will finally complete your work. The varnish will be able to protect the drawing from possible mechanical damage and make it deeper, clearer and richer. If you polish the surface of your car, it will become mirror-like and more refined.
Do-it-yourself airbrushing can become a wonderful hobby, with the help of which you will not only decorate the surface of your own car, but also make money by decorating cars, any other type of transport and the surfaces of household items.
Source: http://www.AvtoKrasim.ru/aerografiya-na-avtomobile-svoimi-rukami/
DIY airbrush at home
Car owners have recently begun to frequently use airbrushing - each of them dreams that his car will be special among the many vehicles. Airbrushing is the application of a design to a body using special paints using an airbrush.
Such work can be done not only by professional artists, but also by ordinary car enthusiasts. How to do airbrush with your own hands for beginners? You can use stencils. But to make images beautiful and vibrant, expensive tools are required.
Fortunately, you can get by with more affordable options...
What is airbrush
A modern airbrush has a simple design and is designed in such a way that during operation two streams are mixed: color and air. Because of this, they are divided into two types: devices with a single and double operating principle.
- Single operating principle . In these devices, the trigger is controlled only by air flow. The air mass, passing through certain holes, mixes with the paint. Mixing can be internal or external. A device with external mixing is suitable for applying a design to a car with your own hands. This is a simple model that can be used at home. Devices with internal paint mixing are more complex. In these airbrushes, you can adjust the feeding force and paint flow.
- Double operating principle . Airbrushes with a dual operating principle are professional equipment. They are used by professional artists in specialized salons. The drawing produced by such a device turns out incredibly realistic. Unlike previous options, in this case mixing of paint and air occurs when the air and needle valves open together. According to the method of regulating flows, models with a dual operating principle are divided into two types: dependent and independent. The flow and flow of paint depends on the air flow. The larger it is, the greater the paint consumption.
Multifunctional airbrushes will cost much more than simple models. If you purchase all the necessary elements from a specialized store, you can assemble such a device yourself in your garage. The cost of a homemade airbrush will be less.
Required Tools
How realistic the drawing will be depends on what kind of airbrush is used. The better the tool, the better the result.
- Airbrush . The device will be suitable for any type of paint, as long as the instructions supplied with it indicate that it is intended to work with aggressive substances. To accurately draw an image, it is necessary to apply thin lines, and for this the nozzle diameter should be 0.2-0.3 mm. Devices with a 0.5 mm nozzle paint only large parts of the pattern. With high-quality airbrushes, the supply of paint and air is regulated.
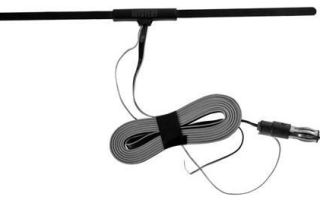
- Compressor . The quality of the image depends on the compressor. The membrane compressor is designed to decorate the machine with small designs and is capable of operating continuously for about 25 minutes. A compressed air cylinder is suitable for it. More professional models are oil and piston compressors. With their help, large and complex drawings are created. These compressors require the installation of oil filters.
- Hoses and oil trap . Spiral hoses are inconvenient to work with, so choose a smooth, lightweight option. The maximum length of the hose should be about 5 meters. An oil catcher installed between the hose and the airbrush will protect the surface of the drawing from excess drops of oil. In addition to its purpose, it performs an additional function - a hand rest.
It is important to know! The process of applying the varnish layer must be continuous. Therefore, the compressor must not be switched off during operation.
Dyes
Each paint has its own characteristics and cost. Accordingly, when choosing a coloring material, you need to take into account all the positive and negative qualities. The required tone for the work is selected by mixing paints in containers prepared in advance.
- Acrylic . Special acrylic mixtures are produced for airbrushing. They are diluted with water, so they are non-toxic. Pros: large selection of colors, excellent color rendition, if necessary, the top layer is easily washed off. Disadvantages: it is difficult to draw small elements due to the thick paint and its slow drying.
- Enamel . This is a good, quick-drying water-based paint. Pros: Cheap and non-toxic material. Cons: poor color rendering, loses color when mixed.
- Nitro paint . This includes synthetic, urethane and polyester substances. Pros: suitable for drawing small elements as it dries quickly. Cons: very toxic material, unstable when mixed, which is why it has low color rendering. Depending on the composition of the paint, a suitable solvent is selected.
It’s also useful to read: How to do airbrush on a car with your own hands
Need to know! Paint that is too thick will clog the airbrush nozzles. Therefore, it can ruin not only the drawing, but also the device itself.
How to make the device yourself
A homemade airbrush can be assembled from simple and cheap materials. This is a ballpoint pen, a syringe up to 20 cc. mm, wine cork, awl and knife, lighter, sandpaper, glass container, hot glue and a bright marker. The airbrush assembly is done as follows:
- You need to remove the tip from the ballpoint pen. We carefully clean the rod from the coloring paste using warm water, solvent and alcohol liquid. After this it will become completely clean.
- Then we prepare a medical syringe. Using a lighter, gently soften the tip of the syringe so that the plastic does not drip. We expand the heated spout with an awl. The width of the spout should be such that the refill of a ballpoint pen fits into it.
- Cut a small hole in the bottle cap. The hole depth should be about 15 mm. Its walls, vertically and horizontally, should create a right angle. You will get a recess 1.5 cm high and 2 cm wide.
- Make marks on the cork with a colored marker. Use a utility knife to cut out all unnecessary parts (that are not used). The height of the cork is reduced to such an extent that there is a distance of 1 cm between the recess and the horizontal edge. In the remaining part of the cork, two through holes are made with an awl and then with a drill. The rod from the handle will pass through the vertical hole, and its body through the horizontal one.
- Using sandpaper, rub the narrow part of the ballpoint pen body until the hole diameter is 3 mm. Then we insert the body into the horizontal hole of the plug so that the tip protrudes slightly from it. We insert the rod into the vertical hole, bringing it to the upper end of the ballpoint pen body. The main working unit of the airbrush is ready.
- All that remains is to adjust the length of the rod. Its length should correspond to the height of the paint bottle. The rod must not reach the bottom of the bottle. If necessary, the rod is trimmed.
- A hole is made in the cap of the paint bottle corresponding to the diameter of the rod. The rod is inserted into the lid and fixed with hot glue. With it, the connection will become completely sealed.
The airbrush is completely ready to go!
Drawing
Do-it-yourself airbrushing on a car is a very exciting and exciting job. But it requires a lot of time and effort. In order for the final result to be justified, clear step-by-step actions should be followed.
- Selecting a picture. The pattern is selected according to the personal preferences of the car owner. But do not forget that the make of the car and the image on it must completely correspond to each other.
- Choosing a location. Choose a place where the drawing will be clearly visible and will not get lost against the general background. If the image is complex, then the part on which it is applied is removed.
- Safety. The room where the work will take place should not be draft-free, it should have good lighting and be clean. When working with paints, be sure to use protective equipment.
- Body preparation. The design is not applied to mirrors, headlights and door handles, so they are removed. Using a fine abrasive, remove the varnish from the surface of the body (the surface should become matte). If there are cracks or scratches on it, they are eliminated using putty and primer.
- Working with images. Before applying the design, the unused part of the body is covered with film and sealed with masking tape. And the working surface is treated with a degreaser and thoroughly dried.
- Fixation. The finished image is coated with one or more layers of varnish after it is completely dry. An additional layer can be used to cover not only the drawing, but the entire car.
Operating technique
How to airbrush a car if you have never used an airbrush? First, try drawing something on a separate sheet of metal. First, they learn to draw horizontal lines and only then draw curved stripes and circles. After a little practice, you can move on to the car. The drawing technique includes three rules:
- The thickness of the lines depends on the distance at which the airbrush nozzle will be located from the working surface. The further the nozzle is from the surface, the thicker the line.
- If the paint scatters and takes up a lot of space, it means it is applied at an angle, which is incorrect. Directing the paint stream perpendicular to the work area will eliminate this problem.
- The density and brightness of the lines depends on the time the device is held above the work area. For example, the line will be bright and dense if you bring the nozzle closer to the surface and hold it a little. A dull speckled spot is formed if the airbrush is moved away to a distance of up to 40 cm.
To avoid drips and light spots, move your hand with the airbrush smoothly. You should not make sudden movements or stop in one place for a long time. When creating an image, light shades are applied first, and only then the rest.
For newbies
If you don't have artistic skills and don't know how to airbrush a car, you can use vinyl stickers or stencils.
- Vinyl stickers . To glue the vinyl film, you need to thoroughly wash the car and thoroughly degrease the surface. All parts protruding from the surface are removed. Fill a spray bottle with soapy water and wet the areas of the car where the film will be applied. The glued film is carefully smoothed and heated with a construction hairdryer. This will help soften it. The car cannot be washed for 10 days.
- Stencils . Professional artists rarely use stencils for their work. But there are some types of drawings where you can’t do without them. Often images made using templates have to be supplemented. Additionally, highlights, shadows and other details are added.
DIY stencil
A disposable or reusable stencil can be purchased in a store or made by yourself.
- The template is made from high-density paper, screen film or oilcloth.
- On the Internet you can select any drawing you like, print it on a printer and transfer it to paper. Then carefully cut out using a sharp knife.
- The stencil is tightly applied to the surface of the car and secured. This is necessary so that the paint does not flow under the pattern.
- To avoid smudges while applying paint, do not move the nozzle too close.
- Shadows and highlights are added as needed.
Care instructions
If you follow the basic recommendations for caring for airbrushing, the image on your car will always look like new.
- To ensure that after washing the car there are no scratches left on the drawing, you need to use special car shampoos and soft rags. After rain or moisture, the area with the image must be thoroughly wiped, otherwise water will damage it.
- If drops of oil or gasoline get on the drawing, you need to wash them off immediately.
- Avoid mechanical damage.
In order to rinse the airbrush as thoroughly as possible from the remaining paint, you need to learn how to quickly disassemble and reassemble it. After finishing the work, wash the nozzles and other elements of the device thoroughly. Otherwise, the dried dye will completely ruin it.
Anyone can do airbrushing - just practice on foreign objects or undergo training. In addition, airbrushing is not only a beautiful activity, but also a profitable business.
Source: http://sam-avtomalyar.ru/aerograf-svoimi-rukami-v-domashnix-usloviyax/
How to make a high-quality airbrush with your own hands for applying drawings to a car. Schemes and methods for assembling homemade airbrushes with visual photos and drawings
Today we will talk about how to make a high-quality airbrush with your own hands for applying drawings to a car.
We will also consider diagrams and methods for assembling homemade airbrushes with visual photographs and drawings. On sale you can find both professional expensive models of airbrushes from well-known manufacturers, as well as cheaper models for performing simple work.
But you can make a simple airbrush with your own hands, which will allow you to significantly save money and get a pretty good tool for doing simple work.
The father of modern airbrushing can be considered Abner Peeler, a jeweler from Iowa (USA).
In 1879, using a spoon, a sewing machine needle, a bent screwdriver, old blowpipes and bent metal, he assembled the first airbrush by twisting it all together on several wooden blocks.
Pairing it with his own patented hand-held air compressor, he called the device a "paint dispenser" for watercolor painting and other artistic purposes.
In April 1882, Charles and Liberty Walkup bought the rights to this invention for $700 and invested another $150 in two new prototypes. By August they had sold 63 "paint spreaders" to the Indianapolis Photographic Convention. In 1884, the Airbrush Manufacturing Company of Rockford was incorporated, and the real growth of the business began, spreading throughout the world.
In 1884, a new Phoebe Walkup design was demonstrated at the New Orleans International Exposition. The huge success of this model became a good springboard for the company. Small classes were opened to teach people how to use the new artistic tool. However, the demand was so great that in 1888 the "Illinois State School of Art" was opened to accommodate all interested students.
However, it must be said that most books on airbrushing, where historical references are given, give a different date for the appearance of airbrush. In 1893, at the Chicago World's Fair, Thayer and Chandler tried to challenge Walkup's rights to the name "Airbrush". In truth, it should be noted that their design was more reminiscent of modern airbrushes.
Developer Charles Burdick began his experiments by modifying the existing airbrush design, intending to make it lighter and more pen-like. It is believed that it was Charles Burdick who, in 1893, registered the first patent for an airbrush device similar to the one used today.
By type of flow mixing (air and color):
· External mixing. This is the simplest tool. It is designed for painting large surfaces. This could be a homemade tool made from an old vacuum cleaner or even an ordinary ballpoint pen.
· Internal mixing. In this case, the mixing of flows occurs directly inside the housing, which is presented in the form of a spray head.
By type of control:
· Single action. In this case, the tool is controlled either through the air or through the ink channel. The airbrush, which is controlled via an air channel, is rightfully considered the most economical in this group.
· Double action. Management here occurs through both channels. In this group, there are two more subtypes: dependent action (automatic) and independent action (manual).
Training video:
· Independent action. This is a mechanical model, the process of working with which is completely controlled. By type of paint supply and location of the paint container: · With top enamel liner. · With enamel bottom liner. · With a side-mounted paint container. · With paint under pressure.
How to make an airbrush with your own hands.
Many people are interested in the question: “Is it possible to assemble an airbrush yourself at home?” Making a homemade airbrush is quite simple, and its production will not require any material costs and will not take much free time.
In order to make a simple airbrush yourself at home, you will need only three things: · a ballpoint pen;
· wine cork;
· a small empty glass container in which the paint will be placed. Preparing the pen for further work First of all, you need to disassemble the pen, remove the rod from it and blow out all the paste from it.
In order not to blow out the paste yourself, prepare a syringe in advance, warm up the nose of the syringe with a lighter and flare (expand) it with a regular skewer.
It is advisable to rinse the paste with alcohol, but you can also use water. Make sure that the rod is completely clean after rinsing.
Preparing the cork
You need to cut a small corner out of the cork. To make it more clear what we are talking about now, please pay attention to the diagram. After this, we assemble the airbrush ourselves according to the drawings. After the tool is assembled, we check its operation. Pour paint into the bottle and blow. So, the paint is sprayed onto any surface that needs to be painted. Spray adjustment is carried out by moving the rod and handle body, and also largely depends on air pressure, that is, on the force with which you blow.
With this homemade airbrush model you can easily paint any parts during repairs or during their restoration.
The quality of work of such a homemade airbrush will directly depend on the tightness of the handle body, plug and rod. How to make an airbrush that will have a long service life. To significantly increase the service life of a homemade airbrush, it is advisable to replace the ballpoint pen with a higher quality material, for example, copper tubes.
This airbrush is light in weight, quite easy to use, and most importantly, it allows you to evenly and efficiently distribute the coloring composition over the entire surface to be painted in an even and homogeneous layer.
So we will try to create the simplest and cheapest airbrush (and if we also have one that works, it will be good, of course). To implement a simple plan, we need: 1. A ballpoint pen (preferably with an empty refill); 2. A small piece of plastic; 3.Needle; 4.Glue + solvent (any).
5. Pump (preferably foot pump) + hose from the pump.
This begs a simple, logical question: “So what, you can make an airbrush out of these things, and even make money from it?” The answer will be just as logical - yes! After all, it doesn’t matter at all what you work on; rather, the result of your work is more important.
Naturally, having studied this lesson to the end, and even creating your own airbrush, you will not become the most famous and successful in this field.
But after reading a few more lessons on the topic of creating and running a business, as well as putting these articles together in your head, you will be able to make money on what is called Airbrush (everything will be very good if you organize several friends with artistic inclinations to help you).
But let's get back to our airbrushes, comrades!
So, having the necessary parts at hand, we begin to create an airbrush. We take the handle and remove the rod from it. We take out the metal head with the ball from the rod. If the refill contains ink, then after removing the head, you need to clean the ink from the refill.
To do this, blow into the rod until all the ink flows out, then clean the rod with solvent. Next, you need to remove the ball from the metal head using a needle.
After removal, the metal head must be washed with solvent and inserted back into the rod;
Next, we cut out two strips from a piece of plastic, approximately 15 mm wide and a couple of centimeters long. We glue these strips together strictly at an angle of 90 degrees and drill a hole in one of them for the rod, and in the other, a hole for the body of the handle. All holes must be on the axis of symmetry;
Now we insert the rod into one hole and the handle body into the other. By moving them, we ensure that the end of the rod slightly overlaps the hole in the handle body. What should happen is shown in the figure.
Don’t forget that you should also have a container for paint (for example, a hand-friendly jar with a lid). And for greater convenience, you can make something like a paint supply valve. To do this, you need to drill a hole with a diameter of about 3 mm in the handle body. When you close the hole with your finger, the air will flow as expected - through the nozzle, a vacuum will be created at the end of the rod, and the paint, rising along the rod, will splash. If you remove your finger from the hole, then all the air will pass through it and no splashing will occur.
As an improvement, you can choose a handle made of plastic, which is not dissolved by solvent, otherwise, the body of the handle will have to be changed periodically.
But the most important thing in all this is that, with a little extra thinking, you can improve your airbrush! And even this primitive drawing shows how to do this. That's all there is to the creation of an airbrush. In the next lesson, we’ll talk about what can be painted (naturally, we’ll talk from the point of view of money and business. Craftsmen offer different ways to assemble airbrushes. Below are 2 ways to make this tool with your own hands. You can make a simple airbrush using a regular ballpoint pen.
Such a spray gun allows you to apply a fairly high-quality coating, and sometimes you simply cannot do without such a tool.
To make it you will need: · a ballpoint pen with an empty refill; · piece of plastic; · needle; · glue;
· any solvent.
Stages of assembling an airbrush: To assemble an airbrush, it is better to choose a plastic handle that will not be dissolved by solvent. Otherwise, the housing will need to be changed. Remove the rod from the pen.
Pull the metal tip out of the rod. If the pen is full of ink, remove it by blowing into it and then rinse with solvent. Remove the ball from the metal tip using a needle. Rinse the tip with solvent and insert into the rod.
1. Cut 2 strips of plastic, 20 mm long and 15 mm wide. Glue them together at a 90° angle and drill a hole for the rod in one of them and a hole for the handle body in the other. Holes must be drilled along the axis of symmetry. 2. Insert the shaft and handle body into the corresponding holes. As you move these strips, make sure the end of the rod slightly overlaps the hole in the handle. In Fig. 1 you can see what it should look like.
To start painting, you need to dip the end of the rod into the liquid paint and blow into the opposite end of the handle.
This is the easiest coloring method. But you can improve the airbrush from a pen by connecting a compressor with a receiver to it. You can also make this equipment yourself, for example, using a compressor from an old refrigerator. If you use a compressor when painting, you can make a primitive paint supply valve in a homemade airbrush. You need to drill a hole in the handle, the diameter of which is 3 mm. By closing and opening the hole with your finger, you will regulate the air supply. When closing the hole, air will flow through the nozzle and paint will be sprayed. When the hole is opened, air will escape through it and paint will not spray.
There is another way to make an airbrush from scrap materials. Such a tool will cost you at least 65% less than a branded one.
To make it you will need: · a copper rod with an outer diameter of 3/32 inches and a length of 0.5 inches; · copper rod, internal diameter of which is 3.32 inches, length is 1 inch; · one-piece pneumatic tube, the length of which is 3/4 inch; · hose fitting, the thread of which is 1.8 inches; · fitting with internal thread; · union with external thread; · tee; · copper tube, the internal diameter of which is 3/32 inches, the length is 0.5 inches; · plastic jar or container; · lid for the jar; · copper tube, the internal diameter of which is 1/8 inch and the length is 3 inches; · a pneumatic tube having an internal diameter of 1/8 inch and a length of 3.5 inches; · 90° angle valve;
· tee.
1 inch = 2.54 cm. The serial numbers of the parts coincide with the part numbers in Fig. 2, so strictly adhere to the diagram when assembling the tool. Assembly Recommendations: To modify this airbrush, you need to purchase 2 more pneumatic tubes, 4 and 4.5 inches long. Heat the middle of part #3 evenly, pull it out and cut it. Insert these two pneumatic tubes into it. 1. Similarly, heat part number 12 and bend it at an angle of 135°. 2. Before assembling the airbrush, wrap all joints with Teflon tape. 3. Connect parts No. 8 and No. 9 at the end of the airbrush assembly. In part No. 9, make a hole that will fit perfectly under parts No. 8 and No. 12.
For an airbrush assembled using the second method, you will definitely need a compressor, which you can also make yourself. To do this, you can use a working compressor from an old refrigerator. A compressor from an imported refrigerator is best suited for this, since such compressors are more economical than domestic ones and make less noise.
The instructions below will allow you to assemble a compressor with a receiver and a pressure switch. At the same time, you will not have to resort to turning and welding, and you will be able to reduce your financial costs as much as possible. Recommendations for assembling the compressor with the receiver: 1. Carefully remove the compressor from the refrigerator. However, do not bite or cut the tubes to avoid metal shavings getting into the compressor. Remove the relay. 2. In Fig. Figure 3 shows a diagram of the assembly of a compressor with a receiver. Using it as a guide, connect the parts. 3. Before assembly, change the oil in the compressor. To do this, you need to unsolder the tube, drain the used oil and fill in new oil. After this, the tube must be sealed with sealant. 4. Bolt the compressor, receiver tank and start relay to the plywood. 5. According to the diagram in Fig. 4 connect all components, hoses, filters, moisture-oil separator. One filter must be installed on the inlet pipe, the other between the compressor and the receiver. At the inlet, install a check valve and next to it - a switching relay. 6. Treat all joints with silicone sealant. What you will need to assemble a compressor with a receiver: · compressor from a refrigerator; · capacity for the receiver (for example, a 24-liter water pump accumulator); · emergency valve with pressure gauge; · check valve installed at the receiver inlet; · pressure switch RDM-5 with a pressure limit of 2.8 bar; · various adapters and fittings for connecting parts; · clamps; · hoses; · silicone sealant; · 2 fuel filters; · moisture-oil separator with output pressure reducer; · plywood;
· bolts.
Source: http://remontavto-moto-velo.blogspot.com/2016/09/blog-post_30.html