Is it possible to tint headlights, how to glue film or tint with varnish
One of the most popular and affordable types of external car tuning is headlight tinting.
Today, some manufacturers produce headlight sets that are tinted at the factory, but such offers are not available for every make and model of car.
Another disadvantage is that tinting headlights at a service center is expensive. However, you can do the tinting yourself, and you can use both film and varnish.
Headlight tinting is the process of applying a special varnish or film to the headlights of a car in order to improve the visual appearance of the car.
Headlight tinting is purely decorative
By and large, headlight tinting is purely decorative. However, when using a special tint film, the car owner can protect the headlights from various types of mechanical damage (chips, cracks, scratches).
The benefits of tinting include:
- giving the car a more original and stylish appearance;
- the ability to make your car stand out in city traffic;
- protection of headlights from mechanical damage.
But it is worth remembering that incorrectly performed tinting can negatively affect the vehicle’s identification on the road, reduce the level of light emission, and also lead to an accident, which can result in death for both the culprit and other road users.
According to Russian legislation, when tinting headlights, it is allowed to use only white, yellow and orange colors, while it is possible to tint reflective devices in various shades, with the exception of white.
Lighting devices located at the rear of the vehicle are prohibited from being tinted (except for white), while reflective elements can only be red.
Based on this, we can conclude that the driver has the right to lightly tint the front and rear lighting fixtures, provided that the color of the glow and the light transmittance of the headlights are preserved.
In case of non-compliance, the driver risks receiving a fine, which for individuals is equivalent to 3 thousand rubles if the front headlights are tinted incorrectly, and 500 rubles if the rear lights are tinted.
But it is worth noting that cases of receiving fines for tinting rear lights are extremely rare.
Toning methods. Advantages and disadvantages of each of them
The most common methods of tinting headlights are:
- tinting headlights with varnish (or special paint); One way to tint headlights is with varnish
- tinting with a special tinting film.
Each of the presented methods has a number of advantages and disadvantages that must be taken into account before embarking on the process of tinting your headlights yourself.
How to varnish (paint)
Advantages:
- low cost;
- decent appearance.
Flaws:
- the need to completely dismantle the headlights; When tinting the headlights with varnish, it is necessary to dismantle them
- difficulty in applying paint/varnish evenly;
- reduction in the light transmittance of headlights; Headlights tinted with varnish have a reduced ability to transmit light
- difficulty in removing paint/varnish without damaging the headlight housing;
- vulnerable to UV rays, temperature changes and precipitation.
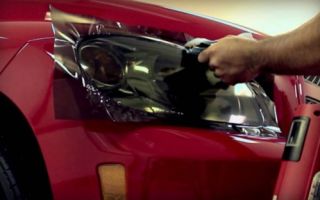
Film tinting
Advantages:
- if necessary, the film can be easily and quickly dismantled; Tinting headlights with film does not affect their light transmittance
- protects against mechanical damage (chips, scratches, cracks);
- does not affect light transmittance;
- there is no need to dismantle the headlights before application;
- Possibility of polishing, which significantly extends the service life of the film.
Flaws:
- high complexity of work;
- high cost of film.
Based on the above-described advantages and disadvantages, we can conclude that it is preferable to tint headlights using a special tinting film, which will not only save you from unnecessary problems with traffic police representatives, but will also last an order of magnitude longer.
How to tint headlights
To tint headlights using paint or varnish, the car owner must acquire the following equipment:
- cleaning solution;
- a can of specialized paint or varnish;
- sander with polishing attachment.
The process of tinting with varnish or paint includes:
- Dismantling the lighting fixture. You need to remove the headlights very carefully so as not to damage the housing and wiring.
- Cleaning and degreasing the surface, for which you can use a regular detergent. After cleaning, the headlights must be thoroughly dried.
- Application of varnish/paint. It is recommended to spray paint from a distance of 0.25–0.30 m from the surface. It is important to remember that the paint/varnish should be applied in a thin layer, and after applying each layer you must wait until the previous one has completely dried. Usually two or three layers are enough.
- Polishing the headlight, for which it is preferable to use a grinder with a special polishing attachment.
- Installation of headlights on a car.
When choosing to tint headlights using tinting film, you will need a set of the following tools:
- film for tinting;
- detergent;
- spray;
- hair dryer;
- squeegee;
- knife or scissors.
The process of covering headlights with film consists of the following steps:
- We clean and degrease the surface of the headlight, after which it must be wiped dry.
- We apply a tint film to the headlight, make notes, and then cut out the blank to the shape of the headlight.
- We spray the surface of the headlight and film with water using a household spray bottle and begin gluing the previously cut piece.
Apply the film to the surface of the headlight
- We apply the film to the surface of the headlight, simultaneously heating it with a hairdryer, which allows the film to lay down in a more even layer. Armed with a squeegee, we remove air bubbles.
The aligned film lies on the headlight in an even layer
- After the surface is leveled, we wrap the edges of the tint film behind the front part of the headlight and remove excess material using a utility knife.
It is important to note that in the case of tinting headlights with film, the car owner is freed from the need to dismantle them - this saves not only his time, but also his nerves.
Tinting headlights is one of the easiest and most affordable ways to transform the appearance of your car.
You can carry out tinting either on your own or by turning to specialized tuning studios for help, where specialists can not only offer a large selection of tinting material, but also issue a certificate of compliance of the light transmittance of headlights after tuning with the current legislation of the Russian Federation.
Source: http://motorltd.ru/kak-zatonirovat-faryi-plyonkoy-ili-lakom/
How to tint headlights with your own hands
Headlight tinting is a very common type of external tuning. These headlights look very stylish, noticeable, distinguishing your car from the flow of other cars, thereby emphasizing your individuality.
Tinted rear lights
But it often happens that when wanting to purchase new tuning headlights, many car enthusiasts are faced with a problem: headlights of a new design cannot be found for every car model.
There is another side to the issue: some of us are not satisfied with the price of tuning headlights. There is no need to be upset about these reasons. If you have the desire, hands and necessary knowledge, you can tint the headlights yourself.
Tinting headlights does not require large material and time costs or special skills.
So, in this article we will look at:
- Is it legal to tint your headlights yourself?
- methods of tinting headlights, advantages and disadvantages;
- how to tint headlights with your own hands.
Will I have problems with the traffic police?
You definitely won’t have problems with the traffic police if you install factory-tinted headlights that have passed special certification.
As for tinting yourself, be prepared for the fact that there is no clear answer to the question of whether such headlight tinting is legal. The wording in the law is quite vague. Many car owners complain about problems when passing inspection.
Know that there is a more favorable attitude towards tinting with film, since it, compared to paint, transmits more light and covers the headlight uniformly.
Possible problems with traffic policemen
Do not overuse tinting, as overly darkened headlights greatly increase the risk of an accident. Therefore, the brightness must definitely be at the proper level. You won't be able to tint your headlights without some damage to brightness, but try to minimize the damage. And further. Don't experiment with exotic flowers. It is better to use green, purple and other delights in other areas of life.
Ways to tint headlights. Advantages and disadvantages
The most common methods of tinting headlights are: varnish (paint) or film. Let's consider their advantages and disadvantages.
Choose a headlight tinting method
Advantages and disadvantages of tinting headlights with varnish (paint):
PROS:
- Cheap. But angrily! Because the disadvantages are significant.
MINUSES:
- when tinting with varnish, it is better to dismantle the headlights;
- paint (varnish) is difficult to apply evenly;
- varnish transmits less light;
- If it is necessary to remove paint from the headlight, it will not be possible to do this without damaging it. Any solvent can cloud the optics;
- paint is destroyed by ultraviolet radiation, temperature changes and precipitation.
Advantages and disadvantages of tinting headlights with film.
PROS:
- you can restore the pre-styling look at any time;
- The film performs not only a decorative function. It protects headlights from scratches and clouding;
- good light transmittance (due to uniform transmission of light);
- perfectly flat surface;
- high-quality film can be polished if necessary.
MINUSES:
DIY headlight tinting. Where to begin?
First, decide on the tinting method. We have already considered the advantages and disadvantages of each of them. Determine what your priorities are and make your choice. If you decide to tint with film, study manufacturer reviews and film characteristics.
Choose a color that goes well with the body. Today there is a large selection of flowers of varying quality from different manufacturers. Main performance characteristics: stretch percentage, thickness, light transmittance.
Decide what kind of design you want. On the headlights, for example, you can not do a full tint, but only tint the “eyelashes”. You can combine a couple of colors.
Video about tinting car headlights:
What paint is suitable? Aerosol will steal a lot of light. Therefore, choose a special tinting varnish. The price of a can of high-quality varnish is high, but one piece will be enough for you.
Tinting headlights with varnish
Before tinting the headlights with varnish, it is better to dismantle them. The varnish will lie more neatly on a horizontally lying headlight, without drips. Carry out dismantling carefully so as not to damage the wiring and optics of the headlight. Think in advance whether you can install the headlight back?
Cover all areas where you don't want the varnish to come into contact. Before applying varnish, the surface of the headlight must be degreased and cleaned. This is done with a special product or alcohol. Let it dry.
It is advisable to carry out painting outdoors, but the humidity should not be increased. It’s better to wait out a damp, cloudy day.
Shake the can well before spraying. Apply paint in a thin, even layer. Hold the can at a distance of 30 cm from the glass surface. If you keep the can near a heat source (such as a radiator), the toner will atomize better.
Apply the first coat and let it dry well. Be careful not to get any debris or smudges on the headlight. Keep solvent nearby just in case.
After the first layer has dried, apply a second one or several at a time to achieve the desired effect. Each layer must be dried. Remember the light transmittance standards and do not overdo it.
Headlights tinted with varnish
Do not rush to put the headlights in place, otherwise the paint may dry unevenly. After drying, the paint may become dull. It needs to be polished to a shine, leveling the surface.
If you do not have such skills, practice on simple glass first.
Film tinting
Pre-clean the headlight and degrease it as described above. You can tint the film directly on the car. Cut the film with an allowance. Wet the headlight, apply the film and gradually stick the film to the glass. Make sure there are no air folds left anywhere. The movement must begin from the center to the edges. It is more convenient to expel the air with a squeegee.
Film for tinting headlights
On a flat surface everything is simple. In places where the surface has a bend, warm the film a little with a hairdryer, for elasticity, stretch it a little and roll the film with a squeegee. Tape the edges well and trim off excess pieces of film.
If you liked the article or have any questions, write everything in the comments to the article.
Have a beautiful and stylish car!
Source: http://AvtoMotoSpec.ru/tyunning-avtomobilej/tonirovka-far-svoimi-rukami-eto-prosto.html
Tinting headlights with film: application technology, pros and cons, punishment
Film tinting of headlights is a great way to give your car an original look. On the road, such cars always stand out among other vehicles. They look more attractive against the background of representatives of the classic style lineup. The application procedure is simple, so you can do it yourself.
Why do you need tint?
Typically, headlight tinting with film is done to improve the aesthetic characteristics of a car. Changing the color of the lighting fixtures allows the car to stand out among other cars and emphasize the originality of the exterior.
In addition, the tint film for headlights performs protective functions. It can protect the surface of lighting fixtures from the following damage:
- scratches;
- chips;
- microcracks;
- cloudiness.
Under the influence of ultraviolet rays and after exposure to small pebbles, sand, dust and dirt, glass loses its light transmittance over time, and the film helps maintain its condition.
Film for tinting headlights is available in a wide range on the market. It may differ in the following characteristics:
- color;
- thick;
- transparency.
Advantages and disadvantages
Tinting rear or headlights with film has a number of advantages:
- Easy to do. You can do the procedure yourself without spending money on the services of a specialist.
- Cleans up easily. This is especially true in proceedings with traffic police officers.
- The film is available in different colors. It is not difficult to choose a material to match the color of the car.
- Does not wear off during use. Retains aesthetic characteristics for a long time.
- Performs a protective function. Prevents scratches and chips on lighting fixtures.
- Forms a smooth surface. Provides uniform light dispersion.
The disadvantages include the higher cost compared to applying tinted varnish. In addition, tuning is noticeable only when the lighting is on, that is, on a sunny day the car will not stand out much among other cars.
How to tint headlights with film yourself: detailed instructions
If you don’t know how to tint your headlights with film yourself, check out the step-by-step instructions below. First, prepare the materials and tools that you will need during the work process:
- film for tinting headlights;
- water;
- degreaser;
- napkins;
- stationery knife;
- squeegee.
Do-it-yourself headlight tinting with film is performed in the following sequence:
- Prepare the film. Cut the blank according to the dimensions of the lighting fixtures. Cut off the material with a margin and remove the excess at the end.
- Prepare the surface of the lighting fixtures. First, wash them from dirt with water, then degrease them with a special product and wipe dry with a napkin or soft cloth. For degreasing, you can also use wipes impregnated with a special composition.
- Wet the prepared surface with water. It is better to use a spray bottle for these purposes, but if you don’t have one, a clean rag will do.
- Remove the protective layer from the film and apply it to the surface of the lighting fixture.
- Straighten the material with a squeegee. Using a fairly strong pressing force, smooth the film from the center to the edges so that small air bubbles come out.
- Trim off any remaining material. Use a sharp utility knife for this.
The technology for tinting the front and rear headlights is no different.
Passing MOT and possible punishment
Car owners who want to do tuning often think about whether it is possible to tint their headlights with film. It is impossible to answer this question unequivocally, the point is not spelled out in the Code of Administrative Offences, but still the owner of the car can be punished. Each case is considered separately.
Difficulties may arise when passing a technical inspection. On the one hand, the law does not punish tinting headlights, but on the other hand, lighting devices must meet a number of requirements specified in GOST.
During maintenance, they are necessarily checked for light transmittance, mechanical damage, size compliance, presence of foreign elements and other parameters.
If the light transmittance of the headlights is below 85% due to the film, you will not be able to pass the MOT.
If the headlights are tinted with film, the fine can vary within several thousand rubles.
Punishment is imposed only in cases where the light transmission capacity is greatly reduced and the car can create an emergency situation on the road.
Such cars are classified as faulty or those whose operation is prohibited. According to the Code of Administrative Violations, fines are imposed in the following amounts:
- 3000 rubles for individuals;
- up to 20,000 rubles for officials responsible for operating the vehicle;
- up to 500,000 rubles for legal entities.
For driving a car with tinting, the driver can be fined 500 rubles if the lighting devices do not transmit enough color. If the color red is used on the headlights, the driver may be disqualified from 6 to 12 months.
For tinting rear headlights with film, the fine does not exceed 500 rubles, but in practice it is usually not charged.
And although the law does not provide for punishment for tinting lighting fixtures, it is worth assessing all the risks before applying it.
If you want to protect lighting devices from damage, you should choose transparent film.
If the main goal is tuning, you should pay attention to the choice of material and refuse to purchase a dark-colored option, which significantly impairs the passage of light.
Source: https://oplenke.ru/tonirovka-far-plenkoj/
Is it possible to tint rear and front headlights and how to tint them yourself, working with varnish or film + video tips
Tinting your headlights is one of the ways to make your car stylish and unique.
The possibility of auto tuning through tinting is widespread due to its accessibility, since modifying headlights does not require large financial and time expenditures.
When planning to tint your optics, it is important to take into account many nuances so that you can avoid problems when the vehicle is stopped by traffic police officers.
Why do you need headlight tinting?
Headlight tinting is part of standard tuning. Tinted optics allow you to transform the appearance of the car. With proper selection of tinting shade, the headlights are better combined with the body and other elements.
In addition to changing the appearance of headlights, tinting increases the standard strength of glass or plastic. Additional protection extends the life of the lighting elements and prevents damage from flying stones.
A car with tinted headlights takes on a unique look. But is it really that simple?
Standards for tinting lighting fixtures: can it be done and how?
The legality of tinting the optical devices of a car is regulated by the Code of Administrative Offenses of the Russian Federation. At the same time, the code does not have a clear interpretation of the ban on changing the appearance of headlights. The vagueness of the concept of tinting leads to the fact that each situation is considered individually.
An administrative fine for tinting headlights can be issued on the basis of articles of the Code of Administrative Offenses 12.4 clause 1 and 12.5 clause 3. The first case refers to the use of red headlights. The fine for individuals for this violation is 3 thousand rubles. According to Article 12.5 paragraph.
3, a car owner may be deprived of a driver’s license for a period of 6–12 months when installing front lighting devices whose operating mode and color do not comply with GOST. The standard states that low and high beams can only be white. Therefore, color film that changes the color of the light beam is not suitable.
It is allowed to glue either white (transparent or yellow) film to fog lights.
According to established safety standards, the tint film should absorb no more than 15% of the brightness of light radiation
The fine for tinting rear headlights, including stop lights, is issued in accordance with paragraph 1 of Art. 12.5. The driver can receive a fine of 500 rubles if defects are discovered or there is no permission to operate the car due to tinting of the rear optics with a subsequent decrease in light transmission.
What material to choose for proper tinting
Changing the color of headlights using tinting film is the best option, since the material transmits more light and covers the surface uniformly. By choosing the right film color, you can not only influence the appearance of the optics, but also avoid problems with traffic police officers. Common types of headlight film are the following:
- Matte - suitable for cars whose body is also covered with matte material.
- Glossy - ensures the unity of the headlights and the body, protects the surface of the optics from abrasions, chips and scratches.
- Chameleon - shimmers when the headlights are turned on and is characterized by increased light transmittance.
- Metallized - has a charcoal tint, reflects up to 50% of infrared radiation and is completely protected from fading.
Well-known brands of car tint films include LLumar, SunTek, Sun Control and Oracal. Films produced under the listed brands have proven themselves to be of good quality and long service life, so if there are no strict budget restrictions, they are worth choosing.
The variety of colors is amazing, but not all films have suitable light transmittance
Necessary tools for DIY work
To tint your car headlights yourself, you need to prepare the appropriate set of tools and consumables. Including:
- film or varnish;
- soap solution;
- hair dryer;
- squeegee for smoothing the film;
- sprayer or atomizer;
- marker;
- stationery knife/scissors.
How to tint headlights with film or varnish
The process of tinting car optics involves performing several simple steps. When using film, headlight tinting is performed as follows:
- Remove and clean the headlights from dirt, wipe them with a degreaser. Then wipe the surface dry.
Remove the headlights
- Place the film against the optics and mark the contour boundaries with a felt-tip pen to make a blank of the appropriate size.
Cover the headlight with film
- Using a spray bottle, apply a soap solution to the surface of the headlight and the back of the film.
The tinting solution is prepared as follows: 5 drops of product (fairy, shampoo and similar) per 1.5 liters of water
- Apply the tint to the headlight and heat it evenly with a hairdryer over the entire area.
A household hair dryer will not work, but don’t go overboard with a construction hair dryer either!
- Having obtained a smooth surface covered with film, tuck the edges and glue them to the headlight. Cut off the excess material with scissors and secure the headlight in its original place.
Make sure that no small particles get under the film during gluing.
Using the instructions described above, you can also tint the rear lights. The only difference is that the rear optics can not be dismantled for gluing the film.
When using tinting varnish, you must adhere to the following instructions:
- Remove and clean the headlights, then place them on a flat surface and cover with thick material those areas where the varnish should not come into contact.
Sometimes the headlights are not removed, protecting the surface around them with a film, but then the work will look less neat
- Shake the can of varnish and apply a thin layer of it to the surface of the headlight from a distance of about 25–30 cm. A professional spray gun is used in the photo.
Without painting skills, you can easily get drips after painting
- After applying the base coat, allow the headlight to dry completely. Then apply another 2-3 layers and after the optics have dried, install it back.
Protected areas were left unpainted. Thus, the headlights changed color and the traffic regulations were complied with
How to tint the rear ones red: the fastest way on video
How to make stickers on the front (video)
Finished works in the photo (options for Chevrolet Cruze, VAZ and others)
Idea for VAZ Chameleon film Example for Chevrolet Cruze Option for Subaru Tuning method for Mazda
Common problems with tinting work
Even if you follow the instructions for working with tinting materials, car owners often encounter minor difficulties. When gluing the film, unevenness and bubbles may occur due to the entry of air. To eliminate defects, it is enough to use a smoothing squeegee.
In the case of tinting using varnish, the main problem is dirt getting onto the surface of the headlight and the appearance of smudges during drying. All unnecessary elements must be promptly removed using a solvent.
Conditions for caring for tinted optics on a car
Regardless of how car headlights are tinted, they can endure high-pressure washing and other more severe abuse.
The operation of tuned optics is not limited in any way, which is an important advantage of tinting.
Moreover, if necessary, you can easily remove the tint by prying it off and carefully removing the film or removing the varnish using a solvent.
Despite the simplicity of tinting car headlights, making mistakes or using low-quality materials can lead to a decrease in light transmittance.
In addition, the presence of film or varnish on the surface of the headlights can lead to difficulties when passing technical inspection.
Before tuning, you should carefully weigh all the advantages and disadvantages, and when actually performing the work, it is important to follow the tinting rules established by law.
Source: http://autoclub.su/sposoby-i-texnologiya-tonirovki-far-svoimi-rukami/
Do-it-yourself headlight tinting - a fashion statement or a practical solution?
DIY headlight tinting is one of the latest fashion trends. Young, self-confident people who are not afraid of experiments and frequent discussions with law enforcement officers on highways are more prone to this type of “refacing” of a car.
Do-it-yourself headlight tinting - the limits of what is acceptable
Tutorial on headlight stickers - video
The first thing you should understand when starting to look for ways to tint headlights is the complexity and responsibility of the process. By analogy with window tinting, you should be very careful in choosing the method and depth of darkening. Of course, on a white or black car, completely black headlights look gorgeous, but this:
- It’s inconvenient, because the brightness of the headlights is significantly reduced;
- dangerous when driving at night for the same reason;
- expensive: in the manufacturing process and when imposing fines.
If you see a car on the road with too dark headlights, you should not engage in blind imitation. As a rule, such tuning is performed for cars participating in exhibitions.
Headlights with only one sector darkened look much more impressive. More often they cover the top line along the cut of the hood. The headlights are slightly narrower and more stylish.
Lanterns with darkened glass look good when the tinting slightly changes the light transmittance.
How to tint headlights using film?
Video of headlight tinting film
In order to change the shade of glass to a darker one, you can use two proven methods. The most common and affordable is tinting the headlights with a film yourself.
The main component that will be needed in the work is a special translucent film of the required color, such as “Oracal”. Usually they choose black, less often - color to match the shade of the car body. Before you buy a film, it is better to see how it looks after installation on other cars.
Additionally, you will need a headlight polishing tool.
Do-it-yourself tinting of headlights with film is done on removed devices, which should be pre-prepared: washed and degreased.
Actually, the sticker process is no different from glass tinting, except for the need to carefully stretch the film heated with a hairdryer over the bends.
For better adhesion and to prevent the appearance of air bubbles, it is recommended to erase the raised inscriptions with a sander with fine sandpaper and polish the area.
In order to become more familiar with the features of the process and learn how tinting of headlights with film occurs, the video can be found on the pages of thematic sites.
We tint the headlights with an aerosol can
An excellent alternative to film tinting is to use a special varnish in aerosol cans. The can itself is an expensive item, which is sometimes difficult to find in car stores. However, the time for the entire procedure is reduced to a minimum, and the amount of aerosol can be enough to cover the headlights and taillights or headlights of 2-3 cars.
In order to darken the headlights using a spray can, it is not necessary to remove them.
Having previously washed the surface of the glass, it should be degreased with a solvent and carefully cover the body elements so that the varnish does not get on them. For more accurate work, it is recommended to remove the headlights.
The varnish is applied in several layers until the required depth of darkening is achieved. Allow a few minutes for each layer to dry.
A few words about tinting headlights
The darkening process also included the rear lights, as well as the turn signal indicators on the wings and side mirrors.
Tinting the lights is an even more important undertaking, because if the darkness is too strong, the light signals for road users may be invisible, and this creates an emergency situation. You must be prepared for the fact that in the event of an accident you will be to blame.
If you make the background of the glass surface a little darker, this will give a good visual effect and save you from troubles. Lanterns and other light sources are tinted in the same way as headlights, but in the case of film, you should seek help from experienced car enthusiasts, since the complex shape of the surface will bring a lot of difficulties during pasting.
Source: http://CarTore.ru/2578-tonirovka-far.html
Methods for tinting headlights yourself
Today, tinting headlights is a popular phenomenon among domestic drivers. This phenomenon is not surprising, since this is an excellent opportunity to protect your vehicle from various defects.
In addition, tinted headlights look very original and beautiful. There is one “but” - the cost of tuning is very high. But if you know how to tint the headlights yourself, then this procedure will become much more economical.
In the event that you decide to do this, you should initially understand that tinting headlights is a very responsible task. You need to be careful when choosing the degree of darkness.
On a black or, for example, white car, completely black headlights look great, but such tuning hides a threat. Dimmed headlights are less bright, which can make you more likely to get into an accident at night.
The final argument will be the fines issued for very dark headlights.
If you see a car with similar tint on the highway, you shouldn’t run to do something like that. Basically, such tuning is done for cars participating in exhibitions. Headlights look most expressive when a specific area is darkened.
For example, this could be a line at the top, which is located along the cut of the hood. With this option, the headlights look slightly narrowed and look very impressive. The headlights, which are slightly tinted, look quite stylish.
This tinting slightly changes their ability to transmit light.
Currently, there are two methods for tuning headlights: using film or using aerosol varnish. These methods have a number of advantages. For example, using film is more economical. In addition, it is easier to remove it from the headlight glasses if such a need arises.
The varnish, produced in the form of an aerosol, guarantees a durable tint, but it is difficult to remove when necessary. This option is usually chosen by those car enthusiasts who need durable tinting. This varnish lasts for 7 years, provided it is applied correctly.
Film tinting
Before applying the film, we select the material and prepare the tools that will be needed. A similar film, necessary for this type of tuning, is sold in car stores. Its cost can reach up to 5–7 dollars. Almost every car enthusiast has the tools necessary to apply tint.
To tint you need:
– a thin sharp knife;
– a small piece of fabric;
– cleanser;
- hair dryer used in industry.
Choosing a film
Now there is a wide variety of films on the market, differing in thickness and stretch percentage. The quality of the material is determined by these indicators. The higher the film density, the better the protection of the car from stones and other factors.
At the moment, a large number of films of various colors are sold. This is red, and blue, and yellow. However, matte black is still at the peak of popularity. It is not recommended to purchase red film because the headlights will turn red when using it. You can get a fine for this.
Toning procedure
This is not to say that applying tint is a very complicated process. The main condition is maximum concentration; all work must be carried out with extreme caution. The main rule is no rush, it’s better to tint slowly, but as needed. The tinting process includes the following steps:
- We dismantle the headlights. Sometimes car enthusiasts do not bother themselves to remove the headlights, but under this condition the tinting does not turn out neat. It is necessary to remove the headlight with extreme caution; the best option would be someone's help.
- Cleaning the headlights. Using alcohol, the headlights are cleaned of dust, we also remove stains, then you need to wipe them with a piece of soft cloth. Next, let the glass dry.
– Pasting. Before carrying out this procedure, it is necessary to protect those areas of the glass that are not intended to be tinted.
The film can be pasted using the “dry” or “wet” method of pasting; in the second option, a soap mixture is used. It is recommended to use the first method, as it guarantees the best results.
If you use the second, “wet” method, use a weak mixture of water and soap.
- Let's give it shape. To obtain the desired shape, it is heated using an industrial hair dryer. She becomes more flexible. During the gluing process, it is necessary to smooth the film using a clean cloth. When working on a flat plane, you can quite successfully use an ordinary plastic card for smoothing.
It is worth considering that this option is only suitable for flat headlights. It is recommended to stick the film in a well-lit place. After the process is completed, you need to remove excess material using a thin, sharp knife. If a soap solution was used, you need to let the film dry for about a couple of hours. After the headlights are tinted, you need to install them back.
The entire tinting process takes no more than three hours.
Aerosol varnish tinting
The use of such varnish is an excellent alternative to film tinting. The cost of the can is quite high, but it's worth it. Using varnish requires little effort and time for the entire tinting procedure.
In addition, the aerosol is more profitable - one bottle is enough to treat two or three cars. Another advantage is that with this method you do not need to remove the headlights. You just need to clean the glass and degrease it using alcohol before tinting the headlights with varnish.
Another condition is that the body parts must be covered.
The varnish is applied in several layers to achieve the desired degree of darkening. Distribute it as evenly as possible. All layers are dried. When applying the first layer, you need to paint all hard-to-reach places.
The instructions included with the aerosol indicate the required number of layers, but it is recommended to add one more. With this option, the tinting looks more aesthetically pleasing and even.
It is worth remembering that excess varnish reduces light transmission.
Before using varnish, you can practice on an unnecessary piece of glass. This will give you an idea of how to achieve your preferred shade level. In addition, you will have the skills to work with aerosol, and the headlights will no longer be damaged.
It is important to remember that the loss of light cannot be higher than 15 percent, otherwise difficulties will inevitably arise when communicating with traffic police officers.
Source: https://bilety-pdd.com/blog/sovety-avtolyubitelyam/tonirovka-far-svoimi-rukami/
How to tint your headlights yourself? Instructions, tips!
Recently, tinted headlights have become more and more common - this is not surprising, since this is one of the most affordable and effective ways to make your car more noticeable. With the help of tinting, individual elements of the car's optics are hidden or, conversely, they are emphasized. In this regard, there are quite interesting design solutions.
There are two common methods for tinting optics:
- applying varnish;
- pasting with vinyl or polyurethane film.
To tune your car in this way, you will contact a car service, which will save time and effort and perform the work professionally, but will entail certain financial costs.
In addition, car service services, as a rule, are generally accepted schemes that are unlikely to add individuality to your car.
Headlight tinting (shading and/or color change) is one of the most popular, simple, inexpensive types of car tuning
By solving the problem yourself, you can avoid unnecessary financial expenses, and you have a wide field for experimentation.
In this case, the car owner is able to take full advantage of his imagination and come up with something more creative than the standard scheme from the catalog.
However, before you stick vinyl on the lights or paint them with varnish, find out what the legal requirements are in this regard.
Types of tint films
Films for tinting are divided into two groups:
- vinyl;
- polyurethane.
They come in different colors - there is red, yellow, black, colorless film.
You can create interesting combinations from them that will delight others.
Such material can have different light transmittance, which depends on the density and type of coloring, and the driver decides what he needs - a light or intense degree of light absorption.
Film for tinting headlights is available in a variety of colors
How to apply headlight tinting film
Beginners who want to service their car with their own hands, if possible, often have a question about how to tint the lights. It should be immediately noted that there are no particular difficulties in this procedure - a beginner who knows how to be diligent, conscientious and careful can cope with it.
The film application process is as follows:
- wash the outer surface of the headlights, freeing it from dust and dirt;
- wipe dry;
- degrease with white spirit;
The film is a good protection for the headlight from impacts from small gravel, branches of bushes and trees
- placing the film on the back side, make a mark with an allowance of 3–5 cm;
- make a cut using sharp scissors;
- spray the surface to be glued with a soap solution from a spray bottle;
- starting from the flattest area, begin to paste over the surface, gradually removing the backing from the material;
- smooth the material with a rubber spatula - for greater convenience, heat it with a hair dryer;
- Tuck the rest and trim so that the material fits with the fold.
What does taillight tinting look like?
Now let's figure out how to tint rear optics on cars - there are no special differences here, and if you decide to do everything yourself, see the algorithm from the previous section.
However, when stocking up on film and developing a future tuning project, pay attention to the legal requirements - otherwise your creativity may become a source of conflict with the road inspection.
When tinting the rear lights, dismantling is indispensable
Is it possible to tint headlights?
You can often hear questions from vehicle owners about whether tinting car optics is allowed - no one wants to break the law and pay fines. You can be absolutely calm about this - the rules allow tuning car optics using tinting.
Headlight tinting - requirements
As mentioned above, tinted headlights are legal. However, you must adhere to a number of requirements specified in the legislation. Very often you can hear questions about whether it is allowed to tint optics in a particular color - there are clear instructions on this matter.
Lanterns covered with film of the following colors are allowed:
- white;
- yellow;
- orange.
To accurately apply the film, it is advisable to remove the headlights, but it is not necessary: the work can be done locally
When asked whether it is possible to use other colors, we automatically receive a clear answer: you can’t!
What kind of film is allowed to tint rear lights?
There are also many questions about the color of the rear optics that always arise after a conversation about whether it is prohibited or not.
Unlike the front lights, the rear lights can be painted in the following colors:
- red;
- yellow;
- orange.
It should be understood that the abuse of tinted headlights is fraught not so much with problems with the traffic police, but with an increased risk of accidents
Fine for tinting headlights
After answering questions about whether tinting optics is allowed and whether this or that color can be used, it was time to talk about what punishment is provided for violators. Any car owner is concerned about what fine he will have to pay if traffic inspectors have complaints about his lights.
The legislation provides for the following sanctions for violating tinting rules:
- Using front lights in violation of the requirements entails a fine of 3 thousand rubles. for an individual, 15–20 thousand rubles for an official, 400–500 thousand rubles for a legal entity.
Deprivation of rights for a period of six months to a year is also possible.
In this case, light sources are confiscated;
- in the absence of permission to tint, the driver is punished with a fine of 500 rubles;
- For violation of the rules for the use of rear light sources, a fine of 500 rubles is provided.
How to remove tint from headlights
Now let's talk about how to remove tinting from taillights and front optics with your own hands.
Removing tint is a simple procedure that consists of the following steps:
- heat the edge of the material with a hairdryer, directing hot air at it from a distance of 15–20 cm. At the same time, make sure that the vinyl does not melt - otherwise it will be much more difficult to get rid of it. Heat the edge, pry it with a sharp knife and pull it towards you;
- remove the material diagonally - pull carefully, and in those places where you feel difficulty, use a hairdryer to warm it up;
- After removing the film, remove any remaining adhesive using a napkin and window cleaner. The procedure may need to be repeated several times until the surface is clean.
Source: https://neauto.ru/kak-tonirovat-fary-avtomobilja-svoimi-rukami/