Do-it-yourself muffler repair without welding
Home » Articles » Do-it-yourself muffler repair without welding
The exhaust system of a car can be fully classified as a complex device. It consists of several devices designed to remove exhaust gases and reduce exhaust noise.
The most common problem for car owners is the muffler; its failure is indicated by a loud exhaust sound.
Its premature failure is facilitated by the operating characteristics of the vehicle, the quality of manufacture of the elements of the exhaust system of the vehicle, the material used for production, and other factors.
DIY muffler repair without welding
Elements of the exhaust system operate under very difficult conditions. On the one hand, the metal is strongly heated from hot exhaust gases, on the other hand, it is exposed to the external environment in the form of water, snow, wet mud, chemical reagents, and other factors.
All this accelerates the process of the appearance of pockets of rust, cracks, and burnouts. What is usually done in such cases? Faulty parts are replaced with new products, but the cost of such items is quite high, so drivers repair them themselves.
Let's consider the types of malfunctions in vehicle exhaust systems:
- Damage caused by mechanical impact on the muffler.
- The appearance of corrosion spots.
- Burnout of muffler housings.
- Failure to secure elements of the exhaust gas exhaust system.
It is difficult to damage any exhaust element on purpose, unless you cut it with a grinder. A number of negative factors contribute to the occurrence of malfunctions:
- Receiving mechanical damage when hitting stones, curbs, or other obstacles.
- Heating of pipes and muffler housings by hot exhaust gases, followed by contact with an aggressive environment.
- After the exhaust gas system cools down, condensation appears, causing the appearance of pockets of corrosion.
- Factory defects in the manufacture of products.
One of these factors is enough to cause a malfunction in the form of burnouts, cracks, and other damage. The occurrence of such problems will be indicated by a loud exhaust, which will force the car owner to take measures to eliminate it. In addition, if the exhaust is too loud, claims may arise from automobile inspection workers.
In addition to loud noise, problems arise in the uniform operation of the power unit, the emission of harmful substances into the atmosphere increases, and fuel consumption increases.
A thrifty owner will not put off solving such a problem, but will immediately begin to eliminate it.
In most cases, repairs can be done independently without special material costs, and the most commonly used are:
- Do-it-yourself muffler repair without welding.
- Use of welding machines to solve problems.
The latter type of work is of the highest quality, but will require welding equipment and the ability to work with it. It is not economically profitable to purchase a welding machine to repair a muffler, which can only be done once. Therefore, many vehicle owners try to do without welding.
Advice! Before making a final decision on choosing a method for repairing the exhaust gas system, you should determine the type of malfunction, its location, and the need to dismantle the damaged part.
If the driver of the car knows how to handle metalwork and other tools, the work can be done quickly enough and with high quality.
Repair can be divided into several stages:
- Removing the damaged part from the car. In some cases, dismantling is not carried out if access to the damaged area is available.
- Inspection of the muffler, preparing the damaged area for repair.
- Carrying out repairs.
- Installing the repaired muffler back onto the car.
Now you should consider several ways to repair mufflers without using welding yourself.
Cold welding during repairs
The use of cold welding when repairing cars and other mechanisms has become very popular among drivers. This is due to the ease of use of this tool and its relatively low cost. Manufacturers produce this product in two forms:
- A liquid form that allows it to be both a shell and a fastener for fastened parts.
- The plastic mass allows you to obtain a connection with high quality, has good adhesion, and can be applied to poorly prepared surfaces.
To work, you will also need to prepare a metal brush, sandpaper, gasoline or degreasing solvent. The order of repair operations will be approximately as follows:
- The boundaries of the damaged area are determined, followed by treatment with a metal brush, then sandpaper to create a flat area on the surface to be repaired.
- The prepared area is degreased.
- Cold welding is prepared for work according to the instructions and for its use.
- The prepared composition is applied to the damaged areas and the layer is carefully leveled. The work must be done quickly, as the composition begins to dry out.
- After this, you need to let the composition dry, after which the part is installed in its place.
Advice! This method will be most effective when repairing cracks and small chips. If there is serious damage, it is necessary to choose other repair technologies.
Fiberglass and bandage during repairs
If there are large damaged areas, the most effective way to repair without welding is to apply a fiberglass bandage. You can also use sheet metal.
Fiberglass fabric withstands high temperatures well, so it can work for a long time on a repaired muffler. The material is folded in several layers and pressed to the damaged area.
It is good to use soft steel wire as clamps.
In addition to fiberglass, sheet asbestos and asbestos cord can be used during repairs. The sheet should first be soaked in water. Then it is applied to the damaged area and leveled to avoid unevenness.
After this, an asbestos cord is used, which is used to wrap the laid asbestos sheets. To secure this “pie” to the damaged area, use soft wire, which is carefully wrapped around the laid asbestos.
At the end of the story, it should be recalled that no matter what method and material is used for repair, this measure is temporary; you should think about a more reliable way to repair parts of the exhaust system.
Source: http://www.samsvar.ru/stati/remont-glushitelya-bez-svarki-svoimi-rukami.html
How to Fix a Muffler Without Welding or Power Tools
DetailsCreated: 12/11/2014 04:43
Step 1: Materials and Tools.
Fixing a muffler is a fairly simple job (the repair can take as little as half an hour), but you will need a few specialized materials:
Wheel ramps or stands. DO NOT crawl under the car without placing tires or a block under it, as even the best jack may not support the weight of the car. People are dying, so be sure to put something under the car.
You will need safety glasses (unless you like rust, dirt and toxic and chemicals getting into your eyes)
You will also need the following:
Metal scissors.
Clamps.
Screwdriver (flat head for working with clamps).
Various pliers, wrenches.
Cold welding (available at any auto parts store).
Empty tin can.
You should also wear appropriate clothing - you can get really dirty. An old hat can also help.
Step 2: Find your problem.
Easily.
If your muffler is not cut all the way but is still leaking exhaust, you will be able to hear it - your car will sound like the engine has gained an extra couple of liters.
If you can't see the hole in the muffler, simply move your hand along the exhaust pipe until you feel a whiff of escaping gases, but be careful, the exhaust pipe may be much hotter than you think.
Step 3: Inside or Outside?
Unfortunately, some mufflers have an oddly shaped hole that means it needs to be fixed from the inside.
I used scissors to turn the can into a sheet of steel and then rolled it up until it was small enough to fit into the muffler (be careful with the sharp edges as you'll get tetanus shots if you cut them - it's quite painful).
Next, I attached the sheet to the damaged area.
I then clamped another piece of steel to the other side of the muffler.
If the damage was in a straight section, I could simply wrap a sheet of steel around the outer break, securing it in place with a couple of clamps.
Step 4: Attachment.
Now it was necessary to tightly attach the sheet of steel to the stationary section of the muffler.
I used one clamp around the free section of the muffler as well as a threaded clamp above it.
I reinforced the first clip, provided a strong anchor point, and then tightened the second clip so they were firmly secured.
I then coated the repair area with more cold weld and left it to dry.
Unfortunately, I have not found any tool to apply the weld more effectively than the human finger. If you have sensitive skin or a cut, use a small spatula or wear gloves.
Once I was happy with how it was all secured, I cut off the ends of the clamps.
Step 5: Warning
This repair is short-lived. You will still have to contact a specialized service to repair the muffler. To repair a muffler in St. Petersburg, I advise you to contact the Master Muffler company.
This small repair cost about $10, so it's up to you to decide whether to do a short-lived repair or go to muffler repair. But if you don't have money, this is a good option.
It would of course be ideal to install a completely new muffler.
Source: http://with-avto.ru/remont-avtomobilya/545-kak-pochinit-glushitel-bez-svarki-ili-elektroinstrumentov.html
Self-repair of a car muffler - methods without welding: sealants and tapes
A muffler is an extremely useful unit in a car, which is necessary to suppress the noise that occurs when the internal combustion engine operates. It is part of the vehicle exhaust system, and its proper operation allows not only to reduce noise, but also to reduce harmful emissions.
Damage to the muffler is a malfunction that is easy to identify. The slightest holes in the muffler change the sound of the car while driving and negatively affect the operation of the converter.
Operating a car with a damaged muffler is prohibited, but you can repair it yourself, including without welding.
The car muffler is made of strong materials, since it is practically not protected from external influences.
Despite this, a bad road, an unsuccessful move over an obstacle or a stone rebounding into the muffler can lead to its breakdown under unfortunate circumstances.
But due to mechanical stress, the muffler rarely fails; chemical corrosion often leads to its malfunction.
When the car is moving, the muffler, which is located on the bottom, operates in an aggressive environment.
Water constantly gets on it if the road is wet, snow sticks in winter, and in large cities salt and other reagents that are sprinkled on the road to prevent ice formation can get on the muffler. All these factors lead to corrosion on the muffler.
Simply put, the metal begins to rust and the strength characteristics of the muffler deteriorate. Over time, rust itself will make a hole in the muffler, or a breakdown will form due to mechanical impact on the weakened metal.
If the muffler is seriously rotten, it is customary to replace it, but in case of local damage, the unit can be repaired to maintain its functionality for some time.
You can repair the muffler yourself, since the entire procedure for restoring a car part comes down to sealing cracks and holes that have arisen due to corrosion or mechanical damage to the unit. Muffler repair can be done in three ways, and each of them has its own advantages and disadvantages.
The most difficult way to repair a muffler yourself is welding.
When welding a muffler, it is necessary that the seams have a certain rigidity and tightness, which is quite difficult to achieve if we are talking about large-scale breakdowns or a “spreading” crack.
In case of massive corrosion that has covered a certain part of the muffler, the right solution would be not to weld the cracks that have formed, but to weld on part of a new element of the exhaust system.
The method of repairing a muffler using welding is not suitable for everyone.
In addition, to weld a muffler, like any other pipes, it is necessary to use a semi-automatic welding machine, which does not change the structure of the metal during the welding process.
To weld a muffler, you need to find the appropriate premises and equipment, as well as have certain knowledge to carry out the work. That is why the method of repairing a muffler using welding cannot be called “folk”.
To restore the muffler yourself, you can use a special sealant that is resistant to high temperatures. It can not only cover up minor damage to the muffler, but also seal the exhaust system when assembling or replacing one of the elements in it. Sealing the exhaust system elements with sealant allows you to simplify the process of disassembling it in the future.
To apply sealant to the muffler, you need:
- Clean the area of the element to which the sealant will be applied;
- Lightly moisten the area of the exhaust system where the sealant will be applied;
- Apply sealant directly to the damaged area of the muffler and wait 30 minutes;
- Next, start the engine and let it run for about 10-15 minutes so that the moisture contained in the sealant is completely removed from it. After this, the engine must be turned off for 10-12 hours.
Manufacturers note that the product dries completely in about 20-24 hours of engine operation, during which the exhaust system heats up, which allows the sealant to harden.
Unlike welding, repairing a car muffler using sealant is a task that can be done in any hole or by lifting the car with a jack. If you follow the instructions, anyone can handle the task of applying sealant to the muffler.
Using muffler repair tape is another easy way to quickly get your exhaust system back into working order. Such tapes are made on a ceramic base, which allows them to withstand temperatures up to 1000 degrees Celsius.
Ceramic tape is not suitable for replacing entire muffler elements, and it should be used only in cases where it is necessary to seal the resulting gap or hole.
The method of using ceramic tape is simple - it is moistened with water, and then it is necessary to wrap the damaged area in 2 or more layers.
If the muffler is rotten or pierced near welds or butt parts, it will be difficult to apply ceramic tape, and it is more advisable to use a sealant.
How to remove and disassemble the side rear view mirror
A car is simple, and we will prove it. Articles on car repair and operation, as well as useful tips for car enthusiasts.
Source: https://calypsocompany.ru/avto/samostoyatelnyj-remont-glushitelya-avtomobilya-sposoby-bez-svarki-germetiki-i-lenty
How to repair an exhaust pipe without welding
Home » VAZ 2110 » How to repair an exhaust pipe without welding
Repairing a car muffler can, of course, be done at a car service center, where they will replace it (and perhaps not only it) for a considerable sum. If you don’t want to feed the service station, but do everything yourself at minimal cost, this article is for you.
How to determine muffler malfunctions
If, while the engine is running, a so-called “rumbling” suddenly appears or an unpleasant loud noise appears, similar to a growl, most likely you have a problem with the muffler. To make sure of this, you have three ways:
- The simplest, but most expensive, is to visit a car service center. There they will definitely point out to you a specific malfunction and even show you the place where the crack or hole is. Naturally, it’s not free, but if you know one secret, you can get the diagnosis completely free. The fact is that many service stations in times of crisis, as part of promotions, do free suspension diagnostics. The main thing here is to show how interested you are in making repairs in this particular place. You remember all the faults and are happy to repair the mufflers yourself.
- Find a hole in the garage or an overpass in the parking lot. Everything is simple here too, crawl under the car with the engine running and find the place where repairs are needed.
- If it is not possible to find a hole to remove the muffler, you can try just looking under the bottom of the car. This method is ineffective, but nevertheless takes place.
Usually the muffler itself either burns out, or the connection points of the elements to the muffler are destroyed by vibration. The muffler is connected to the exhaust system by welding and cracks can form there.
There are several options for repairing a muffler:
- Replacing the muffler. This method is guaranteed to save you from problems with the plug itself for several years, provided you choose a high-quality element made of aluminized steel. On sale you can find inexpensive mufflers made of ordinary steel, which are often painted with silver paint to mislead the inexperienced buyer. Such an element will not last even a year; it is better not to buy it. Also, when choosing, you should pay attention to the thickness of the metal. The thicker it is, the longer it will last.
- Repair using a welding machine. If you have a welder and know how to use it, this method is for you.
- Use of flexible corrugation. Recently it has become increasingly popular.
- Muffler repair by cold welding. If you cannot use a semi-automatic machine, then you can make repairs without welding. This method may not require removing the muffler.
- Repair using ceramic tape. This repair method will last for 2-3 months.
- Fiberglass. Fiberglass can be used to cover those holes that the sealant will not cover.
- Using sealant. It is also extremely short-lived, but allows you to do without welding.
Stages of work on replacing a muffler with your own hands
Car repairs must be carried out in a pit, overpass or lift. Particularly outstanding individuals can carry out repair work by lifting the car with a jack, but this option is for extreme sports enthusiasts. If such an idea comes to your mind, at least install supports.
In order to do the job efficiently, you need to remove the muffler. Removal should be carried out as carefully as possible, after first pouring water on all fastening points and leaving for half an hour.
If you don’t do this, you can crush the muffler itself, break the threads of the fasteners, or tear out the fastenings altogether.
After removal, the muffler is carefully inspected to determine the feasibility of repair, and all holes are cut out using a grinder, and rusty areas are treated with sandpaper.
It is advisable to cut the holes rectangular, which will simplify the application of patches. Under no circumstances should you weld a patch to a rusty place, otherwise you will have to redo everything.
The patch itself is cut a couple of millimeters larger than the hole and scalded along the contour.
When using a flexible corrugation, the vibration of the exhaust system is significantly dampened, which allows you to extend the service life of the welds. In this case, it will not be possible to do without welding.
If you decide to use cold welding, then you can do without traditional welding. Using this method, it is advisable to seal only holes in the muffler; joints and connections should not be touched; vibration will cause cold welding to crumble. Metallized tape must be tightly wound over this welding.
Using ceramic tape you can also briefly delay the death of the muffler. These tapes can withstand temperatures up to a thousand degrees. For repairs, a tape pre-moistened with water is wound around the cleaned muffler in a circle.
If you use a sealant, you can seal cracks and small holes. Many consider it a panacea for any mechanical damage, but in fact, all sealants only temporarily eliminate the problem.
When using cold welding, it is best to combine it with ceramic tape or fiberglass, and use a sealant during installation.
After completing the muffler restoration work, you need to carefully inspect the welding areas and treat them with anti-corrosion compounds.
The most crucial moment comes - installing a muffler on the car.
Installing a muffler is the reverse process of removing it, but it has a number of features.
- It is necessary to align the end of the exhaust pipe before installing the muffler.
- A cut must be made on the same pipe to simplify installation of the muffler.
- It is advisable to use a sealant to lubricate the pipes entering the muffler at both ends.
- It is necessary to hang clamps on the ends of the pipes without tightening them.
- If during dismantling you cut off too large a piece of pipe, you will probably have to extend it.
- When cutting the pipes, be careful not to damage the fuel line or brake line.
The nuances of welding a muffler
The last stage of repair is connecting the muffler to the exhaust system by welding. Welding must be carried out using a semi-automatic welding machine.
If you weld with an electrode, there is a high probability of creating new holes. The welding seam must be continuous; it is advisable not to weld anything tightly to the body.
When welding, be sure to use a special welder's mask and thick gloves.
Replacing a muffler with your own hands is a fairly simple process that allows you to save money. Naturally, you will have to spend a lot of time and effort. If you do the work yourself, you can be sure of its quality.
In addition, if you like this activity, you can start making mufflers for your friends and neighbors, earning a considerable amount of money from it.
In any case, the acquired skills will help you better understand the structure of your car and not be afraid to do various jobs without trips to the service station.
swapmotor.ru
Cold welding for muffler
Source: http://www.allanda-auto.ru/vaz-2110/kak-otremontirovat-vyhlopnuyu-trubu-bez-svarki.html
DIY muffler repair without welding: glue, sealant and tape
The exhaust system of a car performs very important functions in reducing engine noise, reducing the temperature of gases escaping from the cylinders, as well as partially eliminating the smoke and toxicity of exhaust gases.
The malfunction of the elements of such a system cannot go unnoticed. The breakdown of the muffler is especially obvious. When depressurized, this element immediately loses the function for which it received its name.
Considering this feature of the breakdown, it is necessary to restore the functionality of this part as quickly as possible, otherwise increased attention on the road cannot be avoided not only from motorists moving in traffic, but also from traffic police officers.
The easiest way to correct the situation is to install a new part, but due to various circumstances, replacing a faulty muffler may be impossible. Fortunately, it is possible to repair the muffler yourself without welding or replacement.
This article will discuss simple and effective ways to restore the functionality of this element of a car’s exhaust system, but first it should be recalled under what circumstances such a breakdown can occur.
Causes of muffler failure and preventive measures
It is easier to prevent a disease than to treat it later. This statement is also true for car breakdowns.
Of course, it is impossible to avoid all the nuances on the road. But knowing about the dangers that threaten the elements of a car’s exhaust system, you can try to use preventive measures to delay the occurrence of a particular malfunction.
If the car is used constantly, then sooner or later problems with the muffler will arise, regardless of the quality of the material from which this part is made.
Located in the lower part of the car, this part is constantly exposed to the abrasive effects of sand and stones falling on its surface.
And if, when the car is moving, a fairly large solid object ends up between the wheels, then the muffler can be completely destroyed from a strong impact.
Therefore, the main rule for extending the life of the unit is to drive the car carefully.
The muffler is connected to the exhaust system via threaded connections, so if the nuts are not tightened well enough, this part can be lost while the vehicle is moving. To prevent this from happening, the condition of the threaded connections of this element of the exhaust system should be checked from time to time.
The muffler often becomes unusable due to metal burning, but this process cannot be completely stopped. The failure of this part as a result of thermal and corrosive effects can be slightly slowed down only by treating the inner surface of this part using graphite impregnation.
If, despite all the preventive measures taken, the muffler burns out or its body is damaged as a result of mechanical stress, then many owners immediately become interested in the question of how to connect the muffler pipes without welding.
Such repairs can be carried out at home using a special sealing compound.
Muffler repair by cold welding
Cold welding is a two-part adhesive that can be used to glue metal products. Is it possible to cold weld a muffler, because this part is exposed to a very high temperature of the exhaust gases.
The cold welding adhesive composition tolerates high loads and temperatures well, so if a burnout appears in the muffler or a crack from mechanical stress, it is necessary to remove the part from the car and perform the following steps:
- Thoroughly clean the damaged area. Cleaning is carried out with coarse sandpaper or using attachments on a drill or grinder.
- The metal, cleaned of rust and carbon deposits, is thoroughly degreased using a solvent.
- Cold welding is applied to the damaged area. To apply the plastic type of glue, you should use gloves.
- After applying the composition, you need to wait about an hour and then polish the layer of hardened glue.
- After a day, the part can be installed on the car and operated without any restrictions.
Muffler repairs by cold welding must be carried out in a warm room. Only at temperatures above +5 degrees will the two-component adhesive composition react with the metal surface.
Ceramic Repair Tape
Ceramic tape is a popular and effective muffler repair tool.
A small hole in the muffler is sealed in the following sequence:
- The metal is cleaned of rust and carbon deposits.
- The ceramic tape is wetted with water.
- The hole is sealed by repeatedly wrapping the muffler with ceramic tape.
This method is temporary, but during the entire service life of the “bandaged” muffler, its function will not be impaired, and in case of repeated burnout, you can easily wind a new layer of ceramic tape.
Muffler repair with sealant
In the retail chain you can find special high-temperature sealants for the exhaust system of a car.
Such products contain special cement or ceramic additives. Which, when exposed to high temperatures, harden and form a layer that prevents exhaust gases from escaping from the damaged area of the vehicle exhaust system.
The process of repairing a muffler using sealant is usually carried out in the following sequence:
- The damaged area is thoroughly cleaned using sandpaper.
- The cleaned surface is slightly moistened.
- The sealant is applied in a thin layer to the damaged area of the muffler and the part is left for 30 minutes.
- The muffler is installed in place.
- Start the car engine for 10 - 15 minutes to dry the crack sealed with sealant.
- After 10 - 12 hours, the car with the repaired unit can be used.
Using sealant for repairs allows you to delay the purchase of a new part for a long time.
Reviews
Reviews of various muffler repair tools can be found on the Internet, but choosing a tool that can be guaranteed to restore the functionality of the part can be very difficult.
Car mechanics who repair the exhaust system, if it is not possible to purchase a new muffler or repair the damage by welding. It is recommended to purchase expensive ceramic sealant and use it to seal the hole.
To increase the reliability of the coating with a high-temperature sealant, experts advise winding several layers of tin over the applied composition, which then must be securely secured with a wide clamp.
If such repairs are carried out correctly, the muffler will last a significant amount of time. And when new burnout points form, it will be possible to repeat the above steps in a new place.
Conclusion
How to repair a muffler without welding is described in detail in this article. All of the listed methods for eliminating damage to this part are actually working, so the choice of method depends entirely on the car owner.
If you have free time and a desire to try out all the methods for eliminating such a breakdown, you can begin repairing the suppression using cold welding. Which is inexpensive and you can buy such glue in any specialized online store.
Source: http://car-hz.ru/ustrojstvo-avto/remont-i-zamena/5257-remont-glushitelya-svoimi-rukami-bez-svarki-klej-germetik-i-lenta
How to repair a car muffler
The muffler of most production cars, and the entire exhaust system as a whole, is made of steel, which rusts easily, especially on roads sprinkled with reagents in winter.
In addition, constant temperature changes from heating and cooling, plus rather aggressive substances found in the exhaust gases, condensation formed in the muffler can, and vibration, complete the damage and destruction of the metal.
As a result, after just a couple of years, and on some domestic cars even earlier, the driver hears an increase in the exhaust sound, which means that it is time to repair the exhaust system. To learn how to repair a muffler with your own hands in your garage, read this article.
First, you need to determine the location of the burnout, corrosion, or loose connection, because it can be in the invisible upper part of the muffler can or pipe - between the bottom of the car and the exhaust system. To do this, you need to use the inspection hole and ask an assistant to start the engine, after which the location of the defect is usually immediately detected when exhaust gases come out of it.
If gases escape somewhere between the pipe (muffler can) and the bottom, then you can use a mirror to determine the exact location of the leak. But in the event of such a malfunction, it is better to immediately remove part of the exhaust system from the car (or the entire system - depending on the design) so that you can crawl up normally for inspection and subsequent repairs.
If a defect is found in the visible part of the muffler or pipe, that is, from below (or on the side at the bottom of a can, like), and this defect is small, then repairs can be made without removing the exhaust system from the car.
This will significantly save time, since after long-term operation and temperature changes, the exhaust system connections become corroded and literally grow together and can be difficult to separate without heating with a burner.
Malfunctions (defects, damage) of the muffler, or the entire exhaust system as a whole, depend on the mileage of the car and the design of the exhaust system; there may be several of them, and we will consider the main ones in this article:
- Burnout or through corrosion of the muffler can or resonator.
- Burnout or through corrosion of the exhaust system pipe.
- Burnout of the gasket in the connection of pipe flanges.
- Burnout or damage due to corrosion of internal parts (partitions) of the muffling system in the can.
- A crack in the joint (connection) of the muffler can and the pipe, or circular corrosion in this place.
- Exhaust gas leakage through the connection of two pipes placed one on top of the other.
- Leakage of exhaust gases through the connection of the elastic corrugation and the pipe (muffler).
Let's look at each type of defect and its repair in more detail.
Burnout or through corrosion of the muffler can or resonator.
With such a defect, whether or not to remove the muffler or resonator can from the car, as I wrote above, depends on the location of the defect, as well as on its area. If a small crack or hole is found on the bottom or side (as in the photo on the left), then you don’t have to remove the can from the machine.
The area of a small crack or hole is cleaned to a shine with a grinding machine, degreased with a solvent, and covered with a special heat-resistant sealant (paste), based on ceramics, and intended for repairing exhaust systems - there are plenty of them on sale now.
One of them is shown in the photo on the left, and some call them thermal cement for muffler.
But still, whoever has a semi-automatic carbon dioxide welding machine, it is better to weld the defect site, since no putty, even the most expensive, can compare with the welding seam.
Just before welding, do not forget to disconnect the negative terminal from the battery, and if your car is more recent in terms of model year and is equipped with electronics (for example, an ABS system), then be sure to remove both wires (both negative and positive) from the battery.
Cook at low current (or using tacks (dots)), since usually the metal at the defect site is very thin, and burnouts are possible during welding.
If the defect is located between the bottom of the car and the can, or is located below, but has a large area, then you will have to remove the muffler can (with part of the pipe) from the car to carry out a more convenient and high-quality repair.
After all, if there is a large area of damage (through corrosion), you will have to cut out a rather large piece of rotten metal, and then weld new sheet metal.
But beginners will not be able to weld a large area efficiently using a ceiling seam.
Therefore, it is advisable to remove the muffler, it will be more convenient to work and cook. After removing the can, use an awl to determine where the metal of the can is normally preserved, and where it is thin or rotten.
After this, mark the cutout location with a marker. You can, of course, not cut out part of the rotted metal, but put a new rectangle (patch) cut from sheet metal (1 mm) on top of the defective area and weld it.
So of course it’s faster and there’s less fuss.
But I still advise you to cut out the rotten metal, since if you leave it, the corrosion will go further inside the muffler (especially after welding), and there is a high probability that later you will have to repeat the repair, next to the welded patch. In addition, when cutting out a rotten piece, it becomes possible to coat the inside of the muffler with a rust converter before welding (and the patch from the inside too). This will prevent corrosion inside for quite a long time.
The patch is cut larger than the cut window to cover it on each side by approximately 10 mm. With such an overlap, the entire repair area will become rigid. Having applied the patch, we press it to the jar and grab it around the perimeter, and then finally boil it.
Now all that remains is to paint the repair area, and the entire muffler too, with heat-resistant paint. After this, the parts are mounted in their place, and at pipe joints it is useful to use a special paste, which, when heated, hardens and seals the joint.
Burnout or through corrosion of the exhaust system pipe.
This defect is a little less common, since the pipe wall may be slightly thicker than the sheet metal of the muffler can; moreover, condensation usually does not accumulate in the pipes, since they are most often located at a slight slope and all the water flows into the muffler.
Here, just like with a can, if a minor defect is found in the form of a hole or crack, then it is welded in place without removing the pipe from the machine. If the small defect is located in an inconvenient place, or the rotten area is large enough and you need to weld a patch, or maybe even replace part of the pipe, then naturally for such repairs you need to remove the pipe from the machine.
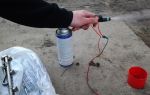
But as a temporary measure (if you do not have a semi-automatic welding machine), a piece of tin, for example from a beer can, and a pair or three of clamps can help (see photo on the left).
The defective place on the pipe is tightly wrapped with tin, and then tightened with two or three clamps.
If, before wrapping with tin, you clean and lubricate the defective area with muffler sealant, and then wrap it in tin, then such a repair will allow you to drive without problems for quite a long time.
To repair exhaust pipes, you can also find on sale a special heat-resistant tape (see photo on the left), which is tightly wound around the defective area on the pipe, and the end of the tape is tightened with a clamp.
It happens that the rotten section of the pipe is quite large and the patch turns out to be quite long. In this case, there is no point in bothering with cutting out the rotten area and welding a patch. It is better to simply cut off the rotten part of the pipe, and weld a new pipe (or elastic corrugation, about which below) of the same length as the cut rotten pipe, and the same diameter and with the same wall thickness.
Only here one nuance should be taken into account, in which, before cutting off the rotten section of the pipe, the entire exhaust system should be secured in two vices (similar to a slipway - one vice before the cut section, and the second after it), so that after welding a new piece of pipe (insert), the parts exhaust systems were located exactly the same as they were located before the repair (at the same angles). Otherwise, the exhaust system will not fall into place.
If there is no vice, or a device with clamps (such as a slipway), which is used only in specialized workshops, then it is better to do the following: without removing the exhaust system from the car, the rotten section of the pipe is cut off with a grinder right on the spot, and a new piece of pipe is welded in its place ( where it is possible to crawl up with a welding torch).
And after this, the exhaust system is removed from the car, and a new piece of pipe is finally scalded in a circle, at both joints. All that remains is to paint the repair area with heat-resistant paint and install the repaired exhaust system in its place.
If you cannot find a pipe in your garage of the same diameter as the exhaust pipe of your car that is being repaired, then you can use a pipe of a smaller diameter, even a water pipe (see photo on the left). Just to join pipes of different diameters, you will have to tinker a little longer to make the transition from larger to smaller.
To do this, in a pipe of larger diameter, you will need to cut several cutouts in a circle (eight or ten triangular cutouts), and then bend the edges of the larger diameter pipe in a circle so that the triangular cutouts meet. This will reduce the diameter of the pipe. Next, we connect the smaller pipe to the larger one and weld everything together. In principle, everything is clear in the photo.
Burnout of the gasket in the connection of pipe flanges.
Such a malfunction, despite its apparent simplicity, can also significantly add sound, that is, when the speed increases (gas supply), an increased sound will be emitted along with the exhaust gases, which is quite unpleasant. In addition, exhaust gases can get not only into the engine compartment, but also into the interior of the car, and this is already dangerous.
Naturally, you need to replace the gasket, but often, in order to do this, many people are unable to unscrew the nuts that hold the pipe flanges together, since the threads of the studs are covered with corrosion. There is no need to rush here, since the studs that hold the flanges together lose their strength due to constant heating and cooling and become quite fragile.
And when unscrewing the nuts, the studs often break. And this can create additional problems, since drilling them out later is not so easy.
A special device described in this article can help with this.
But in any case, you need to act carefully, and before unscrewing the nuts, you need to moisten the threads with a penetrating fluid, such as WD-40, brake fluid, or at least vinegar.
If this does not help, then you should not risk applying force to the wrench. It is better to heat the nuts with a propane torch and then try to unscrew them. After unscrewing the fasteners, the old gasket is cleaned off, and after lubricating the flange surfaces with graphite or copper grease, a new gasket and new nuts are installed, and the flanges are tightened together.
Burnout or damage due to corrosion of internal parts (partitions) of the muffling system in the muffler bank.
This is the most problematic defect, since it takes the most time to eliminate it.
With such a defect in the muffler, an unpleasant rattling sound may be produced when one side of the partition still clings to the wall of the can, but the other does not.
Or the partition simply rotted, and at the same time a louder sound began to come from the muffler, despite the fact that there are no external defects (cracks, holes).
With such a defect, the famous phrase of surgeons is most suitable - an autopsy will show. Naturally, in order to eliminate such a defect, the muffler can must be opened.
You can open the jar in different ways, but the best way is as shown in the photo on the left. The metal is cut first along the can (in the area of the rolled factory seam), and then in the area of the bottom of the can.
Once cut, the jar opens like a pea pod.
Usually, a defect in the internals is immediately visible, and the main goal of further repairs is to replace rotten or burnt metal fragments with new parts. And if the part is not completely rotten, but only has holes from burnout, then naturally it will be easier not to change such a part, but simply to weld the holes using patches (if the holes are large). Here you need to act according to the circumstances.
It happens that some part (partition) has not rotted, but simply moved away from its place (parts are usually fixed at the factory by contact welding) and began to rattle.
In this case, the part is simply welded into place by electric welding.
After restoring the insides (rotten or burnt-out parts), the sheet metal of the opened can is closed in its place, secured by welding and finally boiled (see photo).
A crack in the joint (connection) of the muffler can and the pipe, or circular corrosion in this place.
Such a defect (see photo on the left, which shows the joint of the pipe not with the muffler can, but with the corrugation, but the principle is the same) usually occurs in winter or after winter, since next to the junction of the pipe and the muffler can there is a pipe fastening (made of rod), which gets clogged with dirt.
This causes intense corrosion in this place. And if a small crack can be sealed with a heat-resistant sealant, or better sealed, without removing the muffler from the car, then circular corrosion can be such that the pipe completely falls off from the can (in a circle).
In this case, the rotten section of the pipe is cut off along with the fastener (it usually falls off from the can on its own) and in its place a new insert from the pipe is welded (before welding, we clean the place to a shine), and then a new fastener made from a rod is tacked. After this, the exhaust system is removed from the car (so that it is possible to crawl up with a torch and boil everything in a circle), and the new tubular insert and mount are finally scalded. All that remains is to return everything to its normal place.
If there is a small crack at the junction of the pipe and the can, then it is simply cleaned to a shine with a drill and then welded or sealed with a special sealant.
Exhaust gas leakage through the connection of two pipes placed one on top of the other.
On many machines there is such a connection when a pipe of a larger diameter (it usually has cutouts for tying with a clamp) is put on a pipe of a smaller diameter, and this connection is tightened with a clamp. It happens that exhaust gases escape from this connection, and tightening the clamp even more does not help.
In this case, you will have to disassemble (uncouple) this place by first removing the clamp and removing one of the parts of the exhaust system from the car.
Next, everything is cleaned to a shine, then lubricated with a special paste (for example, as in the photo on the left), which hardens when heated, the pipe is put on one another, and tightened with a clamp.
All exhaust system fasteners are returned to their place. After this, you can start the engine so that the pipe heats up and the paste hardens.
Leakage of exhaust gases through the connection of the elastic corrugation and the pipe (muffler).
Such a malfunction again occurs from corrosion, and in most cases, such as in the photo on the left, it is better to purchase a new corrugation and weld it to the pipe.
In this case, it happens that part of the pipe has rotted (as shown in the photo in the section above), in this case the rotten section of the pipe is cut off, and in order not to weld a piece of a new pipe, you simply buy corrugation of a slightly longer length (exactly as much as you cut rotted section of pipe).
Then a pipe is put on the outer sleeve of the corrugation (the sleeve is shown in the figure on the left) and welded in a circle.
Elastic corrugation is good because, thanks to its ability to bend slightly, it compensates for small errors when welding fasteners or individual fragments of the exhaust system, and also thanks to it, vibration from the engine is not transmitted to the exhaust system.
In addition, it is made of stainless steel, and is naturally much more resistant to aggressive chemicals that are sprinkled on our roads in winter. Therefore, if a section of your pipe has rotted, then when you cut it out, it is better to replace it not with a new pipe, but with elastic corrugation.
After replacing rotten pipes and elastic corrugations, it is advisable to paint the welding areas with heat-resistant paint, which will prevent (at least for the first time) corrosion of the welds.
If someone has a direct-flow muffler on their car, you can read how to repair it here. And although it shows the repair of a motorcycle direct-flow muffler, the principle of both automobile and motorcycle direct-flow mufflers is the same.
I hope that this article will be useful to those people who cannot afford to buy a new exhaust system, and yet decided to repair it themselves, but do not know how and where to start to repair a car muffler, good luck to everyone.
Source: http://suvorov-castom.ru/kak-otremontirovat-glushitel-avtomobilya/