How to replace the outer CV joint boot yourself | With faith in love
Check Also
Road transport is constantly being improved. All modifications made to the design of the car are aimed at improving various indicators - increasing power, reducing fuel consumption, improving aerodynamic performance and the level of overall comfort. This is what it looks like...
How are springs marked, what does the color of springs on VAZ cars mean? Suspension springs perform several important functions. In addition to significantly influencing the vehicle’s handling and load-carrying capacity, they also smooth out uneven road surfaces,...
The body is one of the most important parts of a car. Its main qualities should first of all include safety, strength, and relative cheapness, but at the same time it should be...
There is an established opinion among motorists that tire studs cannot be replaced. This was true until recently. Indeed, it is useless to install standard spikes in old holes, since...
When the car moves, torque from the engine crankshaft is transmitted to the gearbox and then, through the main gear and differential, to the drive wheels. The main gear allows you to increase or decrease the transmitted torque...
The entire variety of automatic transmissions are conventionally divided into two types. For the first type, the control and monitoring functions are performed by a special hydraulic device. And in the second type, control and monitoring functions are performed by electronic...
Since the advent of the internal combustion engine and its use in automobile transport, designers have struggled to ensure the maximum possible power output with minimal modifications to the power plant. The principle of operation of a turbocharger At the moment...
For those who are buying a car for the first time or choosing a model online, it is important to set the right search criteria. There can be quite a lot of them, but the main ones boil down to the fact that a new car...
Spark plugs - basic concepts, types of spark plugs, and principle of operation The spark plug is the main part of an internal combustion engine and performs two main functions: Ignition of the air-fuel mixture Removing heat from the chamber ...
Even the most powerful and expensive SUV will not always be able to overcome serious obstacles, and it will certainly not be possible to compete in offroad. To make your car a real off-road conqueror, you need to...
Injector: device, principle of operation and repair possibilities Over time, the basics of the automotive industry have changed and become more and more distant from their origins. Thus, the fuel system of vehicles was constantly modernized to ...
Dictionary of automotive terms and abbreviations: car enthusiast slang Slang Russian technical dictionary of technical automotive terms. Two (2X) stall - the term refers to the engine, cylinder head. Watch 2-Stage below. Three (3X) stadynik - ...
Tiptronic in a car - what is it and how to use it Relatively recently, a new word has appeared in the everyday life of drivers - “tiptronic”. Due to an incomplete understanding of what it is, many call it...
Which wheels are better - cast or stamped? Most car owners want their car to look elegant and neat. To do this, it is important not only to monitor the condition of the body, but also...
Generator maintenance and repair. Tips I bought a car back in March 2012, but I didn’t have time to write everything. In general, I came from the Lipetsk region. by train by calling in advance...
The clutch is an important structural element of a car's transmission. It is designed for short-term disconnection of the engine from the transmission and their smooth connection when changing gears, as well as protecting transmission elements from overloads and...
I welcome you, friends, to the website for DIY VAZ car repairs. One of the main components in a manual car is the clutch. Its task is to separate the engine from the transmission at the driver’s command and give...
As you know, the vast majority of Japanese cars in general, and Toyota in particular, are equipped not with carburetors, but with fuel injection systems. There is an opinion that injection is good, modern and progressive. There is also…
Source: http://rk-ekvator.ru/kak-vse-ustroeno/kak-zamenit-pylnik-shrusa-naruzhnyj-samostoyatelno
How to replace the outer CV joint boot? – Automotoguru
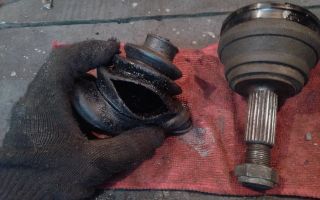
From the article you will learn how to replace the outer CV joint boot, and most importantly, consider the main joint faults. No one will be pleased when a crunch appears from the front wheels. In the early stages of a breakdown, it is noticeable only during a turn. Further we go, worse it becomes.
The tail can also be heard while moving straight. The reasons for premature wear of the hinges lie in the rubber boots, as well as in the amount of lubricant under them. It is worth noting that the front wheel drives are located in close proximity to the road surface.
Therefore, sometimes a large amount of dirt accumulates on them.
Preparing to remove the drive
First, pay attention to how the front wheel drive is made. Two strips with hinges at the edges. They are called CV joints, and if longer, then constant velocity joints.
Depending on how they are located on the axle shaft, there is a division into internal and external hinges. Attachment to the hubs is made using a splined connection. In the same way, the axle shaft is attached to the hinge.
It is worth noting that the outer CV joint boot can be replaced only if at least one grenade is removed.
To remove the drives you will need a certain set of tools. It is extremely important to get a 30mm wrench. Only with its help can you unscrew the hub nut. Please note that the front hub has bearings that are not the same as on classic series cars.
Therefore, it is necessary to tighten the nut with very high force. The consequence of this is difficulty in unscrewing the hub nut. Before starting repairs, be sure to place stands under the rear wheels to prevent the vehicle from falling off the jack. Don't forget to drain the gearbox oil.
Removing the drive
In the next step, you will need to lift the side of the car that is being repaired using a jack. This is done only after the hub nut and bolts securing the wheel have been torn off. Only after this can you completely dismantle the wheel and unscrew the hub nut completely.
Now you need to get rid of all elements that may interfere with the removal of the drive. In particular, this applies to the steering tip and ball joint. If the latter needs to be replaced, a puller is required. However, the tie rod end also needs to be removed using a special puller.
That's how much work it takes to replace the outer CV joint boot on a car.
So, you have freed the front pillar from all fastening elements. And then you should move in the only right direction towards dismantling the drive. To remove the internal grenade, you need to use a hammer and a spatula to knock it out of its seat. But it's better to start by removing the external grenade.
This can be done by making sharp jerks outward with the wheel hub, grasping the brake disc firmly. Please note that you cannot knock out the external grenade with a hammer, as this may damage the threads. If you have a puller, then the task is simplified many times.
Therefore, before starting all activities, it is better if you acquire the necessary tools.
Drive disassembly
Once you have the entire drive in your hands, you can begin disassembling it. This will require a vice and your strength. Please note that even the boot cannot be replaced without removing the grenade from the axle shaft.
Before starting work, be sure to purchase retaining rings, new clamps, a hub nut, and the required amount of lubricant. Provided that you have all the necessary supplies, you can begin the repair.
Also note that using worm-type clamps to secure the boot is not acceptable, as it will snag on the gearbox or hub components.
The old outer CV boot can be cut off and you will no longer need it. The entire interior must be washed in acetone or kerosene. However, you can also use a solvent, white spirit. To remove the hinge from the axle shaft, you will need to use a vice.
You clamp the axle shaft in them and, applying sharp blows with a hammer through a wooden spacer on the CV joint, knock it out. It is worth noting that it will be more convenient to use a bronze hammer, since a spacer will not be required. And bronze will not harm the metal from which the hinge is cast.
The internal grenade is removed in the same way.
Drive flushing
Before assembly, be sure to wash and dry the hinges so that no traces of old grease remain on them. The fact is that when operating this mechanism, very strong friction occurs, which can destroy the metal.
A lot of wear occurs when the car moves away, especially if the wheels are at an angle, even a small one. It is for this reason that symptoms of CV joint failure begin to appear only when turning.
Moreover, the cause of the malfunction is often a damaged outer CV joint boot. A VAZ or a front-wheel drive foreign car - it doesn’t matter, the symptoms of the breakdown are the same.
The main thing in this matter is to get rid of all small particles of metal and traces of old grease. It may also contain metal chips that can damage the hinge. It is advisable to have not only a supply of solvent or kerosene, but also an air compressor.
First, wash the inner surface of the hinges in liquid; you can use a brush during this procedure. Then blow the entire surface with compressed air, getting rid of any remaining solvent. Small particles of dust and dirt will also go away with it.
Then you can begin assembling the drive shaft.
Drive assembly
The essence of this procedure is to install all the elements on the axle shaft, fill it with lubricant and fix the boots in their normal position. This is exactly how the drive is assembled and the external CV joint boot is installed on the Renault Logan.
Do not forget that it is necessary to install new retaining rings, since the old ones may lose their elasticity, as a result of which the drive can easily fall apart. First of all, put rubber boots on the axle shaft. Please note that there are grooves for their installation.
Try not to shift the position of the anthers. You can even immediately fix them on the shaft using clamps.
Now you fill the grenades - external and internal. This operation is performed either with a bronze hammer or with a regular one, but with a wooden spacer. All that's left to do is to distribute the lubricant evenly under the boot, some of it should be immediately applied to the hinge.
Don’t be sorry, but you shouldn’t overdo it either, as the boot simply may not fit into place. After filling the joint with grease, put the boot on it and secure it with a clamp. That's all, the work is almost complete, all that remains is to install the drive on the car and tighten all connections.
And with this, the replacement of the outer CV joint boot can be considered complete.
Conclusion
After reading this article, you were able to understand how to replace the outer CV joint boot. VAZ or foreign car, it doesn’t matter.
I would also like to note that the design of these mechanisms on different cars is identical, the only differences are in shape and size.
The essence of the replacement work will be the same, regardless of whether your car is domestic or imported. We are, of course, talking about front-wheel drive models.
If you find an error in the text, highlight it with the mouse and press Ctrl+Enter. Thank you.
For front-wheel drive cars of the VAZ family, from model 2108 to model 2115, as well as more modern Kalina and Priora cars, maintenance of the drive wheels comes down to periodically checking the condition of the CV joint boots, both external and internal.
Otherwise, the ball-type constant velocity joints with guide grooves used on these machines do not require maintenance.
Reasons for replacing the boot
The service life of CV joints can be reduced very quickly due to damaged boots. Dirt and dust that gets inside the “grenade” act as an abrasive.
And since the hinge elements are heavily loaded and are constantly in contact with each other, the trapped dirt very quickly damages them and the “grenade” fails.
Even if you do not check the condition of the boot, the hinge itself will signal that it is damaged.
For example, as shown in the photo below, the CV joint turned.
When making turns, the CV joint with dirt trapped in it will begin to crack loudly. If the damage is not quickly repaired, the “grenade” will soon simply disintegrate and will have to be completely replaced.
But replacing a CV joint will cost much more than a boot. Therefore, upon discovering damage to the boot, or hearing a cracking sound from the CV joint, it is better to immediately begin troubleshooting the problem.
And such a malfunction is eliminated by replacing the boot, washing the CV joint and adding new lubricant to it.
Next, we will consider the sequence of actions for replacing the external CV joint boot of front-wheel drive VAZs using model 2199 as an example.
Similar work is carried out on the VAZ 2110, 2114 models, so we hope that the owners of these cars will not have any problems after reading the article.
We choose the outer boot because it is damaged much more often than the inner one, since it is located near the wheel hub and the impact on it is more intense, therefore the chance of a crack appearing on it is greater.
Preparation
So, damage to the boot on the VAZ 2199 has been identified. You can replace it and wash the CV joint itself in the garage, the main thing is that there is an inspection hole.
Tools you will need:
- Set of wrenches (socket wrenches, open-end wrenches);
- Set of heads and collars;
- Metal brush;
- WD-40;
- Mount;
- Hammer;
- Jack;
- Wheel chocks;
- Wooden coasters.
You will also need a new boot, CV joint grease-4, a container for collecting oil, a container with gasoline for washing the CV joint, and rags.
It is better to do all work together with an assistant.
For convenience, we will describe the process of replacing the external boot on the left side. The replacement work on the right side is identical.
Disassembling the drive and replacing the boot
Sequence of work.
The car is driven into a pit, chocks are placed under the wheels, and the car itself is left in first gear.
Before completely removing the wheel, loosen all the wheel nuts.
The protective cap of the nut securing the drive to the hub is also removed.
To prevent the nut from unscrewing from the shaft, it is centered around the circumference, which is why it has bends that fit into a groove made in the shaft.
These bends need to be aligned, this is done with a thin screwdriver or a drift and a hammer.
After aligning the bends, using a socket and a powerful wrench, the nut is unscrewed, and the washer located under it is also removed.
Next, the car is jacked up and wooden stands are placed under its sills.
The wheel nuts are unscrewed and the wheel is removed.
Next, work is done under the car.
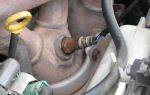
If there is a crankcase protection, it can be unscrewed. Then the oil from the gearbox is drained through the drain plug into the prepared container.
Next, you need to unscrew the two bolts securing the lower ball joint to the hub.
This will make it possible for the latter to move sideways. At the same time, you can check the condition of the support itself.
The steering wheel must be turned all the way to the left so that the drive is completely shifted in the inner CV joint, ensuring its minimum length.
After this, the hub is removed from the splines of the drive shaft.
The outside of the drive will be removed.
Then you can go in two ways.
The first way.
Knock down the outer “grenade” without removing the inner CV joint.
To do this, you need to remove the boot clamps, and then cut the boot, and then wipe off the existing grease on the hinge.
Then you need to prevent the drive from moving on the internal hinge.
To do this, take a small vice or a butt wrench, clamp the shaft in them and hold it firmly in your hands.
An assistant, using a soft metal spacer and a hammer, knocks down the CV joint, striking the inner race of the hinge.
With this method, there is no need to drain the oil from the box. But there is a possibility that when striking, the inner race will jump out of the outer inner CV joint.
Also, shooting down a “grenade” in this way is not very convenient, since this work will be done in a limited space.
Second way.
Complete removal of the drive from the vehicle. To do this, a pry bar is driven between the gearbox housing and the internal joint and the shaft entering the gearbox is pulled back and forth.
After this, the drive is completely removed.
IMPORTANT: With this method, the oil must be drained.
The advantage of this method is also the ability to assess the condition and replace the gearbox seal, through which oil often leaks.
In the future we will consider work with the drive completely removed.
The drive is removed, what next?
The drive surface is cleaned with a metal brush and rags.
Then the clamps securing the boot are removed, and it is cut or removed using a screwdriver.
The CV joint is wiped clean of grease and then becomes loose.
To do this, it can be clamped in a vice or held suspended with the outer “grenade” down, and an assistant knocks it down with a drift and hammer.
After this, you need to check the condition of the retaining ring at the end of the shaft and replace it if necessary.
The removed hinge is thoroughly wiped and placed in a container with gasoline for washing.
The new boot is placed on the shaft.
The washed CV joint sits on the shaft splines and is then driven onto the last one.
It needs to be hammered through a wooden spacer.
Don't forget about lubrication.
Before pulling the boot onto the CV joint, CV joint-4 lubricant is placed inside it, as well as inside the hinge. After this, the boot is put on the “grenade” and secured with clamps.
Then all that remains is to put everything back in place.
The drive is driven into the gearbox using a hammer and a wooden spacer.
The hub is put on the splines of the outer CV joint and the nut securing it is tightened.
The lower ball joint is screwed into place. The wheel is installed.
After this, you need to check the tightness of all the bolts and nuts that were unscrewed.
The crankcase protection is screwed on, the car is removed from the stands, and oil is poured into the gearbox.
The same sequence of work applies to the drive of the other side.
IMPORTANT: you cannot remove the drives from both sides at once, so that the gears inside the gearbox do not shift, after which it will be very difficult to install the drives back.
That's it, you can enjoy your result.
If there is a video in the article and it does not play, select any word with the mouse, press Ctrl+Enter, enter any word in the window that appears and click “SEND”. Thank you.
Source: https://avtomotoguru.ru/kak-zamenit-pyl-nik-naruzhnogo-shrusa/
Why are external CV joint boots needed and how to replace them?
Diagnosis of anthers
As a rule, these joints are common in passenger cars that have independent suspension. They can also be found in the rear wheels and front axles of SUVs.
As for the boot itself, it is a kind of protective cover made of rubber. Its shape is a corrugated pipe.
This cover is indispensable in protecting against various contaminants and dust.
The CV joint itself is a rather complex structure, which is much more demanding than the same ball joint, so it requires exceptional care. If there are dust particles in it, a peculiar crunching sound appears, which means huge problems. In this case, this part will completely fail quite soon, but there are ways to extend its life a little.
The aforementioned corrugated rubber should be located in its very center and it is desirable that it be without damage. A good sign is also the fact that there is not a single trace of grease on it. If there are such marks or the rubber is damaged, or both, then replacement is inevitable.
However, a small crack on the boot is allowed, which does not mean its final failure, but does mean that the hour of judgment is quickly approaching. Still, it’s better not to be lazy, go to the appropriate store and immediately buy a similar new part for your car.
It would be a good idea to have a few of these anthers in reserve. You cannot ignore even the slightest cracks in the structure of the boot, because through them not only dirt, but also the same dust can get into the system, which is why the CV joint will certainly not last long.
All this also strongly supports the formation of a special development on its parts, which leads to the already mentioned crunch.
There is also a way to check without inspection. To do this, you need to find a road with as sharp turns as possible, and if the corresponding sound is heard on it, then problems cannot be avoided.
This method is effective due to the fact that the CV joint itself is a special angular velocity joint that forces the front wheels to rotate and turn. In other words, it is capable of transmitting rotations to axle shafts located at different angles.
This hinge is created from very, very strong alloys, because a huge load is transferred to it when the car moves.
How to change the inner boot
More than one book can tell you how to change the boot. If several need to be replaced at once, many recommend doing this one at a time.
This means that the internal boot must be replaced first. After this, you need to wait until the same part, but of an external type, reaches critical wear.
However, this requires a significant amount of time and the same financial resources.
If there is a need to repair the CV joint, it is advisable to completely remove the shaft and replace the outer and inner boots at the same time without hesitation. This is because if one of these two parts malfunctions, the performance of the second is unlikely to be satisfactory. Sooner or later it will also fail, so it is better to replace it too.
Moreover, if you have already removed one of the CV joints, then dismantling the second one is already a breeze, so it would be nice to check the condition of the second one at the same time.
It is necessary to regularly check the presence of lubricant in the hinges and replace it in a timely manner, which will help the car survive for tens of thousands of kilometers without repair.
You should also understand that even the fiftieth replacement of anthers and lubricant, along with all the previous ones, will cost much less than buying brand new hinges due to banal savings on such simple things.
The repair begins with the need to drain the oil from the gearbox, which usually requires a seventeen key. With its help, you need to remove the drain plug, prudently substituting a five-liter container.
After this, it is necessary to tear the bolts securing the wheel itself out of place and raise the car in the same place using a jack, then remove these bolts and remove the wheel.
It is advisable to place any convenient stop under the car to avoid possible injuries and only then lower the jack onto it.
For further actions, you will need either an assistant or a simple block to press the brake pedal and unscrew the hub nut using a 30-inch socket, as well as a one and a half meter extension.
Each unscrewing of this nut must be accompanied by its subsequent replacement. After this, you need to unscrew the ball joint with a 17mm wrench, move the strut to the side and pull the outer CV joint shank out of the hub itself.
Then you can confidently grasp the inner hinge. To do this, you should very carefully rest against the box using a mounting tool and gradually pick out the grenade. After applying some effort, it should come out calmly. If it doesn't come out, then applying even more effort will fix it, but not nervous blows.
And now everything that needed to be removed has already been removed. The next step is to directly replace the boot. You need to pick up a copper or brass drift and dismantle the grenade from the shaft by hitting it into the CV joint itself.
Before doing this, it will be useful to slightly loosen the clamps of the worn boot and move it to the side. After such actions, the CV joint itself must be washed in kerosene or gasoline so that the old lubricant is completely washed off.
Then it is put back on the shaft, the grenade itself is carefully lubricated with appropriate lubricant and also returned to its place.
The boot clamp must be tightened, meaning the one that is located directly on the shaft, and put on its other side.
Then the CV joint is placed in the position of the middle of its stroke so that one of the edges of the boot can be protruded for subsequent organization of air circulation in it using a screwdriver.
Thanks to this, it will not suffer from unwanted deformations and various dents due to internal pressure.
After this, the second clamp is tightened and the assembly process begins. You need to insert the inner CV joint into the gearbox all the way and only then will the retaining ring make a characteristic click. Then its second end is inserted into the hub.
Now it's time to screw the ball joint back on, tighten the hub nut and put the wheel itself back in place. After all these steps, you can safely pour the oil back into the gearbox.
In general, the sequence of replacing the outer CV joint boot and the inner CV joint boot is the most suitable.
Video “Replacing the CV joint boot”
The recording shows how easy it is to replace a CV joint boot in 5 minutes.
Source: http://MineAvto.ru/remont/hodovaya/naruzhnye-pylniki-shrusa-911.html
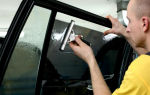
Replacing the outer CV joint boot on a Renault Logan with your own hands - video
Sometimes the reason for the breakdown of a certain component in a car can be that it is heavily soiled. This statement applies to a greater extent to constant velocity joints. They are always protected with anthers.
When the protective elements wear out completely, it means that the hinges will have to be changed very soon, unless, of course, the driver pays attention to this in time.
To understand exactly how to replace the outer CV joint boot on a Renault Logan, you should carefully read this article.
When should a replacement be made?
There are a number of reasons indicating that the time has come to replace the CV joint. Now they will be given:
- A visual inspection showed that there were numerous cracks on the protection that would soon turn into holes.
- When the driver turns the steering wheel, a cracking or rather loud howl is heard.
- While driving, the car constantly pulls to one side.
- The driver observes oil streaks under his vehicle. It may not be a torn boot, but you definitely need to look at it.
- There is a strong vibration felt in the steering wheel, coming directly from one of the front wheels.
Replacement process
So that every motorist can save a little, you should clearly know how to replace the boot. By the way, there are a lot of videos on the Internet where this process is described. The algorithm of actions looks like this:
- The car is driven into a pit and the front wheels are removed.
- Loosen the nut on the hub of the desired wheel.
- Remove the motor protection.
- All oil is drained from the gearbox.
- The steering rod is unscrewed and then it is removed from the hub.
- Unscrew the ball joint and remove it completely.
- After disconnecting the support, move the hub to the side.
- The bolts securing the inner boot are unscrewed.
- Remove the CV joint and drive.
- Using a puller, remove the CV joint cage located inside.
- Loosen the clamp on the boot and remove it.
- Remove the plastic boot. Next to it you will be able to see the oil seal and bearing - remove them too.
- Remove the clamps from the outer boot and cut it.
- All that remains is to pull the new protective element onto the shaft.
- Assembly is carried out in reverse order.
Now everyone knows exactly how to change the constant velocity joint boot. However, there is one peculiarity. The sequence will indeed be as written above. Only the dimensions of the right outer boot will be slightly different.
It is about a few centimeters longer than the left one. As for its diameter, it is one and a half centimeters smaller. This suggests that the anthers on Reno Logan are not interchangeable. Don't forget about this when you're in a car shop.
Replacement without removing CV joint
In order to perform this procedure, you will need certain skills and knowledge. In fact, the process is notorious for being inconvenient. You will have to use open-end wrenches, pullers and other tools again. You may need the help of a second person.
Don't forget about the role of clamps. Considering that the hinge itself will not be removed, the boot will have to be thoroughly coated with oil in order for it to slide properly. This will help to avoid difficulties at the final stage of work. As for removing the old boot, it is very easy to do, because you can simply cut it with a knife.
Many people are interested in the question of price. You can buy anther for different prices. If the issue of quality is not in the first place, then spending 500 rubles will be enough. When you need a really high-quality product, then you will have to shell out up to 2,000 rubles.
Source: https://poliryi.ru/obsluzhivanie-i-remont/reno-logan-kak-zamenit-pylnik-naruzhnogo-shrusa.html
VAZ 2109: how to replace the outer CV joint boot
Installing the outer joint boot on a VAZ 2109 car
With the development and introduction into production of cars with front-wheel drive, the question arose of creating a constant velocity joint - a CV joint, which would transmit torque from the gearbox to the drive wheel.
In rear-wheel drive cars, this moment is transmitted by a cardan transmission, which has a crosspiece and four needle bearings in its design. The use of a similar unit in a front-wheel drive car leads to an increase in its dimensions, which means the price of the product increases.
In addition, the transmission of torque is accompanied by vibration; the greater the angle between the drive and driven shafts, the stronger the vibration.
There are two types of CV joints installed on the VAZ 2109 car:
- The outer CV joint engages with the wheel hub.
- Inner CV joint – transmits torque to the shaft from the transmission.
This article will discuss the question of how to replace the outer CV joint boot of a VAZ 2109.
Design of the external hinge of the VAZ 2109
The photo shows the main elements of the unit:
The design of the outer CV joint of the VAZ 2109 car
Here are the positions: 1 – grenade body, 2 – separator, 3 – clip, 4 – balls, 5 and 9 – clamps, 8 – boot.
When developing CV joints, it was assumed that their lifespan would be similar to the lifespan of the entire car, but during operation, deviations were identified.
It is especially difficult to preserve the CV joint boot for a long period of use in a VAZ 2109 car. The use of a flexible moisture- and frost-resistant material for its manufacture made it possible to slightly increase the durability of the product.
But, under the influence of unfavorable external factors: moisture, abrasive particles, element deformations, cracks may appear on the part, which are unacceptable for its further operation.
This is due to the fact that dust and dirt enter the joint through a torn boot, which leads to wear of the internal parts of the CV joint. As a rule, this can be detected by the appearance of a crunching sound when the car moves around corners.
Therefore, you need to constantly ensure that the boot of the outer CV joint of the VAZ 2109 is replaced in a timely manner.
How to replace the boot of the outer CV joint of a VAZ 2109 car
Violation of the integrity of the boot can be determined by traces of grease on the hinge. All CV joint parts are not interchangeable.
Therefore, the best option for reliable operation of the unit would be to completely replace the outer CV joint of the VAZ 2109 along with the boot.
But, if, nevertheless, there is a need to change only the boot, you need to remove the CV joint along with the axle shafts.
The instructions indicate that for this you need:
- Install the handbrake on the car.
- Secure the rear wheels by placing chocks under them.
- Loosen the nut securing the CV joint in the wheel hub.
- Place the front of the car on stands.
- Then the wheel is removed.
- The steering rod is disconnected.
- The ball joint pin is pressed out.
- The lower ball joint is disconnected from the steering knuckle.
- The steering knuckle, simultaneously with the strut, is pulled back and the outer CV joint is released from the hub.
- The inner CV joint is pulled out of the box.
- The drive shaft is fixed in a vice.
- The clamps holding the boot are removed.
- If it is necessary to inspect all parts of the assembly, then even if the clamps and boots are intact, it is better to replace them with new ones.
- The hinges are knocked down with a hammer made of bronze.
- The anthers are removed.
- All parts are washed in gasoline.
- Do-it-yourself assembly is done in reverse order.
- A boot is installed on the shaft.
- The inner CV joint is put on.
- A new retaining ring is installed.
- The outer CV joint is assembled.
- The inner and outer CV joints are joined.
Outer and inner CV joints assembled on the drive shaft
- A boot is put on the grenade, and lubricant is first placed in it.
- The clamps are tightened on the shaft, then on the grenade.
- In the area of tightening and fixing the clamps, you need to check for cracks, deformations, and traces of contact with the road surface of the clamps. Otherwise, they need to be replaced.
- Before inserting the drive shaft into the gearbox, a plastic plug is installed at its end.
- The splines of the differential gear and shaft are joined.
- The shank of the outer hinge is inserted into the hub. To do this, the strut and steering knuckle are pulled back, and then the splines are threaded.
- A new retaining nut is installed and tightened.
How to replace the outer CV joint boots of a VAZ 2109 is clearly visible in the video.
Source: http://MasteraVaza.ru/hodovka/kolesa/vaz-2109-zamena-naruzhnogo-pylnika-shrusa-722
Experience in replacing the boot on the left CV joint — DRIVE2
I am sharing my first experience in replacing the boot on the CV joint of the left drive shaft.
First I bought anther. I had a company - Motus. The kit included only clamps. Price - 450 rub.
Zoom
And this kind of lubricant. Price — 250 rub. Enough for two CV joints.
Now straight to work!
Zoom
The repairs were carried out in a heated garage in the winter. Placed the machine on a level surface. Before jacking it up, I removed the wheel hub cotter pin and lock washer.
Zoom
Then I picked up a 30 socket head (I don’t remember exactly) and tore off the left hub nut and all the nuts from the wheel mount
Zoom
I had to make an effort)
Zoom
Jacked it up...
Zoom
Tightened the hub nut...
Zoom
I climbed into the hole. Then I unscrewed the lower nut of the stabilizer link. It took two open-end wrenches for 12.
Zoom
Removed the cotter pin from the ball joint nut and loosened the nut. As the nut loosened, I pulled the lever down until the nut was completely unscrewed.
Zoom
Then he unscrewed the tie rod end nut. And knocked out the support.
Zoom
This made it possible to freely pull the CV joint out of the hub. It is more convenient to move the hub to the right to make it more convenient to work.
Zoom
Here is the culprit of the repair...
Zoom
I took off the clamps. The boot moved inside the drive. Cleaned off any remaining grease. I decided not to knock out the CV joint, but to completely remove the drive, and at the same time change the lubricant in the inner CV joint. I noticed that when I pulled out the inner CV joint, a liquid leaked out, not at all like lubricant, too liquid, I concluded that water most likely got inside the boot. I wiped everything and cleaned it.
Zoom
I was all done... I’ll describe it in words later, I couldn’t take pictures. In short, I pulled off the boots from both CV joints, the inner boot turned out to be in normal condition.
It is necessary to make marks with a marker before removing the roller mechanism of the inner CV joint in order to install it in its original position.
Next, I removed the retaining ring from the inner CV joint and carefully removed the roller mechanism. Cleaned off any remaining old grease.
Zoom
This is what happened. I came to the conclusion that the outer CV joint can only be removed with a hammer. Because there is a retaining ring inside that you can’t get to. I found a video on the net on how to remove the outer CV joint, here is the link (maybe it will be useful for someone) - tubethe.com/watch/wgX-3nwRHY8/snyatie-shrusa-granaty-s-vala-razborka-shrusa-toyota.html.
Zoom
In general, I filled the outer CV joint with grease, filled the boot with grease, assembled the outer boot right away, tightened the clamps (the clamps were simply tightened using pliers, the main thing is to do it securely, tighten it tightly).
I did the same with the inner CV joint, put the clamps in place, but tightened them already when I put the CV joint in place. There was just enough lube. In the photo the drive is already in place.
Well, the assembly was accordingly carried out in the reverse order of disassembly.
Repair price: 700 rub.
Source: https://www.drive2.com/b/2780516/
How to replace the outer CV joint boot of Renault Logan: photos and videos
Damage to the CV boot is one of the most common chassis problems on front-wheel drive vehicles.
Consequences of damage to the CV boot!
The need to replace the boot can be determined by visual inspection if ruptures, cracks, or lubricant leaks are detected.
Visual inspection of the condition of the anthers on the drive
If dirt has already penetrated into the hinge, signals that urgent intervention is required may include:
- hum or crackling sound when turning wheels;
- pulling the car to the side;
- steering wheel beating;
- slipping at start (most likely a breakdown of the inner CV joint).
Torn boot, through which dirt penetrated into the CV joint
Tools and accessories needed for replacement
- Set of open-end wrenches;
- Set of socket heads;
- Collar;
- New protective covers and seals;
- Jacks (2 pcs.);
- Chisel;
- Hammer;
- Wheel chocks;
- Pullers for pressing out ball joints;
- Container for transmission oil;
- Fresh lubricant for CV joints.
Replacing the boot (+ photo)
- It is recommended to install the car on an inspection ditch. Using a 30" socket and a wrench, unscrew the nut securing the wheel hub, from the side of which the boot will be replaced.
- Install wheel chocks under the rear wheels and support the front wheels using jacks.
- Using a socket on “17”, unscrew the wheel bolts and remove the wheel.
- Using a wrench or a 10mm socket, unscrew the bolts securing the engine crankcase protection and remove the protection.
- Manually remove the plastic filler plug of the gearbox, use an “8” key to unscrew the drain plug and drain the oil into a specially prepared container.
Drain neck
- Using a special puller, remove the steering rod. At the same time, you can ask your partner to turn the steering wheel and check without steering tips to see if the steering rack is knocking. If there are squeaks and knocks, then repair and tightening of the steering rack is necessary.
- Unscrew the bolts securing the ball joint of the suspension arm and remove the support. (bolt 16, some manuals indicate 15, depends on the phase).
Removing the ball
- Remove the wheel hub.
Some manuals say that it is easier to remove the entire steering knuckle and disassemble the hub at the knee
- Using a socket set to “13”, unscrew the 3 bolts securing the inner CV joint to the gearbox housing.
- Pull out the drive.
- Using a hammer and chisel or a circlip remover, remove the inner joint race from the drive shaft.
- Using a screwdriver, loosen the clamp securing the inner CV joint boot and remove the boot.
- Remove the plastic boot of the inner CV joint and the oil seal and bearing located next to it. To dismantle the latter, a puller or a chisel and a hammer are used. In the latter case, the blows must be applied with medium force and directed towards the upper part of the bearing.
- Remove the damaged outer CV joint boot by loosening the clamps securing it (depending on the phase, the clamps may not be removable, you will have to saw them or break them).
The clamps were bitten off with wire cutters
- Wash the CV joint with gasoline and wipe thoroughly.
- Apply a small amount of joint grease to the shaft to make it easier to put on the new boot, put grease in it and pull it to the CV joint. Secure with clamps.
We put on the boot
- Reassemble in reverse order.
The CV joint is installed in its rightful place
Tips and notes
The procedure for replacing the outer boot of the left CV joint was described above. There are practically no differences in the replacement process for the left and right sides.
The only difference is that the protective cover of the right inner CV joint is not attached to the gearbox using bolts.
The hinge itself is mounted on splines and secured with a stopper, so the shaft is removed by tapping a hammer through a drift.
Despite the fact that on cars before the 2010 restyling, CV joints were non-separable, their design did not fundamentally change, so the technology for replacing CV joint boots is similar.
If you don't have a CV joint puller
If there is no puller for dismantling the retaining ring of the inner joint race, you must use a hammer and chisel carefully so as not to break it.
It is recommended to apply weak blows to the points of the clip located around the circumference at an angle of 120° to each other and continue to do this consistently until the clip is completely removed.
To avoid losing the rings of the cage, before dismantling it is necessary to wrap it in a piece of rags.
Inspect both boots (outer and inner) if you removed the entire drive!
When replacing the outer CV joint boot, it is quite reasonable to replace the inner boot as well.
Firstly, by the time the outer protective cover is removed, most of the dismantling work will have already been completed, and, secondly, this will significantly increase the overall service life of the drive.
In addition, it is strongly recommended that along with the external boot, you also replace the plastic boot, oil seal and bearing.
Thus, by performing a relatively simple operation to replace the outer CV joint boot, you can prevent the labor-intensive and costly work of replacing the entire CV joint or wheel drive assembly.
Source: http://carfrance.ru/menyaem-naruzhnyj-pylnik-shrusa-na-reno-logan-svoimi-rukami/