How to tint your car yourself correctly?
A car is not a luxury, but its maintenance is not the cheapest thing. Every car owner wants his car to be special and begins to bring it to that condition. The very first desire is to tint the car windows.
This procedure is quite complicated, but quite realistic. You can take your car to a specialized workshop, but you can also do it yourself. Next, we’ll look at step by step how to tint a car yourself – with your own hands.
Preparatory stage
Before starting work, we need to collect everything we need:
- tint film (the result and complexity of the work depend on the quality of the material);
- a soft rubber spatula (very often plastic spatulas come with tinting, but they scratch the surface and can tear it);
- a stationery knife with a set of blades (the knives that come with the tint are inconvenient and dull);
- window cleaner, warm water, rag (it is advisable to use a soft rag that does not leave lint);
- a spray bottle (can be used from a window cleaner. The container should be filled with soapy water; tap water with the addition of liquid soap or dishwashing detergent is suitable for this);
- household hair dryer (this item is not mandatory, but it greatly facilitates and speeds up the work).
Now that everything is prepared, it is advisable to drive the car into the garage; you can glue it outside, but any gust of wind can ruin everything.
Many experts recommend removing glass, but for this you need to have certain skills, and since the chosen goal is to do everything yourself, you will have to work directly in the car.
Next, you need to prepare the windows for work. You can only apply tinting material correctly to perfectly clean windows. It should be remembered that there should be no remnants of old tinting or glue from it on the glass.
Having completed all the preparatory work, you can begin the main task; it is advisable to have an assistant next to you, who will be needed when adjusting the blanks.
Side window tinting
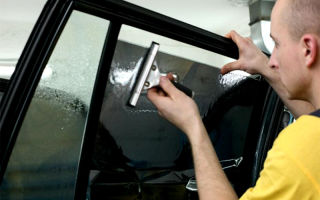
It is better to start tinting a car with your own hands from the side window, since it has a small area and is quite straight. We open the door, the glass should be raised to the very top. It is advisable to remove the side seals, as they will interfere during operation.
Next, a blank is cut out and tried on the outside of the surface to be pasted. At this stage, you need to be careful and remember that the tint consists of two layers - the main one and the protective one. The main one remains on the window, and the protective one is removed.
Having dealt with the sides, the workpiece is applied to the outside of the glass with the protective layer facing up. It is advisable to moisten the surface with soapy water to make it easier to straighten the workpiece. Next, it is trimmed along the contour of the glass with a margin of 5-7 mm. Now the modified workpiece can be removed and the surface wiped dry.
At the next stage, you may need an assistant, since the work must be done quickly. A soap solution is applied to the inside of the glass; this must be done so that there are no dry areas left on it, but there is also no need for drips.
Now the film should be separated from the protective layer. This should be done gradually - with your own hands you separate the main and protective layers, and your assistant sprays the adhesive part with a spray bottle. This procedure must be carried out quickly so that the glass does not have time to dry.
The next stage begins with placing the workpiece on the work surface and leveling it. Having applied the material, it must be leveled over the entire area of the glass using a soft cloth. Remember that until the film has dried, it is very easy to damage.
After the tint is completely straightened, we begin to expel air bubbles and remaining soap solution from under it. This is done carefully using a spatula. Until the film is completely glued, you need to hold it with a rag, and use a spatula to expel water and air from the center to the edges.
After completing this procedure, you need to trim off the excess using a stationery knife. Trimming is carried out 3-4 mm from the edge of the window - such a gap will eliminate the possibility of scoring.
This completes the tinting of the side window, you can move on to the next one.
Of course, if you have a hairdryer, the drying process can be significantly speeded up. You need to be careful in this matter, since the material may begin to melt under the influence of high temperature and you will have to start all over again.
Rear window tinting
Tinting the rear window yourself is quite difficult. The difficulty arises due to the fact that it has a curved shape and a large area. To do everything correctly, a number of requirements must be met. You should start with the right choice of material.
The standard canvas has dimensions from 50 to 200 cm wide and 300 cm long. It is advisable to tint the rear window with a single piece of film, but this is a rather complicated procedure and requires the use of high quality material. Let's start with the difficult method.
To make a workpiece from a single piece, you will need talc, which can be purchased at any pharmacy, as well as a household hair dryer. The surface of the rear window is covered with talcum powder and tinting is placed on it - with the protective layer facing up.
It is necessary to use talc, and not water, for the reason that it will not dry out under the influence of temperature. Next, using a hairdryer, the film is given the required shape. This is done from the center. The whole procedure involves gradual preparation and leveling with a spatula.
Work without an assistant is almost impossible. After the workpiece has taken its shape over the entire surface of the base, trimming is performed, with a margin of 7-8 mm. And the procedure begins, completely identical to tinting the side windows.
If you can’t tint the rear window with a single piece of film, you can do it with three strips. This procedure is quite simple and begins with tinting the upper part of the base. The entire procedure is carried out according to a standard scenario.
With this method, you should wash the surface of the window after applying each layer. The second layer is applied to the very bottom of the glass, since this is the most difficult area. Now the middle remains, which is tinted last. Before pasting it, it is recommended to dry the previous strips.
To paste the last strip, take a piece of film with a margin of 5-6 mm. This reserve will be needed to eliminate the possibility of untinted areas.
At the end of the work, these overlaps can be left, as they will only be visible from the interior, or they can be removed using a utility knife. If everything is done correctly, the overlap will completely cover the joint.
Now we can say with confidence that tinting your car yourself is finished. The car can be used, but windows with film applied cannot be opened for 2-3 days.
Source: http://LediZnaet.ru/dom/avto-i-moto/kak-samomu-zatonirovat-mashinu-pravilno.html
Do-it-yourself car tinting - Step-by-step guide
Do not forget that even such work as tinting a car yourself must be carried out with maximum painstaking care so as not to miss any details.
Any window tinting always starts with the side windows, because they are the easiest to dismantle.
to contents ↑
Materials and tools for car tinting:
- Detergent.
- A sharp blade or utility knife.
- Rubber spatula.
- Tinting film for glass.
- Spray bottle.
- Warm water.
- Lint-free napkin.
All of the above materials and tools must be prepared before tinting your car begins.
Step by step work:
Window tinting must begin after washing it. Wash the glass thoroughly to remove dust and dirt, on both sides. Make a soap solution, apply it to the surface of the glass, and then wipe dry with a lint-free cloth. To check if there is any lint left on the glass, use a utility knife or sharp blade.
Washing glass with soapy water
to contents ↑
Stage No. 2
We are preparing a special solution necessary for applying and further fixing the tint film on the glass. Dilute shampoo or some detergent in warm water. Beat until foam appears.
The foam will allow the film to slide over the glass, which will make it possible to make the final adjustment. For convenience, the prepared solution can be poured into a spray bottle. That's all the preparation for tinting the glass.
Next you will need to work closely with the tint film.
Preparing the soap solution
to contents ↑
Stage No. 3
Car glass measurement
Accurately measure the length and width of the windows you are going to tint, and only then cut out the tint film strictly according to the parameters obtained.
The pattern can also be obtained in another way without measuring the glass parameters. A film is applied to the glass from the outside of the door and smoothed out well, and then simply cut out along the contour.
Pattern of film on car glass
to contents ↑
Stage No. 4
When the film is completely cut to the required dimensions, the window tinting is only half done. Now is the time to apply it to the glass. By the way, you can use tape to effectively separate the film into two parts.
This is done very simply: tape is glued to the film on both sides at different levels, and then you need to pull it in different directions. Next, we apply the film to the soapy glass and move it as necessary so that it ultimately fits perfectly.
The process of separating the film from the substrate
to contents ↑
Stage No. 5
Now it is very important to carefully smooth the film using a rubber spatula and remove air bubbles and soapy water from under it. Next, you should remove the protective film layer piece by piece. It is necessary so that the film can be properly glued and smoothed.
Smoothing the film using a squeegee
to contents ↑
Stage No. 6
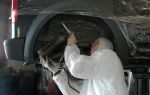
After tinting the side windows, we move on to tinting the rear window. That is why they first undergo training on the side windows. The fact is that all the rear windows have a curved shape, and this significantly complicates the entire work process. However, in general, the entire tinting of the rear window will not differ much from the tinting of the side windows.
The process of applying film to the rear window of a car
You need to carefully separate it from the glass, first only the third part. Then this surface needs to be well lubricated with soapy water. Then attach the film to the glass and you will need to separate another third of the tint from the protective layer.
Smoothing the rear window should be done with extreme caution so that no air or soap solution remains anywhere. The glass will dry for 3 days (during this period it is not recommended to touch it with your hands).
Tinting with an industrial hair dryer:
It is worth noting that tinting the glass on your own, even with a partner, can cause some difficulties on the windshield and rear window, since they have a blown shape. An industrial hair dryer will help you out here.
It is necessary to carefully stretch the film over the entire area onto the wetted concave glass without removing the protective layer of the tint film. When gluing the film, use an industrial hair dryer to remove any excess soap solution and air bubbles. This happens due to heating of problem areas of the film.
Glass tinting using an industrial hair dryer
to contents ↑
Windshield tinting
The windshield stack is tinted in the same way as the rear stack. The only problem that may arise is a crack in the glass. That's why you'll first need to thoroughly inspect your windshield and possibly polish it.
Windshield tinting
Source: http://Driving24.ru/tonirovka-avtomobilya-svoimi-rukami-bez-problem/
Is it possible to tint a car yourself?
The first step when tinting yourself is to darken the windows. Due to the expansion of the legislative framework with a new law limiting the permissible amount of window tint in a vehicle, removable tinting is becoming increasingly popular. And if you do it yourself, you can get significant benefits from the process.
Films for tinting glass can be of different types. What is the difference, which manufacturer to choose, which film is better? The advice is simple - it is best not to skimp on price and choose a proven and reliable supplier.
Buying anything and trying to stick it on your car is not the best alternative if you want to make your car look great and look great. There are certain companies that have been producing film for a long time and are time-tested.
The following companies have guaranteed operating time indicators and certificates:
- SunTek Commonwealth Laminating & Coating, Inc.
- llumar Courtaulds Performes Films.
- Sun Control products Garware Polyester Ltd.,
- Sun-Gard, Glass-Gard and Safe-Gard by Film Technologies International, Inc.
- Johnson Window Films.
- MСС/Solar Gard
- Films from 3M Corporation
How to apply tint yourself
The tint coating should only be applied to clean glass. If work is carried out indoors, there should be no dust in it. Polluted air is one of the reasons for the appearance of bubbles. If you perform the steps without removing the glass, then the interior should also be clean.
If, due to complexity, you want to refuse a job, you always have the opportunity to contact the service. In addition to the fact that the window should be smooth, you should remove everything unnecessary from it, for example, the antenna.
What you will need
Before work, you need to prepare tools and material. Among everything you may need, consumables should not be neglected.
- Tinting film. The quantity should be enough for the side windows, as well as the front and rear glass.
- Rubber spatula and plastic scraper.
- Shampoo.
- Spray.
- Stationery knife with a retractable blade.
- Lint-free cloth, dry.
- Clean and warm water.
- Home or technical hair dryer.
Also, before work, the material must be prepared. Cutting out the film is not a difficult task, and involves cutting out pieces that will be 2-4 centimeters larger than the size of the surface to be tinted.
Car preparation
The next stage is preparing the machine itself. For quality work, be sure to wash the car and workplace. Even grains of sand can cause defects during operation, so attention to detail is worth paying attention to. The film should only be applied to a clean surface and in clean conditions. Therefore, car windows must first be washed on both sides using a special cleaning solution.
Even after washing, when wiping the car with a soft cloth, you must make sure that no lint remains on it - you cannot glue the tint material without bringing the coating to perfect cleanliness. Work should begin with the side windows.
Only after pasting them over can you gain experience and begin working on the rear and front glass. Then the process can go in two directions - removing the glass or not removing it. The most convenient way is to remove the glass; the effect of this is much higher, although it forces you to tinker, doing extra work.
We make the film ourselves
The advantages of tint film have already been described in detail, but the question remains: how and what is it made of? The production of car tinting is based on polyester material. The base for production must be of high quality, and very few companies produce such polyester. The classic film consists of several balls.
The thickness of each is 20 microns. The manufacturing technique is quite complex; the layers are rolled at a certain temperature. It is very important that when used, the film does not distort the appearance of things and the interior. To achieve this, much attention is paid to the uniformity of the physical characteristics of the base in its different sections.
This property allows the film to be glued to any type of glass.
You can also tint your car at home. However, it is not possible to create a high-quality product that will meet modern norms, standards and operational requirements. Tinting film is made using temperature and chemical composition in a factory; recreating the process at home can be an impossible task.
Pasting technique
The methods for gluing the coating to the side, front and rear glass are not much different. Experts advise starting with the sides. Only then, having gained experience, can you begin to apply coating to the rear and windshield.
Before starting the procedures, the side windows are washed with water and a scraper, and then wiped with a rubber pad. The edges are wiped with a napkin, and hands are washed with soap before the second part of the work. The glass is moistened with soapy water, and the protective coating is removed from the pattern.
The adhesive part is wetted with the solution, as are the fingers. The film is carefully applied to the glass, the absence of gaps is checked and how smoothly the applied material fits. Excess water is removed. Drying too hard can scratch the coating.
Water is removed with progressive movements from the center to the edges.
The upper part of the film coating is fixed a little later. The remaining part is also moistened with soap solution. The film is tucked under the lower seal; kinks should not be allowed.
The remaining liquid is removed from under the film with a hairdryer and distillation. There should be no water bubbles after finishing work.
They can be removed almost immediately after applying the tint by walking over the glass with a rag or soft cloth.
Secrets and tips
The advantages of tinting yourself are obvious: saving money, since the work is carried out in your home. The heating of the cabin is reduced by almost half - this is especially noticeable in the summer.
99% of harmful radiation is blocked by tint film. If an accident happens and the glass in the car breaks, pieces of glass will not scatter throughout the cabin.
The headlights of an oncoming car or the glare of the sun are not scary - the darkened coating will completely protect from excess light and radiation.
Hiding the contents of the cabin from strangers is the most affordable way to expand your personal space. And tinted glass can help significantly with this.
The panel inside the cabin and the plastic will be protected from overheating, which is possible when exposed to direct sunlight.
And if we talk about appearance in general, then a car with tinted glass looks more attractive than without it.
Very useful advice: if you want to tint your car, and the information provided may not be enough, it’s worth watching how to do it yourself in the video - a clear example that will help you do everything right.
Video “Vehicle tinting technology”
In this video you can learn everything you need to tint your car.
Source: http://MineAvto.ru/tyuning/eksterer/tonirovka-mashiny-svoimi-rukami-3538.html
How to apply tint on a car yourself (video)
The main purpose of tinting is to create a certain image of the car and hide its internal contents from prying eyes. Many inexperienced car enthusiasts think so.
In contrast, experienced drivers know that tinted windows provide good thermoregulation of the interior, and the tinted windows themselves protect from mechanical damage.
The cost of applying a tint coating at a car service center is quite high, but if you understand the essence of the process, you can tint the car yourself. Let's figure out how to apply tint at home.
Self-stick tinting on glass is possible (click to enlarge)
Selecting material for tinting
There are several ways to darken car windows, but for tinting yourself it is better to use the film method. It is important to know how to properly stick the film and what material is best to choose. The film can be:
- simple, with a black adhesive base;
- multi-colored;
- transparent, having various patterns;
- metallized, with different levels of darkening;
- with a changing color scheme;
- “chameleon” with a mirror surface;
- silicone;
- perforated. Deciding on the type of coating for gluing (click to enlarge)
The quality of the tint and its service life will depend on the tinting material.
The simplest and most affordable are ready-made kits. Manufacturers cut them according to the shapes and sizes of glass for a specific car model. Such kits are very convenient, but are of low quality. Their darkening is achieved not by painting, but by gluing a second film layer. It peels off quite quickly, so you will have to re-glue it frequently.
By watching the video you will learn more about the species:
A little more effort will be required to tint glass with rolled material, since you need to cut it yourself. The cost of such material depends on the density and level of darkness. The color range is presented in a wide range, so there is an opportunity to choose for every taste.
Roll tinting material has the following advantages:
- dense structure;
- strength;
- resistance to mechanical damage;
- ease of gluing;
- ease of removal.
The tint material comes in the form of a roll (click to enlarge)
This material is called removable tinting, since the glass underneath remains unchanged and this tinting can be re-glued as much as you like.
Removable tinting is produced in a standard length, and one roll is enough to cover all car windows.
When choosing a film, it is necessary to take into account its light transmittance. Windshield tinting must transmit at least 50% of light. The film covering the front side windows must have a throughput of at least 35%, the rear side windows and trunk - 15%.
A separate issue is the headlights. Can they be tinted? Tinting can be applied to the front and rear headlights only if the color of their glow and light transmittance are preserved. With headlights tinted in any other way, there is a chance that you will fail inspection and receive a fine.
Preparation for gluing the film
To perform high-quality glass tinting work, you will need:
- knife (it is better to use a stationery knife);
- hair dryer (preferably a construction hair dryer);
- marker;
- needle;
- rubber or plastic spatula;
- spray;
- sponge or clean cloth;
- transparent shampoo.
Find out more information from the video:
For those without experience in gluing, it is recommended to remove the glass. In order to properly cover windows without a recess, certain dexterity and skills are required.
Before gluing removable tinting, the glass must be sprayed with a soap solution from a spray bottle, rinsed thoroughly on both sides and wiped dry with a clean cloth. A soap solution for washing is prepared from three drops of dishwashing liquid and a liter of water.
Any dirt that gets under the film during gluing can greatly spoil the appearance of the tinted glass.
To ensure that the size of the tinting material matches the size of the glass perfectly, it is better to first make patterns from cardboard. This will help avoid damage to the material, and will also save time, nerves and effort.
When making patterns, you should additionally add one centimeter on each side, since the edges of the film should go under the seal.
Pasting the film
Tinting should be applied to the outside of the glass. On the inside of the glass it gets scratched very quickly, peels off and takes on a shabby appearance.
After watching the video you will learn more how to do it yourself:
If you do tinting in winter, the room must be heated to a temperature of at least +10 degrees. Otherwise, the film will not adhere well and will peel off very quickly.
We apply tint to the car in several stages:
- Before applying the tint, spray the surface of the glass evenly with shampoo. This will temporarily neutralize the effect of the adhesive on the film, and it can be moved freely across the glass to precisely fit the shape of the surface being glued;
- We separate the protective coating from the upper corner of the film and glue this corner to the corresponding edge of the glass. Holding the film on the glass, carefully remove the remaining protective layer. In this case, you don’t have to rush, since the shampoo neutralizes the adhesive base for at least 20 minutes;
- when the protective coating is completely removed, press the film against the glass and slowly move it so that it fits exactly in its shape;
- pointing a hairdryer at the tint, warm it up, carefully smooth it out and remove air bubbles with a rubber (plastic) spatula from the center to the edges. If some bubbles cannot be removed, pierce them with a thin needle. This will not affect the appearance of the tint or its service life;
- After removing the remaining shampoo with a dry cloth, leave the tint to dry. In order for it to stick well, the glass should not be touched for at least a day. It is highly not recommended to turn on heating devices to speed up the process. This may cause the film to deform. The adhesive base should dry naturally and adhere securely to the glass.
The process of gluing film onto glass (click to enlarge)
The windshield and rear glass require a special approach. Even a spatula will not help you apply tint perfectly to such glass. You will have to heat the tint material with a hairdryer, while smoothing it with a spatula and removing air bubbles. It is quite difficult to do all this yourself, so it is better to take an assistant.
The process of gluing tint will not seem very complicated and long if you first study all its subtleties and important points. Knowing how to properly apply tint, you can protect yourself and your car passengers from the scorching sun, and protect your glass from mechanical damage, while saving a considerable amount on the services of professionals.
Source: https://KleyGid.ru/sovety/kak-nakleit-tonirovku-na-avto.html
How to tint a car: choosing a film and step-by-step instructions
All about how to choose the light transmittance of the film and tint the car
Good afternoon to all inquisitive motorists! Most recently, we talked about protecting your car with car alarms and mechanical anti-theft devices. Today we’ll talk about protection from prying eyes. Tinting is one of the indispensable attributes of most cars that are found on our roads.
Some are more dark, others less. But many today consider driving in an “aquarium” to be bad manners, because those around you have time to see most of the details of what is happening in the cabin, as well as the things that are in it. Therefore, many people ask the question of how to tint a car. Let's see what you need to know about this.
How to choose a tinting film
Let's start with how best and what film to darken a car, and how it should be chosen for this procedure.
One of the criteria that drivers pay attention to when purchasing a tint film is the percentage of its light transmission.
This indicator means how much light flux the tinting will transmit and how much it will block. In other words, this will affect the degree of darkness.
The darkest one has a light transmission percentage of 5. This means that 95% of the light flux will be blocked by such a coating. While the lightest is characterized by 70% throughput according to GOST.
This is the standard that is used in many countries where such requirements are caused by security and order considerations.
In our country, for now, we have a more tolerant attitude towards this issue, so many craftsmen strive to simply glue the film with their own hands.
It is not advisable to darken the windshield, as this is directly related to traffic safety.
It is better to tint the front side windows with a film with a transmission coefficient of 30% (although this does not correspond to the regulations for the vehicle’s approval for operation), and for the rear windows almost any one will do.
One of the most popular is colored film, most often black, dark blue, silver, or mirror. Even a dark coating makes it possible to drive comfortably at night, if it has a normal light transmittance percentage.
What does car tinting give the driver, the price of which is affordable for most car enthusiasts:
- in hot weather, it reduces the heating of the car interior by half;
- delays the overwhelming amount of UV rays that have an adverse effect on our skin;
- successfully fights glare from oncoming headlights, sunlight, and sparkling snow;
- holds glass in case of physical damage, protecting passengers from fragments;
- protects personal space, as well as interior items (DVR, radar detector, navigator).
In order to darken the windows in your car, you need to stock up on several basic ingredients and components:
- direct tint film. As a rule, one roll of standard length is enough for four side windows;
- stationery knife, always sharp;
- rubber spatula of suitable rigidity. The kit may include a miniature scraper, but it is better not to use it to avoid leaving scratches;
- a solution of detergent and warm water;
- spray;
- any hair dryer (household, installation, construction);
- dry rags (soft rags).
How to do the work yourself and inexpensively
It is advisable to carry out the work with an assistant, since the film dries quickly, and many actions must be carried out in a matter of minutes.
The tinting itself should be planned for a warm day, in dry and windless weather in the open air or in a ventilated, dust-free room. So, let's now see how to properly perform the car tinting procedure:
- First, all door seals are removed. This must be done carefully so as not to damage the rubber coating. All glasses must be prepared accordingly - for this they are washed using a soap solution.
- The film must be cut into pieces completely in accordance with the dimensions of each glass. All pieces must be laid out so that they can be quickly accessed. You can leave a small amount of film on each side.
- We will also need detergent or shampoo for the tinting process itself. The prepared solution is poured into a spray bottle. Now the outer part of the pre-washed glass is sprayed from it.
- Now the required piece of film is applied to each glass in turn. The transparent layer faces outside, and the dark layer faces inside the vehicle interior. Now the dark layer is carefully but quickly separated before the glass has time to become dry. In order to quickly pull it off, you can moisten it from the same spray bottle.
- After this, you can smooth the surface of the glass with a rubber spatula, simultaneously removing any bubbles and irregularities that have appeared. Sudden movements should be avoided, and smoothing should be done from the edges to the center.
- After the transparent part of the tint has fallen off, you can trim off any excess around the edges. This is done with a sharp knife, but extremely carefully so as not to damage the main areas.
- If you have a hairdryer, you can force-dry each finished glass. After a day or two, you can put the seals in place and operate the car as usual.
As you can see, friends, you can tint your car yourself without even removing the windows. The main thing in this matter is to avoid color distortion of the real picture of what is happening outside the window by the driver. There are many interesting notes ahead of us. Stay with the blog to be the first to know the most interesting things from the world of cars.
Sincerely, blog author Andrey Kulpanov
Source: http://avto-kul.ru/tyuning-i-aksessuary/tonirovka/kak-zatonirovat-mashinu.html
How to tint a car yourself?
Car tinting is an integral part of the lives of many drivers. This tuning attribute not only improves the appearance of the car, but also has practical applications. Next, we’ll talk about how to stick the film on car windows yourself and consider all its pros and cons.
Pros of tinting
Each driver, when tinting his car, pursues certain goals. Most people want to improve their appearance, however, in addition to this, there are many other useful properties of tinting:
- a tinted car heats up less in the sun in hot weather, which is important for cars that are not equipped with air conditioning;
- in the event of an accident, tinted car windows do not crumble and do not scatter into small pieces; this is facilitated by the tinting film, which holds all the elements of the broken glass;
- at night, the driver is blinded by cars coming behind, however, a tinted rear window solves this problem;
- tinting a car allows passengers to feel comfortable, because they are not visible from the outside, and accordingly, what they are doing is also hidden from prying eyes.
Cons of tinting
In addition to its advantages, a tinted car also has its disadvantages:
- difficult visibility at night (which greatly increases the likelihood of an accident);
- in many regions of the Russian Federation, tinting the windshield and front side windows is prohibited (the fine for this violation is 500 rubles);
- Low-quality film distorts the image, which can cause driver disorientation and lead to an accident.
After familiarizing yourself with all the nuances, let’s move on directly to the process of tinting the car.
For tinting we need:
1. Directly the film itself, you will have to choose from expensive American and cheap Chinese tint films. As many have guessed, the “American” has better quality, but at the same time loses in price to its competitor. During installation and operation, Chinese-made film will cause more trouble.
2. A set of silicone scrapers (usually this set comes with a high-quality film).
3. Soap solution, spray bottle and glass cleaner.
4. Newspapers and a sharp stationery knife.
Once you have acquired everything you need, you can move on to the process itself.
Instructions for tinting a car yourself:
- Prepare the glass for gluing the film: disconnect the interfering elements, unscrew the seat belts, remove the rubber bands from the door cards.
- Wash the glass thoroughly with a glass cleaner. Use newspapers to wipe glass, as they do not leave streaks on the windows.
- Cut the tint film to fit the window. Don't forget to leave a small allowance to avoid inaccuracies and completely cover the glass with film. When cutting, take into account the location of the adhesive side, remember that the film is glued from the inside.
- Peel off the adhesive side of the tint film from the plastic and apply soapy water from a spray bottle to it.
- Having generously moistened the surface of the window with soapy water, carefully apply the center of the film to the glass and begin to gradually smooth it from the middle to the edges.
- Use silicone scrapers to smooth out the film. Bring air bubbles to the edges of the window. In places where air cannot be removed, the glass can be heated with a hair dryer.
- Carefully cut the tint film along the contour of the glass.
At this point the tinting process is completed; if you did everything correctly, the result should bring you aesthetic pleasure.
To summarize, it must be said that the tinting process is quite complex and time-consuming. Of course, you can do it yourself, however, if you are not confident in your abilities, then you should seek help from professionals.
Source: http://xn--80aeqauefgb1byc.xn--p1ai/kak-zatonirovat-mashinu-samomu
How to tint a car yourself
Window tinting is a useful and very attractive accessory. Without it, the car looks more like a large aquarium on wheels than the driver’s personal transport.
High-quality car tinting in service centers can cost 2-3 thousand rubles. Not every car owner will want to part with that kind of money so easily, especially if he knows that he is able to cope with this task on his own.
Let's figure out how to tint a car yourself without going to paid workshops.
If you wish, you can tint the car alone, but it is better to have a couple or two working hands. Naturally, assistants should have at least a basic understanding of what and how you should do. If they are inexperienced, give them a short briefing.
Before starting work, it is necessary to clean the glass of various types of contaminants, including stickers, remnants of old tinting, etc. The surface should be perfectly clean and transparent. At the same time, it is unacceptable for any stains to remain on it.
Then you need to measure the tint as accurately as possible to the size of the required window. Remember that it should not protrude too far beyond the edges of the glass.
A common and annoying mistake at this stage is to apply the tint on the wrong side, when you can’t see what’s outside the car, but you can see what’s inside - be careful.
But if you do accidentally make a mistake, you shouldn’t be too upset - after all, it will fit on the opposite window.
Experts also advise removing the door trim so that the tint extends a little inside - this will protect against scuffing when lowering the windows and the need for re-gluing. If you decide to do this, cut out the shape with a margin at the bottom.
Stage 3 of tinting: cutting and gluing
Having cut out the shape of the tint, you need to start removing the transparent film, holding on to the part that will be on top. After this, it is advisable to hand it over to an assistant so that he can hold it for a while while you spray the cleaning agent on the window.
At this stage you need to lower the glass, then it can be carefully raised as you glue it. After applying the cleaner to the surface, apply the tint to the window and begin to smooth out any bubbles across the surface.
This can be done with a spatula, which usually comes with the film.
Stage 4: finishing touches
Having removed the detergent from under the tint by smoothing out the bubbles, you can proceed to the final stage. Now you need to use a knife to trim off all the excess tinting marks. Having completed all the above steps, you can begin tinting other elements.
Windshield and rear glass
Tinting your windshield and rear window can be difficult. More often they are due to the fact that the surface of these windows is convex and the film is flat. Service centers handle this task without any problems.
But the average driver in a garage has fewer resources and opportunities to ideally place tinting on the front and rear windows, so he has to resort to various tricks. For example, you can carefully cut the film in the center so that the joint is at the level of the rear view mirror.
The film can also be cut into two strips.
When carefully glued, the cut strip is practically invisible. This eliminates the excess tension that appears when applied to slightly convex glass. Often home-grown artists use a hair dryer to heat and stretch the tint on a non-flat surface.
This is, of course, a very useful thing, but it is better to “blow it out” before use to prevent dust particles from getting under the film.
Source: http://motorltd.ru/kak-zatonirovat-avtomobil-samomu/
How to tint a car yourself? What tools are needed?
Many car enthusiasts like to hide themselves and the interior of their car from prying eyes. Some people install special nets that are attached inside the cabin, while others prefer the good old tinting.
However, in addition to the desire to “hide” from prying eyes, some drivers find in tinting an opportunity to make their car more attractive in appearance. And it is worth admitting that by covering the car windows with a dark film, the driver really gets a good result in the form of a beautiful car.
In this article we would like to tell you how to tint a car yourself, since recently this service has become not as cheap as we would like.
Is it possible to properly tint a car yourself?
When it comes to doing something with your car yourself, in other words, in a garage, the question always arises about the quality of the work performed.
And it’s good that drivers are worried about the end result, because any modernization of the car, including window tinting, affects the safety of the car.
By choosing or applying the tint incorrectly, you can significantly reduce light transmittance, as a result of which driving a car at night will be quite dangerous.
However, when answering the question whether it is possible to properly tint a car yourself, we answer with complete confidence that it is possible.
The tinting process itself is not as complicated as it might seem to the average person at first glance.
The main rule in the process of tinting a car, as in any other matter, is accuracy, attentiveness and straight hands. If you are tinting your car for the first time, we advise you to find someone to help you.
In order to get a good result, you need to prepare all the tools in advance, choose the right film, and have a little patience. Only in this case can you hope for successful tinting, and you will learn all the other nuances and how to tint a car yourself by reading our information article.
Subtleties of selection of tinting materials
Any modernization of a car begins with the selection of the necessary materials and tools. In our case, we need to choose the right tint so that in the future we do not have problems with its gluing and operation. Today's automotive market offers consumers a large selection of different tinting films, so every car enthusiast can choose something for themselves.
First of all, you need to decide on the color of the tint. The most popular color today is the classic black tint.
This is due to the fact that it is a fairly universal and practical color that matches any car color and also provides the best protection from sun rays.
However, in addition to black, you can find various shades of blue, red, yellow, green and various other colors. This point is a matter of taste for each person.
The second point that car enthusiasts most often rely on when choosing a car film is light transmittance. Here again, everything depends on the driver’s preferences, but we still advise you to adhere to the established GOST, which applies to the front and windshields. As for the rear windows, in this case light transmittance does not matter.
In fact, there are many more points from which you can change your choice in favor of one film or another. There are seven types of tinting film alone, so this is a topic for a separate article. And we move on to quickly answer the question of how to tint a car yourself.
DIY glass tinting
Before starting work, you need to prepare the tools that we will need to tint the windows. An approximate set of tools should combine the following items:
- Rubber spatula – choose one that is as soft as possible. It is generally not recommended to purchase plastic spatulas, as they can only scratch the tint.
- Utility knife and spare blades
- Glass and mirror cleaner, heated water, microfiber towel (or any other cloth that does not leave lint on the surface)
- Spray
- A construction or household hair dryer - in principle, all the work can be done without it, but if in the end we want to get a good result, then it will be very useful.
Now it is very important to prepare the glass itself on which our new tint will be glued. It is quite logical that in order for the tint to go on evenly and without bubbles, we need to get a perfectly clean surface.
To do this, you need to wash the glass from all adhered particles, and then wipe it with glass washing liquid.
In general, experts also recommend removing the glass, which will make gluing easier, but in our case, we will tint the car as it is.
How to tint a car yourself
Typically, tinting a car starts with the side windows, since they have a more or less straight shape and are somewhat easier to seal. It is especially recommended to do this if you are applying tint for the first time. For gluing, remove all rubber seals from the glass and lift the window all the way up. Then try on and cut out the film using a stationery knife.
Having cut out the workpiece, the film must be applied to the window with the protective layer facing outwards, having first sprayed the surface with soapy water. Using a rubber spatula, straighten the film and cut off the excess to fit the shape of the glass, leaving an allowance of 5-7 mm. Now the upgraded workpiece can be removed and the wetted surface of the glass can be wiped with a dry cloth.
Now, having enlisted the help of an assistant, you can move on to the actual application of the tint - the film is glued inside the car, that is, in the cabin.
The inside of the glass must also be sprayed with soapy water, and the entire surface must be damp. However, you also can’t overdo it, otherwise smudges will ruin everything.
Then pick up the workpiece and begin to remove the protective layer while your assistant sprays the adhesive part with the solution.
The film is then applied to the surface of the glass and smoothed out using a microfiber cloth. This must be done very carefully, since at this stage it is quite easy to ruin the film. Having positioned the tint layer as it should be, you can begin to remove the bubbles. To do this, use a rubber spatula, directing water and air bubbles from the center of the tint to the edges.
How to tint a rear window
The process of tinting the rear window is somewhat more complicated. In this case, the whole difficulty lies in the fact that the rear window has a larger area, which means the work will be more difficult.
If you are wondering how to tint a rear window, then you definitely cannot do it without an assistant. For high-quality rear tinting, it is better to use a household hair dryer, which will make the work much easier.
Otherwise, the tinting procedure is no different from tinting the side windows.
As you can see, tinting car windows with your own hands is not such a difficult task if you know what to do. And after reading our article, you can safely say that you know how to tint a car yourself.
Source: http://avtomoto-best.ru/kak-zatonirovat-mashinu-samomu-kakie.html