How to correctly set the ignition on a VAZ
The modern automotive world is full of new systems and technologies. But there are still fans of Tolyatti classics who enjoy “digging” under the hood of a VAZ.
These cars are attractive because you can independently adjust, tune and fine-tune the engine, as well as other units.
For experienced car owners of Togliatti creations, it will not be a problem to solve the question of how to set the ignition on a VAZ-2107 or some other model.
Why is the ignition adjusted?
If the ignition timing in a car is set correctly, then this only has a positive effect on a large number of engine performance characteristics. It happens that some drivers drive for a long time with a broken ignition, without knowing it.
And this causes an increase in fuel consumption and a decrease in the dynamics of the iron horse. Therefore, conversations about the quality and durability of Fiat engines, which are becoming outdated in all respects and cannot work properly, are becoming more frequent.
Naturally, this does not reflect reality in all cases.
Of course, using contactless ignition in a car is much more reliable and accurate, and current cars are designed in such a way that they require minimal adjustments. And if they are produced, it will only be with the help of a computer. That is why today not everyone can cope with such a very simple process as adjusting the ignition.
How does a distributor work?
To carry out correct ignition adjustment you need to have a certain set of tools:
- flat screwdriver;
- open-end wrench 12 by 13;
- set of adjustment probes;
- crooked starter;
- spark plug key.
If you do everything intelligently, it will take no more than fifteen to twenty minutes. The whole point of the adjustment is to change the timing of the spark. This should be done not when the piston “stands” at the dead top point and the resulting spark does not give the desired result, but a few moments earlier.
Of course, this figurative meaning of “a few moments” is different for each owner of the “swallow” and it is determined according to the factory parameters. For 2016 models, the advance angle is set to one degree, and for the VAZ-2101 - three degrees.
It is with these settings that timely detonation of the fuel mixture and its complete combustion occur.
Discounts on new cars! Advantageous loan from 9.9%
Installment plan 0%
To make adjustments, each cylinder uses an ignition distributor (distributor), which supplies a spark to the spark plugs in the order in which the cylinders fire.
The firing pattern of the cylinders must be known exactly - it is one, three, four, two. The main working elements of the distributor are the slider and contacts.
The voltage is distributed by a slider using a cover over the cylinders, and with the help of contacts, at the moment of opening and closing, the moment of spark supply is determined.
What needs to be considered in order to make the correct adjustment
You can adjust the ignition once over a long period of time, for example a year or two, or you can do it monthly, and in some cases more often. All this depends on whether the conditions necessary for the successful completion of the undertaking are met:
- Before starting the adjustment, you need to make sure that the entire set of spark plugs is in working condition.
- Clean the breaker contacts, check its condition and gaps.
- BB wires must be in good condition. They must not be damaged; the spark plug caps, ignition coils and contacts with the distributor must be in perfect order.
- The vacuum ignition drive must be connected and it must be free-wheeling.
Only if all these instructions are followed can adjustments be made.
Adjusting the lead angle
- First you need to determine the compression stroke on the fourth cylinder. We block the block head with a finger or something else and use a crooked starter to turn the crankshaft. When the fixing object pops out, then the compression moment of the fourth cylinder will be reached.
- Next, you need to align the marks that are applied to the engine cover and the crankshaft pulley.
- Next, you need to install the distributor so that the cylinder head is located perpendicular to the runner. After this, a very important manipulation follows - you need to slightly raise the distributor body and move the slider with the shaft clockwise by one tooth. Then you need to set the ignition angle according to the spark. To do this, insert the ignition element into the cap, ensuring tight contact with the ground. Then rotate the crankshaft one quarter counterclockwise. Next, with the ignition on, crank the crankshaft until a spark forms. It is also advisable to check the position in which the pulley is located. If it is on the marks, everything is fine, there is a slight discrepancy - perform a simple adjustment, adjusting the position of the distributor to the position of the middle mark.
You can make adjustments in the same way using a light bulb.
Adjustable using a strobe light
If you have a strobe, the adjustment process will look much simpler and faster. You just need to connect the device to the cap of one of the candles and connect the power. The adjustment is made at idle speed.
To determine the ignition moment, you need to point the device at the crankshaft, and its light will duplicate the appearance of a spark, and also display the moment at which the marks of the cover and the pulley coincide. If there is a coincidence, you need to immediately secure the distributor.
Let's sum it up
Self-adjusting the ignition will not only save you a penny on your budget, but will also help you “get closer” to your car. Correctly adjusted ignition is the key to correct engine operation.
Source: http://CarExtra.ru/obzory/kak-pravilno-vyistavit-zazhiganie-na-vaz.html
How to install the ignition of a VAZ 2106 yourself
How to set the ignition of a VAZ 2106 on your own
The condition for quick engine starting and uninterrupted operation is that the ignition is set correctly. Due to its incorrect installation, detonation may occur, and its result will be serious consequences and engine breakdown. Experienced drivers set the ignition by eye, others use a strobe light, and beginners usually turn to a car service center. However, if the result is good, the move itself does not matter.
Required tools:
- key to "13";
- spark plug key;
- control (a voltmeter or a 12-volt light bulb can be used);
You can set the ignition on the first or fourth cylinder. On our website you can see a description of the ignition installation on the first cylinder.
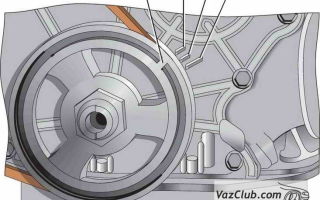
A short, medium and long mark on the timing cover (gas distribution mechanism) shows the ignition moment of the VAZ 2106 .
How to set the ignition of a VAZ 2106 on your own
- Short mark with a leading angle of 10°.
- Average - 5°.
- Long - 0°.
The top dead center is indicated on the pulley rim; opposite TDC there is a special indentation on the pulley hub.
Also check out
Recommendations for displaying the VAZ 2106 ignition at home
- Unscrew the spark plug of the first cylinder, cover the spark plug hole with your finger or rubber plug.
How to set the ignition of a VAZ 2106 on your own
- Using a special wrench, turn the crankshaft until compression occurs in the 1st cylinder (the piston rises up). The plug will fly out or you will feel pressure on your finger.
- Turn until the mark on the crankshaft pulley coincides with the mark on the timing cover. When using “92” or “95” grade of gasoline, you need to align the mark with the middle arrow, if the grade is lower, then with the long one (corresponding to zero advance angle).
- Unfasten the latches and remove the cover from the ignition distributor.
- After the crankshaft has been turned, the distributor rotor should be in a position in which its outer contact is directed towards cylinder 1 on the distributor cap.
4
- After aligning the marks, it is worth considering the distributor. Try drawing an imaginary line through the latches on the cover, parallel to the axis of the motor. If this does not work, you need to do the following:
- Turn the distributor up and unscrew the nut securing the distributor. While rotating the rotor axis, align it parallel to the engine axis.
- Install the distributor, tighten the nut, but do not tighten it completely.
- Upon completion of all these procedures, you can begin the process of adjusting the ignition.
- Connect the “control”: attach one end to ground, install the other at the output of the ignition coil with the low-voltage distributor wire.
- Turn on the ignition. Turn the distributor clockwise until the indicator light goes out. If the light does not light up initially, there is no need to turn the distributor.
- Rotate the distributor from right to left, fix the location of the distributor and tighten the fastening nut while the warning lamp lights up.
- Turn off the ignition and replace the distributor cap.
- Start the engine and start driving.
- Accelerate the car to 45 kilometers per hour, engage 4th gear, and sharply press the gas pedal.
- After a few seconds, detonation will appear (ringing of fingers, popping noises). It will disappear when the car accelerates further.
- The conclusion that ignition is “early” can be made if detonation does not disappear when the car accelerates, and that “later” can be drawn if detonation does not occur. In the first case, turn from left to right by 0.5-1 divisions, in the second - from right to left by the same number of divisions. As soon as you manage to adjust the ignition, use paint to mark the position of the middle mark on the distributor body.
If all actions are performed correctly, you can consider that you have succeeded in setting the ignition of the VAZ 2106 .
Below is a video showing the above process in detail.
We recommend reading
Source: http://prostovaz.ru/vaz-2106/kak-samostoyatelno-ustanovit-zazhiganie-vaz-2106.html
How to set the ignition. Setting the ignition timing
When the engine overheats, does not develop the required power, or its fingers “knock”, look for the cause in incorrectly set ignition timing.
Using a strobe
Warm up the engine to operating temperature. Connect the strobe light's power to the car's power supply.
Place the activation signal sensor on the high-voltage wire of cylinder 1.
Loosen the nut 13 securing the body of the breaker-distributor.
Remove the vacuum corrector hose and plug it. Direct the light from the strobe to the crankshaft pulley.
Start the engine, speed is idle. Rotate the distributor body.
Fix the position of the breaker-distributor body so that the pulley mark coincides with the desired mark on the timing cover.
Tighten the fastening nut.
Using a light bulb
Rotate the crankshaft until the pulley mark coincides with the desired mark on the timing cover, and the ignition distributor breaker slider points to the high-voltage wire of the 1st cylinder.
Loosen the nut securing the distributor body.
Connect one wire of the 12 V test light to the wire going from the distributor to the ignition coil, and the second to the vehicle ground.
Turn on the ignition (required!). Rotate the distributor body clockwise until the light goes out.
Slowly turn the distributor in the opposite direction (counterclockwise). Fix the position of the distributor at which the warning lamp lights up.
Tighten the distributor breaker retaining nut.
By spark
Rotate the crankshaft until the pulley mark coincides with the corresponding mark on the timing cover, and the distributor slider points to the high-voltage wire of the 1st cylinder.
Loosen the nut securing the ignition distributor breaker housing. Remove the central high-voltage wire from the distributor cover, and place its contact at a distance of 5 mm from the vehicle ground.
Turn on the ignition. Turn the breaker body clockwise 200.
Slowly rotate the distributor in the opposite direction. Fix the position of the distributor, at which a spark jumps between the contact of the central wire and the ground.
Tighten the breaker fastening nut.
Aurally
Start the engine. Loosen the nut securing the distributor body.
Slowly rotate the distributor breaker housing in both directions.
Fix the position of the distributor at which the engine operation will be most stable and the speed will be maximum.
Turn the breaker body 2-30 clockwise.
Tighten the distributor securing nut.
"MD-1"
About him - in a separate article
Regardless of how the ignition timing was set, it is necessary to check its correctness using the famous method in 4th gear.
Source: https://goodmaster.com.ua/avtomobil/kak-vystavit-zazhiganie.html
How to set the ignition on the engine correctly
When running an internal combustion engine in a car, it is important that the fuel mixture ignites at the right time. This process is controlled by the ignition system .
The ignition system is a complex element, and it happens that the settings go wrong, and then the engine starts to work incorrectly.
how to set the ignition on the engine , or have insufficient experience, thereby aggravating the situation with careless adjustment. To do this, you first need to know what ignition is and how it works.
Setting the ignition on the engine yourself is not difficult, the main thing is to know all the intricacies of the process. And we will look at this in the article.
Ignition operating principle
The engine is started by ignition. Ignition, in its essence, is necessary to create a spark charge during a certain period of engine operation. This spark charge passes through the spark plugs.
In a gasoline car, a spark is needed to create a charge. It is different with a diesel engine, where combustion of the mixture occurs at maximum compression. Those.
turning the key activates the compression system and supplies the required amount of air-fuel mixture to the engine.
When the ignition system operates correctly, the engine quickly picks up the necessary work, and there is no increased detonation.
Why do you need to set the ignition on the engine?
Many car owners, especially beginners, not only do not know how to set the ignition on the engine, but also why it is needed. And this is necessary so that the fuel mixture burns completely.
Combustion does not happen suddenly, so it takes some time.
To obtain the required efficiency, ignition of the fuel must occur before the piston reaches TDC. Thus, while it approaches the top point and crosses it, the air-fuel mixture burns without residue and the necessary energy is released. Thereby influencing the piston as much as possible.
This is called ignition timing or timing , because... measurements are made by rotating the crankshaft. Those. the angle by which the crankshaft is not turned so that the piston is at TDC.
Causes and symptoms of malfunction in engine ignition
Late and early ignition
Violations of the ignition timing lead to late or early ignition.
Late ignition - when the fuel ignites with a delay if the piston is as close as possible to TDC or has reached it.
As a result, the air-fuel mixture does not burn completely. The result is a small amount of energy.
Early ignition - when the fuel mixture ignites at a time when the piston is still far from TDC.
Thus, it turns out that the release of energy has occurred, but the piston has not yet passed TDC. In addition, the released energy begins to counteract the piston.
Consequences of such violations
Incorrectly set ignition on the engine leads to bad consequences for the engine.
Signs of late ignition:
- The motor does not pick up speed well. There is a lack of power.
- Difficult start-up, especially evident during the first start.
- Increased fuel consumption.
- Engine overheating.
- Popping sounds are present.
The consequences of late combustion are serious for the engine. Because Unburned fuel begins to accumulate on the internal components of the engine in the form of soot. As a result, it results in coking of the engine and leads to malfunction.
Signs of early ignition:
- Fuel detonation occurs.
- Reduced power at low speeds.
- Increased fuel consumption.
- A metallic knock is heard when the engine is running.
Early advance is also quite destructive for the engine. Because the released energy begins to counteract the piston, and shock loads occur on the piston and connecting rod mechanism (resulting in a metallic knock). All this wears out the components, burnout occurs, connecting rods bend, and the crankshaft wears out.
Therefore, to prevent this, you need to know how to correctly set the ignition on the engine .
How to set the ignition on a car engine
There are many ways to set the ignition, but we will look at 3 ways to set the ignition on an engine, which you can handle on your own.
Aurally
No special equipment is needed here; many experienced craftsmen use this method.
Everything is simple here. First you need to start the car. Then lightly unscrew the nut securing the distributor and slightly turn its body. As you turn, the engine speed will begin to change.
A technique for finding the position of the body when the car's speed will be maximum, but stable. In this position, you must quickly press the gas.
If set correctly, the engine will begin to pick up speed quickly, without jerking or delay.
Turn the distributor 1-2 degrees clockwise, getting rid of early ignition, and tighten the nut.
By spark
First, you need to set the piston of the 1st cylinder to the upper position. By rotating the crankshaft, we align the marks on the pulley with the first mark on the timing block.
It is worth keeping in mind that the distributor must be aimed at the contact of the cylinder wire. The fastening nut is loosened and the distributor begins to rotate slightly counterclockwise.
This is how the search for a spark occurs. When the spark disappears, the distributor is fixed.
By the light bulb.
Align the mark on the timing pulley with the protrusion on the cover. Thus placing TDC on the first cylinder. Connect the light bulb, one with a wire to ground, the other with a wire that connects the ignition coil to the distributor.
Lightly unscrew the distributor nuts. Turn on the ignition (without starting the engine) and turn the distributor housing until the light goes out. After this, turn the distributor to another until it lights up.
And tighten the distributor.
Checking the correct installation of the ignition on the engine
To do this, you need to go on a coward and accelerate the car to a stable 50 km/h .
By pressing the gas pedal sharply, detonation occurs (metallic knocking), and it occurs for 1-2 seconds, then the angle is set correctly.
If the detonation is too long, then the advance angle is set incorrectly and should be reduced clockwise. If detonation does not occur, then increase the advance angle by turning the distributor counterclockwise.
Finally…
An incorrectly set ignition timing has a detrimental effect on the engine. In addition, fuel consumption increases, power loss and unstable engine operation occur. Therefore, you need to know how to set the ignition on the engine and understand how important it is to correctly configure this unit.
Source: https://carrepair7.ru/kak-vystavit-zazhiganie-na-dvigatele
How to set the ignition in a VAZ2106. Adjusting the ignition on a VAZ 2106
Ignition of the fuel mixture in the cylinders of an internal combustion engine must occur at a strictly defined moment. Incorrectly set ignition in a VAZ 2106 car is fraught with serious trouble.
The car engine starts to work incorrectly. It is quite possible to adjust the ignition yourself, without the help of qualified specialists.
Below in the article we will look at how to adjust the ignition on a VAZ 2106 car and what you will need for this.
Ignition 2106, how ignition affects engine performance and fuel consumption
As mentioned earlier, if the ignition is adjusted incorrectly, the engine of a VAZ 2106 car begins to work incorrectly. The thing is that if the ignition control is violated, the fuel mixture ignites either too early or, on the contrary, too late.
These malfunctions in the ignition system are called:
- Early ignition.
- Late ignition.
Problems that arise when the ignition is set incorrectly on a VAZ 2106 car:
- The dynamic characteristics of the car are reduced. It does not matter whether the ignition is early or late;
- Increased wear of engine parts occurs;
- The engine gets very hot;
- Fuel consumption increases. To reach the required speed, the engine consumes more fuel.
With a normally adjusted ignition, ignition of the fuel mixture occurs at the moment when the piston is directly at top dead center (TDC). It is at this moment when the mixture is ignited that the engine provides maximum efficiency (efficiency).
Helper tools
To adjust the ignition system on a VAZ 2106, you will need the following tool:
- Multimeter (voltmeter);
- Candle key;
- The key is "13".
How to set the ignition on a VAZ, step-by-step instructions
Before you begin directly adjusting the ignition in a VAZ 2106 car.
You should know that the ignition timing on a given vehicle is set according to marks located on the timing cover.
Three marks of different lengths are cast on the timing cover:
- Short mark - corresponds to an ignition timing angle of 10 degrees from top dead center, intended for driving on 76 gasoline;
- Middle mark - corresponds to an ignition timing angle of 5 degrees from top dead center, intended for driving on 80 gasoline;
- Long mark - ignition timing angle 0 degrees, ignition of the fuel mixture occurs exactly at the top dead center of cylinders 1 or 4, intended for driving on 92 and 95 gasoline.
And so, we proceed directly to adjusting the ignition on a VAZ 2106 car:
- Open the hood;
- Remove the high-voltage wire from the spark plug of the first cylinder;
- Using a spark plug wrench, unscrew this spark plug;
- Close the spark plug hole with your finger or a rubber plug;
- We turn the crankshaft until the compression stroke, that is, until the moment when the piston of the first cylinder begins to move upward (you can understand this by how the rubber plug flies out or the air begins to push out the finger);
- Having determined the compression stroke of the first cylinder, we set a mark on the pulley according to the required ignition (the mark on the timing cover, in our time this is usually the longest mark intended for 92 and 95 gasoline);
- Let's put everything back together.
Now let's move directly to the ignition distributor:
- Unfasten the latches securing the cover to the ignition distributors;
- Remove the cover;
- Loosen the fixing nut with a key set to “13”;
- We set it parallel to the engine axis;
- Tighten the fixing nut (do not tighten it!);
- Turn on the multimeter (voltmeter);
- We connect the positive probe of the multimeter to the terminal of the ignition coil, the negative probe to ground;
- Turn on the ignition;
- We begin to turn the ignition distributor clockwise, it is necessary to turn it until the voltage on the multimeter disappears;
- Now we smoothly turn the distributor counterclockwise, as soon as the voltage appears again, we stop. Ignition adjusted;
- Tighten the fixing nut;
- We assemble the ignition distributor.
How to check the ignition, progress in checking the correct ignition adjustment
Now you need to check the ignition in practice. This requires a long, straight and level section of road. Checking the ignition on a VAZ 2106 car is carried out as follows:
- We start the car;
- Warm up the engine completely;
- We accelerate the car, gradually reach 4th gear, the speed should be approximately 45-50 km/h;
- Press the gas pedal to the floor;
- The sound of “fingers” appears;
- When the speed increases by 5 km/h, the tapping of the fingers should stop;
- This means the ignition is set correctly;
- If not, then the ignition is not adjusted correctly.
Pre-ignition, signs and how to fix it
Early ignition will be indicated by increased and continued knocking of the fingers, as well as detonation in the engine (popping noises).
To correct early ignition on a VAZ 2106, you need to disassemble the ignition distributor and turn it a few degrees counterclockwise. After this, you need to put everything back in place and check the ignition again in the manner described above.
Late ignition, symptoms and how to fix it
Late ignition will be indicated by a slow increase in engine speed.
To fix this problem, you need to disassemble the distributor and turn it a couple of degrees clockwise and check the car again.
Advice from professionals
- According to experts, the ignition on a VAZ 2106 car can be considered adjusted only if no more than 2 finger knocks are heard at a speed of 60 km/h;
- In the absence of a multimeter or voltmeter, the ignition can be adjusted using a conventional 12 Volt control;
- This method of ignition adjustment, in addition to the VAZ 2106, is suitable for all carburetor “classics”.
As we see, adjusting the ignition on a VAZ 2106 car can be done independently, without any help or contacting a car repair shop. This concludes our article.
- Tuning VAZ 2114: modification of the VAZ 2114, a little about everything
- Throttle body, DIY throttle body cleaning
- Gestures and light signals by drivers
- Medical examination for a driver's license 2018
- Lada Vesta official versions. Advantages and disadvantages of Lada Vesta
- How to repair the gear motor of a VAZ 2110 stove
- Kalina stove control unit: design, repair and replacement of the Kalina stove control unit
- What is a pneumotester, how to evaluate its readings?
- Oil pump VAZ 2107, do-it-yourself oil pump repair and replacement
- What to do if your car is stuck in the snow, useful tips
- The headlight is sweating from the inside, what should I do?
- The VAZ 2107 stove does not heat well: how to repair the stove on a VAZ 2107
- Anti-freeze, what is it and how to choose it correctly
- Car lamps: LED, halogen, ice lamps How to choose lamps in a car
- Reasons for antifreeze leakage: faulty cooling system, cooling radiator, heater radiator, faulty connections, antifreeze in the engine oil.
- How to replace a light bulb in a car
- How to photograph a car for sale, useful tips
- How to choose a car service (and save money at the same time), useful tips
- How to start a car in winter, useful tips
- What can knock in a car? How to determine the cause of a knock?
- How to diagnose a car yourself
- Autonomous preheater, autonomous preheater with remote or programmable start
- Replacing the silent block of the front suspension arm, how to replace the silent blocks of the front suspension with your own hands?
- Idle speed sensor malfunction VAZ Signs of a malfunction of the idle speed sensor VAZ 2110, 2107, 2109. Replacing the idle speed sensor with your own hands
- Is it necessary to warm up the engine?
- How to clean the throttle valve yourself?
- VAZ injector does not start well in cold weather, what should I do?
- How to replace a VAZ clutch fork?
- Replacing a 2110 clutch disc. How to replace a 2110 clutch disc without removing the transmission?
- What is a code grabber, how does it work and is there protection against it?
- How to replace VAZ tie rod ends with your own hands?
- Generator 2115 DIY replacement and repair
- Replacing generator bearings 2110
- Automotive clutch: device, operating principle, classification, types, advantages and disadvantages
- How to check generator 2110? How to remove generator 2110? DIY VAZ 2110 generator repair
- Why the rear window of the car does not heat up, do-it-yourself rear window defroster repair
- I flooded the candles in the cold, why the candles flood in the cold, reasons and how to fix them
- Car key with a chip, how and where to make a chip key for a car?
- How to stud winter tires correctly, stud winter tires with your own hands, useful tips
- Why do cars catch fire?
Source: http://prosedan.ru/kak-vystavit-zazhiganie-v-vaz2106
How to set the ignition timing
The ignition system is largely responsible for the stable operation of the engine. An incorrectly set advance angle leads to interruptions in engine operation, difficulty starting it, loss of speed, popping noises and shots.
Another possible reason why you may need to adjust the operation of the system is dismantling the distributor.
Distributor installation
This procedure occurs differently on all cars. Very simple installation of the distributor on domestic Moskvich vehicles, ZAZs and GAZs.
In the shank of their distributors there are two crescents of different sizes. Exactly the same sector is present in the drive located in the engine block.
When installing the distributor, it is enough to ensure that the direction of the crescents of the shank coincides with the drive.
On the body of the distributor of most cars from foreign manufacturers there are special marks for reference, which greatly simplifies its installation.
The distributor is installed on VAZ cars using the first cylinder. To do this, you need to set its piston to the position preceding TDC (top dead center), at which the compression moment occurs. The order of this procedure is as follows.
- The spark plug of the first cylinder is unscrewed.
- Use your finger or a wine cork to tightly close the resulting hole.
- Rotating the crankshaft clockwise with a crank or a socket wrench (36 mm), you need to wait until the moment of compression (the air begins to push out the finger or plug).
- Continuing to turn the flywheel, you should ensure that the mark on its pulley coincides with the middle mark located on the timing cover. The advance angle in this case will be approximately 5°, which is acceptable for “92” and “95” gasoline.
Now you can install the distributor. Its body should be in a position in which an imaginary line through the spring latches of the cover is parallel to the axis of the engine. The rotor of the distribution runner should be directed towards the contact of the first cylinder on the cover.
If all the conditions are met, you can tighten the mounting bolts and try to start the engine (the spark plug from the first cylinder must be screwed back in). If the car starts, then everything has been done correctly and the next step is to adjust the ignition timing.
Video - how to set the ignition on a VAZ 2106 if the distributor has been removed:
Some specialists install the distributor on any of the cylinders. At the same time, they do not look at the marks at all, but rotate the crankshaft with the starter. This process, in principle, is not complicated, but without certain skills it is still better to navigate by the first cylinder.
How can you set the ignition timing?
Ignition timing adjustment is required for complete combustion of fuel in the chambers. Due to the fact that gasoline does not burn instantly, it must be ignited a little before the piston reaches TDC. Therefore, the moment of spark occurrence must be clearly regulated.
Video - problem of early ignition on VAZ 2106:
There are several ways to perform this procedure. Many craftsmen trust exclusively their ears and prefer to do everything by ear. Some auto mechanics use light bulbs or a strobe light to set ignition timing.
Adjusting the ignition by ear
The process occurs at idle speed of a running, warmed-up engine (if necessary, you can slightly tighten the choke to ensure stable operation).
- The nut securing the distributor body is loosened, after which it begins to slowly rotate in different directions.
- In the position where the engine speed is at its maximum, you need to try to “accelerate”. If, when you press the pedal sharply, no interruptions, pops or shots occur, and the acceleration of revolutions is rapid, then the required position has been found.
- From this point, turn the distributor body 1-2° clockwise, and then tighten its lock.
Completing the last point is necessary so that the ignition is not too “early”, which creates unnecessary resistance to the rotation of the crankshaft.
Setting the spark advance angle
The piston of the first cylinder must be set to the upper position by rotating the crankshaft until the pulley mark coincides with the first mark on the timing block.
In this case, the distributor should be directed towards the contact of the wire of the first cylinder. If it turns out to be in the other direction, you need to perform another full revolution of the flywheel. You can also look for the desired position by unscrewing the spark plug from the first cylinder.
The central high-voltage wire is removed from the distributor cover, and its contact is placed at a distance of 5 mm from the vehicle ground. After loosening the distributor lock, you need to turn on the ignition.
Slowly turning the distributor body, you need to move the slider left/right to find the position at which a spark will occur between the wire contact and the ground.
Next, moving the distributor a millimeter in a counterclockwise direction, you should catch the moment at which the spark stops appearing, and then tighten the latch.
Adjusting the ignition by light bulb
Initially, the piston of the first cylinder is installed in the position preceding the TTM (aligning with the middle mark) in the manner described above. Next, one wire of a regular car light bulb is connected to ground, and the other to the wire leading from the coil to the distributor.
Video - how to set the ignition by a light bulb:
When the ignition is turned on, the distributor housing rotates in different directions until the light comes on. Having stopped the distributor in this position, you need to fix it.
There are very rarely cases when a machine works great even with significant mismatches of marks. This may be caused by incorrect previous engine assembly or timing chain stretching.
Features of different types of ignition, contact adjustment
There are two types of ignition systems: electronic and mechanical. Setting the advance angle of any of them is the same, carried out by rotating the distributor body.
A distinctive feature is that with a mechanical distributor, a spark is formed by opening the contacts. Therefore, before adjusting the advance angle, it is advisable to check and, if necessary, adjust the gap between them. This is done as follows:
- The crankshaft is rotated until the maximum distance between the contacts appears.
- Use a feeler gauge to check the gap. If the indicator differs from that recommended by the manufacturer (it is different for each car model), then the screws securing and adjusting the contact group should be loosened.
- By moving the plate, the required gap is set, after which the adjusting screw is first tightened, and after the control measurement, the fastening screw is tightened.
There are no contacts in the electronic ignition system; a spark occurs in it due to the interaction of special sensors and switches. The advantage is the creation of a high-voltage voltage pulse in the electronic system that is 1.5 times higher than that of a mechanical one.
Consequently, a larger spark is formed on the spark plugs, which contributes to better ignition and combustion of fuel, increased speed, improved starting characteristics, etc. The electronic ignition system only requires setting the correct advance angle.
Regardless of the distributor used and the chosen method of adjusting it, during the operation of the vehicle it may be necessary to adjust the advance angle.
With “early” ignition, the car starts well, but when accelerating, constant detonation is heard. When “late”, engine power drops, increased fuel consumption is observed, etc.
In search of optimal solutions, you should change the position of the distributor housing moderately (no more than 1 - 1.5 mm), after which you need to clamp the latch and test the machine in motion. In any case, to achieve the best engine performance you will have to experiment a little.
Video - how to set the ignition on a VAZ 2109:
May be of interest:
Source: http://voditeliauto.ru/poleznaya-informaciya/to-i-remont/kak-vystavit-ugol-operezheniya-zazhiganiya.html
How to set the distributor: ignition setting and clearance
Having learned how to set the distributor on your car, you don’t have to worry about the smooth starting of the engine, no matter where you are. You can also save on fuel, because incorrectly set ignition increases fuel consumption several times. Finally, the traction characteristics of the car will increase, and you will no longer be afraid that detonation will occur.
Setting the ignition according to two scenarios
ATTENTION! A completely simple way to reduce fuel consumption has been found! Don't believe me? An auto mechanic with 15 years of experience also didn’t believe it until he tried it. And now he saves 35,000 rubles a year on gasoline! Read more"
Every modern car enthusiast has his own answer regarding how to set the distributor. Some use a stroboscopic instrument, others perform eye surgery, and still others use only the services of a service station.
If you want to learn how to set the ignition yourself, you will need to stock up on several tools. A 13mm wrench, a voltmeter and a tool for removing spark plugs (spark plug) are required.
Distributor and its placement
Correctly set ignition provides a reference for the 1st or 4th cylinder of the power plant. Let's look at how to do this in the first case.
When setting the ignition timing, you must also follow the marks on the timing cover. There are 3 marks there:
- Long line coinciding with the lead angle equal to 0 degrees.
- Average risk - with an angle of 5 degrees.
- Short line - with an angle of 10 degrees.
Placing on the 1st candle
TDC is marked on the rim of the crankshaft pulley, and on the hub, directly opposite the mark, there is a special influx.
So, here's what you need to do:
- Unscrew the 1st NW, and then close the hole with a plug.
- Rotate the crankshaft pulley until compression occurs. In other words, until the rubber plug placed in place of the spark plug begins to squeeze out.
- Continue scrolling until the crankshaft line aligns with the pointer on the timing case.
- After this, you will need to loosen the latches and remove the cover.
After the crankshaft pulley has rotated properly, the rotor will move to the area where its contact from the outside will face in the direction of the first cylinder. When combining all the marks, it is recommended to mentally draw an axis along the cover latches. The line should run clearly parallel to the axis of the power plant. If this is not the case, the preparatory operation must be continued.
- The distributor locking nut is unscrewed.
- The distributor turns upward.
- After rotation, the rotor axis is placed parallel to the power plant.
- The distributor is put in place, the latch is tightened, but not completely.
Sparking from a spark plug
Now is the time to proceed directly to the process of setting the ignition.
- One end of the voltmeter with a low-voltage wire is connected to the terminal of the ignition coil, the other to ground.
- The ignition turns on.
- The distributor is carefully turned clockwise until the indicator stops flashing.
- Now the distributor rotates against the emergency direction, and as soon as the indicator lights up, the distributor should be fixed completely.
- The ignition turns off.
- The distributor cap is put in place.
It's time to check how everything is done.
- The engine starts and the car starts moving.
- It is recommended to accelerate to 45 km/h, then put it in 4th gear and immediately accelerate.
- After a few seconds, detonation should begin (popping and ringing evidence of this), which will disappear as the car accelerates.
There are several versions. If, as the car accelerates, detonation occurs but does not disappear, the ignition is most likely set to “early.” To eliminate this mistake, you will have to turn the distributor clockwise another half or full division.
You can judge “late” ignition if detonation does not appear at all. In this case, the distributor rotates counterclockwise by half or full division.
Alignment on the 4th cylinder
This instruction does not imply the use of special meters, test lamps or strobe lights. Of course, if the final check is carried out on a moving car, all this is unnecessary.
We prepare the following:
- Wrenches for 13 and 38 (socket).
We set up the distributor with our own hands
Step-by-step instructions for setting:
- The car is put on the handbrake.
- The advance torque is set for a certain octane number of fuel (more about this was discussed above).
- The marks on the crankshaft pulley and the front cover of the power plant are aligned by slowly rotating the crankshaft using the ratchet.
- The distributor is placed parallel to the motor using its latches. In this case, the contact of the slider must be directed towards the 4th cylinder (this can be determined by the distributor cap).
- The ignition turns on.
- The distributor rotates clockwise until the contacts open and a spark appears between them.
The appearance of a spark is the correct ignition moment. In this position, the distributor should be securely fixed.
Additional tips for setting the ignition
It is noteworthy that in some cases, with a correctly set advance angle, the functioning of the power plant at idle is clearly not impressive. In this case, inexperienced drivers begin to turn the distributor again, shifting the position to the “early” position. Of course, you shouldn't do this. It is better to pay attention to the carburetor adjustment.
The gap and its setting on the distributor
The gaps between the contacts of the distributor and their adjustment are no less important. It is recommended to adjust the gap in car repair shops, but in extreme cases you can do it yourself. Especially after the ignition was set independently.
Checking and adjusting the gap
Step-by-step instructions for setting the gap are as follows:
- A set of special probes with a thickness of 0.40 mm is being prepared.
- The distributor cover is removed.
- The distributor rotor is also dismantled (it is held in place by 2 retaining screws).
- The crankshaft rotates until the breaker cam reaches its maximum position - when the contacts are open to the limit.
- Now the gap between the contacts of the distributor is checked. If in one place, for example, the gap is smaller, then you should alternately loosen the fastening screws of the contact group post and move the post away with a screwdriver until the optimal gap is reached.
What are the dangers of an incorrectly positioned distributor?
If the ignition is set incorrectly, this can lead to big troubles. Here are just a few of them.
- Loss of the former power of the power plant and throttle response.
- Increased fuel consumption.
- Black exhaust, indicating incomplete combustion of fuel.
- Detonation.
- Burnout of valves, etc.
As for the reasons for the factory settings being lost, as a rule, they are associated with the human factor. The driver himself dismantles the distributor for some reason, after which the standard settings are lost.
It will be interesting to note that on domestic car models the slider is set according to the 1st cylinder, but on foreign cars - according to the 4th or according to the special mark of the distributor body.
On Moskvich, Zaporozhets and Volga-24/31 marks represent two different crescents. One of them is short, the other is long.
Tired of paying fines? There is an exit!
Forget about fines from cameras! An absolutely legal new product - NANOFILM, which hides your license plates from IR cameras (which are installed in all cities). More details at the link.
- Absolutely legal (Article 12.2.4).
- Hides from photo and video recording.
- Installs independently in 2 minutes.
- Invisible to the human eye, does not deteriorate due to weather.
- 2 year warranty
Source: http://ozapuske.ru/trambler/kak-vystavit-trambler.html