How to properly connect a car radio in a car


Installation and connection of a car radio is necessary in the following cases:
- you purchased a used car that was not equipped with a car radio, or with a radio that did not meet your requirements;
- you purchased a new car as standard and want to install a car radio with higher performance and functionality;
- you got a good radio “by chance”, for example from a damaged car;
- The car radio is out of order.
Each of these options has its own characteristics. Conventionally, the sequence of actions can be divided into the following stages: preparatory stage, circuit installation work, testing and configuration.
1. Preparatory stage
1.1. Vehicle electrical equipment inspection
First of all, prepare the required tool:
- Screwdriver Set;
- side cutters;
- knife;
- soldering kit (if not, in worst case scenario, you can do without it);
- device for dismantling an old radio.
Next, we dismantle the old car radio and carefully examine the place of its installation. There are two types of radio sizes: standard (single-din) and 2DIN (double the height).
In most cases, you will find ISO connectors on the footprint. This greatly simplifies the installation of a new car radio. As a rule, radio tape recorders sold include adapters from the radio casing connector to the ISO connection.
Next, examine the junction of the connectors to the electrical wiring of the machine. If the car is new or “fresh” there should not be any abnormal connections.
For older cars, you will most likely find yourself connecting the connectors to the car’s on-board network, which will probably have to be fixed.
The problem is that such connections can be powered with gross violations of the safety of vehicle operation, or the insulation has become unusable.
Video - how to install a radio in a car and what to look for:
If you change the radio because it has failed, you must in any case reconnect all connections, otherwise the new radio will suffer the same fate. In addition, it is necessary to check all the speakers and the quality of the wiring; this will be discussed in the next chapter.
In the case when you are going to change a radio with increased output power, you need to look at the cross-section of the conductors going to the speakers. Modern high-quality car radios have an output power of 50 watts per channel. The cross-sectional area of the audio system wires in this case must be at least 4 square millimeters.
1.2. Development of a sketch of electrical wiring and a list of components
The next stage is drawing up a wiring sketch indicating the distances to consumers. This applies to cases where a decision has been made to replace audio and network wiring.
The positive power bus for the high-power radio will most likely have to be pulled from the engine compartment; the negative one can be connected to ground near the center console.
The most difficult part is to route the audio system wires. Usually it runs to the rear speakers along the right and left thresholds.
Video - connecting a Pioneer car radio with your own hands:
If you plan to connect an amplifier, cameras, or other additional devices to the radio, they must also be taken into account in the sketch.
The sketch must indicate the connection points for the fuses. It is better to choose them near the connection source. The size of the main fuse is calculated based on the maximum (peak) output power of the car radio using the formula:
Nominal = 2.5 X Total power of radio channels (Watt) / 12 Volts
With a car radio power of 4 X 50 W, about 50 Amperes are obtained.
Next, you need to calculate the approximate consumption of components, for example:
- power wire with a cross section of 8 sq. mm. – 8 meters;
- connecting wire with a cross section of 4 sq. mm. – 4 meters;
- contact group for speakers – 10 pcs.;
- fuse 50 Ampere with socket – 1 pc.;
- 15 Ampere fuse with socket - 1 pc.;
- solder, rosin – 1 set;
- fasteners – 20 units;
- heat shrink 4 mm – 1 meter;
- heat shrink 6 mm – 1 meter.
Heat shrink is necessary for high-quality insulation of electrical connections. It is a vinyl cambric that shrinks in size when exposed to hot air (an industrial hair dryer, or a lighter).
1.3. Measuring the parameters of the speaker system
Next, you need to examine the installed car audio system. To do this, you will have to remove the speaker covers and look at the condition of the diffusers. Then use a multimeter to measure the speaker resistance. Standard resistance values are 2, 4 and 8 ohms (usually 4).
If anyone has forgotten how to do this: switch the multimeter to the resistance position at a limit of 200 Ohms, connect the probes to the speaker terminals. If the resistance is less than 2 ohms, you may have a short circuit in the circuit. For this reason, car radios most often fail.
In order to determine the rated power of a speaker, you will have to look at its labeling. It is applied on the back side.
If you change the acoustics, you need to take into account that you will have to pull the wiring through the corrugation connecting the doors to the interior. This is a big piece of work. In this case, immediately measure the diameter of the speaker seat and the seat depth.
When using a subwoofer and installing a corresponding amplifier, the choice of location is important. It doesn't cool well under the seat; you have to run long wires into the trunk, which will create additional interference. It’s better, of course, to stick with the first option.
Some car radios are equipped with line outputs. This simplifies the task: you only need to route the coaxial wires and the amplifier control wires. If there are no line outputs, an additional high/low level coupler must be installed.
1.4. Recommendations for choosing a car radio
In the case when you buy a radio with improved characteristics for a new car, it is more rational to stay with the standard model. Such car radios are produced by some manufacturers, for most brands of cars, including domestic ones.
They completely match all interfaces (connectors, controls, diagnostics, etc.) to the car. Their installation is extremely simple: remove the old one, install the new one, adjust the light, color and other custom parameters.
Video - installing a car radio in a car:
It is better to purchase a radio with low-level outputs (linear outputs). Then, when installing the amplifier, you will not have to interfere with the circuit.
ANDROID radios are becoming more and more fashionable. In practice, this is a multimedia audio complex with a positioning system, the Internet and other bells and whistles. There is a rational element to this. Firstly, the separate purchase of the necessary devices will cost much more. Secondly, there is no point in cluttering the car’s work area with numerous gadgets.
After purchasing all the components and the radio itself, we proceed to the next stage.
2. Radio connection diagram and installation work
This is the most critical stage. Primary requirements:
- correct development of electrical circuit;
- competent and high-quality electrical installation;
- checking reliability and compliance with the installation diagram.
2.1. Electrical circuit development
The easiest way is to rely on the standard ISO interface. Then, when replacing equipment further, you will not have to change anything.
In addition, its diagram is extremely clear. For most car radios you can buy standard adapters.
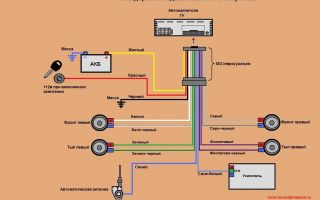
ISO connector pinout (correspondence of contacts and pins):
Typical car radio connection diagram:
Guided by this connection diagram, it is not difficult to make the correct electrical installation.
2.2. Electric installation work
First of all, you need to bring all the conductors from the devices to the connection area of the ISO connectors. The most difficult thing to do is for speaker wires, if such a need arises. In this case, you will have to remove the door trim, then lead the conductor through the corrugated hose connector.
Sometimes, for ease of connection, the wire is led past the connector. Then under the steering wheel you are allowed into the center console. Rear speakers are usually connected along the lower sills.
The signal antenna wire is usually installed by the manufacturer. It is inserted into the coaxial socket of the car radio. There are two types of antennas: passive and active (with an amplifier).
Antennas with an amplifier must be used if the car is operated away from large populated areas. If such an antenna is used in a big city, it will be “clogged” with numerous electrical noises.
Also, some antennas have an extension drive. For this purpose, the circuit provides a separate power supply to the antenna via the ISO interface.
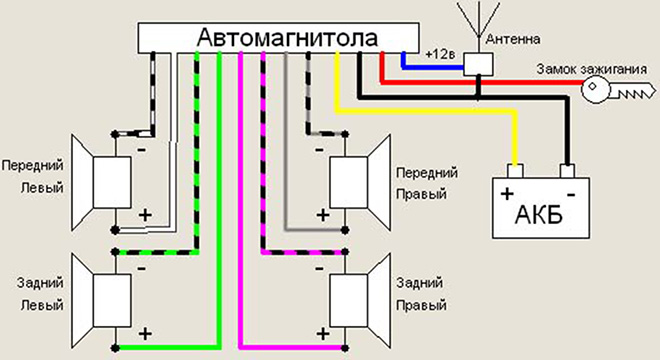
The radio is powered through two channels: directly from the battery to maintain settings and memory, and through the ignition key.
Electrical connections to the speakers should be made using special contact groups. It is better to connect the wires by twisting plus soldering using heat shrink.
2.3. Standard designations for car radio terminals
When drawing up other electrical circuits, it is necessary to use the operating instructions for car radios or, in the absence of them, stickers on the case.
The International Standard provides the following conventions:
- FR+ and FR- front right positive and negative speaker output;
- FL+ and FL- front left;
- RR+ and RR- rear right;
- RL+ and RL- rear left;
- GND – common wire, body, ground;
- B+ battery plus;
- BAT plus battery;
- K30 plus battery;
- A+ plus through the ignition key;
- K15 plus via ignition key;
- ACC plus via ignition key;
- ANT plus antennas;
- SAFE plus via ignition key;
- SWA plus via ignition key;
- N/C no connection;
- LAMP, ILL, ILLUM backlight;
- MUTE, TEL pause for telephone conversation;
- AMP switch on the amplifier;
- DATA IN/OUT data input-output;
- SHIELD braided coaxial wire;
- LINE IN/OUT linear input-output;
- REM management;
- DIMMER adjusts the brightness of the display.
- CAN, K-BUS data bus line;
- CD-IN/OUT, DVD changer connection;
2.4. Compatible with vehicle diagnostic system
If the radio is installed correctly, it should be diagnosed via the CAN bus or K-Line channel.
There are cases that after installing a non-original radio in the existing standard connector, the car is no longer diagnosed.
This happens because the ISO connector has a k-line diagnostic bus. In many car radios, especially those near China, this output is simply short-circuited to negative. Thus, the diagnosis fails. To fix the problem, you need to find the number of this pin in the car manual and cut it off.
After making all the connections, do not rush to insert the radio. Let's move on to the next point.
3. Test and adjustment
First, we check the correctness of the connections. Using a multimeter probe, we determine the presence of the required voltages on the ISO connectors. Plus on A4, A6, A7 with the ignition on, minus on A8.
Next, we measure the speaker impedance on the speaker side. Front right resistance – connect the probes to the B3 and B4 contacts. Should show 4 ohms. We make similar measurements for other speakers.
Now you can connect the ISO connectors of the radio and other connections when the radio is turned off. To measure leakage currents, you need to turn on the multimeter in the current measuring position in the open circuit of each of the fuses. Leakage currents should be no more than 300 milliamps, otherwise the radio will discharge the battery when parked.
Video - what you should pay attention to when connecting the radio to your car:
This is followed by the last stage - turning on the radio, checking all functional properties and adjusting the speaker phases if necessary. How to do this?
Switch the level to the front speakers. Then set the music volume, preferably classical, to the middle position. Shift your balance to the right side all the way. Turn up the volume a little. Then sharply set the balance to the middle position.
If the sound volume has increased significantly, it means that the phases of the speakers match. If the volume has changed slightly, the sound has turned into mush, therefore, the phase of one of the speakers must be changed to the opposite one.
A similar operation must be carried out for the rear speakers. Finally, for right or left side speakers. If the phases of the front and rear speakers do not match, you need to switch the wires on the connectors of two front or rear speakers at once.
Finally, a couple of recommendations. Do not turn on the radio at maximum volume for a long time at first. Make sure there are no foreign odors in the cabin. Avoid exposing the radio panel to direct sunlight.
And may your car radio last a long time!
Video - how to independently connect a radio with an amplifier to your car:
May be of interest:
Source: http://voditeliauto.ru/poleznaya-informaciya/avtoustrojstva/avtomagnitola/kak-podklyuchit.html
How to install a car radio yourself
Publication date: January 29, 2016.
Cars have become a part of our lives and today they are not just a means of transportation, but a place where we spend a lot of time. On the way from work, to work, during vacation and fishing trips, all motorists are faced with such a common phenomenon as traffic jams.
During the grueling hours of standing in traffic jams for many hours, there is nothing better than listening to music or watching a movie. Modern radios have everything you need for a comfortable pastime. The cost of such units can range from several thousand rubles to hundreds, and the choice here depends on your financial capabilities.
You can save a lot on installing the device if you have at least the slightest knowledge of electrical engineering.
Before installing the equipment, you first need to familiarize yourself with the standard dimensions of the radio, which may differ depending on the selected model of audio installation.
Standard sizes of radio tape recorders
On the box with the radio, many car enthusiasts notice hitherto unseen symbols and designations. For example, a 2 DIN car radio with Android navigation. Everyone knows perfectly well what navigation and Android are, but 2 DIN is less common in life. In fact, there are two sizes of sockets for car radios, namely:
- 1 DIN – dimensions 178 x 52 mm;
- 2 DIN – dimensions 178 x 100 mm.
In addition, there are now 1 DIN devices on the market with smaller dimensions of 178 x 52 x 159 mm. Such models are much cheaper due to the fact that they do not have a CD drive, instead of which USB ports are installed on the front panel.
If we talk about the differences in the main standard sizes, then 2 DIN products are equipped with a large display and large buttons. Thanks to this, such radios are easy to control. In addition, such devices often have a large number of functions, turning into full-fledged media receivers.
If you are the owner of a car radio with a retractable display, then most likely the overall dimensions of the device will correspond to the 1 DIN standard.
Such devices are distinguished by their compactness, and thanks to the large display, you can watch DVDs in the car, use the Internet or a navigator. 1 DIN car radios with a retractable screen are installed in the same way as other tape recorders.
The main thing is that everything is done in accordance with the recommendations given below in the article.
If your car has a 1 DIN car radio socket, but you want to use a more multifunctional device, then there are special adapter frames for 2 DIN car radios on sale.
If we talk about the depth of radio tape recorders, then this value is usually 160 mm, regardless of the standard size. Once you have determined that your radio corresponds to the socket provided by the manufacturer, or you have purchased an adapter frame or made it yourself, you can begin installing the device.
Installation Features
Before starting work, you need to pay attention to the connectors of the car radio and the car. If they don't match, it's okay.
Now on the market you can purchase any necessary adapter that allows you to switch from the original speakers to the generally accepted ISO standard.
The best car stereo connector is ISO 10487, so if your vehicle has one, the installation process will be much easier.
Before installation, you must purchase a set of all the necessary wires to connect power and speakers. It is better to choose shorter wiring without unnecessary twists. Multicore wires with silicone insulation are considered the most reliable today. In addition, check whether you will need an adapter frame for a 2 DIN car radio.
Healthy! The diameter of the wiring should be 1.5-2 times thicker than that on the car radio connector. Experts recommend using special acoustic wires with a cross-section of 1.5-4 mm square.
After this, you can proceed to the connection.
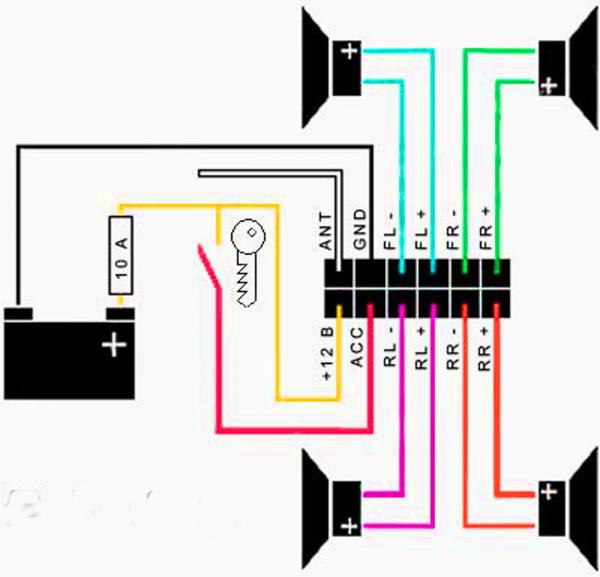
Marking of wires and their connection diagram
Almost all car radio manufacturers adhere to the same standard for marking input wires:
- BAT/B+ – yellow wire to the permanent positive of the battery. When connecting, a 10-20A fuse is used;
- ACC/A+ – red wire to the ignition switch terminal;
- GROUND/GND – black wire indicating minus or ground;
- REM - blue or white-blue control wire, responsible for turning on the car amplifier or antenna;
- ILL – orange wire to the light switch terminal;
- MUTE is a yellow-black wire responsible for remote muting or completely turning off the sound. If it is not included in the kit, then there is no need to buy such a wire.
There is another connection scheme when the red wire is connected together with the red one. This allows the audio system to operate regardless of whether the ignition key is turned on or off. The only disadvantage of such a scheme is that the tape recorder will always be in standby mode, which has a detrimental effect on battery performance. Its discharge rate can increase significantly.
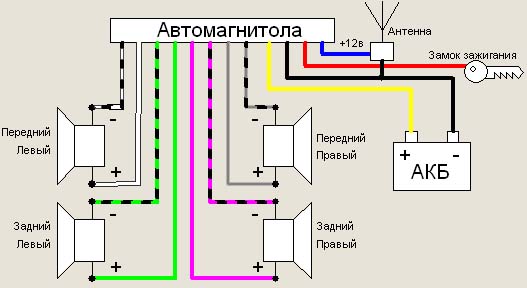
For the radio output, the following wires are used, going to the speakers. They always come in pairs:
- FL- and FL + – minus and plus of the rear speaker (white wires);
- FR- and FR+ – minus and plus of the front speaker (gray wires);
- RL- and RL+ – minus and plus of the left rear speaker (green wires);
- RR- and RR+ – minus and plus of the right rear speaker (purple wires).
In each pair, one wire will be plain, and the second will have a black stripe. Striped means minus. Carefully read the color scheme of your radio and follow the sequence of wires.
Connecting speakers
The process of connecting speakers requires special attention, so be sure to check the instructions. Usually there are plus and minus markings on the speaker terminals.
Most often, the wide terminal is positive, and the narrow terminal is negative. If your car does not have such markings, use the simplest tester - a battery.
Connect its + and – to the speaker terminals and if the cone moves outward, then you have determined the phasing correctly.
There is another way to determine phasing. To do this, transfer all audio to one of the front speakers and increase the volume to maximum until there is noticeable sound distortion. Balance the sound by evenly distributing the volume between the left and right speakers.
If the phasing is done correctly, the overall volume will increase noticeably. If the sound does not become louder or the changes are barely noticeable, this indicates incorrect phasing and the need to swap the wires on one of the speakers. You can also check the rear speakers in the same way.
Important! Be sure to carry out a test, since if you connect incorrectly, you risk losing up to 80% of the sound quality or completely destroying the radio over time.
If your radio has low power, then it will only be equipped with positive wires for each speaker. In this case, the minus of the speakers is connected to the common minus of the audio installation.
You will know that the radio is connected incorrectly or in an “undesirable” way by the following signs:
- when parked, the battery will discharge very quickly, to such a state that it will be impossible to start the car;
- while listening to music, you will notice that the tape recorder constantly “stutters”, and when the volume increases, the car radio “turns off by itself”;
- When the power is turned off, all settings disappear.
If you notice such problems, it is better to check that all wires are connected correctly.
Antenna connection
To connect a passive antenna, simply plug its plug into the corresponding socket. If you are installing an active device, then things are a little more complicated. The fact is that in this case you need to supply power to the antenna. Usually this can be achieved using the blue REM wire, which either comes with the radio or is prepared by you in advance.
Other possible contacts
You may also encounter other markings on the product, so it will be useful to know them:
- AMP – contact responsible for turning on the power to the external amplifier;
- DATA IN/OUT – data input/output;
- LINE IN/OUT – linear input/output;
- ACP+/- – bus lines (most often used in Ford cars);
- AUDIO/R/L COM – common wire (ground), responsible for input/output for preamplifiers;
- SEC IN – additional input;
- ALARM – used to connect an alarm system (very often present in PIONEER radios);
- D2B-/D2B+ – optical communication lines.
In custody
If for some reason you need to remove the radio, this can be done very simply. First, press the RELEASE button and unclip the front control panel.
Next, using two flat keys, pull the radio out.
As you can see, installing a car radio with your own hands, the video of which you will find below, does not require much time and effort, the main thing is to do everything according to the appropriate connection diagram.
Source: https://avto-moto-shtuchki.ru/jelektronika/21-kak-podkljuchit-avtomagnitolu-v-mashine.html
Correct connection of the radio
In the case of individual radio connectors , you can buy either an adapter connector for ISO, or cut the wires and connect them to the individual connector block according to the diagram (which is not recommended; in extreme cases, you should use heat-shrinkable tubes and precautions).
An important point when connecting the radio is to correctly connect the positive wire. To connect the radio, it is better to take it directly from the battery through the fuse. The diameter of the wiring must be no less than that of the radio connector. As a last resort, connect the radio from the cigarette lighter.
Example: diagram of the standard connection of a radio to reduce leakage :
Black - ground
Yellow - power supply +12 volts, from the battery
Red - signal to turn on the radio (from the ignition switch), low-current +12 volts (logical “1”).
Blue - turning on the Antenna or other devices (low-current +12 volts when the radio is on)
Diodes - any, low-current enough type KD522B
To connect the radio, you need to apply plus to two wires (red and yellow):
- Yellow - responsible for powering the radio memory (settings)
- Red - (power) turns off the radio.
| According to the instructions, the red wire is connected through the ignition switch , so the radio will turn off after the ignition is turned off. |
For owners of VAZ 2110 cars, in order not to pull the wire to the ignition switch, you can connect to pin 5 of the BSK block:
However, such a connection has its drawbacks, for example, you need to leave the ignition key with the passenger so that he listens to music, and even when the ignition is on, power consumption increases.
| Therefore, often these two wires (yellow and red) are twisted together and connected to a permanent positive together . Now the radio always works, regardless of the ignition. The negative aspect of connecting the radio this way is the constant current consumption (depending on the model of the radio, the current consumption is different), which leads to the battery being discharged when the car is parked for a long time. |
Content
- Connecting a radio via an additional button
- Conclusion
Connecting a radio via an additional button
To prevent current leakage, place a button in the cut of the red wire:
- Button in the section of the red wire of the radio;
- The button switches between constant “plus” and after ignition;
- Through the alarm.
With the first option, I think everything is clear: just a regular on/off button is hung in the cut of the red wire on the radio. Thus, your radio always works, but if you decide to leave the car in the parking lot for a long time, then simply turn it off. button to supply current to the radio.
The second option is when an emergency button is used instead of a regular button. You will use the second emergency button to switch the power mode of the radio:
- The button is pressed - power is supplied to the radio through a constant plus
- The button is not pressed - power is supplied to the radio through the plus from the ignition
Example of connecting a car radio:
- The radio backlight wire to the cigarette lighter backlight wire.
- Plus after ignition from the clock block (orange wire)
- A permanent plus with a battery or cigarette lighter.
- Ground "-" from the cigarette lighter
Third option : you can mount a simple circuit that will supply a plus and disconnect it automatically from the alarm. If the car has a two-wire solenoid that triggers closing and opening by changing the polarity for each of these operations, then it should work like this:
When the doors are opened, a positive pulse from the solenoid is sent to relay P1, and the relay will operate and actually go into self-pickup mode, providing power from the battery through the terminals of its contacts and relay P2 and connecting the radio to power.
Source: http://PortalVAZ.ru/pravilnoe-podklyuchenie-magnitoly/
How to connect a radio to a car
Modern hits, classical music and hard rock, metal and simple familiar “pop”, chanson and folk songs. This is not just a list of the most popular modern musical movements. Most of these works can be heard from the windows of millions of cars on the crowded streets of megacities, cozy streets of provincial towns and distant rural roads.
In order to experience this convenience and get a lot of pleasure, you need very little. Just buy and install a radio in your car. When purchasing a car for the first time, car enthusiasts are surprised that many brands are sold without certain accessories.
Most often, there is no radio tape recorder, which must be purchased separately, at your own discretion. Nowadays, various manufacturers offer a huge range of similar audio products.
Individual models of radio tape recorders differ both in technical indicators and in price categories.
To choose a radio, it is best to consult with knowledgeable people. These could be consultants at a car dealership or a specialized audio equipment store.
Today it is possible to get advice and purchase the copy you like in online stores. An interesting and very useful video for those who don’t know how to connect a radio to a car.
This raises a problem of a different order. How to connect the purchased new thing? Of course, you can contact the same car dealership where you bought the car or find a specialist in a repair shop.
It's no secret that after such a serious investment as a car, you don't always have extra money. Therefore, in this situation, the skills to install the radio yourself will be very useful.
For this you will need very little, namely:
- A set of special tools that are found in almost every home.
- A few hours of free time.
- Careful study of the proposed instructions and the desire to follow them.
To begin installation and installation, you need to determine whether there is a special niche for musical equipment. Choosing equipment for listening to music. The most widely recommended radios are those offered on the market by the most popular companies. This is Pioneer; Alpine; Kenwood; JVC; Blaupunkt; Nakamichi.
Samples from these manufacturers are representatives of audio systems in a fairly expensive price category. At the same time, the relative high cost is compensated by high levels of sound and operational reliability.
The budget line is represented by Sony, Prology and Mystery. Checking the completeness will allow you to install it correctly. Are there all the connectors for speakers, power connections and slides for attaching the radio in the car?
An example of a radio connection diagram for a VAZ 2107
Having found all the wires and terminals according to the international marking system, all that remains is to accurately and carefully connect them.
Connection options
There are two popular basic options for installing radio tape recorders from any manufacturer. Considering the fact that starting from the most expensive category to all budget offers without exception, all models have a fundamentally similar structure, the connection features are almost the same.
Ideally, when all the indicators correspond, you just need to carefully read the instructions and electrical diagram. It is necessary to determine the compliance of the wiring and speakers with the calculated power.
If certain inconsistencies are detected, and this is most often a mismatch between the car wiring connector and the socket of the mounted radio. Here you need to resort to the second connection option.
It is a complete unified adapter, known as the ISO standard.
If, however, this unique tool is missing, this problem can also be solved in several ways:
- The most proven and reliable . Buy an ISO standard adapter at your nearest specialty store.
- The method is less desirable, but popular among professionals , car enthusiasts and even in technical centers. I call it straight, that is, connecting the stripped edges of the corresponding wires by twisting. Strengthening is done by soldering or insulating with cambrics. You can check the connection by testing the wires.
- In this case, a complete replacement of the set of wires is required . Most require dismantling and connection from zero cycle. The length of the connections is calculated individually. This requires a copper stranded cable with silicone insulation.
Installation
Before starting installation, you need to know that all modern radios differ by 1 DIN and 2 DIN.
European manufacturers tend to produce cars with a niche for a single-block car radio. The automotive industry in Korea, America and Japan offers models with two-block niches. In this video, they will show you how to connect a Pioneer radio for a VAZ car.
Radio tape recorders are distinguished by a wide range of multimedia functions. The actual installation procedure occurs in several stages. First of all, you should pay attention to the correspondence of the polar terminals of the battery, radio, and speakers.
The wires for the positive connections must be stranded copper, with a cross-section of 4 mm² or more, fuses are installed here. You need to make sure that there is no twisting, the length is perfectly calculated.
After this, it’s time to clarify the installation diagram of the radio and connect the speakers as accurately as possible in accordance with the phases. Usually the manufacturer labels the terminals.
In most cases, the wide terminal is positive, and the narrow terminal is negative. Connectors A and B, which provide power to the speakers, usually do not differ from each other. “A” on restylings, pins 4 - 5 are connected to the navigator unit to output sounds.
The next step is the selection of wiring. The acoustics of the radio are marked in a special way. Positive contact wire without black stripe. Negative is marked in black. It is recommended to ground the speakers in accordance with the instructions.
Particular attention should be paid to wire insulation. It is preferable to choose silicone. It is also very important to select a cross-section that matches the power.
The interior gasket requires excellent insulation to avoid chafing or tearing. The gasket in the door must comply with electrical safety regulations. The speakers are located on the rear shelf. They should not be covered so that the sound is not distorted.
Some tips
Everything is simple and not difficult. However, it should be taken into account that this system is associated with electric current.
The slightest short circuit or spark can lead to a rapid fire. Modern cars are made of synthetic materials. They are present both in the interior trim and in the supporting structures.
A fire can break out quickly, which is very dangerous not only due to damage to the vehicle, but also a threat to the lives of the vehicle’s passengers.
That is why it will still be safer to contact a professional installation service center.
Employees will mount, install, and connect the radio, amplifiers, and subwoofer. Thanks to a professional approach, you receive high quality, a guarantee of work and affordable prices. These are several of the most important factors that decide the choice towards the services of professional salons and ateliers.
We also recommend watching
Source: http://natapku.ru/sovety/kak-podklyuchit-magnitoly-v-mashine.html
How to properly connect a radio with your own hands

The question of installing a new car radio arises among a wide range of car enthusiasts.
Some motorists strive to follow fashion and new audio standards, some want to increase power and add bass to the sound of the audio system, while others simply change the car player only if it breaks down.
One way or another, it will be useful for every motorist to know and be able to put into practice methods for connecting car radios of any standard and brand.
How to connect a new car radio according to the ISO marking standard without twisting
First of all, it is necessary to clearly determine which radio tape recorder will be installed.
The shape and pinout of the radio port will depend on the brand and model of a particular device, to which a special ISO plug or ISO adapter is connected, combining the rear and front speakers, antenna, ignition switch, battery, fuse and radio into a single coherent system. If the standard plug of your car does not fit the radio connector, then the best solution to the existing problem of incompatibility will be to purchase a special device - an ISO adapter or adapter, the main purpose of which is to safely connect the wires of the car's audio system without involving twists. In fact, the standard connection diagram for a middle-class car radio looks like this.
Standard car radio connection diagram
Description of radio switching operation
The essence of the operation of switching the power supply of the radio is very simple: from the negative terminal of the battery, the black cable is directly connected to the radio (this is ground), and the positive cable from the battery first goes through the fuse, and then the current goes to a branch - +12 Volt power, which is constantly connected, as well as on the ignition key, through which the current flows to the AAC control terminal, usually made in the form of a red wire. Shorting the red and yellow wires turns on the radio. Some motorists deliberately twist the red and yellow wires so that the radio is turned on even at those times when the ignition key is in the completely off position. Despite all the obvious advantages of this folk trick, there is a real danger of completely draining the battery.
How to connect a car radio if there is no ISO adapter
In fact, there are no unsolvable problems in principle, and even more so with car acoustics. The main thing is to find on the Internet the pinout of all the pin contacts of the connector of your radio.
As a rule, all well-known companies make service manuals, instructions, and the date attached to the microcircuits freely available. Typically, after 10-15 minutes of searching on the Internet, you will have an accurate picture of the pinout of all the pins according to the ISO standard.
Conventions for the front speakers: “FL+” and “FL-” are the speaker located to the left of the driver’s seat, “FR+” and “FR-” are, naturally, the right speaker. The conventions for the rear speakers are: “RL” is the rear left speaker, and the rear right speaker is designated “RR”.
The speakers must be connected in strict accordance with the phase, that is, in accordance with the “+” and “-” signs. If for some reason you do not know where the “+” and “-” of all your speakers are, or the inscription is erased on one speaker, then checking it will not be difficult with a simple 1-size battery.
5V and pairs of wires: connect the battery to the speaker and observe where the diffuser moves when power is supplied from the battery. Mark the pairs of contacts of your speakers so that when power is supplied from a 1.5 Volt battery, they protrude in the same way.
How to properly connect battery power
The main thing is to find 3 contacts: GND, +12 and ACC. Essentially, GND (ground) is the negative wire from the battery. It can be connected directly to the battery without using any switches or fuses. The +12 volt line already requires protection with a wire fuse.
You can also find other designations for the +12 line: B+, BU, Batt. The ACC line must be connected to the positive terminal of the battery and exclusively through the ignition switch contacts.
Connecting the +12 and AAC lines short is undesirable, as there is a danger of severe discharge and wear of the battery.
How to connect a radio if neither the brand, nor the connector, nor the pinout is known
The most difficult case of connecting a radio is connecting an old radio to another car by twisting the wires. The process becomes especially complicated if there is no exact certainty about the location of the pins that are responsible for power and speakers.
To understand how to connect a Chinese NONAME radio, you need to have a little understanding of repairing complex electronic equipment, as well as have simple measuring equipment and radio components. In fact, you will need a very modest set: a Chinese multimeter with a dialing function, a 500 Ohm resistor, test leads, a set of screwdrivers.
The first thing you need to do is inspect the female connector on the radio. Structurally, the pins responsible for power supply should be significantly larger than all the others. The ground line (GND) is determined in a couple of seconds by dialing the housing. The second thick pin is usually pin +12. To start the radio, all you have to do is find the AAC pin.
Perform the following manipulations: with the power turned on 12 Volts at the GND and +12V electrodes, alternately apply +12 Volts through a 500 Ohm resistor to all remaining pins in turn. At a certain pin the radio will come to life. This will be the AAC contact. Next, it remains to find out the location of the speaker pins.
Using a typical circuit for switching on an audio frequency power amplifier (UMPA), made on a TDA family microcircuit or its analogues, you can accurately determine the output pins of the amplifier. These will be our audio channels.
Source: http://muzhik-v-dome.ru/avto-i-moto/kak-podklyuchit-avtomagnitolu-svoimi-rukami/