Changing the oil in a Toyota Corolla manual transmission
A modern car uses several working fluids, which are necessary for the correct operation of individual units.
Manufacturers recommend performing scheduled maintenance and adding new fluids after a certain mileage. Changing the oil in a Toyota Corolla manual transmission is also included in this list.
But many drivers ask questions about how often to change, what oil to use, and others. You can find the answers in this article.
Almost all manufacturers claim that during the operation of the vehicle, transmission oil retains its properties and does not need to be replaced.
Oil for a manual transmission does have a longer service life compared to engine oil, but it does not last forever.
Over time, the composition loses its characteristics and, accordingly, does not cope with the assigned tasks.
High-quality and fresh gear oil allows you to:
- lubricate moving gearbox parts and reduce their wear;
- remove heat from the most rubbing parts;
- protect the structure from rust.
Why is it so important to change the oil in a Toyota Corolla gearbox? If replacement is not carried out for a long time, small metal shavings will form during transmission operation. As a result of this, the latter will spread throughout the parts and components of the mechanism. As a result, the liquid will not become a lubricant, but an abrasive material, which will only accelerate the wear of gears and other parts.
Replacement frequency
A popular and common question among Toyota car owners is when should the oil change occur in the Toyota Corolla 120, 150 manual transmission.
First, we recommend that you look at the owner's manual for your car. The manufacturer advises replacing it every 40 thousand kilometers for active use of the car.
If the car is used rarely enough, this figure can reach 60-80 thousand kilometers.
In many ways, this indicator also depends on how old your car is. In a new car, when using synthetics or semi-synthetics, the fluid will have to be changed less frequently. Older cars tend to use mineral oils, which have a shorter service life. There are a number of signs that indicate the need for replacement for a manual transmission:
- Problems in gear shifting.
- The appearance of a hum in the transmission.
- Change in color and consistency of liquid.
- The presence of foreign impurities in the transmission fluid.
If you encounter one of the above problems, then you urgently need to change the oil in your Toyota Corolla manual transmission. Neglecting this procedure can result in expensive transmission repairs.
Features of choice
All presented products are divided into three large groups: mineral, semi-synthetic and synthetic oils. The first ones are made from oil.
They have the lowest cost, and are used in old cars from the 90s to the 70s.
If you have a modern foreign car manufactured in 2000 (and later), then it is recommended to use synthetic or semi-synthetic products.
Such oils (unlike mineral oils) have many advantages, including:
- High thermal and chemical stability.
- Higher turnover.
- Resistance to temperature fluctuations.
- Long service life.
- Better penetration.
Synthetics promote the formation of a denser film on the surface of parts, which significantly reduces wear.
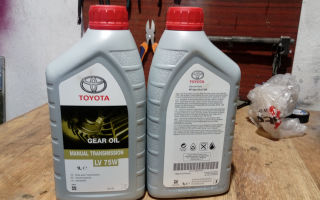
If funds allow, order original products from the manufacturer. It is necessary to use TOYOTA Getriebeoil LV 75W, since it was created specifically for this car model and, accordingly, will provide high-quality protection for gearbox components. If these products are too expensive, you can take a closer look at more affordable analogues. Car owners celebrate products from Castrol.
Changing the oil in a Corolla manual transmission
Once you have selected and purchased the transmission fluid, you can begin the replacement procedure. The drain and fill holes are located under the car, so it is recommended to place the car on a pit or use a lift. Prepare a set of ratchet wrenches and a 5-liter container for used oil.
To perform the replacement, follow these instructions:
- Remove the protective plate by unscrewing the 4 fasteners.
- Place a prepared container under the drain hole. Use a 24 key to unscrew the cap.
- Once everything has drained, unscrew the filler cap. Be prepared that a small amount of liquid may drain from there too.
- Tighten the drain hole.
- Using a special injection syringe, draw new oil from the bottle, and then push a portion into the filler hole. An alternative would be to use a homemade funnel from a regular bottle and hoses.
- Pour in the required amount of liquid.
- Tighten the plug.
- Reinstall the protection.
Take it for a test drive. Make sure that the noise in the box is much less. If any problems persist, contact an auto repair shop. This may be due to a fault in the gearbox.
Now you know how you can change the oil in a Toyota Corolla gearbox yourself in a garage. The procedure is not particularly difficult and takes from 30 to 60 minutes. All your expenses will come down to buying new oil. Car owners will be able to save on car service costs. Replace promptly to extend the life of the transmission.
If the material was interesting or useful for you, publish it on your social network page:
Source: http://jrepair.ru/to-toyota/zamena-masla-v-mkpp-toyota-corolla
Toyota Corolla gearbox, manual transmission, automatic transmission, Oil change
Toyota Corolla and Auris cars from 2006 to 2009 were equipped with a five-speed manual or five-speed robotic gearbox (with a 1ZR-FE engine). Since 2010, cars have been equipped with a six-speed manual (with 1NR-FE and 1ZR-FE engines) or a four-speed automatic transmission (only with the 1ZR-FE engine).
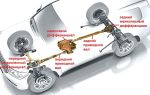
Mechanical and robotic gearboxes are made according to a two-shaft design with synchronized forward gears. The gearbox and final drive with differential have a common housing. The clutch housing is attached to the front of the gearbox housing.
The gear shift mechanism of a five-speed manual transmission differs from the mechanism of a six-speed gearbox only in the absence of a mechanism for prohibiting the engagement of reverse gear. (the main gear is made in the form of a pair of cylindrical gears, selected for noise.
Torque is transmitted from the driven gear of the main gear to the differential and then to the front wheel drives. The differential is conical, two-satellite. The tightness of the connection between the internal joints of the right and left front wheel drives with the differential gears is ensured by oil seals pressed into the gearbox housing.
The robotic gearbox is developed on the basis of a five-speed manual gearbox. For control, electric drives for clutch release, gear selection and shifting are installed on the gearbox housing. The electric drives are controlled by the robotic gearbox control unit based on sensor signals.
The automatic transmission is configured according to a traditional planetary design with braking with friction clutches and is connected to the engine crankshaft through a torque converter. The design of the automatic transmission differential is completely similar to the manual transmission differential.
Repairing a gearbox (especially an automatic one) requires a large set of special tools, so this section only covers checking the oil in the gearbox, removing and installing the gearbox, replacing its seals and repairing the drive. If you need to repair the gearbox, contact a specialized service center.
CHECKING THE LEVEL AND ADDING OIL IN MECHANICAL AND ROBOTIC TRANSMISSIONS You will need: a 19mm wrench, a syringe for filling transmission units. Fill mechanical and robotic gearboxes with oil of quality group no API GL-4, viscosity no SAE 75W. Oil volume in a five-speed gearbox is 1.9 l, in a six-speed gearbox – 2.3 l 1.
Remove the filler plug.
On vehicles with a robotic gearbox, to access the filler plug, you must remove clutch drive 2. Check the oil level: it should be at the lower edge of the filler hole or slightly lower (you can reach the surface of the oil with your finger). 3.
If necessary, add oil with a syringe until it appears from the filler hole. 4. Screw in the filler plug and tighten to a torque of 39 Nm. CHECKING THE LEVEL AND ADDING FLUID INTO THE AUTOMATIC TRANSMISSION
Fill the automatic transmission with Toyota WS type automatic transmission fluid.
The volume of working fluid in the automatic transmission is 2.9 liters.
You will need: a 19mm wrench, a syringe for refilling transmission units. 1. Warm up the fluid in the automatic transmission to operating temperature (70-80 FS), taking a short drive. 2. Place the vehicle on a level, horizontal surface and apply the parking brake. 3.
Pressing the brake pedal and holding it pressed, alternately move the selector lever to all positions from “P” (parking) to “D” (forward driving) with short stops in each position to fill the torque converter and hydraulic system with fluid. After this, set the selector lever to the “N” (neutral) position. Release the brake pedal. 4.
The level of working fluid in the gearbox is checked using an indicator (dipstick) installed in the oil filler hole in the upper part of the automatic transmission housing. Before removing the pointer, remove any dirt from around it. 5. With the engine idling, remove the pointer and check the condition of the working fluid.
The quality and composition of the working fluid can determine the serviceability of the automatic transmission. The automatic transmission should be repaired if at least one of the following signs of decreased fluid quality is present: - the smell of burnt oil: - significant darkening of the fluid: - the presence of a large number of metal particles in the fluid is noticeable. 6.
Wipe the pointer with a clean cloth and insert it into the hole until it stops. 7. Take out the pointer and use the traces of working fluid on it to determine the fluid level. It should be between the two marks located on both sides of the “NOTE” inscription. 8. If the level is not correct, add fluid through the filler plug.
An insufficient level of working fluid can cause a number of malfunctions of the automatic transmission, since air will enter the pump along with the fluid. When air enters the fluid, air bubbles appear, which leads to fluctuations in oil pressure. Exceeding the normal fluid level is also unacceptable.
Fluid poured into the automatic transmission housing in excess of the norm foams, which leads to the same malfunctions of the box as if the fluid level is insufficient, as well as to a rapid deterioration in the properties of the fluid.
In both cases, the formation of air bubbles causes overheating and premature oxidation of the fluid, as a result of which the normal operation of the automatic transmission is disrupted. REPLACING TRANSMISSION SEALS The input shaft oil seal is installed in a non-separable assembly of the clutch release bearing guide sleeve together with the front bearing of the input shaft.
The guide bushing block is pressed into the clutch housing. To press out and then press in the guide bushing block, special tools are required, so if oil leaks through the input shaft oil seal, contact the service center to replace it.
This subsection describes the replacement of the shank seal of the right differential side gear installed in the gearbox housing. The shank seal of the left differential side gear is replaced in the same way.
The differential side gear shank seal can be replaced without removing the gearbox from the vehicle; you must first drain the oil from the gearbox. You will need: socket heads “13”, “30”, a wrench for wheel nuts, a screwdriver, a hammer, a mandrel. 1. Place the vehicle on a viewing ditch or lift.
2.
To replace the shank seal of the right differential side gear, remove the right drive 3. Using a screwdriver, remove the seal from the socket in the gearbox housing. 4. Lubricate the working edge of the new oil seal with transmission oil and press it with a mandrel of suitable diameter with the working edge inside the box.
Install the oil seal into the gearbox socket before pressing in very carefully so as not to damage the working edge of the oil seal.5.
Install the front wheel drive. 6. Fill the gearbox with oil. REMOVAL AND INSTALLATION OF MECHANICAL AND ROBOTIC TRANSMISSIONS You will need: “13”, “18” keys, a flat-blade screwdriver. 1. Place the vehicle on a lift or inspection ditch. 2. Drain the oil from the gearbox. 3. Remove the engine assembled with the gearbox 4. Remove the starter 5. Remove the three bolts of the side... 6. ...two bolts of the upper... 7. ...and two bolts of the lower fastening of the clutch housing to the engine. 8. Remove the gearbox. 9. Install the box in the reverse order of removal.
REPLACING CONTROL CABLES FOR A MANUAL TRANSMISSION
1. Remove the battery 2. Unscrew the two bolts securing the bracket for the cooling system pipes and move the bracket to the side.
3. Remove two bolts on the left and right sides of the battery plate mounting and remove it.
4. Remove the air filter housing 5. Remove the exhaust pipe assembly with the main muffler 6. Turn the gear shift knob counterclockwise and remove it.
7. Remove the floor tunnel lining 8. Disconnect the gear shift control cable from the gear shift lever. Remove the clamp and disconnect the gear selection control cable. 9. Using a screwdriver, pull out the shift cable stopper.
10. Turn the nut 180° counterclockwise and, locking it in this position, disconnect the gear shift cable.
11. Disconnect the gear selection cable in the same way.
Do not turn the nut more than 180°, otherwise it will separate from the inner spring and the shift cable will become unusable. 12. Disconnect the two wire harnesses from the wire harness clamp brackets. 13. Remove the four clips and disconnect the two shift cables from the transmission and bracket. 14. Unscrew the two nuts, remove the bolt and remove the gearshift cable assembly. 15. Install the parts in the reverse order of removal. REMOVAL AND INSTALLATION OF THE MANUAL TRANSMISSION CONTROL LEVER 1. Turn the gear shift knob counterclockwise and remove it.
2. Remove the floor tunnel lining 3. Release the three clips and disconnect the wiring harness from the gear shift lever.
4 Remove the clamp and disconnect the gear selector cable from the gear shift lever. 5. Disconnect the gearshift control cable from the gearshift lever. 6. Using a screwdriver, lift up the shift cable stopper.
7. Turn the nut approximately 180° counterclockwise and, holding it in this position, disconnect the gearshift cable from the gearshift lever holder.
Do not turn the nut more than 180', otherwise it will separate from the inner spring and the shift cable will become unusable. 8. Remove the four bolts and shift lever assembly. 9. Install the lever on the car in the reverse order of removal.
ADJUSTING THE CONTROL DRIVE OF A MANUAL TRANSMISSION
1. Remove the manual transmission control drive cables. 2. Using a screwdriver, pull the lock out of the adjustment block.
3. Install the shift cable to the shift lever.
Make sure the retainer protrudes from the adjustment block. Adjust the length only in the neutral position of the shift mechanism. 4. Install the gear selector cable onto the shift lever. 5. Install the lock on the gear shift lever. 6. Press the latch and fix it on the adjustment block. Press the latch firmly until the lock is engaged. ADJUSTING THE AUTOMATIC TRANSMISSION CONTROL DRIVE Make sure that when you turn the selector to position “D” the car moves forward, and when you turn the selector to position “R” the car move backwards. If this does not happen, you should do the following. 1. Brake the vehicle with the parking brake.
2. Put the car in neutral gear.
3. Remove the floor tunnel lining. 4. Pull the control cable position lock out of the engagement. 5. Set the selector lever to the “N” position. 6. Fix the position of the control cable by inserting the lock into place so that it securely engages the grooves in the cable end. 7. Install the removed parts in the reverse order of removal.
REMOVAL AND INSTALLATION OF THE AUTOMATIC TRANSMISSION CONTROL SELECTOR
1. Remove the floor tunnel lining
2. Remove the clamp and disconnect the automatic transmission control cable from the selector.
3. Using a screwdriver, pull out the shift cable stopper. 4. Turn the nut approximately 180° counterclockwise and, holding it in this position, disconnect the gear shift cable from the gear shift lever holder. Do not remove the stopper. If removed, reinstall it in its original position. 5. Squeeze the clamp 6. ... and disconnect the wiring harness block from the automatic transmission selector position sensor.
7. Squeeze the clamp.. 8. ...and disconnect the wiring harness block from the automatic transmission selector illumination lamp. 9. Release the four clamps and disconnect the wiring harnesses from the automatic transmission control selector. 10. Remove the four bolts and remove the automatic transmission control selector assembly. 11. Install the gearbox control selector in the reverse order of removal. REMOVAL AND INSTALLATION OF THE ROBOTIC TRANSMISSION CONTROL SELECTOR 1. Remove the floor tunnel lining
2. Remove the four bolts securing the robotic gearbox control selector.
3. Squeeze the latch... 4 ...and disconnect the wiring harness connector from the robotic transmission selector lever position sensor. 5. Squeeze the latch. 6. ...and disconnect the wiring harness connector from the robotic gearbox selector illumination lamp. 7. Remove the robotic transmission control selector.
8. Install all removed parts in the reverse order of removal.
Source: http://toyoinfo.ru/news/1/2012-11-28-976
Manual transmission oil change — logbook Toyota Corolla 2008 on DRIVE2
Hi all.
Happy March 8th to the fair sex of our humanity: bright sun overhead, smiles and good mood.
Morning, Saturday, pre-holiday bustle, people are running to the shops to buy gifts. For me, everything is simpler: on weekdays it’s work, and leisure time is in the garage. Sitting in front of the computer and being stupid is not our thing... And that means, let’s go turn the nuts.
We have a penny in our pocket, we buy butter in a box and take all the equipment :
Head 24 - unscrew the drain and filler plugs Head 17 (if I'm not mistaken) - unscrew the watering can protection Hose ~ 50 cm
Oil - TOYOTA Gear Oil Manual Transmission LV 75W (0888581001) 2 liters.
There are no reasons
Difficulties - before you twist anything, read the manuals!
Considering himself the smartest, he dismantled the floor of the car in search of the drain and filler plugs. It turned out to be much simpler. You don't need to remove anything except the crankcase protection (who has it).
Observations - the places where the crankcase protection comes into contact with the body and suspension elements are susceptible to corrosion. In the spring I will remove the protection, wash everything and treat it with anticorrosive.
1
Unscrew the crankcase protection nuts
Fixing the protection with 4 bolts
In order not to get hit on the head with a sheet of iron, we put supports under the crankcase protection in advance
Filler hole bolt. Head 24 mm. Unscrew counterclockwise. The head should not be long.
First, we check the initial level - it should be under the cut of the filler neck. The location of the filler bolt is located just below the clutch release foot, looking towards the coolant radiator
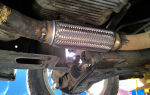
Drain plug. Head 24. Turn counterclockwise. We tear it off literally just a little bit so as not to take a shower. Location - under the left wheel drive (in the direction of travel)
To drain and fill more, we jack up the front
Cut off the bottle and unscrew the drain bolt
Drain bolt with sealing ring
We adjust the body lift higher/lower to drain more.
Have a snack while everything drains.
Tighten the drain bolt (the one with the ring) and go prepare the watering can
The length of the hose is approximately 50 cm, the outer diameter is about 1.2 cm, the inner diameter is 0.6. There could be more, but I couldn’t find another one in the garage
Fixing the watering can
Insert the opposite end of the hose into the gearbox filler hole.
Due to the small internal diameter of the hose, there is no throughput. Slowly but surely the level in the watering can dropped...
I swelled 2 liters without a couple of drops with a jacked up front end.
We tighten the filler plug, wipe it with a cloth and install the crankcase protection.
Old oil on the left, new oil on the right. Visually there is no difference.
Price tag: RUB 1,922 Mileage 61048 km
Source: https://www.drive2.com/l/5937330/
Oil change in Toyota Corolla Axio
The E 150 series sedan, which replaced the E 120 generation, debuted on the automotive market in 2006.
The developers equipped the model with a rich palette of gearboxes: a classic 5-speed manual transmission, a 4-speed automatic transmission, and a new product of those years – a continuously variable variator Super CVT-i. In 2008, a 6-speed automatic transmission appeared on the scene.
And soon the Japanese corporation announced the transfer of all its cars to the mentioned continuously variable CVT unit.
Gearbox lubricant
The smooth and smooth operation of the gearbox depends on the quality and quantity of the oil mixture poured into it. As you know, there are no ideal driving conditions.
High speeds, poor-quality roads, summer heat, winter cold - all this leads to the fact that the lubricant loses its valuable advantages over time. Its planned update is provided after covering a mileage of 160 thousand km.
But practical experience shows: this operation should be performed 3–4 times more often than the manufacturer regulates.
Proper operation and careful care are extremely important for a vehicle's gearbox. Systematic oil changes, protecting the transmission from premature wear and breakdowns, allow the motorist to avoid expensive repairs.
How to change the lubricant in a variator
A continuously variable automatic transmission significantly increases the reliability and comfort of the vehicle. But this type of automatic transmission is especially “whimsical” and “demanding”. Some experts believe that updating the lubricant in the variator is relevant after 20 thousand kilometers. Regardless of the mileage, the driver should pay attention to some warning signs:
- the car accelerates slowly or does not move at all;
- the beginning of movement is accompanied by jerks and jolts;
- at idle speed the gearbox vibrates;
- gears change slowly, with difficulty;
- the oil changes color, becomes cloudy and takes on a burning smell.
These signs indicate that the lubricant in the variator needs to be changed immediately!
Step-by-step instructions:
- Place the car on a lift.
- Warm up the engine until the cooling fan turns on.
- To provide access to the gearbox, remove the lower mudguard.
- To lock the transmission, move the selector lever to the “P” position.
- Place a container for the waste substance under the drain hole, unscrew the drain plug, wait until all the fluid (approximately 3 l) flows out of the gearbox housing.
- Remove the pan and carefully drain the remaining lubricant (about another liter).
- Attach the new strainer.
- Clean the tray thoroughly. Put it in its place.
- Place the rubber seal on the drain plug and tighten it.
- Lower the car to the ground and release the lever.
- Fill the gearbox housing with CVT fluid through the dipstick hole. Its volume is about 4 liters. The lubricant level at this stage should be 12 mm below the “min” mark on the dipstick.
How to measure the lubricant level?
- Place the car in a strictly horizontal position.
- Start the engine at idle speed with the selector lever in position “P”.
- Continue adding oil in small portions. Move the lever to different positions several times, delay for a couple of seconds, then return it to the “P” position.
- The procedure is repeated until the lubricant level reaches normal. It is recommended to drive for a while and then check again.
Vehicle maintenance: rules for draining and filling lubricant
Automatic transmission: features of the procedure
The Toyota Corolla E 150 series has a 4-speed automatic transmission. The lubricant for automatic transmissions is original products - Toyota ATF Type T-IV or Toyota WS. The fluid in an automatic transmission is updated somewhat less frequently than in a CVT - after fifty thousand kilometers.
As in the previous case, the car is warmed up and placed on an overpass or inspection hole.
Sequencing:
- Place a container under the drain hole. Unscrew the plug on the pan. Drain waste material. Disposal of waste liquid
- Remove the pallet. To remove it, it is convenient to use a wooden spatula. Unscrew the differential magnetic plug. Drain off any remaining liquid. Work carefully so as not to get burned on the hot pan and heated oil!
- Wash the inner surface of the pan, magnets and automatic transmission gasket thoroughly with gasoline, then wipe dry with a clean cloth. The gasket can be replaced.
- Install a new filter and o-ring. Return the magnets to their places. Secure the pallet. Tighten the drain plug.
- Clean the automatic transmission filler neck. Fill ATF through the funnel slightly below the mark. Carefully adding liquid, bring its amount to normal.
Checking the lubricant level in the automatic transmission is carried out in the same way as in a variator. Excess ATF is extremely harmful for automatic transmission parts. You can pump out the excess using a regular medical syringe.
It should be noted that the above method is a partial renewal of the automatic transmission lubricant. To complete the process, you need to repeat all the steps several times.
A complete oil change in an automatic transmission is too difficult and painstaking a task. It can be successfully solved only with experience, patience and skill.
For a novice driver, a more reasonable option would be to contact a service center.
Methodology for manual transmission:
The Toyota E 120 series (2001-2007) was equipped with a 5-speed manual transmission. In addition, Japanese designers proposed a robot. In 2008, the next series model received a 6-speed manual transmission.
The timing for oil renewal in a manual transmission is the same as for an automatic transmission.
How much lubrication is required for a manual transmission?
The filling volume of a manual transmission depends on its type. These are: C50, 60 or 150. For the C150 and 50 transmission it is 1.9 liters. 2.3 liters of liquid are poured into the C60 box. In a 6-speed robot it should be 2.4 liters.
Step by step guide:
- A trip is made to warm up the engine, then enters the inspection pit. You can remove the left wheel and raise the car using a jack.
- Thoroughly clean all transmission parts from dirt.
- Unscrew the lower bolt and wait until the waste material completely flows out through the manual transmission drain hole. Clean the bolt and tighten it firmly.
- Under the air duct running from the air filter to the engine is the top bolt (breather). It also needs to be unscrewed. This frees up the neck.
- Fill the manual transmission housing with new lubricant using a funnel. For convenience, you can attach a narrow hose 50 cm long to it.
- Work continues until the waste substance begins to flow from the hole. Tighten the plug and install the breather.
- Check the manual transmission fluid level.
Transmission lubricant: instructions for use
Changing the oil for a manual transmission is not difficult. Even an inexperienced car enthusiast can perform the process with high quality. Good luck to everyone in this useful and important task!
My life is not only connected with cars, but with repairs and maintenance. But I also have hobbies like all men. My hobby is fishing.
I started a personal blog in which I share my experience. I try a lot of things, different methods and methods to increase my catch. If interested, you can read it. Nothing extra, just my personal experience.
Attention, TODAY only!
Source: http://maslodoc.ru/zamena-masla/korobka-peredach/tojota-korolla-aksio
How much oil is in the manual transmission (gearbox) of a Toyota Corolla
The manual transmission equipped with the Japanese Toyota Corolla sedan requires timely maintenance. Many people prefer to do their own repairs and replace consumables.
Thus, changing transmission oil will not be difficult even for an inexperienced Toyota Corolla owner. The same applies to the procedure for selecting consumables, in which you should know a little theory and numbers.
In this article, we will look at how to choose the right oil for a Toyota Corolla manual transmission, how to properly maintain it, and also how much oil is required to fill a manual transmission.
Replacement Regulations
A gearbox is a complex mechanism consisting of a large number of small parts and gears that require regular lubrication. In addition, they require effective cooling, while overheating is extremely undesirable. All this is provided by oil, which thereby ensures the performance of the gearbox for many years.
And yet, negative climatic conditions make themselves felt over time. Thus, Toyota recommends changing the gearbox oil every 40 thousand kilometers. This regulation already takes into account the difficult operating conditions that Russian motorists often encounter.
Frequent temperature changes, driving on bad and dusty roads, dirt and slush - all this negatively affects the beneficial properties of the oil, and as a result it becomes unusable ahead of time. The situation is further complicated by the fact that the driver makes mistakes while driving - for example, violates traffic rules, makes sudden maneuvers, exceeds the speed limit, etc.
In such conditions, including the above, you will have to think about reducing the oil change schedule. In addition, it doesn’t hurt to check the volume of liquid in advance and monitor its condition.
Checking the volume and condition of the oil
The volume of remaining oil, poured on the factory conveyor, is usually controlled with a special dipstick. It is located in the oil filler hole. It can be found in the engine compartment.
The dipstick shows Max and Min marks, indicating the optimal or insufficient oil level. For example, it may be necessary to add fluid if it does not reach the Min mark. It is necessary to pour until the oil reaches the Max mark, but does not exceed it.
Otherwise, the oil will have to be drained, and this will take a lot of time.
To understand that the oil has lost all its beneficial qualities, let’s check it by color, smell and composition. For example, bad oil is indicated by a dark brown color, cloudiness, as well as a specific odor and floating metal shavings.
In general, any suspicious sediment indicates signs of mechanical wear. In addition, another fact is obvious that adding oil alone cannot do this. This will require a comprehensive replacement of the substance, and this must be done as soon as possible.
Choosing oil for manual transmission Toyota Corolla
Having decided that the oil really needs to be changed, we move on to one of the most important stages - choosing consumables. In this case, they first pay attention to the viscosity parameters (SAE) and the degree of quality (API), and then choose the brand they like. Let's name the most popular products for Toyota Corolla using generation IX E120 as an example:
Mobile X1
- Viscosity – 5W-30
- API - SN-SM
Castrol Magnatec C3
- Viscosity – 5W-30
- API - SN-SM
Shell Helix Ultra ECT
- Viscosity – 0W-30
- API - SN
Shell Helix HX8 Synthetic
- Viscosity – 5W-30
- API - SN-CF
Liqui Moly Optimal Synth
- Viscosity – 5W-30
- API - SN
ZIC X7 LS
- Viscosity – 5W-30
- API - SN
As you can see, the optimal viscosity for Toyota Corolla is considered to be 5W-30.
They also pay attention to the type of oil - synthetic, semi-synthetic and mineral oil. It will be better if the choice falls on a synthetic product.
It is more expensive, but in all respects it is superior to semi-synthetics and mineral oil, which have a significantly shorter service life.
How much to fill
For Toyota Corolla, the optimal volume of oil in the gearbox is 2.4 liters. It is important to keep in mind that in the process of changing the oil, a preventive procedure is extremely important, namely cleaning the gearbox from the remnants of old fluid.
To do this, a special flushing compound is introduced into the box, which is circulated throughout the entire transmission with the engine running. Then the used liquid is drained, after which new oil is introduced.
The level is adjusted using a dipstick.
Source: http://maslospec.ru/skolko-masla-v-mkpp-korobke-peredach-tojoty-korolly.html
Changing the oil in a manual transmission Toyota Corolla 2008
When servicing any brand of car, the list of mandatory work includes replacing or adding oil to the vehicle engine. But do not forget that the gearbox also contains oil for lubrication.
In this regard, we will consider in more detail the issues related to its replacement in the 2008 Toyota Corolla manual transmission: what functions does it perform in the gearbox; does the transmission oil burn out and should it be added, as in an engine; recommendations according to which manual transmission maintenance of this car model is carried out.
What is the function of transmission oil?
All modern automobile oils, both those used in engines and transmissions, consist of a base and a set of additional compounds - additives. Basically, the quality of the lubricating function is determined by the base, and the additional additive package only corrects and improves its performance characteristics.
Transmission systems, in addition to lubrication, have another important task. When the manual transmission gears in mesh rotate, a large amount of heat is generated.
In the box of a moving car, the temperature fluctuates within 150 degrees Celsius, while at the very point of contact of the gears it can rise to 300 degrees.
The oil poured into the manual transmission also performs a heat-removing function, while cooling the parts and preventing critical overheating of the box.
How often do you change transmission oil?
At high temperature loads, the oil begins to foam, and at the same time its lubricating characteristics are significantly reduced. Also, during operation, additives burn out, which in turn impairs the performance of the protective function.
The result of untimely replacement of the lubricant is the formation of scuffing on the main gear - during operation, its gears begin to emit a peculiar buzzing sound; after 500-1000 kilometers, the teeth of the transmission parts cannot withstand the increased load and begin to collapse.
If appropriate measures are not taken, the Corolla's manual transmission may jam or completely fail.
The 2008 Toyota Corolla is a front-wheel drive car whose manual transmission is subject to the greatest load, unlike rear-wheel drive cars.
In order to maintain the performance of the transmission for a long time, a scheduled oil change should be carried out every 50-60 thousand kilometers, and for aggressive driving or for cars participating in racing, this period should be reduced to 30-40 thousand.
Checking the gearbox oil level
When operating vehicles, the level of transmission oils in manual transmissions decreases, so in addition to replacement, they should also be topped up regularly. Reasons to check the level are any signs of change in transmission performance. Checking the level and then adding oil are simple operations that you can do yourself.
Work order:
- The car must be placed on a flat horizontal surface above the inspection hole or raised using a lift. Checking the level should be done no earlier than 10 minutes after the vehicle has come to a complete stop, with the engine turned off.
- The surface of the gearbox should be cleaned around the level plugs and breather to prevent dirt from getting inside.
- Unscrew the cap and be sure to wipe it clean.
- Check the oil level - it should reach the bottom edge of the level plug hole.
- If the level is insufficient, unscrew the breathing valve (breather) located at the top of the manual transmission.
- Topping up should be done through the hole in the breathing valve in small portions until oil flows out of the hole for the level plug. For topping up, you can use a funnel and a suitable sized hose.
- Screw the plug into place and tighten it with the required force.
- Reinstall the breather.
Changing the gearbox oil
Changing the oil in the manual transmission of a Toyota Corolla is also a fairly simple job. To complete this task you need:
- Drive the car a little so that the gearbox warms up;
- drive into the inspection hole or remove the left wheel by placing the car on a jack;
Attention! Some of the work will be done under the car, so install hemp under the car for your safety.
What gear oil is recommended for Corolla?
Toyota Corolla cars produced in 2008 are equipped with 5- and 6-speed manual transmissions. To completely replace a five mortar, you will need approximately 1.9 liters of oil, a six mortar - 2.3.
When choosing a brand, you do not need to give preference to cheap and low-quality products; it is better to purchase more expensive, but high-quality products from well-known brands or branded products produced by Toyota.
Sources: http://corollafan.ru/obsluzhivanie/zamena-masla-v-mkpp-tojota-korolla-2008.html
Source: http://master-informa.ru/remont-vaz/zamena-detalej/4759-zamena-masla-v-mkpp-tojota-korolla-2008