Oxygen sensor, signs of lambda probe malfunction

The oxygen sensor, the symptoms of which are known to most experienced car owners, plays a significant role in the functioning of the car. Despite its inconspicuousness and small size, this regulator adjusts the fuel mixture, thereby assisting the power plant.
A car engine that receives a well-mixed air-fuel mixture operates as efficiently as possible. Unfortunately, the regulator sensor or lambda probe, as it is also called, tends to deteriorate.
Causes of malfunction and obvious signs
As a rule, the following reasons lead to malfunction of the sensor:
- Some aggressive liquid, such as antifreeze or brake fluid, gets on the sensor.
- Problems may begin if the owner used chemically active agents when cleaning the regulator body.
- If the car fuel contains a large amount of lead compounds.
- In case of significant overheating of the regulator, which occurs either due to the use of low quality fuel or due to a clogged filter.
Regulator malfunctions can be judged by obvious external signs. It's easy to notice. It is enough to pay attention to the following points:
- Fuel consumption has increased sharply.
- The car jerks jerkily, even when the engine is warm.
- The color and smell of the exhaust gases have changed.
- The operation of the catalyst is disrupted.
steps
In turn, experts see two main stages in the deterioration of the sensor.
At the first stage of sensor malfunction, there is an increase in the engine response time to pressing the gas pedal.
The power unit reacts sluggishly, when you press the accelerator the “check” starts blinking, the pedal is lowered and the blinking stops.
At this stage of the malfunction, the driver notices a deterioration in traction, acceleration dynamics and an increase in fuel consumption (not yet significant). As a rule, this stage of regulator malfunction can last about a year.
The second stage is much sadder. Most car owners at this stage think about why this oxygen sensor is actually needed.
Normal acceleration disappears completely, the car “stumbles” even on a completely flat road.
Another distinctive feature of the second stage is a decrease in the speed of the power unit, even when the accelerator is pressed to the floor. In this case, popping noises may be heard in the intake manifold.
To be completely sure, it is recommended to start the car “cold”. If the oxygen sensor is faulty on the second severity scale, the car will only run perfectly for the first few minutes. When the device starts functioning, sending signals to the ECU, problems will immediately arise.
Regulator check
If there is a suspicion of a regulator malfunction, it is recommended to start by assessing its external condition. In most cases, if the sensor is faulty, it will become covered with a layer of dirt or grime. The normal appearance of the sensor, as a rule, indicates its normal operation, but the check should be continued.
- The regulator should be disconnected from the block.
- Then connect it to a voltmeter that has a fairly high accuracy class.
Note. The connection diagram of the regulator to the voltmeter should be based on its pinout: the black wire of the sensor is responsible for the signal (goes to the controller), the white wires are responsible for heating, the gray wire is for grounding.
Checking the voltmeter readings is a diagnostic test based on the dynamics of the vehicle’s power plant. For example, if cruise mode is engaged (2500 rpm), with the vacuum tube removed, a normally operating regulator should output 0.9 V (slightly more or less). If the sensor readings are below 0.3 V, then the device is definitely faulty.
Checking the sensor may have another mode. You can simulate forced air leaks, thereby depleting the air-fuel mixture. In this case, the regulator readings should be less than 0.2 V.
Another check mode is associated with the intermediate position of the motor. In other words, if the engine speed is within 1500 rpm, the regulator should show a value of 0.5 V.
If the sensor is completely proven to be faulty, it should be removed and replaced. And here you need to adhere to certain rules.
- It is better to change the regulator on a working car, so to speak, “hot”. This gives you a better chance of not stripping the thread.
- It is also recommended to slightly raise the connector of the new regulator, thereby protecting the device from dirt and moisture.
- And finally, experts recommend treating the sensor body with graphite, even with factory lubricant.
Almost all modern cars have an oxygen sensor. The device can be positioned in different ways. On some cars it is located near the catalyst, on others it is in the exhaust manifold.
What to do if you find a faulty sensor on the road
If a sensor malfunction occurs on the road or you need to go somewhere urgently, but the problems with the probe are not resolved, what can you do? The solution is ingenious to the point of simplicity - you just need to turn off the probe. Of course, the blinking “check” will not disappear until the engine stops, and the dynamics, in principle, will not be normal. But you can easily get to a car service center, albeit without amenities.
Regulator replacement
Replacing an oxygen sensor on domestic cars, as a rule, does not cause any particular difficulties. The only difficulty may be that the probe boils, after which it is practically unaffected by mechanical action. But even for such cases there are effective and step-by-step instructions. It is given below.
- The car climbs onto the overpass.
- The protection of the power unit is removed.
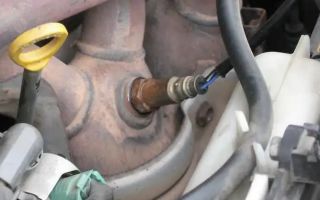
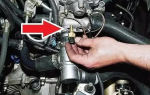
- The hood opens and work begins with the probe wires. The wiring from the oxygen sensor can be found on the CO hoses (cooling systems). They are secured with clamps.
- The plastic clamp holding the wiring is cut;
- The sensor is unscrewed with a key set to “22”.
If the device is not removed, the sensor is boiling. We proceed according to the following scheme. We spray the regulator with WD-40, wait a little and try to remove it again.
If it doesn’t work again, start the engine and heat up the exhaust system a little, pour water on the regulator and try again.
If that doesn’t help, you’ll have to heat the sensor directly with a soldering iron, tap it with a hammer (not too hard) and unscrew it.
The regulator is installed in the reverse order of removal. You must remember to connect the connector and secure the wiring to the hoses.
Knowing the signs of a malfunctioning lambda probe, you can react to it in time and replace it. A normally functioning sensor means high-quality and trouble-free engine operation. A motorist should never forget this.
Source: http://AutoLirika.ru/remont/simptomy-neispravnogo-datchika-kisloroda.html
Lambda probe: device, malfunctions, check
Lambda probe is the traditional name for an oxygen sensor. It helps control the amount of oxygen in exhaust gases. Engine performance is directly related to how efficiently the fuel-air mixture burns. And oxygen is largely responsible for the combustion process.
By adjusting its content in the mixture, you can control the combustion temperature: increasing or decreasing it accordingly. If there is a lot of oxygen in the mixture, then engineers usually denote this situation with the Greek letter lambda.
Well, one cannot but agree that “lambda probe” in Russian sounds much more expressive than the everyday “oxygen sensor”.
The main tasks of the lambda probe
The oxygen sensor is installed where the exhaust gases pass, namely in the exhaust manifold. It is used in those cars that are equipped with an injector. To increase the accuracy of the assessment, two lambda probes are sometimes used. They carefully surround the catalyst, being on both sides of it.
Lambda probe
The electronic control unit regulates the amount of fuel supplied to the engine. An oxygen sensor helps him with this. It transmits information about the oxygen content in the exhaust gases.
Depending on the sensor readings, the amount of fuel injected increases or decreases. When there is too much oxygen in the mixture, its combustion temperature rises. This releases toxic substances that are dangerous to humans and the environment.
The lambda probe indirectly controls the environmental friendliness of the exhaust system and strives to create conditions for the proper operation of the catalyst.
Device
Oxygen sensors come in two types: point-to-point and broadband.
• The two-point sensor has become traditional and is gradually becoming a thing of the past.
lambda probe two-pin
It consists of two electrodes: one inside, the other outside. The outer electrode is coated with a thin layer of platinum, which is susceptible to oxygen. The electrode located inside is made of zirconium. The potential between the electrodes changes in response to the amount of oxygen in the mixture: the more oxygen, the higher it is.
• The wideband sensor is an increasingly popular lambda sensor option.
Wideband lambda probe
In this case, two ceramic elements are used. One performs a two-point function, and the other pumps oxygen.
The mixture of exhaust gases no longer simply reaches the sensor by itself for evaluation and analysis, but the sensor deals only with oxygen, pumping it separately from the mixture.
Possessing a constant voltage of 450 mV, the sensor reacts to a decrease or increase in oxygen concentration by changing the voltage, which is immediately reported to the ECU. Having received the corresponding signal, the ECU creates an injection current. The oxygen content in the mixture is determined through the magnitude of the injection current.
The oxygen sensor only works effectively at temperatures above 300°C, so all lambda probes have a heating system.
Symptoms of the disease
Problems with the lambda probe can manifest themselves as follows.
- The toxicity of exhaust gases has increased and no longer meets established standards. However, the car enthusiast himself cannot check this without a special device.
- Fuel consumption has increased, but this problem can have many other reasons.
- The engine is idling unstable. Unfortunately, this symptom is also not unambiguous.
- The car's dynamics deteriorate.
- A characteristic cracking sound can be heard in the catalyst area.
- The “CheckEngine” light came on, but even here you will need to carry out diagnostics at a service center.
Ideally, a broken lambda probe should be diagnosed by a specialist.
Causes of malfunction
The lambda probe may fail for the following reasons:
- Low-quality fuel is the first enemy of all sensitive elements developed by foreign engineers in order to take care of the environment. Due to lead deposits, the outer layer of the sensor loses sensitivity and becomes inoperative.
- Mechanical impact that disrupts the design of the lambda probe leads to its failure.
- Problems in the fuel system can provoke the formation of carbon deposits or soot on all elements of the exhaust system, which interferes with their proper operation.
- Overheating of the sensor can occur for various reasons, but, as with all sensitive elements, too high temperatures have a destructive effect on the lambda probe.
- Oil or antifreeze getting into the exhaust system, as well as its leakage, also leads to malfunction of the lambda probe.
If the sensor fails, the ECU loses feedback from the exhaust system and works “blindly”, according to the average parameters that are in its memory. It is clear that the composition of the fuel-air mixture, getting out of control, ceases to be optimal.
The lambda probe is a vulnerable and relatively short-lived element . In the best case scenario, after 60-80 thousand km it breaks down.
Checking the lambda probe
Almost anyone can check the oxygen sensor. To check, you need to use one or two auxiliary tools: an oscilloscope and a voltmeter. If you do not know where the device is located, then use the manufacturer's instructions.
Checking the lambda probe with a multimeter
First, you should check the element for mechanical damage. Its body must be intact, as well as the wiring. If the sensor is not damaged, but dirty, then it is better to replace it with a new one. Of course, you can try to clean carbon deposits and soot, as well as any other deposits. If it succeeds, good; if not, then replacement is necessary.
Let's assume that our device is not damaged and has a clean surface. Then you should continue checking using a voltmeter or oscilloscope.
When a lambda probe is not needed
The oxygen sensor loses its value after removing the catalyst or replacing it with a flame arrester. In this case, we are talking not only about mechanical removal, but also about software. If it is possible to reprogram the ECU, then the need for a lambda probe disappears and you can forget about it. Otherwise, deceptions are installed.
It must be said that the lambda probe is not an expensive part (the average price of the part itself varies around 2,000 rubles + 500 rubles for labor), so a failed sensor can be replaced with a new one. The main thing is to do this in a timely manner, before other elements of the exhaust system are damaged, in particular the catalyst, the price of which is completely different.
Source: https://avtoexperts.ru/article/lyambda-zond-ustrojstvo-priznaki-neispravnosti/
And if the lambda probe is faulty - autocenter.ua
Useful tips
| The lambda probe is one of the elements of the power supply system of injection cars, which in our operating conditions can create problems. How to avoid them? |
The Greek lambda in the automotive industry refers to the coefficient of excess air in the air-fuel mixture. This is where the name of the sensor comes from, which measures this coefficient, or more precisely, residual oxygen (O2) in the exhaust gases (another name is oxygen sensor).
The purpose of the sensor is to provide the engine ECU with information that allows it to determine the nature of fuel combustion. This is necessary to create normal operating conditions for the exhaust gas catalytic converter.
The fact is that the “window” for the effective operation of the catalyst is very narrow, when 14.6–14.8 parts of air and 1 part of fuel burn in the cylinders (when such a mixture is burned, lambda = 1 ± 0.01).
Such precise control of the air-fuel mixture can only be achieved using power systems with electronic fuel injection. The lambda probe in these systems serves as a controller in the exhaust tract.
Lambda probe: causes and symptoms of breakdowns
Malfunctions or even failure of the lambda probe can occur due to:
| breaks in electrical connection circuits; |
| short circuits; |
| contamination by combustion products of gasoline with a high content of octane-increasing additives; |
| thermal overloads due to ignition interruptions; |
| mechanical damage (for example, when driving off-road). |
The service life of the lambda probe is greatly reduced by the poor condition of the oil scraper rings, the ingress of antifreeze into the cylinders and exhaust pipes, and an enriched fuel-air mixture.
If the lambda probe is faulty, the CO content in the exhaust increases from 0.1–0.3% to 3–7%. It is difficult to reduce its value in most older engines without replacing the sensor, because...
The range of the mixture quality regulator potentiometer may not be enough.
In cars with two lambda probes, if the second sensor fails, it is impossible to achieve normal engine operation without serious intervention in the electronics.
|
|
Lambda probe: malfunction treatment
There is no technology for repairing faulty lambda probes - if they break, they must be replaced. However, our “Uncle Vasya” nevertheless developed a method for restoring these sensors, but it is not effective in all cases.
Most often, it stops working due to carbon deposits on the sensing element under the protective cap. If the plaque is removed, the performance of the lambda is restored.
You can clean the sensitive element of the sensor by washing it in phosphoric acid, which corrodes contaminants in 10–20 minutes without destroying the electrodes with rare earth metals. It is more effective to clean the lambda probe after removing the protective cap on a lathe and washing it using a thin brush.
But it is advisable to do this if it is possible to secure the cap using argon welding. After washing, the sensor should be rinsed with water and dried. If washing does not help, then the lambda needs to be changed. The cost of washing is significantly less than the cost of a new lambda probe (from 300 UAH).
You can replace an unheated sensor with a heated one (but not vice versa!). If the connectors are incompatible, lay the missing heating circuit yourself, and use universal automotive contacts instead of the connector.
|
Lambda probe: diagnostics
Bosch specialists recommend checking the lambda probe and the fuel mixture control system every 30 thousand kilometers.
The lambda probe provides effective measurement of residual oxygen in the exhaust gases after it is heated to a temperature of 300–400°C.
Only under such conditions does the zirconium electrolyte acquire conductivity, and the difference in the amount of atmospheric oxygen and oxygen in the exhaust pipe leads to the appearance of an output voltage on the electrodes of the lambda probe.
Therefore, the lambda probe signal is checked with the engine turned on and warm. An oscilloscope is better suited for measurements than a multimeter, since it can most accurately estimate the shape and frequency of the signal.
Then the resistance of the sensor heater is measured (with the plug disconnected), which at room temperature is from 2 to 14 Ohms (according to the manufacturer’s requirements).
Next, the voltage supplied to the heater is checked: with the ignition on and the probe connector connected, it should be at least 10.5 V.
If this value is lower, you need to carefully check the battery voltage, cables and connections.
Lambda probe: installation details
| Sensors must only be installed and removed using appropriate tools. |
| If the lambda probe is reused, the threads must be treated with a special mounting paste. In this case, avoid getting the paste on the protective tube, as this can lead to malfunctions of the sensor. New lambda probes from leading manufacturers are pre-treated with paste. |
| Observe the tightening torque specified by the manufacturer, which is usually between 40 and 60 Nm. |
| Lambda probes require careful handling to avoid mechanical damage (eg due to falling). |
| Since the sensors draw in outside (reference, for comparison) air through the connector, it cannot be treated with contact spray or lubricant. When flushing the engine and underbody, the lambda probe connector should be carefully insulated. |
|
Yuri Datsyk
Photo Bosch, GM
Source: https://www.autocentre.ua/opyt/poleznye-sovety/a-esli-neispraven-lyambda-zond-284502.html
Lambda probe (oxygen sensor) signs of malfunction
During the operation of the car, various malfunctions occur in the fuel system. You can determine the malfunction by paying attention to the behavior of the car in road conditions. But first you need to figure out what types of fuel systems there are, what components and parts it consists of.
Types of fuel systems
There are diesel and gasoline engines. They run on different fuels, and accordingly, they have different fuel systems.
In diesel engines, fuel from the tank is supplied through pipes by a fuel priming pump to the injection pump (high pressure fuel pump), then from the injection pump to the injectors. From the injectors, fuel directly enters the cylinder through the engine intake manifold.
In gasoline engines there is no such pressure - such a high compression ratio is not needed to burn gasoline. Gasoline engine fuel systems vary in type. There is a distributed injection system (injector), a single-point injection system (mono-injection) and a carburetor. Carburetor engines have recently been discontinued and are living their last days.
Fuel system parts
Regardless of the engine type, any fuel system consists of a fuel pump, fuel pipes and the device itself that supplies fuel to the intake manifold. Such a device is almost always a nozzle; in carburetor engines, this role is played by the carburetor.
https://www.youtube.com/watch?v=CxhGVt5_YUA
Modern engines use sensors that affect the quality of the combustible mixture and fuel consumption. The injector and single injection system include an idle speed regulator and a throttle position sensor. An air flow sensor is present in injectors and modern diesel systems. In recent years, an oxygen sensor (lambda probe) has been installed on almost all types of engines.
Design and principle of operation of the oxygen sensor
The oxygen sensor (lambda probe) is located in the exhaust system of the car. Depending on the complexity of the design, one or two sensors can be installed; there are also more. If there is only one lambda probe, it is located on the exhaust manifold.
The lambda probe is a ceramic element in a metal casing, to which voltage is supplied through wires. Ceramics, depending on the qualitative composition of the gases in the exhaust system, sends a signal to the control unit. Fuel consumption control is adjusted according to sensor readings.
Why the oxygen sensor may fail
The most common thing that can cause a lambda probe to fail is mechanical damage. Let's say the car was in an accident. In our Russian conditions, fuel quality is often to blame. It’s no secret that gasoline at gas stations in Russia is often “bottled.”
Poor engine condition affects the performance of the sensor. A faulty piston group throws engine oil into the exhaust system, thereby clogging the ceramics of the lambda.
Incorrectly adjusted ignition causes overheating of the sensor. Due to the same ignition, popping noises may appear in the muffler. Strong pops destroy the lambda probe.
The oxygen sensor is damaged by antifreeze and brake fluid, which fall on the ceramic insulator. This may occur due to fluid leaks in the brake and cooling systems.
The main symptoms of lambda probe malfunctions
You can tell whether the oxygen sensor is working or not by looking at some characteristic signs. Although the cause of the problem may be different, professional diagnostics are needed to accurately determine the defect.
A faulty oxygen sensor may occur if:
- – the car moves jerkily along the road,
- – fuel consumption has increased,
- – the car is “stupid”, drives poorly and picks up speed,
- – the engine is unstable at idle,
- – immediately after stopping, a characteristic crackling sound is noticeable in the area where the “lambda” is located,
- – upon external inspection of the sensor, it turns out that it has heated up to a red-hot state (turned red).
If the sensor's wires are broken, then there is no doubt - it will not work in this condition. If there is external damage, you may doubt the functionality of the lambda probe.
The Chek Engine warning light in the car's interior also signals any problems with the engine's electrical system, but the problem can only be accurately determined using computer diagnostics.
Replacing the oxygen sensor
Replacing a lambda probe on a car is very simple, especially if the sensor is located on the exhaust manifold (it is easier to get to). It is better to change it on a well-warmed-up engine, since cold metal contracts and the sensor often “sticks” to the manifold.
To replace you need:
- – turn off the engine and turn off the ignition,
- – disconnect the wires at the connector,
- – use a wrench (sometimes a socket wrench is required) to unscrew the faulty sensor,
- – screw the new sensor into place as far as it will go, but without any extra effort,
- – connect the wires on the connector.
That's it, pretty basic. Now there will be no problems with the new sensor.
Source: http://avto-kuplya.ru/tekhnicheskie-voprosy/proverka-dvigatelya/3-lyambda-zond-datchik-kisloroda-priznaki-neispravnosti
Checking for malfunctions and replacing the lambda probe (oxygen sensor) yourself
With the advent of electronic gasoline injection systems, designers were faced with the task of adjusting the composition of the fuel mixture. For this, oxygen sensors or lambda probes began to be used.
The devices maintain the composition of the fuel mixture within certain limits, which allows for maximum efficiency of the catalytic converter.
With other mixture compositions, the neutralizer begins to work incorrectly and fails.
Depending on the design of the exhaust system, one or two sensors are used:
- The first is installed directly in the exhaust manifold and measures the composition of the exhaust gases before the catalytic converter. On early systems this device was the only one.
- With the introduction of Euro-3 standards, a second probe began to be used, located after the neutralizer. The electronic control unit analyzes data from two probes and indirectly evaluates the efficiency of the catalyst, and also adjusts the composition of the mixture.
Lambda probe options
Manufacturers have established a service life for products:
- probe without heating coil - no more than 80 thousand km;
- heated unit - up to 100 thousand km;
- planar (broadband) probes - up to 160 thousand km.
The declared service life of the probes is not accurate. The operating life of devices depends on many factors and may be less or more than the specified values.
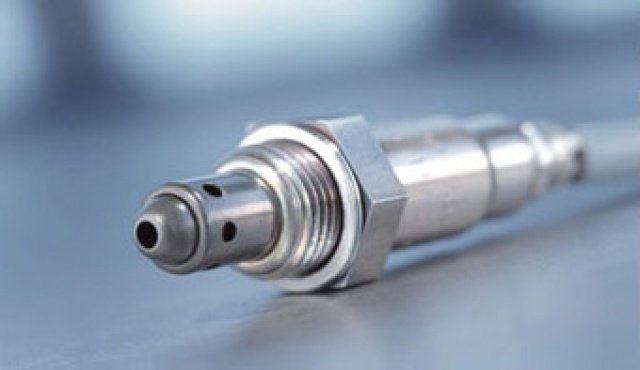
Device diagram
Let's look at the probe diagram, which gives an idea of the placement of nodes. Knowledge of the design allows you to understand the locations of parts that are prone to failure.
Probe design example
The design includes:
- 1 - metal fitting intended for installing a probe, there are turnkey edges on the outer surface, a thread is located below;
- 2 - ceramic insulator;
- 3 — sealing element for inserting the wiring harness;
- 4 - signal wires;
- 5 - metal protective cap, equipped with ventilation vents, designed to protect the measuring element from damage;
- 6 — spring contact part;
- 7 - sensitive element made of ceramic;
- 8 - heating rod;
- 9 - ventilation duct;
- 10 - outer metal casing.
Main symptoms and causes of lambda probe malfunction
The main symptoms of a malfunctioning lambda probe:
- interruptions in operation and floating speed at idle or low shaft speed;
- reduction of vehicle acceleration parameters;
- a noticeable (sometimes by several liters) increase in fuel consumption;
- The Check Engine indicator turns on and errors appear in the memory of the control unit.
The causes of malfunction of the oxygen sensor may be:
- damaged sensor element;
- clogging of the working area of the probe with soot or lead;
- destruction of wiring;
- failure of the heating element.
How to check the oxygen sensor?
If the above problems occur, you need to check the condition of the oxygen sensor. The lambda probe is checked visually and using electronic equipment.
Visual inspection
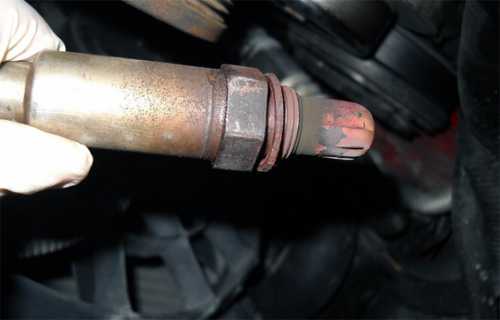
The very first stage of verification is an external inspection of the part, which consists of the following steps:
- Conduct a visual inspection of the wiring and plugs. Melting of insulation, mechanical damage, and oxidation of contacts are unacceptable.
- The working surface of the sensor should be free of soot and soot. A soot layer occurs when piston rings wear out or valves are poorly sealed. Soot changes the sensitivity of the probe, which transmits incorrect information to the engine control unit. After cleaning the part, performance is restored. Cleaning is done with a soft brush and keeping the probe in phosphoric acid for 15-20 minutes.
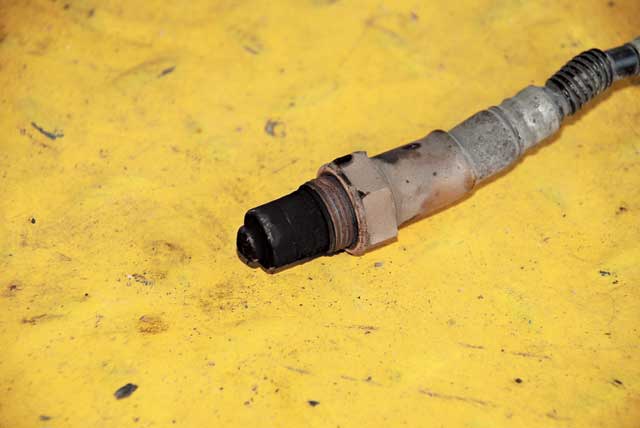
- If white or light gray deposits are present on the surface of the sensitive element, this indicates the use of fuel with additives based on tetraethyl lead. As a rule, such a sensor quickly fails.
An external inspection of the lambda probe allows you to determine only a small part of the faults; a more thorough analysis is performed using a tester or multimeter.
Checking with a multimeter
The heating circuits in the device may burn out or the working element may begin to deteriorate. These faults can be detected using electronic test instruments.
https://www.youtube.com/watch?v=hXI5whguE1c
There are three types of lambda probe plugs:
- two-wire (ground and signal);
- three-wire (a positive power wire for the heating element is added);
- four-wire (there is an additional grounding of the heating coil).
To perform a lambda probe test, factory documentation is required to determine the purpose of the wires and a digital multimeter switched to voltmeter and ohmmeter mode.
Approximate sequence of actions:
- Warm up the engine to operating temperature, since only in this case is it possible to obtain correct data.
- Ring the heating circuits. Under normal conditions, the resistance is in the range of 2-15 Ohms; more accurate data can be obtained from reference literature. Resistance is measured by connecting to two pins in the plug (for a four-wire probe) or to the heater pin and the car body (for three-wire probes). If the resistance is zero, this means that a short circuit in the heating element windings has been detected. The tendency of resistance to infinity is a symptom of a break in the nichrome heating threads.
- Check the wiring going to the heater from the control unit for breaks.
- Check the voltage in the signal circuit. The negative signal can be taken from the car body or directly from the battery terminal. Before checking, the engine should be run at medium speed (2500-3000 rpm) for 2-3 minutes. Disconnect the plug and connect the test device.
- Raise the speed to 2500-2600 rpm and sharply release the gas pedal. The voltmeter readings are in the range of 0.2-1.0 volts and change at a frequency of 1 Hz (on average once per second).
- Disconnect the vacuum tube from the pressure regulator to check the degree of leanness of the mixture. It is possible to force a lean mixture by closing the air intake opening of the throttle assembly with your hand. Measure the voltage, which should be within 0.2 volts or lower.
- Put the handset back.
- Rapidly increase the speed to maximum. In this case, the voltage should be about 1 volt.
An indirect sign of probe inoperability is a stable voltage of about 0.45-0.5 volts, which does not change depending on the operating mode and mixture composition. However, to confirm the failure, it is recommended to conduct a thorough check with an oscilloscope or test computer.
Checking with an oscilloscope
The advantage of checking the probe with an oscilloscope is the ability to monitor not only the voltage value, but also the amplitude of the change over time.
Shifts in amplitude characteristics within small limits cause changes in engine operating parameters, but are not registered by the control unit as an error.
Testing with an oscilloscope is carried out in a specialized service, since the device is rarely found in personal possession.
Sequencing:
- Warm up the engine.
- Connect the oscilloscope leads to the sensor.
- Carry out testing at idle speed. Below are sample curves taken with an oscilloscope. Based on the amplitude of the signal, we can draw a conclusion about the condition of the part.
- Replace the damaged part and retest.
Examples of graphs taken with an oscilloscope
How to check the sensor using the ELM327 USB OBD II scanner
The owner can independently test the sensor using the ELM327 scanner, which works using the OBD II protocol. The device is compatible with most Russian and foreign cars.
Test sequence:
- Connect the tester to the diagnostic connector. The location of the connector must be clarified in the documentation supplied with the vehicle.
- Read operating parameters and transfer them to a laptop with pre-installed special software. The most common utility is Torque Pro, which is publicly available.
Below is a video tutorial on how to use the ELM327 scanner with the Torque Pro utility, provided by the Savontiy channel.
Instructions for replacing the sensor yourself
Before starting work, you need to prepare materials and tools:
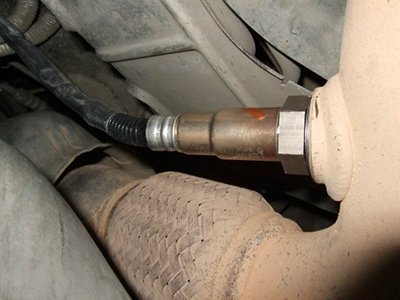
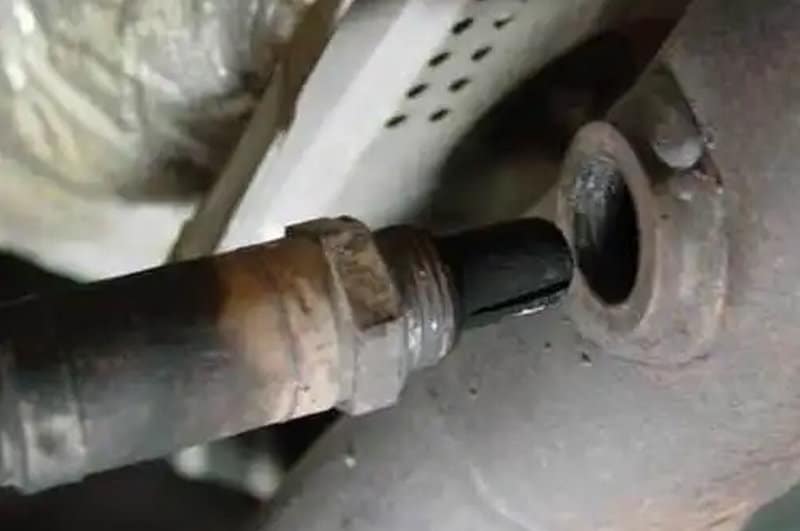
- New probe.
- A wrench or socket that will allow you to unscrew the sensor housing from the manifold. On some cars, you can try to remove the device with a regular 22 mm open-end wrench or a gas adjustable wrench. But the majority of machines require the use of a specialized attachment.
- Extension for nozzle.
- Torque wrench up to 50-100 N/m.
- Protective gloves and sleeves, since work is performed on a heated collector.
- Wrenches for removing protective heat shields and/or manifold.
Lambda probes should be replaced with the same model or a similar one that matches the parameters. You cannot install the first sensor you come across. Before installation, you must carefully study the instructions supplied by the manufacturer.
Approximate sequence of actions when replacing the first probe:
- Warm up the power unit to operating temperature. In this case, thermal expansion of the exhaust system elements occurs, which makes it easier to unscrew the sensor from the manifold or exhaust pipe.
- Turn off the engine.
- Remove the terminal from the battery to eliminate the possibility of the electric cooling fan starting.
- Carefully disconnect the probe connector from the wiring.
- Wear protective gloves and remove the probe wire from the clamps.
- Using the nozzle, unscrew the probe. At this stage, difficulties are possible, since the junction of the probe and the collector becomes clogged with rust and burnt grease. To facilitate the process, local heating with a gas burner can be used, which allows you to burn out the rust. After this, you should try to pull the probe out of place; if the part does not begin to unscrew, repeat the warming up again.
- Wipe the installation area from any remaining old graphite grease.
- Check the presence of standard lubricant on the threads of the new probe. The product may be included in the package in a separate bag. The lubricant is applied in a thin, even layer to the thread. Application to the protective cap is strictly prohibited, as this leads to the formation of hard deposits and deterioration of the probe’s operating parameters. If the car uses a sensor secured with two bolts, then they do not need lubrication.
- Carefully screw the sensor into place by hand until it stops.
- Tighten the probe with a wrench to the required torque. Most manufacturers indicate a force of 40-45 N/m, but it is recommended to check the value in the service literature. If there is no torque wrench, tightening is done by turning the probe 180º after twisting it by hand until it stops.
- Lay the harness along the clamps, secure with clamps if necessary.
- Connect the battery and clear errors from the control unit. Errors can be cleared using a computer or another method (depending on the make and model of the car).
When installing the probe, the tightening torque must be observed. Excessive force leads to destruction of the probe body or breakage of the thread; low torque causes breakthrough of exhaust gases and uneven heating of the part.
How to repair a lambda probe?
Manufacturers of lambda probes position the parts as non-separable and cannot be repaired. However, some car owners, with some success, try to disassemble and repair sensors, assembling one functional one from two or more damaged devices.
The car owner should remember that such a lambda probe repair is a temporary measure. It is recommended to purchase a new sensor and use the repaired one as a spare.
Heating element repair
An approximate sequence for disassembling and repairing a sensor with a damaged heating element:
- Carefully saw through the outer housing of the sensor.
- The second sensor is sawed in a similar way.
- Remove the heating rods from the sawn housings. The entire device must be wiped from carbon deposits and dirt with a dry cloth. The use of cleaning agents is not recommended as chemical reactions may damage the heater.
- Install the heater into the probe that will be used on the car.
- Solder the body with copper-phosphorus solder, which has a melting point of about 700 ºC. A gas jewelry burner is used as a heat source.
- Check the functionality of the product with a tester and install the probe into the collector. If the repaired device does not work, you can try replacing the heater again. Below are photos that explain the repair process.
Set of tools for repairRepaired sensor before soldering the joint Complete heating rod on top, broken on bottom Probe with sawn body
Repairing faulty wiring
There are recommendations for installing an additional resistor in the heating circuit if it fails.
According to the authors' idea, the resulting resistance should give the correct signal to the control unit and turn off error information.
In fact, this is what happens, but the lifespan of the additional resistance ranges from several hours to several days. A resistor that heats up to high temperatures can cause a fire in the engine compartment.
You can troubleshoot a broken wiring harness as follows:
- Saw through the housing on the top of the probe.
- Remove old wires completely, as the insulation wears out and cracks over time.
- Remove the pins with soldered wires from the donor block. Any available plug block can be used as a donor.
- For further work, it is necessary to remove the connecting elements from the pins.
- Assemble a new wiring harness using the standard rubber seal from the probe.
- Install the removed connecting elements onto the ends of the wires.
- Connect the wiring to the lambda probe response cables.
- Crimp the contacts and additionally solder them with refractory copper-phosphorus solder.
- Solder the housing and coat the place where the wiring harness enters the sensor with heat-resistant sealant.
When repairing the lambda probe wiring, it is recommended to check at each stage that there are no short circuits between the conductor and ground.
Soldered connector (far right) Assembled wiring harness Crimped harness wires OEM O-ring Plug used as a source of spare parts Wires with lugs installed
Cleaning from carbon deposits and soot
Another repair option is to clean the measuring element from carbon deposits and soot:
- Carefully cut off the protective caps.
- Soak the sensor in phosphoric acid, then carefully clean off the carbon deposits with a brush. It is not recommended to apply force as the measuring element is extremely fragile.
- If necessary, further clean the element by heating it on a gas burner. The procedure should be performed carefully, as the part may crack. Heating and cooling with cold water, which is recommended in a number of sources, is prohibited, since this will lead to complete failure of the probe.
- Reassemble the sensor by connecting the parts with refractory solder or spot welding.
How much does an oxygen sensor cost?
The cost of the sensor depends on the type of product and the prevalence of the model. Below are reference prices for devices used on some car models.
| Name | Price, rub |
| Lambda probe for VAZ-2114 | 1500-2000 |
| Lambda probe for Hyundai Solaris | 4500 |
| Lambda probe for Volkswagen Polo Sedan | 3500-5000 |
| Lambda probe for Gazelle, Volga | 1600-2600 |
| Prices are relevant for three regions: Moscow, Chelyabinsk, Krasnodar |
Video “Checking the lambda probe”
Recommendations for checking the lambda probe are shown in the video filmed by the author of the channel “v_i_t_a_l_y”.
Source: http://AvtoZam.com/elektronika/sensor/lyambda-zond-priznaki-neispravnosti/