How to change stabilizer bushings on different car models?
The suspension of any car is subject to severe loads while driving. Each of the nodes performs its own function, and together the entire system absorbs shock loads when hitting any obstacle (potholes, potholes, etc.).
This ensures that the vehicle maintains controllability and stability when making sharp turns or making sharp maneuvers.
Therefore, it is important to monitor the technical condition of each suspension element so that the question of how to change the stabilizer bushings does not take you by surprise.
These elements cannot be repaired, since there is no need for this due to the fact that they are practically consumables; it is easier to replace them. And their cost is not so high. Often they are the first to fail, and then the rest of the units.
The entire procedure for replacing them is simple, and the work can be done independently. Otherwise, there are many service stations where new bushings will be installed on the car for a fee. In addition, you can get useful recommendations from the master.
How does a car suspension work?
The safety of the driver and his passengers directly depends on the technical condition of the suspension elements. Levers and axles hold the wheels in the desired plane, but at the same time allow them to easily rotate in the other two planes when turning.
This knowledge is necessary to understand how to change stabilizer bushings. Shock absorbers help dampen vertical vibrations, providing the vehicle with a smoother ride. At the same time, springs serve to stiffen the suspension and return its elements to their previous position. All this is unthinkable without fastening elements due to rigid bolted connections, composite silent blocks and ball joints.
The stabilizer is an indispensable part of the suspension of any modern car. It is usually noticeable as soon as the car is driven onto a lift or pit, in the form of a curved steel rod. One of its shoulders is fixed to the subframe, and the other to the wheel hub. At the same time, the mount is not rigid and allows the stabilizer to move along its axis relative to one plane.
This part appeared at the dawn of the automotive industry, when vehicles could accelerate to speeds of 20 km/h or more. Since that time, many drivers have already begun to think about the problem of how to change stabilizer bushings.
Due to it, it was possible to maintain stability and controllability when cornering. In other words, the stabilizer performs an important task - when the car rolls, it distributes its weight across all wheels. This usually happens when entering very sharp turns or when the trajectory suddenly changes.
Symptoms of a problem
In order to better dampen various vibrations and withstand the loads that the body absorbs, most of the suspension parts are connected through elastic elements. The stabilizer is no exception, and in its case bushings (pillows) are used, most often made of durable rubber or polyurethane.
During the vehicle's operational life, the airbags inevitably wear out. In this case, a characteristic sign appears - a slight tapping of the suspension.
A similar sound also appears when the shock absorbers are faulty, but in the case of bushings, the knock can be heard not only when driving over holes and potholes, but also when entering turns of relative steepness.
This is a serious reason to think about the problem of how to change the rear or front stabilizer bushings.
Extraneous sound is a consequence of wear of parts, resulting in play in the connection of suspension elements. In this case, the effectiveness of the stabilizer is lost.
On a worn-out pillow you can notice a “pattern” of cracks (in the circle of masters - daisies) and abrasions. There is a popular way to diagnose bushings - drive over the well-known police obstacle in second gear. The appearance of a dull thud underfoot will lead to the right conclusions.
Likely consequences
Ignoring bushing wear can lead to a variety of consequences. First of all, the knocking will begin to intensify, which over time will begin to lead to the destruction of parts due to deformation. The body may roll more when cornering, and the steering wheel play will increase.
Many car manufacturers recommend changing bushings every 30,000 - 40,000 km. But in our realities, to decide how to change the stabilizer bar bushings, it is better to focus on the degree of wear of the cushions. And if a slight knocking or rattling occurs, it is better to immediately inspect the suspension or go to the nearest service station for diagnostics.
Recommendations
Often, when dismantling worn parts, you may encounter the main difficulty - rusty bolts. Moreover, the problem manifests itself regardless of the make of the car. In many ways, the condition of fasteners completely depends on the environmental conditions under which the vehicle is operated.
In some cases, increased corrosion prevents the bolts from being unscrewed, and therefore they are pre-treated with WD-40. If necessary, the treatment must be repeated, but if the car undergoes regular maintenance, then there are usually no such problems.
Usually, during general suspension repairs, attention is paid to the bushings; if they are worn out, they are changed immediately, so that after a short period of time you do not have to disassemble everything again. And regular technical inspection allows you to operate the car and do without major repairs for a long time.
Replacing bushings on a Toyota Corolla
How to change stabilizer bushings on a Toyota Corolla? The entire series of Toyota cars is considered the most reliable, however, any vehicle, regardless of the manufacturer, is subject to varying degrees of wear. Corolla is no exception. The operation of replacing stabilizer bushings is carried out according to the following instructions:
- It is advisable to secure the car on a lift at a convenient height for work. You can use a pit, but you will still need jacks.
- Open access, for which the front wheels need to be removed along with the wheel arch liners and plastic protection. However, under field conditions, this step can be omitted.
- Proceed to removing the two stabilizer mounts by unscrewing 4 bolts on each bracket. Without removing them, it will not be possible to replace the bushings.
- The bushings themselves are removed using a mounting tool or other convenient tool. And since they are usually made of elastic material, no special effort is required.
- First you need to clean the place where the new bushings will be installed.
To make it easier to put on the part, it is advisable to moisten the inner surface with a soap solution. Just do not use petroleum oils or brake fluid under any circumstances, as there is a risk of serious damage.
When deciding how to change stabilizer bushings, you will notice that the original bushings are made of rubber, but you can find products made of polyurethane on sale. If possible, it is better to purchase rubber bushings, since, as practice shows, the service life of such parts is significantly longer than that of plastic analogues.
Replacing bushings on a Kia car
The work can be done in a pit, a lift or using a jack, but the second option is still better.
Further actions are presented in the form of instructions:
- Standard wheel removal operation. In some cases it is necessary to dismantle the protection. First loosen the steering rack.
- Using a jack or a special stand, slightly raise the gearbox and unscrew the fastenings of the rear cushion and subframe (4 bolts).
- To access the bracket bolts that hold the bushings in place, lower the subframe slightly. After unscrewing the fasteners, each bracket must be carefully removed so as not to damage the steering rack boot. After this, remove the old part.
- Treat the new part with soapy water and install it in its place.
- Repeat the rest of the process in reverse order.
When puzzled by the problem of how to change the stabilizer bushings on a Kia, it is worth noting that the Kia Ceed models have a feature, which is the telescopic shape of the steering shaft. Therefore, it is necessary to make a mark before unscrewing the fastening bolt, and its installation is done last.
Replacing bushings on a Ford Focus
Replacing an old part does not involve any particular difficulties, and the work can be done independently, which saves money. One of the costs is the purchase of a new part. To install a new bushing, most often it is necessary to remove the stabilizer. An algorithm is useful for this:
- To begin with, the same procedure for removing the wheels.
- After this, the fastening elements of each steering rod are unscrewed.
- Using a special tool, the steering ends are disconnected from the steering knuckles.
- Remove the connecting levers by unscrewing their fastenings.
- Remove the ball joints.
- Unscrew the main fastener of the gearbox support cushion.
- Unscrew the bolts of the cross member (there are 6 of them) and move it to the side, thereby opening access to the stabilizer.
- Now all that remains is to unscrew the stabilizer fasteners and remove its clamps.
This task, how to change the stabilizer bushings on a Ford Focus, is not that difficult.
But it is worth noting that new bushings must be installed in a place specially designed for them - the flats of the stabilizer. Do not use lubricant! When installing the stabilizer in place, you need to ensure that the new parts are located strictly opposite the spacer elements. It can be propped up if necessary.
To make the clamps stand up easily, it is better to moisten them with water. Further actions are performed in the reverse order of the above algorithm.
Replacing bushings on a Lada Vesta car
The work must be carried out when the stabilizer bar is in a relaxed state. This can be achieved by driving the car onto a lift (at a service station), a pit or an overpass. In the future, the production process of how to change stabilizer bushings on a Vesta proceeds in the following order:
- Armed with a wrench, an extension and a 10mm socket, unscrew the bolts securing the protection that hides the steering mechanism. Usually there are 5 of them.
- Next, you need to unscrew both rear bolts holding the bushing brackets using a 13mm spanner.
- Using a special Torx T40 wrench and a ratchet, unscrew the two front fasteners relative to the steering rack.
- Remove the bracket along with the old bushings.
- Make a cut at the bottom of the new parts and lubricate the inner surface with a silicone-based product.
- In the future, use the reverse procedure.
As many owners of cars of the domestic Lada Vesta brand note, polyurethane parts last 3-4 times longer than their rubber counterparts.
They retain their elastic and resilient properties in low temperature conditions. This has a better effect on the handling and stability of the car.
Finally
A vehicle that is in poor condition poses a serious threat. Moreover, this applies not only to the driver himself and his passengers; all other road users are also at risk.
Therefore, it is necessary to carry out diagnostics of a personal vehicle at certain intervals and immediately change the bushings of the Renault Megane 2 or any other brand of stabilizer.
This is the only way the car will embody not only comfort, but also safety!
Source: http://fb.ru/article/338051/kak-pomenyat-vtulki-stabilizatora-na-raznyih-modelyah-avto
Toyota Corolla Forum
Toyota Corolla transmission problems, repairs and spare parts
mytoyotaClub Archivist Messages: 251 Registered: Jan 26, 2013, 10:13 pm Thanked: 6 times
#2
Post by mytoyota » 01 Feb 2013, 12:34
You do not have the necessary permissions to view the attachments in this message.
mytoyotaClub Archivist Messages: 251 Registered: Jan 26, 2013, 10:13 pm Thanked: 6 times
#4
Post by mytoyota » 01 Feb 2013, 12:38
mytoyotaClub Archivist Messages: 251 Registered: Jan 26, 2013, 10:13 pm Thanked: 6 times
#5
Post by mytoyota » 01 Feb 2013, 12:39
mytoyotaClub Archivist Messages: 251 Registered: Jan 26, 2013, 10:13 pm Thanked: 6 times
#7
Post by mytoyota » 01 Feb 2013, 12:41
GroSSHonorary member of the club Messages: 667 Registered: 07 Jan 2013, 19:11 Car: Nissan Qashqai+2 Location: Ryazan, Kolomna MO
#9
Post by GroSS » 01 Feb 2013, 12:43
After replacing the bushings I drove 500 kilometers and it became much quieter. But now another knock is heard. Which only appears when you are coasting on an uneven road, such as gravel.
If you give a little gas or brake, then it’s gone. I decided to start by replacing the racks, I ordered racks from Febi. I think the quality should be no worse than Toyota's, because...
They supply suspension components to the assembly lines of the German automobile industry.
Branch of the forum on social media networks VKontakte Andrey_ka37 Honorary Toyota Driver Messages: 559 Registered: 08 Jan 2013, 14:29 Car: Rav4 2016, 6 manual transmission. Location: Ivanovo region Thanked: 6 times Thanked: 4 times
#13
Post by Andrey_ka37 » 01 Feb 2013, 12:45
Here's a question: do they not change the stabilizer links under warranty or do they replace them?
Who might have had the struts changed?
Vodka is soft, juice is good, a cigarette is light. So why is the morning so bad?...mytoyotaClub Archivist Messages: 251 Registered: Jan 26, 2013, 10:13 pm Thanked: 6 times
#15
Post by mytoyota » 01 Feb 2013, 12:47
Igor51Pochetochny Toyota Driver Messages: 98 Registered: 07 Jan 2013, 20:30 Car: Land Cruiser Prado Thanked: 1 time
#16
Post by Igor51 » 01 Feb 2013, 12:49
Actually, today I changed these bushings because... Got dull knocks in the suspension. Mileage 83 t.km. You need a hole and a head or a 17mm wrench. We unscrew the eight bolts marked with a red arrow and remove the old bushings, which we replace with new ones. feel the difference
Then we twist it back and rejoice.
Igor51Pochetochny Toyota Driver Messages: 98 Registered: 07 Jan 2013, 20:30 Car: Land Cruiser Prado Thanked: 1 time
#17
Post by Igor51 » 01 Feb 2013, 12:50
VINT
As for the modernized ones, there is some kind of problem, I don’t remember exactly. And these stand and silence.
Igor51Pochetochny Toyota Driver Messages: 98 Registered: 07 Jan 2013, 20:30 Car: Land Cruiser Prado Thanked: 1 time
#18
Post by Igor51 » 01 Feb 2013, 12:51
VINT
48815-02140-left 48815-02150-right – I ordered these, and which ones arrived, I don’t know, see the photo I installed it and silence.
GroSSHonorary member of the club Messages: 667 Registered: 07 Jan 2013, 19:11 Car: Nissan Qashqai+2 Location: Ryazan, Kolomna MO
#20
Post by GroSS » 01 Feb 2013, 12:53
After a trip to Volgograd I decided to replace the stabilizer struts. I replaced them with German Fbi ones, but I didn’t really like them due to the fact that: 1. the boot on one stand was torn;2. the pin with the ball is held inside the strut by a plastic sleeve.
When I lifted my muzzle and turned the wheels left and right, I heard a creaking sound in the support, similar to a crumbling bearing or rubber rubbing against rubber. I was scared, I thought the prop man had given up his life, but after lubricating it with lock grease, the creaking went away.
After removing the wheel, I saw cracks on the rubber cushions of the levers on the interior side, 3-5 millimeters long, and sprayed it with silicone grease to calm it down. Before installation, I saw a crack of about 3 mm on one boot. I decided to change it to the boot from the original rack.
When I removed the anthers from both racks, I saw that on the original rack the fingers were held inside the rack by metal, on the German ones by plastic. The lubricant in the native ones is similar to Vaseline, only thinner, there is a lot of it, in Phoebe it is very thick and not enough.
The force for rotating the fingers on my relatives is weaker than on the German ones, I could have ridden them again, but since I took them off, I decided to install new ones. After the replacement it became a little better, but I didn’t feel a significant difference. Febi stabilizer struts Crack in boot TOYOTA struts on the left, Febi on the right: Forum branch on social media VKontakte networks
Go
Source: http://tc-club.ru/viewtopic.php?t=206&start=620
How to change stabilizer bushings on a Toyota Corolla: photos and videos
Many Toyota Corolla owners have experienced that the stabilizer bushings have worn out and need to be replaced. Of course, everyone has a choice to make: contact a car service center or do it yourself.
Video on replacing stabilizer bushings on a Toyota Corolla
This video will tell you how to independently replace stabilizer bushings on a car, what tools and operations will be needed.
The process of replacing stabilizer bushings
New stabilizer bushings.
Replacement algorithm
To replace the stabilizer bushings yourself, you will need tools: a wrench for unscrewing the bracket and metal protection, a jack, and, well, time.
So, let's proceed directly to the process:
- We place the car on the pit and jack up the side where the bushing will be changed.
- If we carry out the process without a pit, then we will have to dismantle the wheel and find the stabilizer, and with it the bushings.
We find the stabilizer and bushings.
- We dismantle the protection by unscrewing the fastening bolts. Remove the fixing protection of the stabilizer bushings.
- Now we got directly to the bushing itself.
After removing the protection, the stabilizer bushing is visible.
- With a slight movement of your hand, remove the bushing from the stabilizer.
The process of dismantling the stabilizer bushing.
- We replace the old bushing with a new one.
Removed stabilizer bushing.
- Assembly is carried out in reverse order.
- We change the second bushing, on the other side.
Product selection: original, analogue, tuning
This will determine how long the part will last, and most importantly, how. More than once, new bushings installed by motorists are of poor quality, which is why they have to be changed more often.
Original
Old and new original stabilizer bushings.
48815-12370 – original catalog number of the stabilizer bushing for Toyota Corolla with a 140/150 body. The average cost of a product is 1000 rubles.
Analogs
In addition to the original bushing, the car market offers a huge selection of analogues. The main ones:
Manufacturer name ArticlePrice in rubles| Blue Print | ADT380125 | 500 |
| Febest | TSB-ZRE151LH | 450 |
| Febest | TSB-ZZE150L | 500 |
| Febi | 42840 | 750 |
| GSP | 513153 | 300 |
| Japan Parts | RU-286 | 450 |
| Masuma | MP-1078 | 450 |
| Nippart | N4272000 | 1200 |
| Sidem | 845822 | 750 |
| Stellox | 79-00006-SX | 750 |
| SWAG | 81 94 2840 | 1000 |
| Yamato | J72058YMT | 300 |
Tuning options
Reinforced stabilizer bushings from the Chinese manufacturer Febest are no longer as expensive as in China. But they seem to praise it!
But, spare parts manufacturers offer vehicle owners tuning versions of bushings, which can be called reinforced or of improved quality. Thus, the Febest company offers stabilizer bushings for Corolla with KIT kit marked TSB-ZRE151F-KIT . The cost of the product is 1000 rubles per piece.
conclusions
True, the process requires certain conditions, such as the presence of a pit. It is worth paying special attention to the choice of product, since there are often fakes that do not justify their service life and resource for their money.
Source: http://carfrance.ru/zamena-vtulok-stabilizatora-toyota-corolla-kuzov-150/
40. Replacing stabilizer bushings for Corolla e150 - approach two - logbook Toyota Corolla sunset color - only white 2010 on DRIVE2
The topic is not new, but still - I decided to describe in a little more detail a couple of nuances that will make it easier to replace bushings and shed light on issues that will allow you to avoid unnecessary movements and costs - the article even turned out to be somewhat tricky...
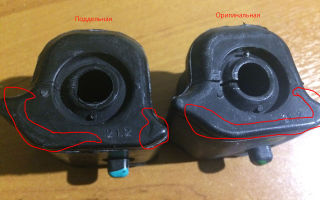
Image #1 The same ones - which are not quite the same...
Recommendations:
The bushings must be replaced from the pit - otherwise there will be difficulties in removing it, because If you jack it up or lift it on a lift, the suspension will be unloaded, the stabilizer arms will rise, and the bushings will be much more difficult to remove.
Oddly enough, but it will be equally difficult to remove the bushings if the suspension is loaded additionally - the arms of the stabilizer will drop as much as possible and when you try to lower the middle part of the stabilizer, it will simply fall on the suspension arms (which will be raised in the loaded position) and the stabilizer will not be able to lower more than 3…5 mm – which is not enough to freely remove the bushings.
Image #2 Front suspension with steering rack
The position of the stabilizer bushings is of fundamental importance because they are made in such a way that the edge of the splash seal is directed towards the outside of the machine in order to prevent dust/water/dirt from getting inside in order to avoid squeaking and premature wear. For the same reason, a slot is made on the back side of the bushing to allow the vehicle to move.
Image #4
We drive the car into the pit...
Image #5 Bottom view - bottom
Image #6 Bottom view – front suspension
Image #7 Subframe with brackets placed on it
Image #8 Also – in person
Image #9 Brackets - 4 bolts each
_______________________________________________
Work I completely unscrewed all four bolts and removed the right bracket (left/right - the order is not important here).
Image #10
On the left bracket, I loosened all the bolts as much as possible - which will allow the stabilizer to be lowered further.
I decided not to completely remove the second bracket - so that later nothing would go anywhere and I wouldn’t have to adjust or expose anything again.
Image #11
I return to the right bushing and remove it - of course it does not “jump out” on its own, but it will take less than a couple of minutes to remove it with bare hands.
Image #12
Installing a new bushing will also not require much effort - we move the bushing along the slot, attach it to the stabilizer and rotate it, placing it in the desired position. The cut on the bushing should be towards the rear of the machine.
Image #13
We put the right bracket, aligning the protrusion on the sleeve with the hole in the bracket, in its place and tighten the bolts by 1...2 turns of thread. Unscrew the bolts on the left side and remove the left bracket. We also replace the old bushing with a new one...
Image #14
...we place the bracket in its place and tighten the bolts evenly, pulling them with a tightening torque of: 87 N*m {9 kgf*m}
Image #15
NOTE:
- Pretighten bolt A, and then fully tighten the 4 bolts in the following order: B, C, D and A.
- After installing the left and right front suspension brackets, ensure that the tab on the front stabilizer bar bushing protrudes outward.
Image #16 The protrusion on the front stabilizer bushing protrudes outward
(photo by starter163)
To work, you will need a minimum of tools - a 17" head and a knob for it
Image #17 Tools
——————————————————————————————————–
Well, in terms of sharing personal experience:
- for the first time I decided to change the stub bushings when the front suspension rattled on speed bumps and a rough road - having chosen a cheaper analogue of the original from Masuma, there was only one remark about the work of the bushings - they creaked, but otherwise the problem was solved .
Over time, the creaking began to become more and more tiresome and it was decided to replace the “musical” bushings with original ones.
There are enough articles on this topic on the Internet, but as it later turned out, they do not have increased information content.
At first I ordered the wrong bushings - 48815-12370 and 48815-12390, I managed to find out after opening the package - by comparing them with the old bushings that were originally on the car.
The first thing that alerted me was the different design of the dust seal - on the old (original) ones it was placed outside the bushing, on the freshly purchased one - inside.
Having looked more closely at the articles, I also saw a difference in them, as well as a difference in the internal holes.
Image #18
I had to order again, but the same ones (for an upgraded stabilizer) - 48815-12400 and 48815-12410
Image #19 New bushings - on the left for pre-restayl, on the right for modernized ones - for restyle
Well, after the replacement, I was able to make sure that the choice was correct, albeit on the second try...
Image #20 Masuma's - creaky and Toyota's - those that were originally
Well, just for information - what kind of bushings there are:
Toyota – not modernized 48815-12370 – front left stabilizer bushing
48815-12390 — front right stabilizer bushing
Masuma - analogue of non-modernized MP-1016 - right stabilizer bushing
MP-1017 — left stabilizer bushing
Toyota – modernized 48815-12400 – front left stabilizer bushing
48815-12410 — front right stabilizer bushing
Toyota - well, sort of like for a car with a 1.4l engine 48815-02140 - front left stabilizer bushing
48815-02150 — front right stabilizer bushing
There is an opinion that polyurethane bushings are more durable, although there are also people on the Internet with a perpendicularly opposite opinion, someone even claims that polyurethane “eats” the stabilizer - i.e. The stabilizer wears out at the point of contact.
Manufacturer X5 RESOURCE - stabilizer bushings -45-0174 - polyurethane right
45-0186 — polyurethane left
Manufacturer VTRTO1418RP - polyurethane right
TO1417RP - polyurethane left
In a word, the more information, the less clarity - for myself, I decided that the easiest way is to order spare parts using the VIN code , even if a part arrives that later does not fit, there will be much fewer questions when returning, and even those can be safely attributed to shortcomings in the VIN database -codes that sellers use, and therefore there can be no complaints against me.————————————————————————————————— ———-
Information from a parallel resource on the article “Gogol”
Modernized anti-roll bar bushings
- it describes in sufficient detail the difference between modernized and NOT modernized parts
(link provided by MobilaE51)
Image #21
.
You can also find a lot of useful information in B/F;
- opening the trunk like on a Ford Kuga
- the door lock of the Corolla e150 is frozen - we repair it ourselves
- standard xenon Corolla e150
- how to register the key for the Corolla e150
- cruise control with speed limiter and radio control buttons
- multimedia radio with 8'' screen - radio, video , navigation, DVD and rear view camera, etc.
- original multimedia navigation system of Toyota Corolla e150
- replacing the front suspension stabilizer bushings
- CARPET sticker on the surface of complex geometry
- about the correct autostart of the Corolla 140/150 manual transmission
- about installing heated rear seats
— replacing the dashboard backlight in white/blue
— noise and vibration insulation of doors, trunk lid/rear parcel shelf and wheel arches
— hook in the trunk, handle in the trunk, turned the spare wheel over
— front PTF with options
— decorative door sills with backlight and correct connection
- LED interior lighting, LED trunk lighting
and a bunch of other things...
Source: https://www.drive2.ru/l/8341325/
Replacing stabilizer struts for Toyota Corolla 150
The chassis of the latest generations of Toyota Corolla is highly reliable. But sometimes, nevertheless, drivers wonder how to change stabilizer bushings on a Toyota Corolla.
It is quite possible to carry out these works independently if you have an inspection pit (lift) and a set of necessary tools. It is important to follow the disassembly order, which we will discuss below.
When assembling components, the tightening torques of bolts and nuts must correspond to those recommended by the manufacturer.
Features of stabilizer bushings
One of the first parts that begins to bother owners when driving over uneven surfaces is usually the anti-roll bar, or rather its rubber bushing. If a knock is periodically heard in the front part, then it may be necessary to replace the Toyota Corolla 150 stabilizer bushings. The procedure can be performed without assistants and does not require special pullers.
The reason for the need to replace Toyota Corolla stabilizer bushings is their wear. It occurs due to the fact that the anti-roll bar constantly changes its position due to the lateral roll of the car.
At this moment, the rubber bushing takes on most of the load. Gradually its diameter increases, which causes knocking and does not contribute to the stability of the car when driving at speed.
Despite the fact that the place where the part is attached is structurally protected by a metal plate, moisture, reagents spilling onto the road in winter, fine sand get under the bushing and the process of corrosion of the stabilizer begins. Over time, the diameter of the part decreases.
This means that the stabilizer in the standard bushing will not be held so tightly. Japanese engineers thought about this and made a cut in the bushing design, which is intended for a tighter fit of the part.
It also facilitates more convenient installation (disassembly) of the part.
The procedure for performing work on replacing bushings
To replace the bushings, set the car to the handbrake. There is no need to disconnect the negative terminal from the battery. Next, perform the following operations.
- Jack up the car on both sides so as to relieve the load on the front axle.
- Remove the plastic protection covering the chassis elements.
Remove the metal plates that clamp the stabilizer bushing.
When removing the bushing, rotate it so that it is convenient to remove it. Use a spatula to increase the gap. Before replacing the Toyota Corolla stabilizer bushings with new ones, lubricate the area with special silicone. The installation process will be faster, and the rubber will be covered with a water-repellent layer.
When inserting a new bushing, pay attention to the hole in the metal casing into which the protrusion on the rubber product should fit.
Stabilizer's pole
If the wear of the stabilizer bushings is significant, then the next element that may fail is the stabilizer link. Replacing the Toyota Corolla 120 stabilizer strut may be required after a mileage of more than 50 thousand km.
A part manufactured under license will last two or even three times less. In most cases, this is due to a loose fit of the rubber boot, as a result of which moisture gets under it and the corrosion process begins. You should pay attention to this fact when choosing a manufacturer.
If knocking noises come from under the wheel arches, this may indicate the need for work to replace the stabilizer struts. This item cannot be repaired. The operating procedure is as follows.
- Remove the front wheel.
- Jack up the lower arm.
- Turn the steering wheel in the desired direction for easy access to the part.
- Clean the connection from dirt and treat the threaded connection with BD-40.
Break off the bolt, and then insert the socket wrench (hexagon) and unscrew the nut holding the post.
The top connection is easier to unscrew. This is due to the fact that it is less susceptible to corrosion, since less moisture and dirt get into it. If it is impossible to unscrew it in the usual way, then try preheating the connection or using pliers.
Install a new one in place of the removed stand.
The procedure for replacing the Toyota Corolla 150 stabilizer bar is the same on both sides.
Watch an interesting video on this topic
Source: https://eurasia-avto.ru/zamena-stoek-stabilizatora-toyota-korolla-150.html
Replacing stabilizer bushings for Toyota Corolla
Sooner or later, every owner of a Toyota Corolla car, having driven an impressive number of kilometers, for example, several tens of thousands, will be faced with such a problem as a knocking sound coming from the suspension area.
For the most part, rubber suspension parts fail; they are the first to be damaged during the operation of the car, since the road cannot be perfectly smooth everywhere; there are often holes and stones that lead the stabilizer bushings to poor condition.
To rid your iron friend of this kind of problem yourself, you do not need any special knowledge in the field of cars; it is enough to know the names of the parts, their location and simply follow the instructions given below. Such work takes about 4 hours, but if you are already experienced in car repairs, you can replace the stabilizer bushings several times faster.
How to determine whether stabilizer bushings are broken
Basically, when driving on an uneven road, the breakdown of the stabilizer bushings is noticeably noticeable and clearly visible, especially on the Toyota Corolla. The sounds in the chassis are loud and clattering, sometimes even frightening, but don’t worry, there is nothing special about this problem, the main thing is to detect it and eliminate it in time.
Replacing the bushings itself is not considered a difficult operation, but it can cause some inconvenience, since the work is done literally by touch.
With characteristic dull sounds, the first suspicions fall on the steering rack; the reason for this is the front stabilizer, in which the rubber bushings wear out.
As you know, to hear a knock in the chassis, the bushings only need to wear down by 1 mm, but this will already mean that it’s time to find a replacement.
Replacing stabilizer bushings
The process of replacing Toyota Corolla stabilizer bushings is as follows:
- First of all, you need to drive the car into a pit and, for the convenience of replacing the bushings, remove the engine protection, if any.
- Using a 17 socket wrench, you need to unscrew two bolts on the left and two bolts on the right side.
- Then you need to remove the staples, then pull out the broken bushings and inspect them very carefully. This is done using a mount.
- The naked eye can see if the bushings have reached the end of their lifespan. This is clear from the appearance of either the rubber being beveled into a cone, or almost completely worn out.
- Let's move on to installing new bushings; it is best to use original bushings for the Toyota Corolla.
- When you already have a new bushing, you need to lubricate it with water or technical petroleum jelly and insert it into the tip of the stabilizer.
- Using a pry bar, the bushing is installed in its rightful place.
- If you did the work correctly, the front stabilizer will not turn when you rotate it by hand.
- Now we screw the plate.
- The second bushing is changed using the same technology as the first.
All that remains is to drive the car, having tried your efforts in practice, if you do not hear any knocking, which will happen, then the work was done correctly. BUT all the same, you need to be more attentive to the suspension of your car and the parts attached to it.
Why are stabilizer bushings needed?
Every motorist knows the answer to this question. The bushing, during uneven roads, absorbs the impact force of the suspension, softens the load, which protects all other more important parts, as well as components, from damage. Due to its frequent use, the bushing tends to wear out quickly, since the rubber parts themselves are more susceptible to wear than all the others.
What is the main reason why bushings wear out? Due to off-road driving and bad roads, or if a sharp and aggressive driving style is used. It is not customary to repair bushings, since this is not cost-effective, therefore, if this part is worn out on your Corolla, it should only be replaced.
Read also
Source: http://grandrepairauto.ru/zamena-vtulok-stabilizatora-toyota-corolla.html
Replacing stabilizer bushings for Toyota Corolla photo and video
However, mileage on domestic roads is reduced; it is recommended to replace these parts a little earlier than the established deadlines.
Replacing the front stabilizer bushing
I drew the attention of the technicians to the maintenance; they checked it and assured me that everything was OK.
Everyone knows how to press on the gas, but then try to cope with the controls Reply with a quote 33 users said thank you to her: Then raise the rear of the Toyota car, placing it on supports. The photo shows the opened stabilizer.
Image 12 Installing a new bushing will also not require much effort - we move the bushing along the slot, attach it to the stabilizer and rotate it, placing it in the desired position. The process took an hour and a half, of which a third was hanging the front suspension
Installing the Toyota car on a lift. Then the front wheels, fender liners, and protective plastic elements are removed.
The fastening is removed from the stabilizer elements. The same operation is carried out with the stabilizer bracket. Then the old parts that have become unusable are replaced with new ones.
How to change stabilizer bushings on a Toyota Corolla #GarageLife
The assembly process proceeds in reverse order. The procedure seems to be simple, although it requires the owner of a Toyota Corolla to have certain tool skills.
When carrying out work, such as in the case of replacing bushings at a service station, as well as when performing work independently, it is necessary to comply with safety regulations. At least no one has canceled them yet. Replacing the stabilizer bushing of a Corolla car on your own. First of all, you need to unscrew the nuts securing the rear wheels.
Then raise the rear of the Toyota car, placing it on supports. After this, the wheels are removed.
The photo shows the opened stabilizer. Next, unscrew the nuts that secure the stabilizer bars to the connection hoses. To prevent the bolt from turning, it must be held with a socket wrench. Next, we release the clamps of the stabilizer bar bushings from the mounting bolts. The stabilizer can be removed by releasing the mount from the stabilizer bar.
33 users said thank you:
A visual inspection of the part being replaced is carried out. It is not difficult to determine wear; seals, deformation, and cracks will be visible visually. The bushing will feel hard to the touch. Next, you need to clean up the space on the stabilizer bar in the place where the bushings go. Installation proceeds in reverse order.
New parts of the Toyota Corolla must be lubricated. Between the pads there is a plastic protection that is held in place by five clips, highlighted in red.
We remove the clips by prying up the core with a screwdriver, lift it and take out the clip: Now we take the 17 head and unscrew 4 bolts on each side that secure the bushing linings: We remove the linings and see our bushings: We remove the old bushings and thoroughly wipe the stabilizer at the installation sites new ones, as well as landing zones above and around them.
This is done so that the abrasive does not get on the metal when installing a new bushing, it will be cut and God forbid sand gets into the cut area.
In my case, it is obvious that despite the insignificant mileage, road abrasive still got onto the stabilizer as a result of wear on the bushings.
Other articles
You can see the rough wear of the seats and the abrasion of the inner surface of the old bushings themselves, for clarity, I cut them: Using a utility knife, we cut the new bushings where the original ones were cut.
We lubricate the inner surface of the bushing with lithium grease and install the bushings in their original places: Carefully press both bushings on both sides with pads, slightly tightening the bolts with a 17-mm head. The threaded part of the bolts may have traces of corrosion, so it is better to clean and lubricate it.
After this, while the position of the stabilizer is still being adjusted, we align it on both sides: Finally tighten the bolts of both pads: We put in place the plastic protection, which was secured with five clips. We clean the workplace and take out a can of beer or a bottle of cognac
Source: http://iaarus.ru/zamena/zamena-vtulok-stabilizatora-toyota.html