DIY LED running lights for cars
Daytime running lights (or DRLs for short) are used to improve road safety during daylight hours. LEDs with good mounting are usually used as light sources for running lights. If the vehicle does not have DRLs provided by the manufacturer, low beam headlights or fog lights are used.
However, in this case, the car is less noticeable, since both are configured to illuminate the road surface, and this is a fundamental difference (see figure below). In addition, low beam and PTF consume more energy, and therefore gasoline consumption increases.
Therefore, it makes sense for owners of such cars to think about buying DRLs or making DRLs with their own hands from LEDs.
How to make running lights on a car using LEDs with your own hands
Let's consider, as an example, the possibility of installing LED DRLs for a car such as the Lada Granta. The manufacturer provides daytime running lights combined with the dimensions.
However, Granta received incandescent lamps as a light source in order to save money. The simplest option for upgrading DRLs with your own hands is to purchase standard LED-based lamps, as in the figure below.
With their contacts, they are just suitable for regular positions.
As practice shows, the only difficulty that Lada Granta owners encounter when installing such lamps is the correct determination of polarity, so the main thing is to correctly install the LED lamp on the Granta.
This is what the Granta looks like with LED DRLs.
For almost any car (let’s leave the Lada Granta alone) you can make LED-based DRLs with your own hands.
First you need to decide: how many LEDs to use and what power? There is a 12 V power supply from the battery, which means that no more than 4 diodes can be connected in series.
Theoretically, you can turn on several parallel chains of four, but in this case four per DRL headlight will be enough (or maybe even 3, if with a good lm/W ratio).
To provide the required luminous intensity (according to standards it should be from 400 to 800 cd), the power of the LEDs should be approximately 1...1.2 W.
It is recommended to purchase LEDs from one of the well-known manufacturers, already mounted on an aluminum board.
For example, DRLs on Gree LEDs (XP series or more budget XTE, XBD series are suitable), OSRAM (Oslon series), you can also pay attention to LEDs from Korean manufacturers, they are usually cheaper than Samsung and Seoul Semiconductor series with similar characteristics to those listed above.
Diodes must be on an aluminum board, because They are not suitable for manual installation and it will not be possible to install them with your own hands without damaging them. LEDs from an unknown Chinese manufacturer may be half the price, but they will almost certainly shine twice as bad, so it’s not worth the risk.
Next, you need to take care of the secondary optics, which should be selected in accordance with the type of LED. The angle should be about 20˚ in the vertical plane and about 40˚ in the horizontal. The most suitable lens for XPE LED in this regard is CA11052_TINA2-O (LEDIL).
The next step is making the radiator housing
You can make it yourself either from a ribbed radiator profile or from an ordinary U-shaped one.
In the second case, the overall dimensions will be larger, but the filling (LED module with lenses) can be recessed inside.
In our case, the area of the diffused surface must be at least 100 cm2, and the specific dimensions of the profile will depend on the installation location of the headlight, the size of the LED modules and lenses.
It is better to secure the LED module on the radiator with screws or rivets, because The thermally conductive adhesive may not withstand such harsh application conditions and there is a risk of losing the LEDs somewhere along the way. The lenses are attached using holders that come with them and have double-sided tape on the base.
For the reason stated above, it is recommended that after installing the lenses, additionally secure them with transparent silicone sealant, covering the perimeter. It’s better to fill the entire module with sealant, so that only the lenses above the surface remain, then you don’t need to do anything else to protect it from moisture and there’s no need for protective glass.
The main thing is not to forget to remove the power wires.
We are coming up with a way to attach the running lights to the car - here are ready-made DRLs made from LEDs with your own hands!
The headlight must be connected to the power supply through a limiting resistor, the value of which will need to be theoretically calculated first and then practically tested.
If the voltage on a charged battery is 12.6 V, the voltage drop across one LED (according to the manufacturer) is 3 V, then to ensure one-watt mode you will need a 1.5 Ohm resistor with a power of at least 2 W.
You can connect the DRL to the car network in various ways, depending on the required operating algorithm and the brand of the car. In any case, you can do all this with your own hands using one of the many diagrams provided on the Internet.
le-diod.ru
DIY running lights
DIY daytime running lights DRL 030
March 23
The fact that running lights increase road safety has been proven more than once by numerous tests.
The first pioneers in this area were European production car manufacturers, who over the past decade have conducted research to improve road safety.
Therefore, we can say with confidence that daytime running lights are a great way to become more visible while driving, thereby increasing the visibility of your own car in traffic, not to mention that running lights are an additional guarantee of safety on the road. Today, there are a large number of different models of running lights for cars, differing from each other in design, manufacturer, and brightness. But the overall and only purpose of daytime lights is safety!
Daytime running lights differ significantly from low-beam headlights in some important ways. 1. Daytime running lights are economical, they can significantly reduce fuel consumption and CO2.2 emissions. running lights have a working life of at least 50,000 hours. This is almost six years of constant glow, which is sometimes longer than the life of the car.3.
Daytime running lights are convenient due to the fact that their operation is controlled through a special relay, which automatically turns on/off the daytime running lights when the engine starts/stops or when the low beam headlights are turned on/off.4. Installing daytime running lights does not take much time. Each installation kit contains visual instructions and connection diagrams.
Their installation is simple.
5. Daytime running lights are universal, which allows you to easily install them on any foreign or domestic car
The development trend of daytime running lights shows that DRLs are increasingly moving from everyday practicality to the level of attractive styling. Just look at the headlights of BMW and Audi cars. With a modern, stylish design, these LED daytime running lights add a personal touch to your vehicle without compromising safety.
In Russia, amendments to the traffic rules came into force on November 20, 2010. According to these amendments, during daylight hours on all moving vehicles, for the purpose of their identification, low-beam headlights, fog lights or daytime running lights were turned on.
Vehicles that were not equipped with daytime running lights from the factory may be equipped with them.
There are special installation kits on sale that include special LED modules for installation on the front of the car, as well as a control module (relay) that turns off the daytime running lights when the low beam headlights are turned on. Self-installation of daytime running lights is real.
Independent installation of running lights on individual vehicles put into circulation is legal and provided for by Decree of the Government of the Russian Federation No. 720 of September 10, 2009.
For a long time I have been looking at my empty plugs for fog lights, which honestly irritate me with their useless appearance. I have repeatedly had the desire to purchase standard fog lights, but I’m not happy with the idea of taking a step towards the conveyor belt of everyday life. I had some free time and I didn’t miss the chance. There was so much time that it was enough to prepare sketches and funny pictures.
Actually closer to the point. Use standard plugs as a platform for installing daytime running lights, consisting of two modules, each with 5 powerful lensed LEDs. The glare will be worse than xenon, so the beam of light during installation will be directed slightly to the sides. We'll talk about the angle of the glow later.
It looks like this in the sketch, let's see what happens in practice.
In order to remove the plugs, it was necessary to ride the car on a lift for about two meters. Access to them from below is blocked by a plastic protection with a large number of bolts. The plugs themselves are held in place by four latches. All you have to do is put your hand under the bumper and unfasten them. Afterwards, wash and dry them. Cleanliness is the key to success 😉
So, we have daytime running lights in our hands, each consisting of five LED modules and a relay made in the form of a block. According to the sketch, 4 LED modules are installed in a row at the bottom of the plug. Fifth in the second row closer to the side of the car. The set contains a special cutter suitable for the diameter of the running lights.
Before you start work, you need to make markings on the back of the plugs for future holes. This stage of work must be treated with increased attention; the slightest miscalculation in distance or shift in height will affect the final result of the work. Next, we drill the intended holes from the back side, placing a wooden block under the plug.
It is better to drill at high speeds.
We used a cutter that came with a set of running lights DRL 030
The holes are drilled symmetrically.
Before installing the running lights, it is necessary to process the edges of the holes from plastic burrs that could remain after drilling. To do this, we use sandpaper, a stationery knife and a semicircular file. Using a file, you can adjust the holes to the desired location if a minor error occurs during drilling.
The dimensions of the navigation lights are presented in the diagram. Cable length between modules 8cm
We install daytime running lights in the plug. Using mortises and spacers, we fix them in the desired direction.
Fill the reverse side with transparent, weather-resistant sealant. Attention! Before filling the LED modules with sealant, make sure that the surface of the plug is clean and free of grease.
We install the plug. We do not remove the installation screws until the sealant hardens (at least 12 hours)
Each module consists of: housing, lens and powerful 1 W LED
The photo clearly shows the direction of the light beam of the running lights. You cannot place them exactly in the direction of travel, otherwise oncoming drivers will be blinded.
Either lower the light down or spread it to the sides. We chose the second option. In addition to the original look, the running lights added individuality to the car, and the car became recognizable.
When turning corners, visibility has become greater due to the additional illumination of the roadway.
The zone of maximum glow remains to the side.
Having looked at the sketches and the result of the work, we can say with confidence that the expectations were justified. The car received an individual, recognizable look, a more economical daytime version of the light source. During the day, the car has become more noticeable, which undoubtedly affects road safety.
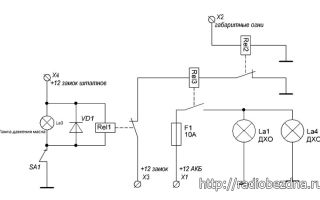
The connection of running lights in accordance with GOST R 41.48-2004 must be carried out through a special relay, which, when the head light is turned on, should automatically turn off the DRL. Also, the power supply for the running lights must be connected to the car’s ignition, this will ensure that the daytime running lights are automatically turned on when the ignition key is turned. Below we present a diagram for connecting DRLs according to GOST.
LEDs are a long-lasting light source with low power consumption. Used in various
box56.ru
Do it yourself! LED daytime lights for cars
The section of useful homemade products for cars has now been replenished with the design of daytime running lights based on powerful LEDs with optics! Good afternoon!
Today I will tell you how to make LED daytime running lights for a car at home.
For the headlights (daytime running lights), I took ready-made radiators made of aluminum 5 by 8 cm. On them, I glued two panels for attaching LEDs with hot glue. Panels with a diameter of 50 mm.
I took three-watt warm spectrum LEDs. You will also need two drivers for the LEDs, since without them the diodes will quickly fail as the generator voltage jumps.
You will also need these lenses, the angle of light of which is 120 degrees; they also protect the diodes from bad weather and dirt.
We solder the diodes through thermal paste onto the substrate. We glue the lenses with silicone.
Having applied a voltage of 12.6 Volts, the station showed a current of 0.90 Amperes, which means that the headlights produce a power of 11.34 Watts. The driver can adjust the power of the headlights in one direction or another depending on the temperature of the radiator. In winter it is brighter and in summer it is less. The driver has a power of 15 watts.
In my case, the radiators will be mounted on the bumper; 4 holes must be drilled in the corners of the radiator and placed on the bumper from the inside, drilling a 50 mm hole in order to insert the headlights.
Can be mounted on rivets or self-tapping screws. It is better to put the drivers in the cabin by placing them in two plastic boxes. The light is very bright, all three diodes seem to merge into one large point.
The moisture protection is excellent.
In my design of daytime running lights, LEDs with the following LED characteristics are used: Color: Warm White 3000-3200K, Lumenous: 180-200Lm, Forward Voltage: DC 3.2-3.4V, Forward Current: 500-700mA
See also:
9952 views
Source: http://autoprivat.ru/remont_avto/svetodiodnye_hodovye_ogni_dlya_avtomobilej_svoimi_rukami.html
Do-it-yourself manufacturing and installation of DRLs in standard headlights: rules and nuances
Home » Light » Do-it-yourself manufacturing and installation of DRLs in standard headlights: rules and nuances
In principle, building daytime running lights with your own hands is not a particularly difficult task. To do this, you only need steady hands and minimal knowledge in the field of electronics.
However, before you make running lights for your car, you need to know exactly what the letter of the law says on this matter.
Otherwise, you may encounter problems with improper installation, which will lead to fines and regular stops by police officers.
According to the laws of the Russian Federation, running lights on a car must be turned on in any case, regardless of the time of year or day. This rule was introduced back in 2011.
The DRLs themselves can be used in conjunction with low beam headlights, as well as fog optics. But if it is not possible to connect them to the existing optics, then they can be installed separately from the headlights.
The main thing is that the installation is carried out taking into account all requirements and standards.
Standards for installing running lights
As for Ukrainian legislation, the traffic rules indicate that DRLs in headlights are lighting devices.
But unlike Russian legislation, in Ukraine the need to turn on daytime running lights arises in several cases:
- during the period from October 1 to May 1 at any time of the day;
- when driving in low visibility conditions;
- when driving outside populated areas.
Manufacturing instructions
So, if you decide to install DRLs in standard headlights yourself, then you do not have to trust the installation process to specialists. Of course, if you have never encountered such a task before, it is better to trust a qualified electrician. The process of making DRLs with your own hands is described in detail below.
Tools and materials
In principle, it is possible to make DRLs from high beams, but we will look at the manufacturing process using the example of using fog lamp housings.
So, to complete the task you will need the following:
- LED strip, you need to give preference to white or blue color of the glow, you will need no more than one meter;
- fog lights or housing for such headlights;
- aluminum plates (video author - channel 2673Kostya).
Stages
So, how to make daytime running optics for your vehicle:
- First of all, you need to carefully disassemble the fog lamp housing.
When disassembling, be as careful as possible to prevent the formation of cracks and damage to the body. Using a construction or regular household hair dryer, you will need to soften the layer of sealant that is applied around the perimeter of the glass. In this case, the glass itself will need to be carefully detached from the body when the sealant is heated; for this you can use tweezers or a thin flat-tip screwdriver. Some car enthusiasts tint their optics as a means of tuning; for this, tint tape or a special paint coating can be used. In any case, if you want to tint the glass, then this must be done at this stage, after it is removed. - Next, when the housing is separate from the fog lights, you will need to disconnect the circuit, disconnect the mounting strips, housings and the diffuser itself.
- Now you will need the aluminum plates that you have prepared. From these you will need to cut out substrates that will be used for the LED components themselves. Please note that the plate must be undamaged and free from any traces of rust. Using sealant, you will need to secure the plates to the body of the diffuser itself. Once done, wait for some time for them to dry.
- After completing these steps, we move on to the next stage. Now you will need to install the LED strip on these plates. Make sure that there is silicone protection on the tape, this will protect the running lights when they are used in wet conditions. If you want to achieve a brighter glow from the optics, you can install several tapes in a row. But keep in mind that in this case the headlights will be more striking, so they do not always look aesthetically pleasing.
- For more reliable fixation, the tape should be placed on a sealant. After this, the LED elements are soldered.
- When the tape is securely fixed, the headlights are assembled. You need to install the glass that you previously removed onto the optics body. For a good fit, use sealant, making sure it is applied around the entire perimeter of the headlight. If even a small leak remains, it will cause the headlights to fog up.
- The only thing left for you to do is make a diffuser. In this case, you have several options - you can mill the glass or cast it from epoxy resin. However, the latter option is considered more accessible.
Installation diagram for running lights
Now let's move on to the installation diagram. An important requirement when arranging the circuit is the automatic switching on of the optics when the ignition is activated.
According to the diagram, DRLs should be turned on without the use of additional control components - switches. Therefore, you will not need to install an additional control button in the car interior.
To install DRLs according to this scheme, the optics must be connected to the ignition.
Photo gallery “Connection diagrams”
1. The most optimal option for connecting optics2. The same diagram, more clearly 3. Circuit without using a relay
How to connect DRLs yourself?
To connect homemade DRLs, follow these steps:
- To ensure activation of optics with ignition, thyristors can be used, and the current in them should be 0.3 amperes. Thyristors with a resistance of 10 kOhm should be used, and their power will be 0.25 volts.
- The zero contact is disconnected from the relay winding. If your car has electric windows, then this contact will be responsible for their operation. The dismantled connector must be well insulated to prevent short circuits in the future.
- Then the PTF enable contact is connected to the DRL relay. This circuit must be built into the relay, which is located in the block.
- If no errors were made during the connection process, the running lights will be activated when the ignition is turned on. If something doesn't work, check the circuit again.
Video “Option for connecting running lights without using a relay”
The video below shows a variant of the connection diagram for running lights without using a relay (the author of the video is Artem Kvantov).
Loading...Do you still have questions? Specialists and readers of the AVTOKLEMA website will help you ask a question
Source: https://avtoklema.com/svet/dho-v-shtatnye-fary-svoimi-rukami-657/
DIY DRL: why you need it, methods, installation, video
According to modern standards, in the Russian Federation, driving around the city and beyond by car requires the mandatory inclusion of low beam headlights, or side lights together with fog lights.
https://www.youtube.com/watch?v=XsIA4tn4ID4
Previously, such rules applied only to motorcycles, and car owners had to turn on their headlights during daylight hours only outside populated areas.
Interesting! For example, in many European countries, turning on headlights within the city has been mandatory since the eighties of the last century. Therefore, when manufacturers exported cars to these countries, they supplied them with built-in DRLs (daytime running lights).
Today, according to the regulations of the legislation of the Russian Federation, the supply and sale of cars in the country also requires the presence of DRLs on them. Therefore, purchasing a car ex-showroom guarantees the presence of basic daytime running lights.
Why do you need headlights on your car during the day?
European researchers have long proven that a car with its headlights on is much more noticeable on public roads. According to their analysis, turning on headlights during the day reduces accident rates by about 7%.
Important! Initially, as mentioned above, turning on headlights in natural light was required only on highways. This was the case in Russia, and this is where the history of daytime running lights throughout the world began. The effectiveness was visible immediately after the implementation of these rules.
In many countries, such as the USA, daytime running lights were originally a recommendation. After analysis, the leadership of these countries decided to make this recommendation a rule.
Why do you need daytime running lights if you have headlights?
The first difference between DRLs and conventional low beam headlights is their efficiency. In natural daylight, the power of the low beam headlights is excessive.
Headlights are designed to illuminate roads at night and, accordingly, the energy that is spent during the day on the powerful emission of their light is unnecessary.
Daytime running lights are created in such a way that the power of light emitted by them is sufficient, but not excessive, to recognize a moving car in the daytime at a distance of up to one kilometer.
This allows you to save significantly on several points at once:
- Fuel economy. It has long been proven that turning on headlights increases fuel consumption of a car. For example, on an average car with an engine capacity of 1600 cubic centimeters, turning on the headlights increases gasoline consumption by 1.5 to 4%. This is due to the additional load on the generator and, accordingly, additional friction during operation of the power unit.
- As for the generator, its brushes tend to wear out . Constantly turned on headlights are a load on its elements. Accordingly, low beam headlights do not have a very positive effect on the operation of the generator.
- Accumulator battery. This point is also not unimportant. The energy for the headlights comes from a battery that receives a charge from a generator. The constant voltage passing through it affects its service life.
All costs for these items are minimized by the presence of DRLs on the car. Especially if, for example, LED bulbs are installed on it. Also, one more, no less important nuance should be taken into account.
Daytime running lights are installed on a car in such a way that they are activated when the ignition is turned on, and when it is turned off, the lights go out.
Such conditions are not accidental. They eliminate the possibility of forgetting to turn on the DRLs during your next car trip, which can lead to a fine from the inspector.
And, of course, and importantly, this function helps in case of forgetfulness of drivers to turn off the headlights when parking a switched off car, which eliminates premature discharge of the battery.
It’s great if you purchased a car that is already equipped with DRLs. Well, if it is not installed by the manufacturer, then you can make daytime running lights with your own hands. This is not so difficult and expensive for the budget of any car owner.
How to make DRL with your own hands?
To make daytime running lights yourself, no special skills or equipment are required. At its core, DRL is an ordinary light source.
Important! When manufacturing it, you just need to take into account several technical and legislative nuances so that the result satisfies both your budget and the employees of transport departments.
What must be considered when making daytime running lights?
From a legislative point of view:
- DRLs should be placed in such a way that the visible area of light from them does not exceed 400 mm from the extreme points of the side planes of the car.
- Daytime running lights should be located at a height of 250 to 1500 mm from the ground surface.
- The distance between the internal parts of the DRLs should not be less than 600 mm. An exception to these criteria exists for vehicles whose width does not exceed 1300 mm; the distance between the inner edges of the DRLs for such vehicles must correspond to a width of 400 mm or more.
From a technical point of view:
- Daytime running lights are best made from official light sources. Homemade flashlights are unlikely to work here.
- The installation diagram does not require specific instructions; it can be individual. The main thing is to take into account the conditions for their activation when turning on the ignition. It can be set so that when the handbrake is raised, the DRL is deactivated.
- Reflective elements must be taken into account. You can’t just stick LED strips on the edges of the car, as many car enthusiasts do.
What to make DRLs with your own hands?
There are two ways to install daytime running lights on a car: external and built-in.
External DRLs can serve as ordinary fog lights. The choice of fog lights and their possible upgrade with a change in the lighting system is the individual taste of the individual car enthusiast.
Internal DRL can be made from LED strips. Such strips can be mounted into standard car headlights. When choosing this type of installation, it is necessary to take into account the dimensional conditions described above.
The running lights installed inside the standard headlight will be more powerful and brighter than the external ones. After all, the reflective elements of standard headlights are better than those in fog lights.
Do-it-yourself DRL installation (LED and incandescent)
When installing DRLs, regardless of whether LED lamps or incandescent lamps are used, they must be output through two relays and with a separate safety block. This must be done according to the following scheme:
We connect the first relay through contact 85 to ground, and 86 to “+” from low beam or dimensions. Contact 30 is connected to the second relay, and the input from the DRL is made at 87A to the first relay.
On the second relay, contact 86 is connected to “+” from the ignition, and 85 to ground. Pin 30 is connected to “+” from the battery. Also, when leading the circuit through pin 30 from the second relay, it is necessary to install a 25A fuse.
Interesting! There is one more small trick in the installation. Contact 86 from the second relay can be connected not to the ignition, but to “+” from the generator. In this case, the activation of the DRL will occur when the engine is started, not the ignition.
By and large, there are no additional nuances. This installation is carried out in 15 - 30 minutes, and the total cost of such a DRL will cost you from 500 rubles.
Source: http://ilovekiario.ru/autosovet/dnevnye-hodovye-ogni.html
DIY DRL
DRLs are an essential element of lighting in cars, which serves to identify the car and make it more expressive on the highway. Today, LED DRLs are used, which are environmentally friendly and economical.
They do not consume a lot of the car’s energy resources, do not affect engine overheating, last a long time, and have optimal brightness, which is immediately noticeable, and at the same time do not have the ability to blind drivers of oncoming or passing lanes. LED lamps are usually framed in a durable housing that is shock-resistant and does not allow dust, dirt or moisture to enter the housing.
The main task of the product
The main and main task of the lights is driver safety on the highway. Standard head optics do not have the brightness and light saturation that DRLs provide. In addition, often in the daytime, if the head low/high beam bulb (used as the same DRL) has burned out, you may not notice it.
Accordingly, your car is no longer so expressive and catchy for others. If one bulb in the LED DRLs burns out, then this does not threaten you in any way, since often several light sources are used in separate devices for daytime driving.
You can find out what characteristics you need to pay attention to when choosing daytime running lights in the article “Light characteristics of DRLs”.
Legal norms in Russia
In the period from 2010 to 2011, a law was passed in Russia that obliges driving in the daytime with active light - low/high beam, fog lights or separate devices called daytime running lights.
Thanks to this, your car will be as catchy and noticeable as possible on the highway, and therefore safety is ensured.
It is for this reason that today it has become important to install purchased DRLs, or make LED DRLs with your own hands.
Why is it recommended to install DRLs and not use low beams: the main differences
Many drivers are interested in the question of whether it is necessary to install separate DRLs on the car, or whether it is possible to use low/high beam headlights. It is still recommended to install separate DRLs, since they have a number of advantages over low beams:
|
These are the main advantages of DRLs, but if you do not want to buy expensive high-quality devices, then you can make daytime running lights yourself.
With the right approach and the correct installation scheme, automatically turning on the DRL with your own hands will be a useful function of the product.
But, before you make DRL with your own hands, you need to know the basic norms and requirements prescribed by law.
UNECE DRL Regulations No. 48/No. 87
If you nevertheless decide to install DRLs with separate devices on your car, regardless of whether you purchase them or make the DRLs yourself, you need to know the rules and requirements. UNECE Regulation No. 48 concerns installation, placement, number of devices, correct legal connection diagram and features of the functioning of the product. What to pay attention to first:
- DRLs must be installed in the amount of two pieces, and installation on a trailer is prohibited.
- You choose the installation diagram yourself.
- There are basic rules that limit you in terms of installing DRLs relative to the level from the road, from the edges of the visible surface. Such rules are necessary so that, ultimately, the light emitted from homemade running lights or purchased ones does not reflect and interfere with oncoming drivers.*
- The DRL connection diagram must be designed in such a way as to ensure their automatic activation in the desired situation.
* In 2011, according to UNECE regulation No. 87, all cars must be equipped with DRLs. This section states that DRLs must occupy 20 cm2-200 cm2 of area and produce light with an intensity of 400-1200 cd.
Also, according to EEC Rule No. 48, DRLs must be installed no lower than 250 mm and no higher than 1500 mm from the ground surface (road).
They should be located no more than 400 mm from the edge of the car, and between them there should be a minimum distance of 600 mm.
You can buy flashlights in a store, or you can make LED running lights yourself. In order to make homemade daytime running lights, you will need:
|
DIY DRL installation diagram
- Step 1. Buy inexpensive fog lights and carefully disassemble them.
- Step 2. Soften the sealant applied to the glass to ensure a tight connection. This can be done with a hair dryer, blowing on the headlight unit from different angles.
- Step 3. After the sealant has softened, carefully separate the glass from the platform with a thin screwdriver.
- Step 4. In order to save time, you can immediately tint the windows. This can be done either with simple tinting from China or with expensive materials - your choice.
- Step 5. The time it takes to dry the tinted glass allows you to move on to the following steps: disconnecting the wiring, glass, holder strips, housing and, of course, the lens.
- Step 6. From durable aluminum plates you need to make/cut substrates for LEDs. The plate must be free of corrosion - smooth and flat.
- Step 7. After this, you need to place the prepared plates on the silicone sealant, attach them to the inner body of the diffuser and allow time to dry.
- Step 8. After this, installing the DRL with your own hands involves mounting an LED strip on an aluminum plate. For high performance and long-term operation, it is recommended to use a special tape that has silicone protection. For greater efficiency and brightness, you can install two strips, that is, in two rows, so your homemade DRLs will be as expressive and catchy as possible.
- Step 9. It is necessary to place the tapes on silicone sealant and solder them.
- Step 10. After this, installing navigation lights with your own hands proceeds to assembling the device. It is necessary to install previously tinted glass on aluminum plates, placing them on silicone sealant.
- Step 11: The diffuser is an important part of the process called DIY running lights. It can be made in the following ways: by milling plexiglass or pouring it from epoxy resin. The second method is more accessible and makes it easier to make DRL yourself.
To correctly connect the navigation lights yourself, follow these steps:
|
DIY DRL connection diagram
The main requirement for DRLs is that they turn on automatically when the car is ignited. They must be turned on or off without additional devices from inside the car.
To do this, the DRLs are connected to a block that supplies voltage to the main, central type of headlights.
The most common do-it-yourself DRL control or installation scheme is when the lights turn on together with the headlights.
Conclusion
Now you know how to make DRLs yourself, how to make running lights so that they are durable and reliable. In addition, self-installation of DRLs will be done correctly and correctly, will not cause problems with the law and will not lead to a fine.
Knowing how you manufactured and installed the device, you will be able to repair the DRL yourself.
And if you don’t want to go through the long, complicated process of making daylight lights, you can buy ones already made for you by following this link.
Source: https://xenon-lampa.ru/cat-dnevnye-hodovye-ogni/a-dho-svoimi-rukami
DIY DRLs (daytime running lights)
In general, in connection with the further implementation of the requirement to have DRLs in the car, it was decided to make daytime running lights ourselves.
I think it’s no secret to anyone that the document “On Amendments to the Technical Regulations on the Safety of Wheeled Vehicles” contains such paragraph No. 17, namely: daytime running lights, as well as corner lights, if installed, must comply with the established requirements UNECE Regulations.
The installation of daytime running lights is mandatory from 1 January 2016;
And I want to connect them so that when the ignition switch is turned on, they light up on their own... But more on that a little later.
By the way, here is a photo of what I did first - etched the board, soldered 60 LEDs (30 for each “headlight”), for every 3 diodes there is a 500 Ohm resistor. All that remains is to assemble the case from plastic and connect it through the lock. So let's see what the etched boards look like:
But we already have LEDs soldered onto them, which were mentioned earlier:
We test the performance of the diodes by connecting them to a power source:
Next, we make a body for our DRLs from scrap materials, here are photos of almost finished lights, I made the body out of plastic, glued everything together. I glued a “frame” of black film onto the front transparent part, all that remains is to seal the whole thing and put it on the bumpers, making holes in them))
Actually, the DRLs themselves are ready, we cut out the glass to the appropriate size for them and seal this entire kitchen well (although there is an opinion that it is necessary to leave holes for ventilation and perhaps this is more correct):
Actually, next we go to “damage” the bumper. We cut out suitable holes in it, attach the DRL lights themselves, and get the result:
Regarding connection to the car's electrical system. There are several options, here are diagrams of the main ones:
You can also connect a meringue relay: + DRL is connected through a switch in the cabin to the + ignition coil, and “-” DRL to the wire going to the + low beam headlights. The resistance of the lamp filament is very small and this will be enough for DRLs; when you turn on the low beam, the DRLs will be + at minus and they go out.
Low beam is 50+50 W in the front + 5+5 in the rear + license plate lights + all the little lights in the instrument panel and other lights. Why the hell with the extra load on the generator.
Also, the light intensity of DRLs should not be lower than 400 cd and not higher than 800 cd.
You can use any connection diagram, or come up with your own.
Regarding the location of the DRLs on the car, not everything is so simple here either, and there are regulations:
Here's a little more about DRLs, the basic requirements:
Quote: “GOST R 41.48-2004 (UNECE Rules No. 48) Uniform regulations regarding the certification of vehicles with regard to the installation of lighting and light signaling devices. State standard of the Russian Federation
6.19 Daytime running light 6.19.1 Installation – Optional on vehicles. Prohibited on trailers. 6.19.2 Number – Two. 6.19.3 Installation diagram – No special requirements. 6.19.4 Placement (photo a few posts above)
6.19.4.
1 By width - the point of the surface visible in the direction of the reference axis that is furthest from the median longitudinal plane of the vehicle must be located at a distance of no more than 400 mm from the edge of the overall width of the vehicle.
The distance between the inner edges of two visible surfaces must be at least 600 mm. This distance may be reduced to 400 mm if the overall width of the vehicle is less than 1300 mm.
6.19.4.2 In height - at a distance from 250 to 1500 mm above ground level.
6.19.4.3 Lengthwise – on the front of the vehicle.
This requirement is considered to be satisfied if the emitted light does not interfere with the driver directly or indirectly as a result of reflection from rear-view mirrors and/or other reflective surfaces of the vehicle. 6.19.
5 Geometric visibility Horizontal angle beta = 20° outward and inward. Vertical angle alpha = 10° up and down from horizontal. 6.19.6 Direction – Forward. 6.19.
7 Functional electrical diagram
If installed, the daytime running lights should turn on automatically when the engine start/stop control is turned to the “on” position. It must be possible to activate and deactivate the automatic activation of daytime running lamps without the aid of a tool.
Daytime running lights must turn off automatically when the headlights are turned on, except when the headlights are turned on for a short period of time to signal road users. 6.19.8 Pilot signal—Optional as a closed loop.
6.19.9 Other requirements – No.”
To put it simply, PTFs are designed to illuminate the road along the lower edge in order to improve the visibility of the roadway in conditions of limited visibility; the beam of light should not be directed upward and blind oncoming traffic.
DRLs are intended to indicate tr. Wed in the daytime, and not for marking the road, the DRL light should be clearly visible to drivers of oncoming traffic. Wed, which means it should be directed above the road surface, it turns out to be in the eyes.
We thank our user gavalik for the idea for writing this article.
You can discuss the article and ask questions in this thread on our forum.
Source: http://www.semerkainfo.ru/content/dkho_dnevnye_khodovye_ogni_svoimi_rukami