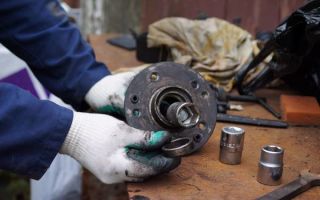
Replacing the front wheel bearing of a VAZ-2112: photo and video
A wheel bearing malfunction on a VAZ-2112 can be detected when an unpleasant noise or hum is heard while driving. Since this problem is quite common on those cars whose mileage exceeds 100,000 kilometers, today we will analyze in detail the step-by-step process of repairing (replacing - approx.) this front-wheel drive system.
Wheel bearing selection
Please note that front wheel bearings should only be purchased in Russia and from domestic manufacturers..
Choose a domestic manufacturer
Chinese analogues, assembled from low-quality materials, have a short service life, and besides, the difference in price is not significant.
Necessary tool
Before you start work, you need to prepare all the tools and assemble them in one place:
- Special puller for bearing removal. The most “ordinary” puller
- Collar.
- Head at "30".
- Keys or sockets for “17” and “19”.
- Mandrel for knocking out the hub.
- New wheel bearings.
The tool is assembled and ready to use
Preparatory work
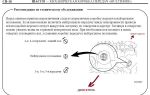
Make sure that the workplace is well lit, and it is best if it is on a viewing hole or a lift. Because this is the only way to talk about high convenience when carrying out such work. It would also be a good idea to familiarize yourself with the detailed diagram of the location of the bearing on the front hub of the VAZ-2112.
Thanks to this illustration, the diagram becomes very clear.
If work on replacing the hub bearings is also planned for the rear wheel, then the work should begin with replacing the front ones, since it is much more difficult to do them, and therefore it will take more time. How to properly replace rear wheel bearings is described in detail below in this article.
Step-by-step work order
First of all, we place the car in a stationary state, put on the handbrake, and, if desired, install wheel chocks. And while the car is on the surface, we tear off all the bolts on the front wheels.
- We unscrew the torn bolts and put them aside.
- We remove the wheel.
- Next, we need to use a “30” wrench to unscrew the hub nut. Please note that during its dismantling, you will have to press the brake pedal, and for this we will need an assistant.
Once the nut is broken, it will easily come out of its seat.
Wheel without hub nut
- Then, using a screwdriver, press out the calipers.
- When this operation is completed, having the key at “17” at hand, unscrew the calipers from the steering knuckles.
Replacing the wheel bearing
Then, when access to the hub bearing is completely open, there are several ways to replace it.
First way
In this case, it is necessary to have a special puller to remove the bearing.
- First you need to take care of removing the stopper.
For dismantling it is better to use pliers or a small screwdriver.
- Using this device, you simply remove the old bearing and install a new one in its place.
You'll have to make an effort to get it out of there.
- After this, we carry out the entire assembly process in the same order as removal.
Before pressing in, the new bearing must be centered.
- The advantages of this method include the fact that during this work there is no need to touch the wheel alignment bolt, therefore, you will not have to add additional work.
- The disadvantages of this method include inconvenience during the process. Because you have to contrive and take an extremely uncomfortable position.
Second way
To carry out this work, it is necessary to carefully dismantle the steering knuckle and completely remove the hub.
- Moving to the workbench, we replace the wheel bearing. This is what the steering knuckle looks like when dismantled.
- To do this, we dismantle the retaining ring and knock the bearing out of its seat, or press it out. The blows must be applied not strong, but stable.
- Next, we perform the installation in the reverse order, having previously cleaned the surface of the hub. The bearing is ready for installation.
Advice! Before you begin removing the alignment bolts, mark their position with a marker or chalk.
In this case, the marks should indicate the current position of the bolt on the rack and the previous location of the knuckles. Thanks to such marks, during assembly it will be much easier to navigate the position of these bolts.
Although it will not be possible to return to the previous state, it will still be possible to minimize it.
Putting marks
- We put marks.
- We knock out all the bolts from the fist.
- Remove the mounting bolts on the lower ball joint.
- This will knock the bearing out of the hub.
- Remove the retaining rings.
- Press out the bearing.
- We mount a new bearing, having previously cleaned the space of the hub and generously coated its surface.
This repair method will be very effective when not only the wheel bearing is subject to repair, but also most of the VAZ-2112 chassis.
Such elements include the replacement of steering tips, silent blocks of levers and ball joints.
Third way
To perform work using this method, it is necessary to remove the entire rack completely.
The stand has been dismantled.
- Next, using a vice, we replace the wheel bearing.
- Because this is how the replacement will happen quickly and efficiently.
After dismantling the bearings, we install everything in the reverse order, assemble the rack and mount it on the car.
Do we make the puller ourselves or buy it?
If you do not want to knock out the bearing, you can purchase a special puller in stores, since the entire process of working with such a device becomes easier and the time required for work is reduced . This also applies to bearing installation work.
Hand-made hub puller
conclusions
As you can see for yourself, there is nothing complicated in replacing the front wheel bearing; you just need to follow the instructions in our article exactly.
Source: http://carfrance.ru/zamena-podshipnika-perednej-stupicy-vaz-2112/
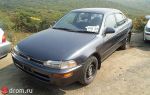
replacing the front wheel bearing (from 2141) — logbook Renault Megane 2000 on DRIVE2
In general, the time has come for him (the bearing) to die. They died. Finally, he howled like someone who had been stabbed to death, a heart-rending howl. And the wear was such that the wheel was shaking with the hub.
Therefore - replacement. Having studied the price list of Exist, I found out that the cheapest “ketai” costs 420 rubles there. At the same time, having compared the dimensions, I confirmed the information that the front wheel bearing from Moskvich 2141 is suitable for us.
I didn’t find the Vologda (VBF) in Lipetsk, in Voronezh the guys saw it for 500 rubles, so I went and bought a certain “AT” for 360 rubles - local Muscovite drivers praised them. By the way, on Renogor itself there has been “Herzog” for a long time, the reviews of which were, let’s say, not very good.
But it already lives for almost 90 tkm.
Okay, I digress. This is what this bearing means:
bearing cat. No. 256908
Catalog number 256908. Dimensions 37mm internal, 72mm external, 37mm height.
By the way, if you suddenly need a hub nut (and technically you need a new one), it also fits from the 41 Muscovite hub :) Any - rear, front... They are almost the same. The rear one only has a collar for locking.
So, let's go figure it out. For those with alloy wheels, you need to remove the hub nut cap and then use a 30 mm socket and a 1-1.5 m lever to unscrew the hub nut. WD 40 is welcome! This operation is not shown in the photo, and everything is clear with this :)
The car should be on the ground, it is recommended to press the brake so that the disc is firmly fixed and does not move under your efforts.
Next we remove the wheel and use it as a stool :)
Now you need to unscrew the brake disc. TORX T-40 head. I did this:
unscrewing the brake disc
I used wheel bolts and a pipe as a stop to prevent the disc from turning.
Now you need to remove the brake caliper assembly. I forgot to take a photo, but it’s easy to remove. It is advisable to have a “short” (100 mm) extension and a 17mm socket. The steering wheel can be twisted all the way to the right and you have excellent access to them.
Remove the brake caliper and hang it with wire from the spring. Make sure that the hose is not stretched or kinked.
At this point, the book says that you need to remove the brake disc... If you can do it, remove it. Using a mallet from the inside, it should come off the hub, but... It didn’t come off for me. Well, to hell with her.
Using a TORX T-30 head, unscrew the ABS sensor (who has it). Disconnect the connector. We remove the wire with rubber bushings from the bracket. And we take it off. It didn’t work for me again :) Well, okay, let it stand. Doesn't really bother me.
It would be a good idea to pull the hub off now. The Kama Sutra recommends using a special puller. You can use a three-legged puller, resting it against the drive shaft. You can also press it out after removing the entire steering knuckle assembly. But I did it differently. Like this
hub removal
We take 4 bolts from the head of the Renault F3R engine. They fit just right in diameter and thread pitch. We screw them into the holes of the wheel bolts and pull them crosswise. The threads are on the hub, and they rest against the steering knuckle. And they tighten the hub no worse than a puller or a press. I removed it together with the brake disc, it turned out like this:
hub with disc and bearing rest
https://www.youtube.com/watch?v=2JP-5ZstZVQ
The bearing has traces of rust. And on the disk there are traces of a slipped sledgehammer 🙁 and, in general, for replacing it, or for boring it.
And here's what's inside the bearing
bearing insides
Nothing good at all.
Now you need to disconnect the steering tip from the steering knuckle. If you have a “Sasic” tip, you can insert a 5-point hexagon inside his finger, keeping the finger from turning. Those who do not have such a hole will have to press the tip from below with a jack and unscrew the nut. You may need a puller to remove the pin. I didn't need it :)
Next, unscrew the 2 bolts securing the knuckle to the shock absorber. The head is 21. The torque is great, I used my trusty pipe. After unscrewing the nuts, knock out the bolts with a “soft metal drift” (from a book).
We tilt the steering knuckle towards ourselves,
the steering knuckle is unscrewed from the strut. The ABS sensor has not been removed.
and unscrew the 2 lower ball bolts. 16mm wrench + 16mm socket.
Well, now we can get the whole hub into our playful hands :)
The ball does not need to be unscrewed.
Now we need the following things: 1. Set of sledgehammers.
puzzles
2. Moskvich 2141 front wheel bearing puller. Convenient with a good set of washers of suitable diameter as well as a spacer ring.
bearing puller 2141
Of course, you can do it without it, using suitable pieces of pipe and washers.
And so, let's go with the pressing. We took the retaining ring out of the fist with a screwdriver and set it aside. It will also come in handy. Take a spacer
spacer
We put it on something metal and massive. An anvil, for example. Instead of an anvil, I use a pillow from the Dt-75 tractor. Wonderful thing.
We pick out the separator and the balls remaining in the bearing. You can do it with them, but it’s better to pick it out. We take a suitable washer from the puller set, place it on the inner ring of the bearing, place the head on top or whatever is at hand - we will apply gentle blows to it with a sledgehammer. We place the fist on the anvil so that it does not contact it, only with the ring! Otherwise it will break.
Knock out the bearing
Now we start knocking out. More gentle, only. Tenderer.
Knocked out. We got a bare steering knuckle. Immediately lubricate the inner surface with engine oil so as not to forget.
bare steering knuckle. lubricated with engine oil.
Now we press in the new bearing.
We put it in the hole and put a wide washer on top. You can use an old bearing.
pressing in the bearing
Gently tapping, we place the bearing in its original place. We make sure that there are no distortions! You can also use a puller for pressing. I tried it - it’s unrealistically hard without a vice. This is what it looked like
pressing with a puller. damn, inconvenient
In the end we get a pressed bearing:
pressed bearing
Don't forget to install the retaining ring! (I forgot. I had to struggle with the car afterwards)
Here is the bearing from the press-in side of the hub
Now let's prepare the hub. The inner race of the bearing remains on it. Carefully, without damaging the hub, cut it with a grinder, as close to the hub as possible. Let's hit it with a hammer and it (the clip) will burst:
We pick it out with a screwdriver and remove it.
The hub is ready. Now you need to press it into the bearing.
It is better to do the pressing on a stump - it will soften the blows. We place the hub on the stump, and put the steering knuckle on top. We take a washer of such a size that it presses on the inner ring of the bearing, and press the hub into the bearing.
pressing with a washer
You can use an old clip: Or a puller for its intended purpose)))
Assembly is almost in reverse order, but it is better to do this: 1. Still remove the ball from the steering knuckle2. screw it to the lever
3. Put the steering knuckle on the drive as far as possible (it fits quite tightly), screw on the drive nut, and insert the ball into the knuckle. Here you may need the help of a friend - press the lever down to make it easier. During this operation, try not to pull the drive out of the box. I pulled it off the splines :)
4. Insert the fist into the grooves of the rack and insert the bolts, tighten.
Well, then in reverse order...
Don’t forget to tighten the drive nut. Big moment! Necessarily! Do not roll the car until the nut is tightened!
While the ABS sensor is not connected, it is better not to turn on the ignition, otherwise an error will appear. Which, however, will be removed after 500m of travel.
That’s it, it seems, that’s all...
Price tag: 365 ₽ Mileage 223900 km
Source: https://www.drive2.com/l/4899916394579353496/
We replace the wheel bearing of a VAZ 2110 with our own hands
If, when the car is moving, an unpleasant noise is heard in the area of the wheel, which may disappear when entering a sharp turn, then this indicates a malfunction of the VAZ 2110 wheel bearing.
Front wheel bearing
This is a fairly common malfunction; it occurs on every fourth car with high mileage. It’s not difficult to correct the situation; you just need to have a garage with a pit and detailed instructions for work.
Experienced technicians recommend not delaying the replacement of this component in order to avoid unnecessary troubles.
Tools and spare parts
The fact is that the VAZ 2110 wheel bearing is a small part, and in order to work with it, you need sufficient lighting and some convenience. Therefore, a car prepared for repair should be driven into an inspection hole and sufficient light access should be created to the repair unit.
Before going down into the pit, you need to prepare all the tools and materials. It should also be noted that replacing the front wheel bearings is much more difficult than doing the same work on the rear components.
Therefore, you need to start work from the front node.
Front wheel hub diagram
A list of required tools should be provided:
- A special puller to remove the bearing;
- The so-called mandrel, that is, a pipe cut of the required size. This device is used to knock out hubs;
- Head 30, equipped with a high-quality wrench;
- Socket wrenches 19 and 17 sizes.
In addition, you need to purchase new suitable bearings that will be needed for replacement. For a VAZ 2110 car, you should choose Russian-made bearing parts rather than giving preference to Chinese analogues. The difference in price for these products is small, so there is no need to experiment.
Stages of work
Work begins with the car being placed in a comfortable position and in first gear. To prevent it from rolling, it is better to install special wheel chocks under the wheels.
Now you can go down into the inspection hole and begin actions that are carried out in the following order:
- Using a wrench, unscrew the wheel bolts, followed by unscrewing the bearing nuts from the front wheel hubs with a 30mm wrench.
It is worth noting here that if a VAZ 2110 car has alloy wheels, you will have to remove the wheels. In order to turn the front hub nuts, you must press the brake pedal at the moment of turning, so an assistant is needed here; - Now you need to use a screwdriver and use it to press out the calipers;
- As soon as they are pressed out, you need to use the 17th key to unscrew the calipers from the steering knuckles. As a result of these manipulations, the caliper may hang on the brake hose; to prevent this from happening, you must carefully tie it up;
- Next, you need to carefully unscrew the brake discs directly from the hubs. Remove the cap. Unlock the nut on the hub. Unscrew the hub nut. Remove the wheel, caliper and brake disc. unscrew the hub nut completely Screw in the studs and attach the brake disc to them Impact knock the hub out of the bearing Remove the bearing from the CV joint Remove the retaining ring in front of the bearing Use a puller to press out the hub bearing Wheel bearing and puller Press in a new bearing Press the hub into the bearing
In addition to the listed types of work, you may also need to remove:
- Trunnion assembly;
- Hub cap;
- Retaining ring.
After this, the hub part is available to the master and can be replaced. There are several options for reinstalling a component, so a few words should be said about each.
Replacement methods
First way
So:
- In the first case, it is necessary to use a puller to remove the bearing;
- Simply carefully remove the bearing and replace it with a new one;
- After installation, all the steps above should be carried out in reverse order.
The main advantage of this method is the fact that the technician will not need to touch the camber adjustment bolt, which is very difficult to put in place later.
Bearing puller from the hub
If we talk about the disadvantages, we can note the following: the master will have to take a very uncomfortable position to perform actions. That is why it is necessary to prepare a lift and climb into the inspection hole.
But it is still very inconvenient for a car enthusiast to knock out the hubs in this position and press in the bearing assembly.
Second way
Consists of the following steps:
- To remove the bearing using the second method, you must carefully dismantle the steering knuckle and completely remove the hub;
- After this, the master will need to go to the workbench;
- The VAZ 2110 wheel bearing is replaced directly on the workbench;
- After this, everything is installed back, just as it was removed before.
We remove the retaining ring. Leaning on the inner ring of the bearing, we knock out the bearing with a piece of pipe. Or we press it out with a puller. We press a new bearing into the cleaned and lubricated hub.
This method is undoubtedly much easier than the first, but since it affects the camber, problems with adjustment cannot be avoided. Before you begin to unscrew the knuckle mounting bolts from the strut, you need to mark their position with chalk or a marker.
The first mark in this case will indicate the location of the adjusting bolt on the rack. The second mark will indicate the previous position of the fists.
After the master begins assembly, he will focus precisely on these marks. Of course, it will be difficult to achieve great accuracy and it will not be possible to return the parts to their place. But with careful work, installation errors can be minimized.
There are some steps to follow:
- The master puts marks;
- Knocks out the knuckle bolts;
- Unscrews the mounting bolts from the lower ball joint;
- The bearing must be knocked out of the hub;
- The retaining rings are dismantled;
- Using a vice, the bearings are pressed out.
Before reassembly, the space in the fists must be thoroughly and thoroughly lubricated.
This method is often used when repairing not only one bearing component, but the entire chassis. As a result of this method, it will also be possible to safely replace ball joints, silent blocks of levers and steering tips.
Third way
It is carried out in the following order:
- In this case, you will need to remove the entire rack completely;
- After all the components have been removed, the technician will need a special vice;
- The wheel bearing will be replaced at the vise and all parts will be reinstalled.
This method is the most complex and difficult because it requires the technician to dismantle the entire rack. In addition, it will be necessary to unpress the steering tip, and you also need to unscrew the fastening nuts, they secure the upper support to the body base.
Direct removal of this VAZ 2110 unit is carried out only after the entire rack has been removed from the car. And this process takes a lot of time.
Nuances
In the process of reassembling the entire node, you must proceed as follows:
- Press in the bearings;
- Install retaining rings;
- Collect your fists;
- Mount new bearing components on them;
- Mount the assembly on the hub;
- Using a mandrel, you need to drive the hubs until they stop.
You can use a puller or press to press in bearing parts. But in no case should you use a hammer, since in this case cracking of the component will inevitably occur. The forces should be directed to the outer rings.
It should also be noted that double-row ball bearings are installed in the hubs, which do not require lubrication and adjustment measures.
Due to the lack of such care, the VAZ 2110 bearings will certainly be destroyed when removed from the hub, so this measure should only be resorted to for a complete replacement.
Working with the puller
If you still don’t want to damage the bearing, then you can replace it without knocking it out of the hub. In order to remove it from there, you can use a special puller. Removal is much easier with this device.
To do this, you need to carefully insert the puller's paws into the grooves on the hub and remove the ring. Sometimes this requires some effort; the ring must be pryed with a screwdriver and removed. Using the device, the part is removed and the nicks on the component are smoothed out.
Then, using a puller, you can also press the new part into the steering knuckle. This tool allows you to press the hub with high quality. Working with a tool of this type greatly simplifies the entire process, and the technician will need less time for all removal and installation. But operating the unit requires some skill and great care.
As you can see from this article, even such a simple repair job as replacing a wheel bearing can have many nuances.
Source: http://VazWeb.ru/desyatka/hodovaya/zamena-stupichnogo-podshipnika.html
Rules for replacing the front wheel bearing on a VAZ 2109 with video
Wheel bearings on domestically produced cars wear out quickly. Replacing bearings on both the front and rear hubs is not an easy task, but it can be done. We will tell you how to independently replace the bearing on the front hub of a VAZ 2109 in this article.
The wheel bearing is the most important part of a car. Its main task is to ensure smooth and uniform rotation of the wheel.
It acts as a connecting link between the car axle and the hub (to which the brake discs and wheel are attached using studs). It is impossible to see the wheel bearing from the outside.
To get to it, you will have to remove the so-called rotary cam from the car, inside of which this bearing is located.
External view of the wheel bearing of a VAZ 2109 car
Wheel bearing location diagram for VAZ 2109
Bearing designs may vary. They come in both ball and roller types (this depends on both the brand of the bearing and the car manufacturer).
Since the article is about the VAZ 2109 car, the car owner will have to deal with closed-type double-row wheel ball bearings, better known as HUB-1.
They are used on almost all “nines”, and the reliability of these bearings leaves much to be desired.
It should be said right away that the bearings on both the front and rear hubs of the VAZ 2109 do not have a strictly specified service life.
If we take the average data provided by the car owners themselves, it turns out that a new domestically produced wheel bearing can successfully travel up to 100,000 kilometers. After this number, problems may begin.
What leads to rapid wear
- Bad roads. When driving on a bad road, wheel bearings are subjected not only to frictional forces, but also to huge shock loads. For some time, the bearing successfully copes with all this, but then so-called “metal fatigue” may occur, which will lead to the rapid destruction of this part.
- Overheat.
During operation, the bearing either heats up or cools down. Such temperature changes are harmful for any part, but in our country they are also aggravated by the climate (regular heating and sudden cooling in the cold of 40 degrees is clearly not good for bearings).
- Aggressive environment.
This means that moisture, dirt, and chemicals that are sprinkled on roads sometimes get into the hub. Dirt and sand can act as an abrasive, and moisture and chemicals can cause corrosion.
There is only one result: premature wear.
The main sign that it is time to change the bearings is a characteristic low hum that occurs in the wheel area while the car is moving. And the higher the speed of the car, the louder the hum. At first, when the bearing is not yet very worn, this hum is practically inaudible; it appears and then disappears.
But as it wears out, it develops into a real howl that is hard not to hear.
If the bearing has already “howled”, this means only one thing: it needs to be changed urgently. If this is not done, the wheel will simply jam. And if this happens while driving at high speed, the car will definitely skid, which, in turn, will lead to an accident.
How to replace a VAZ 2109
In general, the replacement process is divided into several stages, but before that you should stock up on everything you need.
Necessary tool
Wheel bearing puller (can be purchased at any auto store, or made independently), 19mm spanner, 17mm spanner, 30mm socket wrench, screwdriver (flat blade), round nose pliers, vice.
Toolkit in the photo
Metal brushVise for pressing out, medium sizeSet of spannersRound-nose pliers for removing the retaining ringFlat screwdriver, medium sizeSocket socket for 30Puller for pressing out bearings
Sequencing
- First of all, the car should be in first gear, after which the car is put on the handbrake. Wheel chocks must be placed under the rear wheels.
- The car is jacked up, the wheel, in the hub of which the bearing is damaged, is removed.
The car is on a jack, the wheel is removed, the hub is visible
- Use a 30 mm socket wrench to unscrew the wheel bearing nut.
The nut is unscrewed with a 30mm head
- Using a flat screwdriver, pry up the caliper, then it should be unscrewed from the steering knuckle (for this, use a 17 mm spanner).
- The unscrewed caliper should be tied with something (otherwise it will hang on the brake hose and this hose may come off under its weight). You should also unscrew the brake disc from the hub.
- Now you need to remove the wheel bearing itself. To get to it, you must first remove the steering knuckle, which will require unscrewing a couple of bolts that secure the knuckle to the car's ball joint.
Use a spanner to unscrew the ball joint bolts
- Using an attachment of a suitable diameter (you can use a piece of steel pipe of the required diameter as this attachment), you should knock the hub out of the bearing, after which you need to remove the retaining ring (pliers are excellent for removing the retaining ring).
It is better to knock out the hub with a pipe of suitable diameter
The best way to remove the ring is with pliers.
- Now you need to press out the bearing. This is done using a puller pre-clamped in a vice.
Pressing out the bearing with a puller
The bearing was successfully pressed out by the puller
- After pressing out the bearing, the place where it was located must be thoroughly cleaned of rust and dirt, and then lubricated.
- The new wheel bearing is pressed into the steering knuckle using a vice and a puller, and the retaining ring is installed in place.
- The knuckle with the new bearing is screwed back to the ball joint, the unit is reassembled, and the wheel is installed in place.
How to replace (video hint)
https://www.youtube.com/watch?v=FzVUa8Yl9Bo
Important points
- The method proposed above for replacing a wheel bearing is considered the easiest, but it has its drawbacks. The main disadvantage is that when removing the knuckles, the alignment of the car's wheels will inevitably be disrupted. In order to avoid camber violations, before removing the steering knuckle, you should put a couple of marks (this can be done with a chisel, for example). The first mark shows what position the adjusting bolt was in the rack. The second mark shows what position the steering knuckle was in. Of course, these marks will not allow you to achieve an accurate initial camber of the wheels, but the deviation from the original camber when using them will be minimal.
- New wheel bearings almost never fit into place the first time, even with the use of a puller and a vice, so they will have to be “re-fitted” by hand, that is, driven into the fist. To do this, you will need to cut a steel pipe (and the diameter of the pipe must exactly match the diameter of the outer ring of the bearing). The attachment is installed on the ring, after which it should be carefully struck with a hammer. In this case, the fist must lie on a flat, hard surface, and the adapter on the bearing must be positioned accurately, without distortions.
- It can be difficult to unscrew the 30mm nut that holds the wheel bearing. That is why it is best to put a long metal tube on the socket wrench and use it as an additional lever.
- It is best to clean the wheel bearing housing from rust using a wire brush. If you don't have a brush, you can use a regular kitchen knife. It is better to lubricate the seat before pressing in a new bearing not with oil, but with grease.
- After installing the bearing, you should check whether it is seated correctly. The easiest way to check: after the wheel is installed, you should jack up the car a little higher and lightly rock the wheel with the new bearing (away and towards you). The wheel should not wobble. If play is felt, it means the bearing is installed poorly. Be sure to spin the wheel as hard as possible and listen to the sound it makes as it rotates. It should be a very quiet, monotonous hum. If you hear some kind of creaking, or worse, clicking, it means the bearing is installed incorrectly.
As can be seen from the article, replacing wheel bearings is a rather labor-intensive task, even taking into account the fact that the article provides the simplest method (an alternative replacement method allows you to do without removing the steering knuckles, but in this case the car owner will definitely need an inspection hole, which is far from available everyone has). In the method proposed above, a hole is not needed, and the main difficulty is not to disturb the camber of the car’s wheels. If the alignment still turns out to be damaged, there is only one way out: go to the nearest car service center and adjust the alignment again.
Source: http://motorltd.ru/menyaem-perednij-stupichnyj-podshipnik-vaz-2109-svoimi-rukami/
Replacing the front wheel bearing Grant
Sooner or later, any car owner will be faced with a problem related to the failure of the front wheel bearing on a Grant. It is good if the product is replaced on time, when the first signs are detected.
It is worse if the driver ignores signs indicating a faulty element, which can lead to a serious traffic accident.
The main purpose of wheel bearings is to maintain and ensure proper rotation of the wheels.
From a structural point of view, the product consists of two metal rings, between which there are rollers or balls, an insulating material that prevents debris from entering and lubricant from leaking out of the product.
Symptoms of a problem
Problems associated with the front hub are identified by the following symptoms:
- extraneous, unnatural noise from the wheel during rotation;
- wheel beating, vibrations of varying degrees of intensity;
- sounds of scraping metal;
- front wheel play appears.
Causes of breakdowns
The service life of the product is quite long and amounts to about one hundred thousand kilometers, subject to gentle operation.
However, in real “combat” conditions, the element fails much earlier than its allotted time. Here are 3 important factors that significantly reduce the service life of a bearing:
- Unsatisfactory condition of roads. The fact is that when driving on an uneven surface, wheel bearings take on increased load, sudden impacts, and exposure to high and low temperatures. Over time, the metal components of the product become brittle and begin to break down.
- Aggressive environments. Due to the fact that the element is located in the center of the wheel, it is constantly in contact with moisture, water, dust, and dirt. In winter it is exposed to cold temperatures and in summer to hot temperatures.
- High operating temperatures. The rotation process is accompanied by the natural release of heat; constant heating and cooling occurs (especially in winter conditions), which has a detrimental effect on strength and wear resistance.
Replacing the front wheel bearing on a Grant
Work related to removal and installation will require special tools, namely: - a special hub puller; - chisel; - hammer; — a long lever or a specialized wrench to loosen the hub nut; - set of heads; - center punch; — a knob or key set to “30”; - a flat-head screwdriver; — retaining ring remover (or pliers with round ends); - jack or ditch lift;
— wheel stands (2 pieces).
Conventionally, all work can be divided into 18 stages:
- Place the vehicle on a level surface, provide acceptable lighting conditions, and place chocks under the rear wheels.
- We loosen, but do not unscrew the bolts securing the wheel where replacement is planned.
- We loosen the tightening torque for the hub nut (it is most convenient to use a long lever).
- Using a jack, we lift the required side of the car. We dismantle the wheel.
- Using a screwdriver, pry and disconnect the protective plastic cap of the hub.
- Using a hammer and a center punch, straighten the shoulder of the bearing nut.
- Unscrew the hub nut. Please note that the tightening torque is quite high, so it is necessary to use a special wrench or tool with a long lever. Remove the nut and washer. Remove the brake disc.
- Disconnect the wheel drive.
- Unscrew the two bolts of the strut and ball joint.
- Unscrew the steering knuckle fasteners and remove it from the CV joint.
- We install the unit in a vice and, using a head of the required diameter, press in the wheel bearing.
- Remove the special protective ring.
- We place the chisel between the ends of the inner ring and, applying small blows with a hammer to the chisel, tear the ring to the side. Using a special puller we dismantle it.
- Using pliers or round-nose pliers, remove the retaining ring and remove the bearing.
- Using a brush with metal bristles, clean the inside of the steering knuckle from dirt. Then apply lubricant to the cleaned surface.
- Install the new product back into the steering knuckle.
- Further assembly is carried out in reverse order.
Now you know how to change the front wheel bearing on a Grant at home, without resorting to the help of car services.
Source: http://ladaservice.info/lada-granta/hodovaya-chast/zamena-perednego-stupichnogo-podshipnika-granta/
Replacing a wheel bearing yourself: nuances of work
It often happens that when driving the car vibrates strongly and the sound is not the same as usual. This could be a sign of a bad wheel bearing. If it breaks, you will need to replace the wheel bearing.
For those who don’t know, this is the element that is responsible for connecting the wheel to the hub.
Is it possible to do it yourself or is it better to turn to specialists and how much will it cost? What should I do if the anti-lock braking system light does not light up after replacement? We will answer all these questions a little later, but for now let’s figure out why a wheel bearing fails and how to counteract it. The car is a very complex unit, it is very difficult for an ordinary car owner to understand all the details and mechanisms. There is no need for a faulty car to be parked in a garage, and when it breaks down, it can be quite difficult to understand what exactly has gone wrong, especially if these are not obvious things.
The quality of our roads primarily affects the life of the wheel bearing. Thanks to the pits, which place significant stress on the wheels, the bearings also suffer. Even disks can indirectly affect the situation if they are non-standard. Incorrect installation of the bearing itself can also affect it.
If you just slightly tighten the wheel bearing during installation or do not tighten the nuts properly, the increased load will not allow this part to work for a long time.
There are also defects in the production of bearings; an experienced specialist in a car service can easily recognize the defect. Therefore, when replacing a damaged part with a defective one, it is easy to understand that in this case it will also serve you for a very short time.
How much does a replacement cost at a car service?
The pricing policy depends on the brand of the car itself, the bearing manufacturer, the presence of abs in the car, and the need for any other repairs and diagnostics.
For domestic cars, the cost of replacement will range from approximately 400 to 1000 rubles. Foreign cars, depending on the class, cost a little more.
Replacing a front wheel bearing tends to cost a little more than replacing a rear wheel bearing, as they differ in the complexity of the job itself.
How to understand that a bearing has become unusable
The very first sign of a malfunction is the hum of the bearing; if you hear it, you need to do something urgently. You shouldn’t ignore this, because if you don’t take action in time, you can end up with even more problems. Heat and overheating of the wheel may also be a sign of failure of this part.
Unusual sounds, such as crunching, and vibration are most often a sign of a broken bearing.
It happens that the car “pulls”, many motorists then sin on wheel alignment. However, the reason sometimes lies in a faulty wheel bearing, so it is better to check it first.
Replace the bearing yourself or with the help of specialists
Replacing a wheel bearing requires special equipment, so it is quite difficult to do this at home, although there are still those who are ready to do this. In addition, this is a rather complex part, the installation of which requires knowledge of many details.
Replacing a front wheel bearing requires a number of tools. Most of them can be found in almost every garage (hammer, screwdriver, etc.), but some of them are used only in car repair shops and only they have them.
This equipment includes a special tool that is used to remove the old bearing.
Even if you find such a tool, you need to be extremely careful with it, because during dismantling, the main difficulties often arise due to the “sticking” of the bearing.
Replacement involves dismantling the bearing with a special puller, unhooking the anti-lock braking system sensor and installing a new bearing, and the shock absorber strut also requires unscrewing the mounting bolts. These are just the main stages; in addition to them, there are many nuances that a specialist can handle better than you.
After replacement, you should make sure that the ABS is working properly, since you can break its sensor and it will stop lighting up. If you changed the bearing yourself. and the sensor still fails to light up, it is also better to seek help from professionals.
In general, replacing the front wheel bearing is a very important matter, since it greatly affects safety, because if the bearing is faulty, the wheel can even jam. The number of cars involved in accidents due to bearing failure is considerable. So it’s better not to delay, but if necessary, contact the service.
Source: http://cars-bazar.ru/remont/zamena_stupichnogo_podshipnika_v_avtoservise_ili_svoimi_rukami