How to make sound insulation with your own hands correctly?
If you are planning to make noise insulation in your car for the reason that noise accompanies you constantly when operating the car, read our article to the end and remember it. We all struggle with noise from the street in our houses and apartments by installing multi-chamber window structures, and for this, motorists need to take care of high-quality noise insulation using special materials.
You can overcome various noises that arise for one reason or another with the help of our article. The easiest way to deal with noise is when we know the reasons for its occurrence. Often they are objective, for example, noise from wheels when in contact with asphalt.
Considering that manufacturers rarely create good sound insulation of the interior, you are left to silence the car yourself. It’s good that soundproofing materials are not in short supply today. Buy and get to work. The main condition is that you should know how to properly perform sound insulation with your own hands.
Manufacturers of soundproofing materials offer instructions for their products on how to work with their materials. In addition, you can get a lot of useful information from our article today.
What is proper sound insulation?
Soundproofing the floor
To begin with, you must understand that there are places in the car where it is better to apply sound insulation, and there are places that require the use of vibration-proofing materials. We will not consider the concept of thermal insulation in this article.
The fact is that modern soundproofing materials are usually produced according to the two-in-one principle, that is, sound insulation has thermal insulation properties. We bring to your attention a certain procedure.
to contents ↑
Soundproofing stages
- Selection and purchase of materials. It is necessary to consider what kind of sound insulation you plan to carry out: complete or partial. Full involves insulating the doors, interior, trunk, engine compartment and wheel arches.
- Preparing the machine for noise reduction.
We recommend doing complete soundproofing once and for all. Preparing a car for installation of soundproofing materials involves removing the car trim in places where soundproofing needs to be glued. Essentially this is disassembling the interior of the cabin and trunk.
If your car's fender liners are plastic, they should also be removed.
- It is necessary to properly soundproof the car by removing old factory materials. Clean all internal surfaces and do not be lazy.
Remove old noise reduction (usually there is very little of it).
Liquid sound insulation
- The process of applying soundproofing materials itself involves gluing sheets and pieces according to the manufacturer's instructions. We will not give you exact advice on how to glue the noise reduction, since we do not know what material you will use.
Before creating soundproofing, prepare the materials. This means that at the preparatory stage for the most complex surfaces, it is better for you to make patterns from thick paper. After this, make patterns for soundproofing materials for these surfaces.
Complex machine surfaces include the following:
- wheel arches;
- doors;
- space under the dashboard, etc.
to contents ↑
Features of sound insulation technology
Installation diagram
Proper sound insulation requires mandatory consideration of certain technological features:
- The ambient temperature in which you will do sound insulation should be at least 18-20 degrees above zero.
- Before carrying out the final installation of the patterns without dismantling the protective film, it is necessary to roll the pattern at the installation site. This can be done with a roller. The material should be laid in place and then carefully glued.
- We recommend soundproofing the interior floor and roof with one sheet of material. To do this, do not apply the entire sheet, but start from one edge and gradually move to the other.
Special roller
- After completing installation work on the part, roll the entire surface with a roller. It is necessary to expel the air from under the material.
- The rear and front wheel arches must be treated with vibration isolation material on both sides.
- After soundproofing your car, we strongly advise against driving your car into the city within the next 12 hours. This will allow the adhesive base to fully set.
Now you know how to properly soundproof a car. All that remains is one small thing: you need to choose the time and get to work. We assure you that the next day, on your first trip, you will understand that you did not waste your time. Comfort and silence are guaranteed!
Source: http://avtozvuk.info/kak-sdelat-shumoizolyaciyu-v-avto-pravilno.html
Soundproofing a car, how to make soundproofing with your own hands. How to soundproof a car. Materials for car sound insulation. Do it yourself
The main purpose of sound insulation is to get rid of the noise that occurs in the cabin when the car is moving. Any vehicle, even the newest one, is capable of transmitting a certain amount of noise, for example, from the rolling of wheels, engine operation, wind noise, as well as the sound flow created by oncoming and passing traffic. More on this later in the article.
Content
- Car soundproofing, why is it needed?
- Tools, accessories, consumables
- Materials for car sound insulation, an overview of what parts of the car they are used for, the advantages and disadvantages of each material
- Hood cover, how and why the hood cover is soundproofed
- Soundproofing of doors and arches, how and why soundproofing is done, step-by-step progress of work
- Sound insulation of a car roof, how and how sound insulation is done, what are the limitations
- Soundproofing a car floor, what and how
- Sound insulation of a car trunk, wheel niches, arches, what and how, in detail
- Pro tips, the best car sound insulation
Car soundproofing, why is it needed?
For most cars, the factory insulation does not cope well with the task. The only exceptions are premium models. The more budget the car, the weaker its protection against foreign noise.
This is due to the fact that installation of high-quality noise insulation is quite expensive, and in economy class cars it can amount to up to ten percent.
In the fight for the buyer, the manufacturer reduces production costs, including noise insulation.
The older the car, the more noise can penetrate its interior. In addition, excessive rattling and noise occurs in the cabin, which causes irritation for passengers and the driver. As a result of extraneous noise in the vehicle interior, the driver gets tired much faster, and road safety decreases.
The only way to solve this problem is to install additional sound insulation in the car.
Tools, accessories, consumables
- Set of locksmith tools.
- Rolling roller.
- Gas cylinder with burner.
- Industrial dryer.
- Stationery knife and scissors for cutting.
- White spirit or solvent.
- Soundproofing material.
Materials for car sound insulation, an overview of what parts of the car they are used for, the advantages and disadvantages of each material
High-quality sound insulation of a car largely depends on the chosen material. The automotive industry presents a huge selection of these materials, which are quite easy to get confused about.
The main property of any soundproofing material is the absence of hygroscopicity. That is why, when choosing a material, special attention must be paid to this, since accumulated moisture can lead to corrosion of the metal.
Vehicle soundproofing materials can be divided into the following types:
- Bitumen-shale.
- Felt.
- Polyurethane.
- Liquid sound insulation of a car.
Vibroplast is the main material for protecting doors, hood, trunk lid, interior and floor from noise. It is a bitumen-shale, polymer formation with an adhesive layer to facilitate application to the protected surfaces.
Aluminum foil is applied to the top layer using the pressed duplication method. To make cutting easier, there is a pattern on the surface of the foil in the form of squares measuring 5x5 cm. The adhesive layer is protected by a special film.
The material does not absorb or accumulate moisture, is not subject to decomposition from the influence of external factors, has the properties of a sealant, and, when applied correctly, can protect the metal from corrosion. It is easily applied to the surface and follows its contours.
There are several types of bitoplast, which differ in the fillers used and layer thickness. The main disadvantage of this material is its weight.
The thicker the layer, the better the sound insulation characteristics of the vibroplast. Weight of one sq. m. with a thickness of two mm. is three kg, and 4.5 mm material already weighs six kg. To process a vehicle you need 8-10 sq. m.
, so the weight of the car will increase depending on the thickness of the material used.
Spleen has become quite widespread due to its excellent soundproofing characteristics. Additionally, the material has optimal thermal insulation properties, is lightweight, does not absorb moisture, and is easy to install using a special adhesive layer.
In operation, it can withstand temperatures from -45 to +64 degrees Celsius, and is wear-resistant. Used to protect the noisiest areas of the car - side pillars, doors, tunnels, wheel arches and other elements at your discretion.
Depending on the purpose, the thickness of the splen can be 2, 4 or 8 mm. The last digit of the marking indicates its thickness, for example, the thickness of Splen 3004 is 4 millimeters.
Using a special adhesive layer, soundproofing a car interior is quite simple; it can follow all the contours of the surface, and folds and excess can be easily trimmed with scissors. In addition, the material is lightweight and does not reduce the payload of the vehicle.
Felt is also a widely used soundproofing material. It has high sound absorption rates and low cost. In addition to noise absorption, natural and synthetic felts have high thermal insulation properties and are used at any temperature.
A limitation in the use of felts is their ability to accumulate moisture. It has a porous system that absorbs condensate well. During operation, it is virtually impossible to dry the felt, so it should be used only in places where there is no possibility of moisture reaching it.
If you use felt insulation under the floor mats, it can quickly cause corrosion damage to the underbody of your car.
Having accumulated moisture, this material significantly loses its sound-absorbing characteristics, and also becomes the best environment for the development of fungus and mold.
As a result of the accumulation of moisture in the felt, the car windows will constantly fog up, and an unpleasant odor will appear in the cabin.
The second main disadvantage of this product is the complexity of installation. The adhesive coating applied to the felt does not adhere well and can come off the surface. Taking into account all of the above, it is advisable to limit the use of felt for car soundproofing.
Liquid sound insulation is carried out comprehensively - both outside the car and inside. On the outside, wheel arches and the bottom, which are the main suppliers of noise to the car interior, need to be treated with noise-absorbing mastics.
Treating the external components of a vehicle with mastics can not only reduce noise levels, but also protect metal elements from corrosion. Modern manufacturers offer a huge selection of liquid sound insulation - rubber-bitumen and bitumen-shale mastics, foaming and two-component compositions.
Liquid sound insulation must be applied to grease-free, clean surfaces. For better adhesion, a primer may be required in some cases.
Liquid compounds perfectly fill all joints and can provide additional protection. They are applied to surfaces using a brush or spray. When working with compounds, you need to take into account that most of them have a long drying time, which can reach up to several days.
Hood cover, how and why the hood cover is soundproofed
There is an opinion that soundproofing the hood can protect you from the noise that the engine creates. However, this opinion is wrong. In fact, if you soundproof the hood, the engine will not “suffer” from the cold in winter. To perform this operation, you will need a Silver vibrating plate and an accent.
When soundproofing the hood, it is necessary to take into account the weight of the material so as not to overload the hood, since you can cause damage to its shock absorbers, which will subsequently have to be replaced.
To remove vibration, vibrating plates are used. They are quite light, resulting in a small load.
To maintain heat under the hood, an accent is used that protects the engine compartment from hypothermia in winter and from overheating in summer.
The manufacturer, as a rule, makes its own thermal insulation in the car. The sound insulation you create should not replace the standard one, but only complement it.
If the car does not have standard sound insulation installed, it must be done independently, for which you should select very thick material - at least 15 millimeters.
And if you add a material that can absorb vibration, you can protect yourself from extraneous sounds, and the engine will not suffer from the cold in winter.
Soundproofing of doors and arches, how and why soundproofing is done, step-by-step progress of work
This type of insulation is intended not only to protect the vehicle interior from noise, but also to ensure better sound of music in the car. It’s not uncommon that even the most ordinary soundproofing can work “miracles,” as a result of which music in the cabin will be heard much better.
To make minimal noise, take an ordinary vibrating plate “Gold” and “Silver”. The material must be fastened opposite the column inside the doors.
Vibroplast should be placed as much as possible, since the thinner the metal, the more sound insulation will need to be spent.
Before making sound insulation, calculate the weight of the material that must be used for protection. If a soundproofed door weighs too much, the likelihood that it will sag is quite high.
As a result, the door hinges will need to be replaced. If your car has a good audio system, you will need at least four layers of insulating material to ensure that the music in the cabin sounds good.
First of all, it is necessary to protect the inside of the doors. In this case, the material must be glued through special holes behind the speakers in the door. Place Splen four millimeters thick on top of the vibroplast.
Then insulate the outside of the doors. To make your music sound better, seal the part of the door where the speaker is installed. In addition, after the operation the door will be more rigid, which will also have a positive effect on the sound of music. The outer part should be covered with vibroplast “Silver”, and then put Splen.
Next, pay attention to the door cards. To prevent them from making squeaks and other unnecessary sounds, they need to be processed. To do this, use anti-creaking bitoplas or a similar soundproofing material.
Also pay attention to the rods and handles, which should be coated with Madeleine anti-squeak material. The rear doors must be treated in the same way as the front doors. If the speakers are not built into the door, you can apply simpler material.
The wheels make the most noise, so the wheel arches need to be protected as well. In this case, it is necessary to use two or three layers of material with the required thickness. The Bimast Bomb will best protect against vibration. You can use another material, but you will need to lay two layers.
Sound insulation of a car roof, how and how sound insulation is done, what are the limitations
Car owners treat the roof of their car so that noise from outside does not interfere with the comfort of movement.
If you soundproof the ceiling, even in the heaviest rain, you will only feel light dull impacts that will not cause much discomfort. For this type of insulation, vibrating plastic of the types indicated above is suitable.
It is advisable to use the lightest material possible, since too much load on the ceiling can cause the center of gravity to shift upward, which has a very bad effect on handling.
The thickness of the splen used should be four or eight millimeters. If the thickness is insufficient, apply two layers. Restrictions on this measure are based on the fact that after installing the material it will be possible to return the ceiling lining back.
Soundproofing a car floor, what and how
The main purpose of this type of insulation is to reduce noise from vehicle contact with the road, as well as from impacts of small objects on the bottom of the car. The choice of material is unlimited - you can take the best noise and vibration isolators.
As a rule, Bimast Bomb is used to insulate the floor. This material has the best characteristics, but is the heaviest in weight. A material that retains heat and absorbs noise - Splen 4 or 8 - is placed on top of this vibration isolator.
Sometimes it is very inconvenient to use thick Splen, so you can take a less thick material, but you will need to lay two layers, not one. Gaps must not be left; the entire floor area must be covered with Splen.
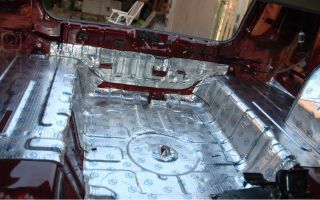
Sound insulation of a car trunk, wheel niches, arches, what and how, in detail
Protecting the trunk is extremely important, since this is where most of the unnecessary noise and squeaks come from. If you want to install a subwoofer in your vehicle, it is imperative to soundproof the trunk.
Particular attention should be paid to the spare wheel niche; try to completely cover it with material that absorbs vibration. Cover all trunk linings with bitoplast.
Wheel niches must be covered with sound-insulating material so that you can feel more comfortable in the cabin. If everything is done correctly, the noise made by the wheels when interacting with the road will actually not be felt.
Before adding additional insulation, first remove the “original” fender liners, which also protect against noise. Then clean the arch from dirt and dust, after which you can lay the material. Vibroplast “Gold” or analogues are often used.
Experts advise treating wheel arches with anti-gravel, which acts as a sound insulator and protects the metal from corrosion.
In addition to the niches themselves, the fender liners are also treated; they can first be covered with vibroplast, and then secured in place.
Pro tips, the best car sound insulation
Whether it is necessary to soundproof the vehicle, what materials to use - all this depends only on the car owner, his skills and financial capabilities.
Source: http://prosedan.ru/shumoizolyaciya-avtomobilya-kak-sdelat-shumoizolyaciyu-svoimi-rukami
How to organize soundproofing of a car with your own hands
Before you begin soundproofing the car interior, you need to decide on the purpose and purpose of this soundproofing. In other words, with what you want to get as a result. If you want to reduce engine noise from the engine compartment, then first of all you need to pay attention to the partition between the passenger compartment and the engine compartment.
If the goal is to improve the quality of music inside the car, then the doors and speaker installation locations will require close attention. When the task is to achieve maximum silence in the car interior, then you need to do comprehensive sound insulation. It will also be necessary to apply sound insulation to the floor, ceiling, trunk, and wheel arches.
All necessary material can be divided into three categories: vibration insulation (vibra), noise insulation (Shumka) and anti-creak. Vibra is a bitumen-based sheet with a thickness usually from 2 to 4 mm. They are slightly thinner and thicker depending on the manufacturer. Its task is to dampen the vibration of the rolled metal sheet from which the car body is made.
On the one hand, such sheets have an aluminum layer, which also serves as thermal insulation. If in places with a temperate climate this property is not very noticeable, then where in winter the temperature drops significantly below zero, this quality of vibration allows the car interior to not cool down for a long time.
The second most important material is the noise insulation itself. It is sold in rolls and is a lightweight porous material whose task is to absorb sound (noise). The thickness of such material can be up to 10 mm or more.
Another material that you cannot do without to achieve complete silence in the cabin is anti-creaking. This is a self-adhesive fabric that is applied to the joints of the contacting elements of the interior, thereby getting rid of the unpleasant creaking that occurs when parts rub against each other.
Now about those tools you can’t do without. This is a construction hair dryer, which is required to heat the bitumen base of the vibrator. Before applying to the metal surface of the body, it must be heated until soft and malleable. Only in this case can the vibration be placed tightly, given the required shape and securely fastened.
To do this, you will need a special roller, with the help of which the entire surface of the material being laid is rolled until reliable adhesion to the base is achieved. Before laying the vibrator, for better adhesion to the metal, the entire surface to be pasted must be degreased using a solvent, for example, white spirit, which is applied to a clean rag.
To cut the material you will need a knife, ruler, tape measure, and marker. When performing comprehensive sound insulation, you will need to completely dismantle the car interior, for which you will need your own set of tools, including wrenches, screwdrivers and other devices.
Such a nuance. If the work is carried out in the hot summer, then it will be possible to do without a hair dryer. It is enough to place the vibration for 5-10 minutes in the sun so that it reaches the condition necessary for operation. The car must also be in an open place so that the body heats up and is not cold.
Sound insulation of hood and trunk
It will not be possible to completely get rid of engine noise in the engine compartment, no matter how much material it takes. The hood noise insulation serves more for thermal insulation of the engine, preventing it from quickly cooling down in the cold season.
To perform this operation you will need a vibration, for example, silver and Shumka up to 10 mm thick. If your car does not have factory hood noise insulation, you can make the noise layer thicker. If factory insulation is present, it should not be removed. It would be correct to install on top of it.
The installation technology is always the same. First you need to degrease the surface using a solvent. Then heat the prepared (cut) pieces of vibra using a hair dryer. Place them in place and carefully roll them out with a roller.
During the rolling process, you need to use a hair dryer to improve the plasticity of the material. Since this material is aimed at reducing vibration, it can be applied in pieces at a close distance from each other (a centimeter - one and a half).
Noise insulation should be glued in one piece over the vibration, otherwise sound waves will penetrate through the cracks.
Soundproofing the trunk is done in the same way. You must first remove all the trim from the trunk, and then degrease the surface to be insulated with a solvent.
If there is a niche for a spare tire in the trunk, it must also be carefully insulated.
Such measures help to significantly improve the noise level in rear-wheel drive models, reducing noise from the driveshaft and final drive (gearbox).
Video “Soundproofing doors: advice from professionals”
Soundproofing car doors
Particular attention should be paid to the sound insulation of car doors, since they make perhaps the greatest contribution to ensuring silence in the cabin. It would be good to start by taping the inside of the outside of the door.
As usual, the surface is first degreased. In order not to make the doors too heavy, we can recommend laying not a continuous large piece of vibration insulation, but several small ones at a close distance from each other.
This will prevent rapid wear on the door hinges.
To improve sound quality, it is better to stick the Shumka thicker in the area where the speakers are located, and thinner in other places. This will save money.
If your goal is not to achieve ideal music sound quality, you can still save money and not seal all the technological holes of the door.
Otherwise, everything needs to be carefully sealed to create a closed acoustic space that significantly improves the sound at low frequencies.
The thickness of the noise insulation on the side of the door card must be chosen so that it can be easily put in place (the door card).
Sound insulation of floor, ceiling and roof
To soundproof the floor and roof, you will have to dismantle almost the entire interior trim, remove the seats and the ceiling. To remove the seats, you may need an assistant, since it is very inconvenient to pull them out alone.
To dismantle the ceiling, it is better to use a special tool, since the clips or pistons with which it is attached to the roof often break. Therefore, special care is required, since it is not always possible to buy new clips to replace them.
The technology for installing insulation is conventional - first we degrease all surfaces with a solvent. Gluing the vibra onto the floor should be done in large overlapping pieces, carefully rolling everything with a roller so that there are no air bubbles.
Vibration insulation is made on a bitumen basis and has anti-corrosion properties, protecting the covered metal from rust. But this is only true if the fit is tight and there are no air bubbles. Therefore, to ensure everything is correct, monitor the quality of rolling. Vibration insulation for the floor can be thicker, and Shumka thinner.
As a result of this work, the noise from the wheels and driveshaft (for rear-wheel drive cars) while driving will be significantly reduced.
In order to properly soundproof the roof, you should use thin material:
- Firstly, thick vibration insulation has significant weight. Because of this, in summer, under the influence of the sun, it will tend to peel off and sag;
- secondly, a thick layer of insulation may interfere with the installation of the ceiling in place and then everything will have to be redone;
- thirdly, the additional weight of the roof will shift the car's center of gravity upward, which will reduce its cornering stability.
As practice shows, even a thin layer of noise insulation is enough to virtually eliminate the noise from drops during rain.
To completely get rid of noise, you cannot do without treating the wheel arches. Sound insulation should be applied both to the arches themselves and to the plastic protection of the arches on the inside. This will significantly reduce the noise from pebbles while driving and ensure a comfortable ride.
Video “Do-it-yourself noise insulation”
If you are one of those drivers who wants to drive in complete silence and not hear the sound of wheels on the road, it’s time for you to think about soundproofing your car. This video will help you take the first step.
Source: http://MineAvto.ru/tyuning/salon/shumoizolyatsiya-avtomobilya-svoimi-rukami-4128.html
Do-it-yourself car soundproofing
The main purpose of sound insulation is to get rid of the noise that occurs when the car moves in the cabin. Any car, even a new one, transmits a certain amount of noise from the engine, rolling wheels, noise from the wind and sound flow created by passing and oncoming traffic.
The factory insulation of most cars does not cope well with this task. The only exceptions are premium sector models. The more budget the car, the weaker its protection from extraneous noise.
This is due to the fact that installing high-quality noise insulation is quite expensive, and in economy class it can be up to 10%.
Fighting for the buyer, the manufacturer reduces production costs and, first of all, noise insulation.
The older the car, the more noise penetrates into its interior from the outside, and unnecessary creaks and rattles appear inside, which irritate the driver and passengers. Excessive noise in the cabin causes the driver to quickly get tired and reduces road safety.
The only way to solve the problem with increased noise is to install additional sound insulation in the car.
Soundproofing a car in service
The fastest and easiest way to get rid of extraneous noise in the cabin is to have your car soundproofed at a car service center by experienced specialists.
But this method has one significant drawback - the cost of the work performed. The second problem is the choice of the car service itself; many promise to do it efficiently and on time, but not many implement this in practice.
The best way to choose a workshop is through reviews of familiar car owners who have had their car soundproofed at this service. Reviews on the Internet have no meaning, since in order to attract potential clients, managers independently write praise on websites.
Before starting work, you should visit the service and ask the master how and with what materials the work will be performed. It’s good if noise insulation work is carried out in the workshop, it will be possible to evaluate the level of skill of the specialists and their attitude towards the work being carried out. If you have the funds and quality service, this is the best option for soundproofing your car.
How to properly glue sound insulation in a car, video:
For people who like to do everything on their own or who do not have enough money to carry out high-quality service work, you can do car soundproofing yourself. This method is convenient because the work can be done slowly and in parts. To perform the work you will not need any special skills or sophisticated equipment.
To do this you will need:
- Soundproofing material;
- Solvent or white spirit;
- Scissors and a stationery knife for cutting;
- Industrial dryer;
- Gas cartridge with burner;
- Stitching roller;
- Set of locksmith tools.
High-quality sound insulation of a car largely depends on the selected material. The industry offers a large selection of these materials, and it is quite easy to get confused in them. We will tell you below how and what material is best for soundproofing a car.
The main property of any soundproofing material for sound insulation is the absence of hygroscopicity. Therefore, when choosing a material, we pay special attention to this, since accumulated moisture leads to corrosion of the metal.
Soundproofing materials for cars
Materials for car soundproofing can be divided into the following types:
- Bitumen-shale;
- Polyurethane;
- Felt;
- Liquid car sound insulation.
Vibroplast
The main material for noise protection of doors, floors, interior, trunk lid and hood. It is a polymer, bitumen-shale composition with an adhesive layer to facilitate application to the protected surfaces.
Aluminum foil is applied to the top layer using the pressed duplication method. To make cutting easier, the surface of the foil has a pattern in the form of squares measuring 5x5 centimeters. The adhesive layer is protected by a special film.
The material does not accumulate or absorb moisture, is not subject to decomposition from external factors, when applied correctly, protects the metal from corrosion, and has the properties of a sealant.
The material is easily applied to the surface, following its contours. There are several types of bitoplast, the differences are the fillers used and the thickness of the layer. The main disadvantage of this material is its weight.
With a thickness of 2 millimeters, the weight of one square meter will be 3 kilograms, and material with a layer of 4.5 mm already weighs 6 kilos.
The thicker the layer, the better the vibration and noise insulation characteristics of the vibroplast. But processing a car requires 8 to 10 square meters, so the weight of the car will increase depending on the thickness of the material used.
Splen
This material is widely used due to its excellent soundproofing characteristics. The material additionally has good thermal insulation properties, does not absorb moisture, is lightweight and is easy to install thanks to a special adhesive layer.
In operation, it can withstand temperatures ranging from -45 to 64ºC, and is wear-resistant. It is used to protect the noisiest areas in the car: wheel arches, tunnels, doors, side pillars and other elements at your discretion.
Depending on the purpose, splen is available in thicknesses of 2, 4 and 8 millimeters. The last number in the marking indicates its thickness, for example, Splen 3004 has a thickness of 4 mm.
Thanks to a special adhesive layer, sound insulation of the car interior is quite simple; it follows all the contours of the surface, and excess and folds are easily cut off with scissors in place. The material is lightweight and does not reduce the payload of the vehicle.
Felt
Widely used material for sound insulation. It has high sound absorption rates and is low cost. In addition to sound absorption, synthetic and natural felts have high thermal insulation properties and can be used in any temperature range.
A limitation in the use of felts is its ability to accumulate moisture. Felt has a porous system that absorbs moisture and condensation well.
It is almost impossible to dry felt during use, so it should be used only in places where there is no possibility of moisture accessing it.
The use of felt insulation under the floor mats leads to rapid corrosion damage to the underbody of the car. Having accumulated moisture, the material not only significantly loses its sound-absorbing characteristics, but also becomes an ideal environment for the development of mold and mildew. Damp felt leads to constant fogging of the windows and the appearance of an unpleasant odor in the car interior.
The second main disadvantage of this soundproofing product is the difficulty of installation; the adhesive coating applied to the felt adheres very poorly and often comes off the surface. Considering the above, it is better to limit the use of felt for soundproofing a car.
Liquid sound insulation
Proper sound insulation of a car must be carried out comprehensively both inside and outside the car. On the outside, the underbody and wheel arches, which are the main suppliers of noise into the cabin, should be treated with noise-absorbing mastics.
Treating the external elements of a car with mastics not only reduces noise levels, but also protects metal elements from corrosion.
Modern manufacturers offer a large selection of liquid sound insulation: bitumen-shale and rubber-bitumen mastics, two-component and foaming compounds.
Liquid sound insulation should be applied to clean, grease-free surfaces. In some cases, applying a soundproofing coating will require the application of a primer for better adhesion.
Liquid compounds fill all joints well and provide additional protection against noise penetration. Liquid compositions are applied to surfaces using a spray bottle or brush. When working with compounds, it should be taken into account that most of them have a long drying time, up to several days.
Preparatory work
Soundproofing work should be carried out in the warm season or in a heated and well-ventilated room.
The car can be processed either as a whole or in small parts. For example, at the initial stage you can treat the bottom and wheel arches of the car with liquid sound insulation, then the trunk and doors.
The most time-consuming work is to protect the internal elements of the car interior: floor, roof and pillars.
Before making noise insulation with your own hands, you should wash the car, this will protect the paintwork from damage, and it will be more pleasant to work with a clean car. When processing the bottom, the car should be placed on a lift, inspection hole or overpass.
If you lack experience, it is best to start work with simple and flat surfaces. The luggage compartment and trunk lid are a good place to test your skills. We prepare soundproofing materials for cars, equipment and tools and prepare for a long and painstaking process to reduce the noise level in the car interior.
Execution of work
Processing the bottom and wheel arches
These works will slightly reduce the noise level in the car, but it is better to carry them out first to additionally protect the car from corrosion. Before starting work, the surfaces to be treated are thoroughly washed using car shampoo.
Next, the surfaces are dried using compressed air or an industrial hair dryer.
Particular attention should be paid to hidden cavities; moisture escaping from them will not allow for high-quality application of soundproofing materials.
The surfaces are inspected and all corrosive deposits and rust are removed using abrasives or a rust converter. The surface is degreased and mastic is applied using a spray bottle or an ordinary brush.
The outer surfaces of the car should be treated with soundproofing compounds in 2–3 layers, with intervals between application of layers of 2–4 hours.
Soundproofing the wheel arches of a car with your own hands, as well as the bottom of the car, is a simple process, especially if you use a lift. In this case, all four wheels are turned off, otherwise you will have to turn each wheel separately and hang the car using a jack.
After the work is completed, you can evaluate the quality; the interior should become a little quieter, especially in the area of the wheel arches.
Do-it-yourself noise insulation of car wheel arches, video:
Before starting work, take everything out of the trunk and remove the interior lining. We remove all debris and dust; you can use a household vacuum cleaner for this work. We inspect the surfaces, if rust is detected, we clean them or treat them with a rust converter, and prime them.
We degrease the surfaces using white spirit and apply vibroplast cut out according to patterns. Vibration and noise insulation materials should be applied to each other as accurately as possible, without leaving gaps. For a better fit, we heat the material using a heat gun and roll it with a special roller.
The main sources of noise entering the vehicle interior are the wheel arches and the spare wheel well; they should be protected as carefully as possible.
After the vibroplast is completely laid, splen is applied to it with an adhesive layer. Before gluing this insulating material, remove the protective film covering the adhesive layer. Excess splen is trimmed using a utility knife.
We look at the quality of the work, and if everything went satisfactorily, we begin processing the next elements of the car.
Do-it-yourself soundproofing of car doors
There are many opinions on how to properly soundproof car doors, but everyone recognizes that it is through these elements that a significant portion of the noise enters the interior and it is very difficult to carry out work there.
To carry out the work, you should remove the door trim, dismantle the built-in speakers (if any), and, if possible, dismantle electrical equipment and wiring as much as possible. We remove debris, dust and degrease.
It is not possible to completely treat the internal surfaces of the door with vibroplast due to the inconvenience of the design. Therefore, we coat the untreated parts with any mastic. We glue splen on top of the vibroplast.
It should be taken into account that after the work the load on the door hinges will increase , so you should not use very heavy materials.
We glue the outer surface of the door using thin splen or bitoplast. We also glue the inside of the door trim using thin splen or bitoplast. After treating all the doors, the sound insulation of the car will improve significantly.
Video on how to glue doors:
Do-it-yourself soundproofing of a car inside the cabin is not as difficult as dismantling the trim elements. Therefore, work on the roof and floor should be carried out simultaneously.
It is better not to touch the front panel yourself or entrust it to specialists. It is better to start work from the roof, gradually going down. To treat the roof, you can use thin vibroplast, splendid felt can be glued onto it.
To process car pillars, splen or vibroplast is used. To protect the floor, vibroplast is used, on top of which splen is applied. If the factory floor sound insulation is made of felt, then it is better to replace it with synthetic materials.
You will be interested in this article – Do-it-yourself car painting. Video lessons.
When processing the interior, you should pay attention to the following nuances:
- When treating the roof, you should not use very thick vibroplast; the center of gravity will shift and the car will lose controllability.
- Using insulation materials that are too thick can create problems with the installation of the floor covering.
With proper work, the sound insulation in the car will significantly improve, and traveling in it will be a real pleasure.
After carrying out noise insulation work, the sound of the speakers will significantly improve, and road noise will not interfere with normal conversation in the cabin.
Whether it is worth soundproofing a car, how and what materials to use for sound insulation depends only on the owner of the car, his financial capabilities and skills.
Source: https://autoot.ru/shumoizolyaciya-auto-svoimi-rukami-video-materialyi.html