Installing an electric trunk lock
Many people have probably seen more than once how the trunks of expensive foreign cars are opened using a button in the cabin or using an alarm key fob. In this article we will briefly try to tell you how to make the same useful device on an ordinary Soviet car - VAZ Classic.
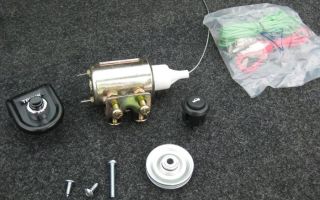
To install an electric lock, we will need: a 10-meter wire, terminals, silicone adhesive tape, a 2-pin door motor and, of course, a button, which can be bought at any auto store.
And so, let's get started. Before we can begin installing the motor and button, we will need to do some wiring from the battery first.
As you know, a battery has two poles - negative and positive, or in other words, plus and minus contacts.
Usually the minus contact always goes along the car body, so this will not be an unnecessary problem for us, but the plus contact is more difficult to find. For this we need a 10-meter wire.
Contact plus, it is best to take it from the car cigarette lighter. To do this, remove the panel with the clock and the cigarette lighter, then, for convenience, remove all the contacts and find the positive wire in them. Next, we connect to it the wire that goes to the car’s cigarette lighter and connect it all together to the relay, according to this diagram.
To ensure that the relay does not interfere with us in the future, it would be appropriate to hide it somewhere. To do this, remove the ashtray and unscrew its plastic fastening. In the place where the ashtray was located, you will see a small hole where we will attach our relay. We do this using a regular bolt and nut.
Next we need to run a positive wire from the relay to the power trunk lock. To do this, we will need to disassemble some parts of the car interior, namely the glove compartment, rear seats and the plastic floor covering, which is located on the right side of the car.
We lay the wire from the bottom of the glove compartment and lead it along the main wiring to the trunk. In the trunk, we again lead the positive wire along the main wiring and push it through the technical holes in the hood.
It will be difficult to push the wire through these holes, so for convenience, we will need a regular piece of stiff wire with a bent end.
Next, we connect the negative contact, which we take from the light bulbs on the car’s registration plate.
We begin installing the electric motor on the trunk lock. In order not to damage the lock and not change its design, we install the electric motor so that it pulls the lock mechanism. You can attach the motor to the hood in two ways: 1) secure it with screws and bolts; 2) attach it to the technical hole in the hood. In this case, we will consider the second mounting option.
We take two plastic rubber bands with holes in the middle and two bolts. We insert the rubber bands into the technical hole and bolt the electric motor, after making sure that it will not interfere with closing the hood. Using this mounting method, you can later adjust the distance between the electric motor and the trunk lock.
Next we work with the trunk lock mechanism. In order to open the trunk, we need to move the tongue, which can be seen in the hole of the mechanism. It is this tongue that opens the trunk latch.
By moving the key, we turn the tongue, which subsequently opens the trunk of the car.
To repeat the same action, we thread the fishing line so that the electric motor attracts it towards itself, and thereby sets the tongue in motion.
You can place the button for opening the trunk anywhere, but the main thing to consider is that it is in a safe, but at the same time accessible, place for you.
We connect all the wires to the electric motor. We go into the car interior and press the button. If the trunk does not open when pressed, then you may have made a mistake when installing the contacts. Try changing the contacts on the electric motor or on the relay installed inside the car.
If your car has an alarm with the ability to open the trunk via a button on the key fob, then you can easily install it. To do this, we study the diagram of your alarm; it should indicate in detail what to connect where. Then we look for the alarm unit and connect to it all the necessary contacts that are indicated in its diagram.
As a result, you get the opportunity to open your trunk with a key, a button in the car, and a button on the alarm key fob.
Source: http://xn—-7sbgjfsnhxbk7a.xn--p1ai/ustanovka-elektroprivoda-zamka-bagazhnika
How to install an electric trunk drive with your own hands?
The rear of the eighth and ninth series VAZ cars are designed in such a way that when there is a counter flow of air, they contaminate the rear viewing window of the vehicle. These models drive almost all the time with a dirty rear end.
And accordingly, with contamination of the rear part of the vehicle, sand, dirt, moisture and salt solutions get into the trunk lock structure, leading to corrosion on the critical mechanisms of the lock, which often leads to its failure.
But the opening of the mechanism can be activated using a button that is located at the driver’s hand in the car interior.
Thus, you don’t have to worry about dirt in the closing mechanism, and it will create more trouble for intruders who want to check the contents of the trunk.
It is possible to improve the “closing-opening” device of the trunk on most Zhiguli models.
This modernization can be offered to “tuners” who will save you from unnecessary locks and keyholes and handles located on the outside of the luggage compartment lid and car doors. In order to control the trunk locking device, you will need an electrical contact device.
This system will work as follows: by pressing a button, which is located in any convenient place for the driver, an additional contact system is activated, which starts the main relay, after which the core is retracted and the trunk lock latch is opened. In this case, we cannot do without auxiliary parts and fasteners, for this reason we will have to make a fastening device for the roller. This wheel, with the help of a screw, is easily attached to a bracket, which is held on the body by a special screw.
In the latch it is necessary to drill several technological holes with threads intended for fastening screws under points 3 and 4. With such screws you can secure the end of the cable.
One question remains unresolved: how to get rid of the lock latch from the trunk lid? This can be realized by making a hole in the trunk lid, the diameter of which will be 1.15 cm.
To knock out the axle in it, you need to insert a dense drift into it and remove the rod. It is necessary to ensure that the roller recess and the two screws are located symmetrically to each other.
When removing the axle, the plate moves and the inside is removed along with the pusher. To make it impossible to open the lock with a key, it is enough to reduce the size of the end of the pusher by approximately 10 millimeters.
After the work has been done, having assembled a new lock system, you can put it in its original place. Then fix the relay in the lower part of the door, at a distance of 150-200 mm from the lock. It is also necessary to maintain a symmetrical arrangement on the axis of the entire device made.
Due to the fact that the roller can be purchased separately, the electromechanical part can be connected to the window lift mechanism. To facilitate installation of the cable, the bushing located at the end of the relay core is replaced with a screw.
You can attach the cable to the screw in different ways, for example, press the body of the cable to the lock with screws, but first place adjusting washers under them. In the same way, we attach the other end of the cable to the main part of the relay.
After the electrical part has been checked, the entire mechanism needs to be adjusted. It is necessary to adjust the cable travel for normal opening of the trunk latch.
If the electrical part of the trunk opening still fails, you can open the lock latch from inside the vehicle by manually pulling the cable.
Example of installing an electric lock drive (video)
Source: http://tuning-lada-2109.ru/ustanovka-elektroprivoda-bagazhnika/
Do-it-yourself automatic trunk lock for a VAZ (electric trunk lock, electric trunk lock)
I'm tired of the situation when you're sitting in a car and you need to open the trunk. You need to turn off the engine, get out of the car, turn the key, open the trunk, turn the key again, return to the cabin and start the engine... It’s another matter when everything opens by simply pressing a button in the cabin.
This is what I decided to implement...
electric trunk lock
so, to make an electric trunk lock, we need:
- Two-wire door actuator for 6 KG
- Fuse 10A
- Trunk button from VAZ 2110
- Relay 90.37.47-10
- Wire 10 m (6 m is possible, but I took it with reserve)
- Female terminals 10 pcs.
- Sheathed hood cable
For those who are not well versed in electrical circuits:
Since I installed the relay next to the lock, I also powered the mass coming from the relay and the activator to the housing (right on the lock, there was already some mass there)
As for the connection. I used a 3-pin button, it is called “Button for opening the trunk lid 2110”. The switching of the button is as follows: when the button is pressed, contacts 1 and 2 are switched, and when the button is pressed, contacts 1 and 3 are switched.
All that remains is to install everything in the car. Let's start with the back door. The installation diagram for the rear door can be seen in the photo below (collective farm, well, it’s still not visible):
Stuffing everything into the back door is not a problem, but running the wire into the cabin is difficult. Further along the cabin the wire is not so difficult to stretch, we just push it under the ceiling. I used a metal wire as a conductor. The most difficult thing is to get through the rubber corrugation between the trunk door and the passenger compartment.
In the cabin, I ran a wire along the ceiling and down the left windshield pillar. As it turned out, at the bottom, next to the hood release handle, there was a plug for a button to open the trunk. Under the steering wheel there was a free block with a permanent plus, I bought a counterpart and powered the radio and trunk to it.
Here is my conductor))) the hood cable remains:
And here is the ominous corrugation through which the wire has to be pulled. Let's just say it wasn't a very convenient place. Probably a prepared person will say that it’s easy. But when the wire goes through this corrugation for the first time, it causes difficulties.
As I wrote above, I found a plug under the steering wheel for a button to open the trunk. Why they did it is not clear, but thank you)))
Even when I installed the radio, I found a free block. There was a fuse on the block, a permanent positive one that opened when you started it. Because You won’t have to use the button often; you can safely set it to 1 plus with the radio.
Having done everything described above, you should get a working mechanism for automatically opening the trunk. Now you can deal with the aesthetic side of the issue. Everything in the interior is fine, the button is in its normal place and looks as if it had always been there. But the trim from the trunk lid does not fit back. The second stage of our refinement is the modernization of the trunk trim.
First, cut a hole in the middle of the casing so that it can then be installed in place.
Accuracy is not needed here; all this will not be visible anyway.
Now we fill it with construction foam on top, while covering the hole with newspaper from the inside. Foam will help give you the necessary head start.
Trim off excess foam. We create the form we need. The main thing is not to leave too much foam, otherwise it will interfere with closing the trunk door later.
Having made the desired shape, you need to try it on by machine. If everything falls into place well, you can continue. Next you need to cover the foam with fiberglass. I didn’t have glass fabric, so I twisted it using improvised methods. I took a piece of carpet, glued it on top of the foam and treated it with starch glue.
When everything has hardened, you can make a hole in the foam.
Finally covered it with carpet, it turned out very nice.
Having completed the hood lock, I decided that I would no longer need the key.
Therefore, I decided to modify the lock so that nothing would stick out from the outside. There are two points:
- Having pulled out the lock, a hole remains and you need to decide how to seal it. You can, of course, just drive with a hole)))) You can weld it and paint it over. However, this is time-consuming and expensive, especially if you cannot do it yourself. I decided to take the easy route and just put a (dragon nameplate) sticker there.
- Automation is good, but you need to leave yourself an escape route and make the trunk opening mechanical, otherwise you risk someday not getting into your own trunk.
I was looking for an old lock to experiment with, but everything that was offered was either dead or of terrible quality; as a result, I bought a new lock (389 rubles).
Disassembling the lock is a problem, so I simply cut off the unnecessary part with a grinder. I filled the resulting cavity with foam so that it would not be possible to open the lock from the outside.
I replaced the spring with a homemade one made from curtain fishing line to make the move easier. The standard spring is very tight and the activator cannot cope with it.
The cut on the lock was wrapped with black electrical tape. I don’t know why, it just seemed more decent.
Further actions were the same as above, except that I extended the cable wire and brought it out from under the trim in the corner. So that in case of emergency you can open the trunk manually.
I glued a nameplate in the shape of a dragon to the outside. I was pleased with the result.
Source: http://mytun.ru/content/avtomaticheskiy-zamok-bagazhnika-na-vaz-svoimi-rukami-elektrozamok-bagazhnika-elektroprivod
How to open the trunk of a VAZ 2114 with a button
Making a trunk with a button in a VAZ 2114 is much easier than it seems to many car owners. All work is carried out with a minimum amount of time and physical effort.
Without resorting to the expensive services of a professional, you can quickly improve the protection of the luggage compartment of your car yourself.
Having completed the work once using simple algorithms and diagrams, the owner of a VAZ 2114 will be able to calmly and easily open the luggage compartment of the car by pressing just one button located in the cabin or on the alarm remote control.
Main components of the electric trunk lock drive
It is best to connect the electric lock drive to a conventional mechanism in order to be able to automatically and mechanically open the luggage compartment of the car.
Electric drives for VAZ cars exist in two types: on an electric motor and on magnetic plates. Due to its high performance characteristics, the first type is more in demand and popular among owners of domestic cars.
But a drive made on magnetic plates is easier to install.
The electric drive consists of the following elements:
- contact relay;
- fuse;
- stock;
- buttons.
The advantages of this design are obvious: increased protection of the luggage compartment, which will become a real obstacle to an attacker; the trunk lock of the VAZ 2114 will work stably and in most cases without failure.
The body design of most domestic cars has some weakness - while the car is moving with an oncoming air flow, all the dirt, dust, and sand actively pollute the “stern”. In this case, the lock itself becomes clogged with small particles, which in the future results in a lot of problems with its functioning. So how to make a trunk from a VAZ 2114 button correctly?
Installation instructions for the electric trunk lock
If you are lucky with the standard lock, it locks and holds the tailgate well, then there is no need to change it.
In this case, you must have with you:
- window lifter roller;
- door activator;
- steel cable;
- wires with terminals;
- relay with four contacts;
- 10 A fuse.
To automate the opening of the trunk, it is necessary to ensure that the lock latch is pulled. For this purpose, a special roller is installed on the wiper gear housing.
The steel cable is pulled through the roller and secured with conventional clamps. Experienced riders often use a bicycle cable because it is durable and flexible.
Using it you can quite easily connect the door activator to the lock tongue.
You can connect the entire structure to the cigarette lighter if you do not have the proper knowledge of the car's electrical circuit. You just need to connect the plus from the cigarette lighter to the button and then to the lock. The negative comes from the taillight. Or carry out the operation of the trunk lock 2114 using a special relay.
Source: https://VAZremont.com/kak-sdelat-otkryvanie-bagazhnika-vaz-2114-s-knopki
DIY electric trunk drive
Car enthusiasts know that most modern foreign cars are equipped with an automated trunk opening/closing device using a special button. The mechanism is powered by an electric drive, eliminating the need for the owner to slam the lid every time. Is it possible to retrofit your car with a similar mechanism? Let’s look at it below.
Theoretical facts
There is no need to “reinvent the wheel” to automatically open the trunk. It will be enough to install ordinary springs, as is common among Lada Granta car owners.
To close the luggage compartment using a button, you will already need a mechanism driven by an electric motor.
Foreign cars, as a rule, are equipped with two electric drives, a control unit and a button in the cabin.
https://www.youtube.com/watch?v=o8BbwWW2V8Y
A pneumatic drive is considered more reliable, while an electric drive is a budget option.
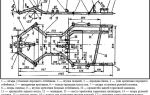
As an example, let’s look at the principle of operation of the trunk closing mechanism of Volkswagen cars. The power rear door kit includes two motors located in the trunk lid control units and a soft-close locking hinge.
Main parts for assembly Trunk door diagram Electric motor installation Trunk lid parts
Opening the luggage compartment can be done in several ways:
- by pressing a button on the remote control;
- by pressing the same button built into the driver's door;
- mechanically using an external handle.
You can close the trunk manually or use the button on the door panel.
The electric motors of the trunk opening/closing mechanism are equipped with a force limiter, due to which they stop if there is an obstacle in the path of the lid movement. As a result, the opening process is interrupted. The limiter works in a similar way when the lid is closed, interrupting the movement of the mechanism and shifting its position slightly back.
To manually open or close the luggage compartment, you need to apply a little more force to the lid than usual, as a result the electric drive is turned off.
If a breakdown occurs in the electrical circuits of the trunk drive, the motors do not turn off, that is, they remain mechanically connected to the lid. Therefore, opening or closing the door in this case will require a lot of force.
Equipping a domestic car with an electric trunk drive
If you install an electric drive for opening and closing the trunk on a domestic car (for example, a VAZ), the basic elements of the mechanism alone, which are already far from cheap, will not be enough. You will also need to install a trunk closer. Therefore, this method of improvement is irrational.
For domestic cars, a cheaper and simpler solution is suitable, such as using an electric window drive.
To bring this idea to life, you need to buy two ESP mechanisms (for example, consider the products of the Forward company costing about three thousand rubles), a trunk lid control button (type 21100-3710620, cost 50 rubles) and a car window closing module (brand DenUp-RWC702m, price – 500 rubles).
Electric power windows "Forward"
In our example, power windows are installed in the luggage compartment of the Lada Priora using a simple connection.
The rear edge of the ESP rail is connected by a threaded connection to the crossbar at the back of the seat, on which the shelf rests.
The front end of the window regulator bracket with a welded nut is screwed to the rear window mounting beam. To do this, a groove is cut in the beam into which an M6 nut would fit.
As a result, the assembled structure works without problems when you press a button specially located in the interior or on the remote control.
Connection diagram
Using one power window is ineffective, since it can hardly cope with its task, and the trunk lid closes askew.
The mechanism of two ESPs is free of these troubles. In some cases, the lock position will need to be adjusted.
Source: http://autoprivat.ru/remont_avto/elektroprivod_bagazhnika_svoimi_rukami.html
Electric trunk lock
You can use the first one, but the effort may not be enough. The effort of the second should be enough. As for the third, it may simply not be suitable in size and has no obvious advantages over the second. By the way, in the latest Volgas, which are 31105, it is the second type solenoid that is used.
As for the connection. I used a 3-pin button, it is called “Button for opening the trunk lid 2110”. The switching of the button is as follows: when the button is pressed, contacts 1 and 2 are switched, when pressed, contacts 1 and 3 are switched. It fits perfectly into the hole located to the right of the steering wheel directly under the APS-4 indicator. By default, the hole is closed with a plug.
Electrical part
In cars of the 10 family, the connection is made as follows: the button breaks the plus coming from the mounting block. This is roughly how I implemented all this on my previous machine.
This time I decided to go a different route - the voltage supply itself is controlled by the relay, but the relay is activated either by pressing a button or using the security system.
The peculiarity of connecting the trunk lock to almost any security system is the impossibility of connecting directly - a very small number of systems include a power output to the trunk lock, mostly it is low-current.
By the way, using a special function rather than an additional channel has its own advantage - while the trunk is opening, the system will turn off the trunk limit switch, and after closing the lid it will protect this zone again.
So, how does it look in my case: contacts 30 and 85 are on “+”, on 86 the wire comes from contact 1 of the button, from 87 we take “+” to the solenoid. On the button itself, connect pin 2 to ground, pin 3 to the alarm trunk unlocking output.
Mechanical part
Actually, I have 99. I tried different options and finally settled on what will be shown below in the pictures. To make it you need a piece of metal (I used the plate that comes with the solenoid), a tap, a small bolt and a file.
As for the file, it is needed to cut one of the grooves of the plate so that the standard mate of the lock can fit into it. Unfortunately, I don’t have a camera, so the photos are not mine, I found them somewhere...
True, it shows just a simple solenoid, but it’s better not to skimp so as not to drill extra holes in the car later - the reinforced and simple ones do not have the same mounting points.
Expenses
1) 4-pin relay with block – 25 r2) button – 35 r3) solenoid – 150 r
4) wire 10m – 50r
Adjustment
When you install the lock, you need to pay attention to the fact that the cable has some slack, as well as in general that the adjustment is correct. If the adjustment is incorrect, the trunk can be opened with a jerk by sharply pulling it towards you and up.
Source: http://club2108.ru/tuning/el_003.html
Installation of an electric drive for unlocking the trunk lock of a VAZ
Photo report on the installation of an electric drive for unlocking the trunk lid lock
of VAZ cars of the tenth family (VAZ 2110 - VAZ 2115)
Most modern VAZ cars of the “tenth” family are equipped with an electric drive for unlocking the luggage compartment lock right at the factory. But it was not always so. Previously, such an option was not provided by the manufacturer, and the electric drive for unlocking the luggage compartment lock was installed as additional equipment.
It is possible to independently install an electric drive for the trunk lid lock (or tailgate on VAZ-2111, VAZ-2112), controlled from the driver’s seat with a special button.
If the security alarm system has a trunk release function, you can connect the electric drive directly to it.
What you will need to install the electric drive:
1) Electric door lock drive with mounting plate. If you purchase a universal door lock electric drive kit without a mounting plate, you can make a device for mounting the electric drive yourself.
2) Four meters of electrical wire.
3) Standard switch button.
The procedure for installing the electric drive for unlocking the luggage compartment lock VAZ 2110 - VAZ 2115
1. Disconnect the negative cable from the battery terminal.
2. Install the electric trunk lid lock drive on a VAZ-2110 car.
3.
Using a screwdriver, use a screwdriver to pry off the four fasteners securing the lock casing and remove the casing.
4. Straighten the end of the lock drive rod with pliers.
5.
Using a slotted screwdriver, loosen the screw securing the lock drive rod, holding the boss with a “7” key.
6. Remove the lock drive rod.
Result at this stage of installing the electric trunk lock:
The trunk lid cannot be opened from the outside: the lock cylinder is not connected to the lock unlocking mechanism.
7. Having attached the electric drive to the lock, you need to mark holes for its fastening on the trunk lid amplifier.
8. Using the template (or marked marks), drill two holes with a diameter of 5 mm.
9. Drill a hole in the lock drive boss to a diameter of 3 mm.
10. Bend the rod as shown in the photo.
11. From steel wire with a diameter of 4 mm, make a U-shaped bracket of such a width that its ends fit into the holes in the bosses of the electric drive housing.
12. Cut M4 threads at the ends of the bracket.
13. Secure the electric drive with a bracket threaded from the inside into the cover reinforcement and with nuts screwed onto the threaded ends of the bracket.
14. Connect the electric drive to the lock with a rod.
15. Having increased the green wire of the electric drive (supplying voltage for retracting the rod), lay it together with the factory wiring harness from the luggage compartment to the control button.
16. Connect the second wire of the electric drive (blue) to the vehicle ground.
17. Install the electric drive control button on the instrument panel to the left of the mounting block and apply voltage to it from terminal 2 of block Ш1 of the mounting block (the circuit will be protected by fuse F15).
18. Connect the negative cable to the battery terminal.
By pressing the buttons we activate the electric drive of the trunk lid lock.
Features of installing an electric tailgate lock on a VAZ-2111 car
To install an electric drive on a VAZ 2111, you must:
a) Make a fastening plate from a steel sheet as shown in the figure.
b) Remove the tailgate trim by unscrewing two screws and removing the pistons.
c) Attach the electric drive to the plate with two self-tapping screws, and the plate with two M5 screws and nuts to the inner door panel.
d) Insert the curved end of the rod into the eye of the electric drive and bend the other end with pliers around the spherical tip of the lock lever.
e) When the electric drive rod is retracted, the lock should open. To do this, you need to adjust the length of the rod by bending its middle part. If the wiring harness for the lock's electric drive was installed at the factory, connect the drive to it.
f) In the tailgate wiring harness, find a two-pole block with white and black wires.
g) Connect the black wire to the blue drive wire, the white wire to the green one.
If there is no factory harness, route the wires to the instrument panel and install the button as described above.
Source: tuningvaz.ru
.
Source: http://www.motortalk.ru/node/1031
Electric trunk lock
Electric trunk lock
I really don’t like the way the trunk lock works on my VAZ-2107. To open the trunk you always need a key.
I was tired of it right away, and I also wanted the convenience of being able to open the trunk with a button from the passenger compartment and from the alarm key fob, especially since the alarm system has a so-called “additional channel”, which is used to connect the electric drive for opening the trunk.
When I was doing the soundproofing of the interior, I already thought that sooner or later I would make an electric trunk opening, so I laid several of my wires in the trunk. One of these wires was just a constant positive from the battery, and the second went from the alarm unit to the trunk but was not connected to anything.
I'll get back to the wiring later, but now let's talk about the drive itself. The electric drive was based on a standard trunk lock; I bought it for as much as 25 rubles. After that I started to figure out how it works. To do this it was necessary to open it. The lock is disposable, it has rivets that I quickly drilled out with a regular drill.
Disassembled castle
The lock consists of two halves, one is iron and the other is plastic. Inside there were two pieces of iron and one spring. Everything is just outrageous. One piece of iron interacts with the counterpart of the lock, and the second fixes the first in the closed position and opens when the lock cylinder acts on it.
How the lock works
Having figured out the design, I first ordered the turner to replace the old rivets with new bolts of a similar shape, only in the place where it had previously been riveted, I ordered an M4 thread to be made.
The fact is that these rivets are not only fasteners for two halves, but also axles for two pieces of iron, so new bolts must be made as identical as possible to the old rivets. My turner did it accurately only the second time 🙁 (in the top photo, these bolts are on the right along with nuts and washers). Now it's time to brainstorm.
I definitely wanted to make sure that the lock could be opened with both an electric drive and a key. In addition, I did not want to buy a specialized actuator (solenoid) for luggage racks, but wanted to make do with a regular door actuator. In the classics conference at www.auto.
ru there were people who made their own electric trunk drive, but most of them did it with the help of a cable that went inside the lock. I didn't like this decision. As always, I went my own way. I decided to lengthen the piece of iron that the larva acts on and connect the rod from the electric drive to this extension.
The extension cord was made of flat 2 mm steel. This extension cord was simply welded to the original piece of hardware, but not on the side where the lock cylinder acts, but on the opposite side. Thus, the possibility of unlocking the lock with a key remained completely. You shouldn’t make this extension cord too long, otherwise the lock simply won’t fit into place.
I was lucky, I made the extension so long that it turned out to be as long as possible, and I didn’t measure anything in advance (if you make it longer, then when you put the lock in place, this extension will rest against the metal of the trunk lid).
Welded extension
In order for the lock to close (to connect the two halves), it was necessary to saw off the upper part of the plastic part, this is where the extension will move.
Then I lubricated all parts of the lock (for some reason, the new lock bought at the store had no lubricant at all), put all the pieces of iron in their places and connected the halves of the lock. There is a very important point here - when you tighten the halves with nuts, the main thing is not to overdo it.
Because if you tighten it too much, the pieces of iron lose freedom of movement and begin to “wedge,” and if you tighten too loosely, then the piece of hardware that the lock cylinder acts on begins to dangle and, accordingly, the lock itself begins to dangle (perhaps this was only the case for me). In any case, you need to check that the pieces of iron are not loose or pinched.
General view of the assembled castle
Then we try on the lock in its regular place. If the extension cord is too long, shorten it locally. After we have decided on the length of the extension cord, we drill a hole in it (in the extension cord) with a diameter of 4.5 - 5 mm. The hole should be drilled as close to the end of the extension as possible (there will be a larger lever).
After this, we secure the lock completely, check that it opens normally with the key (it is better to do this without slamming the trunk, but simply simulating closing it manually), and adjust it so that the trunk lid takes its normal position when closing. Now we take a regular door drive.
It is better to buy a drive from well-known companies (this is a topic for a separate discussion); it is even better to buy a “reinforced” drive, this is when its opening force is not 3-4 kg, but 7-8 kg. Normal installers install such drives in rear doors, especially Volgas.
Included with the drive itself is a bracket in the form of a strip with many holes (we don’t need it), an adapter in the form of a cube with three bolts (we don’t need that either) and a rod with a flare on one side (that’s what we need).
Drive with mounting screws and rod
https://www.youtube.com/watch?v=JN0df1YuR4o
We take the drive and try it on the trunk lid, there are large oval holes on the lid, so we need to secure it so that the fastening bolts do not fall into these holes. You can see how it is secured in the photo.
Drive and lock on the trunk lid, front view
Drive and lock on the trunk lid side view
I secured the drives with two self-tapping screws that are used to secure drywall (I immediately fell in love with these screws). Instead of washers I used two nuts. Now one of the most important and precise operations is bending the rod (rod) in place.
You need to manually move the drive back and forth, move the extension cord and decide what length and shape the rod should be. I got it right the first time. What this thrust looks like can also be clearly seen in the photo.
Pull close-up (lock open)
Pull close-up (lock closed)
On the drive side, the rod is attached with a standard flaring, but on the extension side, I simply bent the rod 90 degrees with pliers. This is quite enough. In addition, with this fastening, you can remove the rod without removing the lock. When installing, you must first insert the rod into the electric drive, then insert it into the extension, and only then screw the electric drive to the trunk lid. In addition, the extension cord can move freely along the rod, so the rod does not interfere with opening the lock with a key. In general, I thought of EVERYTHING!!! 🙂 Now the most crucial moment has come and the time has come to answer the main question - whether the force of the electric door drive is enough to open the trunk lock. I had a standard SATURN electric drive. Once the installation was complete, I routed the two wires from the drive to the outside of the trunk and closed the trunk lid. (Everyone is tensely waiting to see what will happen...) I sent an opening impulse to the electric drive and...... (what do you think happened?). And-and-and-and-and... I won’t bog you down, everything WORKS!!! The power of the electric drive was quite enough to open the trunk, and the force of the spring in the lock was enough to return the electric drive to its original position!!! In short, everything worked, and perfectly! In addition, I noticed such a moment that if you open the trunk and simply “click” the drive, then after retracting it ITSELF returns to the extended position, the impulse is short, it simply pushes the drive into compression and, by inertia, the drive goes into compression. In short, a FAIRY TALE!!! After checking the functionality, I started connecting the wiring (I tried just pieces of wire). After a long search for documentation for my alarm, I read in it that the control signal for the second channel is a half-amp “ground”. This means that control through the “ground”, making a button in the cabin is much simpler, you don’t have to look for a plus, just short it to ground and that’s it. As I wrote above, the wire from the alarm system to the trunk had already been stretched a long time ago, and there was also a plus in the trunk. All that was left was to solder the plugs onto these wires and hang the relay; you didn’t even have to make a mass, since the control signal became the mass. To be sure, I wrapped the reel with electrical tape and stuck it away. The drive has two wires, since the drive is used only for retracting one of the wires, I grounded it on the trunk lid next to the drive, and extended the second wire and ran it to the relay inside the trunk lid reinforcement box. Yes, in addition to opening from the alarm key fob, you can open it with a button from the interior; you need a simple button that will short the wire to ground to the drive. I have the wire, but I haven’t found a nice button yet, as soon as I find it, I’ll install it right away. A lot of time had passed from the moment the electric drive was installed to the time of writing this article, during which time no problems arose, but the gas station attendants were often surprised (at gas gas stations the gun is attached by gas station workers) when the trunk opened “on its own” :) In addition, I finally I bought a decent button to open the trunk from the interior. By chance, in the store, I saw a button from a Niva specifically for opening the trunk, it even had the corresponding symbol on it. And I immediately bought this button for only 20 rubles. I placed the button itself in place of the standard headlight hydraulic adjustment control knob. The fact is that I didn’t have this hydraulic corrector at all and there was a hole in the panel for its handle. I cut out a plate of the appropriate size from black plastic and attached the button. If I have a camera at hand, I’ll definitely take a photo.
Source: http://acki-tuning.narod.ru/2101_2107/articles/elektro_privod_bagaj/el_priv_bogaj.html
Electric trunk lock - how does it work?
- Electric trunk lock - how does it work?
- 1. Electric trunk lock: features and principle of operation of the device
- 2.
Installing an electric trunk lock: what is needed and how to do it correctly
I’m sure the following situation is familiar to many car enthusiasts: you left the house, got into the car, started the engine and suddenly remembered that you forgot to put something in the trunk, or take something out of it.
The further sequence of actions is approximately this: we turn off the engine (after all, you need keys to open the trunk lock), get out of the car and begin to open the trunk. If it is winter outside, then a frozen well can greatly complicate the task; you often have to run for boiling water.
All this takes a decent amount of time, which is especially noticeable when you are in a hurry to leave. You may also forget your keys in the trunk and then you will have to urgently look for something to open the lid to get them out.
In general, you can give examples of the inconvenience of using a mechanical trunk lock for a very long time, however, today I would like to talk about a method for solving the problem... And it is called “electric trunk lock” , which ensures automatic opening of the rear door of the car, which significantly simplifies the life of the driver of the vehicle . And so, let's find out what this part is and whether it is possible to construct such a “miracle” yourself.
1. Electric trunk lock: features and principle of operation of the device
The automatic trunk opening function is a fairly new option, the existence of which most car owners of new car models are just beginning to get used to.
The essence of the operation of the electric drive, which makes it possible to achieve such a result, is, in principle, not complicated: when someone presses the corresponding button in the car, the trunk lid lock is activated through this part, as a result of which it opens.
It seems like a small thing, but it makes life so much easier for vehicle owners, especially in the cold season. We have already mentioned the possibility of the keyhole freezing and then you have to use your imagination to open the trunk.
Most often, the lock is poured with boiling water or heated with a lighter, sometimes the key is heated in the same way, in general, each driver himself comes up with a way that can help solve the problem that has arisen.
But if you had an electric lock, you wouldn’t have to do anything like that. This device is compatible with a standard (mechanical) lock, which means that when opening the luggage compartment lid, you can use two methods simultaneously, which, by the way, increases resistance to burglary.
In the past, the electric drive was installed only on foreign-made vehicles, however, today many domestic cars have it in the list of standard devices.
If your car does not belong to either the first or second group, do not worry, such a mechanism can be easily installed yourself, the main thing is desire and skillful hands.
The electric trunk drive is presented in the form of a device that contains only a few parts, which include: a button, a fuse, a push rod, two four-pin relays and an electric motor.
Today, there are two types of drives that, in order to open the lid, bring the rod into working condition - this is a mechanism that has either an electric motor or magnetic plates.
The first is more common, as it is quite practical and durable, and the second, due to the complexity of the design and frequent problems with use, has not gained much popularity among car enthusiasts.
The operating principle of this device is based on the interaction of a relay and magnetic plates: when power starts to be supplied, the relay pulls the rod back, which helps open the trunk.
Owners of old models of domestic VAZs are not recommended to install a drive with magnetic plates, since most likely it will turn out to be completely impractical to use.
You should immediately decide whether you really need to modernize the luggage compartment lock, because in some cases, due to the possibility of significant changes to the body itself, it is not at all rational to carry out such measures.
The fact is that the design of the trunk lid, equipped with an electric drive, includes two motors in control units and a lock loop with a closer.
The trunk door, in this case, can be opened either using the outside handle, or using the remote control button, or using a button built into the driver's door. The driver can close it either by pressing the button located on its inner lining, or by using the outer handle.
Also, the electric motors of the tailgate are equipped with force limiters and if, when opening, the trunk lid encounters some kind of obstacle, the opening is immediately interrupted. The same thing happens when closing, only after a collision with an obstacle, the process not only stops, but also slightly shifts in the opposite direction, that is, the tailgate opens slightly again.
You can perform all these actions (opening and closing) in manual mode: after a short, stronger press, the electric motors stop working and the operation of the trunk lid can be controlled with normal force. If there is a malfunction in the electrical operation, the drive of the electric motors is not disconnected, which means that more effort will have to be made to open/close the door.
Based on this, if you use an electric trunk lock drive device from a foreign car on VAZ cars, then in addition to the standard parts of the system (which will cost a pretty penny anyway), you will also need to buy a trunk closer, which is not at all reasonable from the point of view of common sense. Of course, this statement does not apply at all to those owners who have extra money.
Well, let's sum it up... An electric drive for a luggage compartment lock is certainly a useful and necessary thing, but only if its installation is justified. If you decide that this is your case, then go ahead - we buy all the necessary parts and begin the process of equipping the vehicle with additional capabilities.
The procedure for choosing an electric trunk lid lock should not be taken lightly. When purchasing, you should not pay attention to cheap Chinese counterfeits, which are quite popular in domestic car markets.
Such an electric drive will not only not last long, but may also operate incorrectly during operation. It is best to give preference to domestic or imported electric locks, which ensure reliability and stable operation for many years.
By the way, installing a device of this kind significantly increases the cost of the car as a whole, which is important in the event of a future sale.
2. Installing an electric trunk lock: what is needed and how to do it correctly
To install the electric trunk drive yourself, first you need to prepare all the tools and materials necessary for the work. In addition to the device itself, you will need: terminals, fuse mounts, electrical tape, electrical wires with a cross section of 1 mm and a set of tools including screwdrivers, pliers, wrenches, etc.
All this needs to be collected before starting work, so that nothing distracts you during the installation process. So, now about the process itself... At the initial stage, you need to remove the plastic trunk lining, only carefully so as not to damage it.
This part is secured by several bolts and plastic latches, so dismantling should not be difficult.
Then, we proceed to removing the lock, in which you will need to bend one tooth (in this way, when opening, it will operate with one click).
Some auto shops, in addition to the electric drive, also offer to purchase a new lock that does not require modification.
You shouldn’t take such a proposal with hostility, because a new part will really save you a lot of time, and it will work a little more accurately.
After manipulating the keyhole, we move on to laying the wiring, but before that, don’t forget to remove the terminals from the car’s battery, otherwise you never know. To perform this stage of work, you will need electrical power coming from the vehicle's cigarette lighter.
This choice is quite justified, because this element is used the least and does not have a large load. In general, we disassemble the central shaft and install a protective fuse in the space between the cigarette lighter and the electric drive button.
Its location should be chosen so that in the event of a breakdown it is easy to get to it and replace it.
You can install the button responsible for opening the luggage compartment wherever you want, however, if there is a regular place for this, then placing it near the cigarette lighter or a drawer for small items will be illogical.
Subsequent actions are carried out according to the diagram included with the electric drive.
Using electrical blocks, we make power connections, and the laying and installation of the electric lock wiring is best carried out along the thresholds of the vehicle, additionally isolating it in places where moisture may accumulate. The length of the cable required for operation is approximately 3.5 meters; the excess part can always be cut off.
Having completed these steps, we move on to the final stage of installing the electric drive mechanism for the tailgate.
There are several options for further installation steps: you can connect the part to the standard trunk lid lock; replace it with a similar one, more suitable for interaction with an electric drive; install a ready-made set of electric drive for the trunk lid lock, which is quite often found on sale.
From our point of view, it is best to choose a method in which you do not have to make additional holes in the luggage compartment fastening.
If, in your case, it is not possible to avoid this phenomenon, then immediately determine the most convenient place for this and use the mounting strip, screwing it into a well-accessible part of the trunk. Installation of the drive bar is carried out taking into account the length of the device rod.
Note! It is best to carry out installation parallel to the main rod of the lock, and the extra piece of the rod, previously placed in the initial position on the electric drive, can simply be bitten off with wire cutters.
Next, we move on to connecting the wiring to the electric drive device. At this stage, it is important to observe the polarity of the power supply, for which the wires are connected according to the instruction diagram.
If the connection is incorrect, the mechanism motor will start working in the reverse order and the lock will not be able to open. Before locking the device, it is necessary to install a fuse, which will protect the electric drive from possible damage.
All wiring connections should be carefully wrapped with electrical tape or special heat shrink should be used.
Now we put the terminals on the battery and check the functionality of the installed mechanism in practice. Sometimes, there are cases when more precise adjustment of the electric drive mechanism is required, for which purpose the rod is fine-tuned.
If everything is fine and the back door opens/closes freely, then the wiring can be installed to completion.
If possible, when reinstalling the plastic trunk lid, stick a special anti-noise material on it, which will save you from the unpleasant sounds that occur when the electric drive operates.
Taking into account the owner’s wishes, it is possible to simultaneously open the rear door lock both using a button and using the alarm key fob (if it has any additional channel), but for this you will have to use a relay and the alarm circuit itself. Note! In order for the electric trunk drive to function normally when connected to an additional alarm channel, it is necessary to select a pulse length of 0.8 seconds.
As for the features of the installation process, there are also some nuances. For example, the inrush current when power is supplied to the drive is approximately 15A , so it is advisable to use a 20A fuse to power the relay .
The trunk lid position control button can be located in the standard hole for a carrying socket (if available). From this position it will be equally convenient to use: both sitting in the driver’s seat and standing outside it.
Source: http://xn--b1altabgdr.org/avtoremont-i-tyuning/elektroprivod-zamka-bagazhnika-kak-on-funkcioniruet