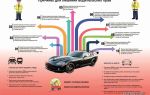
Instructions for installing car covers
During the development of patterns, the fashion designer first of all takes into account the visual perception of car covers by the consumer, so that it becomes a natural purchase, like, for example, buying a suit you like, and the main thing in this case is to be sure that “ the suit will fit perfectly.”
The idea about the purpose of seat covers that has developed in recent years has been that the purpose of car seat covers is only to keep your car seats from getting dirty.
The vision of covers in our time has become completely different - this is a fashion trend that encourages making these products very stylish and at the same time of high quality and becoming better in every way than the original seat upholstery of your car!
Car covers fully comply with all modern technologies, are very practical, have a personal unique style and are certainly easy to install.
By using the services of a professional, the issue of installing covers automatically becomes resolved.
It will become clear to you that you were not mistaken in deciding to use this service as soon as you see how a professional puts covers on the seats of your car.
This opinion was formed as a result of a direct survey of customers. This service will take about two hours, but requires more expenses from the customer for the work of a professional.
This service is usually used by people who do not have free time, or who usually entrust the work to professionals to be sure of obtaining a high-quality result.
At the same time, it is also necessary to take into account the factor that some buyers, for various reasons and conditions, cannot use this service. They probably have “golden hands”. For such people, installing car covers will not be difficult.
This introductory part will help you choose the best option.
If you decide to install the entire kit yourself, our company will try to convey to you detailed instructions for installing car covers from the 60 MP/H company. Included with car covers (see.
the back of the advertisement) contains general instructions indicating the main points. However, some cars have their own characteristics. Therefore, we offer you a detailed description of this process.
Firstly, when choosing covers, you need to know not only the model of your car, but also its equipment, interior, and year of manufacture. Based on this information and comparisons, the seller should select “original” covers for your car that will exactly fit the seats of your car.
You have no idea how many different variations of salons there can be! These differences can be in anything: seats and armrests, front and rear headrests, backrests.
The front advertisement attached to the case contains all the necessary information - this is the exact name of the car in English and Russian, its year of manufacture, the number of backrests, headrests, etc., a schematic drawing of the configuration, body type, as well as other features.
Based on this, when purchasing car covers, the buyer has the opportunity to control the correct selection of covers for his car.
After you have purchased car covers and are ready to install them on your personal car, we recommend, even if you are fully confident in the correct selection of the kit, to visually check all products for quality, matching with interior parts, fastenings, and most importantly, to objectively assess your strengths for installations.
Further in the text you will find a description of all stages of installing car covers. Some buyers may not need some of the information, but we still want to talk about all the nuances in more detail.
First, you need to remove all the headrests. Considering that head restraints are different, the mechanisms for their release may also differ from each other.
Any, even the simplest headrest, can be removed by pressing one or two levers at once, however, there are models that have a hidden small lever or key.
On the latest models of fully equipped cars, the rear head restraints can be active. In such cars, the pins are not pulled out for technological reasons, such as the electric drive.
In these cases, the cover is installed according to the “T-shirt” principle - the top of the cover is open to the gap and secured with Velcro.
So, the headrests have been removed, now we visually evaluate further actions: what else needs to be put on in place or, possibly, unfastened. On almost any model, the front seats can be put on without removing them.
In this case, you need to pay attention to the bolts: ordinary ones or sprockets, which you may not have? You can unscrew 4 bolts, and the chair is on your table.
This will allow you to carry out full tightening and installation much easier and faster.
On the other hand, you know that there is an airbag in the front backrest, and it is directly connected to the computer. If it is disconnected incorrectly, problems may arise. Therefore, it is better to put covers on the front seat without disconnecting it.
For those who decide to remove the front seat for various reasons (frost, etc.
), it is necessary to dismantle in the following sequence: disconnect the battery terminal and disconnect the chip (with a thin screwdriver), and vice versa, connect the chip, and only then put on the terminal.
In this case, the airbag light on the instrument panel may not go out, then you need to remove the terminal again, as a result of which it should go out.
When putting the front seat on any model, you first need to put on the seat, this way it will be more convenient when tightening with a cord and attaching hooks with an elastic band. After reclining the back, we tuck the back sewing with hooks between the back and the seat. Usually this is easy, but on some models the gap may be too narrow, so you will have to try.
After this, the “skirt” of the cover is tucked under the decorative plastic located on the side of the door. To do this, the plastic is pulled back, and if the skirt has elastic bands with hooks, then you need to use a 30 cm ruler, preferably a wooden one. It will be most convenient for her to pass the hook with the elastic down under the seat between the plastic.
There is no need to disconnect this plastic from the seat, because the fastening is usually on clips and is one-time use.
The already tucked cover is adjusted to the seat, and the lace is placed in the openings between the back and the seat, or on the sides of the seat, it depends on the design. Next is an important point - we hook the hooks to the furthest places under the seat.
At one end the cord is specially tied into a loop to make it easier to tighten through the loop with the other end of the cord. On some models, the cord may pass through iron fittings (angle) and may be cut or frayed when tightened.
To prevent this from happening, a white cambric (tube) is placed on the cord, which allows for strong tightening without problems.
When tightening the seat cover with a cord, you need to press on the seat along the entire perimeter - this way you can achieve a strong pull with the cord under the bottom of the seat.
After tightening the cord, you need to tie it into a knot with almost one hand, while at the same time holding the tension with the other hand - the result is 2 knots.
You should have about a meter of cord left, which must be pulled forward under the seat and threaded through the loop hanging on the front of the skirt. After this, the cord must be returned back to the same knot, and, pulling it tight, tie it moderately.
Such requirements must be met for the front seat, because it is precisely this that is the most vulnerable place for covers in terms of a “firm fit”. A properly tightened cover will always look like original upholstery and will never wrinkle or slide off.
Next, we will begin installing the covers on the backs of the front seats. You need to carefully examine the case itself and think through the sequence of actions.
There must be clips under the headrest on the front backrests, an armrest on the driver's right, a lever for extending the bolster for the back - on the end, and an airbag (AIRBAG) on the backrest near the door. All markings and holes on the cover are already available and processed with sewing equipment.
This allows you to tuck them under using the “tire fitting” method. Let's imagine that the holes under the headrest are smaller than the clips themselves, and in order to tuck them under, you will need a lot of effort or even a screwdriver, with which you can (albeit with a bang) tuck the holes.
If suddenly the holes are smaller than the clips, and the clips come in different sizes, then you can simply trim them in the corners to make it easier to tuck. All filled technological holes will create the appearance of “native” upholstery.
After you have placed the cover over the top of the backrest itself, you can immediately tuck the clips under the headrest - this will center the cover. After this, we put the cover on all the way to the bottom, squeezing the sides of the back. The cover often fits quite tightly at the sides - especially in this case, the end can be torn.
Having settled the cover, we firmly grasp the rear rear and the front sewing with Velcro, where the Velcro is located, and press the cover firmly along the entire bottom. We tuck the front sewing with Velcro under the back and begin to pull it out from behind with great effort in order to secure it with the back Velcro.
As you can see, the cover fits quite tightly and usually the Velcro may not converge by 3-4 cm. It is these centimeters that will have to be pulled and then secured with great effort. This operation is best performed with an assistant - he pushes the middle of the cover under the back into the gap “along the face” and thus, by pulling the sewing, connect the Velcro.
Sometimes the Velcro may not lie flat and wrinkle, then you need to try again. It is necessary that all seams are straightened around the perimeter.
The last step is to secure the hanging curtain under the seat with hooks. This is a normal, standard backrest fastening, but it happens that there is no through gap between the backrest and the seat, or it is closed by the original rigid curtain. In this case, the curtain is unfastened under the seat and tucked up under the cover.
During the development of patterns, our company thinks through the entire process - how it will be more convenient to install the cover and how tightly it will fit. For example, Renault Logan, Sandero, Duster, Largus and Megana cannot be unfastened at all, and there is no through gap between the seat and the back. In this case, we develop our own fastening - during installation it is more complex.
Finally, the back and seat are dressed, you are pleased with the excellent result, and even considering that more than an hour has passed, you are in a great mood!
Next, let's move on to the back row of car seats. In this case, we also evaluate the situation: is it possible to put on the covers without removing the back or seat. Hatchbacks, sedans, minivans, station wagons - the interiors of all types of cars are designed differently, taking into account the structure of the body and ease of use.
Rear seats on sedans can be either full or 40/60 split; on hatchbacks and station wagons - usually divided 40/60 or 50/50.
On some versions of jeeps and hatchbacks, the back row of seats can be in the form of a transformer (At the moment when the rear backrest and seat move and fold like a book in half, sometimes even automatically, without the help of the driver).
Considering that the interior of these cars is not simple, you need to understand that installing the covers will be much more difficult than usual. However, covers from the 60 MP/H company for any seats are made taking into account all the features, and after you read everything stated above in this manual, you should not doubt that you will confidently cope with the installation!
Continuing the installation process, you must look, evaluate the situation and decide that, for example, the seat must be removed. Next, you need to understand the principle and sequence of further actions. If some incomprehensible situation suddenly arises, it is most likely indicated on the front advertisement with covers.
The seat on most cars can be removed separately and easily by literally pulling it up near the knees - at the door. But it happens that, despite all attempts, it is not possible to do this so easily, although the mount itself is in a visible place. In such cases, you have to rip out the seat along with the clip, and then hammer the seat lock into the socket in the same way.
Immediately after removing the seat, we will begin installing its backrest. If it is not necessary to remove the backrest, then put it on in place. In some models, there may be separate parts of the backrest on the sides of the backrest.
They are called "elytra". In most cases they are removed equally and easily. After you have removed the seat, unscrew the fastening of the “fender guards” on the floor of the body and pull them up.
The covers of the “fender flaps” are put on tightly and tied tightly with elastic bands.
Having previously prepared the cord, let's start putting on the seat. When tightening, squeeze along the entire perimeter, because the tightening must be correct and very tight. In any case, the cord is enough to completely tie it cross to cross.
The backrest is put on according to the principle of the front backrest. We pass all the holes under the bottom. During the development of patterns, it is taken into account where it is possible to tuck the cover (holes) under the bottom, and where this is impossible due to the design of the upholstery and backrest. As mentioned earlier, everything is very tightly tucked in, literally with a bang, a screwdriver and, if necessary, cuts.
The central seat belt on the backrests of some models can extend from the backrest itself and be attached to the floor of the body or in the transformer seat. In these cases, the back cover is made with a hole for the belt, into which it is threaded so that it ends up on top of the cover.
The cover can be designed in the form of a “vest”, in those places where the belt is attached to the floor with an asterisk. On the back of the back of the cover there is a special connecting seam in the form of Velcro, which allows you to “envelop” the back so that the seat belt is on top of the cover. This was done because not every driver has a set of sprockets, but simple keys are most likely available.
All the armrests on the rear backrests are made almost identically, as well as the covers themselves - with zippers. When a cover is provided for the armrest itself, and there is a cup holder in it, then it is possible to tuck the processed (“sheathed”) hole (tightly with a screwdriver) under the plastic of the cup holder itself, which will give the appearance of “native” upholstery.
At the moment when you have put on both the back and front rows of seats, only the headrests remain, which are not so easy to put on. If the patterns are looser, you will get a “mitten” effect.
But we need to get neat “gloves” - tight and tight. This comparison is appropriate for headrests.
Head restraints, both front and rear, must be put on in a compressed state, literally centimeter by centimeter, and it is necessary to have time to straighten all the seams. In the end, you will definitely be pleased with the result!
These instructions for installing car seat covers from the 60 MP/H company have been compiled to assist the buyer. The ideas of fashion designers must be competently sewn by seamstresses and installed on the seats of your car without any problems in order to achieve a result that pleases you. Good luck!
Source: http://60mph.ru/poleznoe/16-instruktsiya-po-ustanovke-avtochekhlov
How to properly put covers on T5 seats
IMPORTANT! To save an article to bookmarks, press: CTRL + D
How to wear covers?
All car owners know that it is very difficult to keep the seats in their vehicle in their original form, since a lot of dust and dirt settle on their surface.
Solving this problem is not difficult - you just need to buy covers. You can purchase them in the store depending on your own taste and preference.
Now the purchase has been made, and you have a new problem - how to put on the covers?
How to put on covers
To begin with, the covers should be removed from the packaging to understand what elements they consist of and what they are intended for.
Experts advise that you first lay out all the parts of the newly purchased product in the car’s interior in the same way as they will later be installed.
Covers intended for the front seats are placed on the front seats, and covers intended for the rear seats are placed on the rear ones.
You should carefully understand which seat this cover is intended for - right or left. The fact is that for many models, the covers for the left and right seats are very different from each other.
This requirement applies not only to the part of the cover that is intended for the seat, but also to its rear part. In this case, you should focus on the absence or presence of mechanical adjustment of the support of the pockets, armrests and back.
This scheme can also be applied to installing covers on the rear seats.
Before putting on the covers, you need to carefully examine the car product. Pay special attention to the head restraints. The fact is that on some models the front head restraints are larger than the rear ones, although this may not be noticeable at first glance, but can be checked.
To check, the side elements of the head restraints must be placed next to each other. There is another important point - for installation you should determine the back and front parts. For some cases this is simply necessary.
You should also carefully consider the armrests; they also have front and back parts. For correct installation, it is worth understanding which part is the front and which is the back. To do this, you need to carefully examine their side parts. The side with the larger curve is the front.
Installation procedure
First, the covers are put on the front seats. How to put covers on the driver and front passenger seats?
- There is no need to remove these chairs from the interior to install covers on them.
- The headrests can be removed from both seats.
- After this, the cover is put on the back of the front seat and pulled down. Three elastic bands located on the central seam are threaded between the back and the seat through the gap, after which they are pulled so that the cover fits tightly on the chair. Only after this the rubber bands are secured with hooks under the seats.
- The next step is to place the lower part of the car cover on the seat. This part extends in all directions and is secured under the seat using hooks.
- After this, the back of the product is pulled over the back. To do this, you need to pull it down and secure the elastic under the seat using hooks.
- The last stage is to stretch the cover over the headrests and tie an elastic band. A cross-shaped cut is made in the places where the headrest rods enter the chair. After this, the edges of the cut are tucked into the pistons and the headrests are inserted.
- The same steps are carried out with the other front seat.
How to properly put covers on the back row of seats
- The rear seats are dismantled and removed from the car.
- After this, you need to put the parts of the cover on the corresponding parts of the chairs. Those parts with zippers are for the back of the seat, and those without zippers are for the lower part.
- The car cover, intended for the back of the rear seat, is pulled using elastic bands from top to bottom, and then secured with hooks.
- After this, a cover is put on the lower part of the chair and straightened in the direction from the front of the seat to the back. Before securing with hooks, the cover must be tightened using elastic bands.
- After all these steps, the upper and lower parts of the rear seats are installed in the car.
Source: https://akakpravilno.ru/nadevat/kak-pravilno-nadevat-chehly-na-sidenya-t5
How to properly put covers on car seats
Home » Miscellaneous » How to properly put covers on car seats
November 19, 2016
Step-by-step instructions for putting covers/capes on car seats with video. We'll show you how to cover car seats step by step.
Are you a car owner? Then you are familiar with the problem of dirty car seats, which arises with enviable regularity.
It is clear that they collect a large amount of not only dust, but also dirt, and it is very difficult to preserve them in their original form. Naturally, you won’t be able to wash it all the time.
Then how to avoid imminent pollution? The simplest and most effective option is to know how to put a cover on a car seat. In fact, the algorithm is simple and will not take you too much time, the only caveat is that you may need the help of a friend.
Algorithm for putting on car covers:
- After you have unpacked them and checked the presence of all parts, lift the headrest of the chair and fasten the new accessory using the iron pins with special fastenings for quick and reliable fixation. Lower the headrest all the way down - this way the cape will look better, giving a more aesthetic appearance to the interior.
- Raise all car seats to the maximum level. Before doing this, be sure to review how the decorative back protection is removed. Usually it is located under the seat, so it is important to find the fastening that needs to be removed. Pull the tongue of the cover between the backrest and the seat.
- Sit behind the seat, take the tongue that will be peeking out, and pull it as tight as possible. Next, ask your assistant to give you elastic bands from the covers under the seat. Tie them with the elastic bands from the backrest into a strong but simple knot so that the car seat covers can be removed quickly.
- Pull the elastic bands with hooks as tight as possible and hook them onto the metal part under the seat. Return the rear protection to its original position and lower the car seat.
Do the same algorithm with all the other chairs.
Now let's figure out how to put covers on the rear seats of a car:
- Remove the sofa (the chair itself). It is attached to the chips, so lower it in and turn it. Stretch the cover and tie the front elastic bands to the back ones. Correct it and level the surface.
- It fits on the backrests as standard: we fasten the elastic bands with a special fastener to the headrest pins.
- Tie the elastic bands of the backrest and sofa as tightly as possible and return the chair to its original position.
The whole process will take you no more than fifteen minutes.
It’s easy to put covers on car seats, the main thing is to stick to this algorithm! You can watch a video of how this is done correctly in the video above.
This way you will insure your vehicle against damage, and you will not have to spend a lot of money on dry cleaning the interior (seats).
Car covers will not only protect your car from dirt, but will also give it a more presentable appearance.
cantra.ru
How to put on car covers. VIDEO
02/10/2017
author Kachan Tatyana Andreevna
HOW TO PUT ON CAR COVERS
Detailed instructions and video.
1.
Remove the car covers from the packaging and sort out all the components. Lay out all parts of the product inside the car approximately as they should be installed in the car. Place the covers intended for the front seats on the front seats.
2
Go through all the car covers very carefully, be sure to focus on the headrests.
Some cars have rear head restraints that are smaller in size than the front ones, although at first glance they may seem the same. You can check this by placing the side elements next to each other.
Also consider the side of the armrest. The front part is the one with the greatest bend.
3
Move the front seats all the way forward. Place the product on the back of the chair. Using special rubber bands with hooks that come with car seat covers, begin securing the rubber bands under the seat.
Place the car seat covers on the chair and also secure the rubber bands under the seat. Then move on to the rear seats. The rear seat usually rises. Put a car cover on it and fasten the elastic bands under the seat using hooks.
Put on the back back in the same way and fasten the elastic bands behind the back with hooks.
Next, put on all the headrests. Sometimes car seat covers do not have slots for headrests. Then they need to be done using small scissors along the seam of the product and secure the seam so that it does not come apart.
Or perhaps you would be more interested in watching a video on how to put on car covers.
car-baby.ru
How to put on car seat covers correctly
Everyone who owns a car has thought more than once about how to keep car seats in their original form for longer.
After all, over time, dirt settles on them, subsequently causing irreparable damage to the surface. In fact, there is a solution to the problem, and it is quite simple - these are car seat covers.
So you bought these covers, but there is still one small problem - how to put them on correctly?
First, of course, you need to take the covers out of the packaging and see what the kit consists of. As you know, many cars have different front seat covers.
Therefore, you need to immediately determine which cover is intended for the right seat and which for the left. To do this, you need to see if the case has a means for mechanical adjustment of the pockets, armrests and back.
When you have already decided which cover is left and which is right, place the corresponding covers on the corresponding seats.
Also, when installing covers, it would be worth paying attention to the head restraints, because in some car brands the front and rear head restraints are of different sizes, which is often quite difficult to notice. To decide which head restraints are rear and which are front, just put them next to each other, and you will immediately see what you need.
First you need to put covers on the front seats. To do this, you first need to remove the head restraints, then put the cover on the back of the front seat. After this, the cover is put on the lower part of the chair. The covers are attached using special elastic bands and hooks. And the last step is to put the cover on the headrest, after which you attach it back to the chair.
The next step is to put the covers on the back seat. Unlike the front seats, the rear seat needs to be removed from your vehicle. You should put the part of the cover that has a zipper on the back of the rear seat, and the part that doesn’t on the back seat. This cover is also secured with appropriate elastic bands and hooks. After all this, you need to put the back seat of your car in place.
Just because you put special covers on your seat does not mean that your seats will last forever. Do not forget that the covers only protect the upper part of the chair.
If you don't remove the seat covers from time to time and wash them or take them to the dry cleaner, dirt will seep through them and still stain your seat.
But if you follow this advice, then everything will be fine! I wish you success!
autoclub36.ru
As a rule, after purchasing a new car, its seats gradually begin to get dirty. This process occurs especially quickly if there are children in the family. After just a few months, marks appear on the chairs:
- mud;
- dust;
- oils;
- food;
- drinks, etc.
As a result, the appearance of the car's interior becomes very unpresentable. In addition, if the owner has the habit of smoking, then the upholstery of the chairs is often burned through by fallen ash.
Source: http://racing-nn.ru/raznoe/kak-pravilno-nadet-chehly-na-sidenya-avtomobilya.html
How to Put Covers on Cars
How to properly put car seat
After purchasing a car, every thrifty car owner strives to preserve its original appearance as much as possible. This applies not only to the outside of the car, but also to the interior. In addition to using dry cleaning or steam generators, you can try to protect the surface of the chairs using covers.
Since to put covers on car seats in such a way that there is no sagging or “accordion”, you need to do this consistently and carefully.
Preliminary operations
When purchasing covers, you should choose not universal ones, but ones for a specific car model. Their size will exactly correspond to the dimensions of the front and rear seats. Also, the headrest covers will be harmoniously located in their places. After all, this safety detail has different overall dimensions in different brands of cars.
Scheme for assembling covers in a car
When choosing a set of capes or covers in a store, you need to pay attention to the fastening of these products to the chairs . It is desirable that the hooks or ties are placed on elastic bands or interspersed with rubber fibers, providing good tension when fixing.
Installing car seat covers: how to put covers on car seats
The video clearly shows how to put universal car seat covers on car seats. Some…
How to put on car seat covers correctly. Instructions
Avtoprofi online store – We are on VK – .
High-quality covers do not have a pronounced unpleasant smell of paint. If one is present, then this may be a sign of counterfeiting.
The kit should include products for the right and left front seats. The difference may be access to the height or incline adjustment levers. These handles do not need to be covered with fabric or leather.
Sequence of operations
It is generally accepted that in order to properly put covers on car seats, you need to start with the front seats. It is not necessary to remove them from their places. You can do the job without dismantling.
The procedure is as follows:
- the headrests are removed from both seats;
- the corresponding part from the kit is put on the vertical part of the chair , and the fixing rubber bands or “tongue” are passed into the slot under the “back” to secure it under the bottom of the chair; the tension should be sufficient so that the fabric straightens well;
- Now you can put on the lower part of the cover and secure it with hooks under the bottom, also ensuring tension;
- after that, we put the kit element on the headrest and tie it with braid to secure it;
- if the covers do not have holes for the headrest guides, then you can independently make cross cuts in the appropriate places with a construction knife , and then insert the headrest into place.
The same steps must be done with the second front seat.
Covers for the back row are usually put on from the bottom. Some people find it more convenient to dismantle the backrest to make working more convenient. Having packed the lower part, we fix it under the bottom with hooks or ties. Next, we put the upper part on the back, and attach the hooks at the back.
If the sofa has a division, then it is necessary to cover each part of the back one by one. We suggest watching a detailed video with step-by-step instructions.
Source: http://5net.ru/kak-nadet-chehly-na-avto/
Installation of covers
INSTRUCTIONS FOR INSTALLING CAR COVERS
You might be interested in ready-made:
Congratulations, you have purchased original Rossweingroup AUTOPILOT car seat covers! We hope that, subject to simple installation conditions, they will transform the interior of your car and for many years will become a guarantee of the reliability, style of your car and, consequently, your good mood!
Car seat covers produced by Rossweingroup AUTOPILOT LLC comply with all modern technologies, are practical, have their own unique style and, of course, are easy to install.
We offer you a professional installation of covers. We have no doubt that by taking advantage of this offer, you will not doubt the correctness of the decision made. This service is provided within an hour and a half and requires additional financial expenses from you.
If you want to install the covers yourself and have enough time, we suggest you read these instructions.
- Check all products for quality, matching with interior parts, fasteners, and most importantly, evaluate your strength for installation.
- Remove all head restraints (usually the head restraint is removed by pressing one or two levers at once, but there are models that have a hidden small lever or button. The front head restraints on the latest models of fully equipped cars can be active , and they (pins) are not pulled out for technological reasons - for example, an electric drive. In such cases, the cover itself is already designed for installation according to the “T-shirt” principle - the top of the cover is open under a slot, and is secured with Velcro).
3.
On almost all models, the front seats can be put on without removing them, however, you need to pay attention to the bolts: regular bolts or sprockets, which you may not have? You can unscrew 4 bolts, and the chair is on your table, which will make installation and full tightening much easier. On the other hand, you know that there is an airbag in the front backrest, and it is directly connected to the computer, and if it is disconnected incorrectly, an error may occur. Therefore, it is better to put the covers on the front seat in place without disconnecting it.
For those who nevertheless decided to remove the front seat for any reason (frost, etc.
), you need to dismantle it in the following sequence: disconnect the battery terminal and disconnect the chip (with a thin screwdriver), and vice versa, connect the chip, and then put on the terminal.
In this case, the airbag light on the instrument panel may not go out, in this case it is necessary to remove the terminal again, as a result it should go out.
When putting on the front seat on any model, first put on the seat, this will be more convenient when tightening with a cord and attaching hooks to the elastic band. Having reclined the back, we put the seat cover on the seat itself, tuck the back sewing with hooks between the back and the seat.
In most cases this is easy, but on some models there is a very narrow gap, so you have to try.
Then we tuck the “skirt” of the cover under the decorative plastic, which is located on the side of the door, to do this we pull back the plastic, and if the skirt has elastic bands with hooks, then you must use a 30 cm ruler, preferably a wooden one.
It will be convenient for her to pass the hook with an elastic band between the plastic and down under the seat. You should not disconnect this plastic from the seat, since the fastening, as a rule, is on clips and is one-time.
4. We adjust the tucked cover over the seat, and place the lace in the openings between the back and the seat, or on the sides of the seat, it depends on the design. Then (an important point!) we hook the hooks to the furthest places under the seat.
The cord at one end is specially tied into a loop so that it is more convenient to tighten the other end of the cord through the loop. The cord on some models passes through iron fittings (corner) and can be cut (frayed) when tightened.
To avoid this (for these models), a white cambric (tube) is placed on the cord, which allows for strong tightening without problems.
When tightening the seat cover with a cord, you need to press the seat along the entire perimeter - this way, a strong tightening of the cord under the bottom of the seat is achieved.
Having pulled the cord, we tie it into a knot with almost one hand, with the other hand at this moment we hold the tension - as a result we make two knots.
We pull the remaining end of the cord (about a meter) forward under the seat and thread it into a loop that hangs on the front of the skirt (under the knees). Next, we return the cord back again to the same knot, and, pulling it tight, tie it moderately.
Here is the correct installation of the front seat cover.
5. We begin installing covers on the backs of the front seats. It is necessary to carefully examine the case itself and understand the sequence of actions.
On the front backrests themselves there are always clips under the headrest, an armrest on the driver’s right, at the end there is a lever for extending the bolster for the back, as well as an airbag (AIRBAG) on the backrest near the door. The cover already has all the markings and holes processed with sewing equipment.
This will allow you to tuck them under using the “tire fitting” method. Let's say that the holes for the headrest on the cover are made smaller than the clips themselves, and to tuck them under the bottom will require a little effort or even a screwdriver, with which you can (with a bang) tuck the holes.
If the holes are much smaller than the clips, and the clips come in different sizes, then you can simply trim them in the corners to make it easier to thread. All filled technological holes will also create the appearance of “native” upholstery.
By placing the backrest cover over the top of the backrest itself, you can immediately thread the clips under the headrest - this will center the cover on the backrest. Then, squeezing the sides of the backrest, we put the cover on all the way to the bottom. Usually the cover fits very tightly, especially at the sides; to do this, you can tear the end.
6. Having settled the cover, we firmly grasp it by the front sewing with Velcro and by the rear rear, where the Velcro is also located, and firmly press the cover along the entire bottom. We tuck the front Velcro sewing under the back and pull it out with great effort from the back to secure it with the back Velcro.
As already mentioned, the cover fits very tightly and, as a rule, the Velcro does not meet by 3-4 cm. These centimeters will have to be pulled and secured with great effort. This operation can be performed with an assistant - he “in the face”, pushes the middle of the cover under the back into the gap, and thereby you tighten the sewing and connect the Velcro.
Sometimes the Velcro does not lie smoothly and wrinkles, then you need to try again. All seams must be straightened around the perimeter.
The final step is to secure the hanging curtain under the seat with hooks. This is an ordinary, standard backrest fastening, but it happens that there is no through gap between the backrest and the seat, or it is closed by the original rigid curtain. In this case, unfasten the curtain under the seat and tuck it up - under the cover.
Now the back and seat are dressed.
7. We proceed to the back row of seats of the car, while also assessing the situation: is it possible to put on the covers without removing the back or seat. Sedans, hatchbacks, station wagons, minivans - all interiors are designed differently, taking into account the structure of the body and ease of use.
On sedans, the rear seats are either solid or split 40/60; hatchbacks and station wagons - most often divided 40/60 or 50/50.
On the latest releases of hatchbacks and jeeps, the back row of seats comes in the form of a transformer (when the rear backrest and seat not only move, but also fold in half, perhaps even automatically without driver assistance).
Due to the fact that the interior of these cars is not simple, it is worth understanding that installing the covers will be more difficult than usual. However, covers from Rossweingrupp LLC “Autopilot” for any seats are made taking into account all the features, and after reading everything stated above in this manual, you can rest assured that you will confidently handle the installation!
8. We continue the installation process. You looked, assessed the situation and decided that, for example, the seat must be removed. Now you need to understand the principle and sequence of further actions. If some incomprehensible feature arises, it must be indicated on the front advertisement with covers.
The seat on many cars can be removed separately and easily, literally by pulling it up near the knees - at the door. But it happens that, despite all attempts, it is not possible to do this so easily, although the mount itself is in a visible place. Yes, this happens, and you have to rip out the seat along with the clip, and then hammer the seat lock into the socket in the same way.
9. When the seat itself is removed, we begin to install the seat back. If you understand that it is not necessary to remove the backrest, then put it on accordingly in place. Please note that on some models there are separate parts of the backrest on the sides of the backrest.
They are called “elytras” because they stand above the wings. They are removed just as easily and in most cases the same way. Having removed the seat, you unscrew the fastening of the “fender flaps” on the floor of the body and push them up.
The covers of the “fender flaps” are put on tightly and tied tightly with elastic bands.
The seat is put on the table, having previously prepared a cord. The tightening should be very tight and correct, namely, when tightening, you squeeze along the entire perimeter. In any case, the cord is enough to completely cross-tie.
We dress the back back according to the principle of the front back, and we also thread all the holes under the bottom. When developing patterns, it is taken into account where the cover (holes) can be tucked under the bottom, and where this is impossible due to the design of the back and upholstery. As mentioned earlier, everything is tucked in very tightly, literally with a screwdriver, with a bang, if necessary, with cuts.
On the backs of some models, the central seat belt extends from the back itself and is attached to the floor of the body or even in the seat of the transformer. In such cases, if the fastening on the floor is secured with a simple bolt and not an asterisk, then the back cover is made with a hole for the belt, into which it is threaded to be on top of the cover.
Where the belt is attached to the floor with an asterisk, the cover is technologically designed according to a different principle (in the form of a “vest”), that is, on the back of the back of the cover there is a special connecting seam in the form of Velcro, which allows you to “envelop” the back so that the seat belt is also on top of the cover. This was done taking into account the fact that not every driver has a set of sprockets, but simple keys will probably be found.
All the armrests on the rear backrests are practically made the same, as well as the covers themselves - with zippers. If a cover is provided for the armrest itself, and there is a cup holder in it, then it is possible to tuck the processed (“sheathed”) hole (tightly with a screwdriver) under the plastic of the cup holder itself, which will give the appearance of “native” upholstery.
When you have put on the front and back rows of seats, all that remains are the headrests, which are not an easy task to put on.
If you make the patterns looser, you will get a “mitten” effect, but in this case you should get neat “gloves” - tight and tight. This is exactly the comparison that applies to headrests.
The front and rear head restraints are put on in a compressed state, literally centimeter by centimeter, while you need to have time to straighten all the seams. In the end, you will definitely be pleased with the result!
This general detailed instruction for installing Autopilot car covers from the Russian Sewing Group is compiled to help the buyer and should fully provide you with all the necessary information!
Complete installation of the kit requires not only 2 hours of time, but also skill, diligence and patience.
Source: https://domcars.ru/article/install/