How to make a karting with your own hands: drawings, manual with photos
Karting is the childhood dream of many boys, however, doing it yourself is not so easy.
Kits for making go-karts or ready-made cars are very expensive, and the drawings are designed for specific parts that are not always available.
After reading the article, you will learn how to make a go-kart with your own hands, where to get parts and materials for it, and also learn how to draw up drawings for its manufacture.
Where to get materials
If you decide to make a karting with your own hands, then first of all you need to decide what materials are available to you. If there is a car dismantling facility nearby or a collection point for ferrous/non-ferrous metals, then some of the units can be purchased there. At the car disassembly you can buy:
- armchair;
- pedals;
- pedal mounting block;
- axle shafts;
- steering wheel;
- steering shaft;
- steering knuckles;
- steering rods;
- pins;
- master and working cylinders of disc brakes.
All parts, except the seat, can be removed from old Soviet cars. It is advisable to remove the seat from a foreign car, it will be more comfortable. When selecting parts, check their condition - the kingpin and steering knuckles rotate without jamming, the brake cylinders are free of leaks, and other spare parts are not rusty.
At the collection point for ferrous or non-ferrous metals you can purchase:
- suitable gears;
- chains;
- metal pipes, corners, strips;
- wheels;
- motor;
- bearings.
Scheme development
Having selected the necessary materials, you can begin to develop the scheme. There is no generally accepted concept for the shape or size of a go-kart, so everyone builds what they like best. In most cases, the decisive argument is the availability of certain parts.
There is a rule - the taller the person, the longer the homemade go-kart should be, otherwise a tall person will be very uncomfortable in a short car. If you bought a car seat along with a sled that allows it to move around the cabin, you can make a long go-kart with the ability to adjust the distance to the pedals.
Thanks to this, even short people will not have any difficulties driving such a go-kart.
You can take any drawing posted on the Internet as a basis and adapt it to your materials or units. This is easier than drawing up a drawing from scratch, calculating the strength of the entire structure.
When developing a diagram, it is necessary to take into account the features of attaching the seat to the frame, methods of installing brake cylinders and the size of the kingpins. Also pay close attention to the method of attaching the tie rods to the steering pendulum.
On many homemade karts, the tie rods are made of a steel rod with a diameter of 8–15 mm, and the pendulum is made of a metal plate 5–7 mm thick. This scheme does not allow wheel toe adjustment, which is why there is a high probability of rapid tire wear.
You can use welding to combine them with tie rod ends from cars, which will allow you to change the toe angle of the wheels, or you can do something similar yourself.
Powertrain and steering
If you could only get the motor from a chainsaw, then you can use it to make a drive with one gear. This is not very convenient because there is no way to adjust the drive/driver ratio, so the wheel torque will be the same during acceleration and during constant movement.
If you were able to get a scooter’s power drive, a motor from the old Soviet “Ant” scooter or its analogues, then you can use its gearbox to increase torque during acceleration. To do this, you will have to install the clutch pedal and gear selector lever.
For the scooter's power drive, these operations are not needed because it uses a variable speed drive.
To create steering, it is convenient to use the axle shafts of rear-wheel drive vehicles and the tip of the steering shaft. The tip is cut off and then welded to the axle shaft. After this, the axle shaft is cut to the required length and the steering column pendulum is welded at the other end.
Steering rods are attached to the pendulum using a bolt or welding, installing one on top and the other on bottom. To prevent the steering wheel shaft from dangling, it is secured with two axle bearings. To fix the bearings, you can use standard axle bushings, which will have to be heated to a temperature of 400–500 degrees.
The brake mechanisms of a sports bike or moped are easier to install, but they are difficult or expensive to obtain. The master and working cylinders of the front brakes from a Lada or Lada can be found at any disassembly site, and besides, they will cost very little.
If the standard brake disc is very large, you will have to use some kind of substitute - a flat gear or a final drive flange welded to the axle shaft. Due to the low speed of rotation of the axle shaft, as well as low loads, the flange will work for a very long time.
For the front axle, the king pin assembly with the steering knuckle from GAZ 21 and GAZ 24 cars is well suited. But for them it is necessary to install car wheels, at least from Oka. If you have small wheels, you will have to cut off the bearings of the steering knuckle and king pins and use welding to make a new unit to which to attach the wheel hub.
Kart assembly
Having prepared the drawings, units and small parts necessary to create a karting with your own hands, proceed to assembly. To mount the frame, the easiest way is to use a welding inverter with electrodes with a diameter of 2–3 mm. Check each seam carefully. If you do not know how to weld yourself, contact a welder you know.
This will increase costs, but the homemade kart will be more durable. After completing the installation of the frame, be sure to process all the seams with a grinder and a sanding disc, then paint it. Once the paint is dry, begin installing the front and rear wheels.
When installing the rear wheels, it is necessary to weld brake discs, a pulley or a final drive gear onto the axle shaft.
Then install the steering. It is very important to make it so that the steering wheel play does not exceed 5 mm. Otherwise, the homemade go-kart will be thrown from side to side. Once you have mastered the steering, install the brakes.
If you use brakes from a car, be sure to connect the cylinders with copper or steel pipes located on top of the frame, fill with brake fluid and bleed. If the tubes are on the bottom, there is a high probability of them being flattened due to impact with a bump, which will lead to improper operation or failure of the brakes.
If you have brake actuators from scooters or some other small-sized equipment, you will have to be smart.
The seat should have good lateral support
Install the seat. It is necessary to check the operation of the steering and braking systems. Get in the go-kart and have a friend push you. Check the operation of the steering wheel and brakes. If everything is fine, proceed to install the motor and drive. Attach the motor according to the diagram you developed.
If you haven’t taken something into account or the engine has changed, you’ll have to improvise. Connect the fuel tank, shutdown button and accelerator linkage. Carefully check all machine systems. If everything is fine, start it and take it for a test drive.
Remember, you built the go-kart with your own hands, so you can’t drive it on the roads.
Conclusion
Now you know how to assemble a kart, where to get materials and what equipment you will need.
This knowledge, available materials, drawing and ingenuity will help you assemble a beautiful, practical go-kart that you can ride around the yard or field.
By taking it with you outdoors, you will surprise your friends and acquaintances, because not everyone has a go-kart, even a homemade one, the younger brother of the legendary buggies.
Source: http://AutoLirika.ru/interesnoe/stroim-karting-svoimi-rukami.html
What do you need to build a homemade kart?
Is it possible to create a car with your own hands? Of course, for an ordinary car enthusiast this idea will seem a little crazy and difficult to implement, but in this matter it all depends on ambitions and attitude.
For example, a go-kart is the same as a small car, but almost any car enthusiast can construct it.
Yes, difficulties will still arise, but with a competent approach to implementing such a task, you will definitely succeed.
1. Design stage
Before you create something with your own hands, you will have to carefully weigh the pros and cons of such a decision and develop a clear plan for all subsequent actions. In the case of creating a go-kart at home, it all starts with designing the future structure.
It can have a variety of shapes and sizes, and the overall design depends only on your imagination and wishes. However, in any case, we should not forget that a homemade kart must also include some mandatory elements, without which this venture will not be successful. These include the steering/braking system, chassis and, of course, the engine.
All these components should be depicted in detail on a plan diagram, because only with its help will you be able to correctly assemble all the parts.
The design process must be approached creatively, and for inspiration you can use the Internet, where there are visual examples of various models of “small cars”. It would also be a good idea to consult an experienced mechanic.
If you don’t want to tinker with the drawings yourself, there are always people who can help in this matter for a fee.
In addition, there are ready-made templates in the vastness of the World Wide Web, and adding your own calculations to them is a matter of technology.
When indicating the dimensions of the future go-kart, be extremely careful, because they must fully correspond to the height and age of the driver.
For example, for an average teenager a width of 0.76 m and a length of 1.3 m will be sufficient, while for an adult these parameters will have to be increased to 1 m and 1.8 m, respectively.
The longitudinal distance between the axes should be in the range from 101 to 122 cm (if the length of the map corresponds to 132 cm).
In addition, when developing a project, pay due attention to even the smallest details, accurately depicting them on the diagram. Otherwise, when selecting the necessary elements, it will be extremely difficult for you to determine their quantity.
2. We purchase the necessary materials
After all the preliminary calculations have been made, all that remains is to find the suitable parts and you can get to work.
If your budget allows, then buying them will not be difficult, because any auto and motorcycle parts store will certainly provide you with a ready-made solution to this issue.
In cases where there is not so much free money, you can find the necessary parts in a landfill or in your garage, especially if you once had an old lawn mower or other similar devices lying around there.
As an alternative, you can also contact employees of specialized workshops, where they will give you the parts they don’t need “for cheap” (for example, failed trimmers, a four-stroke engine with a power of 10-15 hp and other important elements). In total, for work you will need:
• For the chassis - a square and steel pipe with a diameter of 2.5 cm and 2 cm (the length of the sections will depend on the size of the kart), a steel plate 0.5 cm thick (its width and length should be slightly larger than the size of the engine), plywood or a sheet of metal for the bottom and under the seat, driver's seat.
• For the motor - the unit itself (you can use the engine of an old trimmer), a chain that will fit to the sprocket hub, a fuel tank and small connecting elements (bolts, washers).
• The transmission will need wheels, steering wheel, gearbox with hand brake, drive and steering shaft, bearings, brake pedal, throttle/gas pedal.
Among the tools, the most important tool is the welding machine. If you yourself have never encountered its use, then you can hire an experienced welder.
Considering that a strong chassis is the most important part of the entire structure (supports not only the weight of the engine along with other parts, but also the driver himself), welding of various parts of the structure must be carried out under conditions of fairly high temperatures and a high level of penetration.
All welding seams are made smooth and neat. Failure to comply with these requirements will lead to poor contact between the elements, and bubbles and cracks will appear at the joints. Naturally, using such a vehicle would be extremely dangerous.
If you are not sure that you will be able to complete the task the first time, then you can practice on smaller products, and after successfully welding them, you will move on to assembling the kart.
Nowadays, you can find entire large construction sets (they do not require welding and are assembled using the most common tools).
The kit includes all the parts required for the card, so if you are not interested in thinking about all the nuances yourself, then buying such a kit will be a good alternative (all diagrams and instructions are also included).
3. Collecting cards
3.1. All attention to the frame
The frame card is its skeleton, created from pipes placed on a slipway (a flat table with a metal tabletop attached to it, at least 2 m long and 1 m wide).
Before placing the pipes, frame markings are applied to the surface of the slipway in a proportional ratio of 1:1 (the outlines of the units are outlined in dotted lines).
Next, you need to take the pipe blanks and all the components with the brackets installed on them (this will save you from the need to thoroughly check all the mounting points).
The motor must also take its place, after which the brackets are secured by welding and the components are removed.
The pipe joints are adjusted using a grinder, and when all the elements begin to fit together perfectly, they are simply welded.
The power unit subframe is connected to the frame at three points: at the top on a U-shaped bracket and at the bottom in two places. The suspension brackets should be further strengthened with gussets (wedges).
The front axle is formed from a metal pipe with a diameter of 2 cm and bushings attached to the frame. The structure is held together with washers and bolts, but it is most logical to install the plugs before starting work with the steering column.
Mounting the rear axle also has its own characteristics. It must not only be attached to the frame, but also rotate freely, which can be achieved by attaching the holder support bracket to the rear axle.
The steel plate is welded to the chassis and further strengthened with bolts and nuts, in such a way that the bearing is pressed.
A ready-made design called “support-bearing units” can help make the work easier.
Note! When welding frame components, press the chassis parts with a concrete slab and check the accuracy of all welds. The chassis must have a high level of strength, so any shifts in the elements when connecting them can have an extremely negative impact on the further operation of the card. To make the task easier, it is better to secure the chassis in a raised position using the same concrete blocks.
3.2. Steering and wheels
An equally important step on the path to creating the kart of your dreams is assembling the steering and installing the wheels. To perform this task, you will need a two-centimeter metal rod for the axles and a one-and-a-half-centimeter metal rod for the drive.
The last element should be bent at a right angle using a soldering iron to heat the steel.
Steering wheel alignment requires adjustable joints, and proper wheel alignment (steering wheel angle and front wheel vertical) is simply an integral part of kart handling.
As for installing the wheels and brake system, everything is even simpler. You will need to select small racing wheels (allowing for a high level of acceleration and controllability of the car) and attach them to the axles. After this, you can proceed to installing the brake system: the caliper is attached to the chassis, and the disc is attached to the rear axle.
Note! The braking system of a go-kart must use at least two wheels, but for greater safety it is better to install brake discs on all four wheels of the car.
The braking system itself can be borrowed from an old broken down motorcycle, as these vehicles are the right size and can make your job easier.
The chassis is assembled exactly according to the drawing plan, which is best made in full size using graph paper glued to any thick material of a suitable size.
The drawing should be made in several projections, according to which the metal pipe is cut into pieces.
It must be said that in most types of go-karts the camber angle of the front wheels is slightly less than the rear wheels, due to which they can turn (the chassis also rotates).
To achieve this effect, the steering axis must be fixed at the front corners, exactly in the place where the wheels will be located.
If using a paper drawing plan is a little inconvenient for you, then you can draw a kart on the floor, laying out the parts directly on it.
3.3. Engine for kart
Having selected a motor for your structure (it can also be a chainsaw engine), it must be installed correctly. First of all, all unnecessary parts, presented in the form of handles, chains, tanks, etc., should be removed from the “blank”.
The most complex and time-consuming process is the process of remaking the sprocket (a chainsaw sprocket is taken as a basis, from which the teeth are first ground off, and it takes on an arbitrary size).
At the next stage, for mounting to the engine subframe, it is necessary to drill two holes in the cooling casing.
The trimmer's gasoline engine is a fairly compact internal combustion engine, and although the karting speed with such a unit will not be too high, it is quite enough for beginner karting drivers.
Separately, mention should be made of the installation of the power unit suspension. To attach it, you need to weld a steel plate to the back of the frame, and place the motor itself on it so that the pulley coincides with the working pulley on the axle.
After this, apply markings indicating the locations for the bolts. Securing the pulley to the axle is best done before you insert the axle into the bushings, and a set screw works well to secure it.
Another fastening option is to weld it to the axle, but it must lie in line with the engine pulley.
3.4. Pilot seat
The bottom of the go-kart and the driver's seat are made from a pre-prepared sheet of plywood or metal.
The pilot's seat itself can be made using a regular seat with a cushion, which is removed from an old go-kart or other vehicle, the main thing is that it fits in size.
In any case, the seat must be made in such a way that during sharp turns the driver sits tightly, without moving towards the inclination. Also, do not forget about the additional space for levers, pedals and steering wheel.
Even if you think that installing a seat is a fairly simple task, it will be difficult to cope with it alone.
With the help of a friend, and taking into account all the design parameters, mark and drill holes in the seat for the front mounting points.
The chair is fixed on the front supports, and after you install the stop between the shaft and the top of the seat, sit in the chair and once again check the comfort of its location.
Markings should also be applied for drilling the side fastening points, and after final installation, do not forget to check all the recommended parameters. Precise adjustment of the seat position is carried out using spacer washers of different thicknesses and additional holes. If necessary, the seat mounting brackets can be bent slightly.
Note! The reliability of fixing the driver's seat increases if you strengthen it in those places where it connects to the chassis frame, using metal washers that are adhesive on both sides.
The shape, thickness and metal of manufacturing parts depend only on your imagination and capabilities. A few extra holes in these washers allow for another adjustment, which makes it possible to adapt the kart to a fast or slow, dry or wet track. In wet weather, designers recommend moving the seat 5 cm forward.
3.5. Pedal levers
By and large, the entire kart pedal assembly is a simple design. The pedals are installed and connected to the engine and brake system. In most cases, these parts are made from steel or aluminum rod with a diameter of 8 mm.
Before “creating” the pedals, experts recommend cutting out a model of the driver’s foot to make it easier to choose the right dimensions. After this, all that remains is to correctly place the layout on the frame, paying special attention to the location of the control cables. They should not have any sharp bends, and they should not get tangled under the driver's feet.
The rear axle also deserves special attention. The fact is that for a high level of elasticity and good adaptation of the kart to any type of road, it will have to be made with an open steel rear axle.
Also a mandatory element are special landing grooves for bearings located at the end of the axle.
You can attach the hubs to the conical components of the rear axle not only with the help of bolts, but also with a chain sprocket, the number of teeth of which can be changed by the car enthusiast depending on the power of the engine installed on the kart.
The brake disc is bolted to the frame, and, regardless of the type of accelerator, a foot brake pedal should be installed, because when driving the car, your hands should be as free as possible.
It would be a good idea to place special guards to prevent your feet from slipping off the pedals when cornering.
That's all - having installed all the parts in their places, you will get a homemade kart, and even if it is not perfect yet, mastery will come with experience.
Source: https://auto.today/bok/4145-karting-svoimi-rukami.html
How to assemble a homemade kart
Probably every ardent motorist, not necessarily young, but also adult, sooner or later thinks about how to assemble a real sports kart with his own hands. There is a certain group of people who are seriously interested in this hobby and hold weekly Sunday races at a paid karting track.
Homemade kart
It turns out that anyone can make a homemade kart. You can learn how to assemble a kart from this article, which was written jointly by highly qualified designers and those who assembled such equipment with their own hands.
To be able to assemble a homemade kart, you should arm yourself with the necessary drawing, tools, a ready-made kit for assembling a homemade kart, as well as several pieces of sheet metal. Then proceed according to the instructions.
Let's first consider the front axle map, which includes a beam, rotating components of the wheels and two eyes. As for the turning pin, it consists of an axle and a pin bushing, which can be ordered to be turned by a good turner. After the adjustment is made, the axle is welded at the desired angle. Ninety-eight degrees is what you need.
Homemade kart competitions
Next, you will need to prepare sheet steel fifteen millimeters thick and make a swing arm. It itself must have a peculiar cross-section, similar to the letter P, so that the entire structure is assembled correctly. This homemade swing arm will need to be connected to the swing arm and then turn your attention to the axle, which should form 110 degrees.
It is important to pay attention already at the initial stage of design to the trunnion axis. It must be exactly 110 degrees, otherwise problems are inevitable.
The frame is an important part of a homemade kart
In general, kart frames do not lend themselves to any classification. For the most part, they come in two types: flat and spatial. The flat frame has spars that work in torsion and bending. In other words, this does not in any way affect compression and tension, since there are no loads in this case.
The sample for the frame can be assembled from ordinary graph paper, which can simply be glued onto thick paper. And everything needs to be transferred to the drawing correctly, observing sizes, shapes and proportions.
Drawing of a homemade map
It will be necessary to further cut the pipe of the required size and proceed to the manufacture of the frame, or rather, its base. We place the workpiece on a flat surface and weld all the parts so that a single structure is obtained. You can check all the parts for symmetry with a regular level.
Now you will need to prepare pipes for fixing the engine, pedals and steering column. We look at the layout and make the same frame according to the drawings. We make sure that we do not miss any components or parts.
We weld the finished workpieces to the frame. We carefully check the angles of inclination, dimensional accuracy, symmetry and much more.
In particular, we will consider separately how to make a homemade steering control on a map. You will definitely need to prepare a pipe with a diameter of 16 mm with thin walls. The column will be welded to the center of the wheel, and rotation will take place in two sliding bearings.
To prevent the steering from moving longitudinally, it needs to be strengthened. This is done by welding thrust rings. A bipod is welded to the steering column, the shoulder of which is equal to sixty millimeters, and the length of the transverse rod is determined during the kart test. It is clear that it must be adjustable.
Video review of a homemade buggy (karting)
As for the U-shaped eye, it will need to be welded to one end of the rod. The other end will be crowned by a steel bushing with an M10 internal thread, into which a five-centimeter rod with a lock nut and an eye welded onto it is screwed.
We go further and connect the transverse rod to the steering column using a special hinge through the eyes. Fastening is carried out using M8 bolts.
In this case, and in general, to eliminate play in connections, you need to use rubber bushings.
As for the wheels, they must turn at the desired angle (thirty degrees), and the gap between them and the frame must be at least five millimeters. All connections must be secured with special nuts.
Wheels and seats
Now we move on to making the wheels and seats. We also make them from sheet metal. In particular, wheel rims can be made on a lathe from a one and a half millimeter piece of steel sheet. We attach the discs to the hubs by welding their heads. Don't forget to weld both swivel units of the front axle. Then they will need to be fixed with the eyes using pins.
We especially note the process of fastening the left and right rotary assembly to the front axle beam.
It must be taken into account that the camber of the front wheels, or rather, its angle, should be zero, and the angle of inclination of the king pins should be 12 degrees.
Thus, the coordination and interconnectedness of the components and mechanisms of the map becomes correct, and these parameters, as is known, depend on the wheel camber and other important calculations.
It's time to install the engine. It will need to be secured to the frame support points and the bolts tightened to a torque equal to the value indicated in the attached drawings. Let's go further and connect the rest of the attachments, which includes the carburetor and other important parts.
Homemade pedals
As for the pedals, we install them and connect them to the engine and brake system.
In general, the kart pedal assembly is a fairly simple and reliable design. Pedals are often made from steel or even aluminum rod with a diameter of 8 mm.
It is recommended to do the following before making the pedal: cut out a model of the foot and thus select the required dimensions. Then all that remains is to correctly position the layout on the frame.
Particular attention will need to be paid to the location of the control cables, where there should be no sharp bends, and the cables should not hang freely and get tangled under the driver’s feet.
The rear axle deserves special attention. For elasticity and good adaptability to any road, it will need to be made with an open rear axle from 18HNVA steel. Special bearing grooves at the end of the axle are also required.
The video shows a kart assembled with your own hands:
Also, the hubs are threaded onto the conical components of the rear axle not only with bolts, but also with a chain sprocket, the number of teeth of which can be changed depending on the power of the unit installed on the homemade kart.
As for the brake disc, it will need to be bolted to the frame.
Almost everything is done. All that remains is to install the finished seats, steering wheel, and other important parts. Having learned how to assemble a homemade kart with your own hands of a conventional design, you can later get the hang of it and assemble real professional samples that will be the envy of many to win races.
Source: http://365cars.ru/soveti/kak-sobrat-kart-svoimi-rukami.html
Do-it-yourself karting: a guide with drawings
For many fans, the passion for karting begins at a young age. At this age, according to the law, it is still too early to have a driver’s license, so young drivers look for inspiration on specially designated routes. At the same time, not everyone has the opportunity to purchase such a vehicle, so you have to look for options on how to make a go-kart with your own hands.
If you make your own small car with an internal combustion engine, you will be able to save significantly on assembly. In this case, the device will be maximally adapted to the specific driver. It will also be possible to create an independent design for a personal four-wheeler, which will give maximum individuality to the vehicle.
What is karting?
This sport is one of the most popular among young people who are interested in motorcycles. The older generation can also take part in it. Cars with unusual, at first glance, shapes can give positive results:
- certain vehicle driving skills;
- add adrenaline to the blood;
- They allow you to “feel” the car yourself and fall in love with the technology.
A go-kart is a vehicle in the form of an open mini-car, which usually lacks suspension and simplifies many traditional systems. Another feature of it is the ability to quickly gain speed in a short time.
The hobby attracts fans so much that they make homemade go-karts with their own hands in order to get a unique result. You can also put production on stream, turning it into a small business.
Initial design stage
Manufacturing begins with the formation of the project. The optimal shape and convenient dimensions are selected. The authors are limited only by their design imagination. It is only important that basic control and safety systems are in place. A home-made device must have the following modules:
- steering system;
- chassis on frame;
- internal combustion engine;
- brake system.
It is worth first sketching a plan diagram with the location of important components. This is done to scale, preferably on graph paper or in a convenient computer program. You can look for design inspiration on the Internet by looking at photos of modern kart models.
When choosing dimensions, you should take into account the height and weight of the driver so that he easily fits into the parameters of the car. Traditionally, the size of a minicar depends on the age of the driver. In most cases, teenagers can get by with a length of 1.3 m and a width of 0.75 m. For adults, it is worth raising the bar to 180 cm and 100 cm, respectively.
Frame drawingAssembly positionsDrawing in two projectionsComplete assembly
Maneuverability is influenced by the center distance. With a total length of 130 cm, a value in the range of 1-1.2 m will be convenient. It is advisable to immediately draw everything on the sketch to scale in three projections in order to visually perceive the parameters.
How to collect karts
The selection of materials is carried out in specialized stores, at metal sites or in construction markets, where profile metal with different properties is offered. It is selected according to the required characteristics based on labeling and assortment. If you have broken equipment such as lawn mowers, trimmers or mopeds, then some of the equipment can be recovered during dismantling.
When assembling individual components and systems, it is important to take care of a sufficient set of necessary materials. For the brake and steering system you will need:
- steering wheel;
- multi-stage gearbox;
- hand brake;
- wheels of small diameter;
- at least a pair of pedals (gas/brake);
- set of ball bearings;
- shafts for steering and drives.
Source: http://ktonaavto.ru/avto-faq/raznoe/karting-svoimi-rukami-rukovodstvo-s-chertezhami.html
How to make a kart yourself: instructions for beginners
Today, a huge number of children and even adults are passionate about karting. These nimble, fast cars allow you to gain driving skills and also feel the rush of adrenaline during fast trips around the go-kart track. But many hobbyists cannot or simply do not want to buy a kart; they want to assemble it themselves. And it is quite possible to do this.
Today, a huge number of children and even adults are passionate about karting. These nimble, fast cars allow you to gain driving skills and also feel the rush of adrenaline during fast trips around the go-kart track. But many hobbyists cannot or simply do not want to buy a kart; they want to assemble it themselves. And it is quite possible to do this.
Where to begin
Before starting work, you need to purchase the necessary materials and units, which are difficult to make yourself. For this, there are special kits that include wheels, chassis and steering parts and other small components.
You will need pipes from which the frame and thin sheet metal will be made. The tools you will need are a set of wrenches, screwdrivers, a pipe bender, a hammer, pliers, etc. You will definitely need a welding machine and the services of a specialist welder.
Making a layout
At the next stage, according to the drawing, a mock-up of the go-kart frame is made on cardboard. Pipes of a given length are cut according to the layout, which are fastened with welding seams; if necessary, they can be bent using a pipe bender. The components of the power, steering and chassis need to be attached to the resulting frame.
To start work, 2 U-shaped tubes are welded to the bottom of the card, which need to be reinforced with transverse ties. Each tie is attached at one end to the frame, and at the other end to the corresponding tubes intended for fastening the units.
This will give the entire structure the necessary rigidity. Brackets for mounting the engine are welded onto the frame, the location of which depends on the brand of engine chosen for the go-kart.
For installation, special engines are used, for example, Rotax.
A more budget option is any air-cooled engine, for example, from a Zaporozhets or a motorcycle. The transmission drive will be attached to the rear axle, so the engine will be installed under or behind the driver's seat.
Control installation and car assembly
Installation of the steering control is quite simple. A gear is attached to the steering shaft, the best option is z = 10. Next, this gear is connected to the rotary cams, which, in turn, are attached to the rods that turn the wheels. Then this entire structure is attached to the frame.
At each stage, you need to strictly check the dimensions on the drawing, otherwise you can break the symmetry, which will not allow the map to stay on the road normally.
The pilot's seat is bent from sheet metal and then mounted on the frame. At the final stage, the wheels included in the go-kart kit are attached to the frame, and the front ones are attached to the steering. The brakes are mounted only on the rear wheels; they are connected to the pedal using cables. At this stage, all sizes and levels are finally measured and adjusted.
Only after this is the fuel supply system, gas tank, fuel lines and carburetor installed, taking into account the requirements presented by the engine manufacturers. Don't forget about the air and fuel filters. After this, you need to configure its operation and you can go for testing.
Source: https://magmens.com/tech/3120-kak-samomu-sdelat-karting-instruktsija-dlja-nachinajushchih/
DIY karting
KARTING FOR BEGINNERS “Pioneer”
(Part one)
Pioneer class kart Its engine displacement is only 50 cm3.
Such karts are built for races in which children aged 9 to 16 years participate. Unfortunately, the industry does not yet produce these machines, and they are created in sections and circles.
Unlike “adult” go-karts, “Pioneer” has its own design features.
Its frame, for example, is welded from thinner pipes and has a wedge-shaped shape. It is characterized by manufacturability and reliability. It has advantages over its own kind in rigidity and strength. By the way, we make this frame configuration for karts not only of the “Pioneer” class, but also of the “Junior” and “Soyuzny” class. The initial stage of construction is the development of drawings and preparation of fixtures and equipment.
It is most convenient to draw the frame in full size on a sheet of graph paper glued to thick cardboard. Such a drawing will later serve as a template on which individual elements are roughly adjusted.
It is necessary to draw the frame in two projections - top view and side view. Separately draw the front spar.
Don’t be confused by the absence of some dimensions in the drawing - this means that the parts here need to be adjusted to the location.
The next stage is the manufacture of a slipway for assembling the frame. It will be required if you intend to produce these machines in a small series. The base of the slipway is a sheet of duralumin measuring 1700X900 mm and 15-20 mm thick. A clear longitudinal line is drawn along its major axis - a trace of the plane of symmetry of the kart frame and perpendicular to it - the base line for installing the pin bushing clamps.
The holes in the latter must be cut on a boring machine - this will ensure the necessary accuracy of installation of the bushings when welding the frame. Steel corners are also installed on the slipway to secure the longitudinal spars.
The frame itself is assembled from two longitudinal spars, three cross members (front, middle and rear), a front bumper and steering column mounting brackets.
For its elements, it is preferable to use chromium-silite (from material 30KhGSA) or seamless pipes made of grade 20 steel.
The order of their preparation for assembly is as follows. Cut the pipes with an allowance of about 30 mm and bend them using a tool according to the plaza drawing. This operation is best performed without heat. I propose several of the most rational methods for such processing.
The easiest way to bend pipes is to use a spring inserted inside from OBC wire. It is screwed on a lathe and then necessarily normalized. For thicker pipes you will need 2.5-3 mm wire, and for the rest 1.5-2 mm.
The outer diameter of the spring should be such that it is inserted into the pipe with some force. If the card frame is made in winter, then water can be frozen in the pipes before bending.
Pouring molten rosin gives a good effect. And finally, the traditional processing method is stuffed with sifted and calcined sand.
It is easier to bend the pipe by heating the bend with the flame of a torch or blowtorch.
But this method is less preferable, since heating alloy steel significantly reduces its strength and elasticity. Having given the blanks the required shape, adjust them - nail them to each other so that there are no gaps left in the joints.
Start this work by installing the front cross member on the slipway (align the middle with the center line of the slipway). Next, install a clamp with a pivot bushing on one side and adjust the cross member to it so that the resulting plane is inclined at an angle of about 30 degrees to the vertical.
Perform the same operation on the opposite side of the slipway.
Press the front cross member prepared in this way with staples to the slipway and nail the longitudinal spars to it. Attach the rear cross member to the latter in a similar way, and the bump stop to the front cross member.
Fix all frame elements on the slipway with staples and clamps, check their position again and start welding.
The best seams are obtained when using argon-arc or carbon dioxide welding, while conventional electric welding gives somewhat worse results.
Gas should be used last. Weld the frame in several stages. First, “tack” all the joints - each at one or two points, and then weld them completely. Without removing the frame from the slipway, weld the engine and rear axle mounting brackets. Pre-install the latter on the axle - this will help ensure that it is perpendicular to the plane of symmetry of the frame.
The pedal axles, steering column brackets, middle cross member and seat supports should be welded only after preliminary “fitting” of the kart to the racer. The lower part of the seat is located at the same level as the lowest points of the frame side members.
The correct rider's position has the following characteristics: the back is tilted back 20-25°, the legs are slightly bent at the knees.
The last to be welded are the floor mounting ears, the brackets and tubes of the front upper bumper, the gussets at the junction of the longitudinal side members with the front cross member and the gear shift lever ears, as well as the cable stops.
For the front axle you will need several turned parts, in particular the front hubs (from D16T). axles (from Z0KhGSA), bronze bushings and king pins made of steel 45 or 40Х.
It is best to bend the eye of the front axle from a steel strip measuring 40x30 mm according to a template. A lever, a reinforcing gusset and, last but not least, a trunnion should be welded to it.
The design of the rear axle is quite simple and technologically advanced.
The bearing housing hubs are cast from aluminum alloy with subsequent finishing on lathe and milling benches. The brake card is a disc brake with a hydraulic drive. According to technical conditions, Pioneer class karts
The brake disc is mounted on the rear axle of the kart, and the brake machine is installed on the frame. Its body is made of duralumin, the working cylinder is steel (З0ХГСА or Art. 45).
The piston is made of brass or made of D16T material. You can also use the front shoe brake from a T-200 scooter or an M-106 motorcycle.
When installing it, you should be very careful about the alignment of the brake drum. To select the optimal gear ratio of the rear axle chain drive, it is recommended to manufacture a set of driven sprockets with a number of teeth from 22 to 28 with an interval of two teeth.
This will greatly facilitate the adjustment of the drive to the weight of the kart and rider, the engine power and the speed of its drive sprocket. The kart wheel rims can be made from aluminum alloys D16AM or LMG-6. The thickness of the workpiece sheet is 2-3 mm.
The method for extruding a disk is as follows.
First, a punch is turned from any metal.
The workpiece is pressed against it by the tailstock of the lathe and rolled by a roller fixed in the tool holder until it takes the shape of a punch.
Processing is carried out at a rotation speed of the machine chuck from 150 to 300 rpm, and ordinary soap is used as a lubricant. It is best to drill holes in wheel rims using a jig template.
It is advisable to make the latter from steel and harden it. Take the time to do this, especially if you are planning to build several machines. The fastenings of the front wheels, steering rods and pedals must be pinned; Self-locking nuts are also quite acceptable.
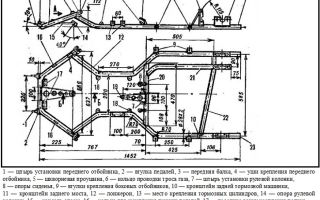
Rice. 1. Pioneer class kart: 1 — front upper bumper, 2 — gas pedal, 3 — brake pedal, 4 — gear lever, 5 — rear bumper, 6 — brake disc, 7 — brake master cylinder, 8 — frame . L — steering column bearing, B — steering column thrust bearing.
Fig 2.
Kart frame: 1 — front lower bumper, 2 — pedal axles, 3 — front transverse beam, 4 — pivot bushing, 5 — longitudinal member, 6 — floor mounting bracket, 7 — gear shift lever mounting bracket, 8 — gusset, 9 — front engine mount, 10 — rear mount, 11 — rear axle bracket, 12 — rear cross member, 13 — brake master cylinder mounting bracket, 14 — brake lever axis, 15 — seat supports, 16 — middle cross member, 17 — steering column bracket, 18 — steering column support axis.
Rice. 3. Front wheel steering knuckle: 1 - hub, 2 - axle, 3 - wheel disks (size in brackets - for the inner disk), 4 - bracket, 5 - kingpin, 6 - liner (2 pcs.), 7 - front transverse beam, 8 - pivot bushing, 9 - bipod.
Rice. 4. Engine mounts: left - front, right - rear.
Fig 5. Bumpers: 1 - front, 2 - rear, 3 - elements for attaching the rear bumper to the frame.
Rice. 6. Rear axle: 1 — wheel hub, 2 — brake disc, 3 — brake disc hub, 4 — axle support bracket, 5 — shaft, 6 — wheel disks, 7 — sprocket, 8 — sprocket hub, 9 — bearing housing, 10 - brake machine.
Fig 7. Construction of the steering trapezoid
Rice. 8. Steering wheel. bZyu
Homemade kart
KARTING FOR BEGINNERS “Pioneer”
(part two)
As already mentioned, on Pioneer class karts
You should not immediately start boosting the engine - this will sharply reduce its service life and reliability. You just need to adjust the carburetor and ignition correctly. For starters, this will be enough for you. For the gas tank, it is best to use a 2 liter polyethylene canister.
It should be placed on the court so that the fuel flows by gravity into the carburetor.
A fitting or tap is inserted into the lower part of the container, and a hole is drilled in the plug of the canister through which a polyvinyl chloride tube is passed. The tension of the engine chain is regulated by a stop - a tander with two ShS-8 bearings pressed into its ears.
If such a tander is not at hand, weld an M10 nut onto the frame and screw a bolt into it so that it rests against the engine mounting bracket. The chain is covered from above with a plastic shield, half blocking the driven sprocket. Shield width 30 mm.
The steering column is installed at the distance of the athlete’s outstretched arm (the hand grips the upper part of the steering wheel).
This is a steel pipe with a diameter of 18 mm; in the lower part there is a rotary coulter welded to it - a lever made of a steel strip about 2 mm thick.
When cutting the hole for the steering rod in the bipod, you should remember that the optimal ratio of the lengths of the steering knuckle lever of the front ear wheel and the bipod arm is 1.7:1.
Steering rods are tubular; bushings with ShS-6 or ShS-8 bearings are tucked into their ends, or, in extreme cases, rubber bushings. After assembly, check the functioning of the steering mechanisms: the axle should rotate at an angle of about 35 degrees.
If the angle of rotation is greater, make stops. The steering wheel is cold bent from an AMG or AMC pipe with an outer diameter of 22-2S mm and a wall thickness of 1.5-2 mm.
The pipe is filled with sand and wound in several turns onto a suitable reference, for example, a gas cylinder. Thus, blanks are obtained for several “steering wheels” at once.
The spokes are cut from 4-5 m of aluminum sheet of the AMG or AMC brand.
I warn you that making spokes from “hard” alloys D16T, D19T, V95 and the like is not recommended - cracks may form at the welding points and the steering wheel will fall apart.
Then the steering wheel is attached with three bolts to the steering column thrust bearing, sheathed in leather or leatherette with preliminary pasting of microporous rubber or foam rubber. The brake, gas and clutch pedals are curved from steel pipes with a diameter of 12×1.5 mm.
The rings for which the cables are attached, as well as the stops, are connected to the pedals by welding.
When assembling, do not forget to install a return spring on the gas pedal. Polin is made of duralumin sheet 1.5 mm thick; it was fastened with screws to lugs welded to the frame. The easiest way to glue a seat out of fiberglass is to use a map of the Leningrad DOSAAF plant as a “dummy” seat.
When gluing the shell, apply a separating layer of parquet mastic to the “boob”. It is advisable to paint the seat not after gluing, but immediately by mixing black pigment into the epoxy resin.
The seat is attached at the front to brackets welded to the kart frame, and at the rear to two adjustable tubular supports.
After control assembly of the card , debugging and adjustment of all card , you need to completely disassemble it.
Thoroughly clean the frame from rust and scale, degrease it, prime it and paint it with nitro or synthetic enamel. It is advisable to chrome the bump stops, steering column, pedals, tie rods and gear shift lever. The steering knuckles of the front wheels can be painted black. Cut out the card numbers from the plate; their dimensions are 220x220 mm. The corners of the square should be rounded with a radius of 20 mm.
Brake machine: 1 - caliper, 2 - spring, 3 - lining fastening screw, 4 - brake cylinder, 5 - hole for bleeding the cylinder, 6 - rubber cuff, 7 - piston, 8 - brake lining, 9 - friction plates.
(Source: Modelist-Konstruktor magazine 5.1982)
Source: http://samodelkyn.3dn.ru/blog/karting_svoimi_rukami/2013-11-11-174