Replacing spark plugs in Toyota Corolla
Automotive spark plugs are one of the most important parts of the engine, since it is thanks to them that the fuel is ignited at a certain moment and the car begins to function.
Also, it is the spark plugs that determine the power parameters of the engine and the environmental friendliness of the exhaust gases. Toyota Corolla spark plugs are the reason for easy engine starting in any weather, and especially in cold weather.
The service life of modern spark plugs is quite long, but they, like any parts, tend to fail due to deterioration in performance characteristics.
And now, sooner or later, the time comes to change the spark plugs for a Toyota Corolla, but this procedure is very simple, the main thing you need is to purchase new spark plugs.
You can buy them in absolutely any auto parts store, the main thing is to correctly determine which spark plugs are suitable for the model of your car, since not all analogues may suit you.
If you have already decided to choose similar spark plugs, it is better to consult with a knowledgeable person before purchasing them so as not to make a mistake in your choice.
What happens when spark plugs fail?
Since they ignite the engine, the spark plugs can burn out and not match the number of cylinders.
And when problems with their performance begin to arise, even if the problem is literally just a couple of spark plugs, in this case the entire motor system may suffer.
On a Toyota Corolla, despite the fact that the spark plugs may be of the best quality, it is recommended to replace them every 15 thousand or 20 thousand km.
The purpose of spark plugs is mainly to be able to withstand the highest loads.
The situation is the same with oil: expensive and high-quality elements last much longer than cheap analogues, so it is better not to skimp on car repairs, so as not to have to overpay for their replacement later.
If a breakdown occurs, you cannot delay it; replacement must be done as soon as possible. If you do this, you will save a lot in terms of fuel and cash savings.
In addition to the fact that spark plugs operate at high temperatures, their quality can be affected by low gasoline levels.
If at least one spark plug stops working, then gasoline will stop burning in the cylinder.
It will enter the exhaust system, leaving behind a lot of gases, and if the car is equipped with a neutralizer for such exhaust gas, then this is even worse, since it will also soon fail.
Replacing spark plugs
To replace spark plugs you will need the following parts:
- Head wrench 10
- Spark plug wrench 14 (with extension 70-100, 100-120 mm)
- Denso iridium spark plugs.
The engine must be completely cool before installing the spark plugs.
- The first thing we recommend doing is covering the bumper with something soft.
- Using a 10mm wrench, further unscrew the coil mount.
- Using a screwdriver, disconnect the connector from the coil. No special effort is required, you can remove it even without the help of a screwdriver - with your own hands.
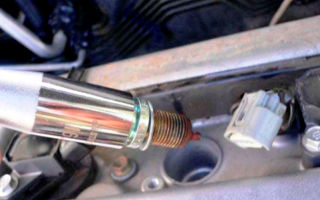
- Next, insert the key into the “well”. Do the work carefully and carefully, otherwise the threads and insulator may be damaged.
- Remove all foreign objects from the engine, then unscrew the spark plug with a wrench.
- Now it's time to get the candle. If the spark plug does not have the required rubber seal, it must be removed using a reel or a piece of polymer tube.
- After you have removed the spark plugs, you need to arrange them according to their cylinders.
- Before inserting new spark plugs, lubricate their threads with graphite lubricant.
- Put everything back in the reverse order and it's done.
Read also
Source: http://grandrepairauto.ru/zamena-svechey-toyota-corolla.html
Replacing spark plugs on a Toyota Corolla (body 120)
We will need:
1. Spark plug key for 16. They cost differently, in the store where I bought two of these keys, they differed only in the color of the handle, one had a red one - 50 rubles, the other had a blue one - 65 rubles. I didn’t save money and bought the one for 65 rubles.
2. 10mm wrench, socket. Carob will not work because... To unscrew the plastic casing, you need the end one. The one I bought costs 35 rubles. But there is no specific price, and it can vary over a fairly wide range. Maybe you decide to immediately buy a super cool set for $500, that's up to you.
The whole tool looks like this:
3. You will also need candles, because we change them. This is whoever wants it, maybe you want BOSCH, maybe something else. Someone has DENSO K16R-U11. Personally, I had NGK BKR5EYA, I decided not to change the manufacturer and bought exactly the same ones for 85 rubles - a piece. If anyone doesn’t know, we need 4 of them.
Total costs for candles and tools:
- “Candle key for 16” - 1 piece - 65 rub.
- “Spanner wrench 10, socket” -1 piece - 35 RUR.
- “Candles NGK BKR5EYA” -4 pcs - 340 rub.
Total – 440 rub.
Let's move on. Open the hood and place two keys on top of the engine. Then you will get exactly the same picture (or almost the same):
We take a 10 key and unscrew the two nuts marked with red circles. It is quite possible that there will be not 2 but 4 nuts. There are 2 more holes on top both in the plastic cover itself and in the engine, but personally I didn’t have any nuts or studs there.
And you say “THE TAZ sucks” - The Japanese also forget to screw in a couple of bolts. In general, unscrew it. Personally, I had a nut unscrew on the left, but the pin remained in the engine, and on the right, a pin was unscrewed from the engine and remained in the plastic cover. Unscrewed? Now remove the cover.
The engine will appear in front of you, naked to the waist (pants are still on).
Let's take a closer look:
Apparently these are the ignition coils, of which, as I understand it, our drill has four (this is not a TAZ). Let’s look even closer:
And we see a bolt that we actually need to unscrew. It’s even written on it – 10. This is probably so that the Chinese don’t make a mistake when counterfeiting. But before unscrewing the bolt, you should remove the terminal from the ignition coil:
This is done very simply, press on the special latch and remove:
Now you can unscrew the bolt that secures the coil to the engine:
Now we take out the coil, put it somewhere and admire:
Also, if you want, you can look into the hole where you pulled out the coil, that’s where the candle itself is located:
Now you need to take the spark plug key, lower it into this hole and press a little at the same time, screwing it either clockwise or counterclockwise, so that the key fits onto the spark plug. I’ll explain why to press. There is a rubber bushing in the key, the spark plug is fixed in this bushing, otherwise you will not pull the spark plug out of this well.
Now unscrew. Let me remind you that you need to unscrew the spark plug counterclockwise, and tighten it in the same way as in principle all nuts and bolts.
In order to unscrew, or rather tear the spark plug out of place, you need to apply some force. Did you unscrew it? Amazing!
Now pull out the candlestick, it will come out along with the candle:
You can put the new and old candles side by side and see. As they say, find 10 differences:
That's basically it. We change all the other (three) spark plugs in the same way.
Then we assemble everything in the reverse order, do not forget to connect the terminals to the ignition coils.
Source: https://webhamster.ru/mytetrashare/index/mtb0/1422701191mnq2xrow8j
Adjustment – Valve clearance (2zz–ge) – Toyota Corolla Repair Manual (Toyota Corolla)
1. REMOVE NO. 2 CYLINDER HEAD COVER. 2. REMOVE IGNITION COIL ASSEMBLY. 3. DISCONNECT VENT PIPE NO. 1. 4. REMOVE CYLINDER HEAD COVER ASSEMBLY. 5. REMOVE ENGINE LOWER COVER, RIGHT SIDE. 6.
REMOVE THE FAN AND ALTERNATOR V-BELT.
(a) Slowly turn the drive belt tensioner clockwise and loosen it.
Then remove the drive belt, gradually reinsert the drive belt tensioner, and then secure it.
7. SET CYLINDER NO. 1 TO TDC/COMPRESSION
(a) Rotate the crankshaft pulley and align its groove with the “0” tooth mark on the timing chain cover.
(b) Check that the dot marks of the crankshaft gear and VVT gear are in a straight line on the surface of the timing chain cover as shown in the figure.
ADVICE:
If this is not the case, then rotate the crankshaft one revolution (360°) and align the marks as described above:
8. CHECK VALVE CLEARANCE.
(a) Perform the test on the specified valves only.
(1) Using a feeler gauge, measure the valve clearance between the valve tappet and the camshaft.
(2) Record the valve clearance measurements exceeding the specified parameters. These will be used later to determine the required shim.
Valve clearance (cold state):
| Inlet | 0.08 - 0.18 mm (0.003 - 0.007 inch) |
| Release | 0.22 - 0.32 mm (0.009 - 0.013 inch) |
(b) Rotate the crankshaft one revolution (360°) and set the No. 4 cylinder to TDC/compression.
(c) Perform the test on the specified valves only.
(1) Using a feeler gauge, measure the valve clearance between the valve tappet and the camshaft.
(2) Record the valve clearance measurements exceeding the specified parameters. These will be used later to determine the required shim.
Valve clearance (cold state):
| Inlet | 0.08 - 0.18 mm (0.003 - 0.007 inch) |
| Release | 0.22 - 0.32 mm (0.009 - 0.013 inch) |
9. ADJUST VALVE CLEARANCE.
(a) Set SST.
(1) Rotate the crankshaft so that the corresponding rocker arm for which the valve clearance is adjusted is pushed completely down.
ATTENTION:
Remove the spark plug and release the compression:
(2) Insert SST into the spark plug channel.
SST 09248–77010 (09248–07010):
ATTENTION:
• The SST cannot be inserted until the set screw is loosened.
• Make sure the camshaft is in the same position as for step (1).
(3) Using the lever, install the SST support surface onto the valve retainer and secure them together with the setscrew.
ATTENTION:
• No play is allowed between the valve retainer and the SST support surface.
• When inserting the SST, be careful not to create a gap, as a gap may cause the holder to unlock.
(4) Fix the setscrew on the spark plug bore side with SST.
(5) Rotate the crankshaft so that the camshaft is positioned as shown in the figure.
ATTENTION:
• Pay attention to the direction of rotation so that the front end of the camshaft and the SST rod do not interfere with each other.
• Do not over-rotate the crankshaft.
(b) Remove the adjusting plate.
(1) Raise the tappet to provide clearance and use SST to remove the adjusting plate.
SST 09248–77010 (09248–07010):
ATTENTION:
Do not remove the SST when the adjustment plate is removed:
ADVICE:
• Setting the SST higher than the right side makes it easier to remove the adjuster plate.
• If there is not enough free space, reinstall SST.
(2) Determine the size of the adjusting plate to be replaced using the formula or tables:
• Calculate the thickness of the new adjuster plate so that the valve clearance is within the specified value.
| A | Thickness of the new adjusting plate |
| IN | Thickness of the removed adjustment plate |
| WITH | Measured valve clearance |
Inlet: A = B + (C - 0.13 mm (0.005 in)) x 1.5 Exhaust: A = B + (C - 0.27 mm (0.011 in)) x 1.5
ADVICE:
Shims are available (41 sizes) in thicknesses ranging from 2.000 mm (0.0787 in) to 2.800 mm (0.1102 in) in 0.020 mm (0.0008 in) increments:
2ZZ Shim Selection Chart (Inlet) –GE: Adjustment Plate Selection Table (Exhaust)
(c) Raise the rocker arm to provide clearance and install the adjuster plate using SST.
ADVICE:
• Placing the SST higher on the right side makes removal easier.
• To remove the SST from the adjusting plate, it is recommended to press the rocker arm down.
(d) Rotate the crankshaft so that the corresponding rocker arm for which the valve clearance is adjusted is pushed completely down.
ATTENTION:
• Pay attention to the direction of rotation so that the front end of the camshaft and the SST rod do not interfere with each other.
• Do not over-rotate the crankshaft.
(e) After loosening the two set screws on the SST, remove the SST itself.
SST 09248–77010 (09248–07010):
10. INSTALL CYLINDER HEAD COVER BLOCK.
(a) Install the gasket to the cylinder head cover.
(b) Remove the old sealing material (FIPG).
(c) Apply sealant in the two places shown in the figure.
Seal: Part No. 08826–00080 or equivalent.
ATTENTION:
• Remove oil from the contact surface. • Install the cylinder head cover within three minutes of applying the seal.
• Do not add engine oil within two hours after installation.
(d) Secure the cylinder head cover and cable bracket with ten bolts.
Tighten the bolts evenly, in several passes, in the sequence shown in the illustration: Torque: 10 N·m (102 kgf·cm, 89 in.·lbf)
11. INSTALL VENT PIPE #1.
(a) Install a new gasket and No. 1 vent tube.
Torque: 10 N·m (102 kgf·cm, 89 in.·lbf):
12. CHECK FOR FUEL LEAKS.
Source: http://toyota-omg.ru/14_dvigatel_mehanicheskaya_chast/klapanniy_zazor_2zzge/regulirovka.html
Replacing spark plugs in Toyota Corolla
Spark plugs in a car do more than just ignite the fuel mixture. Their condition indicates how high quality the fuel is used.
By appearance and characteristic features, specialists can determine what kind of malfunctions have arisen in the operation of the engine.
Replacing spark plugs in a Toyota Corolla 120 or 150 does not require special skills and tools, but has some features.
Timely replacement of spark plugs in a Toyota Corolla, as in any car, is a mandatory procedure. The frequency of its implementation is very arbitrary, since the service life of the device that ignites the fuel mixture depends on:
- quality of candles;
- serviceability of the ignition system;
- fuel used.
If you follow the manufacturer's recommendations, spark plugs can be used for 100 thousand km or more. Replacing spark plugs in a Toyota Corolla is inevitable when signs such as the car twitching at low speeds appear, as well as:
- loss of power;
- increased gasoline consumption;
- problems with starting the engine after a short period of inactivity.
The location of the spark plugs requires special tools to replace them. Therefore, owners often wonder how to replace spark plugs on a Toyota Corolla.
In addition to the usual set of sockets and a spark plug wrench for 16, you will need a special extension. This is due to the fact that the part that needs to be removed is located in the spark plug well, which is about 250 mm deep.
When choosing a tool, make sure that the outer diameter of the spark plug wrench does not exceed 21 mm.
Replacement procedure
To make replacing spark plugs on Toyota Corolla 120 and 150 as convenient as possible, carry out repairs in a well-lit place. It will also not be superfluous to change the negative terminal from the battery. The procedure for replacing all four spark plugs is the same, it is as follows:
- Unscrew the nuts by 10 that hold the decorative plastic engine protection;
- Disconnect the electrical connector from the ignition coil.
In most Japanese cars, a separate ignition coil is connected to each spark plug. - Unscrew the ignition unit with a 10mm head.
- Remove the part connecting the coil and the spark plug from the tunnel.
- Insert the key and unscrew the spark plug.
If the key does not have a rubber seal, then you can use a magnet to fix the spark plug and pull it out.
After replacing all four spark plugs, perform the operations in reverse order. No additional tuning or adjustments are required after installing new spark plugs.
Replacing spark plugs for Toyota Corolla 150 may differ from the 120 version only in the number of nuts holding the plastic engine casing. Otherwise, the sequence of actions and the tool used are similar.
What spark plugs to install in Toyota Corolla
The original spark plugs supplied by the manufacturer are Toyota 90919-01253. Analogues: Denso VK16, Champion OE093T10, Valeo 246624, NGK BKR5EYA. Additionally, consult a specialist.
If the material was interesting or useful for you, publish it on your social network page:
Source: http://jrepair.ru/remont-toyota/zamena-svechej-zazhiganiya-v-toyota-corolla
Toyota Corolla spark plugs: replacement, reasons for failure
The successful functionality of the Toyota Corolla depends on the car's combustion plugs, which affect the operation of the engine and serve to ignite the fuel, due to which the car starts. Modern automobile products are made of higher quality parts and therefore their service life is longer, but they also require replacement.
For Toyota Corolla, high-quality spark plugs are used, which help to start the engine without any problems in any weather. But after time they require replacement and this happens quite easily. The main thing is to purchase high-quality parts and do the work yourself or contact a car service.
Reasons for replacing spark plugs
The candle is produced with a diameter of 14 mm. For installation on a Toyota Corolla, specimens of a certain type are required, but it is possible to install a suitable spark plug with the required capillary number from other manufacturers. This part is cleaned every 10 thousand kilometers using a sandblaster.
Spark plug device
What reasons may influence the replacement of such an important part in a car:
- Oiliness. If oil enters the combustion chamber due to a worn guide valve or piston ring, then they become oily and this causes misfire, making the engine difficult to start and running unstable. In such cases, it is recommended to carry out mechanical work and replace the spark plugs.
- Overheating. If there is a lack of deposits on the parts, and the part itself is porous, there is erosion, then the service life is reduced. In such cases, you need to check the coolant level or the radiator; it is possible that it is clogged.
- Coal deposits. The possible presence of certain soot deposits can cause your Toyota Corolla to misfire or have difficulty igniting, and also affect engine stability. You need to check the air cleaner to see if it is clogged, as well as the fuel level. You can try using candles with a longer insulator, which will help increase resistance to contamination.
- Ignition ahead of time. If the parts have melted electrodes or a white insulator, or there are cases of unnecessary debris getting into the combustion chambers, then the engine may fail. With these symptoms, you need to check the quality of the mixture, it should not be pale, the condition of the cooling system, the correct number of parts that are installed. If anything from this list is broken, then mechanical work must be carried out or replaced.
- The electrodes close. Combustion products begin to enter the interelectrode space. Ignition in the cylinder does not occur due to the accumulation of solid deposits. In such cases, you can simply clean the interelectrode space and remove all deposits there.
- Wear. If the engine starts with difficulty and additional fuel consumption occurs, then the spark plugs must be replaced.
Guide to replacing spark plugs
Before you start replacing parts, you need to prepare a wrench with a 10 mm head, a 14 mm spark plug wrench and, of course, the spark plugs themselves.
First of all, the Toyota Corolla must have a completely cooled engine.
- The bumper is covered with a soft covering.
- The coil mount is unscrewed using a 10mm wrench.
- Next, the connector from the coil is disconnected - this can be done with a screwdriver or manually.
- A key is inserted into the “well”.
- All foreign objects are removed from the engine, after which the spark plugs are unscrewed using a wrench.
- The part is obtained using a coil or a polymer pipe.
- After these manipulations, the candles are laid out in accordance with their cylinders.
- All parts are returned to their places and in the correct sequence.
If you need to unscrew the spark plug, you should check if there are any foreign objects in it. If debris gets into the washer hole or bolt, it can destroy the valves or cylinder head when the engine starts. The appearance of the spark plug shows how the injector works and the condition of the engine.
Replacing spark plugs on a Toyota Corolla Link to main publication
Source: http://CorollaCar.ru/remont/dvigatel/svechi-zazhiganiya-tojota-korolla.html
Instructions - Replacing spark plugs Toyota Corolla & | Car owner forums
Conclusion Replacing spark plugs on a Corolla in the back is a simple process, and it is not necessary to contact a service center and overpay to carry it out.
Engine decarbonization, flushing, oil change, spark plugs, filters, Toyota Corolla 2008
There are two types of spark plug defects: If the sheet sits closely between the electrodes, then the distance is acceptable, and if it does not fit or fits, but there is still space left, then vice versa. Also in this section:
Toyota Corolla, replacement, spark plugs, engine Section: Apparently these are the ignition coils, of which, as I understand, our drill has four, this is not a TAZ. Be careful when clamping spark plugs:
In addition to the usual set of sockets and a spark plug wrench for 16, you will need a special extension. This usually depends on the number of cylinders.
Replacing spark plugs in a Toyota Corolla Replacing spark plugs in a Toyota Corolla Spark plugs in a car do more than just ignite the fuel mixture.
Their condition indicates how high quality the fuel is used. By appearance and characteristic features, specialists can determine what kind of malfunctions have arisen in the operation of the engine. Replacing spark plugs in a Toyota Corolla does not require special skills and tools, but has some features.
Service life and symptoms Timely replacement of spark plugs in a Toyota Corolla, as in any car, is a mandatory procedure.
The frequency of its implementation is very arbitrary, since the service life of the device that ignites the fuel mixture depends on: If the manufacturer's recommendations are followed, the spark plugs can be used for thousands of km or more.
You will also need candles, because we change them. If anyone doesn’t know, we need 4 of them.
Total costs for spark plugs and tools: Open the hood and place two keys on top of the engine. Then you will get exactly the same picture, or almost the same: Take the 10 key and unscrew the two nuts marked with red circles.
It is quite possible that there will be not 2 but 4 nuts. There are 2 more holes on top both in the plastic cover itself and in the engine, but personally I didn’t have any nuts or studs there. And you say “THE TAZ sucks” - The Japanese also forget to screw in a couple of bolts.
The engine shakes and does not pull. Ignition coil
Personally, I had a nut unscrew on the left, and the pin remained in the engine, and on the right, a pin was unscrewed from the engine and remained in the plastic cover. Therefore, it is recommended to use a magnetized head or long tweezers.
Be careful when clamping the spark plugs: Take a new spark plug and perform all the steps in reverse order. Below is a video that clearly shows how to change these elements on a Toyota Corolla 1.
How to distinguish the original from analogues On the domestic market of ignition elements, there have been a huge number of fakes since the year, which look exactly the same as the original ones, but have a quality that is much worse.
There are several subtleties in order to distinguish the original from fake candles: There should be no bubbles on the white insulator.
Answers (1)
The inscription on the insulator should not be erased with a fingernail. There should be no small chips on the edges, as, for example, in this photo: Side engraving should be applied evenly. Watch the engraving mark while rotating the candle in your hands. The ring should not unscrew.
There will be small burrs on the threads. The electrode gap will not be centered. The main method For this we need a multimeter measuring device.
We set its sensitivity to 20 kOhm. We connect the first pole to the contact at the beginning of the candle, and the second to the contact at the end. One thing worth noting is that there are no electrodes.
The combustible mixture is ignited by exposure to laser beams. Spark plugs are usually changed when problems arise with the engine.
There are many signs that alert the driver that it is time to change the spark plugs.
Service life and symptoms
So, when they become unusable, the engine can lose a significant amount of power - this is due to the fact that the mixture in some cylinders may not ignite.
In addition, poor engine starting will certainly occur.
The motor can run very hard and vibrate. An increase in fuel consumption is also one of the manifestations of damage to spark plugs. And finally, the dynamics of the car - it changes significantly, the loss of power makes itself felt. Instructions for replacing spark plugs on a Toyota Corolla This instruction will perform a step-by-step replacement on a Toyota Corolla E with engine 1.
VK spark plugs were purchased for replacement. We will need gloves to avoid getting our hands dirty, a 10mm wrench and a special 10mm spark plug wrench.
Source: http://diabloarea.ru/zamena/zamena-svechey-na-toyota-korolla.html
Replacing spark plugs for Toyota Corolla
Replacing spark plugs on a Toyota Corolla, according to technical regulations, should be changed every 30,000 km. When purchasing original Toyota spark plugs, the box will contain Denso spark plugs.
Toyota Corolla Already mechanical. Prestige › Logbook › Replacing spark plugs on a 2008 Toyota Corolla with a mileage of 97 thousand. ToyotaCorolla 999, written 1 year ago. It's clear. But estimate the mileage yourself.
About the logo. The Toyota logo is a triple oval. Two internal ovals located perpendicularly symbolize the strong relationship between the client and the company. In addition, if you look closely and use your imagination a little, in these ovals you can see an image of all six letters of the brand name T, O, Y, O, T, A.
www. corolla BMW-MOTOR.RU – Club of Toyota Corolla owners in Samara, Togliatti and the region. Mileage of spark plugs at the time of replacement (it was at the end of about km.
For example, you purchased a car, and the previous owner did not tell you when he changed the spark plugs. MOVING to the second-level domain... Replacing the spark plugs of Toyota Corolla Verso and Corolla Axio is carried out in a similar way. Dimon Shustry, added to FAK. The rubber band on the reel had to be removed, anointed with sealant and put on.
Photo report: Replacing engine spark plugs – Toyota Corolla Forum
Many novice drivers do not even know what they are needed for. In this article we will talk about what spark plugs are needed for, what types can be found on the market, which ones are better, and also how to properly replace spark plugs on a Toyota King.
Spark plugs are understood as special devices that allow ignition of the fuel mixture in the combustion chamber of different types of engines. As a rule, based on their classic version, the mixture ignites through an electric discharge running between the electrodes located at the end of the spark plug.
We won't talk about the building itself. You can study it from the inside yourself. To do this, you need to look at the picture below. Its structure is not complicated and therefore does not require explanation.
The first type is most common for domestic cars. Their electrodes are coated with copper. They have the shortest service life, since metal oxidizes very quickly.
The second and third types are the most common for modern foreign cars, since their coating takes much longer to oxidize.
And the last type is laser. It was developed by Japanese scientists quite recently, so it is too early to talk about the advantages and disadvantages. One thing worth noting is that there are no electrodes.
The combustible mixture is ignited by exposure to laser beams. There are many signs that alert the driver that it is time to change the spark plugs. So, when they become unusable, the engine can lose a significant amount of power - this is due to the fact that the mixture in some cylinders may not ignite.
In addition, poor engine starting will certainly occur. The motor can run very hard and vibrate. An increase in fuel consumption is also one of the manifestations of damage to spark plugs. And finally, the dynamics of the car - it changes significantly, the loss of power makes itself felt. Having dealt with the necessary tools, we lift the hood.
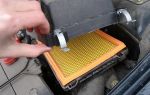
The photo below shows the view that we should see in reality. First of all, we need to remove the engine cover.
Replacing ignition coil tips for Toyota 1ZR engine
- RSS subscription
- Share Vkontakte
Source: http://bmw-motor.ru/avto22/zamena-svechey-toyota-corolla.php
Checking the condition and replacing spark plugs
All cars » Toyota Corolla (Toyota Corolla) .
Spark plug replacement tool kit
| 1. Spark plug socket wrench with rubber insert to protect the porcelain insulator 2. Torque wrench. Designed for tightening candles (although its use is optional)
3. Ratchet. Designed for wrapping and tightening candles |
4. Adapter. Designed for assembling connections and for loosening spark plugs in engines of various types. Depending on the vehicle and available tools, various types of adapters are used (including an extension with a universal joint) Designed to check the gap between spark plug electrodes, it has various designs. Make sure the kit includes the correct spark plug gauge for your vehicle. |
To replace spark plugs you will need a spark plug socket wrench with a ratchet.
The end head of the spark plug is equipped with a rubber insert to prevent damage to the porcelain insulator of the spark plug and also to hold the spark plug when installed in the cylinder head.
You will also need a round gauge to check and adjust the gap between the spark plug electrodes, and a torque wrench to tighten the spark plug (see Fig. Tool kit for replacing spark plugs ).
Set of calibers. Designed to check the gap between spark plug electrodes, it has various designs. Make sure the kit contains the correct spark plug gauge for your vehicle.
When replacing spark plugs, you need to purchase new spark plugs, set the gap and screw them in instead of the old ones, replacing each spark plug separately
When purchasing new spark plugs, make sure the type matches your vehicle.
The type of spark plug is indicated in the “General Technical Data” section, on the information plate on the back of the hood (VECI plate, which also indicates the emission standards for your vehicle), and in the vehicle’s operating instructions.
If the data from the indicated sources differs, then be guided by the data on the information plate, since it is the type of spark plugs indicated on the plate that corresponds to the type of engine of your car.
| EXECUTION ORDER | |||||
|
Removal
| EXECUTION ORDER | ||||
|
Installation
| EXECUTION ORDER | ||||
|
Source: http://toyotacorollamanual.narod.ru/toyota-23067-10.m_id-2510.m_id2-2514.html