How to replace a Toyota Corolla brake disc: do-it-yourself repairs
The ninth generation sedan Toyota Corolla E120 series in a short period of time from 2000 to 2007 was able to become one of the most popular models ever produced by the Japanese company.
Affordable price, excellent driving performance and, most importantly, safety - all this was also appreciated by domestic motorists.
You can already buy the eleventh generation of Corolla in showrooms, but not everyone wants to part with the proven ninth generation cars.
During the entire period of operation of the 120 series, many car enthusiasts were able to master techniques for eliminating simple breakdowns, which do not happen very often, but, unfortunately, do occur. An operation such as replacing a Toyota Corolla brake disc does not pose any particular problems for a driver who knows how to use keys and is interested in the structure of the car.
General information about the Toyota Corolla brake system
The machine is equipped with a hydraulic dual-circuit system, which is divided into front and rear wheels. The main cylinder has two tanks that supply both circuits with liquid; if one of them fails, the second will work. Installed brakes vary and are divided into:
- front – disc;
- rear - drum-disc.
When should brake discs be replaced?
The timing of replacement can be determined while driving; they are expressed in the following signs:
- wheel runout;
- car leaving a straight path when braking;
- extraneous knocking or grinding noise.
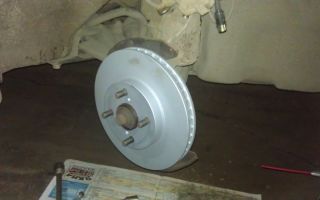
The manufacturer recommends installing a new part after replacing the second set of pads. Despite this, you should still carry out a preventive inspection and measure the thickness of the unit so as not to miss replacing faulty Toyota Corolla brake discs and not get into a difficult situation on the road. The company determined the following indicators for these nodes :
- for rear TDs, the minimum thickness is 8 mm;
- for front TDs the minimum thickness is 23 mm.
Algorithm for replacing front brake discs of Toyota Corolla E120
To carry out the work you need to prepare the appropriate tool :
- a set of keys;
- jack and wheel wrench;
- stand;
- thrust shoes;
- special lubricant;
- wire.
Now you can proceed directly to the operation.
So, point by point:
- Pump out the fluid from the brake master cylinder reservoir.
- Secure the vehicle with shoes, jack up the desired side, install a stand and remove the wheel.
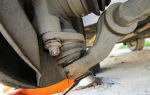
- Unscrew the lower caliper bolt, lift it up and tie it with wire.
- Remove the pads and unscrew the second caliper bolt and disconnect it from the bracket.
- Turn the steering wheel in the direction of work and unscrew the two bolts of the caliper bracket and remove it.
- Screw two M8 bolts into the special holes for dismantling until the disk is removed.
- Install a new disc and caliper bracket.
- Lubricate the guide bolt.
- Press in the piston of the brake cylinder and install the caliper.
When replacing brake discs on a Toyota Corolla, some drivers try to save money and not change the pads. This is an extremely frivolous act, because old pads have an uneven surface that matches the profile of the removed disc. Next, it’s easy to guess what will happen to the new part - it will also have uneven production.
Features of changing the rear discs of the Toyota Corolla brake system
This procedure is similar to that described above, with the exception of some points. Here they are:
- Release the handbrake.
- Before dismantling the disc, bring the handbrake pads together with a screwdriver.
- After replacing the pads, first spread them until there is no rotation, and then close them a little until they rotate freely.
After carrying out the work, it is necessary to fill in new fluid and bleed the hydraulic system. And remember, brakes need to be given special attention and kept in working order throughout their entire service life.
Source: http://autoclub.su/zamena-tormoznogo-diska-korola/
Replacing brake discs Toyota Corolla
Toyota cars have long been considered the undisputed leaders in sales in the markets. Directly, the Toyota Corolla is even listed in the Guinness Book of Records as the best-selling car in the world.
Toyota Corolla, despite the huge competition, has practically no analogues.
Few cars can boast the same excellent ratio of price, quality, wear resistance of parts and, most importantly, safety.
But, unfortunately, even such cars require maintenance and repair, especially if your car has already crossed the line of 10 years of operation.
What you should especially pay attention to are the brakes. And we're not just talking about Toyota cars. Good brakes mean excellent safety, or a saved pedestrian.
This article will focus on a more in-depth inspection of brake discs and pads.
Basic information about the brake system of Toyota Corolla
Corollas are equipped with a dual-circuit hydraulic system, divided between the front and rear wheels. The master cylinder has two containers that supply both circuits with liquid.
If one fails, the second will still work. Basically, these cars are always equipped with ventilated disc brakes at the front, and drum-disc brakes at the rear.
Each of these types of brakes adjusts automatically, regardless of pad wear.
When to change brake discs and pads
Without special knowledge, you can determine that the brake system is living its last days. The main signs of unstable brake operation:
- Periodic wheel runout when turning and driving on uneven surfaces
- Changing the vehicle's trajectory when braking
- Extraneous knocking or grinding noise when pressing the brake pedal
It is recommended to change both the disc and pads at once in order to increase their service life and improve the safety of the car. Despite this, it is still necessary to periodically inspect the brake system for preventive purposes.
Based on statistics from Toyota service centers, on average, front brake discs are replaced at a mileage of 100-130 thousand km. The rear ones are more resistant to stress.
In general, the principle of replacing brakes is almost the same for all cars, only the design feature of the brakes differs. Let's move on directly to the process of replacing the brake system:
- Remove fluid from the brake master cylinder reservoir.
- Jack up the car on the desired side and remove the wheel. Turn the steering wheel to the side as far as it will go.
- Unscrew the lower caliper bolt, disconnect it and hook it with a wire so that it is raised.
- Remove the pads, after which you can unscrew the upper caliper bolt and disconnect it from the bracket.
- Turn the steering wheel to the side where the replacement process is taking place, and unscrew the two bolts of the caliper bracket, then remove it.
- Screw two M8 bolts into the special holes for dismantling until the disk is removed.
- Install the new disc and caliper bracket.
- Lubricate the guide bolt.
- Press in the piston of the brake cylinder and install the caliper.
Many drivers, in order to save a little money, do not replace their brake pads with new ones. This is an extremely unreasonable act, because old worn-out pads have a surface that does not correspond to the new disc.
It is not difficult to imagine what will happen to the brake disc itself. It will also have uneven output and after a certain time you will experience a creaking or whistling noise when braking due to a small amount of play.
Features of replacing rear brake discs
This procedure is identical to replacing the front brakes, with the exception of some nuances:
- Release the handbrake
- Before removing the old disc, tighten the handbrake pads with a screwdriver
- After replacing the pads, first spread them until there is no rotation, and then close them a little until they rotate freely.
After the procedure for replacing brake discs and pads, it is necessary to fill in new fluid and bleed the hydraulic system. The most important conclusion: brakes should be given special attention and always kept in good condition. It doesn’t matter how fast a car goes, it is important that this car stops efficiently and quickly.
Read also
Source: http://grandrepairauto.ru/zamena-tormoznyh-diskov-toyota-corolla.html
Replacing brake pads Toyota Corolla detailed instructions, many photos
Replacing Toyota Corolla brake pads is usually required after 30-50 thousand mileage. Such a large range is associated with a large number of factors, ranging from driving style to the condition of the brake disc.
The front brake design of the Toyota Corolla is a disc mechanism with automatic adjustment of the gap between the pads and the disc with a movable caliper. A single-piston working brake cylinder is mounted on a movable bracket. The shoe guide is attached with two bolts to the steering knuckle.
The movable bracket is bolted to guide pins installed in the shoe guide holes. The guide pins are lubricated with grease and protected by rubber covers. A piston with an o-ring is installed in the cavity of the cylinder of the movable bracket.
Due to the elasticity of this ring, an optimal gap is maintained between the pads and the ventilated disc, the surface of which is protected by the brake shield.
Naturally, replacement of Toyota Corolla pads must be carried out on both wheels at once; when replacing brake discs, the pads also require replacement. The process of replacing pads on a Toyota Corolla is not much different from the same procedure on other similar cars, although it has its own characteristics.
We hang up the front of the car and remove the wheel. By inserting a mounting spatula or a screwdriver with a wide blade between the pad guide and the caliper and resting it on the guide, we move the caliper, recessing the piston into the cylinder. This will help us remove the old pads more easily.
Using a spanner or socket, unscrew the lower bolt securing the caliper to the guide pin while holding the nut with another wrench. Raise the caliper by turning it around the axis of the upper guide pin. We remove the pads from their guide.
Remove the two spring clamps of the pads. Using a metal brush, we clean the pad seats in their guide from dirt and corrosion. Before installing new pads, we check the condition of the protective covers of the guide pins. We replace the torn or lost elasticity cover.
To do this, remove the finger from the hole in the pad guide and remove the cover.
Before installing the pin, put a little grease (special high-temperature grease for brake pins) into the hole in the pad guide and apply a thin layer of lubricant to the surface of the pin. If your finger is covered with rust, be sure to clean it.
Another important point is the mandatory lubrication of the plate (which is placed on the block and covered with an overlay) with a special heat-resistant lubricant. Original pads come with lubricant included. Next in the photo you can see this plate, which is designed to prevent the pads from squeaking when braking.
Before installing new brake pads, it is necessary to move the piston as far as possible into the cylinder. To do this, use sliding pliers to press the piston into the cylinder.
We install new Toyota Corolla brake pads into the pad guide and lower the caliper. Now we screw the lower finger. After assembly, be sure to press the brake pedal several times so that the pads take their working position.
We check the brake fluid level in the reservoir and bring it up to normal if necessary.
Source: http://ruauto99.ru/2017/05/zamena-tormoznyx-kolodok-toyota-corolla-podrobnaya-instrukciya-mnogo-foto/
Replacing front brake pads for Toyota Corolla 150
To date, Toyota Motor Corporation has introduced the 11th generation of the famous Corolla brand. Its release began in 2012. Many car enthusiasts are faced with the need to service the brake system and, in particular, replace the brake pads.
Design features of the brake system
The Corolla has disc brakes on all four wheels, so replacing Toyota Corolla brake pads on the front and rear axles is not much different and not particularly difficult.
However, some features should still be taken into account when replacing these parts.
In order to change the pads on the Corolla in accordance with the manufacturer’s recommendations, you should not select this part yourself.
Brake pads offered by manufacturers vary in shape and thickness, attachment points, and the presence or absence of electronic wear sensors. The pads differ depending on the engine size, as well as the mounting method.
Different bases are used in production. For example, they could be:
- organic;
- ceramic;
- metallic (semi-metallic).
Purchase brake pads using the part number, and when choosing a manufacturer, give preference to well-known certified manufacturers such as TRW, Kashiyama, Nisshinbo.
Preparatory activities
Before changing the pads in a Toyota Corolla, place the car on a site without a slope. Be sure to block the wheels in both directions with wheel chocks and turn on the speed. You can apply the handbrake when replacing the front brake pads.
If the wear of the pads is decent (usually the front ones wear out a little faster), then you should take the brake fluid from the expansion tank. This is necessary in order to press the piston. Because of this, the volume of brake fluid in the system will decrease and some of it will overflow into the reservoir. Leave the brake fluid level at a minimum - this will be enough.
Procedure for replacing front brake pads
- Turn the steering wheel to the left (when replacing brake pads on the left side). Accordingly, to the right side - when the pads on the right side are replaced.
- Jack up the front side of the car and remove the wheel.
- Loosen the caliper mounting bolt.
To do this, insert a 17mm open-end wrench between the caliper and the rubber boot, and use a 14mm socket to unscrew the outer bolt.
- Remove the bolt and lift the caliper up.
- Remove the pads by moving them towards you and away from the brake disc.
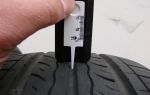
To monitor the condition of the brake disc, measure its thickness.
To do this, use a micrometer and measure the remaining thickness of the disk. It is allowed for the thickness to be at least 19 mm.
On the opposite side, the operations for replacing brake pads are performed in the same way.
Replacing rear brake pads on a Toyota Corolla also requires removing the wheel. However, unlike replacing the front brake pads, you may need to remove two guide bolts.
- Unscrew the top bolt first and then the bottom.
- Remove the bolts and pull out the caliper.
- Inspect the condition of the anthers and replace them if necessary.
A sign of damage to the boot may be difficult movement of the guides or the appearance of rust.
The rear pads differ from the front ones in that a bar indicating critical wear is riveted to the pad body at the factory.
On the opposite side, replacing the rear brake pads is done in the same way. During replacement, monitor the brake fluid level. If the level increases critically, some should be taken away. At the same time, be careful not to allow air to enter the system.
If the material was interesting or useful for you, publish it on your social network page:
Watch an interesting video on this topic
Source: https://eurasia-avto.ru/zamena-perednih-tormoznyh-kolodok-toyota-korolla.html
TOYOTA COROLLA
Mechanical brake pad wear indicators are installed in the wheel brake mechanisms.
Picture 1
They are metal plates fixed in a certain way on the internal brake pads. As the friction lining wears away, the plate gradually approaches the surface of the brake disc.
When the minimum permissible thickness of the lining is reached, the edges of the plate and disk touch. When braking, a characteristic creaking sound appears. This is a signal that the pads need to be replaced.
After the sound appears, you can drive the car, but you must avoid heavy braking and replace the brake pads as soon as possible.
To prevent the need to replace your pads from taking you by surprise, do not wait for the wear indicator to go off. Before a long trip or when rearranging wheels, visually check the degree of wear on the brake pads and discs.
You will need a caliper or ruler.
NOTE
If the car pulls to the side when braking or you hear extraneous noise, check the condition of the brake pads.
1. Place the car on a lift or jack.
Figure 2
2. Remove the front wheel.
Figure 3
3. Check the condition of the front wheel brake pads through the hole in the movable bracket housing. If the thickness of the friction linings is less than permissible, replace the brake pads (see “Replacing the brake pads of the front wheel brakes”).
Table. Dimensions of brake pads and discs of the service brake system, mm
| Parameter | Front brakes | Rear brakes |
| Brake disc thickness | 22 | 9 |
| Minimum brake disc thickness | 19 | 7,5 |
| Maximum brake disc runout | 0,05 | 0,05 |
| Brake lining thickness | 12 | 9,5 |
| Minimum thickness of brake pad friction lining | 1 | 1 |
NOTE
Figure 4
Only the thickness of the friction lining is measured (shown on a removed block for clarity). The thickness of the metal plate at the base of the block is not taken into account in the measurement.
Figure 5
4. Measure the thickness of the brake disc. If its thickness is less than acceptable (see Table), replace the brake disc (see “Replacing the brake disc of the front wheel brake mechanism”).
NOTE
The disc surface wears unevenly. There is a lip left on the outer circumference of the disc, so it is more correct to measure the thickness of the disc with a micrometer.
Figure 6
5. Check the mobility of the pistons and guide pins of the brake mechanisms with a screwdriver inserted between the disc and the brake pad. If the pads cannot be moved, it means that the piston in the brake cylinder or the caliper guide pins are jammed.
Figure 7
6. To check the degree of wear of the brake pads of the rear wheel brake mechanism, remove the wheel and check the condition of the pads through the hole in the movable bracket housing. If the thickness of the friction linings is less than acceptable (see Table), replace the brake pads (see “Replacing the brake pads of the rear wheel brakes”).
7. Measure the thickness of the brake disc. If its thickness is less than acceptable (see Table), replace the brake disc (see “Replacing the brake disc of the rear wheel brake mechanism”).
WARNING
After completing the checks, press the brake pedal all the way down several times. This is necessary in order to select the gaps in the brake mechanism that appeared after the pistons were pressed into the cylinders.
Source: http://ToyotAuto.net/corolla/proverka-stepeni-iznosa-tormoznyh-kolodok-i-diskov.html
Replacing the rear pads of a Toyota Corolla with disc brakes
Replacing the rear pads of a Toyota Corolla is required about half as often as replacing the front pads. That is, 70-80 thousand mileage for the rear pads of Toyota Corolla is normal. The disc brake mechanism of the rear wheels of the Toyota Corolla has a similar design as the front brakes.
The brake pads are actuated by a single hydraulic wheel cylinder. The optimal clearance between the disc and pads is maintained according to the same principle as for the brake mechanisms of the front wheels. In addition, the rear brakes also perform the additional function of a parking brake (handbrake).
The process of replacing rear disc brake pads on a Toyota Corolla is not complicated; you can carry out the replacement yourself. Instructions below.
1. Loosen the rear wheel nuts 2. Raise the car with a jack 3. Completely unscrew all the nuts and carefully remove the rear wheel. 4. Using a 12mm socket, unscrew the lower guide in the caliper. Use an open-end wrench to hold the nut. To avoid unscrewing both guides, unscrew only the bottom one. 5.
Move the caliper bracket up. 6. Remove the old pads 7. Clean them from pad dirt using a metal brush and remove the so-called anti-squeak plates from them. (Manufacturers advise changing them every time you replace the pads, but since they are difficult to find separately on sale, you can use the old ones) 8.
We install the plates on the new pads.
9. Install new pads.
Many people have a problem with the inability to recess the brake piston into the cylinder, because without this, new thicker pads do not allow the caliper to be put in place. The problem can be easily solved.
The brake piston of the Toyota Corolla pads must not only be pressed in, but also screwed in clockwise. To do this, you can use various tools of suitable size.
Let's look at the photo for clarity.
Since there are grooves on the bottom of the piston of the rear brake caliper cylinder, you can use pliers with long “jaws” when recessing and screwing in. Another photo with the caliper removed.
Some craftsmen make their own special tools themselves. To do this, you can take a long strip of iron and carve “horns” at one end, which will fit into the recesses in size. This special tool will come in handy in any case. After all, many modern cars with rear disc brakes have a piston of a similar design that needs to be recessed by screwing it in.
After installing the new Toyota Corolla rear pads, do not forget to press the brake pedal several times so that the pads fall into place.
Source: http://blaginin.net/2016/07/07/zamena-zadnix-kolodok-toyota-corolla/
Replacing Toyota Corolla brake discs: the best analogues, resource
The Toyota Corolla brakes are a hydraulic unit with two circuits, which is divided into the front and rear wheels. The main cylinder has two barrels in its design, through which the circuit is supplied with liquid. If suddenly one of them becomes unusable, then the other barrel takes on all the work.
Different units can be installed on the machine, namely rear drum-disc type and front disc. This and another type have automatic adjustment, but it is carried out depending on how worn the pads are.
The equipment at the rear acts as an additional hand brake and is equipped with a special adjustment mechanism that is activated during parking.
The brake system of a car is a unit that must always be in good working order, otherwise there is no need to talk about safety on the road. The driver should always know when it is time to diagnose a Toyota Corolla and whether the brake discs need to be replaced.
After the second pair of pads has been changed, the manufacturer recommends changing the system. Regular car maintenance and replacement of parts is the key to quality control on the road. It is definitely worth checking the necessary indicators for both system nodes. The discs at the rear should not be thinner than 8 millimeters, at the front 23 millimeters.
Brake discs are replaced on average every 130 thousand kilometers. From time to time you can remove scratches with the help of a groove, but such repairs do not provide a long-term effect.
To replace Toyota brake discs, you must first prepare all the necessary equipment for the job, namely: keys, jack, lubricant, stand, wire.
The principle of changing front brake discs is almost identical for any vehicle, but there are some features:
- The first thing you need to do is drain the brake fluid, then secure the vehicle with a shoe, lift the desired side of the car with a jack, put on a stand and remove the wheel.
- Next, the caliper bolt is unscrewed, lifted up and tied with wire. Only after this the pads are dismantled and the second bolt is unscrewed, which must be disconnected from the bracket.
- At the next stage, we turn the steering wheel to the side where we are doing the work, remove the bolts and dismantle the bracket. Insert M8 bolts into the dismantling holes until the disk is removed.
- Now we install a new disk, bracket, lubricate the bolt, fire the piston and install the caliper in place.
Many people try to save budget money, so replacing the front brake pads is left for later, but this is very stupid, because the surface between them and the installed disc becomes uneven, and it is difficult to predict the consequences of such wear.
In principle, in the Toyota Corolla, changing the rear units follows the same principle, only there are a couple of distinctive points. For example, you should definitely lower the handbrake, and before the dismantling procedure you need to bring the pads together using a screwdriver. After the replacement has been made, the pads must be moved apart so that there is no rotation, and then brought together again.
At the end of everything, new brake fluid must be filled in and the system must be bled. Remember that you should pay close attention to the brakes in your car. This is the part of the structure that you shouldn’t skimp on repairing and it’s better to do it right right away rather than worry about the car while driving.
Replacing brake discs on a Toyota Corolla Link to main publication
Source: http://CorollaCar.ru/remont/tormoznaya-sistema/zamena-tormoznyh-diskov-tojota-korolla.html
Toyota Corolla Verso Replacing front brake pads
Please enable JavaScript!
Removing the brake pads
Drain the brake fluid.
Remove the front wheel and temporarily secure the rim with two nuts.
Unscrew the bolt and disconnect the brake hose bracket.
Holding the guide pins, unscrew the caliper mounting bolts (Fig. 6.26).
Lift the caliper and secure it with wire.
Remove two anti-squeak springs, two brake pads, two anti-squeak pads holding the plate liners (Fig. 6.27).
Using a thin blade screwdriver, remove the pad wear indicators (Fig. 6.28).
Remove the guide pins from the caliper (Fig. 6.29).
Using a thin blade screwdriver, remove the sealing rings from the guide pins (Fig. 6.30).
Unscrew the caliper housing mounting bolts and remove the caliper (Fig. 6.31).
Holding the caliper in a vice with soft jaws, using a screwdriver and a hammer, remove the anthers of the guide pins (Fig. 6.32).
Using a screwdriver, remove the spring ring of the brake cylinder boot and the boot (Fig. 6.33).
Place a rag between the piston and cylinder.
Using compressed air, remove the piston from the cylinder (Fig. 6.34).
Using a screwdriver, remove the oil seal (Fig. 6.35).
Checking the brake pads
Measure the thickness of the brake pads with a ruler (Fig. 6.36).
Standard thickness: 12 mm.
Minimum thickness: 1.0 mm.
Checking the brake disc and brake components
Check for corrosion, wear and damage on the inner cylinder walls. Replace the cylinder body if necessary. Minor imperfections caused by corrosion or foreign particles can be removed by sanding the surface with fine emery cloth.
Replace the cylinder body if necessary. Check for wear, cracks and damage. Replace the relevant component if necessary. Check for corrosion, wear and damage on the piston surface.
Replace the relevant component if necessary. Check the guide pin and guide pin boot for corrosion, wear and damage. Replace the relevant component if necessary.
Check the surface of the brake rotor for uneven wear, cracks or serious damage.
Measuring brake disc thickness
Using a micrometer, measure the thickness of the brake disc (Fig. 6.37).
Standard thickness: 28 mm
Minimum thickness: 26 mm
Replace the disc if the disc thickness is less than the minimum permissible thickness.
Brake disc runout measurement
Place marks on the brake disc and the wheel hub axle bushing (Fig. 6.38).
Secure the brake disc to the wheel hub using wheel nuts (in 2 places or more).
Check the runout with an indicator (Fig. 6.39).
Measuring point:
At a distance of 10 mm from the outer edge of the disk.
Maximum runout: 0.05mm or less.
If the runout is significant, find the point of minimum runout by sequentially shifting the installation position of the brake disc on the hub by one hole.
Assembly
Apply lithium rubber grease to the piston seals and install them into the cylinder body (Fig. 6.40).
Install the brake cylinder boot spring ring and boot (Fig. 6.41).
Using a socket wrench (19mm) and a hammer, install the guide pin boots (Fig. 6.42).
Pre-lubricate the boots with lithium grease.
Install the brake cylinder body onto the brake disc and tighten the mounting bolts.
Tightening torque: 103 Nm.
Install the guide pins.
Install the brake pads.
Install the caliper.
Tighten the mounting bolts.
Tightening torque: 34 Nm.
Install the brake hose and tighten the fastening nut.
Tightening torque: 29 Nm.
Fill the barrel with brake fluid.
Check to see if brake fluid is leaking from the master cylinder.
Check the brake system pipes and hoses.
Bleed the brakes.
Install the wheels.
Source: http://vnx.su/content/avto/toyota/corolla-verso/6-2-10-zamena-perednih-tormoznyj-kolodok.html
Toyota Corolla e120. Replacing front brake pads, what to choose?
Toyota Corolla e120. Replacing front brake pads, what to choose?
A tedious squeak appeared in front, emerging during braking and dying after releasing the brake pedal. All this indicated wear on the front brake pads. Well, it looks like a couple has come to replace them with new ones! But what to choose? Original or substitute?
Selecting brake pads for Toyota Corolla e120
On the Internet on forums about the Corolla, discussions about the choice of pads unfold over dozens of pages and hundreds of messages! Some people recommend only the original, while others have cheap “China” ones that are no worse than the original. After studying hundreds of messages, I came to a small conclusion. In terms of price/quality ratio, there are three companies that should be bet on Toyota. I will list them in order of deteriorating quality.
- The first place is occupied by original Toyota brake pads, because... they don’t creak, the brake disc doesn’t wear down, but their exorbitant price of 2,000 rubles makes you think about a replacement.
- Next after the original, I recommend Akebono pads as a substitute - they don’t creak, the brake disc doesn’t wear down, they cost 1,300 rubles. The downside, according to users, is that they wear out faster than the original.
- In third place, as a substitute, you can put brake pads from Kashiyama - the disc eats up moderately, with a creak, if you're lucky, the price is 550 rubles.
Personally, I wanted to buy brake pads from Akebono, but only Kashiyama were available, and the seller praised them, supposedly all taxi drivers take them, no one has complained yet. I didn’t want to wait ten days for delivery, the old pads were completely worn out, so I decided to take a chance and check it out. Moreover, the price is almost 2.5 times lower!
Here they are, not expensive Kashiyama pads for Corolla
Replacing brake pads Toyota Corolla e120
Changing pads on a Toyota Corolla e120 is as easy as pie. I don’t see the point in describing how to do this; I don’t see any subtleties. I will only tell you about the unpleasant moments that arose for me.
A detailed description of replacing brake pads can be found in the Toyota Corolla e120 service manual. The only thing I noticed when replacing the brake pads was their uneven wear.
On the right side, the pads were ground to zero, and on the left wheel side, the pads could go another 10 thousand.
Compared to the left side, I noticed increased resistance when moving the caliper relative to the bracket. These two parts will be connected using two guide bolts. In them, increased resistance can be created for a number of reasons.
I decided to disassemble it, check for lubrication and wear on the guides themselves. As a result of the inspection, I did not see anything suspicious. When I started installing it, I tore one of the guide bolt boots (the screwdriver fell right into the rubber band).
A torn guide bolt boot cannot be left; it can lead to a number of serious consequences, including damage to the bracket.
It turned out that there were no boots available, so for the time being I had to install a not very good alternative - a boot from a VAZ 2109. It costs only 30 rubles, and it protects the guide bolt exactly the same.
In the meantime, a front caliper repair kit was ordered from TRW, which includes a complete set for repairing both calipers. The guide bolt boots are not sold separately! The cost of the repair kit is 520 rubles.
The original is 1.5 times more expensive.
While the repair kit was in progress, the low beam lamp on the right managed to burn out (mileage 111138). While disassembling the caliper once again, I never ceased to be amazed at the combination of design reliability and ease of maintenance of the Toyota Corolla e120.
Well, this time everything has been checked, all spare parts and tools are available. I'm actually starting to replace the pads. First of all, I change the guide bolt boot, lubricate it with special LiquiMoly lubricant, and at the same time clean and lubricate the pad seats.
Caliper guide bolt with new boot
I remove the brake piston of the cylinder all the way into the caliper (if the piston is not removed all the way, the new pads simply won’t fit in), and in the last millimeters a confusion occurs - the cylinder “blew” with brake fluid! It was exactly the same on the other side; at the very end, the cylinder let a little liquid come out. The reason is not clear to me.
Caliper cylinder leaking brake fluid
If I missed it, I missed it, so we’ll bleed the Corolla’s brake system. The only thing worth noting here is that you don’t need to be afraid of the pedal “sagging” after pumping. If you put a lot of pressure on it, it slowly begins to sink into the floor, this is due to the ABS system (at least that’s what the “service people” say).
Advice, before replacing, try to press the brake pedal hard and hold it in this position, after a while it will slowly begin to go down. Then you won’t have to call friends, go to service centers and Google for hours, looking for an answer to the question of why the brake pedal began to fail after replacing the brake pads.
PS: To make sure that the brake fluid was not going anywhere, I put a mark on the brake fluid reservoir with a marker and watched it for several weeks.
Consumption:
— Kashiyama brake pads – 550 rubles.
— TRW front caliper repair kit – 520 rubles.
— Lubrication of caliper guides – 140 rubles.
— Low beam bulb — “Mayak” 75 rub. x 1 piece, 75 rubles.
— Boot VAZ 2109 – 30 rubles.
Total: 1315 rubles.
Source: https://webhamster.ru/mytetrashare/index/mtb0/1432391030fmw73viwpz