Replacing the timing chain of Toyota Corolla (AURIS) E150 1.6 VVTi 124 hp. 2008 — logbook Toyota Corolla ZR-FE 1.6 124 2008 on DRIVE2
Hi all.
In general, I decided to change the chain after buying the car; there was a slightly rustling sound at idle. Removing the alternator belt reduced the sound a little, but it was still there. When it was cold, after parking for the night, after starting it there was a rattling sound for about a second, then everything was ok.
The mileage is about 140 thousand km, the previous owner bought the car new, it was serviced only by officials, the service marks are all there. The mileage doesn't seem to be great, but the condition of the chain is questionable. There is a lot of information about this on the Internet.
Some people have problems at this mileage, and others even at 300 thousand km. no problem. Many people start with the simplest thing: replacing the chain tensioner. It’s 50/50, it helped some, some didn’t.
In general, I decided to take the difficult path, replace everything with a kit and forget about this problem.
I did all the work myself, for the first time. Everything took 12 hours. All spare parts are original, except for the timing chain (DID) and the oil pump chain (DID).
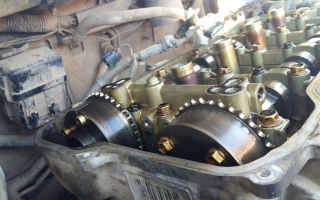
Full size
Timing chain kit
Full size
Chain tensioner
Also, along the way, I replaced the pump (AISIN) with a modernized one, although this one was already installed (changed under warranty at 45 thousand km, along with bolts) and was a little noisy.
Alternator pulley (INA), oil, antifreeze and filter.
Full size
Generator pulley
Full size
Alternator pulley installed
And so, let's go. Briefly about the replacement process, I won’t go into more detail, it’s in the manual.
We remove the valve cover, unscrew the spark plugs, the generator, the right engine mount, drain the antifreeze (there is a drain valve on the radiator), oil, remove the pump, the crankshaft pulley (unscrew it with a wrench), unscrew and remove the chain tensioner, the oil filter housing, disconnect the two pipes from the thermostat (not at all convenient, but I didn’t remove the intake manifold)
Full size
These two pipes are difficult to remove, they stick, there is very little access
Full size
Valve lid
Unscrew the side timing chain cover.
Now the fun part, we remove the chain and compare it with the new one. Here I was a little surprised, the length of the new and old chains is the same, i.e. The old one is not stretched at all. I didn't take a photo. BUT, the side sag was greater than the new one. I think that replacing just one tensioner could solve the problem with the rattling noise at startup and noise at idle. The old tensioner was pushed out just a little bit.
Full size
Old tensioner
But since everything has been disassembled and all the spare parts are there, I decide to change everything.
I'm installing new sprockets (crankshaft and oil pump), I haven't changed the phase regulators, I'm installing new dampers, chains, everything is as marked.
Full size
New chain installed
Full size
Oil pump chain with tensioner
I hooked the chain tensioner damper with a wire to keep it tight. Next, we clean the side cover of the old sealant (we also clean it on the engine), apply new sealant (we used gray Victor Reinz), install and tighten the cover.
There are 3 o-rings in the lid, I bought them, but for some reason they didn’t fit, so I didn’t change them. We install a new tensioner with a new gasket (in the cocked state with the hook engaged). Now you need the tensioner to work and tighten the chain.
According to the manual, it says to turn the crankshaft counterclockwise until the hook comes off. I didn’t do that, I immediately took a long screwdriver and manually moved the hook. We remove the wire that was attached to the damper. Next, turn the crankshaft clockwise, listen for clicks (this is the tensioner rod extending and tensioning the chain).
I didn’t hear the tensioner click, but there was a loud click for one revolution of the crankshaft, no matter how much I turned it, it didn’t go away, although the chain was already tensioned.
Next, we collect everything in the reverse sequence.
Full size
Diluted antifreeze
New oil and new antifreeze (toyota red) were poured the next day so that the sealant would dry properly. About 5 liters of antifreeze came in. I did not drain the block. I did not change the valve cover gasket, many write that it is reusable. I was unlucky, after the repair I started to snot a little, not critical. I'll change it next time.
Now is the most exciting moment. We start it up and listen to the engine work with peace of mind. The extraneous sounds have all disappeared, and there is no rattling noise when starting up cold. Spare parts that were installed: 1. Timing chain(DID Daido Kogyo co., LTD) 05FK SDH 140 LE - 51$2. Oil pump chain (DID) 215FDDHA52LE - $153. TOYOTA Crankshaft Star 1352137011 - $84.
TOYOTA Oil Pump Star 1351937010 - $45. Timing chain tensioner TOYOTA 1354037030 - $206. Chain tensioner gasket TOYOTA 1355237010 - $27. Upper damper TOYOTA 1356237010 - $178. Calculator TOYOTA 1355937050 - $189. Calculator TOYOTA 1356137050 - $3410. Oil pump chain stabilizer TOYOTA 1354937010 - $611.
Pump AISIN WPT-140 (This pump comes in the original packaging) - $4512. Antifreeze 5l. TOYOTA 0888980014 red concentrate - $3513. Distilled water - $213. Alternator pulley INA 535020810 - $45 (Litens included in the package)14.
Oils titan 5w-30 $25 Filter left over from the previous owner Total spare parts: $327 Spare parts were purchased at a discount, so the price may differ from the market price.
Thank you for your attention, full tanks and good luck on the roads everyone.
Issue price: $327 Mileage: 139,000 km
Source: https://www.drive2.ru/l/490469048480432461/
Toyota Corolla timing chain replacement
Cars with the 1ZZ engine configuration are increasingly conquering the global car market. This is because these engines are equipped with a timing chain (timing chain) instead of a traditional belt and have a number of advantages.
Firstly, replacing a chain on a Toyota Corolla is not done as often as replacing the timing belt of an engine with the same displacement. Secondly, with a power of 140 horsepower, fuel consumption is much less than that of engines 7A, 4S (engines with a timing belt). Thirdly, despite the small engine displacement (1.8 liters), it has more power than engines with a timing belt.
The gas distribution mechanism is of great importance in the operation of both the engine and the entire machine as a whole. With its help, fuel is supplied to the engine cylinders and combustion products are removed.
The movement of this mechanism is carried out using a chain or belt connecting two gears. Thus, the chain or belt plays the role of a transmission mechanism when the engine is running, and a rupture of this mechanism will inevitably lead to the cessation of engine operation.
Toyota Corolla car owners often ask themselves the question: “how often should the car’s timing chain be changed?” You can easily answer this question like this.
If you hear noise from the front of the engine when driving, you should know that the timing chain needs to be replaced. Of course, it shouldn’t tear, but you are guaranteed discomfort while driving.
The process of removing and installing the timing chain
In order to replace the chain on a Toyota Corolla, you need to purchase the following components:
- the timing chain itself;
- hydraulic chain tensioner;
- shoe;
- drive belt.
Do not rush to contact specialists at a service station to replace the chain. You will simply pay money for work that you can do yourself. Although this is a labor-intensive process that requires a lot of attention, it is still within the power of a car enthusiast.
You can replace the timing chain of a Toyota Corolla yourself without the help of service station specialists. But you need to understand that if you are not confident in your abilities, then it is better to seek help from specialists.
Timing Chain Removal Guide
- Remove the engine protective cover and spark plug ignition coil.
- Remove the valve cover. Here I would like to note that the gasket, which is located under the valve cover, is reusable and should not be thrown away, as it can be used again.
- Having secured the car in a stationary state using a jack or other lifting mechanisms, remove the front right wheel and the protection (fender liner), which is located in the wheel arch.
- After this we gain access to the pulley on the crankshaft. Having gained access to the pulley, jack up the engine and remove the support to gain access to the belt.
- Release the belt tension and carefully remove it. (The belt in a Toyota Corolla performs many functions. With its help, torque is transmitted to the generator, power steering, and air conditioning).
- After removing the belt, we lock the crankshaft pulley by jamming the flywheel. Unscrew the bolt on the crankshaft pulley and remove it from the key.
- Having completed these operations, remove the generator and power steering pump to gain access to the side cover and unscrew it.
- Drain the antifreeze, remove the hydraulic tensioner and shoe.
- In order to remove the chain, we need to pull out the lower sprocket, it moves without problems along the crankshaft at a distance of 10-12 mm, then we remove the chain itself.
- After removing the chain, you must thoroughly clean everything from contamination using compressed air and begin installing a new chain.
Timing Chain Installation Guide
- At the beginning of assembly, we place marks on the camshaft pulleys and the crankshaft. This is very important for the normal operation of the car.
- Now let's start installing the chain. We install the chain first from above and then from below.
- Before replacing the chain on a Toyota Corolla is completed, you should tension it; to do this, cock the chain tensioner using a hook and put it in place, tightening the mounting bolts. Only after this we remove the hook. Thanks to this procedure, the rod takes its place and the chain is tensioned.
- After installing the chain, install the side cover and tighten it.
All subsequent assembly is carried out exactly the opposite.
Replacing the timing chain on a Toyota Corolla Link to main publication
Source: http://CorollaCar.ru/remont/dvigatel/zamena-cepi-grm-tojota-korolla.html
Apparently the time has come. Replacing the timing chain. — Community “Toyota Corolla E12, Allex, Runx, Fielder” on DRIVE2
I decided to repost my report on replacing the timing chain in November 2014. The report was written two years ago and is read from time to time, but in recent months interest in this post has grown hundreds of times.
In just a few months, it has already been viewed by almost 15,000 people. Apparently the time has really come when the owners begin to worry about the condition of the timing belt and are planning a replacement.
Perhaps my experience in this matter will help someone.
I set out to change the chain. The chain did not rattle, the engine ran smoothly. The only causes were a leaking windshield seal and a similar problem with the valve cover gasket. At the same time, I wanted to inspect the condition of the engine for oil deposits. The mileage at the time of repair was 230,000 unrolled kilometers.
The chain was original, almost sure it was still factory.
Before the repair, I consulted with a friend who has been doing repairs for many years, including Toyota. He was very surprised at my impulse to replace the chain, because... Based on my professional experience, I am sure that the chain on our cars, with proper care, lasts 500,000 km.
On Prado, the chain is generally designed for the entire service life of the car.
Beginning of work. TO 230
Correct installation of marks on camshafts. Marks on the stars that are not visible in the photo are marked in red.
Fixing the camshaft with a chrome vanadium assistant :)
I will not describe the entire replacement process; this has been done before me more than once. If anyone needs it, I can give you a link to the forums. I will only dwell on some points that caused difficulty: 1) Life hack. It is profitable to buy the entire set of gaskets for the engine at once.
The kit also includes valve stem seals - you may need them someday. I pre-ordered from existential with delivery in 22 days. It turned out quite inexpensively. 2) There was a difficulty when installing the chain; I didn’t understand at all why I needed to turn the shafts somewhere.
Especially “turn the crankshaft 40-140 degrees” that threw me off track! In life I am very responsible and pedantic, but here 40 -140 degrees, not 40 or 140, but exactly 40 dash 140! And it’s not clear in which direction. After thinking, I decided not to twist anything, but to put the chain on according to the marks, in the position of the shafts as I removed the old one.
As I understand it, all these degrees and turns are needed to put the chain on the sprockets. Because the chain simply won’t fit. I did this, threw the chain along the marks on the camshaft sprockets, then releasing the free movement of the chain by turning the crankshaft first to the left, then to the right, I put the chain on the crankshaft.
Perhaps this is why these degree turns described in the manual are needed? For this procedure, I had to screw a nut onto the crankshaft to make it possible to rotate it with a wrench. 3) After installing the chain and bringing the tensioner into working position, I decided to make sure that the assembly was correct.
Turn the crankshaft by the bolt with a wrench; I have already screwed the nut there. The engine turned easily, but I was surprised that not on the second or even on the fourth lap, all three chain marks did not coincide with the marks on the shaft sprockets.
I had to call the specialist again. It turns out that this is normal and the marks will fall into place after ten circles :) He explained for a long time why this was so, about the different sizes of stars, about the formula by which one can calculate the coincidence of marks. In general, after a few more turns, all the marks fell into place. Everything immediately eased up. Can be assembled/filled/started.
It started the first time and immediately stalled. Then it seized and began to stall until I helped with the throttle. Apparently because of the new spark plugs.
As a result:
• the engine is clean, with a slightly yellow oily film. Let me remind you the mileage is 230tkm. The oil for the first 4 years of life in Russia was Eneos 5W-30, now for the second year I have been pouring Toyota 5W-30 from a tin can. Replace every 5-7tkm. Oil consumption 200-400g. by 5-7 t.km.
The engine is quite clean.
• When replacing the chain tensioner, it was extended by a maximum of one third. I’m sure that I could travel another 200 thousand km with it.
Here you can see how far the tensioner is cocked.
The tensioner has been dismantled, the remaining working stroke can be seen from the oil trail.
• The chain was not stretched even a millimeter!
Chains. New on the left, old on the right
Check for stretch. It was not possible to check the example described in the manual; it seems to me that there is an error in the numbers, or I did something wrong.
• There was no wear on the damper/tensioner bars!
The main thing is that everything should have its place :)
Spark plugs with 55t.km mileage. Regular, not iridium.
P.S. It’s funny to read when people on the forum claim that the chain needs to be changed (almost like a belt) at 100 tkm. Or when owners change an elongated chain and claim a mileage of 90 thousand km on a 12-14 year old car. This is nonsense, this can only happen in Far Eastern fairy tales. Even the Japanese grandmother, who drove to supermarkets in her youth with your current car, has driven more.
Conclusion: If you are confident in the mileage of your car. If the chain does not ring and the engine is in a “clean” state. I wouldn’t even bother with the timing belt until 300t.km. exactly, and perhaps more. In addition, new original parts are often inferior in quality to those installed at the factory.
Source: https://www.drive2.com/c/450868213060732196/
Toyota Corolla Forum
Toyota Corolla maintenance reports, questions, problems and solutions.
AlekseichHonored Korolovod Messages: 2080 Registered: Mar 09, 2013, 07:34 pm Thanked: 1 time
#2
Post by Alekseich » June 02, 2013, 10:33
I won’t say anything about Toyota, the two previous cars were Almeria classics, they also have a chain, on the first the mileage was 290t.km in three years, on the second 222t.
km two years without a month, the chains were in perfect order, there were no prerequisites for replacement, oil change strictly every 10 thousand km, synthetic oil was Helix ultra 5/40, highway driving 80%.
If you change the oil while changing the oil and don’t tear the car so that the tires burn instead, then the chain should take a long time to come off. I hope that on a Corolla it should at least withstand 300t.km.
aleks 69 Honorary Korollov Messages: 5379 Registered: 19 Feb 2013, 20:01 Car: Corolla Elegance 2012 1G3 Reistal automatic transmission, oil XenumX1 5w30 Location: Moscow Thanked: 3 times Thanked: 16 times
#4
Post by aleks 69 » 02 Jun 2013, 15:58
when the chain is stretched, the phases will wander, hence the prerequisites for replacement
Do you want your car to run? Do it yourself. Nobody needs it in a car service for 100 years. They need your money!
KO4ETblg Messages: 236 Registered: Jan 11, 2013, 09:48 Car: Corolla March 2014, 1.6 handle Location: Lipetsk
#5
Post by KO4ETblg » 02 Jun 2013, 22:17
I talked with an acquaintance from Toyota Center Lipetsk, the chain can safely take care of 150-180 thousand km, but not only it needs to be changed, but also the sprockets on the timing mechanism, which are not sold separately from the mechanism and are quite expensive. I didn’t understand the issue, I don’t plan on such a mileage, so I’m selling it for what I bought it for.
basyrych70 Messages: 1 Registered: 09 Nov 2013, 17:57 Car: Toyota Carolla 2005
#7
Post by basirych70 » 09 Nov 2013, 21:02
I bought a Toyota 2005. The carolka runs smoothly, but sometimes there is a small slight rattling, that is, no, in the front part of the engine I can’t smell what kind of canoe, tell me
Odyssey Messages: 22 Registered: November 26, 2013, 11:52 Car: Toyota Corolla Location: North Caucasus Federal District
#8
Post by Odysseus » November 29, 2013, 2:02 pm
Can anyone tell me that the problem is that when accelerating, the clattering of valves when it’s hot. When the engine is cold, you can’t hear any sounds... Corolla 2007, 1.6 1zr engine??? Who can advise what???? Mileage over 100,000 I can’t say for sure the car is recent, I think it’s worn out.
aleks 69 Honorary Korollov Messages: 5379 Registered: 19 Feb 2013, 20:01 Car: Corolla Elegance 2012 1G3 Reistal automatic transmission, oil XenumX1 5w30 Location: Moscow Thanked: 3 times Thanked: 16 times
#9
Post by aleks 69 » 29 Nov 2013, 16:53
There was a topic, see the detonation section, it might help.
Do you want your car to run? Do it yourself. Nobody needs it in a car service for 100 years. They need your money!
DyushaHonored Korollovod Messages: 11430 Registered: March 30, 2013, 01:53 pm Car: Corolla, 2011, 4 automatic transmission, 1.6 l petrol diesel, Comfort+, drank more than 9700 l/Ai92, Toebta 0W20 Location: 133, Kovrov Thanks : 7 times Thanked: 24 times
#10
Post by Dyusha » November 30, 2013, 01:23
At what speed does it rattle? Wash the hydraulic chain tensioner.
Odyssey Messages: 22 Registered: November 26, 2013, 11:52 Car: Toyota Corolla Location: North Caucasus Federal District
#11
Post by Odysseus » November 30, 2013, 10:33 pm
The sound comes out after 1500 t, it’s very unpleasant... Today I visited a mechanic and thought about changing the chain, but he said that it’s not a chain... I can’t hear it when it’s cold, only when the engine is warmed up the sound...
Go
Source: http://tc-club.ru/viewtopic.php?t=747
Replacement – Chain block (3zz–fe/4zz–fe) – Toyota Corolla Repair Manual (Toyota Corolla)
1. REMOVE ENGINE LOWER COVER, LEFT SIDE. 2. REMOVE ENGINE LOWER COVER, RIGHT SIDE. 3. DRAIN COOLANT (See pages 16–20). 4. REMOVE FRONT RIGHT WHEEL. 5. REMOVE NO. 2 CYLINDER HEAD COVER.
(a) Remove the two nuts, two clamps, and remove the cylinder head cover.
6. REMOVE THE FAN AND ALTERNATOR V-BELT.
(a) Slowly turn the ribbed V-belt tensioner clockwise and loosen it. Then remove the fan and alternator belts, gradually reinsert the ribbed V-belt tensioner, and then secure it.
7. REMOVE NO. 1 Ribbed V-BELT IDLE PULLEY UNIT.
(a) Remove the nut, bolt, tube and idler pulley.
8. REMOVE GENERATOR UNIT (See page 19-20). 9. REMOVE THE TRANSVERSE ENGINE MOUNTING INSULATOR.
(a) Place a block of wood between the jack and the engine, install the jack, and then remove the four bolts, two nuts and engine mount insulator, right side.
10. REMOVE IGNITION COIL ASSEMBLY.
(a) Disconnect the four connectors.
(b) Remove the four bolts and four ignition coils.
11. DISCONNECT THE ENGINE ELECTRIC WIRE..
(a) Disconnect the connectors.
(b) Remove the three clips from the three clip brackets.
(c) Remove the bolt and nut securing the motor wiring.
12. DISCONNECT VENTILATION HOSE.
(a) Disconnect the breather hose from the cylinder head cover.
13. DISCONNECT VENTILATION HOSE #2.
(a) Disconnect the breather hose from the cylinder head cover.
14. REMOVE CYLINDER HEAD COVER BLOCK.
(a) Remove nine bolts, two sealing washers, two nuts, three clamp brackets, and remove the cylinder head cover assembly.
15. SET NO. 1 CYLINDER TO TDC/COMPRESSION.
(a) Rotate the crankshaft pulley and align its groove with the “0” tooth mark on the timing chain cover.
(b) Check that the dot marks of the crankshaft gear and VVT gear are in a straight line on the surface of the timing chain cover as shown in the figure.
ADVICE:
If this is not the case, then rotate the crankshaft one revolution (360°) and align the marks as described above:
16. REMOVE THE CRANKSHAFT PULLEY.
(a) Using SST, remove the pulley bolt.
SST 09960–10010 (09962–01000, 09963–01000):
(b) Remove the crankshaft pulley from the crankshaft.
17. REMOVE THE Ribbed V-BELT TENSIONER UNIT.
(a) Remove the bolt, nut and ribbed V-belt tensioner.
ADVICE:
To remove the bolt, raise and lower the jack:
18. REMOVE WATER PUMP ASSEMBLY.
(a) Remove the six bolts, water pump and O-ring.
19. REMOVE THE TRANSVERSE ENGINE MOUNTING.
(a) Remove the three bolts and the transverse engine mount.
20. REMOVE THE CRANK POSITION SENSOR.
(a) Remove the two bolts securing the crank position sensor.
21. REMOVE NO. 1 CHAIN TENSIONER UNIT.
(a) Remove the two nuts and remove the chain tensioner
ATTENTION:
Do not rotate the crankshaft without a chain tensioner.
22. REMOVE THE CHAIN OR TIMING BELT COVER UNIT.
(a) Remove eleven bolts and nuts.
(b) Using a socket wrench (E8), remove the threaded rod.
(c) Remove the chain cover by using a screwdriver to pry up the areas between the cylinder heads and the cylinder block.
ATTENTION:
Be careful not to damage the contact surfaces of the chain cover, cylinder heads and cylinder block.
23. REMOVE GEAR COVER OIL SEAL.
(a) Remove the oil seal using a screwdriver.
24. REMOVE NO. 1 CRANKSHAFT POSITION SENSOR DISK.
(a) Remove the crankshaft position sensor disc from the crankshaft.
25. REMOVE CHAIN TENSIONER GUIDE BAR.
(a) Remove the bolt and chain tensioner guide bar.
26. REMOVE CIRCUIT UNIT.
(a) Remove the chain and crankshaft gear by prying them off with screwdrivers as shown in the figure.
ATTENTION:
• Place a rag or similar material to protect the engine.
• If it is necessary to rotate the crankshafts with the chain removed from the gears, turn the crankshaft 1/4 turn for the valves without touching the pistons. 27. INSTALL CIRCUIT BLOCK.
(a) Set the No. 1 cylinder to TDC/compression.
(1) Turn the crankshaft heads using a hex wrench and align the dot marks of the crankshaft gears.
(2) Using the pulley bolt, rotate the crankshaft and position the adjusting wrench in the upper direction on the crankshaft.
(b) Install the chain on the crankshaft sprocket, aligning the yellow chain link with the tooth mark on the crankshaft sprocket.
ADVICE:
The chain has three yellow links:
(c) Secure the gear using SST.
SST 09223–22010:
(d) Install the chain onto the crankshaft sprockets, aligning the yellow chain links with the tooth marks on the crankshaft sprockets.
28. INSTALL CHAIN TENSIONER GUIDE BAR.
(a) Attach the chain tensioner guide bar with a bolt.
Torque: 19 N·m (194 kgf·cm, 14 ft·lbf)
29. INSTALL NO. 1 CRANKSHAFT POSITION SENSOR DISC.
(a) Install the disc with the “F” (3ZZ-FE) or “B” (4ZZ-FE) mark facing forward.
30. INSTALL GEAR COVER OIL SEAL.
(a) Apply MP grease to the lip of the oil seal.
(b) Using SST and a hammer, lightly tap the new oil seal until its surface is flush with the edge of the chain cover.
SST 09223–22010:
ATTENTION:
Do not allow foreign objects to come into contact with the seal lip.
31. INSTALL THE CHAIN OR TIMING BELT COVER UNIT.
(a) Remove old sealing material from the contact surface.
(b) Apply sealant in the form of a small ball (3.5 - 4.5 mm (0.1379 - 0.177 in) in diameter) as shown in the illustration.
Seal:: For water pump: Part No. 08826–00100, or equivalent: For other parts: Part No. 08826–00080, or equivalent:
(c) Secure the chain cover with eleven bolts and a nut.
Tightening torque: 13 Nm (133 kgf cm, 10 ft lbf) (M6) 19 Nm (194 kgf cm, 14 ft lbf) (M8)
ATTENTION:
• Remove oil from the contact surface. • Install the oil pan within three minutes of applying the seal.
• Do not add engine oil within two hours after installation.
(d) Using a socket wrench (E8), install the threaded rod.
32. INSTALL CHAIN TENSIONER UNIT #1.
(a) Check that the O-ring is clean and install the hook as shown in the figure.
(b) Apply engine oil to the chain tensioner and secure it with two nuts.
Torque: 9.0 Nm (92 kgf cm, 80 in. lbf)
ATTENTION:
When installing the chain tensioner, reinstall the hook if it releases the piston.
33. INSTALL THE CRANK POSITION SENSOR.
(a) Apply engine oil to the crank position sensor O-ring.
(b) Secure the crank position sensor with two bolts.
Torque: 9.0 N·m (92 kgf·cm, 80 in.·lbf)
34. INSTALL THE ENGINE MOUNTING TO THE TRANSVERSE ENGINE.
(a) Secure the transverse engine mount with three bolts.
Torque: 47 N·m (479 kgf·cm, 35 ft·lbf)
35. INSTALL WATER PUMP ASSEMBLY.
(a) Install a new O-ring on the chain cover.
(b) Secure the water pump with six bolts.
Torque: Bolt A: 9.0 Nm (92 kgf cm, 80 in.lbf) Bolt B: 11.0 Nm (112 kgf cm, 8 ft lbf)
36. INSTALL THE Ribbed V-BELT TENSIONER UNIT.
(a) Secure the ribbed V-belt tensioner with a nut and bolt.
Torque: Nut: 29 Nm (296 kgf cm, 21 ft. lbf) Bolt: 69 Nm (704 kgf cm, 51 ft. lbf)
37. INSTALL CRANKSHAFT PULLEY.
(a) Align the pulley setting wrench with the groove of the pulley key and slide the pulley.
(b) Secure the crankshaft pulley bolt with SST.
SST 09960–10010 (09962–01000, 09963–01000): Tightening torque: 138 Nm (1407 kgf cm, 102 ft lbf)
(c) Turn the crankshaft counterclockwise and remove the piston pin from the hook.
(d) Turn the crankshaft clockwise and check that the guide bar is pressed by the piston.
ADVICE:
If the piston does not press out, then press the guide bar against the chain tensioner with a screwdriver or finger so that the hook is removed from the pin and the piston is pressed out.:
38. INSTALL THE CYLINDER HEAD COVER BLOCK.
(a) Remove the old sealing material (FIPG).
(b) Apply sealant in the two places shown in the figure.
Seal: Part No. 08826–00080 or equivalent.
ATTENTION:
• Remove oil from the contact surface. • Install the cylinder head cover within three minutes of applying the seal.
• Do not add engine oil within two hours after installation.
(c) Secure the cylinder head cover and three cable brackets with nine bolts, two sealing washers and two nuts. Tighten the bolts and nuts evenly in several passes.
Torque: Without washer: 11 Nm (112 kgf cm, 8 ft lbf) With washer: 9 Nm (92 kgf cm, 80 in. lbf)
39. INSTALL IGNITION COIL ASSEMBLY.
(a) Secure the four ignition coils with four bolts.
Torque: 9.0 N·m (92 kgf·cm, 80 in.·lbf)
40. INSTALL ENGINE WIRING.
(a) Secure the motor wiring with a bolt and nut.
Torque: 9.0 N·m (92 kgf·cm, 80 in.·lbf)
41. INSTALL THE TRANSVERSE ENGINE MOUNTING INSULATOR.
(a) Secure the engine mount insulator located on the right side with four bolts and two nuts.
Torque: 52 N·m (530 kgf·cm, 38 ft·lbf)
42. INSTALL ALTERNATOR UNIT (See page 19–20). 43. INSTALL NO. 1 Ribbed V-BELT IDLE PULLEY UNIT.
(a) Install the tube and idler pulley using a nut and bolt.
Torque: 39 N·m (400 kgf·cm, 29 ft·lbf)
44. INSTALL NO. 2 CYLINDER HEAD COVER.
(a) Secure the cylinder head cover with two nuts and two clamps.
Torque: 7.0 N·m (71 kgf·cm, 62 in.·lbf)
45. INSTALL FRONT RIGHT WHEEL. Torque: 103 N·m (1050 kgf·cm, 76 ft·lbf)
46. FILL WITH COOLANT (See page 16-20). 47. CHECK FOR ENGINE COOLANT LEAKS (See page 16-15). 48. CHECK FOR ENGINE OIL LEAKS.
Source: http://toyota-omg.ru/14_dvigatel_mehanicheskaya_chast/blok_tsepi_3zzfe4zzfe/zamena.html
Replacing the Toyota Corolla Chain Tensioner
How to change the timing chain on a Toyota Corolla
When to change the timing chain?
A timing chain is even better than a belt and lasts much longer, but from time to time you have to change it too. This is due to normal wear and tear because the chain can stretch.
When it comes to Toyota Corolla, replacing the timing chain is resorted to when the element can no longer be tightened. If the chain is stretched, it can no longer be restored by adding links.
If the part is stretched, the gas distribution of the car will be disrupted and the engine will not work normally.
In addition, a stretched chain will lead to rapid wear of the engine boot, and can also destroy the damper, changing which every month is quite a precious pleasure.
You will know that the timing chain has stretched because the engine begins to run noisily. It needs to be replaced urgently because if it breaks, the car will suffer severe damage.
How to replace the timing chain on a Toyota Corolla?
Toyota Corolla is not the most fastidious car, but the timing belt may require repairs. This feature can be done in your garage. It is not necessary to disassemble the front part of the engine to replace the timing chain.
Method No. 1
If you do not want to take risks and waste a lot of time doing pointless work, use the following method: remove the front cover and crankshaft pulley.
This will allow you to get to the appropriate element without riveting its links.
Your Corolla can suffer severe damage if the chain opens on its own due to careless operation, and the method of accessing it through the crankshaft will protect you from this risk.
GR mechanism schematically
To replace it, you will need to carefully open the links of the stretched chain, then the broken part is connected to the new one and pulled forward in such a way that the new part takes the place of the old one, holding all the sprockets.
The part is stretched to the place where the disconnected link is located, then it is necessary to rivet the links of the new chain. This method has one drawback, but it is quite significant. By using this method of repairing the timing belt of a Toyota Corolla, you will significantly reduce the life of the new timing chain.
Another problem may be the lack of a good connection. Such a substitution should be done only in the latter case, if you have no other choice.
Replacing the hydraulic chain tensioner 1zz-fe. Chain chattering on Toyota Premio
Replacing the hydraulic tensioner together with the ring on the 1zz-fe engine. The prerequisite for the replacement was the chattering of the chain when hot.
Toyota Corolla E120 engine sound before and after replacing the timing chain tensioner
Toyota Corolla E120 A metallic sound appeared when starting the engine, later it began to appear at speed and...
Method No. 2
There is another, much more reliable method of replacing this element, but it requires more time and skill than the previous one.
To do this, you will first have to remove the battery terminals, definitely disconnecting the plus, remove the air filter so that it does not interfere, and the valve covers for the same reason.
Then you need to set the engine according to the marks made by the manufacturer. The mark on the camshaft sprocket should coincide with the mark located in the center of its housing. The bottom mark should match the mark on the crankshaft pulley.
The marks should align on the motor cover, which is located in front.
The ratchet holding the crankshaft pulley is moved to the side, then the engine is turned with a special wrench with a flat base. Having placed the engine in the required position, remove the wires from the ignition coil and turn on the starter. The ratchet will come off either the first time or after several attempts.
https://www.youtube.com/watch?v=8dKfXa4btsg
Then you need to remove the crankshaft pulley and unscrew the front engine cover. Loosen the tensioner bolts and remove it. You will need to check the boot and remove the auxiliary shaft sprocket. Only then can the part itself be removed. This method will take a lot of time, but it is safer for the motor, and you will not ruin the new chain.
Before assembly, check that the sprockets are not damaged. This is quite simple to do: put a chain on them. If there is no play, then the sprockets are working. Most often you have to change them too.
After installing the chain, you need to assemble everything in the reverse order. Do not immediately tighten the sprocket bolts. First you need to make sure that the marks on the engine and the cover match the ones we used to set everything at the beginning.
If yes, then feel free to tighten it, if not, bring the marks into line.
Repairing a timing belt on a Toyota Corolla is not a simple task, and if you are not confident in your abilities, it is better to contact specialists.
Source: http://avto-melvin.ru/zamena-natjazhitelja-cepi-toyota-corolla/
Manual.CountryAuto.ru:
The components of the timing chain are shown in Fig. 2.121.
Removing the right engine mount cushion
Remove the bolt, then disconnect the fuel return pipe (Fig. 2.122).
Remove 2 bolts, then disconnect the oil tank bracket No. 1 (Fig. 2.123).
Place a wooden block on the jack and place the jack under the engine.
Remove 4 bolts and 2 nuts, then remove the right engine mount cushion (Fig. 2.124).
Removing the ignition coil
Disconnect the 4 ignition coil connectors (Fig. 2.125).
Unscrew the 2 nuts, then remove the engine wiring harness (Fig. 2.126).
Remove the 4 bolts, then remove the 4 ignition coils (Fig. 2.127).
Removing the cylinder head cover
Disconnect the crankcase ventilation system hose from the cylinder head cover (Fig. 2.128).
Disconnect hose No. 2 of the crankcase ventilation system from the crankcase ventilation system valve (Fig. 2.129).
Remove the 3 clamps securing the engine wiring harness from the bracket.
Unscrew 9 bolts, remove 2 sealing washers, unscrew 2 nuts, remove 3 mounting brackets, then remove the cylinder head cover (Fig. 2.130).
Removing the poly V-belt tensioner assembly
Unscrew the bolt and unscrew the nut, then remove the poly V-belt tensioner (Fig. 2.131).
Removing the right engine mount bracket
Remove 3 bolts, then remove the right engine mount bracket (Fig. 2.132).
Remove the coolant pump assembly.
Remove 2 bolts and disconnect the crankshaft position sensor (Fig. 2.133).
Setting the piston of cylinder No. 1 to TDC of the compression stroke
Rotate the crankshaft pulley and align the mark on it with the “0” timing mark on the timing chain cover.
Make sure that the marks (dots) on the camshaft drive gears are located opposite each other, as shown in Figure 2.134.
Otherwise, rotate the crankshaft 1 revolution (360°) and align the marks as indicated above.
Removing the crankshaft pulley
Using SST 09960-10010 (09962-01000, 09963-01000), remove the crankshaft pulley mounting bolt (Fig. 2.135).
Remove the pulley from the crankshaft.
Removing chain tensioner No. 1
Unscrew the 2 nuts, then remove the chain tensioner (Fig. 2.136).
Removing the timing chain or belt drive cover
Remove 10 bolts and 2 nuts.
Using a TORX E8 socket wrench, remove the stud.
Separate the timing cover by inserting a screwdriver between the cover, the cylinder head and the cylinder block (Fig. 2.137).
Removing the timing chain or belt drive cover oil seal
Install the timing cover on wooden blocks.
Use a screwdriver to remove the oil seal (Fig. 2.138).
Removing the toothed disk of the crankshaft position sensor No. 1
Remove the toothed disk of the crankshaft angular position sensor from the crankshaft (Fig. 2.139).
Removing the chain tensioner shoe
Unscrew the bolt and remove the chain tensioner shoe (Fig. 2.140).
Removing the chain assembly
Using 2 screwdrivers, remove the chain along with the drive gear, as shown in Figure 2.141.
If it is necessary to turn the camshafts with the chain removed from the gears, turn the crankshaft 1/4 turn to avoid contact of the valves with the pistons.
Installing the Chain Assembly
Set the piston of cylinder No. 1 to TDC on the compression stroke.
Turn the camshafts by the hexagonal part so that the 2 marks (dots) on the drive gears are located opposite each other (Fig. 2.142).
Turn the crankshaft by the crankshaft pulley mounting bolt so that the key of the timing gear is aligned with the dot mark on the oil pump (Fig. 2.143).
Install the chain on the timing drive gear, aligning the link with the yellow mark with the synchronizing mark on the gear (Fig. 2.144).
Using SST 09223-22010, install the timing drive gear on the crankshaft (Fig. 2.145).
Install the chain on the camshaft drive gears, aligning the links with the yellow mark with the synchronizing marks on the camshaft gears (Fig. 2.146).
Install the chain tensioner shoe and secure it with the bolt.
Tightening torque: 18.5 Nm.
Install the toothed disk of the crankshaft angular position sensor with the mark “F” to the front of the car (Fig. 2.147).
Installing the timing chain or belt drive cover oil seal
Lubricate the seating surface of the new oil seal with a thin layer of multi-purpose grease.
Install the timing cover on wooden blocks.
Using SST 09223-22010, press in a new oil seal so that its surface is flush with the edge of the timing cover (Fig. 2.148).
Installing a timing chain or belt drive cover
Remove any remaining old sealant from the mating surface.
Apply sealant in the form of a continuous bead (diameter 3.5–4.5 mm), as shown in Figure 2.149.
Install the oil pan within 3 minutes after applying the sealant.
Fill the engine with oil no earlier than 2 hours after installing the pan.
Apply sealant especially carefully in area D - no more than the specified amount (Fig. 2.150).
Secure the timing chain drive cover with 10 bolts and 2 nuts (Fig. 2.151).
Tightening torque: 13 Nm for bolt A and nut A.
18.5 Nm for bolt B.
Using a TORX E8 socket wrench, tighten the stud.
Tightening torque: 9.5 Nm.
Installation of chain tensioner assembly No. 1
Make sure that there is no dirt on the sealing ring, then install the hook as shown in Figure 2.152.
Apply a thin layer of engine oil to the O-ring.
Secure the chain tensioner with 2 nuts.
Tightening torque: 9.0 Nm.
If the hook comes loose when installing the chain tensioner and releases the plunger, re-lock the plunger with the hook.
Installing the crankshaft pulley
Align the key on the shaft with the groove in the pulley, then slide the pulley onto the crankshaft.
Using SST 09960-10010 (09962-01000, 09963-01000), tighten the crankshaft pulley bolts.
Tightening torque: 138 Nm.
Turn the crankshaft counterclockwise, then remove the hook from the locking pin and release the plunger (Fig. 2.153).
Turn the crankshaft clockwise and make sure that the plunger presses the chain tensioner shoe (Fig. 2.154).
If the plunger does not extend, use a screwdriver to push the shoe toward the tensioner until the hook disengages from the locking pin so that the plunger can extend.
Installing the crankshaft position sensor
Apply a thin layer of engine oil to the crankshaft position sensor O-ring.
Secure the crankshaft position sensor with 2 bolts.
Tightening torque: 9.0 Nm.
Install the coolant pump assembly.
Install the right engine mount bracket.
Tightening torque: 47 Nm.
Install the serpentine belt tensioner assembly.
Installing the cylinder head cover
Remove any remaining old sealant from the mating surface.
Apply sealant at 2 points, as shown in Figure 2.155.
Secure the cylinder head cover and 3 mounting brackets with 9 bolts, 2 sealing washers and 2 nuts (Fig. 2.156).
Tightening torque: 11 Nm for bolt A and nut A, 9.0 Nm for bolt B.
Install 3 engine wiring harness clamps onto the brackets.
Connect hose No. 2 of the crankcase ventilation system.
Connect the crankcase ventilation hose.
The remaining components are installed in the reverse order of removal.
Source: http://manual.countryauto.ru/toyota/corolla-verso/2-4-1-zamena-cepi-mehanizma-gazoraspredelenija.html