Repair of heater radiator Toyota Corolla 2007-2010 – Autoliterature
A car, like any other complex piece of equipment, is prone to various breakdowns. It doesn't matter whether it's a used car or a new one. It all depends on the operating conditions and driving skills of the “operator”.
One of the common reasons to be dissatisfied with appliances is improper operation of the stove, especially in winter. Let's consider the symptoms of the malfunction, their identification and subsequent repair of the heater of the Toyota Corolla 2007-2010 , operated in Russia.
Cool air comes out of the air ducts for a long time, sometimes the windshield begins to fog up, and dampness appears under the feet of the front passenger or driver.
It may be that when the maximum mode is turned on, the air pressure does not correspond to the norm - it is very weak, although the motor is working at full power. These are signs of a malfunction of the stove itself, or the heater radiator.
When you turn on one of the modes, no matter which one, you cannot hear the noise of the stove motor.
First of all, you need to look at the cabin filter. It may be clogged and the air flow from the fan cannot pass through it.
The heater radiator, if there is no cabin filter, and this happens, is covered with a kind of felt covering. Violation of the integrity of the radiator cells of the stove, because of this a leak appears and the windshield becomes foggy. The heater fan has failed. Typically, it will need to be replaced because it will cost more to repair than to replace.
Thermostat is faulty. It is constantly open, and the coolant does not have time to heat up - cool air comes out of the deflectors, and as the speed increases, the air becomes even cooler.
In order for the repair of the 2007-2010 Toyota Corolla heater to be successful and fruitful, it is necessary to determine the cause of the malfunction as accurately as possible.
The car can be diagnosed at a service center, but the cause can be identified yourself, in a garage.
To get to the cabin filter and the heater core, you need to perform several necessary operations. First you need to disconnect the battery to avoid unforeseen situations.
Then drain the coolant from the radiator into a clean container by unscrewing the drain valve. The next step is to remove the supply and return hoses. They are located in the engine compartment, and are put on the heater radiator pipes that come out of the car.
Shoot as carefully as possible. Remove the clamps, then rotate the hoses, and then remove them.
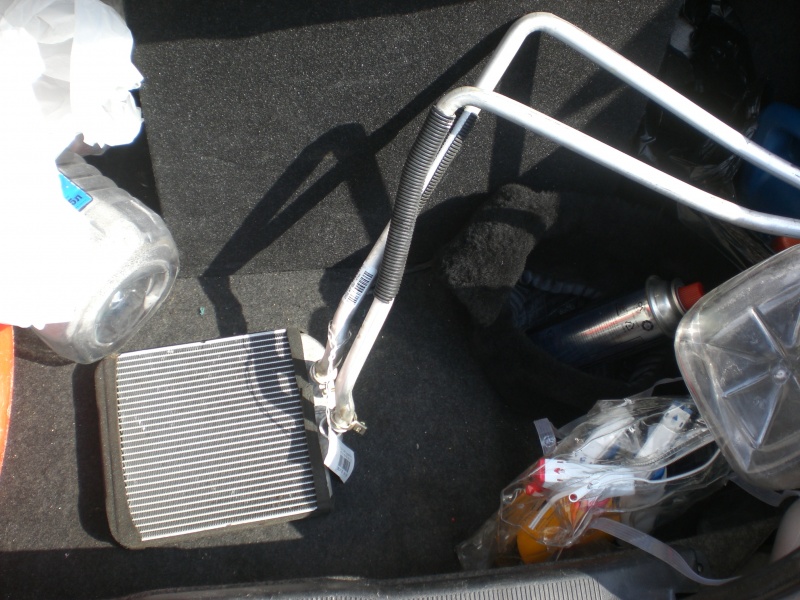
Remove everything from inside the car that interferes with access to the heater. After we have removed the cabin filter and made sure that it is in working (clean) condition, we dismantle the heater assembly. Having placed it on the laboratory table, we remove the heater radiator. Using compressed air we check the integrity.
To do this, fill it with antifreeze (it is more fluid than water), connect a hose with compressed air to one pipe, and close the second pipe tightly. We create pressure, and if a leak appears, then we begin repairing the 2007-2010 Toyota Corolla heater , which is not as complicated as it seems at first glance.
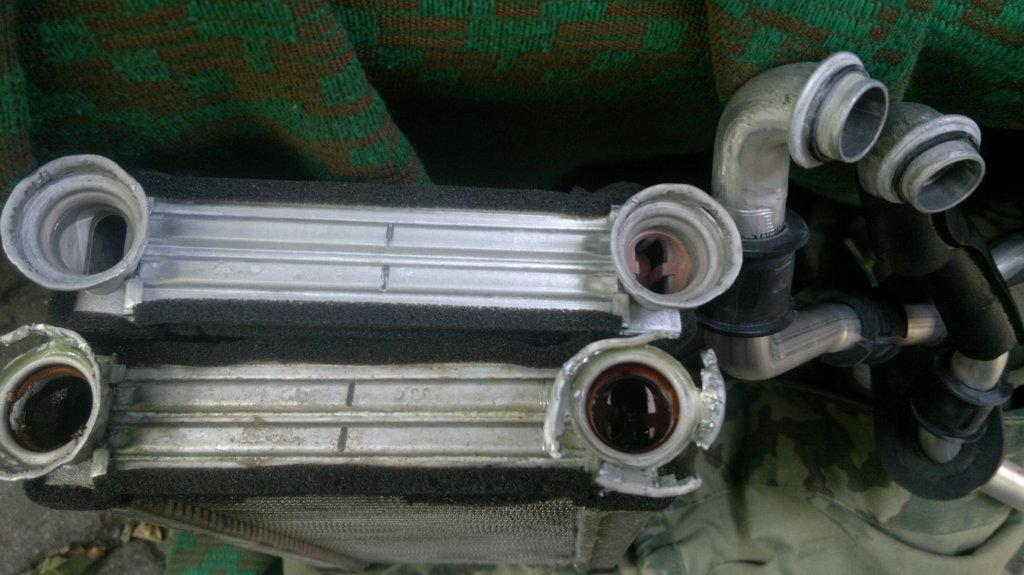
If the honeycombs are leaking, then using a powerful soldering iron and alkali we solder them well, but if there are baths, then the best solution would be a complete replacement. After we have soldered the damaged honeycombs, we will check the radiator for free passage of air. If the air flows poorly, then you need to connect the hose to the nozzles one by one, and, creating pressure, blow it out.
After these procedures, the assembly can be assembled and installed in place.
Assembly proceeds in reverse order
Sergey Demin specially for the Avtoliteratura website
Source: http://myautobook.ru/publ/toyota_remont/toyota_corolla_2007_2010g/remont_radiatora_otopitelja_toyota_corolla_2007_2010/8-1-0-32
Replacing the heater radiator for Toyota Corolla 120
Sometimes replacing the Corolla heater radiator is the only solution that can eliminate an antifreeze leak.
To perform this operation, you should have a simple tool on hand and be patient, since removing the radiator is preceded by dismantling the front panel.
Before you start work, purchase a new stove radiator. Repairing an old unit is in most cases impractical.
Antifreeze is leaving, where to look
Coolant has greater fluidity than water, so even a slight depressurization of the cooling system (CO) leads to a decrease in the liquid level. If a special dipstick shows a constant amount of oil, and the coolant level continues to drop, then it is necessary to carefully examine the cooling system and identify the presence of a leak.
Structurally, all CO elements, as well as connecting pipes, are located in the engine compartment, so leaks can be detected by characteristic stains remaining at the vehicle’s parking spot.
The only element that is located inside the car is the heater radiator. It can also cause an antifreeze leak whether you use the heater while driving or not.
Leak detection
It is easiest to detect a leak in the winter, as the windows of the car interior begin to fog up, and at the same time a specific smell appears. Traces of antifreeze can be found in the area of the front floor mats.
To quickly determine the location of depressurization, manufacturers add a fluorescent dye to the coolant. If you have exactly this kind of antifreeze, then there will be no problems with detection. The smallest stains are clearly visible under the influence of an ultraviolet lamp.
Repair procedure
If traces of antifreeze are found in the cabin, then in this case replacing the air conditioner radiator in a Toyota Corolla is the only right solution. In order to carry out repairs, remove all personal belongings from the front of the car.
During the dismantling process, the electrical connectors of the on-board devices will be disconnected. Therefore, disconnecting the negative terminal from the battery will provide the necessary level of safety.
The heater unit, which contains the heater radiator, is installed under the dashboard, so it will have to be removed. To do this, perform the following operations.
Open the hood and disconnect the antifreeze supply pipes to the stove. Prepare containers for antifreeze. Remove the air conditioner pipes.
At this point, replacing the Toyota Corolla heater (air conditioner) radiator may not be completed. When installing a new part, there is no need to flush the radiator. But, if a used stove is installed, then it is recommended to clean it. Water with citric acid is used as a washing solution.
Reassemble the front part and install parts in the reverse order. Install decorative elements last, after checking the functionality of electrical regulators and light displays.
Please note that after depressurization of the cooling system, an air lock appeared in it. Over time, it will go away on its own, but at first it can cause mediocre heating of the interior and cooling of the engine. Ensure the appropriate coolant level; if necessary, add to the Full mark indicated on the expansion tank.
Watch an interesting video on this topic
Source: https://eurasia-avto.ru/zamena-radiatora-pechki-toyota-korolla-120.html
Replacing the Toyota Corolla heater radiator
The Toyota Corolla comes with a pretty good heating system installed from the factory. But as the years go by, over time even the most reliable components fail. Before replacing the heating radiator, you can try flushing it. If this measure does not help, then proceed to replacing the device with a similar new one.
Flushing
You can do the flushing of the heater radiator on a Toyota Corolla 120 with your own hands. Here it is important to decide on a mixture that will clean the internal space of the system.
There are many options: starting with peroxide and caustic soda, ending even with yogurt. Some craftsmen use products to clean sewer pipes, washing machines from scale, etc.
Let's give an example of flushing a stove radiator using a drain cleaner. They are widely available at hardware and home improvement stores. It is better to choose liquid formulations as they penetrate the system more easily.
Important! Before flushing, be sure to remove the standard pipes and replace them with temporary ones through which you will clean the radiator. Aggressive liquids can damage them.
- Choose any good drain cleaner. Too thick ones will be difficult to penetrate into the system, and various powders need to be diluted and poured. Simply put, liquid is more convenient to use.
- First drain all coolant from the system. This will be a good reason to change the coolant if it has been used in your Toyota Corolla for a long time.
- When the heater radiator is free of coolant, pour the selected cleaning agent inside. It is better to use a compressor pump so that the drug penetrates inside more efficiently.
- Pour in fluid until it comes out of the return hose. Wait a while. This is necessary so that the product has time to act and dissolve all kinds of dirt and sediment that interfere with the normal operation of the heater on the Toyota Corolla.
- Install a hose on the return line and turn on the hot water supply. Cold water will not be able to drive away all the dirt and remove it from the radiator as effectively. So it’s better to heat a lot of boiling water in advance.
- Hot water must be supplied under pressure. Having a pump will help you a lot with this.
- Run hot water on the heater core until all dirt and cleaning agent residue is removed. This can be determined by completely clean water.
- For prevention, blow out the heater radiator with just air. Large fractions of debris and dirt may come out that were not captured by the flow of hot water.
- Fill the heater core with coolant.
- Start the car, press the gas pedal, which will expel any remaining air from the heating system. Check how much better the heater works.
Important! If flushing does not work, check the radiator for leaks. If there are leaks, repairs will not help. The element needs to be completely replaced.
Replacement
If replacing your heater radiator is the only way to bring your heating system back to life, first find a suitable new radiator. After this, you can begin work on disassembling, replacing and reassembling the unit.
- Remove anything from the vehicle that may interfere with work. This is especially true for things from the front of the cabin.
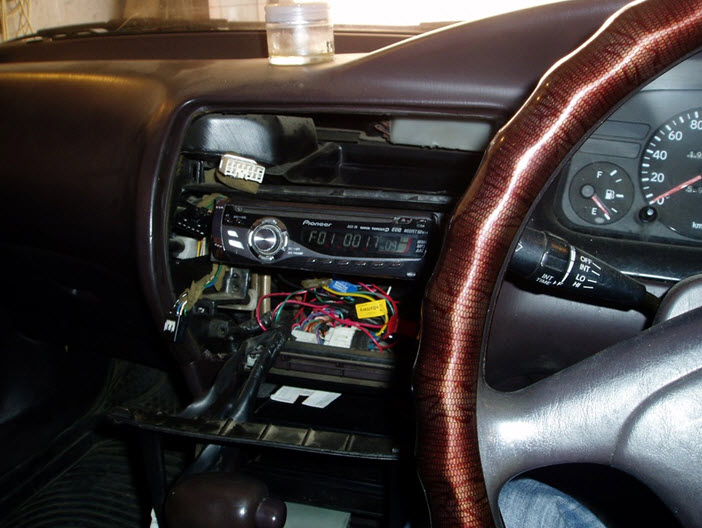
- Remove the front panel. Without this, you won't be able to get to the radiator. First, the central panel and audio system are dismantled. On the driver's side, remove the panel located to the right of the steering wheel (if the Toyota Corolla is right-hand drive). It is removed after unscrewing the nut that holds the panel to the body.
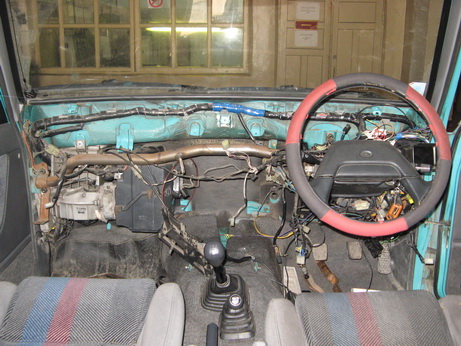
- Take out the instrument panel and disconnect all the wires from it. It is better to pre-mark the wiring so that you can put it back together without any problems.
- Enter from the front passenger side. There is a glove compartment there that needs to be removed. And the panel from the gearbox is also removed. Otherwise, it will interfere with removing the torpedo.
- The fastening bolt is located here above the panel under the plastic flap. Open this element and unscrew the bolt.
- All wires must be disconnected from the connectors. The panel moves slightly to the side and the fan unscrews.
- In parallel with the dismantling work, we advise you to clean, wash and lubricate everything as necessary. This will make the interior cleaner, and extraneous noise will go away.
- When you have removed everything, all that remains is to dismantle the stove. To do this, lift the hood of the Toyota Corolla and find the hoses that go to the stove. They need to be disabled. Coolant will flow from the hoses, so be sure to place some container under them to drain the coolant.
- Now you can completely remove the stove from the interior. This is a good opportunity to assess its condition, check various components and elements of the stove. If all is well, cleaning and lubricating the elements will not hurt.
- Our old heater core is removed from the stove. A new heater radiator is installed in its place.
All that remains is to assemble the assembly in reverse order. Be careful when connecting wires. If you don't remember which one goes where, it's best to look at the instruction manual.
Important! Replacing a radiator on a Toyota Corolla is not an overly complicated or easy procedure. But independent repairs will only cost the cost of a new radiator, while service stations charge about 5–7 thousand rubles for a replacement.
After completing the work, do not forget to add the missing amount of antifreeze, remove air from the system and check the quality of operation of the repaired heating system.
Be sure to leave your comments, share your own stories about car repairs and tell us what products you poured into the radiator for flushing and how effective they turned out to be.
Sources: http://remam.ru/vozdsys/zamena-radiatora-pechki-tojota-korolla.html
Source: http://master-informa.ru/remont-audi/avto/13764-zamena-radiatora-pechki-tojota-korolla
Replacing the cooling radiator. Photo report
Now it's time for me to change the cooling radiator. Old (13 years old), the radiator leaked. It could not withstand a six hundred kilometer run at a speed of 140 at -27 degrees outside. True, I didn’t immediately like its condition when I bought it.
The ribs were thoroughly jammed between the tubes. And it seems that they are also partially dissolved by road reagents. But the replacement was postponed mainly for two reasons: no money, no time.
And here, on you, “well, it should be like this for the New Year, five hundred ago, five hundred forward.....”. We change.
What happened:
Search and selection (not advertising even once). Let me remind those who are interested, the car is a Corolla sedan 2001, 4zz-fe (1400cc 16v).
Where can I get a new radiator? The choice of stores is huge, but in the old fashioned way in Exist. Not because they are somehow better (or worse), just nearby and along the way. And then the first shock and cold breath of the famous amphibian.
Toyota 16400-0D060 Engine radiator 14358.36r.
Not weak... And not any analogues or substitutes. They are not (?) or cannot be found. OK. Home, computer and Google in teeth, in search (well, as usual, night, jar, screen flickering). Browsing all the well-known forums and stores yielded virtually no results. Just hints.
I sat some more... And further…. I got into a Eurocar. Sometimes I buy a used one there, it’s relatively inexpensive, nearby, on the way... There’s a one-of-a-kind used radiator. However, I can’t decide on the lottery (but it remains an option).
Yeah, but then it’s more interesting, for our crown “beats” AVA TO2273 (4400 rubles) (“I’m coming from Germany and bringing a radiator”).
Yeah, of course, the most ordinary China, moreover, with very contradictory reviews and further problems in selecting a cap for a given pressure (the original does not fit (I got it from our forum)). Nooooo, the mind screams. I agree. In search...
I put the “German-Chinese” in Exist. Yeah, another number appears:
Toyota 16400-0D030 Engine radiator 6592.48 RUR.
Not bad already. A little more expensive, but it's the same original. Will it fit? Logic dictates that if the first thing is interchangeable with the second, and the second with the third, then (logically) the third will replace the first (with a reasonable approximation).
Night in thoughts, morning... Okay, let's take it... As a last resort (if it doesn't work), we take China or used. Still cheaper. The manager warned a couple of times that he was not responsible for anything. I agree (reluctantly), but I order what I chose.
We are waiting...
A couple of days later, it arrived... With some fear I pick up the “new one” (oh how beautiful!) I run to the garage. I'm revealing it.
New (tags, stickers, etc.): New, general appearance and packaging:
model:stickers:
first visible difference:
Below everything seems to be fine so far:
Tools: We will need quite a bit of it. If I am not mistaken:
12 wrench, 10 wrench, preferably larger pliers (to deal with tight hose clamp springs), thin screwdriver, WD40 (not useful), small pliers (if the drain plug resists), a little rag (for hands, face, plugging disconnected from the radiator tubes).
Yes, I almost forgot again, the container for drained antifreeze has a total volume of 6-6.5 liters (so that later you don’t have to run around the garage and frantically look for the missing container (like mine))). Anti-freeze plastic containers with the top cut off are ideal.
You can also use a basin of suitable size (not AvtoVAZ products!). If you are not going to change the antifreeze, then it is advisable to use a clean one.
About a liter of fresh antifreeze for topping up, something will still spill, or 7 liters of fresh antifreeze for a complete replacement (flushing the cooling system and all the nuances associated with it are not considered here).
Removing an old (but original) radiator:
General view of the location of operating points.
Let me remind you that it is advisable to carry out all work on the cooling system with the engine cooled down (especially in summer)). In winter, you can slightly warm up the engine (because it’s cold) to 40-45 degrees. That’s what I did, the garage is not heated and it’s at least a little more comfortable to work.
))
For safety, it is advisable to first disconnect the negative terminal of the battery. I didn’t do this (tired of resetting the on-board equipment settings)). Therefore, the first thing we do is disconnect the fan connector (don’t put your hands in the fan, just in case). The connector is quite tight.
It is difficult to press with your fingers, but a screwdriver (from the fan motor side) is a little easier. Let's try this and that... Phew, they took it off (2 minutes))). Disconnect the fan wire from the fan shroud. The clamp operates on the principle of a nylon tie.
Use a thin screwdriver to press out the pawl, and with the other hand try to pull out the clamp leash from below. It may be easier to pull the entire clip out of the fan shroud. I haven’t watched it, so I can’t say anything...
Next, remove the radiator cap (turn it and pull it up). You can (and should) remove the lid using a rag; there will be less splashing and spilling. Then disconnect the tube to the expansion tank.
To do this, use pliers (or fingers through a rag) to squeeze the clamp and move it along the tube to the tank, then disconnect the tube (it’s easy).
Now is the time to place the stored containers under the car, opposite the hole in the protection (one by one, then we change them as they are filled). We climb from the left, from above, down and unscrew the tap.
It didn’t “go” with my hands, we use “flat” tools, the force is small, the faucet is fragile, carefully. Unscrew it slowly, watching the flow of antifreeze. We select the position of the faucet so that the stream flows straight down and does not splash in all directions. You can select a tube for the drain hole in advance. It will be easier.
Its diameter is the same as the expansion tank tube (you can use it). Let's take our time. It flows slowly and sadly. You can have a “smoke break” or a smoke break. We monitor the filling of the container. Sometimes we change. Drained... Carefully remove the filled containers away or pour them somewhere, slowly, there will be dirt at the bottom. Or filter it.
Next, remove the radiator itself.
We squeeze the clamps with large pliers and take them to the motor through the tubes. Be careful, they are very stiff and fly very well (for safety, you can throw a rag on top when you try them on). First, remove the top tube, plug it with a rag (away from dirt), secure it as conveniently as possible so that it does not interfere. Then, using a 12mm wrench, unscrew the two bolts from the top along the edges of the radiator.
Unscrewed it. We are trying to pull the radiator up, shaking it. They pulled me out. Let's push on, don't be afraid. The tubes are very flexible. We pulled it out as conveniently as possible and tried to remove the lower tube from the radiator in the same way as the upper one. Let me remind you once again to be careful. Not only do the clamps fly great, but they also hide great in garage trash. I searched for about 10 minutes.
They tightened the clamp, removed the tube, and pulled out the radiator. Remove the fan casing.
And then the first ambush awaited me. The lower radiator bushings turned into trash, in the truest sense of the word.
I don't have any new ones. Therefore, immediately, even when ordering a radiator, it is worth assessing their condition and ordering it in advance. I’ll say right away that they are not expensive (230 rubles, only the original), the wait is very long - up to a month or more. It’s too much to drive... I’m still going...
“The collective farm is a voluntary business; if you want, we’ll write it down; if you don’t want, we’ll shoot you.”
I had to join.
After a short but persistent search, the problem with the bushings was easily resolved. It turned out that the original bushing can be perfectly replaced by a symbiosis of a rubber bushing for the UAZ suspension (10 rubles per piece, you need 2) and two oil seals (8 rubles per piece, you need 4) of a manual transmission from Volga.
This design (one might say truly nanotechnological) fits perfectly, with little interference, both into the seats on the car frame and on the radiator. A month of using “this” did not reveal any shortcomings in its work.
You can leave it like that, or you can replace it later.
Further, through a simple visual comparison of the new and old radiators, another feature was revealed that requires immediate entry into the “collective farmers”. The fact is that the fan casing has protrusions at the bottom, which in turn fit into the lower holes of the old radiator. And the casing is held on top by two bolts (as we have already seen above).
The new radiator does not have such holes. In addition, the protrusions of the casing do not really match the screw holes on the new radiator. By simply modifying the casing (carefully remove the excess plastic with a soldering iron), two pawls from the mailbox locks, a rubber gasket and stainless screws, we got what we got.
The upper holes of the casing and the new radiator completely coincided.
I would like to note that all manipulations with the new radiator were carried out only after plugging its holes with a rag.
Installation: The fan shroud is already screwed to the radiator. We insert “nanovushki” into the car frame, maybe with WD40, it goes easier (well, you know that). Radiator onto the frame, attach the lower tube, struggle with the clamp (it’s a bit difficult without special tools).
Don’t forget to take the rags out of the holes as you go (we’re not surgeons). We clamped the tube, lowered the radiator, and got the protrusions of the radiator into our bushings. We screw the upper clamps of the radiator, having previously placed a pair of wide 10mm washers between the frame and the clamps.
Since our bushings are still slightly high, the radiator sits a little higher, literally by 5-7 mm.
Attach the top pipe. Despite the fact that the upper hole of the radiator is shifted to the left by 5-7 cm, there is enough tube (I remind you that it is quite flexible). Although I don't like the fact that it is slightly stretched and rubs against the intake manifold. Therefore, in the future, I want to pull a large diameter tube onto it at the point of friction with the collector. It's better to do it right away.
Next, we attach the fan wire to the casing and plug in the fan connector.
We attach the expansion tank pipe. We check the drain valve, it’s suddenly open. I did not use sealant for fitting pipes, although I have seen something similar. Nothing is leaking.
Bleeding: Open the top cover. Fill with new or filtered antifreeze. I use Felix Carbox G12+ antifreeze. Not expensive, the store is nearby, and on the way. For 10 years there were no problems with cooling.
The antifreeze drained from the system (it was 2 years old) was no different from the new addition. Fill slowly. As soon as the radiator is filled (it’s better not to the top, it will leak in vain), we begin to compress all the cooling tubes that we see with slight pumping.
The air comes out, the antifreeze leaves, add... And so on several times.
Then close the lid, start it, for 20-30 seconds at 2000-3000 rpm. We turn it off, open it, download it, top it up. We also top up the expansion tank to the FULL mark or a little higher. I would like to note that I did not bleed the system the first time, no matter how much I pressed on the tubes. The stove was not working well.
Therefore, I carefully (watching the temperature readings) drove 10 km, warming up the engine thoroughly (although it is possible on the spot, but there is not the same pleasure from the work done). The temperature was normal. Cold. And left the cars in the garage overnight. This morning I checked the level in the expansion tank. It fell about 5 centimeters. That is, the system sucked in antifreeze while cooling.
I refilled the radiator and the tank again, it took about 700 ml. Started it up. Everything is normal, the stove, the temperature is normal. Profit.
The savings amounted to almost 8000 rubles. Original radiator, pleasure (despite the frost) from the work done. I am by no means an experienced auto mechanic. I did everything on a whim (as best I could, from what I had), with the help of this wonderful forum.
Who mastered it, thank you. That's the end of the fairy tale. What I forgot, missed, write. If you can’t do it yourself, contact the Alfa Fleet car service. Here is the link: http://www.alfa-servis.com/
With great respect to you all. Bye.
Source: https://corolla.ws/forum/showthread.php?t=25833
Replacing the Toyota Corolla heater radiator
The Toyota Sorolla of the year with right-hand drive will be used as an example; owners of other variations, with left-hand drive, should not be upset.
Removing the front panel of Toyota Corolla 140/150
Cold water will not be able to drive away all the dirt and remove it from the radiator as effectively. Remove the plastic air intake covers at the corners of the dashboard through which air flows.
Replacing the heater fan light bulb:
When installing a new part, it is necessary to flush the radiator. Unscrew the steering column mounting bolts 4 pcs.
Traces of antifreeze can be found in the area of the front floor mats. To quickly determine the location of depressurization, manufacturers add a fluorescent dye to the coolant. If you have exactly this kind of antifreeze, then there will be no problems with detection. The smallest stains are clearly visible under the influence of an ultraviolet lamp.
Repair procedure If traces of antifreeze are found in the interior, then in this case replacing the air conditioner radiator in a Toyota Corolla is the only correct solution.
In order to carry out repairs, remove all personal belongings from the front of the car. During the dismantling process, the electrical connectors of the on-board devices will be disconnected.
Therefore, disconnecting the negative terminal from the battery will provide the necessary level of safety.
The heater unit, which contains the heater radiator, is installed under the dashboard, so it will have to be removed. To do this, perform the following operations. Next, use thin-nose pliers to dismantle the clamp and remove the pipe.
Replacing the Corolla 120 heater radiator:
Add antifreeze to the system. Reassemble everything in reverse order.
Replacing a Toyota Corolla heater fan Signs of a heater fan failure will be noise, chirping, weak or completely absent air flow when the heater is running. If after diagnostics it is confirmed that the stove fan is not working, it must be replaced.
The fan platform and wires going to the stove will be visible. Use a screwdriver to remove the screw securing the wires. Remove the wire chips from the thermistor and from the motor.
Why is the Toyota Corolla 120 heater replaced?
Remove the fan platform by unscrewing the 3 screws. Remove the fan mounting screws and dismantle the device. Replace the fan with a new one and reassemble in reverse order.
In order to better understand the fan replacement process, it is advisable to additionally watch the video. The Corolla Verso stove fan is changed in the same way as described above. Replacing the heater fan light bulb: The fan control can be easily removed; it is located in the center.
Some craftsmen use products to clean sewer pipes, washing machines from scale, etc. Let's give an example of flushing a stove radiator using a sewer cleaner. They are widely available at hardware and home improvement stores. It is better to choose liquid formulations as they penetrate the system more easily.
Before flushing, be sure to remove the standard pipes and replace them with temporary ones through which you will clean the radiator. Aggressive liquids can damage them. Choose any good drain cleaner. Too thick ones will be difficult to penetrate into the system, and various powders need to be diluted and poured.
Next, disconnect all the wires from the connectors, slightly move the panel and unscrew the fan. You don’t have to remove the pipe; it shouldn’t interfere with you too much.
During the removal process, you can clean and wash everything. It will be more pleasant for you to sit in a cleaned interior. After all this has been removed, you can proceed to the stove itself. We need to find the hoses going to the stove and disconnect them.
Toyota Corolla replacement heater - interior heater radiator, quickly
It is very important to place the jar when removing, as some of the antifreeze will spill out. Next, completely remove the stove from the interior.
Other articles
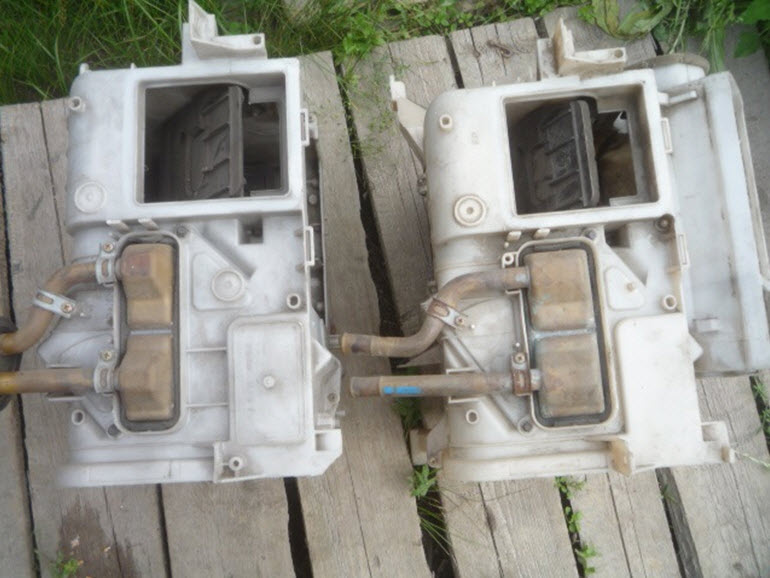
They may look like the one shown in the photo below. Having removed the stove, we take out the old radiator from it and insert a new one in the same place.
By the way, it’s worth cleaning and lubricating everything again for more smooth operation of the entire heating unit. The old radiator was ironed like this.
Source: http://iaarus.ru/zamena/zamena-radiatora-pechki-toyota-korol.html