DIY seat heating installation

Hello, readers and visitors of this site! Today I will tell you how to make a winter version out of a regular Mazda. What you need for this is to buy heated seats! I ordered from ebay for $100 and three weeks later an unattractive box arrived.
The mail was dented, but oh well, let’s unpack it and look inside.
From left to right - heating elements, a bag of goodies, buttons and fuses. Then we select the coldest day and unscrew the seats in the car.
I will describe the process without a photo - we unscrew the decorative bolts on the plastic panels, then pull them out along with the pistons, then remove the plastic panels and see three bolts and one 14 nut that hold the chair.
We unscrew it and take it away, additionally disconnecting the seat drive or airbag connectors found under the seat.
Armchairs at home. Let's start with the passenger one, because it weighs less. Turn it on its side, remove the backrest tilt handle by prying the tongue from the inside with a screwdriver, then take out the plugs and unscrew the bolts shown by the arrows
Then we turn the chair upside down and unscrew the 4 bolts indicated by the arrows. The lower part ends up in our hands.
We use pliers to pry out the metal rings around the perimeter, work carefully, you may want to insert them back later. If not, stock up on 3.5*200 clamps in the amount of 100 pieces (so that you have a reserve).
After this, the metal frame can be removed.
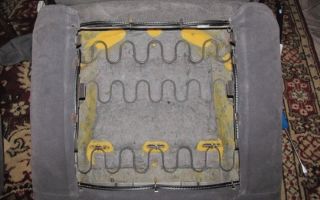
Then we turn the seat over to its normal position and wrap the upholstery. Under the upholstery, in a foam base, there is a metal rod, to which the upholstery is attached with metal rings. Unfortunately, I didn’t photograph the lower part, but I’ll show you an example of the upper part.
We turn the rings inside out, gradually revealing the surface necessary for installing the heating elements.
Trying it on
We remove the paper protection from the adhesive base and glue the heating elements.
Then we thread our upholstery clamps through the metal rod at the base.
We tighten the clamps and straighten the casing. The seat back can be disassembled in the same way, with only one nuance. To gain access to the upholstery, use a flat screwdriver to feel for the flexible plates on the sides of the pocket on the back, press them and remove the pocket from the back.
We get this picture (upside down view)
Then we carry out the above-described manipulations to install the thermal elements (by the way, there is no need to remove the back of the seats, it can be easily disassembled anyway). We assemble everything in the reverse order, then we drill places for the heating buttons.
We lay the wiring in the grooves of the armrest
We put buttons
Don't forget about fuses
And the final stage - we put it in the car. Plus we throw it on the corresponding fuse, or on the cigarette lighter; We take the minus in the area of the armrest. And we enjoy the warmth in the car.
Source: http://DekorMyHome.ru/rukodelie/ystanovka-podogreva-sidenii-svoimi-rykami.html
DIY driver's seat heating
Not every modern car is equipped with heated seats; such equipment is often available only in top trim levels. And although the controversy surrounding the usefulness of the option does not subside, most drivers still prefer this comfortable function and install the heating kit themselves.
What type of driver's seat heating can you install yourself: types of heating elements
The car accessories market today is capable of satisfying almost any requirements of motorists. This fully applies to products intended for heating seats, which are available in two types:
- Covers and capes.
- Built-in.
Cases and capes
Before you make heated seats with your own hands, you need to know that the first option is characterized by low price and ease of installation. All you have to do is put the cover on the chair, connect it, and the kit is ready to go. Typically the heater is plugged into the cigarette lighter socket, but terminal connections are also possible. However, this type of heating organization also has a number of significant disadvantages:
- low electrical and fire safety;
- uneven heating of the area;
- discomfort from wires;
- violation of the interior layout;
- impossibility of using covers on the rear seats.
There is one more problem. Many drivers plug in other gadgets into the cigarette lighter socket, for example, a GPS navigator, a video recorder, or a phone charger. Using a splitter is not a solution to this situation - the heating element consumes a significant amount of energy and the fuses may fail. In addition, there is a threat to the fire safety of the car.
Built-in models
Car owners who decide to organize seat heating with their own hands are confused by this option because of the installation difficulties.
Here they can be reassured - detailed recommendations from experienced car enthusiasts will help everyone who knows how to hold a screwdriver in their hands to complete the installation.
It is enough to carefully study the proposed technology and have a nominal set of tools. In addition, the advantages of embedded systems compared to capes are obvious:
- the possibility of equipping not only the front seats with heating, but also the rear ones;
- hidden connection, wiring is laid under the interior trim;
- direct connection to the on-board network, the cigarette lighter socket is accessible to other consumers;
- The profile of the chair and the interior components of the cabin do not change.
Since everything is clear with heating covers and capes and their installation raises absolutely no questions for anyone, below we will talk about built-in systems.
Source: http://RuliKolesa.ru/podogrev-voditelskogo-sidenya-svoimi-rukami/
It will be warmer: how to make heated seats yourself and not make mistakes?
Not every modern car is equipped with heated seats; such equipment is often available only in top trim levels. And although the controversy surrounding the usefulness of the option does not subside, most drivers still prefer this comfortable function and install the heating kit themselves.
What kind of seat heating you can install yourself: types of heating elements
The car accessories market today is capable of satisfying almost any requirements of motorists. This fully applies to products intended for heating seats, which are available in two types:
- Covers and capes.
- Built-in.
Cases and capes
Before you make heated seats yourself, you need to know that the first option is characterized by low price and ease of installation. All you have to do is put the cover on the chair, connect it, and the kit is ready to go. Typically the heater is plugged into the cigarette lighter socket, but terminal connections are also possible. However, this type of heating organization also has a number of significant disadvantages:
- low electrical and fire safety;
- uneven heating of the area;
- discomfort from wires;
- violation of the interior layout;
- impossibility of using covers on the rear seats.
There is one more problem. Many drivers plug in other gadgets into the cigarette lighter socket, for example, a GPS navigator, a video recorder, or a phone charger. Using a splitter is not a solution to this situation - the heating element consumes a significant amount of energy and the fuses may fail. In addition, there is a threat to the fire safety of the car.
Built-in models
Car owners who decide to organize seat heating with their own hands are confused by this option because of the installation difficulties.
Here they can be reassured - detailed recommendations from experienced car enthusiasts will help everyone who knows how to hold a screwdriver in their hands to complete the installation.
It is enough to carefully study the proposed technology and have a nominal set of tools. In addition, the advantages of embedded systems compared to capes are obvious:
- the possibility of equipping not only the front seats with heating, but also the rear ones;
- hidden connection, wiring is laid under the interior trim;
- direct connection to the on-board network, the cigarette lighter socket is accessible to other consumers;
- The profile of the chair and the interior components of the cabin do not change.
Since everything is clear with heating covers and capes and their installation raises absolutely no questions for anyone, below we will talk about built-in systems.
Briefly about the choice of heating elements
The range of elements that are mounted directly into the body of the chair is quite extensive. This allows you to make the optimal choice based on the design features of the interior and its components, as well as the financial capabilities of the owner. The most popular products are from Russia, China, Taiwan and Germany. Here are some examples of models:
- installation kits from Weaco (Germany);
- built-in blocks “Emelya” from the company “Teplodom” (Russia);
- “VO” kits from the “Avtotherm” group (Russia);
- sets from Megalight (Taiwan);
- kits from Autoline International (China).
Naturally, all models differ both in terms of workmanship and price. Owners who already know how to properly heat seats with their own hands assure that the high cost of German equipment is compensated by its reliability and versatility. Its elements are equipped with overheating protection and have several operating modes.
Russian models of heating technology are practically not inferior to German ones; reinforced cable or carbon fiber is used as a heating element. The kit includes an electronic temperature controller and overheat protection.
Products from China are attractive in price, but most often that’s where all the advantages end. As our car enthusiasts note, the main problems with such kits are:
- broken power button;
- short circuit or broken wiring;
- uneven heating of the seat plane.
Practice: how to make stationary heated seats with your own hands?
So, the choice has been made and the heating kit has been purchased. All that remains is to prepare the necessary materials and tools. These include:
- a set of screwdrivers and wrenches for disassembling the chair;
- electrical tape and heat shrink tubing;
- plastic clamps;
- multimeter;
- scissors and a knife with replaceable blades;
- pliers;
- soldering iron;
- marker;
- glue 88 or double-sided tape (available in the installation kit).
To all this, we can add that the set of materials may vary depending on the configuration of the product. For example, if there are no wires or a fuse connector, then you need to purchase them. A stranded wire with a cross-section of 2.5 mm² is suitable for wiring.
Before you organize the heating of the front seats with your own hands, special attention should be paid to the placement of the control buttons that are included in the kit.
It is important to study the method of their fastening and dimensions, since there is a possibility that the buttons will not fit into their normal place. Then you will have to choose another place or purchase control elements for a specific car.
Further, all work is performed according to the following scheme:
- dismantle the seats and carefully remove them from the car;
- disassemble the seats, remove the headrest and all plastic elements; work better at a desk;
- remove the seat upholstery, which in most cases is fixed from below with metal rings or plates; You don’t have to remove it completely - just make room for heating mats;
- remove the trim from the back, to do this you need to remove the plastic bushings for the headrests;
- lay the heating fabric on the foam base and mark its contours with a marker;
- if there is a temperature sensor, fix it on the foam rubber;
- stick strips of double-sided tape along the marked lines or apply glue 88;
- fix the heating mats on the back and seat; in this case, be sure to pay attention to the position of the wires - for the driver’s seat they should be on the right, and for the passenger seat they should be on the left;
- bring out the power wires;
- install the casing on a foam base; in places where necessary, use plastic clamps;
- reinstall all plastic elements and headrests;
- install the seats in their standard places and lay the wiring to the locations of the controls and power connections.
Connecting heating elements
Every self-respecting manufacturer completes the installation kit with instructions for connecting the unit to the vehicle’s on-board network. If this stage causes certain difficulties or you are unsure of your abilities, then it is better to immediately contact electrical specialists.
For those who are confident in their own abilities, the following recommendations will be useful:
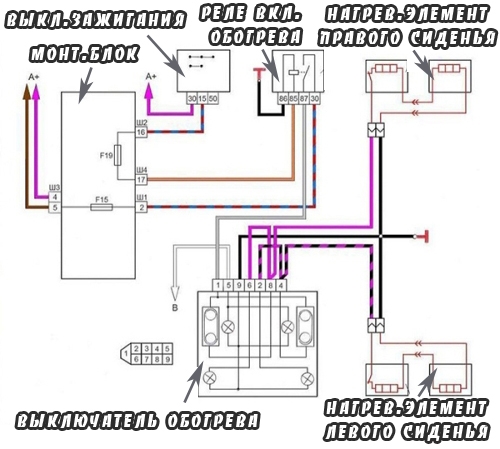
- using a multimeter, you should detect the 12 V power supply, backlight and ignition circuits;
- connect the positive wire of the thermal relay to the ignition switch connector, where power appears only after turning the key;
- connect the supply wire through a fuse to the positive terminal of the battery;
- connect the negative wire to ground;
- connect the button illumination wires to the cigarette lighter contacts;
- solder and insulate all connections;
- check the operation of the system.
For example, below is a diagram of the connections of the Emelya UK kit.
How to make your own built-in heated rear seats in a car?
This option is quite rare on budget class cars. For some motorists it is not of interest, but for those who have a large family, a warm rear sofa will not be superfluous. The technology for installing and connecting equipment is identical to that described above.
To implement built-in heated rear seats, you will need two heating kits. Despite the fact that the installation process is carried out by analogy with the front seats, it is worth briefly considering the main transitions:
- choose a location for installing control buttons;
- remove the trim from the back, it is not necessary to do this completely - it is enough to release only the front and side parts;
- fix the heating mats and remove the wires;
- remove the upholstery from the sofa using the same principle;
- secure the sensors and heating fabric, remove the power wires;
- lay the wires in the tunnel between the chairs under the cover;
- install the buttons and connect according to the diagram.
Some car enthusiasts recommend using seat belts as a “ground”; the contact is quite reliable. Each person places the power buttons at their own discretion. For example, this could be the back of the front armrest or door. This option allows passengers to adjust the temperature at their discretion.
Source: http://autobann.su/kak-sdelat-obogrev-sideniy.html
DIY seat heating installation
Tuning > Manuals > Repair and Tuning of the Interior > Installing heated seats yourself
Not every modern car is equipped with such a useful function as heated seats. It is installed only in cars of a certain price segment or in the maximum configuration. If the interior of your car was not equipped with it, then if you wish, you can connect this very useful functionality yourself.
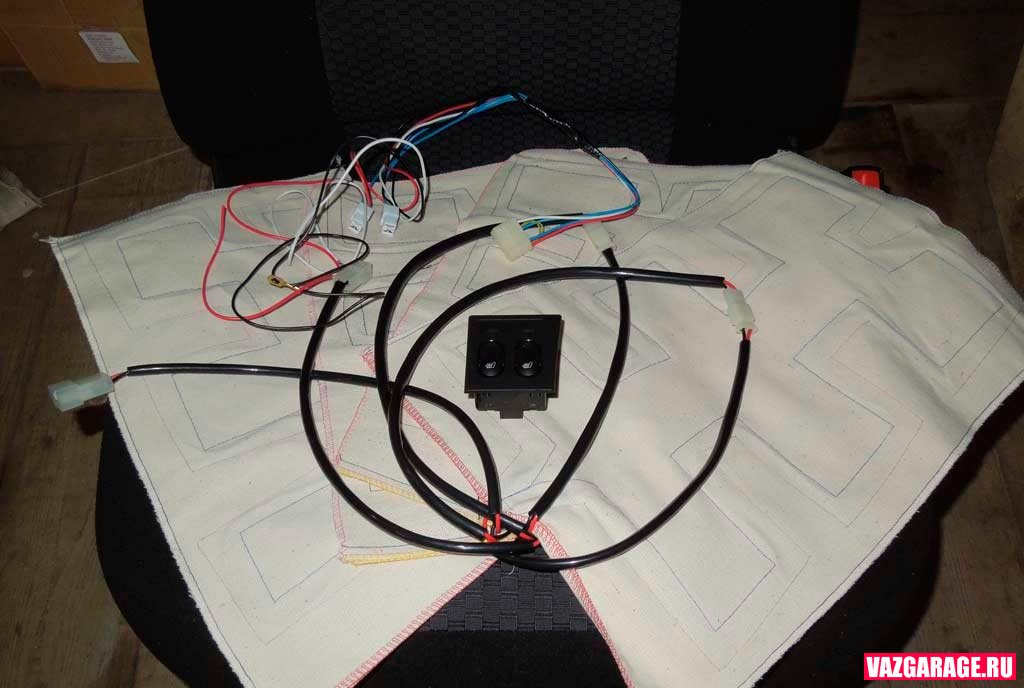
When preparing to install heated front seats, you need to ensure that you have the following components:
- seat heating elements. Selecting a heater option without or with a backrest according to individual desire;
- two-position control buttons – 2 pieces;
- sockets with 4-pin relay;
- terminals, wires, insulating tape;
- tools (screwdrivers, wrenches, pliers);
- free time.
You can begin the installation process only after everything you need has been prepared.
Installation of elements and parts
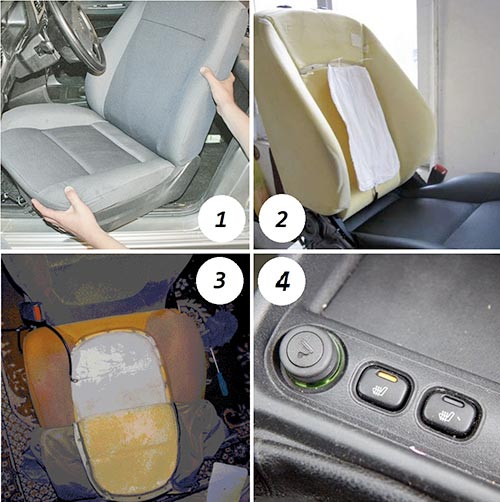
- Remove the front seats. Unscrew the slides and remove the passenger and driver's seats from the car interior for faster and more convenient work.
- After removing the seats, you need to carefully remove the trim, which is secured on special plates or hooks under the seat and along the contour of the car seat.
Everything must be done carefully, without using brute force, so as not to damage the casing.
- If you plan to install heating for the back of the chair, the covering is also removed from it. To do this, you need to remove the plastic bushings for the headrests and disconnect the trim from the bottom from the plates or hooks.
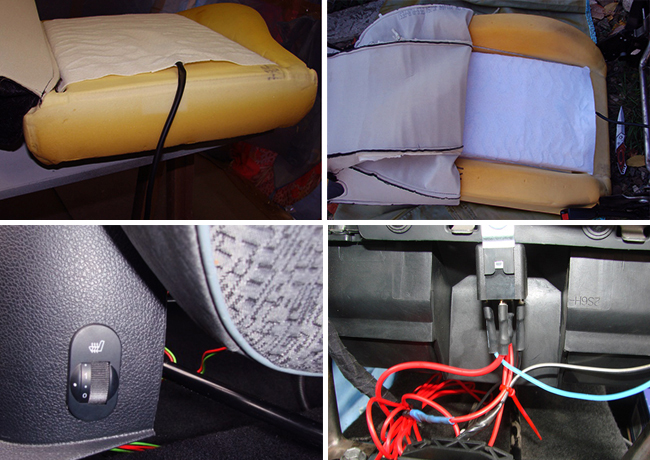
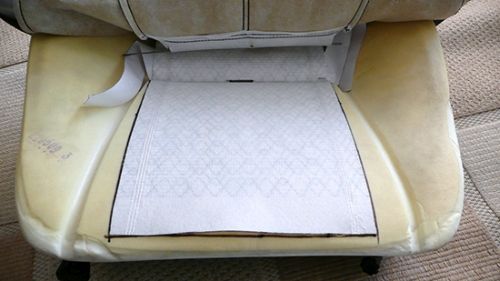
- Place the heater on the seat foam and mark the contours with a marker.
- Glue a tape along the contour, using double-sided tape, onto which to glue the heater (necessary so that when assembling the casing, the heater retains its original seat).
- When the heater is installed, you need to run its contacts under the bottom of the seat.
- Install the trim on the seats and install them back into the car.
Connection to power supply for heated seats
- First, determine the location where the heating on/off buttons will be installed. They are usually mounted approximately near the handbrake or in the center of the control console.
- After installing the button, you can proceed to the connection process.
- The heater is equipped with an adapter for a 12V socket. Using the diagram, resolder the wires, connecting the cigarette lighter contacts to the button.
- Isolate contacts. Next, check the operation of the seat heating using the installed buttons.
- Hide the wiring under the car carpet and enjoy the work done with your own hands, and also the warm seats.
During the winter period of operation, you will be able to appreciate all the advantages of this option in your car.
If your car has a remote start, you can connect it so that the heated seats will trigger the alarm automatically.
Source: http://tuningrukami.ru/manualy/interior/ustanovka-podogreva-sidenij-svoimi-rukami/
DIY seat heating installation
 As winter approaches, many car enthusiasts whose cars do not have heated seats from the factory are starting to buy special seat covers.
Many people are annoyed by such capes, but there is a way out of this situation - this is to retrofit the car with a set of heated seats.
to install the seat subtree yourself, on any car, if you only have the time, money and desire.
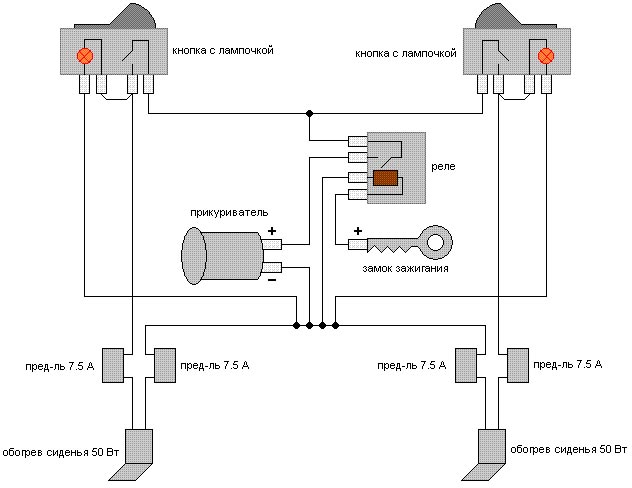
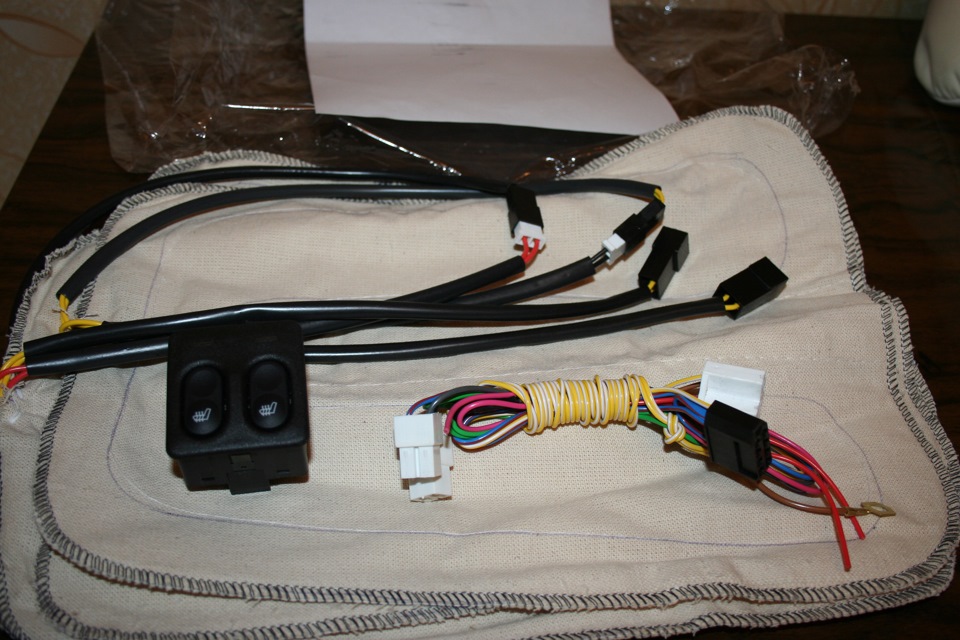
– Seat heating kit, for example Emelya. Cost about 2500 rubles
– Fuse and connector for it
- Wires. For power I used a stranded wire with a cross section of 2.5 mm (about 6 meters), for control 1.5 mm, and also used a cable 2 x 1.5 (4 meters)
– Control wire (also taken from what was at hand, with a cross-section of 1.5 mm) – 2 meters.
– Male-female terminal blocks and 6mm washer terminals
– Self-locking nuts M6
– PVC Corrugations for wires (diameter 4, 6 or 8 mm) if desired
– Plastic clamps
– Electrical tape
– Heat shrink tubing
– LEDs are red.
– Tools (screwdriver, screwdrivers, files, knife and scissors, pliers, side cutters, wrenches, etc.
Test car: BMW E39 (features of this car: the battery is not under the hood, but in the trunk, there is a squib from the airbag under the seat, there are presence mats inside the seats.
Therefore, the process of installing heaters will be more extensive; if there are no mats in your car, then you can immediately skip this installation stage. So. As mentioned above, our choice fell on a self-installation kit called Emelya.
There is a fairly clear connection diagram on the box.
1) Since the heaters will be installed inside the seats, they must be removed from their mounts. The designs in each car are different; if your vehicle is equipped with airbags, be extremely careful when dismantling it so as not to damage the squib. It would be a good idea to look in the documentation for more details about installing and removing seats on your car. 2) Now we begin to disassemble the seat, to do this we remove the trim from the hooks, and remove the tightening rings with side cutters; in the future we will use plastic tightening clamps instead of them.
3) If your car has presence mats under the seat trim, you can leave them, or you can remove them by installing a blende.
In any case, you decide for yourself what is best for you to do. 4) We try on the heating mats on the seat and mark the places for the slots with a marker. They are needed to attach the mats to the upholstery and seat frame. As you probably already guessed, you cannot cut heating filaments; this is even written in the instructions.
5) We fasten the seat trim through the threads of the heating mats with plastic clamps through the slots so that the wires are on the side of the frame.
6) We insert the power wire of the heating mat through the foam of the seat. It is advisable to bring it out closer to the armrest, and from behind. You can also put this wire in a corrugated PVC tube. (In cars with standard heating, by the way, this is done)
7) Now we take the included regulators and solder the green LEDs to red ones. This operation, of course, is at your discretion, I just prefer the red color. 8) The length of the standard wires from the mats to the place where the regulators are installed was not enough for me, so I extended it with a 2 x 1.5 mm wire using soldering, we hide the wire in a PVC tube. 9) Prepare the power cable; you will need a fuse with a socket and a female connector, and connect it to the positive terminal of the battery. (On many cars the battery is in the front, on ours in the back, so in order to lay the cable from the trunk to the installation location of the regulators, we had to remove the rear seats, laying the cable under the interior carpet). Now, to continue all the work, you need to pull out the fuse, or remove the positive terminal from battery
10) The wires from the regulators to the heating mats were also laid under the carpets, having previously covered them in PVC corrugation. At the same time, do not forget that you cannot pull the wire tightly; you need to leave a little free play in case you suddenly decide to move the seat.
11) Of course, BMW has a standard place for regulators, but the original heated buttons are more expensive than the installation kit itself. And those included in the kit do not fit in a regular place. Therefore, we decided to install them on the side on the center console. 12) Well, the last point is connecting the positive wire from the relay included in the kit to the ignition switch. Detailed instructions for connecting to the ignition switch and the diagram are given above. The contact numbers for all cars are different, but you need to solder to the drive on which +12 V appears in position 2 of the ignition switch. We lay the control wire itself through the panel into the center console. We cut it off a small reserve of all the wires going to the relay: power supply, heating mats, control. We solder or press them into female connectors, wrap them in heat-shrink tubing and connect them to the relay. We connect the ground wire to the body in the nearest place. Well, that’s all, if anything is unclear, write in the comments or use the installation instructions from the manufacturer, its photo is at the top of the article.
http://bmw5erclub.ru/forum/showthread.php?t=37745
Source: https://www.freeseller.ru/4161-ustanovka-podogreva-sideniy-svoimi-rukami.html
DIY seat heating
Undoubtedly, we all love comfort and coziness, the presence of which can hardly be said, for example, in a car with a leather interior frozen in winter. Moreover, the issue here is not in the upholstery, but in the inevitable discomfort in frosty weather. Do-it-yourself heated seats are the best way to avoid this discomfort.
Important!
Installing heated car seats is quite a responsible task, especially for those who are familiar with electricians, so in order to avoid force majeure situations, before getting down to business, be sure to consult with an electrician or an experienced installer of homemade heated seat systems.
Buy or make?
On the modern market of auto parts and accessories, you can easily find removable heating covers (capes) and even entire heated seats. Their low cost and ease of connection are undoubted advantages, therefore, if finances allow, as they say, do not show off and buy a ready-made option.
Of course, if there is no money for it, you will have to do everything yourself.
What you will need.
- Nichrome wire 0.5 mm in diameter and 10 meters long.
- Relay.
- Button.
- Wires and connectors for mounting the heater in a car.
Do-it-yourself seat heating: instructions
- To begin with, you need to make 4 spirals from wire: the most convenient way to do this is with a wooden beam and two nails driven into it (without heads, they should be bitten off) at a distance of 4 cm from each other - just wrap the wire around the nails in a figure of eight, forming spirals.
- Find a piece of fabric, preferably denim, that matches the size needed to heat the seat of your car (approximately 30 by 30 cm). Using a sewing machine, sew 4 rows of spirals parallel to each other to the selected fabric flap.
Connect the spirals with wires. The power of such a heater reaches 40W. Connect the resulting structure via a relay to a power source (cigarette lighter).
Unfortunately, this type of seat heating, regardless of whether it is homemade or purchased in a special store, has a number of quite significant disadvantages.
- There is a risk of getting burned, because no one gives a 100% guarantee that any of the wires will not fail, igniting right under its warmed owner.
- Such cases are often characterized by uneven or discontinuous heating.
- This heating element is connected to the power source through the cigarette lighter socket. However, at present, many drivers use this connector to connect a navigator, video recorder, etc., and a splitter in this situation cannot be a way out of the situation, because heated seats require considerable current consumption, which is disproportionate with several connections to the network at once, so the driver or his passengers will have to choose what is more important at the moment: to stay warm or to follow the instructions of the navigator, for example.
- One more point: the heating option considered is very inconvenient to use due to the presence of wires in its design that interfere with the driver, and passengers in the rear seats do not have the opportunity to warm up in this way, unless, of course, you extend the wires leading to the relay.
Based on the described disadvantages of the heating method described above, we will consider a built-in version of heating elements. Many car owners may justifiably be frightened by this solution to the problem, because, in addition to assembling the structure itself, the driver faces the difficult task of installing it.
However, this option will solve many of your problems in one fell swoop (the wires are hidden, the interior interior is not changed, the cigarette lighter socket will remain free, because
all elements are connected directly to the car’s wiring), providing the opportunity to warm up in winter frosts not only to the driver and passenger sitting in the front seat, but also to “guests” from the rear sofa.
How to make built-in heated seats with your own hands?
First, you need to purchase the so-called backbone of the entire structure - heating elements. Why buy and not make it yourself? The issue is your safety.
Since the elements are built-in, and any inaccuracy in independent work cannot be identified and eliminated in a very short safe period of time, it is better and more reliable to use ready-made elements. Their selection is quite large.
We will focus on the domestic manufacturer “Emelya” (Russia), whose product quality is not inferior to reliable Germans, and the price is much more pleasant.
Included in this set you will find an electronic temperature controller and overheat protection.
The heating element in Emel is represented by reinforced cable or carbon fiber.
Additionally you will need:
- Screwdriver Set,
- wrenches for disassembling the chair,
- plastic clamps,
- scissors,
- knife with replaceable blades,
- insulating tape,
- multimeter,
- heat shrink tubes,
- pliers, marker,
- soldering iron,
- double-sided tape (you can use glue 88),
- stranded wire 2.5 mm sq. cross section - for wiring.
First, decide on all the control buttons and their fastenings, so that if necessary (suddenly they don’t fit in their regular place), purchase the ones that are suitable for this car.
Now we can get down to business.
- Disassemble the seats: start with the headrest, then remove the plastic elements, then the seat upholstery, making room for laying heating mats. To remove the “back” trim, remove the plastic bushings for the headrests.
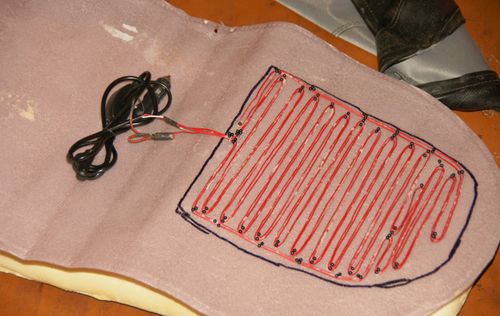
- Place the sheet with heating elements on the seat foam, marking its dimensional contours with a marker. Following the marked lines, stick on strips of double-sided tape or use glue 88. If there is a temperature sensor, also install it on the foam rubber.
- Glue (attach) heating mats to the designated area on the seats. Here you should pay special attention to the location of the wires. Do not forget that on the driver's seat they should be on the right, and on the passenger seat on the left. Remove the power wires.
- Install the “original” skin on the supplemented foam base, using plastic clamps in the required places. Also return all plastic elements, headrests to their original position and install the seats in their original places. The wiring should be laid in the locations where the power connections and controls are located.
A very important point: the wires going to the heating mats from the regulators cannot be laid under tension; leave such a margin that you can easily move the chair away if necessary.
- It's time to connect the heating elements. The instructions included with the installation kit should help you with this issue. If it is not an assistant for you in connecting the unit to the on-board network, it would be better and more correct to turn to professionals for help. If you are confident in the correctness of your actions and are ready to try to figure out this stage yourself, we recommend that you pay attention to certain recommendations:
- It is necessary to detect the power (12V), ignition and backlight circuits using a multimeter.
- Connect the positive wire of the thermal relay to the ignition switch connector, where power appears only after turning the key.
- Connect the power wire to the positive terminal of the battery through a fuse.
- Connect the negative wire to ground, and the button backlight wire to the cigarette lighter contacts.
- All connections, of course, must be soldered and insulated. Then you can check the system.
An important point: a correctly assembled system will only work when the ignition is turned on. Otherwise, you risk not starting the car someday.
Only one question remains unclear: what to do with the rear sofa and its heating? For those who constantly travel with their family in a car, this is a very important point. But there is nothing complicated here either: installation and connection of the rear seat heating system is similar to that described above. The only difference is that for one sofa you will need two sets of heating elements.
Video
I recommend reading:
Source: http://autoepoch.ru/tyuning/podogrev-sidenij-svoimi-rukami.html
Heated seats, its types and self-installation
Warm seats are a good option, which is not always present in your car; the way out is with the help of non-standard electric heating. Inside, the heating is equipped with a wire or carbon heating element, the latter is much more practical due to its wear resistance, but more expensive. Heatings vary in shape and size; let’s look at and compare their main types.
No. 1 Heated lower part of the seat
Pros : low cost, compact size, low power consumption
Cons : low heating capacity, does not warm the back
A budget option, it has the convenient shape of a simple pillow and does not require special fastening to the seat.
No. 2 Heating in the form of a seat cover
Pros : low cost, low power consumption, warms your back.
Cons : requires fastening to the seat (you need to be careful when getting into the car so as not to move the heating from its place).
It has advantages over the first option in terms of heating area; when purchasing, you need to pay attention to the quality of the straps that secure the device (if they are elastic, over time there may be problems with fixing it on the seat).
Important: when purchasing, check for the presence of an automatic shutdown function, which will prevent overheating and battery discharge.
No. 3 Heating built into the case
Pros : easy to use, additional seat protection.
Cons : Aesthetically, it may not match the design of the rest of the cabin.
A practical option, heating is built into a full-fledged cover for the entire seat; the location of the heating element is similar to option No. 2. A possible drawback is the lack of a cover made of similar material on the rear seat (when installed on the front).
No. 4 Built-in heating
Pros : does not interfere with landing, is constantly located under the original trim (no need to remove it during the warm season), power is connected to the standard wiring (the socket on the console is free), the control is firmly fixed to the panel (and does not hang on a wire), when selling the car can safely be considered an additional necessary option.
Cons : the heater itself is quite expensive, installing it in the seat is costly.
A good solution for a personal car that you plan to use for a long time. Convenient control of heating modes.
Price/size/power ratio of types of car seat heaters
| № | Manufacturer | Heating modes | Size, cm | Power, W | Price, ₽ |
| 1 | Emelya 1 | 1 | 40x40 | 20 | 600 |
| 2 | Emelya 2 , with backrest | 1 | 40x80 | 50 | 900 |
| 3 | SKYWAY S02202003* | 2 | 116×56 | 35 | 1800 |
| 4 | Emelya UK 1** | 4 | 37×32 | 70 | 3500 |
*seat cover, **for stationary installation under seat trim (for two seats).
Consider installing built-in heating yourself
If you have certain skills, you can install a heating element under the standard seat upholstery. To do this, we will need to disassemble the dashboard console to connect the heating elements, and route the wires under the gearshift lever trim. Place control buttons in a convenient place.
Important: read the installation instructions carefully; if you are not confident in your abilities, it is better to contact a specialist, at least at the stage of connecting to the on-board network.
It is convenient to disassemble the seats at home; after installing the heater, the trim should be secured in all the required places, otherwise it may move over time.
When installing the seat, we connect it to the removed wiring (the plugs are connected as with standard heating).
You might be interested in
Source: https://sdelairukami.ru/podogrev-sidenij/
Interesting too
Comfort for drivers plays an important role, because they spend a lot of time on the road. Additional heating of the seats will be an excellent alternative if the driver is not used to enduring the cold for a long time.
After all, standard heating inside the transport itself is not always enough to create a normal microclimate; additional devices are needed.
Installing heated seats will not cost that much, but will add significant comfort not only to the driver, but also to his passengers.
Prices for kits for heating front and rear seats
The specific indicator depends on the city, as well as on the car model: whether seat heating will be installed in a Priora, Lada Granta or BMW, the price can vary significantly. Most often, a complete set costs somewhere around 4-6 thousand.
If you use the services of an experienced mechanic. Purchasing devices and installing them yourself will save money, but this is not the best choice, because you can skip certain nuances.
Specialists will help you avoid mistakes, immediately guaranteeing uninterrupted operation of the devices.
Cost of installing heated seats at the installation center
In this case, prices for installing heated seats start from six thousand rubles. Again, in each situation it is determined individually how much the installation work will cost. The level is approximately the same in all salons; if there is a difference, it is small.
Owner reviews about Emelya kits
Many drivers have already appreciated the advantages of this domestic kit. The main advantage is the price, which is accessible to buyers of any level. Even if any problems arise after installing the Emelya seat heating, it is easy to replace the part.
Most reviews note that the design can last up to 3-4 years, even with active use.
The sets are designed for two seats at once, which is also important. Allows you to create comfortable conditions not only for the driver, but also for those who travel with him.
The design using hydrocarbon fiber is the main difference between the Emel models and other analogues available on the market. This is a durable material that can withstand loads of up to 100 kilograms.
Even active use does not lead to the appearance of tension or other similar defects. And if one part of the structure fails, the rest continue to work, which is very convenient.
How to install heating yourself?
For those who like to do everything with their own hands, it would be a good idea to answer the question: how to install heated seats without the help of a specialist.
The control unit requires the preparation of a convenient place - this is how work begins, regardless of the design option used. There are various solutions, each of them has a reason for existing:
- Door space.
- Between the seats.
- On the dashboard.
Template stickers are sold in kits to make it easier for the user to later cut out holes for the control buttons.
Next, remove the trim from all the seats on which the system will be installed in the future. The location of heating panels should not allow contact with wire or metal casings.
Maintaining the integrity of the heating filaments is a point that deserves additional attention. Suitable areas must be treated with a degreasing compound. The heaters are applied after drying.
The main thing is to level the plates as much as possible, then folds will not form.
When the installation of the heating elements is completed, the wiring along with the pads is brought out under the seat. The harness should lie where this part can remain unharmed.
You will need to attach 4 contact blocks with special holes for the blocks.
When connecting wires, the following diagram is used:
- Red connects to the 12-volt power circuit. For this, a 20 Ampere fuse is used.
- The blue one should be connected to the ignition switch.
- Black connects “with the mass.”
- The white one should be with the backlight wiring.
Under the seat we connect the heater pads and the harness. They are easily attached to the seat frame using plastic ties. It is also necessary to combine the contact blocks and control units with each other. The wires of the harness must first be insulated using a special tape.
When the connection of all elements and installation is completed, all that remains is to check the operation of the device. If everything works, you just need to put on special covers. The four-pin block is disconnected from the control unit if problems are detected.
A little about the types of external heaters
Systems of this type can be divided into two large categories:
The option is considered simple and available for purchase. The manufacture of products involves using rubberized or dense fabric as a base. It is on this canvas that the heating elements are then attached. Elastic bands with hooks or Velcro provide additional fixation for the structure. The cape just needs to be connected to the cigarette lighter for it to start working.
But even such simple options have disadvantages:
- Inability to install heated rear seats.
- The cigarette lighter remains closed at all times.
- Not attractive appearance.
- The cape constantly slips due to fastenings, the reliability of which leaves much to be desired.
- Lack of temperature regulators, which causes overheating.
"Cases"
Various materials are used to manufacture products in this group:
- Textile.
- Leather, natural or artificial varieties.
- Eco leather.
The covers are easy to install over standard equipment. The connection is made directly to the side system. This option is much better than using cigarette lighters to supply energy. In this case, it is permissible to install heating on both the front and rear seats, without affecting the appearance. Covers fit into the interior if chosen well.
Most cases are equipped with additional control panels. They allow you to regulate the temperature used, thereby extending the life of the structures themselves.
The main advantage of the previous type is simple installation. And the covers still need to be pulled over the seat so that they fit.
How to install heated seats yourself, watch the video:
Source: http://avto-femida.ru/driver/useful/sistema-podogreva-sideniy-v-avto.html