Ball joint - diagnostics and repair

Most motorists have probably heard about a ball joint, but they have no idea what it looks like and where its place in the car’s design is.
The purpose of this article is to familiarize people with the structure of the ball joint, diagnosing its malfunction and the possibility of repairing it, for which we will consider a number of questions: 1. How is the ball joint structured and its purpose in the design of a car? How to identify a ball problem? 2.
Reasons leading to ball failure and methods for checking it. 3. Extreme moment - support separation. 4. Is it possible to repair (restorate) the ball? And how reliable is it?
How does a ball joint work?
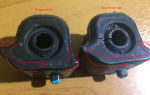
A ball joint is a very important part of a car that is part of the suspension design. It consists of a metal pin with a spherical end on one side and a thread on the other, as well as a body filled with polymer, in which a spherical socket is made.
With its spherical end, the finger is inserted into the housing socket without gaps, which eliminates the slightest backlash, but the finger is able to move in different planes. A rubber boot is put on the body-pin connection to prevent dust and dirt from getting inside this unit.
The threaded end of the ball joint is inserted into the corresponding hole in another part of the suspension - the lever and, using a nut, is attached to it. Due to the movement of the spherical end in the housing socket, their mutual mobility is ensured. It is worth adding that there are ball and without threaded connections.
Purpose of the ball joint
Structurally, the ball joint is located in the steering knuckle system, which is part of the front suspension of the vehicle on which the wheel is mounted. The ball joint provides the steering knuckle with the mobility necessary to perform, when acting on the steering mechanism, turns of the car.
In this regard, the use of a ball joint in such units will be justified and reasonable. The multi-link front suspension design has two ball joints - upper and lower - on each side of the car (four in total, but there are also six and eight).
The MacPherson front suspension has only one lower ball joint on each side of the car.
Signs of ball wear
The most obvious signs of a ball joint malfunction include an extraneous sound in the suspension while the car is moving on an uneven road surface. This sound can be described as “smacking”, which is characteristic of the collision of metal structural elements with plastic.
In winter, in frosty weather, when the car is moving, you can also hear the creaking noise made by the ball joint. This is possible in the case of a torn protective boot, since moisture gets inside the ball joint through cracks in the rubber and this contributes to the freezing of the lubricant.
Reasons leading to its failure
The design of the ball joint is very durable and, in general, it is not afraid of roads (unless of course it is an obstacle course) and time. However, the main destructive factors of this unit are water and dirt.
The penetration of water and dirt becomes possible when only a seemingly insignificant part is damaged - the protective boot. It is almost impossible to damage it while moving due to its location.
Most often, small cracks appear on the boot, which form over time (rubber aging) or under the influence of climatic conditions. The human factor should not be excluded - an accidental break with a tool used to repair the front suspension.
If a rupture of the boot or the presence of cracks from rubber aging is detected in time and replaced, then this will not affect the operation of the ball joint.
Prolonged driving with a damaged boot allows water and dirt to get inside the support, which leads to excessive abrasive friction of the ball-shaped tip on the polymer filler and the formation of cavities, both on the surface of the ball and in the polymer. This, in turn, contributes to the appearance of backlash - a very dangerous phenomenon that requires urgent measures to replace or repair the ball joint. Neglecting these actions can lead to negative consequences, including an accident.
Ball joint testing methods
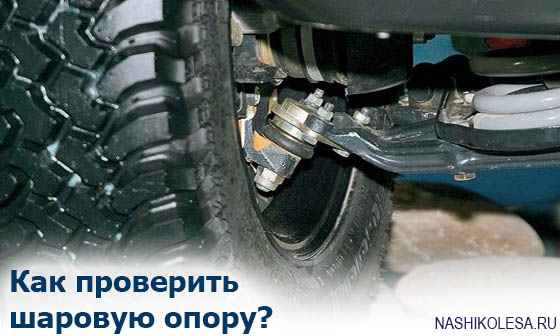
The best place where you can professionally identify possible malfunctions of the ball joint is a car service. However, checking the front suspension is also possible in a personal garage if there is an inspection hole or lift and with sufficient lighting. Checking the support consists of identifying the integrity of the boot and any gap play.
If there is no play when the boot is damaged, only the boot needs to be replaced. If there is play, replacement of the ball joint is required at the time of detection.
There can be no talk of any movement of the vehicle in such a state - it is dangerous!
Extreme moment - tearing out of the ball when moving
To understand what happens when a ball joint breaks, you should remember its function, which is to connect the steering knuckle to the lower or upper suspension arm.
If the connection is broken, the steering knuckle ends up with only one support point and the ability to move in several planes, which makes it practically impossible to control the car.
This causes the wheel to spin outward, causing inevitable damage to the fender and possibly the doors. Sometimes a pullout occurs when a wheel falls into a hole under high-speed conditions.
In such a situation, only the driver’s intuition and experience can protect him from negative consequences, since a twisted wheel does not allow him to drive the car normally.
Is it possible to repair (restorate) the support? And how reliable is it?
Often, car owners neglect to repair the ball joint, preferring to replace it. However, a qualified craftsman, with the appropriate equipment and materials, is able to restore a unit that has lost its functionality. Moreover, the cost of repairs is two or even three times less than replacement.
A ball joint that has been repaired becomes more wear-resistant, and most often has a service life even longer than a new one. This means that repairs are definitely cheaper than buying a new support.
It goes without saying that the process of restoring the support itself is a responsible operation, so you need to be thoughtful about choosing a specialist.
You should not perform this operation yourself, without the appropriate knowledge, equipment and training.
Source: http://www.poiskavtouslug.ru/tehnicheskoe-obsluzhivanie/sharovaja-opora-diagnostika-i-remont.html
Ball joints are showing signs of wear
Every car driver should know the signs of wear on ball joints. Quickly identifying if this part is faulty can save you from a serious accident. When driving, a faulty support may break off, causing the wheel to sharply turn outward.
And due to the shift in the center of gravity, it is almost impossible to drive the car. It’s good if this trouble happens at low speed.
You can at least somehow control the car, which means you can stop or pull over to the side of the road. But at high speed, somewhere on the highway, it is impossible to control the car.
If one wheel is turned out, the car can skid or drift into the oncoming lane. The result can be fatal. If the support breaks, the wing is guaranteed to be damaged. Such a breakdown is very dangerous.
But, if you carry out diagnostics of the car within the time limits specified in the technical passport. Such damage can be avoided.
Causes of ball joint failure
There are several reasons why ball joints become faulty. The service life of ball bearings is from 30 to 120 thousand kilometers. Operation depends on the vehicle model and its use. A sharp temperature change has a negative effect on the balls. The reason is in the support boot. It is made of rubber or rubber.
As you know, with a sharp change in temperature, rubber deforms. Over time, the material becomes hard. And cracks form in the boot. Moisture and dirt get into them. Because of this, the service life is significantly reduced. But bad roads and careless driving also have a negative impact. After all, at the moment of hitting the races, the load from the impact falls on the supports.
The result of this is mechanical failure of the ball joint.
After all the above reasons, the finger of the part is constantly ground down. As a result, it begins to dangle freely. The part cannot fit tightly because the gap is too large. Because of this, when the car is moving, the finger may simply fly out of the socket. But most often this problem occurs due to heavy load.
Here are a few reasons why a part may malfunction:
- Heavy load when driving on bad roads.
- Long service life of the part, more than 120 thousand kilometers traveled.
- Breakage of the boot itself.
- Lack of oil for lubrication. The inside of the part should be lubricated.
Signs of a bad ball joint
Typically, a ball joint does not break suddenly. Sudden failure occurs due to a poorly manufactured part. The first reason is a loud knock in the suspension when the car goes through jumps or pits. The sound is usually heard from the front of the car.
The reason for this is a ground off ball joint pin or a lack of lubricating fluid. But knocking may not be a sign of a breakdown. If on a frosty day, when you start driving, you hear a small knock, and then it disappears, do not worry.
This happens because the part is frozen and begins to heat up. But a malfunction can also be determined by the smoothness of control. If the car wobbles while driving, the reason for this is wear on the support. The wheel is not securely fixed, causing it to wobble.
If you feel that the car is not behaving as usual when driving, you need to immediately stop and inspect the supports.
Source: http://avto-kuplya.ru/tekhnicheskie-voprosy/proverka-khodovoj/41-sharovye-opory-priznaki-iznosa
Self-diagnosis of ball joint and chassis | Motorist's benefit
The ball joint is one of the most vulnerable parts of a car suspension, and the consequences of failure of this part can be very disastrous. In my article today, I will try to tell you how to independently diagnose car ball joint malfunctions based on characteristic symptoms.
Before you begin diagnosing the ball joint , you should remove the wheel.
Afterwards, you need to unscrew the screw plug from below, then use a depth gauge to check the distance - if it is more than 11.8 mm, this support must be replaced.
If this is not done, then with some strong impact the upper body of the hinge may burst along cracks, after which the ball will fly out completely.
The most fragile part of the ball joint is the end of the ball joint lever; often this is where cracks occur, which subsequently lead to big troubles.
Cracks can also appear near the lugs for silent blocks, or in the middle part of the support. Timely detection of these cracks is your chance to avoid an emergency, serious problems and major repairs.
Sometimes a crack can be seen by a characteristic yellow strip of rust, which is impregnated with a thin layer of dried dirt.
You can diagnose a malfunction using one old method. To do this, you need to wet the lever with diesel fuel, then wipe it dry and apply a layer of liquid clay.
After a few days, inspect the dried clay - diesel fuel that has penetrated into the cracks will definitely appear on the clay. The main thing in this method is meticulousness; the success of the diagnosis depends on it.
Cracks, one way or another, will lead to breakage of the lever, as a result you will get the same thing as if the ball was torn out.
If the lever breaks near the silent block, the wheel will begin to hold the road poorly, the slightest push during braking, or simply when hitting an obstacle, will deviate in different directions. As you understand, such a malfunction is especially dangerous at high speeds. Because of this, you can easily fly into the oncoming lane, what happens next, I think there is no need to explain...
Often the transverse beam - the basis of the front suspension, which also serves as a support for the car's engine and combines the side members with mudguards - fails.
Having discovered a crack that has not yet widened by a few millimeters, you need to take the car to a service station without unnecessary delay, otherwise the bolts and nuts may simply fly out of the old lower flange of the spar, after which the engine may even tilt.
The axle of the lower arm will eventually go down, and the wheel will get negative camber, in which case, as you understand, you can’t avoid trouble either!
Often the transverse beam can break in the center, after which the beam broken in two under engine pressure will lead to rocking and deformation, and possible breakage of the side members. At the same time, other engine and body parts are destroyed.
High speed can cause the beam to break near the mounting bolts of the lower arm axle, which in turn poses the risk of the lower arm tearing out the bolt that tightens the ball joint ; this can happen, for example, after a push or a wheel falling into a hole. After such a breakdown, the car will veer to the side, and the driver may lose control of it, since it will be very difficult to hold it at this moment.
Repair of a cross beam is usually done by welding, and the result directly depends on the professionalism of the welder, so try to find a “smart” one.
If the welder does everything correctly, the beam can still serve and will have no less strength, but for this all its drawing dimensions must be restored.
In case of poor quality work, after repair there will be problems with the geometry of the front suspension.
Of course, you shouldn’t forget about such parts as: springs, anti-roll bar, etc., which can also fail.
You can identify a low-quality spring by the characteristic sag of the car, and a failed stabilizer by the frankly large rolls when cornering.
As for shock absorbers, after only 15–20 thousand kilometers on “our” roads, they stop functioning and do their job; as a rule, they are no longer able to provide even minimal comfort.
And this is not a complete list of all the “symptoms” that indicate serious “diseases” of the ball joint, as well as the consequences of this malfunction. I also recommend from time to time to carry out a complete diagnosis of all elements of the car suspension.
As the golden rule says: “preventing a disease, in our case a malfunction, is easier than treating it later.”
If you are not lazy and regularly monitor the condition of all the above parts, you can not only save your money but also time, and can also avoid disastrous consequences.
car suspension device
Source: https://sanekua.ru/samostoyatelnaya-diagnostika-sharovoj-opory-i-xodovoj-chasti/
How to check and change the ball joint on a Renault Logan: video and photo
Operating the vehicle on bad roads can damage this unit. Meanwhile, the ball joint plays a vital role in the chassis of the car and there is no way to delay its repair.
The video of replacing the ball is published below!
What is a ball joint?
Thus, the ball joint is involved in turning the wheel and without it, maneuvers are not possible.
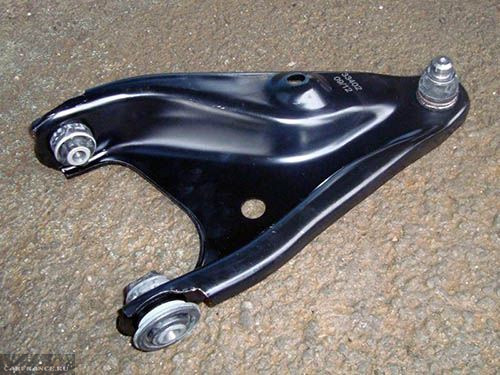
Renault Logan lever. Ball number 2
Additionally, the unit ensures correct fixation of the hub and wheel in the horizontal plane during vertical movements.
How many ball joints are there for Renault Logan?
Renault Logan is equipped with a MacPherson-type front suspension. This means that in its design there is only one ball at the bottom - on each side of the front axle. The part is located on the lower arm, under the hub. It is clearly visible when the car is suspended or in a viewing hole.
Typical faults
Signs of a failed unit include:
- A dull knock when driving over bumps.
- Creaks emitted as the car moves in the cold season. They may appear due to a torn boot, through which moisture penetrates and the lubricant freezes.
- Increased effort and the appearance of squeaking and knocking noises when turning the steering wheel.
- Poor directional stability of the car even when driving in a straight line. Steering wheel course correction required.
- Accelerated and uneven tire wear.
What threatens
If you do not monitor the condition of the ball joint, it may ultimately result in major repairs. The basis of the unit is the body and the so-called finger.
At a critical moment, the finger is simply pulled out of the body and the wheel separates at the bottom of the hub. Further operation of a vehicle with such a malfunction is impossible - only with the help of a tow truck.
How can you check the ball joint on a Renault Logan (video)?
Modern diagnostic equipment for suspension in the form of stands is not always able to determine the condition of the supports. Therefore, you can resort to simple but effective methods. Their essence boils down to auditory and tactile diagnostics (by touch):
- To test the balls by ear, you need an assistant. One person should rock the car, and the other should listen for possible knocks.
- The assistant presses the brake pedal all the way, and at this moment the inspector must grab the top and bottom of the wheel, rocking it. If there is play, we can talk about the formation of a gap in the ball joint. The unit needs to be replaced with a new one.
- The examiner places his palm against the body of the unit in such a way as to simultaneously grasp the body and finger. At this moment, the assistant begins to rock the wheel - if play is felt, then the support needs to be replaced. Standard wheel radius for Renault Logan 15!
- Place the car on a lift or jack and inspect the ball joint from below. If the boot (protective rubber cover) of the assembly is damaged, the ball must be replaced. Also, do not forget to inspect the CV boot; if it is damaged, it will need to be replaced. If dirt has managed to get into the “grenade” mechanism, then the CV joint will also need to be replaced.
The boot is torn - this is clearly visible
Replacing the ball joint
Wear or damage to this unit requires its replacement. There is no alternative to this. Therefore, you need to buy a new ball joint, take the car to a service center, or replace it yourself. In general, it is recommended to carry out the change in conjunction with the lower suspension arm.
Tools required for work
- Key size 13.
- Hammer.
- Screwdriver with flat head.
- Wrenches (open-end) in sizes 16 and 18.
- Socket wrench size 30.
Replacement steps
- Hang the car or lift the front part (from the desired side) with a jack, and then place the car on supports.
- Remove the wheel.
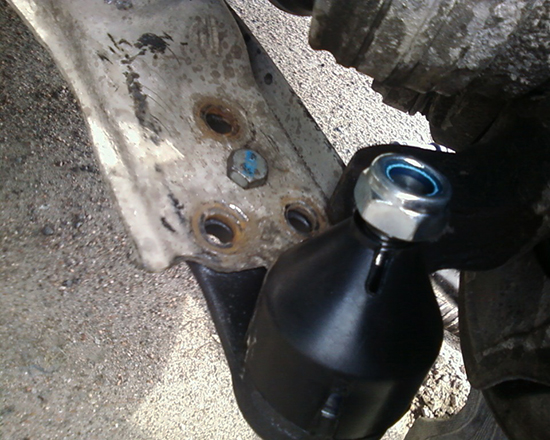
Let's go. The wheel was removed. Let's look at the scope of work
- Unscrew the nuts from the upper and lower bolts (located on the connecting rod mount, which also needs to be removed).
- Unscrew the stabilizer bar mounting nut. Pull out the bolt. Read more in the material about replacing the stabilizer link.
- Unscrew the ball joint bolt.
- Pull the pin out of the steering knuckle housing.
- Remove the bolts of the front and rear silent blocks.
- Now you need to start dismantling the lower suspension arm.
Lever close up
- Replace the ball joint: remove the rubber cover of the assembly and the metal fixing ring. Then knock out the support with a hammer.
We press out or knock out their ball joints
- Install a new ball - its teeth must coincide with the grooves of the spline.
Part numbers
Take into account! Renault Logan ball joints of the first and second generations are almost identical, and therefore interchangeable. The article number of the ball that Loganovody recommends is TRW for a first generation car - JBJ721.
401604793 — article
If the front suspension arm or ball joint is damaged, they must be replaced. The suspension arm itself and the ball joint are connected to each other.
During repairs, you can replace both parts simultaneously or separately. Initially, the parts are connected to each other with rivets. When repairing, they should be replaced with bolts.
Therefore, during repairs, you must immediately drill out the rivets. The support must be changed on the lever removed from the car.
Signs of problems (checking the condition of the ball joints)
Torn boot - ball needs to be replaced
The following signs indicate wear of a part:
- The tires on the front wheels wear unevenly.
- A knocking sound will be heard while driving.
- When turning, you will hear a squeaking noise from the front of the car.
If at least one of the symptoms listed above is detected, then most likely the ball joint needs to be replaced. Before starting repairs, you must remove the suspension arm from the car. The work is carried out on an inspection pit or overpass.
The ball joint on a Ford Focus 2 broke.
Removing the lever
Process:
- The front wheels are hanging out. If only one wheel is lifted, the vehicle's stabilizer bar will interfere with the work (about replacing the stabilizer bushing here). Levers located on the right and left are removed in the same way.
- The wheels are removed.
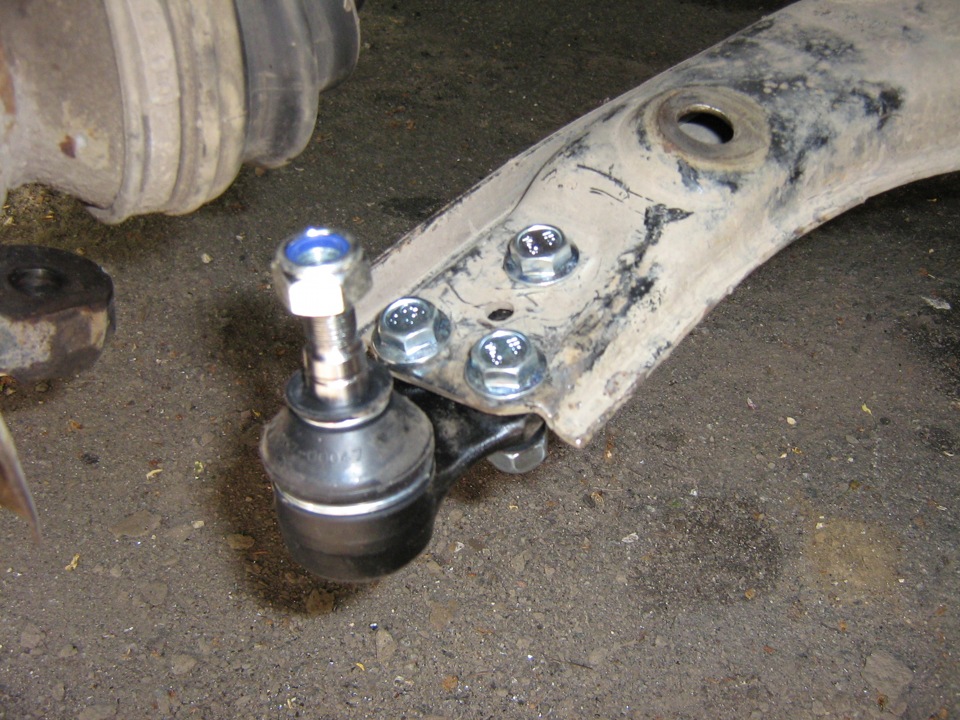
Let's look at the scope of replacement work
- Using a key set to “18”, unscrew the nut that secures the support to the hub. In this case, the nut should rest against the wheel drive joint.
- Using an adjustable stop, the finger is pressed out of the socket. To do this, use the support lever to press the support down, striking the steering knuckle with a hammer.
- As the finger comes out of the eye, you must continue to unscrew the nut.
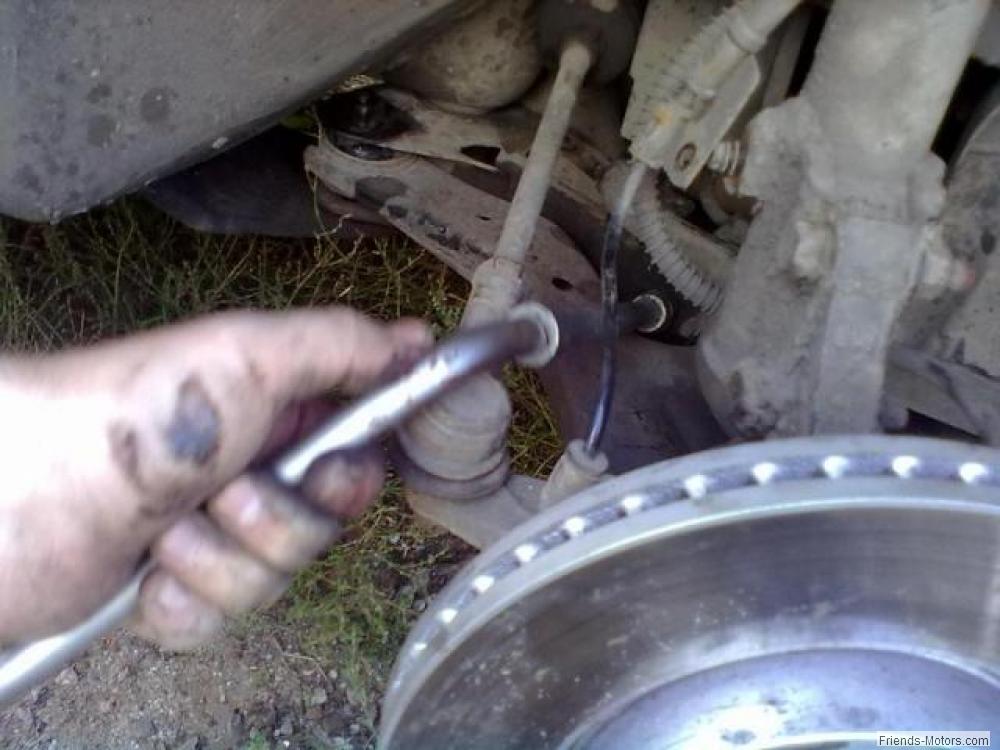
Another perspective
- The support pin is removed from the steering knuckle.
- Using a key set to “21”, unscrew the nut that secures the lever to the rack. The bolt should be held with a head of the same size. After unscrewing the nut, the bolt is knocked out of its socket.
- The second nut securing the lever is unscrewed in the same way.
- The suspension arm is removed from the car.
Phew, they took it off!
Replacing the ball joint
Since the manufacturer does not separately make spare parts for the support and lever, it is recommended to disassemble them and replace them with similar parts that can be picked up from other cars. You can also replace the lever and support completely with new ones.
Drilling Guide
- The rivets that hold the support on the lever are drilled.
- After drilling, the rivets should be knocked out of the socket and the support removed.
- A new support is installed on the lever and secured with bolts.
- The unit is installed on the vehicle in the reverse order of removal.
New ball in the lever
To ensure that these parts last for a long period of time, it is recommended to drive carefully on uneven roads.
Choosing a ball joint for Renault Logan
TRW JBJ721 - cheap, cheerful, high quality
Teknorot R-585 - not a well-known name, but the quality is good
Why do you need a ball joint?
It is a part that connects the front wheel hub to the suspension, so during operation this unit can experience heavy loads.
Source: http://carfrance.ru/proveryaem-i-menyaem-sharovuyu-oporu-na-reno-logan-svoimi-rukami-video-est/
How to determine the condition of ball joints. How to check ball joints
When driving on uneven roads, the suspension is subjected to serious loads, and the ball joints are subject to increased wear. How can you tell if they need replacing?
Ball joint device
The ball joint housing (1) is made of metal with high toughness and strength.
Inside the housing there is an insert (2) made of material that is resistant to abrasion and shock loads.
Inside the insert there is an apple (3) and a conical tip (4) connecting the hinge to the steering axle of the wheel.
The apple and insert are secured inside the ball with a retaining ring.
The outside of the ball joint is closed with a cover (5) and a boot (6). The boot protects the internal parts of the device from dust and dirt. Inside it is filled with refractory lubricant.
Reliable fixation of the boot on the ball joint body is ensured by a spring (7) and an elastic ring (8).
— change in camber and toe characteristics;
— lateral wheel runout with subsequent uneven tread wear;
— the car is pulled away from the original trajectory during braking, accompanied by characteristic clicks;
— knocking when cornering in combination with steering wheel beating;
— creaking when turning the steering wheel;
- light tapping and faint crunching while moving;
— a distinct knocking sound when driving at low speed on a road with uneven surfaces;
Reasons for ball joint failure
The main reason for the malfunction of this suspension part is severe wear of its interacting surfaces, as a result of which the gap between the ball and the ball joint housing increases.
Wear can be either natural, combined with the natural aging of materials, or a consequence of heavy loads on the suspension while driving on uneven sections of the road at high speed.
If the boot is damaged, moisture, dust and dirt get inside the ball joint mechanism, causing abrasive wear and corrosion.
All taken together leads to the fact that instead of the tens of thousands of mileage declared by the manufacturer, the ball joints do not cover even half of this distance, failing prematurely.
Self-diagnosis
First of all, make a visual inspection of the anthers. The presence of cracks and mechanical damage on them will indicate the need to replace the ball joints.
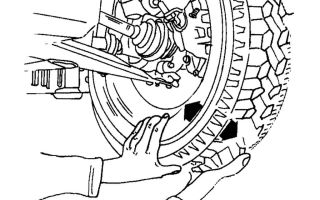
One of the easiest ways to diagnose ball joints is to check them “by touch”. With your hand on the body of the part so that you can feel both the body and the ball joint pin at the same time, ask an assistant to rock the wheel. If there is play in the finger in the body, you will feel it.
After jacking up the car, place a pre-prepared stop under the ball joint housing, and then lower the car down a little to load the part under test. The wheel should remain suspended and rotate freely.
To eliminate the influence of wheel bearing play, have an assistant hold down the brake pedal. At this time, try to swing the wheel yourself, grasping it at the top and bottom points.
The detected play will indicate a decent gap between the pin and the ball joint body due to its wear. The wear can only make itself felt at a certain position of the wheel, so when performing the check, ask an assistant to slowly turn the steering wheel, first in one direction and then in the other.
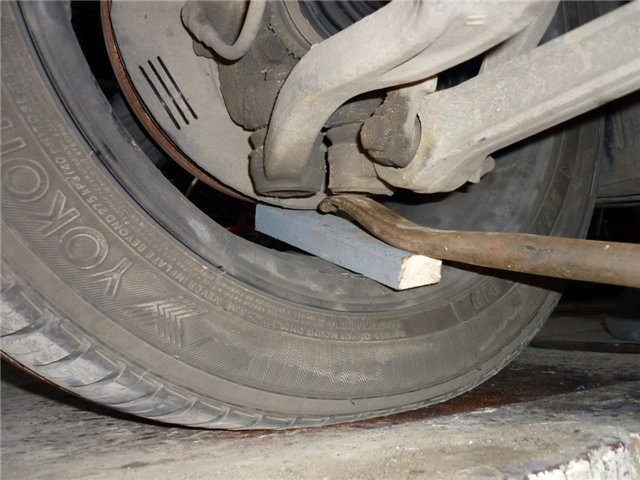
A more accurate diagnosis can be made using a mount. Inserting its flat end between the lever and the pivot pin, press down on the pry bar handle.
At this time, observe the behavior of the support parts yourself. If there is play in it, you will definitely notice it.
Source: https://goodmaster.com.ua/avtomobil/kak-opredelit-sostoyanie-sharovyh-opor.html
Replacing the upper and lower ball joint of a VAZ 2107: how to check and change, instructions with photos and videos
A car's ball joint is a connecting structure that is part of the suspension and allows the wheel attached to it to rotate in different directions. If it fails while driving, it can lead to a serious accident. Therefore, every owner of a VAZ 2107 should know the algorithm for checking the functionality and replacing ball joints.
Purpose of ball joints VAZ 2107
A ball joint (BJ) is an ordinary hinge built into the VAZ 2107 suspension and allows the wheel to move only in a horizontal plane. At the same time, it limits the possibility of wheel movement in the vertical direction.
https://www.youtube.com/watch?v=UQOHltQ8LHU
Ball joints on the latest versions of the VAZ 2107 have become more compact
Ball joints of the VAZ 2107 are very short-lived, so they have to be changed often.
Design of ball joints VAZ 2107
Previously, passenger cars did not have ball joints. They were replaced by bulky king pins that had to be lubricated frequently. The mobility of such compounds left much to be desired. This, in turn, negatively affected the car's handling. The designers of the VAZ 2107 abandoned the kingpins and installed ball joints. The first SHO consisted of:
- housings;
- ball pin;
- springs;
- anther
The finger was pressed into a fixed eye, fixed with a powerful spring and covered with a boot. This structure also needed to be lubricated periodically, but quite rarely (about twice a year). The lubricant on the pins had to be changed every week.
Modern ball joints do not use springs
Subsequently, the VAZ 2107 SHO was constantly improved:
- the spring disappeared from the structure;
- the steel boot was replaced with a plastic one;
- the fixed eyelet in which the finger was fixed became more compact and received a plastic external finish;
- SHOs have become non-separable, that is, practically disposable.
One driver I know assured me that he had found a great way to extend the life of plastic boots. Before installing new ball joints, he always applied a thick layer of silicone ointment to the boots, which car owners use to prevent the rubber bands on car doors from freezing in winter.
From his words, it turned out that the anthers after such a procedure become practically “indestructible.” When I asked how an ointment intended for rubber could improve the quality of plastic, I was recommended to just try it and see for myself. Unfortunately, we never got around to it.
So I leave it to the reader to check this driver’s find.
Reasons for failure of VAZ 2107 ball joints
The main reasons for SHO failure are as follows:
- Alternating shock load. As a result, the ball pin pressed into the suspension eye is destroyed. The support is designed in such a way that the shock loads on the pin ball are very high. When the quality of roads is poor, these loads increase manifold. In such conditions, even a high-quality SHO will not be able to fully exhaust its resource.
- Lack of lubrication. Under the influence of shock loads, the lubricant is gradually squeezed out of the SHO. In addition, over time, the lubricant loses its original properties.
- Anther destruction. The boot protects the hinge joint from dirt. If a crack appears in it, the dirt that gets into the hinge turns into an abrasive material and grinds down the surface of the ball pin. Through a crack in the boot, dirt gets into the hinge and grinds down the surface of the ball pin
Signs of malfunction of VAZ 2107 ball joints
The main symptoms of a VAZ 2107 SHO malfunction include:
- Extraneous sounds. While driving, a knocking or grinding noise begins to be heard from the wheel. This is especially pronounced on uneven roads at a speed of about 30 km/h and is usually a consequence of partial destruction of the ball on the support pin.
- Wheel rocking. When accelerating, the wheel begins to sway slightly in different directions. This happens due to the backlash that occurs in the SHO due to its wear. The situation is quite dangerous, and the backlash must be eliminated quickly. Otherwise, the wheel may turn at a right angle to the body at speed. Play in the ball joint leads to rocking of the front wheel, which can turn around at speed.
- Grinding and squeaking noise when turning the steering wheel left or right. The reason is the lack of lubrication in one of the SHOs (usually only one of the supports fails).
- Uneven wear on front and rear tires. This can happen not only due to faulty SHOs. The cause of uneven wear may be incorrectly adjusted camber and toe-in, insufficient or excessive air pressure in individual wheels, etc.
Diagnostics of ball joints VAZ 2107
You can make sure that the cause of the grinding or squeaking is the ball joint in various ways.
- Aurally. An assistant will be needed for this. Two people rock a car with the engine turned off, simultaneously pressing on both sides of the car's hood. If at the same time an uncharacteristic sound is heard from one of the wheels, the corresponding wheel is worn out or needs lubrication.
- Detecting the backlash of the sho. The wheel, on which the support has most likely failed, is raised with a jack by about 30 cm. An assistant from the interior presses the brake pedal as hard as possible. After this, you should forcefully rock the wheel, first in a vertical plane up and down, then to the right and left. When the brakes are locked, play will immediately appear. Even if it is insignificant, the wheel still needs to be changed. To identify play in the ball joint, the wheel should first be rocked up and down, and then to the right and left
- Inspection of ball pins. This method is relevant only for the latest VAZ 2107 models, which have special inspection holes for monitoring ball pin wear without disassembling the support. If the pin wear is more than 6 mm, the ball joint should be replaced.
Selection of ball joints for VAZ 2107
The main element of any SHO is a ball pin, the reliability of which determines the operational life of the entire assembly. A high-quality ball pin must meet the following requirements:
- the finger should be made only of high-alloy steel;
- the ball of the finger must necessarily undergo a cementation procedure (surface hardening), and the body of the finger must be hardened and then cooled in oil.
Other support elements are produced by cold heading followed by heat treatment.
https://www.youtube.com/watch?v=uOadGCL0gI0
This technology for manufacturing SHO is quite expensive. Therefore, there are only a few companies that produce high-quality supports for the VAZ 2107. These include:
- Belebey plant "Avtokomplekt"; Ball joints "Belebey" are very popular among VAZ 2107 owners
- PO "Nachalo"; Ball joints produced by PO "Nachalo" are more expensive than "Belebey" supports, and it is much more difficult to find them on sale
- Pilenga (Italy). Italian Pilenga SHOs are one of the most expensive and durable supports for the VAZ 2107
When choosing ball joints for the VAZ 2107, you should beware of fakes. There are quite a lot of such products on the market. Some of them are made so well that they can mislead even a specialist.
The only criterion to distinguish a fake from the original is the price. Low-quality SHOs cost half as much as real ones.
However, saving on details on which the driver’s life literally depends is unacceptable.
Replacement of ball joints VAZ 2107
Ball joints on the VAZ 2107 cannot be repaired. On the first “sevens”, collapsible ball joints were installed, from which a worn ball pin could be removed and replaced. Modern supports cannot be disassembled. Moreover, even if we allow for the possibility of disassembly, it will still not be possible to repair the SHO, since ball pins for the VAZ 2107 have long been discontinued.
To replace the SHO you will need:
- a set of new ball joints;
- jack;
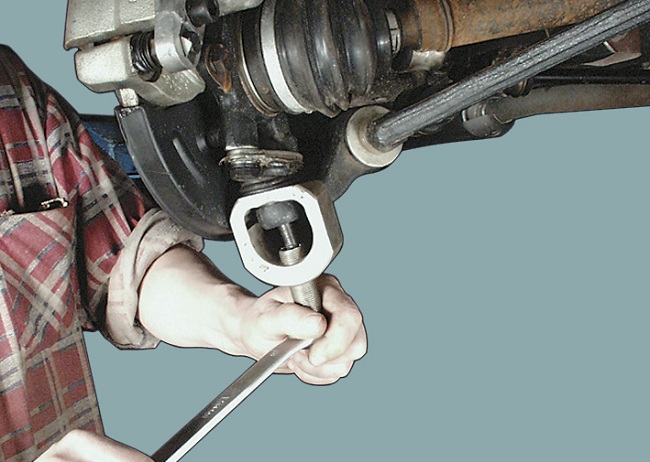
- a device for squeezing supports out of the eyes;
- set of open-end and socket wrenches;
- hammer;
- flat blade screwdriver.
Procedure for replacing ball joints
Replacing ball joints on a VAZ 2107 is carried out as follows.
- The wheel on which it is planned to replace the wheel is jacked up and removed.
- Use a 22mm open-end wrench to unscrew the nut securing the upper ball pin. The nut securing the upper ball pin of the VAZ 2107 is unscrewed with a 22mm wrench
- Using a special device, the pin is pressed out of the eye. The upper ball pin of the VAZ 2107 is squeezed out using a special device
- Instead of a device for squeezing out a finger, you can use a hammer, which gives several blows to the suspension. In this case, the finger is pryed off with a mounting blade and pulled up. Since the paddle is used as a lever, it must be quite long. Instead of using a ball pin tool, you can use a hammer
- Using a 13 mm wrench, unscrew the three bolts securing the upper support to the suspension. The bolts securing the upper ball joint are unscrewing with a 13 mm wrench
- The upper ball joint is removed from the suspension.
- Using a 22 wrench, loosen (by 6–7 turns) the nut securing the lower ball joint. It is impossible to completely unscrew it, as it will rest against the suspension arm.
- Using a special device, the lower ball pin is squeezed out of the eye. The lower ball pin of the VAZ 2107 is also squeezed out using a special device
- The ball pin fastening nut is completely unscrewed.
- Using a 13 key, unscrew the three fastening bolts on the eye. The lower SHO is removed from the suspension. The lower bolts of the ball joint are unscrewed with a 13 mm socket wrench
- New ball joints are installed.
- The suspension is assembled in the reverse order.
Video: replacing the ball joint of a VAZ 2107
Thus, technically replacing ball joints on a VAZ 2107 is quite simple. However, in practice, squeezing the ball pins out of the lugs will require considerable physical strength. Therefore, any car owner should realistically assess their capabilities before starting work on replacing the car.
Source: https://bumper.guru/klassicheskie-modeli-vaz/hodovaya-chast/zamena-sharovyih-opor-vaz-2107.html
Ball joint diagnostics - more attention to detail
The ball joint is one of the most vulnerable parts of the suspension; the consequences of a breakdown of this part of the car can be very unpleasant, and sometimes even disastrous.
It is much easier to promptly follow a number of preventive rules and periodically monitor the condition of the car, then diagnosing the ball joints of the front suspension will not only save money and time, but will also preserve your health. To do this, you should know how to check the ball joint.
A worn ball joint can jump out of its socket at any time; a small hole or bump on the road is enough. At best, you will need urgent repairs or replacement of the ball joints.
When the ball comes out, you either have to go to the store for parts, or call a technician if you can’t repair it yourself. Whatever one may say - hemorrhoids.
Therefore, experienced drivers recommend remembering a few simple but useful points on how to determine whether a ball joint is faulty.
Signs of wear on ball joints:
• The most typical indicator of bearing wear is a knocking sound that occurs while driving on an uneven road at low speed. The fact is that when worn, the gap between the pin head and the inside of the body increases and, as a result, the ball in the body becomes loose;
• When turning the steering wheel, an unpleasant creaking sound appears in the area of the ball joint; • The third typical sign of problems is “wobbling” along a straight road (unstable movement);
• And, as a consequence of the previous one, uneven tire wear.
Ball joint diagnostics
To independently diagnose ball joints, you need to jack up the car, or better yet, lift it on a lift. It is impossible to check the wear of ball joints if the machine is standing on the ground.
First of all, when checking the ball, you need to pay attention to the protective casing. It is known that a small crack is enough for sand, dirt and water to get into the rubbing surfaces, which significantly shorten the “life” of ball joints.
So, grab the top of the wheel with one hand and the bottom with the other. By rocking the wheel in this way, you can determine whether there is play in the support or not. This method allows you to determine the radial play in the ball joint. To check the axial play of the ball joint, it is necessary to shake the steering knuckle with strong up and down movements.
However, remember that it is almost impossible to accurately determine the amount of wear on the ball joint without removing it. Of course, if during the inspection you feel a strong play, and when driving you feel all the above-mentioned signs of wear on the ball joint, this is a clear sign that repair or replacement of the ball joints is required. But with a small gap, the degree of wear cannot be calculated indiscriminately.
Do-it-yourself diagnostics of ball joints on a Lada (VAZ) does not require special knowledge, but some prefer to resort to the services of a car service during a comprehensive check of the entire suspension of the car.
This detailed ball joint analysis can reveal wear on the shock strut upper mount or wheel bearing.
During any checks, remember that if significant runout and strong knocking are detected, restoration and repair loses its meaning; all that remains is to replace the ball joint.
(1 ratings)Loading…
Source: https://olade.ru/diagnostics/diagnostika-sharovoj-opory-bolshe-vnimanija-melocham.html