How to make unique headlight tuning with your own hands quickly and inexpensively
Optics on any car are primarily an element of the traffic safety system. To personalize their car, many drivers upgrade their lighting system on their own. There are several basic options for tuning headlights with your own hands. Each of them does not require highly specialized equipment, expensive materials or special skills.
Basic optics modification options
Beautiful headlights give the car a more impressive, exclusive and expensive look
There are several inexpensive and simple options for modifying headlights:
- cilia;
- color film;
- tinting;
- "angel eyes";
- LED strips.
Cilia
You can add individuality to your car without significant financial investments using special overlays on the optics - eyelashes. Visually, they seem to be a continuation of the hood, as they overlap the upper part of the headlights. Due to this, the car gets a more dynamic and aggressive look. In this case, the linings can have any shape - it all depends on the preferences of the car owner.
Eyelashes are sold in almost every parts store, so every car enthusiast can do headlight tuning with his own hands. You need to select the desired plastic profile and cut out the appropriate component. Before installation, the resulting parts are usually painted in a suitable color. Then, using double-sided tape, the covers are installed on the optics.
Discounts on new cars! Advantageous loan from 9.9%
Installment plan 0%
There is a method that will allow you to make more spectacular eyelashes. For this you will need:
- fiberglass;
- epoxy adhesive;
- sandpaper;
- primer;
- masking and double-sided tape;
- dye;
- fiberglass scissors;
- a set of keys for removing and installing optics;
- marker.
The first thing to do is remove the headlights. Then use tape to block the glazing areas. Strips of fiberglass of the desired width are glued on top and impregnated with epoxy. When they are dry, apply more tape and glue. This must be repeated until four even layers are obtained.
Then masking tape is placed on top. Pressure is created on it so that the workpiece takes shape, like the glazing profile. Depending on the manufacturer, epoxy glue dries from eight hours to a day.
Using a marker, markings are made for the cut, which you need to follow with scissors. After this, the workpiece is processed with sandpaper, primer and paint are applied.
After drying, the finished products are glued to the headlights using double-sided tape.
This method allows you to create different eyelash designs. Many people even recommend making several options, and then simply choosing the most attractive one.
This method has its advantages:
- ease of creation;
- the gap between the hood and the optics is closed;
- stylish tuning look;
- There are no problems when replacing.
Color film
This method allows you to do headlight tuning quickly and inexpensively. To do this you need to have:
- color tint film;
- detergent and napkin;
- soap solution;
- hair dryer;
- sharp knife;
- rubber squeegee;
- a set of keys for installing headlights;
- marker.
In order to facilitate the gluing procedure, the optics must first be removed. The glass is moistened with detergent and wiped dry with a napkin.
After this, you need to attach a tint film to the headlight and mark it with a marker. Cut out the required part. Then the protective layer on the film is removed and moistened with a soap solution, just like the optics itself. Then the surfaces are connected.
When heating the film with a hairdryer, you need to slowly smooth it out using a rubber squeegee, which allows you to remove air bubbles. Then the optics are installed in their original position.
Tinting
Doing headlight tuning yourself, like many other car improvements, is not difficult. You need to set aside a few hours of free time and purchase the necessary materials. In particular, to give the optics a new shade of glow using tinting, you need to:
- a can of professional paint, which is intended specifically for headlights;
- paper tape;
- degreaser;
- polishing cloths;
- a set of keys.
The headlights are removed and cleaned of dirt and dust. Areas that will not be covered with tinting are covered with tape. The necessary segments are degreased.
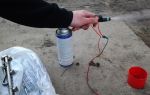
Before applying paint, it is better to place the can in hot water for five minutes - this will make the varnish more flexible. You need to spray at a distance of 30 centimeters from the surface of the headlights. After creating the first layer, you need to wait some time specified in the instructions for everything to dry. Then the action is repeated.
IMPORTANT! If the process is accelerated, drips may appear. Then everything needs to be removed with a solvent that will not damage the optics, and the whole process must be repeated. A special polishing cloth will add shine to the surface.
"Angel Eyes"
At first glance, doing LED tuning of “angel eyes” headlights with your own hands is something impossible. But if you look at it in detail, the whole process is simple and short. To do this, you need to prepare the following materials and tools:
- LEDs of the desired color - usually blue or white;
- two 220 Ohm resistors;
- wire;
- pliers;
- soldering iron;
- needle file;
- sandpaper;
- transparent plastic tubes;
- stationery knife;
- insulating tape;
- construction hair dryer;
- nine volt battery;
- a stencil around which you can bend the plastic.
The transparent tube is heated and bent around the stencil. To do this, it is better to use pliers. Using a knife, the excess is cut off and the edges are sanded. The result is a ring that exactly matches the size of the glazing.
After cooling, a small gap of two to five centimeters appears at the rings.
Along the entire circumference, at a distance of half a centimeter from each other, using a knife, indentations of several millimeters are made and “brought to mind” using a needle file.
After this, a wire is soldered to the LED on one leg, and a wire and resistor on the other. After this, you need to connect the battery to check operation. All contacts are wrapped with electrical tape. The second LED is made using the same principle.
After this, both are connected to each other. The resulting light structure is mounted into a gap in the plastic circle so that the diodes are placed at different ends of the tube. Next, the system is again checked for functionality. If everything is functioning normally, the system is installed in the intended locations.
LED strips
To complement the image of “angel eyes”, LED headlight tuning is often done using special strips. You won't need much for this:
- LED Strip Light;
- wires for connection;
- soldering iron;
- transparent glue;
- degreaser.
First you need to measure the required length of the light strip for each headlight. After this, wires are soldered to the connectors for connection.
Before gluing, be sure to degrease the surface. The tapes are installed directly on transparent glass. After this, the headlights turn into pronounced “eyes”, which gives the car an aggressive character.
Any tuning of the optics system will immediately distinguish the vehicle owner from the rest. In addition, after such an improvement, the car immediately begins to look “more expensive”. At the same time, to create the desired effect you only need a few hours of free time, as well as purchase the necessary components.
Decorating the taillights
Often a lot of attention is paid to the front headlights, and the rear ones are usually forgotten, but that’s in vain, they can also be decorated quickly and easily by installing an LED strip in them.
You will need a tape for 120 light elements, dismantle the headlight and remove the glass; to do this, you need to remove the sealant (by heating and using a knife). We seal the glass from the inside with masking tape.
It is important to isolate the remaining surface from paint drops, and paint the inside with silver. When the paint is completely dry, remove the tape and a relief pattern will remain on the headlight. We glue the required size of LED strip onto it using superglue or double-sided tape and connect the wires.
Coloring was carried out to ensure a uniform glow of the dimensions. During such tuning, there is no need to turn off the headlight bulb; it is enough to insulate the contacts of the headlights.
How to illuminate a car from the inside
Do-it-yourself interior lighting tuning of a car can be done in two ways: with a strip of LEDs and neon lamps.
Neon salon
You will need:
- Nylon clamps.
- Aluminum corner.
- Neon lamps.
- Self-tapping screws.
It is more correct to start tuning by installing neon lights at the bottom of the cabin.
Most often, neon lamps are manufactured with a cigarette lighter connector; it must be cut off and then the ends must be stripped.
Then we saw off a corner corresponding to the size of the lamp and screw it under the dashboard in the cabin. We fix the lamp on the corner with nylon clamps.
The same is done in other places in the cabin, except for the rear seats, where the corner is attached with the edge up to protect the lamp from damage.
We stretch the ends of the wires under the rugs to the dashboard near the driver's seat and insulate them at the connection points. Then we connect them to the door sensor, interior light switch and battery.
It is also important not to forget to connect one of the wires to the throttle sensor so that in the future it will notify you of the available lighting when flashing the ECU, this is necessary so that the neon lamps do not burn out.
The result will be a triggered light when the doors open, which will amaze with its unusualness not only you, but also those passing by.
LED salon
Connecting the backlight using LEDs is similar to neon, the only thing is to position the tape correctly (you may have to cut off individual pieces), and then clean the ends and solder them to each other; for safety reasons, bushings are put on the connections and heated with a hairdryer.
Glowing bottom
We immediately warn you that tuning the light for the bottom of the car is illegal, since the changes are not provided for by the manufacturing plants and car designs. But this does not stop many car enthusiasts, so it’s up to you to make such an upgrade or not.
Previously, “lower” tuning was done using neons, but it was quite unprofitable and tuners switched to LED backlighting, which is much easier to install and consumes much less electricity.
You will need:
- Waterproof LED strip.
- Soldering iron and everything needed for soldering.
We measure the size of the bottom and cut the tape to the desired size. It's good if you get 4 pieces. After which contacts are soldered to each piece. Then we install them on the bottom of the car using clamps, so it will hold much stronger than if you glue it with glue.
Route the wiring through the holes, connect to the dimensions, or make a separate power button.
The procedure for illuminating the bottom, like the others, does not require special knowledge; even a novice car enthusiast can cope with it. The main thing is not to catch the eye of a traffic police officer with such tuning.
In conclusion, we note that light tuning is an inexpensive and effective way to distinguish yourself. You can implement it on your car in a short time, so don’t be afraid to experiment, and the result will be excellent.
Source: https://remam.ru/tune/tyuning-far-svoimi-rukami.html
DIY headlight tuning and LED car tuning
An effective and affordable way to transform a car is to do it yourself by tuning your headlights. There is a wide variety of ways to modernize optics, among which the most popular are linings (eyelashes), paint tinting, LED film tinting and others.
Conversion of headlights based on the use of overlays
The most cost-effective way to give your car a unique look is to use trims.
The upper part of the optics border is covered with special overlays (eyelashes), which in turn act as a continuation of the headlights. This modernization of optics gives the car a more aggressive look. The shape of the overlays can be very different and depends on the creative decisions of the owner. They can be made of decorative film or plastic.
The cover is easy to install. First you need to cut out any suitable shape from the profile, after which it is attached to the headlight area using double-sided tape.
For manufacturing, you can use both fiberglass and epoxy glue, which allow you to get the maximum effect. It is recommended to remove the headlight and seal it with a special protective film (painting tape will do). We fix the fiberglass with tape and cover it with glue. It is necessary to apply several layers of glue, allowing each layer to dry.
Next, apply masking tape to the last layer and press with a heavy object. As a result, we should get a blank that follows the shape of the headlights, which must be left alone for a day to dry the glue.
After drying, mark the desired configuration on the workpiece with a marker and cut it out. The workpiece is processed with sandpaper, primed, and painted.
As a result of the operations performed, the car acquires an original appearance, and if desired, such linings can be easily dismantled.
To make the headlights look attractive, you can use a material such as LED strip. How to make LED headlight tuning with your own hands (“angel eyes”) quickly and easily?
It is quite simple to do; for this you need to prepare the following materials:
- tubes, which should have a transparent appearance and be made of high-quality plastic. Such products can be taken from the design of blinds;
- 220 Ohm resistors, two pieces;
- LEDs with a power of 3.5 volts (4 pieces are enough);
- knife and pliers;
- drill with cutting wheel;
- wire for fastening;
- soldering iron;
- insulating tape;
- 9 volt battery;
- hair dryer;
- stencil to create the required circle. An ordinary jar may be suitable for these purposes.
At the first stage of work, it is necessary to make a blank from a plastic pipe. The pipe must be heated with a hair dryer to such an extent that it can be bent. The tube must be bent using pliers around a stencil, such as a can.
Once the material has cooled, you can remove the ring. The edges of the ring are sharp, so they need to be sanded using a drill. The end result is a round-shaped blank with a gap of several centimeters, which ideally fits the size of the headlights.
Along the entire circumference of the resulting ring, it is necessary to make notches at a distance of 4-7 mm, which then need to be deepened by 3-4 mm using a drill.
At the next stage of work, we take a soldering iron in our hands and attach a wire to the LED. This procedure must be done with each LED leg. We attach a resistor to the second wire. In order to check the quality of the work done, we need a battery. If everything is correct and the LEDs emit light, then all connections must be insulated with electrical tape.
Thus, it is necessary to prepare all the LEDs, and then combine them into one common design. We should end up with two LEDs that point in different directions.
LED optics tuning is resistant to various climatic changes and provides a high level of safety.
The LED structure must be inserted into a previously made plastic ring so that both ends are opposite.
Next, it is recommended to connect the battery to check the functionality of the ring. If everything is done successfully, the resulting structure should glow.
Using this simple method, you can effectively transform your car, giving it a new, updated look. However, this type of do-it-yourself tuning is most relevant for round-shaped headlights.
Video: how to make “angel eyes” yourself.
How to improve your car with LEDs?
The car's LED lighting adds additional attractiveness to the car. LEDs are mounted in the housing and located under the sills and bumpers.
Do-it-yourself LED car tuning can be done simply. To work on converting a car you will need the following tools:
- plastic pipe with an approximate diameter of 40-50 mm;
- plexiglass (plexiglass);
- high brightness LEDs;
- copper coated wires;
- 500 Ohm resistor;
- glue "Moment";
- transparent silicone.
The first step of the work is to make a housing in which I will mount the LEDs. For optimal illumination, it is advisable to install three pieces on the front and rear bumpers and about the same number on the car sills.
Using a hacksaw, the pipe must be cut into separate cylinders 50-60 mm long. The cylinders are sawed again only lengthwise. At each end of the workpiece it is necessary to make a cut at an angle of 25-35 degrees.
The edges of the workpiece must be heated. When exposed to high temperatures, they become soft and bend easily. We bend the workpiece into a boat shape, and clean all sharp and protruding edges with sandpaper.
Using a drill, you need to drill small holes to fit the LED and fastener. The workpiece inside must have a reflective surface. To create it, you need to glue cut-to-shape foil to the inner surface. It is better to use Moment glue for this. You also need to make a hole in the foil.
Next we start working on the LEDs. In order for them to distribute light evenly, it is necessary to cut down their end a little. Sawing down removes the lens, and the glow then turns out to be a pleasant diffused light.
The two LEDs are connected in series and connected to the car system using a resistor. In this case, it is necessary to control the polarity of the connection.
LEDs need to be soldered like this
After the soldering is completed, you can begin installing the protective glass; you need to glue it to the boat and treat all the cracks with transparent silicone.
The backlight is attached to the car using screws or sheet metal. The LED housing is installed in a place inaccessible to the eye, creating the effect of an invisible glow.
Our lighting must be connected in series through a fuse, and the switch can be mounted on the dashboard in the cabin.
Video: DIY LED lighting in a car.
I think that you also have your own experience in terms of car tuning! Don't be stingy, tell us about it in the comments!
Source: http://xn--b1altabgdr.org/avtoremont-i-tyuning/tyuning-far-svoimi-rukami-i-svetodiodnyj-tyuning-avto
Two ways to tuning headlights with your own hands
The main purpose of optical equipment installed on a car is related to traffic safety.
The aesthetic pleasure received from contemplating one’s vehicle is no less important in the life of a car enthusiast.
Readers of this article will learn about two simple methods for tuning headlights with your own hands. One method will allow you to tint the light emitter, the second - decorate the outline of the lights with LED backlighting.
There is not much work, the source materials chosen are not the most expensive. But the result of the process will bring a lot of pleasure and will immediately make the unit stand out among the traffic flow.
Preparatory operations for tuning car headlights
The best solution in both cases is to dismantle the optical equipment.
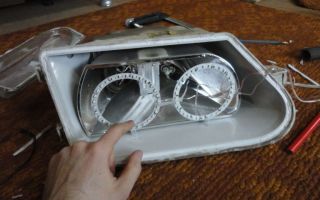
A description of the sequence of actions is given below.
- The headlights come out of the cavities of the car body. Usually this does not present any particular difficulties. The problem of separating the prefabricated structure causes some confusion.
- Disassembling the lantern element by element will no longer be an insoluble issue if we remember that the sealant, which firmly holds the parts of the structure together, changes its properties under the influence of high temperatures. The first method: direct a stream of hot air from under a technical hair dryer to both headlights for a short period of time (15-20 minutes). The second option: put the optics in the oven, setting the temperature to 100-110 degrees Celsius.
- In order to separate the main halves of the structure, you need to carefully pry the edges with the sharp edge of some object: a knife, scalpel, scissors.
- You need to wait until it cools down and carefully wipe the inside of the headlights with alcohol. Use a knife to remove old sealant from the edges. Then shake off any trapped debris.
This concludes the process of preparing for further actions.
LED headlights called “Angel Eyes”
In order to get started, you need to find a convenient surface for laying out the components and purchase the following components:
- a package of transparent sealant, a Moment-Crystal tube or any instant superglue;
- a strip of tape with built-in RGB diodes (the length of the strip is calculated based on the area of the edging; the choice of a specific type of tape is determined by personal tastes);
- rubber gloves, cleaning cloths, brush;
- special solution for washing headlights or 96% alcohol.
Applying a layer of glue along the intended contour of a car headlight and precise installation of the LED strip will not be described, they are already clear.
A thin layer of sealant is carefully squeezed out along the edge of the metal surface. If necessary, smear with a brush. Then both parts of the structure are joined, with the glass part at the top, and fixed by hand for a short period of time.
You need to wait a few minutes for the parts to set, and then apply glue again on the outer surface (from the glass side). Pause again for a short period of time.
Turn the optical device upside down and install it in such a way that a load weighing 1.5-2.5 kg can be placed on top of it for 24 hours.
You must act carefully. It is in vain not to touch either the reflector or the inside of the glass headlight with your fingers. Glue drips must be monitored and promptly eliminated.
After the day required for setting, the headlights are wiped with alcohol.
Connecting to the car's electrical wiring is usually not difficult.
Changing the color of car headlights
Automotive designers rarely pay attention to the issue of tinting headlights, except perhaps on a Volkswagen Golf unit.
If you are striving for changes in a personal car, the process can be carried out without dismantling the optical equipment. In this case, you will have to take measures to protect the entire body from possible paint splashes.
This material discusses the algorithm of actions when car lights are removed from workplaces, since it is much more convenient to work in this case.
To tune car headlights using the tinting method you will need:
- one can of paint, preferably professional, designed specifically for headlights, which is accompanied by a certificate of conformity;
- masking tape, surface protection film;
- solvent (just in case);
- auxiliary equipment: gloves, polishing cloths.
Areas of the car headlight structure that are not intended for tinting must be carefully covered with film and secured with tape.
Before you start applying, it doesn’t hurt to warm up the can for a few minutes on a hot radiator (or put it in warm water): this will only improve the plasticity of the paint.
It is better to spray paint at a distance of 25-30 cm with quick movements. After applying the first layer, drying time is given (it is indicated in the instructions). Only after this the action is repeated.
It should be remembered that when you try to speed up the process, drips appear.
In this case, the work will have to start over (after using the solvent). After tinting is completed, the surface can be given shine using a special napkin.
In this way, the color of the car's headlights changes.
Read about how to do your own tuning of headlights using overlays in the article “Fashionable eyelashes for headlights - an inexpensive method of updating the design of a car.”
Tuning activities are important both for the vehicle and for the owner, who wants to be proud of his car. Follow fashion and learn new work techniques!
Source: http://NashiKolesa.ru/svet/tyuning-far
We tune the headlights ourselves
Friends, many of you want to improve the headlights of your car, some just want to improve the light, and some want to refresh the appearance.
And some have even decided that they want to engage in headlight modification on a full-time basis for creative outlets or as extra income.
I am one of those who once decided so myself, and now I will tell you what is required first of all for the successful completion and comfortable execution of most procedures for modifying optics.
So, let's begin!
We are starting at a low price, so by definition we will not talk about the fact that we need a stove for more than a hundred thousand rubles.
We will use
But! We need not just any hair dryer, but a hair dryer with temperature control to clearly select the heat mode. There are many reasons for this, it would take a long time to explain, just accept it as it is.
I use a hair dryer and it has completely paid for itself and justified itself - excellent value for money.
Although you can generally use a regular hair dryer or oven during the first couple of hours, you need to be very careful with the oven.
Next we need
- box according to the size of your headlight,
where we will install the hair dryer to heat the air inside by making a hole in it for the nozzle and sticking the hair dryer there. Remember: the temperature on the hair dryer is no more than 350 degrees!!!
Next we need
- blades for disassembling the interior plastic,
so that they can be used to carefully disassemble the headlights. Yes, of course you can use a screwdriver, but this is unprofessional and in bad taste, at least for headlights with heat sealant.
As a rule, only one spatula is used from the set.
Next we need to purchase
We need them to tighten the nuts on the lenses because... There is usually not enough room for a hand. Apart from the fact that you need regular screwdrivers, of course.
Next, we need to know that there are headlights with hard sealant and they are quite difficult to disassemble using a spatula, and you don’t really want to pick them with a screwdriver. And here you need to think about whether you are ready to give up almost 4 pieces for special
- knives for headlights on solid sealant
Or will you make do with a screwdriver for now at your own peril, risk and inconvenience? Of course, it’s much easier with them, but it’s possible without them.
Next, you need to understand that the lenses do not always fit into the headlights, which is called a bolt-on. Those. we have to modify, sometimes quite significantly, the seats and here we, just like air, need
so that you can carefully trim, sand, and drill the necessary areas. Sometimes it can be used to open non-separable headlights or headlights with solid sealant, which are difficult to open in any other way - everything comes out much more neatly with it.
This was all that was needed to disassemble and modify the headlights, and for subsequent assembly we needed
For headlights with thermosealant, you need to use, respectively, new butyl thermosealant Orgavyl or Abro WS904R or original Nissan sealant B6553-89915 (but it comes in very small packs; you need as many as 3 packs for a set of headlights).
As for the headlights on solid sealant, you can either re-glue them onto a thermo-sealant (but it happens from time to time - sometimes it will sweat, sometimes it won’t, sometimes you have to re-glue it), or glue it back onto the sealant for gluing the glass.
And if your headlights had H4 bulbs, then you will still need to redo the wiring for everything to work correctly, which you can read about in this article.
The set described above will be enough for you to start tuning headlights competently, and for a more professional level you will of course need a lot more cool things like
for heating headlights.
And
- chemicals (such as paint remover).
for removing dust from reflectors.
in order to paint everything properly.
for covering external chrome elements. And a bunch of other specific staff that can greatly facilitate your work and raise the quality of work to an unprecedented level.
So stock up on everything you need for work and go ahead – into the world of lighting tuning!
Information provided by the Works-Garage workshop team.
Works-Project.ru
Source: https://www.beworks.ru/marki/obshchee/eksterer-i-kuzov/Tuning-far-svoimi-rukami
DIY LED headlight
Every driver dreams of his car being convenient, comfortable and unique. External tuning is not only one of the ways of self-expression, it is also an interesting activity that will highlight the advantages of any vehicle. For example, do-it-yourself LED headlight tuning is suitable for each driver. Minimum costs – maximum effect!
Tuning headlights - methods of execution
Tuning is a modification, making changes to the design of a car in order to highlight it or improve some details. It can be both internal (refinement of the engine, interior) and external (transformation of bumpers, suspensions, body).
Modifying headlights on cars is a very common type of tuning. After all, as soon as you change the light or the shape of the optics, the appearance of the car immediately changes.
There are many ways to modify optical instruments. You can install xenon or LED lamps in the headlights, change or emphasize the shape of the optics by making specific “eyelashes”. But “angel eyes” - LED rings in optics - are capable of creating a sensation!
Which method to choose is up to each driver. Whether it’s installing purchased headlights or modifying standard ones, the car will in any case attract the attention of others. Absolutely any car owner can handle this type of work independently. This is a great way to highlight your individuality and also save money on a trip to the car dealership.
LED tuning
Recently, the use of LED lamps to refine the optical devices of a car has become very popular. Most new cars leave the factory with LED headlights already installed.
This can be explained not only by the attractiveness of these small bulbs, but also by their low cost. Making LED headlights yourself is much cheaper than buying a ready-made kit.
Advantages of LED tuning
- High light output. The light of the lamps is as close to daylight as possible.
- High vibration resistance due to the absence of needle thread.
- Extended service life (up to ten years and more when using lamps no more than twelve hours a day).
- Wide spectrum of radiation.
- Instant on. Using LED lamps, you don't have to wait for them to heat up and the light to become brighter - it happens instantly.
- LEDs are resistant to temperature changes. They perform well at both high and low levels.
- Safe and environmentally friendly (no mercury or ultraviolet radiation).
- Aesthetic. The size of one lamp allows you to experiment with the shape of optical devices.
- Relatively low price of one LED.
This is why LEDs are so attractive to tuning enthusiasts.
Lamps are used not only to modify and decorate headlights, but also to illuminate the interior, dashboard, rims, and underbody of the car.
Making LED headlights with your own hands
Purchasing LED optics for a car will not be much of a problem. The automotive goods market presents a wide range of models to suit every taste and budget. However, such headlights are also made by hand.
You can make not only LED low beam headlights, but also fog lights, turn signals, side lights and taillights.
To work you will need:
- LEDs and resistors (size and color at the discretion of the driver).
- Insulating tape.
- Soldering iron.
- Sealant.
- Drill for metal.
- Wire, marker, paint.
Execution order
Before work, the headlight is removed from its original location. Gently heat it up with a hairdryer and remove the old sealant. The reflectors must be painted matte black so that the LEDs do not glare too much.
Mark the places on the case with a marker and drill holes where the diodes will be inserted. LEDs are connected to resistors - they will protect the wiring from burnouts and short circuits. Connect the lamps to their standard places using wire.
After the operation of the LEDs has been checked, the headlight can be filled with sealant and reinstalled.
Instead of LEDs, you can purchase ready-made LED lamps or heads. They cost a little more than usual, but they will cause less hassle.
To make LED fog lights with your own hands, you need LED heads, and lamps are suitable for low beam. The procedure for manufacturing PTF is identical to the previous one. The only difference is the body.
An old fog light or any other device will do.
LED headlights for VAZ - making “angel eyes” with your own hands
After the release of BMW cars, the so-called “angel eyes” - LED rings in the headlights - became very popular. This type of tuning is suitable for all cars with round optics. VAZ cars, like no other, are prone to such changes.
To make your own “angel eyes”, you need the following “ingredients”:
- Plastic sticks (like those for blinds).
- Sealant.
- LEDs – 8 pcs.
- Resistors – 4 pcs. (based on the calculation: one resistor for two diodes).
- Can.
- Pliers.
The sticks need to be softened. This is done either in the oven or in boiling water. Soft sticks bend around a tin can. For convenience, use pliers. The ends are cut off a little so that diodes can be inserted.
You also need to drill holes at the ends of the sticks for them. LEDs are connected to resistors and installed in the resulting rings. There are two diodes in one hole. Small notches are cut throughout the ring to make the diodes shine brighter.
The notches should be made 1/3 of the depth of the stick at intervals of one to one and a half centimeters. Then they carefully disassemble the headlight and insert the resulting rings into it, having first checked their operation. After this, the optics are sealed and mounted back.
Well, DIY LED headlights! A little free time and a minimum of materials will make standard optics irresistible.
Alternative optics from a car store
For those who do not want to “bother” with making headlights themselves, ready-made optics kits can be purchased in specialized stores. Headlights, different in shape, purpose, quality and price, will satisfy absolutely any driver.
For example, good LED low beam headlights will cost about 2,000 rubles per pair. There are models that are more expensive, and some that are slightly cheaper. The German brand Hella is popular. High-quality LEDs in a modular design are suitable for almost every car.
True, the cost of this optics is high - from 3,300 rubles. So if you have a couple of extra thousand, then please.
When choosing headlights, you should be very careful - the market is “teeming” with fakes. Particular attention should be paid to the body and glass of the optics.
A few final words
The optics of a car are one of its main components. It must always be in good condition and carry out its work uninterruptedly. Properly selected and installed optics is the driver’s main task.
LED tuning will help refresh old headlights and thereby update the appearance of the car. Making LED headlights with your own hands is not difficult even for a new driver.
The necessary materials can be purchased at any specialized store, and they will cost several times less than buying new lamps.
In addition, making headlights with your own hands is a great way to emphasize your individuality.
fb.ru
Making LED headlights with your own hands (30 photos)
If you really like the trendy LED lights on cars, but the headlights on your car, called Led-Day Light, are not produced by the car factory, you can make them yourself. How?
See detailed instructions in the continuation of the post.
Source: http://autoprivat.ru/remont_avto/svetodiodnaya_fara_svoimi_rukami.html
How to do your own headlight tuning: recommendations for motorists
You will need:
- Plexiglas
- LED strips
- Glue
- Corner made of plastic
#1
Before we begin a detailed description of one of the most accessible and easy-to-perform master classes, it should be noted that there are a huge number of different ways to decorate the headlights of your own car - from flirty eyelashes, which are in great demand among car ladies, to gluing color film to the inside or outside of the glass. However, the most popular method of tuning headlights with your own hands is still equipping their panels with LED strips, because this is not only very beautiful, but also quite inexpensive. Moreover, this kind of tuning of headlights with your own hands is very easy to do and does not require any special skills, talents or many years of experience. Among other things, it should be noted the versatility of such decoration, because it makes the glow brighter and is suitable for all cars, without exception, regardless of their make and modification.
#2
And the first thing you need to do is to properly prepare the plexiglass, and this material should be in two types - white and matte.
Purchasing it is not at all a problem, but if the household has fragments from an old personal computer monitor in more or less complete form, you can easily use them.
In total, you will need six absolutely identical fragments, the dimensions of which are determined depending on the dimensions of the headlights (a standard strip can be presented in a format of 200 by 10 millimeters).
It is best to work on plexiglass using a glass cutter, carefully breaking off the cut fragments with ordinary wire cutters. After this, you need to connect the LED strips together in pairs, making sure that the colored diodes are next to the colored ones, and the white ones are next to the white ones. Connections can only be made using a soldering iron.
#3
When all the pairs are finally connected, they begin gluing them to the back side of the strips, pre-cut from plexiglass. For these purposes, it is best to use the so-called aquarium glue, which is used to connect glass objects and parts together.
After this, ordinary food foil is glued to the outer side of the plexiglass strips with the shiny layer facing up, using epoxy glue, which is actively used in automobile workshops, for this purpose.
When the adhesive layer is completely dry, you can begin gluing the resulting blanks with black oracal (special self-adhesive film). Ultimately, the plastic corners are glued, which again requires epoxy glue.
When the glass strips have dried properly, they begin to connect the LED strips glued to these same strips, for which you will need a power controller.
#4
Moreover, ideally use a controller that supports the color switching function. This feature allows you to assign certain colors to the car’s illumination (white light when the lights are on, main light when the lights are on, etc.).
As for completely changing the color of car headlights, this can be achieved in two ways - by gluing a colored film to the outside of a glass lens or by painting its inside with a spray can.
In the first case, you should use a special colored translucent film, which can be produced with or without an adhesive base.
The workpiece itself should be made slightly larger in size than the lens, and gluing is carried out by applying a weak soap solution to the glass.
#5
To ensure that the film is evenly distributed over the streamlined surface and does not wrinkle, it should be dried with a hairdryer as it is leveled. At the same time, a hot jet is out of the question, since in such situations the material can easily be damaged, causing it to wrinkle and deform.
You can help yourself in this matter with the help of a special rubber spatula with a moving edge. Painting the glass lens of a headlight is also not something supernatural.
To do this, you need to use special car paint for headlights (it differs from ordinary paint in weak pigmentation, which allows light rays to pass through glass tinted in this way), sold in spray cans.
If painting will be carried out on the outside of the headlight, then the entire surface surrounding it should first be sealed with special tape (you can use construction tape).
#6
Ideally, staining should be done from the inside of the lens, which, as you might guess, involves its temporary dismantling. Before work, it is advisable to keep the can in warm water, which promotes better mixing of the paint and, as a result, its uniform application.
It must be sprayed at a distance of at least 25 centimeters, otherwise characteristic stains and/or smudges may form on the glass. It is advisable to paint in two layers in order to achieve uniform distribution of paint on the glass, and the second and all subsequent layers, if any, must be applied only after the previous one has completely dried.
To give the surface a characteristic shine, you can use a regular napkin.
Source: http://uznay-kak.ru/avtomobili/tyuning/kak-sdelat-tyuning-far-svoimi-rukami