How to replace a windshield with your own hands: dismantling, preparation and installation, what is needed for the procedure
Experts say that repairing or replacing a windshield with your own hands on a modern car is a breeze. Let us allow ourselves to disagree with them. The prestidigitator can also claim that tricks are a piece of cake. Yes, for a professional, without a doubt.
What is needed to replace a windshield?
But we are not professionals, so we will not relax and will approach replacing the windshield with our own hands with full responsibility. And of course we will be able to replace the windshield. It may take longer, but we will do it.
By and large, replacing a windshield is a fairly rare procedure, except in cases of “total bad luck.” Windshield replacement is required if repairing a crack that has formed on the windshield of your car will certainly not lead to the desired result.
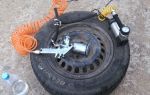
To replace a windshield with your own hands, as well as to repair a windshield, you need a traditional set of tools and materials, in addition to the windshield itself and your great desire to replace the glass yourself. The listed items are sold both as a set and individually. The choice is yours. Decide on your pricing policy. So what is required.
- A cut string or a special knife for removing the windshield from its place;
- A regular retractable construction knife for cleaning the groove from old sealant;
- Degreasing liquid;
- Primer for preparing the groove surface for sealant;
- Sealant for gluing glass. As a rule, one tube is enough;
- Sealant gun;
- Activator - a special composition for applying to the remaining strip of old sealant.
- Adhesive tape for fixing the installed glass.
Yes, and don’t forget when purchasing a windshield, an elastic band, the so-called. molding or “capsule” for placing it around the perimeter of the glass.
DIY windshield replacement steps
Removing the old windshield . A string or a special knife is inserted between the glass and the groove, and the old sealant is cut. Be extremely careful when passing the area bordering the dashboard so as not to damage the plastic.
Preparing the place for gluing the windshield
- Using a construction knife, cut off the remnants of the old sealant. In this case, the molding usually fails, but we didn’t forget to buy a new one, so we’re not particularly worried.
- We try on the new glass for its future location. If necessary, make notes with a marker. Some car models have special stops that will prevent the windshield from being installed or replaced incorrectly.
- If you do not have a glass stand, then prepare a place on the hood by first covering it with something soft so as not to damage the new windshield.
- Degreasing the glass groove. Either the degreaser from the kit or an anti-silicone degreaser.
- Padding. It is not recommended to apply a primer to the remains of old sealant. The primer is applied in one layer either with a brush or with a swab from the kit. The primer is applied to the place of gluing on the body and to the glass at the place of intended contact with the groove.
- Activator. We use it to treat the remaining remains of the old sealant that have not been removed.
Installing a new windshield
- Applying sealant. This is one of the important points of the process. It is recommended to use an air gun, because... The sealant is very tight. Or a professional hand gun. The sealant strip is applied evenly, without breaks.
- We apply the glass, aligning it with the marker marks. Remember when we made them? Then we go around the perimeter and press the glass tightly so that the sealant “lays down” as it should and ensures contact between the groove and the glass. If the sealant comes out in some places, do not rush to remove it immediately. This can be done later after polymerization. It can be easily removed with film.
- We fix the glass with tape. The following sequence is desirable: first attach the tape to the glass, and then to the body with a “lift”. That's all.
Important! For 6-10 hours, try not to open or slam the car doors. Go home and let the sealant “set.” And also, the temperature regime: at 0 degrees and below, the sealant practically does not harden, and at elevated t0 it quickly polymerizes.
That's it. On the road tomorrow.
Good luck, car lovers.
Source: https://carnovato.ru/kak-zamenit-lobovoe-steklo-svoimi-rukami/
How to replace a windshield with your own hands
You can often hear from specialists that the procedure for replacing or repairing a windshield is simple. It is difficult to agree with this, since there are many rules and recommendations that are extremely important to follow.
Hearing such words from a professional is like comparing the statements of an Olympic champion in athletics about the ease of performing a double somersault.
If specialists have no problems with the replacement, then it will be difficult for a beginner to figure out how to replace a windshield with his own hands.
There are many reasons why most motorists are hesitant to install a windshield themselves. Some of them are related to the fear of harming your car. However, by following all our recommendations consistently and correctly, you will be able to complete all replacement work correctly.
Why do you need to change your windshield?
There are only two main reasons why you need to replace the windshield.
Lets moisture through
This reason implies a loss of tightness in the seals, as a result of which moisture enters the interior. If there is an unsealed area between the body and the glass, you need to fill the space with sealant.
If the warranty has not yet expired, then you are undoubtedly in luck. But otherwise, you will have to do all the work yourself.
If the sealant did not help, and you were unable to eliminate the leak, then you need to re-glue the windshield completely.
Mechanical damage
The appearance of small chips on the windshield is a common occurrence for motorists. Many people “caught” small stones from under the wheels of other cars. The problem is that even the smallest crack grows rapidly, gradually turning into an ugly cobweb.
1 – asterisk; 2 – crack; 3 – combined chip; 4 - bull's eye
The presence of such damage will not allow you to pass MOT; moreover, a large cobweb on the windshield significantly impairs the driver’s visibility, and this is unsafe both for people in the car and for other road users. Repairing cracks in auto glass is only possible if there is minor damage. In other cases, it is necessary to replace the part.
What will be needed for replacement?
The first and most important thing is the windshield itself. There is no way to make a replacement without it. Moreover, if you choose between old and new, then always give preference to the new product. Why save money and then buy it again anyway?
When choosing a windshield, check its light transmission coefficient.
How to check the light transmittance on the road
Don’t forget to inspect the glass for damage so you don’t have to spend money on repairs later. In addition to the windshield, you can purchase a molding, since using an old rubber band is undesirable (even if its condition is good).
Tools and materials
You will need:
- mounting gun;
- flat screwdriver;
- 2 knives – regular and construction;
- a product for cleaning and degreasing the surface (choose at your discretion);
- special gel;
- faceted string;
- adhesive tape (useful for fixing new glass until the sealant dries completely);
- primer;
- 1 tube of primer (this should be enough).
Armed with everything you need, you can get to work.
Necessary tools for work
Windshield replacement - main steps
Initially, you need to park your car on a level surface. If possible, cover the body and interior with protective film - this will protect it from possible damage during the work process.
Removing the old windshield
Dismantling is carried out in the following order.
- Remove the rubber seal installed on the outside. To do this, use a flat-head screwdriver.
- Remove the moldings and windshield wipers with plastic protection (if your model has one).
- Now remove the front pillar cards and the seal from the inside.
- After unscrewing the screws, carefully remove the visors.
- Disconnect all wires and sensors going to the windshield.
- Pierce the old sealant with an awl. If you don't have an awl nearby, use regular wire with a pointed end.
- Insert a faceted string into the puncture site, attaching handles to its edges. It is advisable to start the cut from the left side.
- It is convenient to cut off the old sealant with two people: one person is on the outside of the car, and the second is sitting in the cabin. The principle of operation is as follows: a stretched string is moved from one side to the other (as when cutting a log with a saw with two handles). During the process of “cutting” the sealant, the string gradually moves along the glass.
- Protect the car's upholstery with a metal sheet, placing it in possible places where the string will touch the body.
- After making a cut along the entire circumference of the glass, remove it using suction cups.
String dismantling process
Surface preparation
The place for gluing the car windshield must also be prepared according to the instructions.
- Get rid of the old sealant completely. To do this, use a knife. Since you bought a new molding, do not be afraid to ruin this one.
- Try on the new glass, placing it on your future location. Make small notes with a felt-tip pen or marker if necessary. Some models are equipped with special stops, which make it impossible to install the glass incorrectly.
- If you don't have a glass stand, make one on the hood. You just need to first lay something soft on it.
- Degrease the surface. You can replace the special degreaser with regular “anti-silicone” (that’s what anti-silicone degreaser is called).
- Apply primer to the bonding area. It must be applied to both the body and the glass. Before doing this, inspect the place of gluing for the presence of old sealant again. If there are minor residues, the sealant must be removed and only then a primer must be applied.
Many people underestimate the properties of the activator. Don't be one of them
Windshield Installation
For proper installation, you must follow the following instructions.
- Warm up the sealant bottle and the glue tube in warm water. You can do this with a hairdryer.
- Install the new rubber seal on the glass.
- Cut off a little bit of the dispenser tube, leaving about 2 centimeters.
- Apply the glue evenly to the surface of the body, although this can also be done to the contour of the glass. Some professionals use sealant for treatment. But if you do not have special suction cups, then it is advisable to glue the body. In this case, the sealant strip made must be continuous with a single joint in the central lower part.
- After applying the glue, carefully place the prepared glass into the opening and lightly press it down. A little pressure is enough to spread the sealant throughout all the voids.
- Secure the glass with tape (for security).
- Reinstall all the parts that you previously removed. Don't forget the sun visors!
- Make sure there are no unnecessary vibrations (do not slam doors or hood loudly), as this may cause the glass to move.
- Leave the car for a day. During this time, the sealant will completely harden.
- After 24 hours, wash the windshield and the entire front of the car. But before that you need to remove the tape. Conduct a visual inspection to determine the quality of the resulting seam. If you find a leak in the seal, seal the area, both on the outside and on the inside. Only after achieving 100% tightness can the work be considered completed.
The worst is over, the glass is installed
Only correct implementation of all instructions and instructions will ensure a positive result. Of course, during work, minor mistakes may be made, from which no one is immune, but the main thing is to master new heights in car repair!
Some tips for replacement
Tip #1. The windshield is responsible for the safety of the driver, and proper installation is a guarantee of safety. That is why not all specialists are ready to take on such work. The most important aspect during installation is the high-quality “fit” of the windshield.
Only by doing all the work correctly, you will be able to fully enjoy the results of your work.
Tip #2. When ordering materials, be sure to specify the model and make of your vehicle so that you are not sold unnecessary junk.
Tip #3. The most important material in this case is glue. Don't believe those people who claim that every car model requires a certain type of glue. This is not true, it fits all models. Although special attention should be paid to its quality: you cannot save on this, since the price of this saving will be your safety.
Tip #4. Make sure to purchase a pair of gloves for work. Safety glasses are also a good idea. The fact is that when removing damaged glass, you can easily get injured by small fragments. Better to be prepared.
Safety comes first!
Tip #5. Do not neglect the instructions, because it is not for nothing that manufacturers pack them with the product. First of all, we are talking about glue. Look, the effect of some types can be enhanced with the help of additional compounds. Do not forget to also degrease the surface before applying glue. You can also use acetone for this.
The procedure for replacing a windshield is actually not very complicated, you just need to follow the instructions and complete all the steps in a timely manner. After putting the glass in place, give the glue a little time to cool and go ahead into the wind!
What else do you need to know?
Doors slamming. This has already been said, but it’s worth mentioning again. The fact is that some cars have a sealed system. By forcefully closing the doors or trunk, you can create additional air pressure acting on the windshield. This will break the seal, which will cause the newly installed glass to shift.
Contact with water. Washing within 48 hours after installation is highly discouraged. This applies to both automatic and manual washing.
By ignoring this, you risk damaging the sealant, which has not yet completely hardened, with water.
During these 48 hours, you can wash, for example, the wheels - this will slightly refresh the appearance of the car and the seals will remain intact.
Trips. Try to avoid traveling immediately after replacement. At a minimum, you need to wait a couple of hours. You've probably already noticed that the only means of replacement is glue. It just needs to adapt to temperature and humidity after completing all the procedures. It's better not to take risks, because you did a good job.
Windscreen wipers. Since wipers are in close proximity to the windshield, causing wear and tear, they need to be replaced as soon as possible.
These mechanical devices work in such a way that their energy is directed against the glass, resulting in fine scratches.
To prevent rapid wear of the windshield wipers, it is necessary to replace windshield wipers as often as possible.
Scotch. During the windshield replacement process, adhesive tape is used for fastening. It is not recommended to remove it earlier than 24 hours after installation is completed. It will not block your view, so you can safely go about your business with such a tape. By removing the tape, you will also remove the support it provides.
Video - How to replace a windshield
Source: http://na-dorogu.ru/kak-zamenit-lobovoe-steklo-svoimi-rukami/
How to change a windshield
Replacing a windshield is a rather labor-intensive and complex process. However, this procedure can be performed by any car enthusiast who knows the design features of his vehicle well enough and knows how to use tools.
The latest developments from automakers are represented by cars even with panoramic windows. In such instances, it is difficult to understand where the line is between the glass and the car body. All these innovations impose a lot of requirements on windshields:
- high level of safety and durability;
- heat-saving properties;
- ultraviolet protection and so on.
As a result, new additional elements appear, both functional and decorative. At the same time, despite all the innovations and improvements, even the newest model is not immune to glass damage.
Pebbles thrown from the tires of a car in front and other similar troubles can cause cracks in even the most innovative glazing.
The appearance of deformed areas on the windshield spoils the appearance of the car, impairs visibility, and also significantly reduces the level of safety.
If small cracks and chips can still be repaired, then significant flaws cannot be eliminated; the glass needs to be replaced. In preparation for such a procedure, the owner begins to calculate the costs.
Of course, the cost of materials will be the same in any case, whether you install it yourself or at a service center. But you can save a lot on installation without compromising the quality of work.
Next, we will consider in detail how to remove the windshield and install a new one.
Windshield replacement tools
We will not buy expensive professional equipment, since windshield replacement is performed quite rarely. For repairs we need a traditional set of materials and tools. By and large, the only difference from the work of specialists will be the time required to complete the procedure. Of course, only you are responsible for the result and guarantee of high quality.
To mark a windshield, in addition to the glazing itself, you should prepare the following materials and tools:
- knife for extracting glass or cut string;
- construction knife;
- activator - a special composition intended for applying a new sealant to the remains of the old adhesive layer;
- degreasing composition;
- primer;
- sealant with gun;
- masking tape for fixing glass.
All items required for work can be purchased in a special kit or individually.
Removing old glass
To remove old glass or what's left of it, you can use a special knife or a cut string. The operating principle is similar, regardless of the tool used. The device is refilled between the glass and the car body, inside and out.
Gradually we begin to stretch it along the edge. This cuts the sealant that holds the glass in place. First you need to make sure that glass fragments do not fall into the interior.
The design of modern glass excludes this possibility, since they consist of several layers glued with film.
After removing the old windshield, we begin cleaning the opening. It is necessary to cut off all the old sealant, leaving a layer of a few millimeters. To perform this procedure, it is recommended to use a construction knife. You shouldn’t cut everything off until it’s sparkling clean.
Trying on new glass
After dismantling, you must carefully insert the windshield into the opening and align all the gaps using adjusting wedges. Then we glue several strips of masking tape around the perimeter. After this, cut the tape along the seam. This way we will get marker marks. They will make it easy to install the glass on the sealant. We take out the glazing and proceed to the next stage.
Degreasing and priming
For degreasing, the composition from the kit is used. You can also use an anti-silicone degreaser. After treating the opening and glass with a degreasing compound, we proceed to the next stage.
The primer is applied in one layer in a wide strip. Only clean areas, places where there is no old sealant, should be primed. It is not recommended to apply a new layer of primer over the remaining sealant, as it will become brittle after drying.
Apply sealant
We apply the sealant in a uniform seam, in the form of a “pyramid”, with a wide shape at the bottom and an acute angle at the top. To do this, it is necessary to cut off the tip of the sealant bottle at a large angle.
Ready-made kits for gluing glass already have a cut that allows you to apply the material with an acute-angled seam. When cutting, it is necessary to take into account that the height of the extreme point, rather than the width of the seam, plays a more important role.
If this is sealant from a kit, follow the instructions carefully. If it is not available, look for recommendations on the use of this drug on the Internet.
The sealant is a very dense material and it is quite difficult to squeeze it out. It is not recommended to use manual pistols, especially cheap Chinese ones. The best option would be an air gun and a compressor. This will significantly reduce time.
You can make the extrusion procedure easier with one simple step. Before use, the sealant must be heated to a temperature of +30 to +40 degrees. The curing process of glass sealant is significantly influenced by ambient temperature and humidity levels. At zero temperatures and below, it practically does not harden; at elevated temperatures, the process accelerates.
Windshield installation
Having completed all the preparatory steps and applied sealant around the entire perimeter of the opening, carefully apply the glass, aligning the strips of tape with the previously placed marks. Next, slowly, with minimal effort, we begin to press down the glazing.
The essence of this action is to drive the glass into the desired angle and gaps. The main thing is not to overdo it in this process, otherwise the sealant may stick out of the joints. If this happens, there is no need to panic and remove the material in a hurry. It can be easily removed after drying; in the worst case, you will have to cut it off with a knife.
Try to make sure that the glass falls into place under its own weight.
Fixation
After the new glazing has been installed, it needs to be fixed for several hours. To do this, use tape. First the tape is glued to the glass, then to the body. For reliability, stick 6 tapes, one on each side and two on the horizontal joints. Then the car must be left alone for 10-12 hours for the sealant to completely cure.
Source: http://VipWash.ru/lobovoe-steklo/kak-pomenyat-lobovoe-steklo
DIY car windshield replacement
Replacing a windshield with your own hands will be within the capabilities of the average car enthusiast if all operations are carried out carefully. But many motorists believe that replacing a windshield can only be done at a specialized service station equipped with professional equipment.
There are many myths and fears regarding the windshield removal and installation procedure. Therefore, car owners rarely dare to replace or reinstall it themselves. However, if all operations are carried out consistently, it will be possible to carry out the replacement efficiently, quickly and with your own hands.
Why do you need to replace your windshield?
There are two main reasons that lead to the need to replace your windshield.
- Penetration of moisture from under the seal.
Leakage between the glass and the body occurs due to the presence of an untaped area. If there is no warranty, you will have to carry out the repairs yourself. Sometimes it is possible to eliminate a leak when a hole is detected by filling the gap with sealant. If you cannot get rid of the leak, you will have to completely re-glue the glass. - Damage to the windshield.
Many motorists have encountered problems such as cracks and chips. They gradually grow, forming a whole “web” on the windshield. In this case, you will not be able to pass the state technical inspection, and the operation of the vehicle will be unsafe. If there is minor damage, chips and cracks can be repaired, otherwise the glass must be replaced.
Below we will tell you what tools and materials you will need for replacement, how to remove the old windshield and install a new one in its place. And at the end of this article, watch detailed video instructions on how to replace a windshield with your own hands according to all the rules.
Materials and tools for windshield replacement
Before you start replacing your windshield, you need to stock up on the following materials and tools:
- metal string with 2 handles;
- awl or sharpened wire;
- suction cups for holding glass;
- screwdrivers;
- spanners;
- chisel;
- masking tape;
- glue-sealant for glass;
- gun for applying sealant;
- solvent, primer;
- tampons and gloves.
To replace glass, you will need a closed and dry room (garage or car bay). The car must spend at least one day in it.
To do the job efficiently and safely, you will need one or two assistants. Before starting work, the car should be washed (how to properly wash a car), especially in the area of the windshield.
How to remove an old windshield
A clean car must first be placed in a garage or box on a flat surface. The procedure for removing the windshield is as follows:
- Using a flat-head screwdriver, you need to remove the rubber seal located on the outside of the car.
- Wipers, plastic protection, and moldings are dismantled.
- In the cabin, the dashboard and front seats should be covered with film to protect them from dust and dirt.
- The seal is removed from the interior side, and the front pillar cards are pryed off in the area of the latches and dismantled.
- Now you need to unscrew the screws and remove the sun visors.
- The existing sensors and wires that go to the windshield must be disconnected and removed.
- An awl or sharpened wire is used to pierce the sealed seam (old glue).
- A faceted string is inserted into the puncture, after which handles are attached to its edges. It is more convenient to start cutting the old windshield from the upper left corner.
- It is more convenient to carry out the work of cutting the adhesive-sealant together. One is conveniently located inside the cabin, and the second is on the outside of the car. The principle of operation is simple: first, one person pulls the string towards himself, and the other holds his section taut. Then the string moves in the opposite direction. In this case, the string shifts along the windshield.
- In those places of the body where the string can touch the panel or trim, a piece of metal sheet should be placed.
- When a cut has been made along the entire perimeter, the windshield is removed from the car using suction cups.
- Now you need to clean the old glue from the body and glass (if it will be installed again). This requires a chisel and solvent.
Everything is clearly shown in the video at the end of the article.
Windshield Installation
Installation of a new windshield is carried out in the following sequence:
- Before applying glue to the surface of the body and glass, it is necessary to treat the contour with primer. It will improve the adhesion of the surface to the glue.
- Before applying the glue, it is advisable to warm the tube or container with a hairdryer or warm water, then it will be more convenient to apply the sealant to the base.
- A clean rubber seal is mounted on the glass.
- The dispenser tube is trimmed at approximately a height of 20 mm (width 5 mm).
- The glue can be applied both to the contour of the windshield and to the surface of the body. Most specialists treat glass with sealant. But in the absence of suction cups, it is better to glue the perimeter of the body. It is very important that the sealant strip is continuous. The only joint is made at the bottom center.
- After applying the glue, the windshield must be carefully placed in the opening. Having placed the glass in place, lightly press on it - then it will fit tightly to the body, and the sealant will fill all the voids.
- To prevent the glass from accidentally moving, it should be secured with several strips of tape.
- After replacing the windshield, you can install plastic protection, side moldings and wipers.
- Do not slam the doors, trunk or hood to avoid creating vibrations and dislodging the glass.
- In this position, the car must be left alone for a day. It should be remembered that the higher the air temperature in the garage or box, the faster the glue will polymerize. If the room temperature is below 0 degrees, the sealant will not harden.
The next day, the tape is removed and the windshield and adjacent areas of the body are washed. At this point, you can check the tightness of the resulting seam. If a leak is detected, then you should additionally glue both the inner perimeter and the outer side of the seam. When 100% tightness is achieved, the car can be completely assembled.
If all windshield replacement operations are carried out carefully and consistently, the result will please the car enthusiast. High-quality installation with your own hands often eliminates ridiculous mistakes that even car service technicians make in a hurry. The main thing is that they are not afraid to master new levels of automotive repair.
Video instruction: how to replace a windshield with your own hands
Source: https://unit-car.com/diagnostika-i-remont/139-zamena-lobovogo-stekla.html
How to replace glass on a car. Tools, materials and description of the procedure for replacing a car windshield
The procedure for replacing car windows most often involves replacing the windshield or rear window, since side windows have to be replaced much less frequently (unless hooligans broke it) and the procedure does not require special tools and materials. Therefore, in our case, we will analyze the process of replacing the front glass on a car.
The process of replacing a windshield on a car.
Replacing front windows is much more difficult than it might seem at first glance, and only professionals undertake such work. Not only because certain materials and tools are needed, but also because your life depends on the correct installation of glass.
The windshield is an important part of protecting a modern car in an emergency, as it represents an essential element of the strength of the body structure. It determines how deformation will occur in case of an accident. In a head-on collision or rollover, the strength of the glass is vital to stabilizing the vehicle's body.
That is why car glass replacement must be carried out in compliance with all installation standards and technologies.
If you do not doubt your abilities and are confident that replacing glass will be possible, then read on to find out what set of tools and materials you will need to replace glass on a car, as well as understand the sequence of preparation and the glass installation itself.
Tools and materials
Before you start replacing glass, you need to collect all the necessary tools and materials for cutting out the old glass and installing (gluing in) new glass.
- A string for cutting glass and a knife for cleaning the landing site from glue residues;
- Special adhesive-sealant for gluing glass on cars;
- Mounting gun with which glue will be applied;
- Activator-cleaner and primer-primer , to prepare the area before applying glue;
- Masking or regular tape to secure the glass until the glue dries completely.
The right technology also requires a thermohydrometer to determine the exact temperature and humidity in the garage. It helps to correctly calculate the time until the adhesive sealant completely dries. The norm is +23°C at 50% humidity.
We will analyze the correct technology for replacing glass on a car, as is done in workshops, and then it’s up to you to decide whether to change it yourself or leave it in the hands of a specialist.
Glass dismantling
- First thing gain access to cut out old glass (remove wipers, moldings and rubber seal).
- If possible, cover areas of the interior trim with masking tape or dismantle individual trim elements in order to protect them from damage and contamination by glue.
Also disconnect the wires if any (for example, rain sensor or heated parking wipers).
- Thread a string for cutting glass and, together with an assistant, carefully cut off the glass.
- To remove old glass, it is recommended to use special suction cups, which can be used to easily dismantle it.
Basic steps when replacing glass on a car. Installation and dismantling of glass; removing old glue from the opening on the car body; preparing glass and applying glue.
Preparation and installation of a new stele on a car
- After cutting the glass, to completely remove the old glue, you need to go through it with a knife. remove any remaining sealant as carefully as possible so as not to damage the paintwork or damage the plastic upholstery.
- Degrease the installation site glass around the perimeter.
- Apply the activator on the surface of the new glass along the perimeter in the place where the glue is applied (applied with a clean, lint-free cloth in one motion, without rubbing). Then, after a minute, remove the remaining activator with a dry cloth using the same method.
- The next step in preparing glass for gluing is applying primer in the place where the glue-sealant for glass will be placed, as well as on the edges of the glass. This is done to protect the glue from UV rays, since standard silk-screen printing may not cope with such protection well enough.
The soil should dry for 15 minutes at a temperature of +23 degrees.
- Turn the glass over to install the suction cups so that after applying the sealant it is convenient to install it on the car.
- To improve adhesion and to avoid corrosion on the edges of the body where the glass is installed, experts also recommend treating it with a primer.
- If the installation of glass also involves the presence of a rubber molding that is still in good condition, then before applying glue to the glass, clean it from dirt and dust, and after degreasing, install it in place and secure it with tape so that the glue does not squeeze the seal out during installation.
- Turning the glass back over, install a can of glue in a special gun and Apply adhesive-sealant to the prepared glass surface without breaks and with a uniform ridge height (some craftsmen apply glue not to the glass, but to the body at the installation site).
- Holding the suction cup handles, we install the glass into the opening . The insertion is carried out as carefully as possible; the process must occur without shocks or displacements while simultaneously controlling the placement of the rubber molding.
- Light pressure press the glass along the entire perimeter car opening.
Then secure it with safety tape. If the sealant has come out in some places, do not rush to remove it, you need to wait for polymerization. Before installing the glass, it is recommended to lower the side windows to avoid air impact when closing the door. Now all that remains is to wait 7-10 hours until the glue dries .
During this period, it is prohibited to slam the door or touch the glass. Create all the conditions for proper drying of the sealant specified in the instructions for it. At this point, replacing the glass on the car is considered complete; all that remains is to remove the tape and check the quality of the work done by spilling plenty of water.
All work must be done with nitrile gloves.
When a chip or crack in the glass cannot be repaired, it is then that the glass on your car needs to be replaced. And although the whole process does not look very difficult, failure to follow all the rules and technologies when gluing in new glass can result in, at a minimum, falling out on the first bump or behind a hot interior after rain, not to mention the situation in the event of an accident.
Source: https://etlib.ru/blog/243-zamena-stekol-na-avto
How to replace a windshield in a car with your own hands?
A vital structural component of a car that is often overlooked is the windshield. The tips and techniques described in this article will not only teach you how to replace a windshield in a car with your own hands, but will also allow you to understand the importance of timely care for it.
Automotive glass is made up of a material that is highly resistant to damage, which is why it is used not only for windshields, but also for other commercial purposes, such as panoramic car roofs or the exterior of modern high-rise buildings like the Lotus automobile headquarters, etc. similar. In the case of vehicles, the windshield not only protects the driver from oncoming air flow, but also helps to support the roof, providing relative safety during collisions and various types of accidents. It just so happens that the car is constantly exposed to potential danger, and the windshield, naturally, too. We talked a lot about the fact that very often cracks appear on the front glass for various reasons. Sometimes the damage is so severe that windshield crack repair kits are useless, leaving you with no choice but to replace the windshield. Failure to timely replace the windshield in a car can lead to the same thing as untimely vehicle maintenance. To do everything correctly on the first try, we decided to share with you some tricks for installing this glass, as well as give some tips on how to properly replace a windshield in a car.
Tips and Tricks for Proper Windshield Replacement
A properly installed windshield is a guarantee of driver safety; this is a very responsible task, which is why not every professional mechanic undertakes to replace a windshield. One of the most important aspects of installation is the perfect fit of the glass. When done correctly, you can reap the full benefits of this structural component of your vehicle.
- When you go to order installation materials, make sure you check the make and model of your car so that the materials you order don't turn out to be a pile of unnecessary junk.
- One of the main materials in installing a windshield is, of course, glue. Each brand of car does not require a separate adhesive; it can be one for all types of vehicles. But since adhesive is one of the materials that will hold your windshield in place under different operating conditions and climates, make sure that it is truly a high-quality product.
- An important point in installing a windshield is your safety. Make sure you have a good pair of work gloves and safety glasses . You would hardly change a whole, undamaged glass, but you can expect anything from damaged glass. Therefore, it is better to be prepared for the development of events in the most unpleasant scenario.
- Always follow the auto glass installation instructions and directions found on the back of the adhesive package. It should also indicate whether the adhesive requires additional connections to create an even stronger bond between the glass and the vehicle body structure. Remember that before applying glue, the surface must be grease-free and dry. For degreasing, you can use acetone.
- Learning how to install a windshield is the easiest procedure. All you need to do is apply glue and insert the glass into its original location. Give the material a day or two to dry thoroughly and properly bond the glass and iron, and then you can continue using your four-wheeled friend.
Of course, you can turn to a car workshop for professional help, but do not forget that you will have to pay not only for glass and other materials, but also for the work of the master, that is, replacing the windshield in the car.
And how much he values his work at may remain a secret until the invoice is issued. However, if you still decide to do this yourself, that is, do everything yourself, then carefully read the following instructions.
What are the do's and don'ts of replacing a car's windshield yourself?
- Avoid slamming doors too hard. Most cars have a sealed system, so immediately after installing new glass, try not to forcefully slam the door with the windows closed. Slamming the door will create excess air pressure on the windshield, which can easily damage the new seal.
This in turn will create leaks and move your glass from its actual location.
- It's not time to wash your car yet! After replacing the windshield on your car, do not wash it for the next 48 hours. At the same time, we would like to note that neither automatic nor manual washing is advisable at this time.
Remember this vital tip and avoid any type of unnecessary water or air pressure on the vehicle for at least 48 hours or so. If you ignore this advice, you may simply damage the new glass seal, which has not yet had time to set properly.
In the meantime, while the windshield is drying, you can wash the wheels of your car yourself, naturally with your own hands.
- Wait about travel. If you just installed a windshield in your car, try to avoid driving it for at least an hour or two. As you have already noticed, To replace glass you need glue and the glass itself.
After all the procedures, they need time to find balance with the humidity and temperature of the environment.
- Replace the windshield wipers.
Windshield wipers are mechanical devices whose action is constantly directed against the windshield of the car, so there is a possibility that they will damage the glass or cause unpleasant scratches on it. This way, the glass will begin to wear out and will therefore need to be replaced every few months.
Therefore, take immediate action and change your windshield wipers as quickly as possible.
- Glass tape. Typically, during the process of replacing a windshield with your own hands, a special tape is used to secure it . Make sure that this same tape stays on the windshield for at least 24 hours. You can drive with this tape and it does not interfere with visibility at all, but if you remove this tape, the support that the windshield now needs will be lost.
Silent but informative movie - instructions for replacing a car windshield using the example of a VW Golf
Source: http://zap-online.ru/info/avtonovosti/kak-zamenit-lobovoe-steklo-v-avtomobile-svoimi-rukami-neskolko-poleznyh-sovetov