DIY compressor for painting a car (video)
Many people know that you can assemble a compressor from an old refrigerator, and in a home workshop, without special skills. But not everyone is familiar with the technology and secrets.
If you think carefully, an air compressor can be useful in any garage, workshop or household. With its help you can paint a car, pump up tires, or start any pneumatic tool.
Even blowing off dust is also useful. Let's consider the version for painting.
Installation Requirements
Painting is a responsible business. Such a compressor must meet a number of requirements. The main one is a uniform supply of air, and without foreign bodies.
The most undesirable defects on paintwork are graininess, shagreen, and cavities on the surface. If the air flow is not stable, all this will occur, including dull spots and drips.
Specialized branded compressors have everything necessary to eliminate the slightest defect. But the price is off the charts.
Should I buy a unit or assemble it myself?
Therefore, it makes sense to make a compressor for painting a car yourself. To do this, it is worth studying in detail the structure and operating principle of a real, factory compressor. And it is the same for all samples. High pressure is created in the cylinder. The method of air injection is not important - it can be mechanical or by hand.
In the case of manual supply, we save a lot of money, but where can we find a slave capable of pumping air continuously? The automatic process will eliminate many disadvantages and problems. An exception is changing the oil in the compressor.
Only the mechanism is capable of continuously supplying a stream of air into the cylinder! The theory is simple; making a personal compressor station with your own hands is quick and easy.
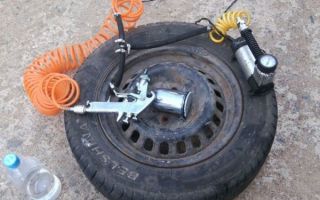
Compressor from a car chamber
How to make a paint application installation from a simple car camera? List of required materials:
- pump with pressure gauge for blower function,
- car camera for receiver function,
- awl,
- repair tool kit,
- nipple from a car camera.
The difficult stage is the creation of a compressor station. The camera should be checked for leaks. She's being pumped up. If there is an air leak, the problem is solved by gluing or vulcanizing the raw rubber. Then a hole is pierced with an awl.
We place the nipple in it for uniform air flow. The auxiliary fitting is secured by gluing. A repair kit will help you cope with this work. Then the fitting is attached to the spray gun.
To control the release of the air stream, unscrew the nipple.
But it is noteworthy that the old nipple is not removed. It will act as a valve and hold excess pressure. A control check of the pressure value is carried out by spraying a dye onto the metal surface.
If the paint lays down in an even layer, then the installation is functioning perfectly! Additional control of the pressure value can be checked with a pressure gauge.
The air flow, even after turning on the aerator key, must be intermittent!
Designing a home compressor is easy. And after using it, car painting will be of better quality than using a spray can.
When working at home, you should avoid the penetration of dust, foreign bodies, and water into the car chamber. These things can get into the spray gun and the painting will have to be done again.
With proper operation, our unit will work for a long time, and it is advisable to automate air injection.
Craftsmen often noticed that a homemade compressor can last much longer than a factory one. And regardless - domestic or imported. An item assembled with your own hands has positive energy. It is easier to repair and maintain - after all, you are well aware of its weaknesses and design.
Compressor from an old refrigerator
The unit, made from components of an ancient refrigerator, will not be inferior in performance to compressors from elite manufacturers. To construct it you will need:
- pressure gauge,
- rust converter,
- compressor receiver,
- threaded adapters,
- relay for high-quality control of the flow pressure force in our compressor,
- fuel filter element for gasoline,
- oil moisture separating filter and its gearbox,
- the engine driving the installation,
- cross with 3/4 inch thread for water pipes,
- switch for 220 V voltage,
- sealant,
- motor oil grade 10W40,
- brass tubes,
- oil hose,
- simple syringe,
- thicker board
- metal paint,
- filter element of the power supply system for a diesel engine,
- furniture wheels,
- needle file,
- studs, nuts, washers,
- fum tape,
- car clamps.
A compressor unit from a rare Soviet refrigerator can be useful as a motor. In our example, a compressor from a refrigerator is the most optimal solution.
It has one great benefit - a compressor start relay! Very old Soviet models have an advantage over foreign competitors. They are capable of pumping up very high pressures.
During assembly, it is necessary to carefully remove rust from the actuator unit.
The rust converter will be able to perform high-quality treatment of the compressor and prevent further oxidation. This will simultaneously prepare the working engine housing for painting. Then they move on to changing the oil. It is clear that if the old refrigerator was subject to maintenance, it was a very long time ago.
This also applies to changing the oil in it. But this situation also has a justification - the system is absolutely completely isolated from the environment. Semi-synthetic oil is suitable. This modern lubricant has properties no worse than compressor oil.
It will cope with the task remarkably well - it contains many high-quality and effective additives. On the compressor body we find 3 tubes: two of them are open, the remaining one is hermetically sealed. We supply power to the compressor unit and determine the nature and direction of the air flow.
It is better to immediately write down or mark the intake and exhaust ducts.
A sealed tube is needed to change the oil. We remove it with a needle file, making a notch around the circumference of the tube. It is important to prevent metal shavings from getting inside the compressor. We break off the tube and drain the oil completely into a container that will allow us to determine its volume. Using a simple medical syringe, we pour in the semi-synthetic, and with a larger volume than what poured out!
After filling, the engine lubrication system is shut down. Select a suitable screw and seal it with tape. It should be remembered that oil in the form of droplets will sometimes penetrate from the air outlet tube.
An oil/moisture separator for the compressor will save you from this. Assembly of the installation begins with strengthening the motor with the start relay on a wooden base. It should be in the same position as on the frame.
The correct switching of operating modes depends on the correct installation and installation of the compressor!
Receiver
How to make a receiver? It is good to use a cylinder from a simple fire extinguisher. It can withstand high pressure perfectly and has a good margin of safety. The cylinder is an excellent solution for attached technological equipment. As a basis, you can take a fire extinguisher of the OU-10 brand with a volume of 9.99 liters.
It is able to withstand pressure up to 16 MPa. We unscrew the locking and trigger mechanism from our workpiece and screw in the adapter. If we find corrosion, we will mercilessly remove it. It is difficult to remove internal rust; to do this, pour the rust converter into the container of the cylinder and shake out the contents.
After cleaning is completed, screw in the crosspiece for the water supply.
A wooden board will be a good base for mounting the motor and fire extinguisher body. It is advisable to place all working parts and assemblies on one line. Threaded rods will serve as fasteners; they must be threaded into the holes obtained by drilling. You will need nuts and washers.
Then take the receiver and place it vertically. You will need 3 sheets of plywood. One sheet is for a through hole for the cylinder. The remaining 2 sheets are fastened with self-tapping screws to the main board and glued to the sheet that holds the receiver. At the base, a recess is made from wood for the bottom of the receiver.
To move the unit, we attach furniture wheels.
The system should be protected from dust using a gasoline filter for rough cleaning of the fuel. It will act as an air intake. A rubber hose and an inlet tube from the supercharger will come in handy. The air pressure at the inlet is very low, clamps are not useful. An oil dehumidifier is installed at the outlet to block liquid droplets.
A filter element for the power supply system (in simple terms, a filter) is suitable. You will need clamps for the car. The oil moisture separator is connected to the input of the gearbox, and the output is screwed into the crosspiece we have already prepared on the left side. A pressure gauge is screwed into the right side to monitor the pressure value.
And on top of the crosspiece we screw in a relay for adjustment.
Adjusting the pressure force in the system
The adjustment relay allows you to set the desired range or limit of the receiver pressure. And at the required moment, interrupt the power supply circuit of the system supercharger. It is recommended to use RDM-5 as a performing unit.
With its help, the compressor will start when the air pressure in the tank drops below the required value and will turn off if the parameters are higher than permissible. The required amount of air flow is adjusted to the relay using a pair of springs. The purpose of a large spring is to apply light pressure.
A small spring allows you to adjust the upper limit and set the final limit for turning off the entire compressor installation.
RDM-5 was designed for water supply lines. In reality, this is a simple two-pin switch. In this example, one contact is needed for switching with the network zero, the other is needed for switching with the supercharger. The mains phase is carried out through a toggle switch for connection to the second input of the compressor installation. The toggle switch will help you quickly disconnect the system from the power supply.
All electrical contacts are well soldered. Then the compressor unit is painted and tested. During a test run, the operation of the relay and the tightness of the system are checked. A test run will allow you to determine the optimal pressure for painting with a uniform layer. To ensure high-quality and long-term operation of the compressor, maintenance is required.
An important step in this case is changing the oil.
If you decide to buy a factory-made air compressor, study its parameters and capabilities. Give preference to well-known companies.
Source: https://poliryi.ru/instrumenty-i-materialy-pokraska/kompressor-dlya-pokraski-avto-delaem-samostoyatelno.html
DIY compressor for painting a car
It is possible to carry out high-quality painting of a car in a garage. To do this, you will need to set up a convenient spray booth, as well as be equipped with the necessary tools. Many car owners cannot afford the purchase of expensive equipment, so they have to make a compressor for painting the car with their own hands. This operation is significantly cheaper.
To properly manufacture this device, you will need to familiarize yourself with the theoretical part. Thanks to this preparation, during subsequent work it will be possible to avoid the appearance of grain, shagreen or dust particles mixed with paint on the surface to be painted.
The operation of almost any factory-made or home-made compressor is based on the same principle. An increased pressure is formed in a sealed cavity, which is higher than atmospheric pressure, and then it is used in a targeted and dosed manner.
For injection, a mechanical or manual method is used. In the second case, you get savings on electricity, as well as independence from the presence of electricity supply points near the work area. In the case of automatic air supply to the working cylinder, it will be necessary to monitor the availability of oil for the air compressor.
Before you make your own compressor for painting a car, let’s prepare the tools. There is a method in which the working element is a car camera. To do this, we will select the components from the list:
- working chamber from a car or truck;
- a pump with a built-in pressure gauge to inject pressure;
- additional nipple for camera;
- hard awl;
- repair kit for sealing the camera.
We first check the tightness of the selected chamber. To do this, it is pumped up and lowered into water. If leaks are found, we will definitely get rid of them.
We mark a point in the free space where the second nipple is supposed to be installed. In this place we make a hole with an awl. The fitting must be glued using a repair kit. A uniform air supply will be ensured through it.
An initial nipple built into the chamber is necessary to maintain the operating pressure at the required level. The performance of the installation is determined by the final result. When the paint is distributed evenly, this indicates proper assembly and sufficient pressure in the container. The pressure gauge built into the pump will help you select the desired parameter.
When such a homemade compressor is used to paint a car, you need to try to prevent moisture and small debris from getting inside the cavity.
This will ensure maximum cleanliness of the surface to be painted. It is also advisable to prevent condensation from appearing inside the chamber.
With proper assembly and regular maintenance of the device, a homemade compressor can last much longer than the factory one. With all this, it is unlimited in repair parts, and can also be periodically improved and refined.
The basis for a more progressive model is the elements of an old refrigerator:
- receiver for compressor;
- pressure gauge 10 atm;
- a relay that controls the pressure inside the compressor;
- adapters with pipe threads;
- gasoline purification filter;
- gearbox with a filter protected from moisture and oil;
- plumbing cross with ¾ inch thread;
- electric motor for operating the compressor;
- hydraulic hose clamps;
- semi-synthetic oil;
- oil-resistant hose;
- copper tubes;
- medical syringe;
- wooden slab;
- rust remover;
- power system filter;
- hardware elements;
- furniture wheels;
- sealant, sealing tape;
- a small file or metal saw;
- electric switch (220 V).
The advantage of earlier models of refrigerators is the presence of a start relay. Also positive is the fairly powerful pressure that the compressor develops. Using a rust converter, we clean problem areas on the body and working elements of the assembly being prepared.
It is advisable to carry out a little maintenance on the compressor by replacing its oil with semi-synthetic one. Modern oils contain a sufficient amount of additives to ensure long-term operation of the compressor.
Its design has three pipes, one of which is hermetically sealed. The other two will have air circulation. To determine the direction of flow, you will need to connect the device to the power supply.
The sealed pipe completely hides the oil. Having bitten off with nippers or sawed off its end with a file so that the shavings do not fall inside the cavity, carefully drain the liquid into the prepared container. This will determine the required amount of oil for replacement. It must be infused using a syringe in the same volume that was removed through the tube.
After topping up, plug the hole with a screw or self-tapping screw wrapped with sealing tape along the thread.
Now the installation of the entire structure begins on a wooden base or a welded frame made from a building profile. Compressors from refrigerators are quite sensitive to their position in space.
To identify it, there is a special arrow on the body. The correct operation of the entire unit depends on this.
A standard foam or powder fire extinguisher is suitable as an air container. It is advisable to select it so that the cavity is at least 10...12 liters. They are usually tested to withstand pressures up to 15...20 MPa. To release the cavity, unscrew the adapter with the locking and starting device.
If areas with corrosion are identified on the surface, then it is necessary to eliminate them , preventing the spread of rust, which can lead to through damage. Such phenomena are unacceptable, as they contribute to depressurization of the container.
You can pour rust converter into the cavity and shake it well, then pour it out and dry it. We attach the plumbing cross to the outside.
The most convenient option would be to place all parts on a wooden base. For installation, holes are drilled and elements are secured with bolts and nuts. You can also use a sheet of plywood, to which everything is easily attached with self-tapping screws. 360 movable wheels are installed on the bottom plate or frame for greater mobility.
Coarse gasoline filters will help provide sufficient protection against the penetration of fine dirt or moisture. They are usually mounted on the air intake side. An inlet tube is placed on this side, which can be held in place even without clamps, since there is no high pressure in this place.
You will also need to install a protective filter on the outlet side, which will protect the air flow from moisture and oil particles from the compressor. Fuel filters are used as such a blocker. Without clamps such a unit will not stand.
We will install an adjusting relay into the output cross, as well as a pressure gauge to control pressure. We connect the free plug to the gearbox. Using a relay, you can adjust the pressure range in the receiver.
PM5 (RDM5) is used as an actuator . Initially it was used in plumbing systems, but since it is a two-pin switch, it is suitable in our case. One contact goes to the connection with the supercharger, and the second to the “zero” of the 220 V network.
Using a toggle switch we connect the network phase. It will help you quickly turn off the power supply if necessary, so as not to run to the outlet to do this.
Having collected all the elements together, we need to check the performance of the mechanism. To do this, we connect the device to the power supply, and set the relay to the minimum pressure supply. We monitor the pressure gauge readings while the system is operating.
After checking the relay, you will need to identify possible areas of loss of tightness. For this operation, a prepared soap solution is used. It is made thick in the form of a paste. We coat problem areas with the solution while the compressor is running. If air bubbles appear, seal the leak.
During a possible pressure drop to critical values, you can install additional air pumping by turning on the compressor. After receiving positive results from the test, you can begin painting.
We select a satisfactory pressure for the operation of the system empirically. In this situation, it is necessary to select the settings so that everything happens at minimum values of the supercharger operation. With this design you can paint any surface.
Building a compressor for painting can be quite economical. It can also be based on elements from an old refrigerator, and any sealed cavity is usually used for a container with air:
- Exhausted oxygen cylinder. It is able to withstand high pressure parameters, but has the disadvantage of being large.
- Propane tank. It has the same positive qualities as oxygen.
- Fire extinguisher. Models with a volume of 10 liters or more are suitable, as they have a better ability to withstand high pressure. However, at the outlet they have a metric thread.
- Hydraulic accumulator. The cavity has a good volume with sufficient working pressure. Requires some modifications to get rid of the membrane and metric threads.
At the next stage, we combine the receiver with the compressor. It is necessary to provide maximum compatibility of connectors for connecting a relay capable of turning off the compressor at the right time. You can also use RDM-5.
The pressure gauge is selected with maximum values of 10 atm. We select fittings, tees or angles with inch threads. This will make the installation easier and ensure maximum air passage through the channels. To place the structure, it is allowed to use chipboard.
As a result, the list of necessary elements will be as follows:
- Prepared compressor;
- Receiver for air flow distribution;
- Pressure switch connected to the network;
- Pressure gauge up to 10 atm;
- Filter reducer;
- Emergency release valve;
- Transition threaded elements;
- Sealing elements (tape, paste, etc.);
- Electrical wiring, plugs and on/off elements;
- Hose that protects against moisture and oil;
- Chipboard;
- Hardware elements, wheels, gaskets.
Installing a receiver in the form of a hydraulic accumulator will be the easiest, since it is already equipped with the necessary brackets. They can also be used to mount the compressor on top. The result is a two-level structure.
As fasteners, it is advisable to use bolts with hooks passed through pre-drilled holes. This will ensure greater structural stability.
It will be possible to reduce the influence of vibrations with rubber/silicone gaskets used as damping.
Using prepared flexible tubes, we connect the compressor outlet and the inlet to the receiver. Protective mechanisms in the form of filters must be installed. Power is supplied to the switch and relay. The structure must be grounded.
leave a comment
Found a mistake?
Select it with the mouse and click:
Copying materials without indicating an active backlink is prohibited. © 2014 – 2017
Source: http://calypsocompany.ru/avto/kompressor-dlya-pokraski-avtomobilya-svoimi-rukami
DIY car compressor for painting a car
Content:
A compressor is one of the tools necessary for servicing a car with your own hands.
Moreover, it has a wide range of applications, that is, using this device you can carry out various car maintenance operations, such as painting, inflating tires, providing air to pneumatic tools, and repairs. This article discusses how to create compressors with your own hands for painting cars.
Compressors are divided into several types based on their design. Below we consider the general operating principle of these devices. It consists in the fact that the air pumped by the engine enters a container where it accumulates, reaching increased pressure. When excessively high pressure is reached, excess air is removed from the container through the drain valve.
That is, compressors operate on the basis of maintaining pressure at a constant level. Constancy of pressure is especially important for devices intended for painting. In any case, air pressure is considered the main parameter of such a device, therefore the technology for creating a car compressor and the choice of materials for it are determined based on the required pressure value.
The easiest way to create a compressor for painting a car with your own hands is based on a car camera. In this case, this item will serve as a receiver. In addition to a camera from a car, for the work described you will need: a nipple from another camera, a car pump with a pressure gauge, materials for working with rubber, and a set of tools.
It is important to find a whole chamber from the car, since the functions of the receiver in this case are to accumulate air. The role of an air blower in a homemade car painting device will be performed by a car pump with a pressure gauge.
The work begins by cutting a hole in the camera from the car and gluing a nipple into it.
The nipple with nipple, which is initially present on the camera, will serve during operation to pump air into it with a pump, and the glued one will supply air to the sprayer hose.
After this, you need to adjust the pressure in the chamber. This is done by selecting its value using a pressure gauge, based on practice, that is, by spraying paint.
If there is a release mechanism, the pressure will be stable even without this action.
The following are some recommendations to simplify the work of creating such a compressor for painting a car with your own hands and achieving the desired result. So, you should first secure the chamber to avoid its vibrations when the air is supplied by the pump.
It is unacceptable to fill it with any bulk materials, as this may cause the channels to become clogged, causing the paint to mix with this substance. The same rule applies to liquids. That is, it is possible to mix the liquid and paint in the chamber. This will lead to the paint losing its properties and, moreover, it will be sprayed unevenly.
This homemade compressor for painting a car is more complicated than the one discussed above. He is considered semi-professional. Therefore, in order to make this airbrush device for a car with your own hands, you will need a larger assortment of tools and raw materials:
- pressure gauge;
- pressure switch;
- gearbox with oil and water separator;
- cross and adapters;
- nipple;
- coupling;
- oil/water separator filter;
- a tube;
- receiver;
- car clamps;
- furniture wheels;
- fitting, nuts, washers, screws and studs;
- toggle switch;
- automobile oil;
- fuel filter and oil and petrol resistant hose;
- plug and cord;
- refrigerator compressor;
- plywood panels (chipboard);
- "Epoxylin";
- dye;
- sealant, fum tape;
- rust converter.
Naturally, it is difficult to obtain such a large number of devices individually. Therefore, it is advisable to find an old refrigerator - it will serve as a source of some parts for the compressor.
So, you can use a cylinder with a built-in relay.
However, you first need to make cosmetic repairs, that is, clean them from dirt, as well as rust, which is present on many elements of old refrigerators.
In addition, it must be taken into account that during the operation of the refrigerator, the compressor may have lost its sealing, which led to a change in its operating conditions. Therefore, you should replace the original oil with an analogue for a car, since the latter can withstand much more severe operating conditions.
Synthetic motor oil for cars is suitable. To change the oil, there is a tube sealed in most cases on the side of the device. First you need to file it and then break it off.
In this case, precautions must be taken to ensure that fragments of material do not get inside the tube. Car oil is poured into a syringe in a pre-calculated volume.
After this, the tube is plugged with a screw of the appropriate diameter with a rubber gasket to ensure tightness.
As a receiver, you can use, for example, the body of an OP-1 fire extinguisher with a volume of 10 liters, having first sawed off the handle from it. Due to the fact that the refrigerator compressor is characterized by abundant evaporation of oil, an oil-water separator filter should be installed at the inlet of the receiver, which will prevent foreign liquids, such as water or oil, from entering the paint.
Next you need to drill a hole for the adapter and secure it. The easiest way to do this is by cold welding using Epoxylin.
It is first necessary to repair the bottom of the receiver, namely to clean it of all dirt and rust for effective interaction of Epoxylin with the working surface and to avoid contamination of the paint during subsequent operation.
Cleaning is carried out by sanding the bottom of the fire extinguisher in a circular motion with sandpaper until a metallic shine is achieved. After this, the adapter is fixed on the front side with a nut and left for some time (the exact timing is indicated in the instructions) for the Epoxylin to dry.
To secure the device, you need to drill holes for it and studs in the base. The latter are secured with nuts and washers.
A car filter with a paper core should be placed over the inlet port to prevent contaminants from entering it.
To increase ease of use, you should equip the compressor for painting a car with a pressure switch (for example, RDM5 or PM5), which will turn it off when the maximum pressure value is reached and turn it on when this value drops to a minimum. The maximum and minimum pressure values can be adjusted independently using the relay springs. The relay has 2 contacts intended for connection to the network. One of them must be used for its intended purpose, and the other must be connected to the compressor.
In addition, it is advisable to equip the compressor with a general shutdown toggle switch, which will allow you to de-energize the entire installation at once. It is installed on the gap between the network and the pressure switch.
Next, you can paint the receiver and begin final assembly. You need to screw a nut with a fitting onto the oil-moisture separator filter. One of the ends of a reinforced, oil-resistant hose is put on the latter. The second end is put on the compressor tube. The connections should be clamped with clamps, and the threaded connections should be sealed with fum tape.
The filter must be screwed to the bottom of the receiver and the silicone connection must be treated with sealant. Next, screw on the cast-iron lid with the threads pre-treated with sealant, placing a rubber gasket under it. A tube with a quarter-inch thread is screwed onto the lid, and a cross is screwed onto it.
To secure the receiver tightly to the base, it should be pressed with a plywood cover with a pre-made hole for it.
A relay is screwed to the left of the cross, a gearbox with a filter is to the right, and a pressure gauge is on top. At the end of the work, connect the wires to the relay.
The last step in preparing a car painting device for use is setting it up and testing it. Such a compressor for painting a car is much more difficult to set up with your own hands than the one discussed above, but it is easier to paint and make repairs with it. Moreover, this airbrush device can be used not only for painting, but also for other purposes, that is, it is universal.
Considering how much branded compressors cost, creating such an airbrush tool yourself turns out to be very profitable. Thanks to this, you can provide vehicle maintenance and repair without incurring high costs. In addition, homemade compressors are more profitable from a maintenance point of view.
So, if branded devices need to be taken to a service center for repairs, repairing homemade compressors is easy to do with your own hands. In addition, since all their components are easily accessible, repairs are carried out in a short time and do not require large expenses.
Moreover, due to the simplicity of the design, homemade compressors are very reliable, therefore, repairs will not be required often.
Source: http://AutoKuz.ru/materiali-instrument/avtomobilnyj-kompressor-svoimi-rukami.html
Compressor for car painting – how to make the right choice?
Painting specialists distinguish several types of modern compressors, which differ from each other in such indicators as:
- design features (piston or screw),
- amount of oil in compressed air (oil-free or oil),
- the presence of a belt drive and drive,
- power and type of power source (from 220 to 380 volts),
- dimensions of the air storage tank,
- air flow performance.
Screw compressors are devices where air compression occurs through the rotation of casing rotors, which are located parallel to each other. Thus, during continuous rotation, special air cells are created, which gradually decrease in volume, and the pressure in the system increases.
Screw compressor for car painting
- They will protect the chassis and save you money, increasing ground clearance by 3 cm.
As a rule, screw-type compressors are equipped with automated control and monitoring systems, so they are quite easy to configure to the desired operating mode, which depends on specific conditions. Screw compressors can provide an uninterrupted supply of compressed air for a long time, which is why they are used in professional workshops for painting cars and other equipment.
Due to their thoughtful and at the same time simple design, such devices have a high price, but this disadvantage is compensated by ease of use and practicality. The advantages of screw compressors also include:
- low energy consumption (compared to other types of compressors),
- no pressure drops during operation,
- low noise level.
Low noise unit
Piston-type compressors - this type is more common among ordinary car enthusiasts due to its affordable price. Due to the simple design, various faulty parts can be easily replaced without opening the housing. The pressure in such systems is pumped up by a built-in piston drive.
The drive can be direct or belt. In the first case, the installation will be noisier and less productive, so experts recommend choosing oil compressors with a two-stage belt drive to eliminate noise and increase productivity. In addition, the belt-driven compressor motor rotates at a lower speed and has a more reliable cooling system.
Household compressors are used in a wide variety of industries, but among car enthusiasts they are used when painting car body parts. Before choosing a compressor for painting cars at home, you need to know all the parameters of painting work, for example, the volume and timing of painting, the required output quality, the number of paintings per day, etc.
Choosing a spray gun for spraying paint
Choosing a compressor involves taking into account the indicators of the spray gun (maximum pressure, amount of air “passed” at a time, etc.). Different systems have different requirements for the amount of air consumed. The most effective spray guns of the HVLP system are those that have low excess pressure at the outlet, but very high air flow.
As for piston-type compressors, when choosing them, it is also recommended to take into account performance reserves (at least 20 percent).
If work is carried out at low temperatures (up to 5 degrees), then when using a piston compressor there may be problems with starting the engine, since the oil in the crankcase thickens and the engine does not have enough power to scroll the cylinders and piston. To avoid this, you should warm up the oil sump before painting.
Painting work can be divided into household and professional. In the first case, we are talking about simply painting some body part (fender, mirrors, handles, racks, etc.) without the need to comply with standards and requirements. Professional painting uses effective tools, special technologies, paints and other materials.
Compressor for household painting work
Thus, for simple painting, a piston-type oil compressor with a two-stage belt drive is suitable, the performance of which does not exceed the maximum volume of air consumed by the spray gun, and no more than 250 liters/min.
The power of the device can vary between 1.5–3.5 kW with a pressure of up to 8 atmospheres. If you paint in a garage, it is also recommended to equip the compressor with a special air filter that prevents solid particles and oil residues from reaching the surface being painted.
In addition, you can purchase a special air dryer that removes water vapor generated during the compression process.
For more professional painting, piston compressors are ineffective, even though they are more attractively priced. In this case, it is better to use oil-free screw compressors with low power. They are economical, productive and do not require the purchase of additional parts and filters, and the output is clean air free of oil and moisture.
As a rule, a standard paint shop at a specialized service is equipped with a mobile screw-type unit with a power of up to 5.5 kW, a capacity of up to 620 liters/min and a pressure of up to 15 atmospheres. The air intakes on such models can reach 200–300 liters in volume, while the installation itself has all the necessary filters and a refrigerator to remove moisture.
When choosing an air compressor, you need to pay attention to the following criteria:
- inlet and outlet pressure,
- device power,
- power supply,
- versatility,
- manufacturer,
- warranty periods,
- receiver volume, etc.
Selecting the volume of the air compressor receiver
Pressure is one of the main selection criteria. In piston installations, a constant pressure must be maintained in the range of 5.5–6.5 bar. It should be remembered that an increase in pressure leads to greater energy consumption, which should be taken into account when purchasing a compressor for reusable industrial work.
Mechanism for industrial reusable work
An important factor is also the versatility of the device for DIY painting. The optimal design will allow the compressor to be used in various conditions (in a garage, in an open area).
Some compressors are capable of operating from the vehicle's on-board power supply and can be used not only as tools for painting, but also as a universal inflation device, etc. Therefore, choosing a compressor requires taking into account the power source and voltage from which the compressor can operate.
The volume of the receiver does not play the most important role in the selection process, so universal models with a tank volume of up to 100 liters are suitable for domestic conditions.
The easiest and most effective way to make a compressor with your own hands is to make it from an old car inner tube. To do this you will need:
- car inner tube with or without a tire,
- car pump with a connected pressure gauge,
- additional nipple,
- repair kit (awl, rubber, etc.)
Car pump with connected pressure gauge
In our case, the chamber acts as a receiver, and the pump pumps up pressure. First you need to check the chamber for leaks; to do this, you need to inflate it with a pump and check for air leaks.
If there is a leak, the rubber must be vulcanized. Next, we make an additional hole for the nipple through which air will escape.
The original nipple should also be left; it will serve as a valve that holds excess pressure.
Checking the chamber for leaks
Next, we connect the spray gun and determine the required pressure level in the receiver using the barometer built into the pump. The paint can be sprayed onto any flat surface, it should be applied evenly.
Having determined the desired pressure, slightly loosen the pump hose so that the homemade compressor does not change the pressure (especially if the pump does not have a bleeder mechanism).
After work, make sure that no moisture gets into the camera, otherwise the paint will be washed out.
A homemade compressor is much more effective than a can of spray paint, and given the cost of professional kits, sometimes it makes sense to make one yourself. There are other methods, but they require more parts (motor, adapters, gearbox, etc.) and cannot be done without professional knowledge.
Source: http://tuningkod.ru/stajling/vneshnij-tyuning/pokraska-avtomobilya/samodelnyj-kompressor-pokraski-avtomobilja-proizvoditelnost-vybor.html