General theory of creating body kit and interior elements from fiberglass
General theory of creating body kit and interior elements from fiberglass.
Not every tuning enthusiast can afford to order original body kit or interior elements from specialized companies. But this is not always necessary - you can make a car unique yourself if you master the technology of manufacturing fiberglass parts.
Fiberglass is a polyester resin that is shaped and reinforced with fiberglass or a fabric woven from it before polymerization. Of course, garage tuning masters should not compete with professionals from specialized companies.
But many people can produce relatively small parts of a car’s interior or body kit. It is best to start with a small secondary part of simple outlines, the subsequent installation of which on the machine will not require special precision in mating.
The experience gained will subsequently allow you to take on the production of more complex elements.
The main thing is accuracy. The first stage - making a punch, or blank - is the most labor-intensive. Its shape will be exactly repeated by the future part of the cladding or interior, so from the very beginning it is necessary to take care of the correctness of all lines, cleanliness of surfaces, maintenance of symmetry, etc.
It is important to choose the right material for the punch. Thus, large parts with large radii of curvature - for example, bumpers - are best glued on a foam base, which then can not be removed from the resulting “shell”.
Smaller parts are sometimes made on a clay or plasticine block, although the specifics of processing these materials may puzzle some. Often wood is used for the “boob”. And if the initial processing of a wooden workpiece may seem difficult, then finishing with sandpaper is not difficult.
At the same stage, you should decide how the glued product will be removed from the punch. If the shape of the part allows, it is simply removed from the blank. In some cases, you can cut or score the fiberglass and separate the halves to remove the unnecessary “boob.”
One way or another, in order to separate the plastic “skin” from the punch, it must be lubricated with some waxy substance before gluing. However, if you decide to leave the foam punch (or part of it) in the finished product, there is no need to do this.
We resin according to all the rules. Polyester or epoxy resin, which is used when gluing fiberglass products, becomes plastic only after adding a hardener to it. The components must be mixed according to the instructions.
Having some experience, you can to some extent influence the course of polymerization (hardening) of the resin. For example, to speed up the process, you can warm it up a little. Changing the proportion of the mixture in favor of the hardener has the same effect.
However, in both cases the hardened resin will be more fragile.
Fiberglass fabric is pre-calcined on a hot stove or over an open fire. When the heated fabric stops smoking, the “burning” must be stopped: this means that the paraffin and other protective substances have already evaporated from it, and nothing will prevent the space between the threads from being filled with resin.
It is better to impregnate flaps of fiberglass on glass - this will ensure even distribution of the resin. For the same purpose, you can additionally run a metal ruler over the soaked fabric with force.
Depending on the skill of the performer, the shape of the part and its desired thickness, the fiberglass can be laid on the punch in one large or several smaller pieces.
Naturally, it is better to cut the fabric into small fragments before impregnation.
When laying the impregnated fiberglass fabric on the blank, you need to ensure that it fits as tightly as possible, without wrinkles or folds. If they do appear, you can trim the fabric with a sharp knife; By the way, air bubbles are released from under a layer of fabric in the same way.
The number of layers depends on the thickness of the selected fiberglass, the size of the product and its desired strength. However, in most cases one layer is not enough. Large parts or those that do not have curvature, bends and stiffeners should be made thicker: from 3-4 to ten layers of fiberglass.
The layers must be laid alternately, but without interruptions, so that the previous layer does not have time to harden. Down with the "blockhead"! Properly prepared resin will cure completely in approximately 24 to 72 hours. After making sure that the fiberglass crust does not stick to your fingers, you can separate it from the blank.
This important procedure does not always occur without partial damage to the resulting “shell.” However, it can be glued on the reverse side with pieces of fiberglass impregnated with the same resin.
When glued onto a punch, the outer surface of the resulting part is not smooth, so additional mechanical processing will be required - grinding, puttying, painting. Fiberglass is easily processed with sandpaper, drilled, and cut with a knife.
If the first fiberglass “pancake” comes out lumpy and the part does not fit well with the standard elements of the machine, the edges can be extended using the technology described above. Peculiarities of manufacturing plastic body elements The technical process used in tuning companies is based on the above scheme.
However, if the parts are planned to be replicated, production becomes more complicated. The “shell” removed from the punch is reinforced with additional layers and used as a matrix in which parts are subsequently glued.
Using such a matrix, you can obtain any number of parts with high surface quality, requiring minor finishing before painting.
When it is necessary to obtain fiberglass parts of special strength, during polymerization the mold with the laid impregnated fiberglass is subjected to vacuum: placed in an elastic plastic bag, from which the air is then pumped out.
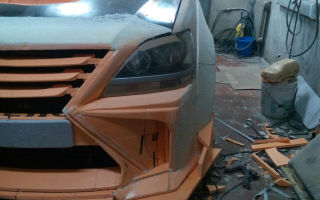
Under atmospheric pressure, layers of fiberglass and resin are compacted, resulting in a high density of the resulting material. When working with exclusive samples, the punch mold is cut out of foam plastic, previously glued to the car.
After polymerization of the resin, the mold, naturally, is not removed, so the machine turns out to be partially foam plastic (see photo).
Source: http://acki-tuning.narod.ru/useful/articles/stekl_pl/stekl_pl.html
Learning to make fiberglass parts with your own hands
Agree, not every fan of tuning has the opportunity to purchase original interior items in the appropriate stores. But, to be honest, this is not at all necessary - you can turn an ordinary car into a piece of art yourself if you learn how to properly make fiberglass with your own hands.
Actually, fiberglass is a polyester resin, which is manufactured approximately as follows: the material is given the required shape, reinforced with glass fiber and then polymerized.
It goes without saying that we do not intend to compete with branded garage tuning items. But if the necessary parts are small in size, then almost anyone can make them. But it is best to start such a practice with primitive details that have the simplest outlines.
We learn to be careful.
At the initial stage of manufacturing, we need to make a blank and for this, I tell you, we will have to work hard. It is worth noting that the shape of the blank must exactly imitate the future part. For this reason, the most important concern will be the correctness of all bends, symmetry and the cleanest possible surface.
Another equally important point is the material from which our punch will be made. For example, if the part has large dimensions (such as a bumper), then it is better to make a blank for it from foam plastic.
The base obtained in this way does not even need to be removed after the process is completed. For smaller parts, you should use clay or plasticine parts (but, frankly, the nuances of processing such materials can confuse you a little).
Wood is often used as a punch. Although its preliminary processing associated with giving shape seems complicated at first glance, subsequent processing with sandpaper will be a mere trifle for you.
In addition, at this stage we must decide exactly how the finished product will be removed from the blank. If there is an opportunity, we simply remove it. But in some cases you will have to cut the blank into two parts in order to remove the product.
Be that as it may, before removing the product, you will in any case need a special lubricant with which you will need to treat the walls of the matrix. Although, if you plan to use polystyrene foam, then such manipulations will not be required.
Stage two.
The resin used in making fiberglass turns into plastic only after a hardener is added to it. There are also special instructions in accordance with which the necessary components are mixed.
With minimal experience, you can control the curing procedure yourself. So, if you need to speed up the process, then the mass should be heated a little. Approximately the same effect is achieved if the amount of hardener is increased. But in both the first and second cases, the resulting mass will not be too strong.
Another important point is calcining the fabric, even over an open fire. When the smoke stops coming out, we stop the procedure: all the protective substances, including paraffin, have already evaporated, and the voids between the tissues are filled with our resin.
When we start impregnating the fiberglass, it is better to place it on the glass, so the resin will be distributed as evenly as possible. You can also use an iron ruler for this, pressing it firmly to the surface.
The role of fiberglass
When the finished fiberglass fabric is placed on the blank, you need to take care of its maximum fit, eliminating various folds. But if you overlooked something there and they still formed, then we carefully remove them with the tip of a knife.
Air bubbles are removed in approximately the same way. It is also worth noting that often one layer of fabric is not enough, the minimum amount is three or four. We lay each layer in turn, but without long delays. Otherwise, the previous layer may dry out.
Removing the blank
When the resin hardens (this is about 3-4 days), we remove the blank. By the way, this is an extremely responsible process and damage to the “shell” in it is a common occurrence. If this happens, do not despair, because the damaged surface can be glued using the same resin.
As a result, I would like to add that almost every production of a tuning part is carried out according to this scheme. But if there are several copies, the procedure will become much more complicated. The “shell” must be strengthened with additional layers. Such matrices can be used repeatedly, but all parts that come out of it will require a good cleaning.
And if you need to make more durable fiberglass with your own hands, then the product at the hardening stage is placed in a vacuum (that is, in a plastic bag with evacuated air). Then all layers of fabric will be compacted and, accordingly, the entire surface of the finished material will be significantly compacted.
Video tutorial - do-it-yourself fiberglass matrix
Source: http://BoldProject.ru/raznoe/sdelat-stekloplastik-v-domashnix-usloviyax.html
How to make a fiberglass hood with your own hands
The process of creating a composite part is quite complex and has many nuances. In order to make a fiberglass hood with your own hands, you will first need an original factory product that will serve as a model for a set of matrices, wax for working with composite materials, polyester resin, and fiberglass.
Assembly of hood matrices
Take the hood from which the matrix will be removed. A flange is made along its perimeter, that is, the sides are covered with strips of auxiliary material, slightly increasing its perimeter. Wax for composite materials is applied to the front part, after which the wax surface is polished.
You can polish it manually with a lint-free rag. A gelcoat is applied over the polished wax surface, which should dry for about 12-24 hours.
After the gelcoat has dried, two layers of glass veil with a density of 30–50 grams per square meter, pre-coated with polyester resin, are applied and left to dry for 12–24 hours.
Thanks to its structure, it protects the gelcoat from traces of other layers of fabric. Used as a barrier between the surface of the matrix and the glass mat. When gluing the material, you need to ensure that there are no air bubbles, as they reduce the rigidity of the product.
Next, glass mat with a density of 300 grams/m2 is applied in two layers, coated with polyester resin, and left to dry for 12–24 hours. Afterwards, a double layer of glass mat with a density of 600 grams per square meter is applied with a bonding polyester resin. The structure is left to dry for at least 12 hours.
The thickness is completed by roving fiberglass fabric, which, coated with polyester resin, is also laid in two layers.
After laying the last layer of material on the front part of the hood, the part is left to dry at a temperature of +20...−25 degrees Celsius for 40–60 hours. During this time, the processes of shrinkage and hardening of the matrix occur.
Discounts on new cars! Advantageous loan from 9.9%
Installment plan 0%
Next, the hood is turned over and work on the frame begins. Inside the frame, all existing gaps, chips, and cracks are covered with plasticine or other materials in order to avoid the ingress of resin. The process of waxing the inner surface is carried out, followed by polishing with a rag. The fiberglass fabric is laid in exactly the same sequence and volume as on the front side of the hood.
The outer and inner matrices are separated, the product is removed out. The resulting parts are treated with wax in 3–4 layers, with each of them polished.
Next, we work with a general-purpose gelcoat, which is applied to the front hood matrix with a brush and left to dry for about 12–24 hours.
Then a glass veil is applied, glass mat with a density of 300 grams per square meter, glass mat with a density of 600 grams/m2, each layer is pre-impregnated with polyester resin, everything is rolled with a roller, and thoroughly dried for 40–60 hours.
Two layers of impregnated glass mat with a density of 600 grams per square meter are applied to the inside of the matrix.
The fiberglass hood is pre-equipped with metal fasteners that will be attached to the interior.
The edges of the outer and inner hood matrices are glued along the perimeter with a strip of fiberglass 5–6 centimeters wide in 2–3 layers to impart strength. In the process of forming parts, a fiberglass cord soaked in resin is laid along all existing bends of the form.
After both parts have hardened, the flash is trimmed along the perimeters of the products. The embedded fastening parts are glued in before joining the matrices into one product. In order to assemble both parts into a solid hood, an adhesive mixture is prepared to glue the halves of the matrix. The mixture contains polyester resin and aerosil.
Before gluing, the surfaces are thoroughly degreased, dust-free, and fitting and adjustment are carried out. The compound is applied around the perimeter where the hood will be glued. The upper matrix of the frame is glued into place in the lower one. After hardening, the irregularities are puttied and sanded.
Also, the necessary technological holes provided for by the factory design are cut out on the surface of the part.
Preparing the hood for painting and painting
The assembled fiberglass hood is puttied, cleaned with a grinding machine, sandpaper and a block, checked for flatness, absence of dents and deep scratches. After this, a primer is applied in order to identify problem areas and coating defects. The developing primer layer is cleaned with fine sandpaper.
Having thus developed the surface, if necessary, additional puttying of irregularities is carried out, as well as cleaning before applying the second layer of primer. Having developed the primer with sandpaper, as a rule, minor defects remain, which are filled with finishing putty and do not require additional application of primer.
The well-prepared surface of the product is dust-free and degreased with a solvent. Preparing paint for painting. To ensure that the color of the part does not differ from the color of the car, a color selection is made.
The resulting paint of the desired shade is diluted with a solvent to the required consistency, and then poured into the container of the spray gun. The operation of the gun on a foreign surface is tested, and if necessary, the spray pattern and intensity of paint supply are adjusted.
Using a properly configured painting device, a developing layer of paint is applied to the fiberglass hood. Leave to dry in the drying chamber for 12–18 hours. Clean the resulting surface with fine sandpaper in order to reveal residual minor defects.
Irregularities are filled with finishing putty, leveled with a grinding machine, and covered with primer. Next comes final painting, drying and subsequent installation on the car.
List of consumables for making a fiberglass hood
In order to decide on the question of how to make a fiberglass hood, you need to know what materials to use, as well as in what quantities. To create a part measuring 100 centimeters by 140 centimeters you will need:
- polyester resin about 6–8 liter cans;
- glass veil with a density of 30–50 grams/m2 in an amount of 7–8 square meters;
- glass mat with a density of 300 grams/m2, with a total area of 8–9 square meters;
- glass mat with a density of 600 grams/m2 - 10–12 square meters;
- universal putty - 6–8 kilograms;
- alkyd primer - 1–2 liters;
- body paint - 0.5–1 liter;
- solvent 750 - 1 liter;
- tassels;
- solvent - 1 liter;
- wax for composite materials - 4–5 liters;
- Aerosil - 0.5–1 liter.
The hood, produced by molding from fiberglass, is 50–70% lighter than the factory counterpart, is not inferior to it in strength properties, and is even superior in durability, considering the material from which it is made.
We would be interested to know if you liked the real material.
Source: http://CarExtra.ru/tyuning/kak-sdelat-kapot-iz-steklovolokna.html
Making your own body kit
I think many Muscovite owners have a desire to “highlight” their car, give it a sportier appearance, and improve the vehicle’s appearance. exterior. Unfortunately, it is quite problematic to find a body kit for our cars, unlike the same VAZs. And if they did find it, the price was quite steep.
Fortunately, it is possible, with your head and hands, armed with enormous patience and perseverance, to make a body kit with your own hands. Plus it's relatively inexpensive!
I bring to your attention one of the most “visual and understandable” articles that I have encountered on the endless fields of the Internet and which has taken a place in my archive. Of course, there are still a lot of nuances, but I think the manufacturing principle will become clear!
So:
The goal was quite difficult, but literally necessary for any tuner: to make a body kit for the MAZDA MX-3... Oddly enough, the most difficult thing was to figure out what the future bumper would look like. Everything was used, from Photoshop to a simple notebook.
To be honest, I couldn’t do what I wanted in Photoshop... But it doesn’t hurt to roughly estimate what IT will look like... In general, this is a creative process and if you have difficulties already at this stage, make sure once again that you need it.
Or select a team with a strict distribution of functions.
I liked the notebook better... After 2-3 nights of drawing, the result was something like the following. I advise you to think about the entire manufacturing technology IMMEDIATELY, otherwise you will run into a lot of trouble. Think through the whole process!!!
I decided to make the bumper cover out of fiberglass. To begin with, the bumper was removed and with difficulty put into the bathtub for subsequent washing :-) In the process of dismantling the bumper, lying on the cold garage floor in winter, I got a terrible cold. I should have taken the mattress... I needed to wash it properly! It will be better to pester everything…. Then I'm sick in a hot bath...
Then the bumper was installed at the same angle as it was on the car. The height from the ground was previously measured and it was decided to reduce the ground clearance by 5 cm.
At the same time, I was tormented by vague doubts about what to do with a broken turn signal... Just replacing it sounded banal.
We'll get to it later... I got the bumper that was broken, crumpled, and also with a bad geometry (apparently due to overheating for an unknown reason). In such cases, do not rely on the ruler! Do everything according to visual assessment. Approximately…
The bumper is protected from splashes. Then the contours of the future bumper are filled with polyurethane foam. It is better to pour it gradually, otherwise it will take three to four days to dry to a state suitable for cutting. In short, we make a blank. This is a technology for single production. In mass production, as I heard, “matrix” technology is used.
Two days later, the following happened... A control autopsy showed: the foam had dried. Do not fall for the assurances of sellers who say that one can of foam is enough for 50 liters.
It needs to be crushed (for strength) and the volume will noticeably decrease. It took us 3 large cylinders. When making overlays, it makes sense to reinforce the foam with wire or strips of steel screwed to the bumper.
In general, keep in mind that the blank is already half of the future bumper.
This thing, called dried foam, was marked and cut according to the sketch. It’s better to mark according to templates, otherwise you might end up messing it up.
You should not immediately cover the foam with fiberglass. The cut foam is first sanded (the smoother it is, the less putty is consumed) and then covered with thick paper. What for, you ask? The foam is like a piece of cheese; it has a lot of irregularities and cavities into which the fiberglass will fall. This is an extra can, or maybe two putties.
Then everything was covered with thin fiberglass (fiberglass mesh is better, it stretches better) soaked in epoxy…. Cook in portions of no more than 300 grams, otherwise it will harden. The resin will reach maximum strength in 24 hours. Don't sand or putty before - you'll mess up. You can dilute the epoxy with a solvent for better penetration, but not more than 5% of the resin volume.
You can add a filler like aluminum powder or something like that to the last layer of epoxy - the surface will be much smoother. Fibrous fillers such as fiberglass and glass wool increase the strength of the structure. If the fiberglass fabric was spilled at a construction site or from a heating main, then you need to pre-rinse it in gasoline, this will remove the lubricant.
It comes in oil and paraffin. In the latter case, rinse in acetone. If there is nothing, then you can anneal it in a fire. WORK WITH GLOVES!!! The number of layers of fiberglass depends on the expected loads. 4 layers of fiberglass mesh are enough to demolish the bumper of a “chisel” or start a VAZ 2112 from a pusher, pushing it into the w..u.
We leave the foam inside to give additional rigidity. Her weight allows this...
When gluing, try to ensure that the weave lies as evenly as possible. Sand with an orbital sander with a grit of no more than 80. The first layer of putty ONLY with fiberglass. Otherwise it will crack from small impacts.
Sand the surface with 220 or 320 grit sandpaper (maximum, otherwise the paint will not stick). If you paint with anti-gravel paint, then you can use 120. And one more thing: no matter what you do, sand the bastard….
Take care: -) To reduce labor losses, look below... (or read everything again)
Carefully check any possible bends in the bumpers. There the putty tends to crack. Solution: glue it with fiberglass.
ABC plastic bumpers must be glued!!! For those who are confident that they know what they are doing, there is a recipe for liquid putty: putty with a double dose of hardener is diluted to the desired state with white spirit or 646m solvent and applied with a sponge or brush... Fills small unevenness on the surface, can get rid of many annoying unevenness.
Carefully remove dust from the putty... Prime in 2-3 layers. Go over with a matting sponge or fine sandpaper.
When everything is smooth and even, the part can be painted... I have a great desire to cover all the holes in the bumper with mesh... We'll see...
Source: https://azlk-team.ru/articles/stati_s_clubazlknet/izgotovlenie_obvesa_svoimi_rukami/
DIY fiberglass bumper
Men's hands are not for boredom, especially for motorists. They always want to improve, make their “swallow” more beautiful and presentable. Well, if your hands are in place, then why not start improving your car.
And besides, if God forbid the bumper was damaged, in an unequal struggle with our roads or another car. Then he will definitely have a direct path to the garage, where he will be restored to his previous appearance or even given a beautiful tuning.
Our article will be devoted to how to make a bumper from fiberglass (fiberglass) with your own hands. The process is complex and lengthy, so anyone who wants to do it quickly should give up hope, since the technological process and accuracy will require their own.
Otherwise, it is better to abandon the idea of making a fiberglass bumper with your own hands altogether. Fortunately, in large cities there are auto repair shops that can take on such work and do everything to your taste.
So, we have a bumper that we have to replace with a fiberglass one, with some modifications.
The bumper, in the end, should look like this. So let's say this is a sketch, sketch, design project. This is exactly the kind of project everyone should have when starting to work on a bumper.
All work will be carried out in the garage. We remove our bumper from the car. The factory (standard) bumper will serve as a good basis for further modernization.
The “grinder” is used to cut off openings for fog lights that have become unusable and the lower damaged edge of the bumper.
The entire surface of the bumper is covered with masking tape, into which warm plasticine is rubbed.
Then a mass of cold plasticine falls out, which is pressed down with your hands or a spatula, or other device, and leveled. Sometimes polyurethane foam is also used to obtain the matrix. It is applied to the bumper and then processed, cutting off the excess. But in our opinion, working with foam is more difficult.
Plasticine covers those areas that will subsequently undergo changes. The upper part of the bumper is covered with tape. Next, we will mark the lines on it and compare the bumper shapes.
The bumper is then turned upside down and the bottom flange is sculpted.
That is, our task is to restore everything that was, and also bring in a little of our own, what we would like to see in our new fiberglass bumper.
Using masking tape, make a template of the same shape and transfer it to the other edge of the bumper.
Next comes the final finishing of the front part of the bumper, the proportions and lines of the bumper are adjusted. The curvature of surfaces and the contour of the entire surface are specified. The mating angles must be clear and sharp.
Then lines are marked on the tape, located at a distance of 10-15 cm. This is done so that the shape of the finished side of the bumper is exactly transferred to its other side. The configuration of the sections is made using special rulers with movable knitting needles, or simple cardboard patterns.
The resulting profile is transferred to the other side of the bumper and aligned in accordance with it (the photo shows that correction grooves have appeared, in accordance with the dimensions of the opposite side of the bumper. A new profile of the bumper shape will be drawn according to them. A layer of excess plasticine is removed.)
This requires patience and precision.
Next, using masking tape, remove the template for the lower edge of the bumper from the finished side and apply it to the other side, exactly matching it along the lower edge of the bumper.
Using the template, holes for the fog lights are made. Having placed the bumper in the correct position, evaluate the accuracy of the holes and the overall symmetry of the bumper.
And the final stage is the rounding of sharp corners that were used to interface the surfaces.
The model is ready for molding the fiberglass bumper matrix. The matrix is made in order to make a bumper using it.
If we make a bumper right away using this modified bumper, we will probably not guess with the seats, since the fiberglass fabric of the future bumper will be slightly different from the original, it will be slightly larger.
As a result, our bumper will not fit into place, and we will not achieve the desired result. So, first we make a matrix, and then we put our future fiberglass bumper into it, but first things first.
Manufacturing a matrix for a bumper made of fiberglass (fiberglass, fiberglass)
When manufacturing a matrix, one of the main technological surfaces is the flange.
The flange is a kind of removable part used to facilitate insertion and removal of the fiberglass bumper from the matrix. To make a flange, an additional bevel is made at the ends of the bumper, 5-7 cm wide.
It is a continuation of the bumper at its ends and is located at an angle of about 30 degrees outward relative to the shape of the matrix.
Three layers of Teflon polish are applied to the matrix. It will prevent the bumper from sticking to the matrix. You can also use wax.
Next, the first layer when forming a mold is a matrix gelcoat with aluminum powder, which in its composition is actually a resin, but as a rule, when hardened, it turns out to be more uniform than resin. It also has a glossy appearance.
For subsequent layers, polyester resin is used. This mixture is brought to the state of thick sour cream and applied in thin layers. Fiberglass is also laid on top.
Glass mat grade 300 is used. The first layer of glass mat (fiberglass) is laid.
The air bubbles on the fiberglass are carefully pierced, the air is released, and the mold is laid out on the bumper. You can try squeezing air into the edges of the fiberglass.
Next, wait until the composition hardens. The entire surface of the glass mat is sanded to remove protruding fiberglass needles.
After this, using the same technology, in two layers, grade 600 glass mat is applied, as well as strips of the same material along the perimeter of the matrix to strengthen the edges.
We turn the bumper over, remove the plasticine bars, wash the flanges with kerosene and cover them with a separator (wax) in three layers. This must be done carefully. Then the strips are laid along the edges of the bumper. These strips will be removable and, together with the matrix, will form our future fiberglass bumper.
Fiberglass and bumpers can deform under load and “float” due to temperatures and low rigidity. Therefore, in order to maintain the shape of the matrix with fiberglass, structures made of metal or wood are used. This design acts as a stand during the hardening of the composition.
In this case, four boards were cut and assembled so that the matrix stood in place.
The wood is impregnated with resin and molded to the matrix with strips of fiberglass. It stays like that for several days. Before shooting the matrix, the connecting points of its fragments are marked. In our case, there are removable strips along the edges of the bumper matrix.
Usually, holes are drilled in the flanges for M8 bolts, or possibly for self-tapping screws. And then the edges are leveled with a grinder, while the connection between the matrix and the planks is cut, the parts are separated. A very unpleasant operation, since fiberglass can get into places where it is not needed (eyes, skin). Be sure to use PPE.
The quality of the application of the separating layer can be judged by how the matrix parts are separated from the model. Teflon car wax applied without gaps gives excellent results. The fiberglass molded around the model tightens and therefore it is very difficult to remove the model.
The only thing that helps is plasticine, which you don’t mind picking at.
Plasticine and pieces of car wax are removed from the matrix with kerosene, white spirit, then the remaining plasticine is heated with a hairdryer and wiped with a rag. The front part (inside) is lightly processed with sandpaper, only minor imperfections. The matrix for the fiberglass bumper is ready.
Making a fiberglass bumper with your own hands
And only now we proceed directly to making a fiberglass bumper with our own hands.
The matrix turned out good, now we need to finish the niches for the fog lights. To begin with, optics are selected. The hole for the headlights is transferred to cardboard.
The cone of the niche and the size of the hole must correspond to the size of the fog lights. To do this, mold a plasticine mound with a cardboard template on top. We transfer the template from one side to the other and align it.
The matrix is coated with wax and then with a gelcoat consisting of polyester resin and aluminum powder.
The first layer of gelcoat is the most important.
Then comes the formation of the first layer of fiberglass. Glass mat 300 is used again. The sharp corners of the matrix are coated with glass powder. The main thing here is to ensure that there are no air bubbles. We squeeze them out or pierce the fabric to release the air. The second and third layers are applied using grade 600 glass mat using rollers.
The next morning, remove the screws from the matrix. Separate the strips at the ends of the bumper
We take out the fiberglass bumper from the matrix. Separating parts is a rather painstaking process. There is no need to rush here. In the gap between the part and the matrix, wooden wedges and slivers will be used.
At some point the bumper will separate from the matrix.
Then you can mold a second copy, just in case. Carefully coat the matrix with separator and dry it. All technology is repeated. The bumper is sanded and trimmed. The second copy is ready nearby.
The bumper is then puttied and leveled, ready for painting.
The bumper is first adjusted to the location on the car, tried on, and then painted.
Well, the already painted bumper looks absolutely great. You can learn how to paint a bumper from the article “Painting a car body”
It’s not so easy, but it’s true, you can make a fiberglass bumper with your own hands.
Source: http://www.AutoSecret.net/tuning/tuning-kuzov/1454-bamperizsteklovoloknasvoimirukami
How to make a body kit for a car with your own hands
Every person wants to express their individuality. Someone buys clothes, jewelry or collects stamps, and car enthusiasts modernize their cars in every possible way. In this case, tuning is the most common way to transform a car. Few people may notice the new engine, but the updated body catches the eye immediately.
Ordering a bumper or other part in a store is quite expensive, so it makes sense to make a body kit for your car yourself. With a minimum set of knowledge you can get a lot of advantages, including:
- Significant cost savings compared to a custom body kit
- Opportunity to create a unique body kit for your car
- The work is done independently, which means that with due effort it will be done conscientiously
- Gaining Real Useful Skills
Scheme for removing the rear body kit using the example of a VAZ-2114
Before making a body kit, you need to dismantle the old one. Depending on the car, body kits can be attached differently. For example, the “Japanese” have them glued to them with double-sided tape and self-tapping screws. After unscrewing all the bolts, you need to remove the remaining tape. There is an option when the pistons are used as fastenings.
Regardless of the fastening technology, it is recommended to use a garage with a pit or a jack to carry out such work. After disconnecting the parts, corrosion may appear in the place where the body kit was located. Remove it using a sanding device.
Cut polystyrene foam into cubes and glue
In order to understand how to make body kits for a car, you need to decide what you will make it from. Expanded polystyrene is considered the best material in terms of price/quality ratio. Before applying it, carefully tape the areas where polystyrene foam is applied with tape.
Recommended reading:
Having finished the preparatory work, we cut it into cubes and stick it where the new body kit will show off. The sizes of the pieces depend on the dimensions of the body kit.
Don't forget to pre-treat the surface that will be adjacent to the car. Glue the pieces using macroflex. It must be applied in a thin layer. We advise you to cut polystyrene foam cubes with a margin.
The structure itself is glued in various ways, including:
- High quality double sided tape. Otherwise, a do-it-yourself body kit on a car will disappear after encountering puddles
- Sealant, but if you want to remove the body kit again it can damage the paint
The result obtained is the foundation. The next step is to give the polystyrene foam the desired shape. For this stage you will need an electric knife, as well as a large piece of sandpaper. When working, it is advisable to pay attention to the following tips:
- Glue the cut blocks only on the car
- Your task is to give the pieces of polystyrene foam the shape of a car body. This is done to ensure a tight fit of the material to the car body. This solution will reduce the number of cracks and further problems at the next stages
- It is recommended to lay out the blocks as if laying bricks. Lay them out block by block and carefully adjust them to the required shape. Of course, you will spend about half an hour on this, but later you will understand that the time was not wasted
- Don't forget about minimum security measures
After working with polystyrene foam, a lot of dirt remains, so there is a possibility that the material could get into the car's air duct. Don't forget to vacuum it.
If you want to make the bumper skirt even, remove it and place it on the table. Thus, the work will progress faster and better.
Using coarse sandpaper to give shape
The body is shaped using 40mm coarse sandpaper. By wrapping it around a stick, you will get an excellent file. An electric knife is a good tool for creating a rough outline. Use a magpie to create a rough shape. Having reached the limit of half a millimeter to the desired result, switch to 80 mm sandpaper.
Regardless of what part of the body kit you are making, you need to make every effort to achieve complete symmetry. Before moving on to the next stage, carefully check that all parts of the body kit fit tightly to the body. This work is the most difficult in the question of how to make a body kit with your own hands. Use 40mm sandpaper for adjustments.
Cover with epoxy resin and fiberglass
Coat the resulting body kit with a single layer of epoxy resin with fiberglass, which must be cut into small pieces. Apply the resin first, followed by the fiberglass. Glue the entire body kit. In some places, dripping drops of resin form. It is recommended to remove them after the resin has hardened. At this stage, it would be a good idea to follow a few tips:
- Stock up on pieces of fiberglass
- To obtain normal density, overlap the fiberglass
- Small pieces of fiberglass are easier to glue
Once dry, begin applying a layer of coarse putty. The main problem at this stage will be applying an even layer. This process is necessary to remove all irregularities and flaws. After this, go through the sandpaper to remove problem areas. To get the best result, you will have to repeat the procedure several times. We remove small indentations with putty.
Source: https://kareliyanews.ru/kak-sdelat-obves-na-avtomobil-svoimi-rukami/
How to make your own aerodynamic body kit
Recently, external car tuning has become very popular. With the help of aerodynamic body kits you can not only transform the appearance of a car, but also significantly improve its driving performance.
1
Before you start making your own bumper body kit, you need to decide on the base material. The best option is fiberglass (glass mat). First you need to create a mock-up mold from foam plastic. It is cleaned with a sharp knife and, if necessary, corrected with plasticine.
Next, the model is covered with glass mat. The more layers of fiberglass, the stronger the resulting part. After the material has completely hardened, the mold is carefully separated. The surface of the part is thoroughly cleaned, after which the necessary fasteners are installed. Then it’s time to putty and primer.
The final stage of work is painting the part.
2
To make your own aerodynamic bumper body kit, you can use plastic. The first thing to do is prepare a suitable blank. It can be made of ordinary dense foam or balsa, or from linden wood. The foam model is treated with a mixture of parquet varnish previously diluted with acetone and epoxy glue.
The surface of the balsa must be primed - the material will become stronger and more durable. For the primer, mix equal amounts of nitro varnish and baby talc. After the preparatory work, the surface is treated with polish or stearin and after an hour, thoroughly rubbed with a woolen cloth.
This simple procedure improves the sliding of the plastic over the surface of the blank and minimizes the thinning of the material.
3
Drawing plastic is a rather painstaking process. Shallow drawing of small parts can be done in the following way. To begin with, a sheet of thermoplastic is crimped on opposite sides with plywood strips and secured with screws. Next, using pliers, the plastic is heated to a plastic state over an electric stove.
The air temperature in the working room must be at least +20°C, otherwise the plastic will quickly cool down and lose flexibility and ductility. If necessary, the blank is heated in the oven (this does not apply to foam models).
Keep in mind that when heated, the sheet narrows in the center, and its edges may turn in, so make the workpiece with decent allowances.
4
The threshold body kit is made of epoxy directly on the car. To avoid the epoxy resin sticking to the body, it is thickly soaped in advance. Next, several layers of fiberglass are laid on the “native” threshold of the car.
Then, using polystyrene foam and polyurethane foam, the profile of the future body kit is formed. After this, it is glued with fiberglass. When the product has dried well, carefully remove it from the threshold of the car and begin priming.
Then they remove the base and install the body kit (fix it with self-tapping screws), putty it and paint it.
5
The spoiler is made in this way: a frame is made from plywood, then, using polyurethane foam, it is given the required shape. After this, the base is covered with fiberglass. After drying, it is cleaned, puttied, primed and painted. Attach the finished part to the car body using self-tapping screws.
And finally, when starting to make your own aerodynamic body kits, do not forget to get high-quality rubber gloves - the materials you will have to work with (epoxy, paint) stick very much to your hands and are difficult to wash off.
Aerodynamic body kits are the best option for external tuning, which will make your “iron horse” both more attractive and faster.
Source: http://SovetClub.ru/kak-sdelat-samomu-aerodinamicheskij-obves