How to replace car shock absorber struts with your own hands

Many car enthusiasts, both beginners and experienced drivers, want to repair the car’s chassis themselves. This is clear, because the work there will take a knowledgeable person for several hours, and in service centers they will ask for a fabulous sum for such work.
That is why drivers are interested in how the shock absorber strut is replaced and what nuances they should know. Replacing shock absorbers and their struts is a labor-intensive process, but completely uncomplicated.
Moreover, if you ever had to replace, for example, front shock absorbers, then you can replace the rear ones without problems, because the algorithm of actions is the same.
The only thing that complicates the situation is the number of car manufacturers, because each company tries to sell the chassis according to its own developments. Therefore, the replacement process on different models may differ, but not significantly.
Shock absorbers soften shocks when the car is moving
How to understand that shock absorbers are already faulty
Experienced motorists themselves are able to determine the condition of the chassis. They observe how the car behaves on the road and draw the appropriate conclusion.
This is quite easy to notice; a car with sagging shock absorbers begins to skid along the road when driving at speeds above 70 km/h.
Moreover, when you drive over a hole or bump, you hear a characteristic knock, this sound comes specifically from the chassis.
You can also check the condition of the shock absorbers yourself. It is enough to be near the car. The procedure is as follows: you need to press on any edge of the body to the limit, for example, on the rear.
After this, sharply release, a working shock absorber of the car should quickly and smoothly raise the body.
But what if the body has risen to the maximum upper point and begins to fall down, in other words, just swaying? In this case, bad news awaits you: your car requires replacing the rear shock absorbers.
An external inspection of the chassis is just as effective. A bent rod or oily smudges will tell you that the system is already worn out and requires repair.
Necessary equipment for repair and replacement
For repair and replacement you will need the following tool:
Discounts on new cars! Advantageous loan from 9.9%
Installment plan 0%
- pliers;
- jack;
- screwdrivers (flat and Phillips);
- hammer;
- brush for cleaning dirt;
- spanners;
- open-end wrenches;
- heads with collars;
- screeds;
- WD-40 liquid.
Spare parts required for repair: boots, struts or new shock absorbers, bump stops.
Algorithm of actions during dismantling
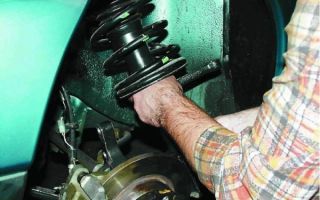
We will consider the process of replacing front shock absorbers using the example of a Hyundai Getz car. The first thing to do is to remove the seals and other parts under the hood of the car in the engine compartment that may interfere with our work. In other words, you should have unobstructed access to the top rack support.
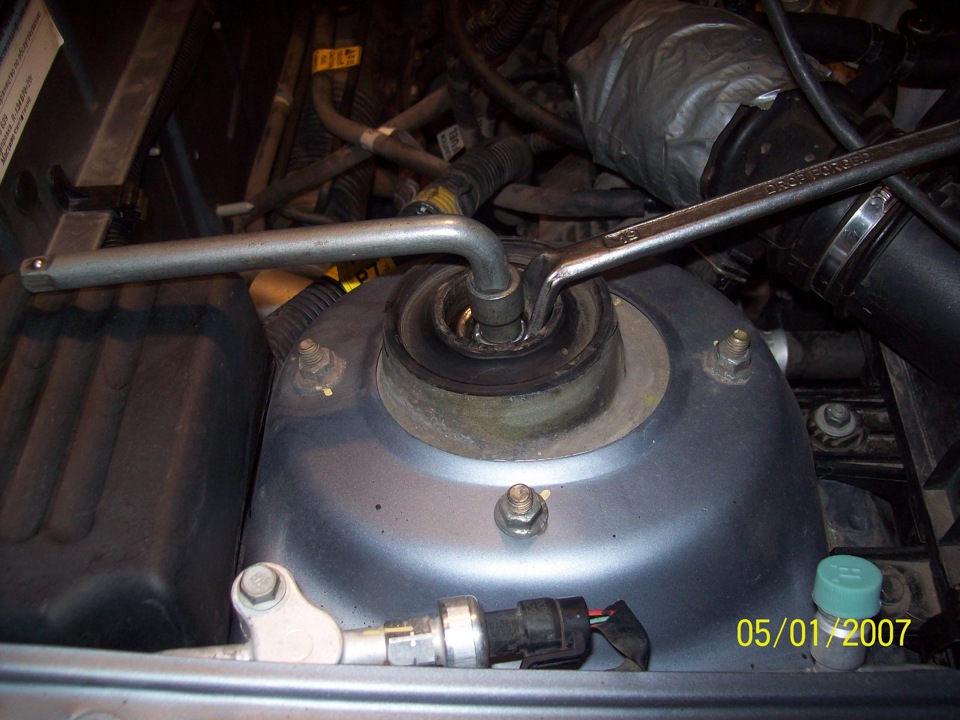
Now remove the plug, and then unscrew the nut that secures the rod to the stand. It is more convenient to do this with a coupling head on an extension, provided that the car is on all wheels and the stand has not yet been removed.
If you removed the stand in advance, the process will be more complicated, because you will have to fix the rod so that it does not rotate. Now raise the car on a jack so that the wheel does not touch the floor (ground).
Be sure to protect yourself by placing additional stands under the car.
Now you should remove the wheel and clean with a brush all the threaded connections that you see. Next, clean the stabilizer bar, screw, brake hose and even bolts. After cleaning, be sure to wet the bolts with WD-40.
Unscrew the nut that secures the hinge and loosen the screw that secures the brake line. Please note that if the car is equipped with an ABS system, carefully remove the sensors with cables from the rack and move them to the side.
Now we pay attention to the fastening bolts, unscrew the nuts and pull out the bolts themselves. In this case, you will have to knock them out with a hammer, since they fit very tightly.
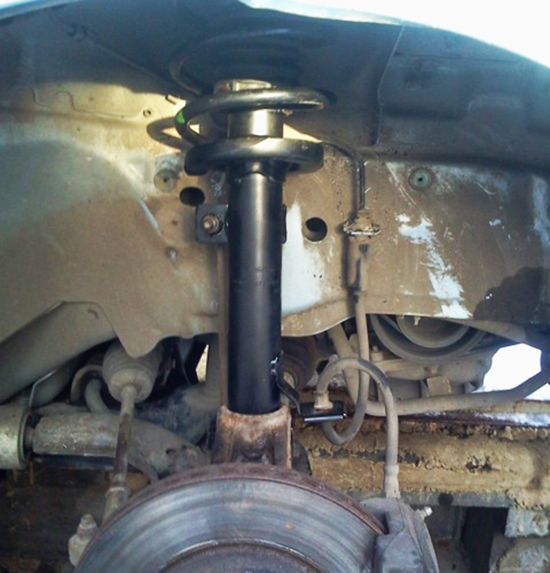
After you have removed the bolts, the rack from below is no longer secured by anything, now you can begin to dismantle it from above.
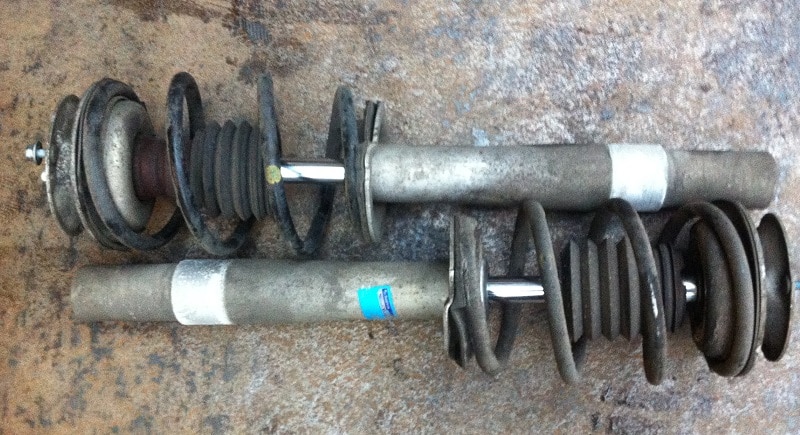
Now we unscrew the bolts that secure the chassis to the body and remove the strut along with the spring and supporting part.
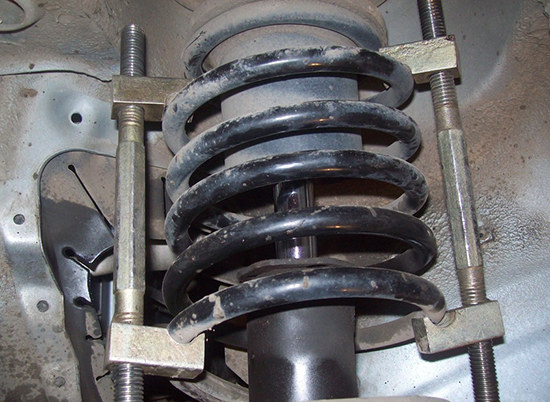
Now you need to secure the spring between the ties and gradually compress it until a gap is found between its edge and the support cup. Next, you need to completely unscrew the nut on the rod, after which you can remove the support cup and the spring itself. Carefully inspect other parts for damage; if damaged, they should be replaced.
Algorithm of actions during installation
Now you can start replacing the shock absorbers; if the manufacturer’s recommendations indicate bleeding, be sure to do so.
Place a new boot and bump stop on the rod of the replaced strut. An important point: when installing, do not forget to put the gasket on the stand, which is located under the spring.
You can remove it from the old rack if it is in satisfactory condition, or buy a new one. Then put the spring on the body, do it carefully and carefully, the lower and upper turns should coincide with the grooves.
Place a support cup on top and secure it with a nut.
Loosen the ties on the spring and lower it into the corresponding grooves, insert the pins into the special holes and tighten them with the springs.
During the assembly process, carefully inspect the transverse stabilizer; if it is loose, then its rubber bushings need to be replaced.
Now screw the rack onto the lower supports, secure the wheel and remove the car from the jack, having first removed the stands. After this, tighten the nut on the rod and studs.
That's all, the process of replacing shock absorbers is completed, now you are convinced that it is not very difficult. Now repeat the manipulations on the second side of the car.
The Hyundai Getz car does not have a camber adjustment process provided by the factory, so we will omit this point. Accordingly, by installing serviceable components on an undamaged body, no additional problems will arise.
It is worth noting that we did not change the steering rack length, so the wheel alignment will remain the same as it was before the replacement.
Please note that shock absorbers are always changed in pairs so that the car behaves equally on each wheel (front or rear) while driving. This way you will protect yourself from the risk of getting into an accident.
Rear shock absorbers
In almost all cars, the shock absorption system on the rear wheels is simplified. It uses only one shock-absorbing element, and not a whole strut, as on the front wheels.
Therefore, to replace it, it is enough to unscrew the bolts on the lower and upper supports. If the shock absorber in your car model is not closed by a spring, the replacement process will go much faster.
Experienced craftsmen also change the bushing along with the shock absorber so that there is no play.
Conclusion
We examined in detail the process of replacing shock absorbers on the front and rear wheels. If you delve into the process, it will become clear that there is nothing complicated here. The only disadvantage of such repairs is its duration. However, by replacing the shock absorbers yourself, you will save a tidy sum that you previously would have had to pay to a service station.
Source: http://CarExtra.ru/remont/kak-zamenit-stoyki-amortizatorov.html
How to change shock absorbers. Replacing racks with your own hands
Quite often you can hear the question: how to change shock absorbers, because there are many people who want to repair the suspension themselves, both among experienced car owners and among novice motorists.
But contrary to popular belief, it is not difficult and not difficult. The answer to the question will vary slightly depending on the car model and whether the shock absorbers are front or rear.
But if you replaced the front strut of the car with your own hands, then you will not have any questions when replacing the rear one.
How to determine if shock absorbers are faulty
Experienced drivers determine the malfunction of shock absorbers by how the car behaves on the road. After all, a car with faulty shock absorbers already at a speed of just over 70 km/h begins to “float” on the road, and overcoming bumps is accompanied by dull sounds.
To evaluate the front or rear shock absorbers, you need to swing the front or rear of the car, respectively, with your hands several times, pressing down on the edge of the body, and release at the bottom of the stroke.
If the shock absorbers are working properly, then the edge of the body will smoothly rise from the bottom to the top without swaying.
If, having reached the top point, it does not stop, but continues to swing up and down, then the shock absorbers on this side of the body require replacement.
Do not underestimate this type of shock absorber diagnostics as an external inspection.
Required tools and materials
- Jack.
- Set of sockets with wrench and extensions.
- A set of open-end and spanner wrenches.
- Crosshead screwdriver.
- Iron brush.
- Car stand.
- Pliers.
- Hammer.
- Spring ties.
- VD-40 or other “liquid key” type liquid.
- Spare parts: bumpers, boots, struts or shock absorbers, if they can be replaced individually.
Procedure
To change the front struts, for example, on a Hyundai Getz, you need to perform a number of the following manipulations:
- Remove the engine compartment seal, as well as other elements that prevent access to the upper strut support.
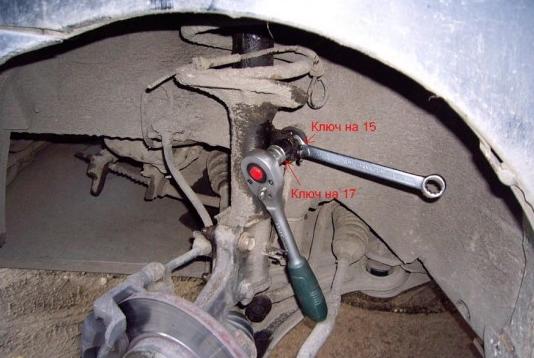
- After removing the plug, unscrew the nut securing the strut rod to the upper support. This is done with a head with an extension and a wrench while the car is on wheels and the rack is not removed. It is much more difficult to do this with it removed, because you will have to look for a tool to fix the rod from twisting.
- Loosen the wheel mount and lift the car with a jack so that the wheel does not touch the floor. For insurance, be sure to place a stand under the car.
- Remove the wheel. Using a wire brush, clean the threaded connection of the stabilizer bar joint, the screw securing the brake hose, and the bolts securing the steering knuckle strut. Moisten them with Vedashka or kerosene.
- Unscrew the nut securing the stabilizer joint and the screw securing the brake hose. If the car is equipped with an ABS system, remove the tube with the sensor wires from the rack.
- Unscrew the nuts from the bolts securing the knuckle to the strut. Knock out the bolts with a hammer. On some cars you will also have to remove the bushing. After removing the bolts, nothing holds the rack down.
- Remove the nuts securing the upper support to the body. Remove the strut assembly with support and spring.
- Compress the spring with ties until a small gap appears between its outer coil and the support cup.
- Unscrew the previously loosened nut from the rod. Remove the upper support and the spring with the cup.
- Inspect the boot and bumper, and if necessary, replace them with new ones.
- If the manufacturer of a new shock absorber recommends bleeding its products, carry out bleeding in accordance with the recommendations.
- Place the bump stop and boot on the rod of the new strut, and don’t forget to move the gasket under the spring from the old strut to the new one. Place the spring on the strut body, aligning its lower coil with the seat under it. Place the support on top of the cup and screw on the stem nut.
- Remove the tie rods from the spring and insert the upper support studs into the holes provided for them and tighten with nuts.
- During assembly, pay attention to the anti-roll bar; if you notice that it moves too freely, then it’s time to change the rubber bushing in its bracket, or better yet, both.
- Pull the stand mount from below, screw on the wheel, remove the stand, and lower the car.
- Tighten the wheel mount, the rod nut, and the nuts on the upper support studs.
As you can see, the process is simple, do the same on the other side and the front ones are ready.
Camber adjustment is not provided on this model, which means that when installing serviceable components on an undamaged body, the desired camber value is obtained.
And since we did not change the length of the steering rods, the wheel alignment angles should be normal (if the toe-in was adjusted correctly before the replacement). This means you don’t have to do “geometry”.
Please note that it is recommended to replace shock absorbers in pairs. This way you will insure yourself against unexpected behavior of the car on the road.
Rear axle
Often on passenger cars, the rear axle is equipped with only a shock-absorbing element (unlike the front axle, where the shock absorber is installed in a cartridge, and the entire assembly is called a strut).
In this case, to replace, you will need to unscrew the upper and lower fasteners.
In cases where the shock absorber is located separately from the spring, you will not need ties, and the process itself will take much less time.
Most often, on rear axle shock absorbers you have to change the bushing, which breaks over time and causes play.
Bleeding shock absorbers
During transportation of the shock absorber, liquid from the inner tube may flow into the outer tube and be replaced by air. Therefore, the shock absorber must be pumped before installation so that the liquid in it takes its place. To ensure that the goal is achieved, the operation must be performed several times in a row.
- Turn the shock absorber with the rod down and slowly compress it. Hold it compressed for a few seconds.
- Without pulling out the rod, turn the shock absorber 180°. Hold it in this position for a few more seconds.
- Pull the rod out as far as possible.
- Repeat the procedure at least 5 times. If failures are detected, you need to repeat the procedure from the beginning.
- Make sure that the shock absorber, when in working position, has an easy compression stroke and requires effort to stretch.
- After successful pumping, store it in a vertical position with the stem up until installation.
The only difference in pumping oil and gas oil will be that the rod of the latter, after compression, returns back on its own, while the oil rod needs to be pulled out.
Source: http://AutoLirika.ru/remont/kak-samostoyatelno-pomenyat-amortizatory-i-stojki.html
How to replace front strut shock absorbers
During operation, the car suspension is subjected to serious loads, which lead to wear and breakage of a number of components. More often, damping components fail - shock absorbers, whose task is to dampen spring vibrations.
The consequences of faulty shock absorbers are serious - the car’s handling deteriorates greatly, and it begins to “float” on the road, especially after going over bumps, the braking distance increases, and all this is accompanied by strong knocking from the suspension. An additional sign of shock absorber failure is the appearance of oil smudges on the body.
Shock absorbers are non-repairable suspension elements, and in case of malfunction they are replaced. It is noteworthy that due to the greater load, the front shock absorbers wear out more often and require replacement.
The car uses several types of front independent suspension, differing in design, which affects the algorithm for replacing worn damper elements. But the most widespread is the MacPherson suspension; it is used on most passenger cars.
This type of suspension is structurally simple, but the technology for replacing shock absorbers in it is the most labor-intensive compared to other suspensions. This is due to the fact that the damping element in it is part of the shock-absorbing strut, which, in addition to the shock absorber, includes a spring, a housing, supports, and all this is assembled into a single structure. Therefore, a special tool is required for replacement.
Tools needed to complete the work
To replace the front shock absorbers in the MacPherson strut suspension you will need:
- standard wrenches (open-end wrenches, socket wrenches, heads of standard sizes);
- remover of ball joints and steering tips;
- spring ties;
- means for processing bolted joints (WD-40);
- marker or center punch;
- percussion instrument (hammer);
- rags;
Shock absorbers must be replaced in pairs; replacing only one element is not allowed. Therefore, it is necessary to purchase two struts or shock absorbers and additional elements at once - anthers, bump stops.
Although the MacPherson suspension on different cars has the same design, there are always certain differences in design, which affects the work algorithm.
For example, let's look at the technology for replacing front shock absorbers on a VAZ-2110. Note that there are two ways to perform the work - by disconnecting the strut from the hub and removing the strut assembly with the steering knuckle.
Replacing front strut shock absorbers on a VAZ. 1st method
The first method is simpler, but it is not always used. Replacing shock absorbers using this technology is performed as follows:
- We jack up the front of the car and remove the wheel.
- Under the hood we find the plugs covering the fasteners of the strut to the body and remove them.
- Loosen the nut holding the shock absorber rod in the upper support (under no circumstances should we twist it completely, otherwise the spring will “shoot”).
- Loosen the three fastening nuts of the upper support.
- Unscrew the nut and press out the tie rod end with a puller.
- We remove the brake system line from the bracket.
- Using a center punch or marker, we mark the position of the upper bolt securing the strut to the hub (this bolt is an adjustment bolt - it adjusts the mounting angles of the wheels, so it is important to mark it in order to position it correctly when assembling the suspension).
- Tighten the nuts on the rack mounting bolts.
- We knock out the bolts.
- Using a downward movement, we pull the hub off the rack.
- We unscrew the three fastening nuts of the strut to the body (under the hood).
- We remove the stand.
- We tighten the spring with ties.
- Unscrew the shock absorber rod nut.
- Remove the support and spring cup.
- We remove the spring, remove the boot and bump stop.
The shock absorber is placed in the strut housing. Most car enthusiasts prefer to replace it together with the body assembly. A bump stop with a boot and a spring are installed on the new element and secured with an upper support. After this, the rack is installed in place.
But on a VAZ-2110 you can replace the shock absorber itself (it is often called a cartridge, cartridge, insert). In this case, it is necessary to further disassemble the rack and for this:
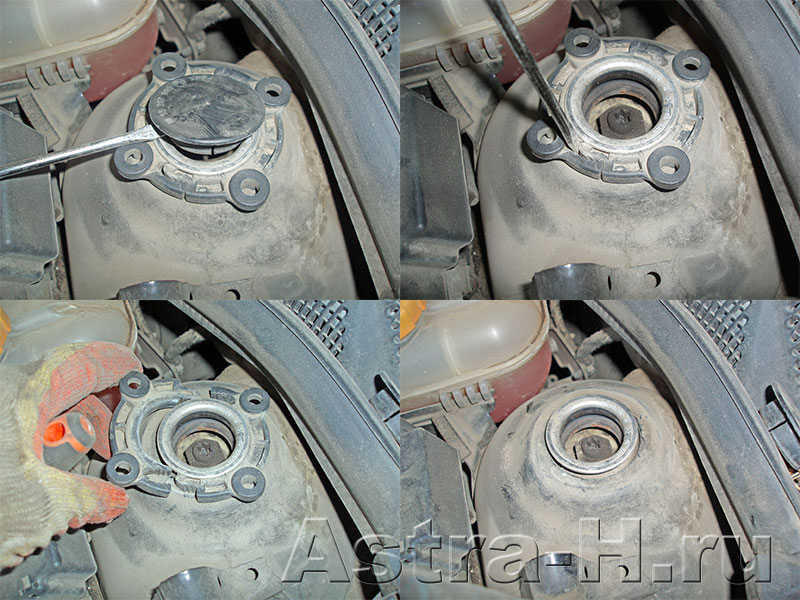
- Using a hammer and chisel, knock the support washer off the body.
- Using a special wrench, we unscrew the fixing nut, which is installed in the housing under the washer (if you don’t have a wrench, you can carefully unscrew it with the same hammer and chisel).
- We remove the worn cartridge.
- Installing a new element.
- We fix the cartridge with a nut and fill the support washer.
- We put the removed elements (spring, support, etc.) on the rack.
- We install the rack on the car.
Before assembling the strut, be sure to bleed the new shock absorber. During the installation process, it is important to correctly install the adjusting bolt (according to the marks) and check the tightness of the bolt connections. After assembly, we carry out a similar operation on the other side.
Video: Replacing the front shock absorbers of a VAZ 2110
The second method (removing the strut together with the hub) is more labor-intensive, but it is good because during disassembly the adjusting bolt is not affected, but in this case only the shock absorber changes, and the body remains the same.
A brief algorithm for replacing the front shock absorber of a VAZ-2110 using the second method is as follows:
- Before starting work, loosen the nut holding the drive shaft in the hub;
- Jack up the car and remove the wheel;
- Loosen the nuts under the hood (shock absorber rod, upper support);
- We unscrew the brake caliper, take it to the side and hang it (so that the rubber pipeline is not stretched);
- Press out the tie rod end;
- Unscrew the fastening bolts of the lower arm to the ball joint;
- Unscrew the drive fixing nut;
- Pull the hub off the drive shaft using a “pull towards” movement;
- Unscrew the nuts of the upper support and remove the stand;
And then we disassemble the hub, change the cartridge, and put everything back together. After completing the replacement, it will not be superfluous to adjust the camber/toe angles.
This replacement technology was considered using the example of the VAZ-2110. But this algorithm is also suitable for other versions of the VAZ, ranging from 2108 to Lada Priora.
Features of replacement work on a Ford Focus 3
As already noted, the general design of the MacPherson suspension is similar on different models, but differs in design. So, if you take a Ford Focus 3, then replacing the front shock absorbers on this car is done differently than on a VAZ. Below are the nuances of the operation on Ford Focus 3:
- It is impossible to change only the shock absorber itself, and it is replaced together with the body. Therefore, the method of removing the strut together with the hub is not suitable for this car;
- There is no adjustment bolt on the Ford, and the strut is attached to the hub with only one bolt connection.
- The anti-roll bar strut is attached to the shock absorber strut, which is disconnected during disassembly.
- In the process of removing the shock absorber strut, the ABS sensors should be removed from the hub (after first disconnecting the battery from the on-board network).
- To pull the hub off the rack, after unscrewing the fasteners, loosen the eyes through which the bolt passes. This is done using a thin chisel, which is “driven” into the slot between the eyes with a hammer.
But otherwise, the technology for replacing the shock absorber is the same as described above - disconnect the hub from the strut, unscrew the bolts securing the upper support to the body. After dismantling the strut, we disassemble it, replace the shock absorber and body assembly, put everything back together and install the strut on the car.
Video: How to change Ford Focus shock absorbers
Source: http://AvtoMotoProf.ru/svoimi-rukami/zamena-perednih-amortizatorov/
Do-it-yourself replacement of front shock absorbers
Detailed information on how and when it is necessary to replace the front shock absorbers on a car.
The role of shock absorbers in a car is difficult to overestimate; they act as the main damper of vibrations that are harmful to the car body that occur when driving. The second task of this important device is, of course, to ensure adequate comfort for those in the car.
Many novice motorists often do not understand what the difference is between the rear and front suspensions of a car. The principle of operation of shock absorbers and the features of the front and rear suspension also remain a mystery.
The short answer will be something like this: shock absorbers installed at the front fail much faster, since our “not ideal” road conditions are rich in all sorts of unevenness, potholes and potholes, and as a rule, the first blow, and it is often stronger than the second, falls precisely on the front struts.
It is for this reason that the service life of such devices is measured by the number of kilometers traveled on the above roads.
The main task of any shock absorber is far from creating comfortable driving conditions, as many beginners and inexperienced car owners mistakenly believe. This is often the reason for choosing the wrong shock absorber model.
The main function of shock absorbers is to dampen the vibrations that are created when the car moves due to all kinds of shocks and jolts that it suffers from.
If modern cars were deprived of such a device as shock absorbers, they would hardly last more than one year.
Other suspension elements such as springs, torsion bars, cushions, springs and much more help shock absorbers cope with dampening the destructive effects of vibrations. However, unlike the above suspension elements, car shock absorbers require special attention.
When to replace front shock absorbers
- Clear signs of corrosion on the shock absorber spring support. If you ignore this fact, you soon risk getting a torn spring plate and many other undesirable consequences.
-
Oil leakage or leakage from the device cup.
To be honest, this is a rather unpleasant thing; at first glance it may seem that this is “not fatal” and nothing bad will happen if you drive a little with less pressure in the shock absorbers. I assure you, this opinion is wrong, the operation of such a device will be incorrect, and vibration damping will not be able to be fully carried out.
As a rule, due to the car’s own vibrations, resonance may occur in body vibrations when the car is moving. I’ll tell you from personal experience, it’s not enough pleasant things, forget about any comfort.
-
Clear deformation of the shock absorber housing. Due to this malfunction, further operation of the piston becomes simply impossible, since the body is curved and its movement is impossible.
Source: https://avtodoc24.ru/zamena-perednikh-amortizatorov-svoim/
How to repair shock absorber struts yourself
Proper operation of shock absorbers is no less important in terms of the safety and durability of a car than a well-functioning engine or braking and steering systems. For example, if a car is moving on an uneven road, one of the wheels comes off and the vehicle loses control for a split second.
Attempts to brake or turn the steering wheel at speed can result in a rollover. Shock absorbers just reduce the time of separation from the road surface. Therefore, their failure leads to accelerated wear of the body, and even an accident. Is it possible to repair shock absorber struts yourself? More on this below.
How shock absorbers work
By design, this device resembles a chamber containing liquid or compressed gas. A piston with holes moves through them. When its stroke is small, the chamber is filled by means of bypass valves. In this case, the shock absorber does not affect the operation of the suspension in any way.
But as soon as an obstacle is detected in the form of, for example, a hole, a force appears that slowly pulls the rod up. Moreover, its value is greater, the higher the speed. As a result, after overcoming the unevenness by inertia, the shock absorber still holds the wheel in a “suspended” state and the driver and passengers almost do not feel the failure of the suspension.
When hitting a tubercle, the rod begins to quickly recess, and after passing the obstacle it slowly returns to its place.
How to check shock absorbers
If the suspension is simple (dependent or double wishbone), typical of the Soviet “classics”, then simply sharply press the wing with your hand and release it in order to swing the body by 10-15 cm. If it swings no more than twice, then the test is passed. If not, you will have to change the shock absorber, or even the entire strut (for front-wheel drive cars).
However, for cars with multi-link suspension, such a “number” will not work: it’s all about silent blocks that dampen vibrations. Here you need to contact a technical center where there is a stand to check the device.
You can do this yourself, but the result will not be accurate, because you need instruments to measure the force exerted on the product. Remove the suspension element and pull it out by the rod, and then press it in.
The tensile force should be significantly greater.
Dismantling
It is recommended to carry it out on a lift or inspection pit. As a last resort, use a jack and stands. Be sure to use supports and wheel chocks: the slightest movement of the car can cause injury to the repairman.
Front suspension
On a front-wheel drive car (for example, VAZ2109), you will have to remove the strut. To do this, disconnect it from the steering tip and the steering knuckle at the bottom (do not forget to move the brake hose). Then tighten the springs with a special tool and unscrew the nuts securing the rod, holding it with an asterisk wrench.
Then unscrew the three nuts from above in the engine compartment and pull out the strut. At the same time, inspect the support bearing - it may require replacement.
If the car is rear-wheel drive (for example, a VAZ classic), everything is simpler: you need to unscrew the two nuts securing the product to the triangular lever at the bottom, and one at the top (you will need a “7” key to hold the rod) - the shock absorber will fall down.
Rear suspension
It can have a variety of design features, but shock absorbers are mounted in two ways:
- bolt from below and from above through silent blocks;
- a bolt with rubber bushings at the bottom and top - a cushion with 3-4 of the same hardware. In this case, you can get to the shock absorber mount from the trunk or interior.
Recovery
First, the dismantled device must be washed and then carefully inspected. If there are cracks or jams, repairing the shock absorber makes no sense: it is better to scrap it and buy a new one.
The whole body requires further checking: pull the rod up and push it down - if there is play or jamming, replace the spare part.
There are two types of shock absorbers, disassembling each of them has its own characteristics:
- double-pipe: pull out the rod completely to gain access to the fastening nut, which can be unscrewed with a special wrench;
- single-pipe: there is a protective cap at the top, which must be knocked down, and then unscrew the fixing nut to remove the rod together with the cylinder or cartridge.
Peculiarities
If the shock absorber is oil, you need to drain the oil from the cylinder by pressing on the valve spring. Then knock down the bushing, remove the rod with the piston, remove the valve from the other side of the cylinder. If the device is gas or has a replaceable cartridge, simply unscrew the fixing nut and install a new one.
Recovery methods
There are two ways: the first involves completely replacing the rod along with the cylinder with a new cartridge, the second involves replacing the parts of the device. It’s worth going into more detail here, because in the first case, the financial costs will be 5-10 times higher (it all depends on the car model). To independently restore the shock absorber with complete disassembly, you must purchase a repair kit.
To disassemble the product, unscrew the fastening nut and pull out the piston. Further:
- replace the compression valve, which is installed by pressing in by hand;
- install the piston and guide bushing;
- fill in the oil (you can use the old one if it is clean and transparent) - hydraulic fluid for automatic transmission, power steering or the Russian product AZh-12T.
Press the rod into the cylinder and fill in 200-250 ml of liquid. Next, slowly insert the cylinder while simultaneously pulling out the rod so that the oil penetrates into the cavity and does not leak out. When the cylinder is fully inserted, pull the rod out and put it back in several times to allow the oil to completely fill the body. Then tighten the nut and pump the shock absorber again 4-5 times.
On a two-pipe device, all of the above restoration procedures must be carried out by putting the upper pipe on the lower one. As you do this, push it down while holding the rod in place. Next you need to bleed the device and tighten the nut.
Features of installing shock absorbers on the VAZ2108-15
All operations to restore performance are no different from those described above. But before installation, the shock absorbers must be well pumped (this also applies to new products), otherwise they will not work fully. How to do it?
Bleeding the oil shock absorber
- place the device with the rod down and press the rod until it stops;
- hold the shock absorber in this position for a couple of seconds;
- Without releasing the rod, turn the part over and hold it in a compressed position for 5-6 seconds so that the air comes out;
- extend the rod completely, pause for 2-3 seconds and repeat the operation 5-6 times.
Bleeding the gas shock absorber
- turn the product upside down;
- slowly press the rod in and leave the part in this position for 5-6 seconds;
- turn the product over and hold for 5-6 seconds;
- extend the rod all the way;
- turn the shock absorber over and repeat the procedure 3-4 times.
How to use shock absorbers
It is necessary to follow simple rules, then these devices will last much longer than even their manufacturers claim:
- The driving speed must correspond to the road surface: you should not accelerate on uneven dirt roads with potholes and bumps, even if you are driving an SUV.
- Check the condition of the shock absorbers every year: fluid leaking from them indicates the need for immediate diagnosis.
- If shock absorbers are replaced (they must be the same), then this must be done on wheels of the same axle.
- When driving in cold temperatures, drive at a slow speed for at least 5 minutes after the engine has warmed up. During this time, the oil in the shock absorbers will warm up and they will begin to operate normally.
If you have new shock absorbers in “spare”, they must be stored vertically (as required by the manufacturer): in this case, the rod must be retracted.
For gas products, it can extend spontaneously, so it is necessary to use special ties.
It is worth adding: if the shock absorber is oil-based and it is expected to be stored for a long time, then it is better to use a horizontal position so that the seals are lubricated with liquid and do not dry out.
Source: https://djago.ru/podveska/vosstanovlenie-amortizatorov/
Replacing the front shock absorber VAZ
The shock absorber is an important part of any suspension, which dampens vibrations created by the springs and prevents the car from excessive swaying. Like any other part, the shock absorber also needs periodic replacement, as it has a limited resource.
Replacing the front shock absorber of a VAZ 2110 can also be done in a regular garage.
In this article we will talk about all the intricacies of this procedure, and also list the main methods for replacing the front suspension elements and try to answer the most common and confusing question: “which shock absorber would be best to install?”
Unlike rear shock absorbers, such as on classic cars, the front one is mounted inside a spring in the form of a strut. In order to remove it, you need to disassemble the suspension a little.
There are several ways to do this. Each of them differs in complexity and duration. Which one to choose is up to you. And we will tell you about the procedures.
The easiest way to replace front shock absorbers
This method is also called classic, for its simplicity and accessibility to any car owner. It can be used by both beginners and fairly experienced drivers. To change the front shock absorber in this way, you need to buy a special key in advance that is capable of holding the shock absorber rod.
Replacement procedure:
- The car is installed on a flat surface and the possibility of any movement is excluded. Open the hood and, holding the shock absorber rod with a new tool, unscrew the top nut.
- After this, unscrew the three nuts at the edges of the mount.
- Loosen the hub nut using a 30mm socket and a very long lever. Raise the car and remove the wheel. Now completely unscrew the hub nut and use a hammer and a wooden block to knock the CV joint out of the hub.
- Using a puller, remove the tie rod end and the tie rod itself. Unscrew the brake caliper mountings to the hub. Unscrew all fastenings of the hub to the levers and dismantle it. After this, pull out the shock absorber, remove the spring from it and install it on a new element.
- Assembly occurs in reverse order.
Replacement method with marking of the angular position of the adjusting bolt
In fact, there is nothing complicated here. To do this, take the most ordinary punch and make a note about how the adjusting bolt is located. After this, the upper nut is also unscrewed, and then the lower one. The bolts are pulled out, and the steering knuckle is moved to the other side so as not to interfere with dismantling. All that remains is to unscrew the upper mounting nuts and pull out the shock absorber.
Do not forget that the removed wheel greatly simplifies repair work. Moreover, carrying out repair work without this procedure is simply not possible.
Removing the front shock absorber along with the knuckle
Remove the rubber pad from the highest support point and loosen the joint. After this, carefully remove the corresponding steering rod and remove the brake disc with caliper.
All work must be carried out with the wheel removed and the replacement side raised. The hub nut must be loosened in advance. Unscrew this nut and knock out the outer “grenade” using an impact tool and a wooden spacer.
After the support from below is released, it is necessary to unscrew the three fastening nuts from above and remove it together with the steering knuckle. Replacement is carried out in the same way as in all other cases: the spring is removed and placed on a new element. After this, the new shock absorber is installed with the old spring. If necessary, the spring itself can be replaced.
Which shock absorber is better to choose?
In the process of replacing a shock absorber or tuning the suspension, drivers often think about which shock absorber is best to install on a VAZ 2110. Due to the design and purpose of the car, oil ones still have an advantage.
There are two types of shock absorbers - oil and gas. However, there is another type - hybrid, but it is used very rarely on domestic cars. Today, oil shock absorbers are the most common in the automotive industry.
The fact is that oil has a higher compression ratio than gas, and accordingly, the oil shock absorber will be much softer. This is an ideal choice for bad roads and low speeds.
Such a shock absorber will last a fairly long service life and create a comfortable environment in the car, regardless of the road surface.
Gas shock absorbers, having greater rigidity, have proven themselves well on sports cars where increased stability when cornering is required.
Since “tens” are the most common cars, not intended for sports competitions, the use of gas shock absorbers on them is impractical. This is explained by the fact that any unevenness in the road surface sends quite strong vibrations and shaking through the body.
The result is not the most comfortable ride, and the details of the already noisy interior begin to crack even more.
This concludes our article. Perhaps this is all you need to know about shock absorbers on a VAZ 2110. As you can see, choosing and installing a new shock absorber on a “ten” yourself is not as difficult as it seems at first glance. It is enough to have a minimal understanding of the principle of operation of the suspension and have a standard automotive set of tools.
Source: http://VipWash.ru/podveska/zamena-perednego-amortizatora-vaz
Replacing shock absorbers yourself

- New shock absorbers, according to the technical requirements of the manufacturer of this car. Before purchasing these mechanisms, be sure to refer to the book with the instruction manual and technical description of the model. It should describe what types of shock absorbers are on the car and which ones are suitable for replacement.
Also in these technical specifications you can sometimes find requirements that new shock absorbers must meet.
- A motorist's kit, which should include keys of different sizes, spare nuts, adjustable wrenches, pliers, and a hammer.
- A jack or vehicle lifting device (select vehicle models only).
- A tool for removing shock absorber springs - so-called couplers. Such a device can be purchased in specialized stores or built manually. The second method is less expensive financially, but you will have to work hard on it.
- A small syringe (you can use a regular medical one) or a metal construction one.
- Machine oil or other specialized oil.
- Other specific tools may be needed for certain types of machine models.
- Special work clothes, shoes and gloves.
Since you will have to tinker with the lower part of the car, which is constantly exposed to mud flows, it is better to use special “robes” for these purposes, which you don’t mind putting on, getting dirty and damaging.
Another condition for successfully replacing shock absorbers is the presence of an overpass with a slight rise to the height of the mechanic or slightly lower.
It is also possible to use a special construction pit, but its disadvantage may be the lack of sufficient lighting (especially if the shock absorber is not removed for repair, but remains in the car).
Replacement instructions
If all this is prepared, then we proceed to the replacement:
We drive the car onto the overpass and put it on the handbrake. Similar actions should be taken if a special pit is used.
There are several ways to remove the shock absorber - from above through all the mechanisms of the car or from below near the wheels. It is better to choose a method depending on the type of car and model. For example, if we are talking about a Mitsubishi Colt, then the top method is better, but if we are talking about an old six or a Muscovite, then there will be less work from below.
If the first method is chosen, then we remove the wipers along with their panel, the drive for the windshield wipers. Next, we remove the metal panel that is in the way and we see the upper round part of the front shock absorber.
We unscrew the nuts that secure the mechanism and fill the bolts that hold our broken shock absorber with solvent. This is worth doing in any case to easily unscrew the mechanism. Roll it up and remove it.
If the second method is chosen, then we move under the car and near the wheel we find the bolts that hold our shock absorber, turn them counterclockwise and easily remove our broken device from there. There are some types of car models where there are additional elements that help secure the shock absorber. Look carefully at what this mechanism is holding and release it.
When the broken part is in our hands, we see that it is closed with a large spring. Therefore, we take a spring puller and use it to get the desired device. We analyze it - see what is broken, whether it can be repaired or only requires replacement.
Next, we install a new shock absorber (already pumped) or repair the old one, pump it and install it. If you install a used device, it should last a little less than a new one, so do not forget the described technology.
Using a similar sequence, we put the shock absorber in place and check the performance of the car’s suspension, its stability and driving parameters.
It is worth noting that if you are changing such an important part as a shock absorber, then it is important to inspect the condition of its boot. This is a flexible rubber band that protects the device from dust, dirt and small particles. It is this part that prevents early wear of the main part of the shock absorber and it is important to monitor its integrity.
To replace the rear wheel shock absorbers, you should perform similar steps, but they will only have to be done from underneath. In this case, the upper repair method is not suitable.
But if it is important to repair a part and just add oil, then it is not necessary to remove it. All you have to do is take a syringe with oil, find the hole you need and add liquid there.
If we are talking about a gas device, then it cannot be repaired, but only requires its replacement.
To change a part of the car that is responsible for stability, a comfortable ride and the ability to quickly level out when hitting a bump, as we see, you don’t need much. But this is only true if you have previously encountered the device of a car.
If you are a complete beginner in this matter, then it is much easier to invite an experienced specialist to your place and look at his work.
After such a clear example and training, you will definitely understand all the nuances for yourself and next time you will be able to repair and replace the shock absorber yourself.
It is important not only to monitor the timely replacement of the car’s shock absorbers, but also to monitor their condition. If the anthers are torn, they should definitely be replaced as soon as possible. And when installing new mechanisms, do not forget to bleed them. Listen to the vehicle and ensure it is operating properly. Only then will he repay you with long and high-quality work. Good luck!
Video “Changing shock absorbers yourself”
In the video, an auto mechanic talks about the pitfalls of replacement. After watching the recording, you will learn how to change front shock absorbers using the example of the tenth VAZ family.
Source: http://MineAvto.ru/remont/hodovaya/zamena-amortizatorov-2592.html