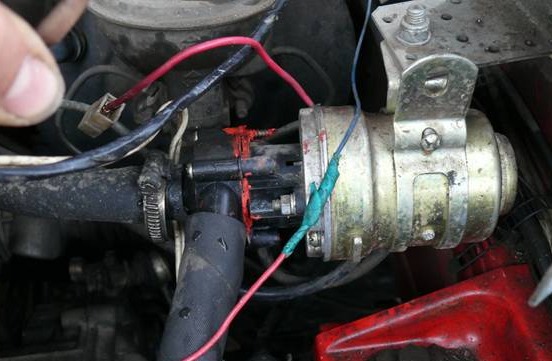
Homemade pre-heater for a VAZ car engine
Content:
In winter, starting a frozen power plant causes many problems for car owners.
Thickened oil, poor fuel volatility, and increased resistance in the battery make the power unit very reluctant to start.
But there is a solution to this problem - install and use pre-heaters. These devices allow you to warm up engine fluids, providing relatively easy engine starting in severe frost.
The car accessories market offers a large number of such devices. But many car owners are in no hurry to spend money, preferring to make an engine heater with their own hands. And this is quite possible; in terms of performance indicators, homemade devices are not inferior to factory ones, and the financial costs will be significantly lower.
In general, factory-made and home-made products use the same principle. Heating elements are used for heating, that is, heating is carried out by electricity, but they can affect both antifreeze and oil. They can also operate from a 220 V network, or be autonomous, powered by the car’s on-board network (12 V). Each of these devices has its own advantages and disadvantages.
Some nuances
A few details about the features of using both types of heaters. If you take a regular passenger car, the volume of lubricant and coolant is not much different (on average, 3.5 liters of oil are poured, and 4.5 liters of antifreeze).
That is, theoretically, approximately the same energy will be required to heat both liquids. But there is one nuance - the oil is in one place - the pan, and the antifreeze is located throughout the system.
Therefore, in the case of using a device for heating the coolant, circulation is required, but when heating the oil this is not necessary.
And one more thing - the antifreeze needs to be heated quite strongly (at least to 50-60 degrees), but the oil does not require this; you can only slightly increase its temperature to increase fluidity.
Due to these features, it is not advisable to use a 12-volt heater to heat antifreeze, since proper heating will require a lot of energy. Therefore, autonomous devices are mainly used to influence the lubricant, but those operating from a 220 V network are installed in the cooling system.
Next, we’ll look at how to make a pre-heater with your own hands for a VAZ or any other car. Note that there are a lot of variations of homemade devices, but we will describe only two devices that are relatively easy to manufacture.
Antifreeze heater 220 V
The first will be an antifreeze heater operating from a 220 V network. To manufacture it you will need:
- heating element;
- Pipe sections;
- Plumbing fittings, tees, adapters;
- Materials for sealing connections;
- Clamps;
- Cable with plug;
- Insulating materials;
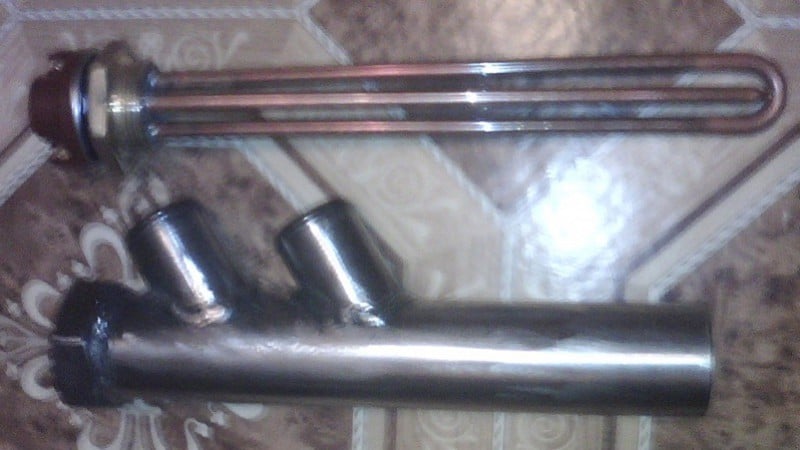
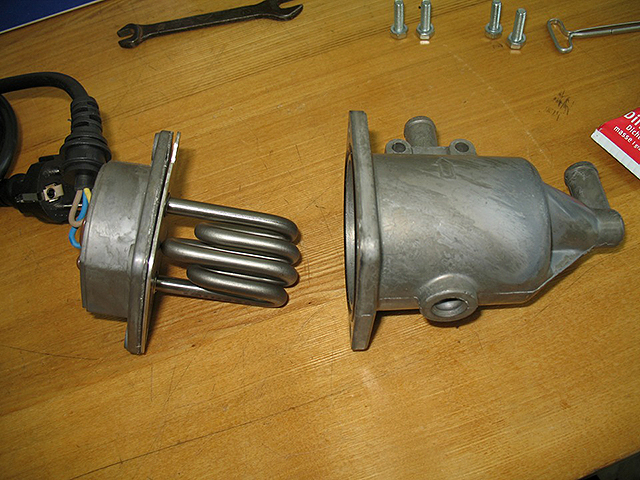
Below are the plumbing items that will be required for assembly:
Regarding the heating element. It is best to purchase a heating element for a water heater (for example, “Ariston”), equipped with a thermostat. Installing it in a homemade device will not be difficult, and in addition it will be possible to adjust the heating range. As for power, a heating element of 1.2-1.5 kW is suitable for a passenger car.
The diameter of the pipe and its length should be selected based on the size of the heating element and its mounting thread. The pipe itself should be thick-walled.
To assemble the device you will not need many tools:
- Bench vice;
- Taps and dies for threading;
- A set of keys;
- Angle grinder with cutting wheel (“grinder”).
Having prepared everything, you can start working. Assembling the pre-heater is done as follows:
- We take the pipe and make the necessary measurements, taking into account the existing bends and tees;
- In plumbing tees, the threads are usually already made, so you can immediately screw the heating element into it using sealing materials;
- We cut threads on a piece of pipe (external on one side, internal on the other);
- Screw the prepared section into the tee;
- On the other side, screw the adapter into the pipe;
- We screw another adapter into the third terminal of the tee;
- We connect the cable to the heating element and isolate the connections;
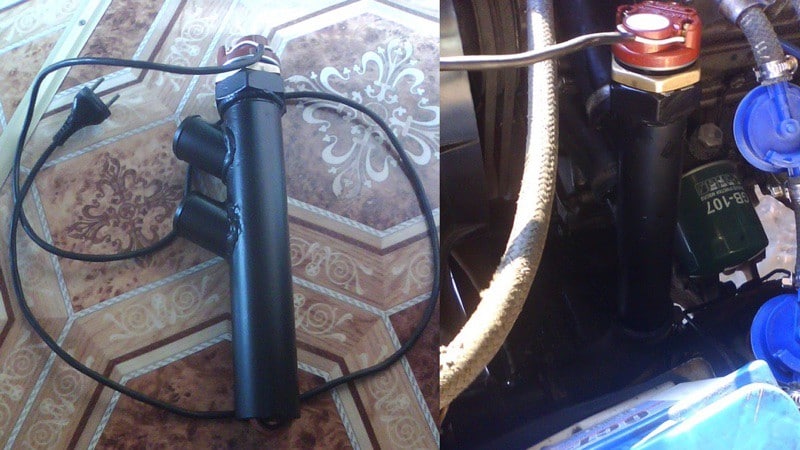
After assembly you should get a device like this:
As you can see, assembling an antifreeze heater is very simple. It is only important that all connections are well processed in terms of sealing, since even the slightest leakage of antifreeze is not allowed. Therefore, after assembly, you should carefully check the device before installing it on the car.
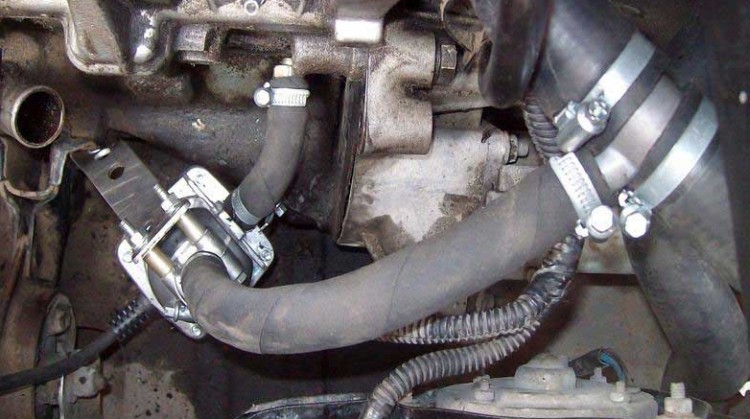
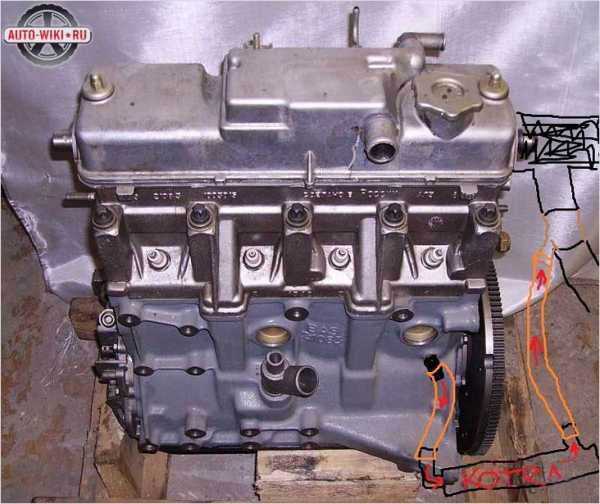
Additionally, you can weld a mounting bracket to the pipe. Installing an engine heater yourself is also not difficult. It can be mounted using either a sequential circuit (embed the device into the antifreeze supply pipe into the interior heater) or parallel (organize the supply from the cylinder block, and the drain into the pipe leading from the main radiator).
It is up to the car owner to decide which circuit to use, but the device must be installed correctly. In both cases, you need to correctly determine where the supply outlet is and where the drain outlet is.
The adapter screwed into the end of the pipe is a supply adapter; it is through it that antifreeze will be supplied to the heater. The second outlet (from the tee) is a drain.
The device must be installed so that the drain outlet faces upward.
Using a parallel circuit for installation, we place the heater below the intake point (usually this is the drain hole of the cylinder block, into which a fitting is screwed instead of a plug).
Also, some include electric water pumps from a GAZelle car in the scheme. In this case, forced circulation is ensured. Moreover, this pump can be powered either from the car battery or from a 220 V network. But in the second case, you will have to additionally use a step-down transformer.
12V oil heater
Now let's look at how to make a 12 volt engine heater with your own hands. In this case, the device will be used to heat the lubricant. It will be located in the pallet. Moreover, for this you do not need to make any holes in it, since the oil heater will be screwed in instead of the drain plug.
To make it you will need:
- Small diameter tube;
- Nichrome wire 0.6 mm, total length 2 m (in the form of a spiral);
- Ceramic insulators;
- Textolite washers and bushings;
- Small connecting elements (bolts and nuts for them);
- Drain plug;
Assembling the heater is not difficult, but turning work will be required.
The heater is made like this:
- In the drain plug on the thread side we make a hole (not through, there should be about 5 mm left to the end) with a diameter of 13 mm, and cut an M14 thread in it;
- Then you need to make a through hole of 8 mm. We insert a textolite tube of the appropriate size into this hole;
- For manufacturing, you will need a piece of tube 12-13 cm with an outer diameter of 14 mm. On one side we apply an external M14 thread;
- On one side we screw a long bolt with a nut to the nichrome spiral. We throw a textolite washer over it and insert it into the hole of the plug. On the other side we put another washer on, and then secure everything with a nut. This will be the “positive” terminal, so when assembling everything, you need to make sure that the bolt being installed does not touch the body of the plug anywhere;
- We put ceramic insulators on top of the spiral;
- We also screw a bolt and nut to the second end;
- We insert a spiral with insulators into the tube, and then screw it into the threaded hole made in the plug;
- The second end of the tube must be plugged with a plug. In this case, you should make sure that the bolt at the end of the spiral is in constant contact with the plug (it can be soldered);
- We seal the product. To do this, it is better to solder the plug and the connection point of the tube;
Below is a more visual diagram of the heater:
Having collected everything, all that remains is to install and connect the sump heater. There is nothing complicated in the installation, we screw in the product instead of the drain plug and that’s it.
For power, you will need to lay a wire from the battery (only “+”, since “-” is the tray itself). In this case, you will also need to install a switch and a 10 A fuse in the circuit.
This heater is convenient because it does not require a third-party power source and can be used anywhere.
But it is worth noting that during operation it consumes quite a lot of battery power, so you should not turn it on for more than half an hour.
Only two methods for manufacturing a pre-heater for a VAZ are described above. In fact, there are more manufacturing schemes, and knowing the operating principle, you can develop your own device with some other design features.
Related articles:
Source: http://remont-avtovaz.ru/samodelnyj-predpuskovoj-podogrevatel-dvigatelya-avtomobilya-vaz/
How to make an engine preheater?
When preparing a car for winter operation, changing one tire from summer to winter is not enough. You need to check the battery, and if necessary, charge or replace it.
But this may not be enough; more precisely, you can solve the problem of quick and trouble-free starting of the engine if you are not too lazy and make an engine pre-heater with your own hands , which will help you start the car the first time, no matter how cold it gets.
This is not a trick, not a fairy tale, but repeatedly proven methods that have been used for a long time and successfully. If the cars of you or your fathers and grandfathers have long been close friends, then you will not see anything unique in the manufacturing process of the pre-heater.
If you remember, once upon a time the engine was warmed up with ordinary blowtorches and even kerosene stoves. By the way, it’s not always successful.
Of course, rich lazy people will be able to buy a factory heater, but a self-made device is hardly any worse, and besides, it is cheaper and is not inferior to a store-bought one in terms of reliability.
In technical terms, an engine warmer is a device that can heat a car’s coolant (antifreeze or antifreeze) to such a level that the engine starts freely even in the most severe frosts.
Types (types) of pre-heaters
Type one is the simplest. Powered from an external source, an electric heater, outwardly somewhat reminiscent of an ordinary household boiler, is lowered directly under the hood of the car.
Factory analogues of such a device look much more complicated, but their functions and reliability are the same as those made independently. The electric heater has its drawback.
Quite a serious consumption of electricity, when in just one night it can generate up to 10, or even 15 kW of energy while your car is in the garage.
The second type is more complicated, sometimes more dangerous, but has a number of beneficial advantages. This type is a gas heater.
Its advantage is that it has proven itself well on both gasoline and diesel engines. But there is also an obvious disadvantage. This is a high fire hazard.
There were frequent cases of garage fires due to the fault of the owners when engine preheating, based on the use of gas, was used.
Electric heater and its components
To assemble the first type, electric, you will need simple materials that are available today almost everywhere and with everyone.
- An incandescent coil (TEN) from an old kettle is perfect.
- Metal tank.
- Fittings that can be purchased at any plumbing store.
- Junction box, also sold at any electrical store.
From all of the above, a device is installed that allows you to easily and hassle-free preheat the engine, which can eliminate cold start problems, save fuel during prolonged warm-up and preserve the life of your car’s engine for a longer period.
However, it is necessary to immediately warn those wishing to experiment that the independent production of such a device does not guarantee the unconditional fact of its high-quality production.
And its installation can be seriously complicated, unlike the factory one. The latter is installed in the engine completely freely, following the instructions supplied with it.
However, the use of engine preheating in the Russian climate greatly simplifies the operation of any car.
Source: http://NashiKolesa.ru/pod-kapotom/predpuskovoy-podogrevatel-dvigatelya
How to make a simple preheater
Late autumn and winter, the time when drivers begin to think: “Should I install a pre-heater?” If the car is parked, the guards are unlikely to be pleased with your request for 3 kW of electrical power. And a request to come to your car at exactly five o’clock in the morning and plug in the plug may be considered an excessive request. Even for an extra charge.
This is the case when a low power heater is better. For a passenger car, a heater of half a kilowatt is suitable. This power is enough to keep the engine hot all night. The cheapest such heater is a domestic homeless one, a boiler in the cylinder block. It costs a thousand rubles and another five hundred to install.
Do you want to make a heater yourself? I won’t even tell you how much it will cost. I had everything I needed.
Find a boiler in the kitchen. How many years has it been sitting idle for you? I last used mine in 1997. It's time for the boiler to change its field of activity. Five hundred watts is just right for Kalina. But if you are planning to buy a tractor with high power, then you will need a more powerful heater.
Select a piece of steel water pipe with threaded ends. It's better to drive away. The long thread is then used for fastening. It is necessary that the boiler fits onto the pipe with a slight tightness or minimal gap. I had a piece of galvanized pipe, and I tore off the zinc in the right place. You can get by with just a black squeegee. After all, antifreeze contains anti-corrosion additives.
Now you need to clean and tin the pipe and boiler. I cleaned the boiler from scale in citric acid and lightly scrubbed it with emery cloth. It’s much easier with a pipe; I used an angle grinder with a stiff wire brush. Ten minutes and your shiny belt is ready.
To tin I had to use a blowtorch, solder, and aspirin (these are tablets, I used them as a flux). I managed to tin the belt on the pipe. As for the boiler, the result is rather negative. Although we managed to apply solder on the external surfaces. Perhaps you can do it better.
Now you need to put the boiler on the pipe. If solder flows into the gap between the coils of the boiler and connects them, then use a hacksaw. Screw on the boiler and heat the connection with a blowtorch. The solder will melt and the boiler will return to its original shape. Probably, if you solder it well, this is enough. But I think that filling the lead coupling will not be superfluous.
Make a mold for the coupling from cardboard or whatman paper. Of course, this material cannot withstand hot lead, but it will last for five seconds. And a bucket of sand will help you. Make a mold and place it in a bucket so that the sand supports the sides of the mold. The sand should be only slightly damp so as not to crumble, but not damp.
Heat the lead longer. Until it melts and another fifteen minutes. We need to melt the solder so that the lead sticks to it well. Quickly pour into the mold and leave to cool for about fifteen minutes. The lead itself will harden in a few seconds, but it is better to wait until everything cools down. You can pick it up. Remove the burnt paper, perhaps clean or trim somewhere.
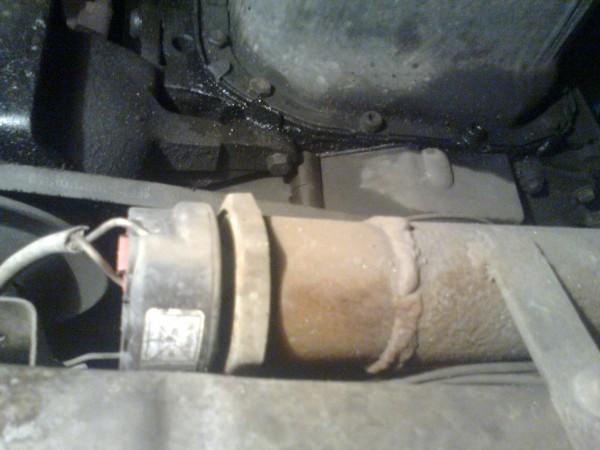
The result was a heater connected to a pipe. The lead sleeve will help transfer heat to the pipe walls. Think for yourself how exactly to integrate it into the cooling system. I haven't put my heater on the car yet. I want to add a thermal relay, I will screw it to the coupling with a self-tapping screw. And you need a suitable connector. I'll secure it in the engine compartment.
Source: http://www.LadaTuning.net/tyuning-dvigatelya-vaz/781-kak-sdelat-prostoj-predpuskovoj-podogrevatel
DIY engine preheater
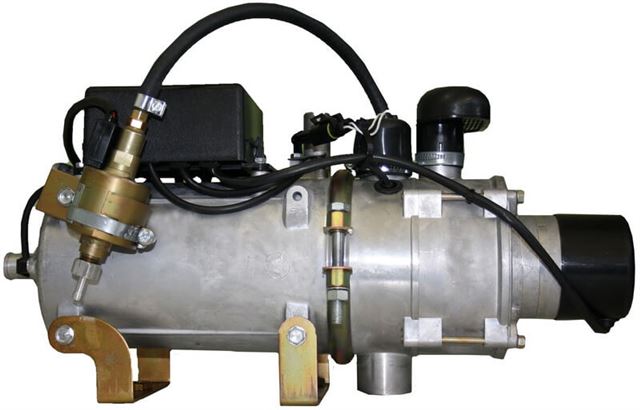
Successfully starting an engine on a frosty morning is quite a challenge. However, manufacturers of pre-heaters have long found a way to make this task easier: these devices heat up the car engine to the optimal temperature, allowing the engine to start without any problems.
At the same time, the pre-heaters themselves come in two types, the main difference between which is the ability to operate autonomously or the requirement for a standard 220V socket in the place where the car is parked.
It is not a problem to purchase both of them today. But if you want to save money, it is better to make a preheater yourself.
Which is also a completely feasible task for everyone, especially if you follow the instructions given below.
We make a pre-heater for the engine. What do you need to know about it for this?
It is best for beginners to consider making their own pre-heater using its most basic representative - a device that simply heats up the coolant in the engine. True, such a heater requires an outlet near the place where the car is parked overnight. Therefore, let's assume that this requirement does not pose a problem for you. Let's continue.
So, the heater in our case will consist of a heating heating element, which will cut into a small circle of the cooling system, and a pump that forces the coolant to circulate through this system when the engine is turned off.
In addition to the heating element, the heater itself will require some fittings, pipes and fittings. It will consist of and with their help and be connected to the motor cooling system. Now the details.
How to make a pre-heater with your own hands: instructions
First we need a standard tee for an inch pipe. It is necessary to wrap a heating element into one of the ends of such a tee, which, by the way, can be picked up in the same plumbing store where you will purchase the tee.
If the seller finds it difficult to help you with your choice and purchase, then the words “TEN for instantaneous water heaters for 1-1.5 kW” should help him offer you what you need.
Ideally, it is desirable to find a similar heating element with a built-in thermostat.
A small pipe 10-15 cm long is screwed into the opposite end of the tee, which is necessary so that the coolant in the resulting chamber heats up faster and better.
It is necessary to screw adapter plugs into the remaining unused end of the tee and the end of the pipe opposite the tee, allowing a flexible hose to be connected at this location.
During assembly, all connections must be reliable and tight.
Now, the heating unit is ready, now it needs to be connected to the engine cooling system.
Most often, the best connection location will be a break in the lower hose of the cooling system, which supplies coolant to the car's interior heater.
Next, a wire of the required cross-section for your power is connected to the contacts of the heating element. Subsequently, voltage will be supplied to this wire, which is necessary for the operation of the created system.
The next step in making an engine preheater with your own hands will be to install an electric pump to circulate fluid in the system.
For these purposes, you can use ready-made options - pumps for pumping coolant from Gazelle cars, or you can look for something else.
It is quite possible that such a pump is in your car itself, then a similar one can be used for our purposes.
When you find the pump, it should be connected in front of the heater we assembled - through a standard open relay to the car's hog network or through a step-down transformer with a rectifier to the same socket (220V) as the heating element of the heater.
The preheater is ready.
The operation of this system is as follows: half an hour to an hour before the trip, we connect our heater to the network (during this time, at an outside temperature of about -25°C, 1.5 kW is able to heat the engine, although not to positive temperatures, but to about zero for sure, and make it easier thereby starting the last one), and before leaving – turn it off.
Video
I recommend reading:
Source: http://autoepoch.ru/remont-i-obsluzhivanie-avto/predpuskovoj-podogrevatel-dvigatelya-svoimi-rukami.html
Do-it-yourself engine pre-burner
In our area, starting a car in winter after parking overnight can be problematic due to severe frosts.
It's good if the car is in a warm garage. What about the topic of those who don’t have it? This is where car enthusiasts come up with tricks - some remove the battery at night and take it home, some wrap the engine in old blankets and padded jackets, and some pull wires from the house and install stationary heaters.
So I struggled with starting the engine, until the idea came to my mind to do the pre-heating of the liquid - antifreeze - with my own hands.
Making a heater
To make the heater, I needed: a piece of thin-walled pipe 080 mm, two pipes 20 mm, sheet metal, a nichrome spiral and a pump from a Gazelle.
First, I sawed off a piece 80 mm long from the pipe. From sheet metal 1 mm thick, I cut out two disks along the inner diameter of the pipe (photo 1) and two plates, which I welded into the disks to increase heat transfer (photo 2).
The most difficult thing is to weld the heat exchanger. It is advisable to do this with a welding machine for body work or gas welding so that a continuous seam can be laid.
You can also solder with tin using a powerful soldering iron. After welding or soldering, be sure to check the assembly for leaks with water. Note that the plates are positioned perpendicular to the coolant flow (photo 3).
I used sheet asbestos as electrical insulation (photo 4), placed two circles inside the heat exchanger on both sides (photo 5).
Any nichrome spiral is suitable for heaters (photo 6). We measure two pieces with a resistance of 2.5-4 Ohms (measured with a multimeter).
The lower the resistance of the spiral segment, the more it will heat up, but at the same time the risk of overheating and, as a result, burnout of the spiral increases.
From thick paronite we cut out two disks along the inner diameter of the heat exchanger, onto which we attach the spirals with M4 bolts.
On the reverse side we attach the power wires to the same bolts (photo 7). We tighten the bolts as tightly as possible to reduce the contact resistance.
For final assembly, we cut out two covers with ears from sheet metal (photo 8) (which we tighten with 05 mm studs (photo 9).
Assembling the heat exchanger
Place the heating elements inside with the spirals facing down. We lay asbestos sheets and put the covers in place. We wrap the entire structure with 10 mm foam film for thermal insulation. The heat exchanger is ready (photo 10).
Thus, we have a heat exchanger with two heating elements designed for 12 V. It can be connected either to 12 V in a parallel circuit or to 24 V in a serial circuit.
Source: http://kak-svoimi-rukami.com/2014/05/predpuskovoj-progrev-dvigatelya-svoimi-rukami/
We assemble a 220V engine pre-heater with our own hands
Methods for heating the engine.
Our country is characterized by severe frosts in winter, which make starting a car engine difficult. For example, to prepare your vehicle for winter, it may not be enough to replace tires or carry out major repairs or replace the battery. Pre-heating of various units can solve this problem.
To start your car without problems in the cold season, you just need to build an engine pre-heater with your own hands, which is guaranteed to ensure trouble-free starting the first time. Autonomous electric heating is a well-known method of heating antifreeze, which is responsible for starting torque.
Heating.
Our fathers and grandfathers used slightly different heating methods - they warmed up the engine with blowtorches and kerosene lamps, which, by the way, did not always lead to the desired result.
The modern market is ready to provide you with a factory-made electric heater, but is there any point in paying decent money when you can make a heating device with your own hands that is not much inferior to a store-bought equivalent? So, if you look at it, an autonomous pre-start heater serves to heat the sump and engine cooling fluid - antifreeze or antifreeze, warming it to such a heating level at which the engine can start even in extremely cold conditions.
The first type of heating is a simple and primitive device that looks like an electric boiler. On the Internet you can actually find a wide variety of videos on assembling the unit with your own hands in order to get to know the heater device better.
Its use is extremely simple - you just need to put it “under the hood”, and then it will do everything for you. If we look at factory and store heating models, the principle of their operation looks somewhat more complicated, but the results they show are the same as a homemade device.
In addition to its usefulness, the electric heater has one big drawback - the huge consumption of heating electricity (up to 15 kW per night).
As for the 2nd type of heating, it is not only more efficient and economical, but also more dangerous and complex. We are talking about a gas heater, which has repeatedly proven itself in engines running on diesel and gasoline fuel.
Like the electric one, the gas version of the heater has its pitfalls - the danger of sudden fire. There are many known situations in which, due to violation of heating installation rules by car owners, entire fires and ignitions occurred in enclosed spaces.
In view of these reasons, we will dwell in detail on the 220V electric heater, and will also tell you how to install it with your own hands.
Assembly and commissioning of heater equipment
One of the main advantages when carrying out such work on assembling a heating device is that almost every car owner has all the materials necessary for DIY production. So, you will need:
- Heating in an incandescent coil. For all the time that car enthusiasts have been inventing such mechanisms and devices, the world has not seen anything. For example, an incandescent heating element from old electric kettles would be an excellent example;
- Metal tank. Any container made of carbide metal will do, for example, a small canister;
- Fitting. Fortunately, today such a part can be bought at any retail plumbing store, of which there are now many in every city;
- Junction box, which consultants from an electrical store will help you find.
From all of the above, you get one comprehensive solution that will once and for all save you from the problems of cold engine starting. By the way, in addition to its main purpose, such do-it-yourself engine heating guarantees fuel savings during long-term engine warm-up, and also undertakes to extend the life of your engine.
Engine Pan Heater Installation
The pre-start electric coolant heater, operating from a 220V network, does not require professional intervention during installation, unlike gas heating.
Also, you do not need special tools or equipment, and the process itself, if done correctly, will not take more than a few hours.
So, we can highlight the following stages of the so-called installation that the heater goes through:
- The coolant needs to be drained. That is, the engine is completely cleaned of antifreeze or antifreeze;
- Then you should remove the standard list pipe, which is secured with two nuts;
- A special gasket is installed in the place of the pipe, and a special clamp is placed under it. This structure is fixed using 2 previously unscrewed nuts;
- The last step is to fill the coolant tank.
Moreover, sometimes there is an autonomous pre-heater, the installation and commissioning of which is carried out slightly differently. You will have to cut it into the fuel hose with your own hands, which goes to the radiator.
Fortunately, there are many videos on the Internet that will help you carry out heating installation work without errors.
It is important that such heaters must be mounted at an angle of the tray, since the horizontal type can lead to breakage.
As a conclusion
Do-it-yourself 220V electric pre-heaters are, although no less effective than store-bought ones, but more dangerous from a fire safety point of view if installed incorrectly. The pre-launch element is installed in the car simply, but in order to complete the installation process accurately, it is better to familiarize yourself with the training videos.
In any case, an autonomous electric heater for the engine sump in winter is an indispensable element of every car. By doing the assembly yourself, you can save a decent amount of money, and getting into a warm car in winter is a worthy reward.
It should be especially noted that preheating will significantly extend the life of the engine itself, radiator and crankcase.
In general, for preheating, an electric heater module is an excellent way to ensure comfortable vehicle operation in winter.
Source: http://carmend.ru/engine/predpuskovoj-podogrevatel-dvigatelya-svoimi-rukami.html
Winter question: how to preheat the engine yourself?
 (Last Updated On: 10/13/2017)
Do-it-yourself engine heating (photo)
When a car is used in winter, when it is subjected to heavy loads and sometimes even refuses to start, many motorists are thinking about purchasing a device for heating the engine.
And some particularly sophisticated car owners are seriously thinking about how to preheat the engine with their own hands? After all, a high-quality engine preheating unit costs a lot of money; it also needs to be serviced only by professionals, which is also not cheap.
There is a practical grain to this - you can make such heating with your own hands, although this is far from the easiest task. First, you need to understand what such heaters generally are and what their features are.
Types of devices for engine preheating
The most popular option due to its simplicity and at the same time practicality is an electric heater. For its operation, an external connection to a standard 220 volt network can be used.
According to the principle of operation, it resembles a classic boiler, only placed not in a container of water, but in the engine compartment of the car. For connection, connectors provided with reliable insulation are provided on the bumper; through these connectors, the heater is connected to the network.
More complex factory versions are equipped with additional useful modules, for example, a battery charger or a fan to disperse heated air around the engine compartment. The most high-tech samples also have a remote control unit and a timer.
There are also special pre-heaters that are mounted directly into the cylinder block. Another type is an autonomous heater, which takes energy not from an external network, but from an electricity source built into the car. The advantage is independence from the presence of the network and the current in it, the disadvantage is limited capacity and the need to constantly recharge.
Making your own car heater
As mentioned above, this is not an easy task, but it is doable. But there are many advantages from using such a heater:
- it is independent of external power sources;
- suitable for both gasoline and diesel engines;
- Can also be used to heat windows and interior.
The design of such a heater includes a small-sized boiler chamber containing a fuel-air mixture and an element for igniting the mixture. Fuel comes directly from the tank. A circuit containing coolant passes through the heater, which heats up and releases heat to the surrounding space after exiting into the small circuit.
To make the heater you will need the following parts:
- heater, for example, a coil from an electric kettle;
- tank for the fuel-air mixture;
- fittings;
- junction box.
Fittings for fuel supply are installed and sealed in the bottom of the tank. And a fitting for bleeding air is mounted in its wall. A heating element is attached to the tank lid; its contacts must be brought out.
Video:
To get rid of unnecessary wires under the hood, the connection must be made through a mounted junction box. In this case, the wire can be unfastened and stored in the garage when the heater is not needed.
After this, you need to seal the tank with epoxy resin, connect the hoses - and you can carry out tests.
You can install such a heater in a car in different ways. You can, for example, connect an additional circuit that will heat the engine oil.
Of course, such a solution is far from ideal, so before you preheat the engine yourself, you need to justify to yourself the impossibility of purchasing a branded unit.
Source: http://cassuspro.ru/kak-sdelat-podogrev-dvigatelya-svoimi-rukami.html
All variety of engine preheaters
Publication date: October 19, 2017.
When cold weather sets in (usually “sudden” for any of us), every car owner thinks about whether his car will start or not. And even if the battery coped with the difficult task and the “cold start” was successfully carried out, with this method of operation a number of negative consequences arise:
- engine parts wear out faster;
- the load on the battery increases: as a result, the service life is significantly reduced;
- the engine runs at idle speed for quite a long time (and this is not the most “useful” operating mode for it).
Pre-heating the engine will not only extend the “life” of the engine without repair, but will also significantly increase the comfort of using the car in winter.
Operating principle and types of engine preheaters
All systems, regardless of design, installed in cars to facilitate engine starting in the cold season, do not heat the engine itself, but increase the temperature of the coolant surrounding it (abbreviated as PZD). Therefore, antifreeze, which saves the engine from overheating while driving, heated with the help of a pre-starting device, heats the engine elements, which contributes to its easy starting (even at very low temperatures).
Based on the principle of operation, all engine preheaters (both gasoline and diesel) are divided into two main groups:
- autonomous;
- electric.
The first ones use car fuel as an energy source. To operate the latter, you need to be connected to a 220 volt power supply.
Autonomous pre-heaters
This type of engine pre-heater is the most functional, since it does not depend on connection to external energy sources (that’s why they are called autonomous). However, their cost is higher than electric ones.
It is quite difficult to install such engine heating yourself without having the necessary technical skills and sufficient experience.
In addition, independent installation of such high-tech devices leads to loss of warranty on the car.
On a note! If you install the heater in an authorized center, then all warranty obligations are retained.
And, despite the rather high cost, such devices are widely popular. By analogy with autonomous heating systems for buildings, such devices are sometimes called boilers.
Until recently, the most famous manufacturers of these products were the German Webasto and Eberspacher (Hydronic).
But now Russian companies are worthy competition for them: “Binar” and “Teplostar”; as well as the Chinese "Belief".
Autonomous heating consists of:
- fuel pump;
- glow plug or glow pin (tungsten or cobalt);
- evaporation burner;
- combustion chambers;
- heat exchanger;
- supercharger motor;
- coolant inlet and outlet pipes;
- control unit.
The boiler is installed in the engine compartment and built into the fuel and cooling systems of the car. The diagram below helps you understand how an autonomous heater works.
When the device is turned on (by a button, a signal from a timer, a remote control unit or a GSM module), the air-fuel mixture enters the combustion chamber and is ignited by the glow plug (or glow pin).
When the mixture burns, the heat exchanger heats up, which leads to heating of the coolant. The pump pumps antifreeze through the engine and radiator of the standard interior heating system.
When the liquid temperature reaches about 60°C, the automation unit turns on the interior fan.
The “Webasto Thermo Top Evo Start” heater (power 5 kW), designed for installation on cars with an engine capacity of up to 5 liters, with a programmable weekly timer and installation parts costs about 25,000 rubles.
The remote control unit (range of about 1 km) and the GSM unit (for the ability to control from a mobile phone) must be purchased separately. Installation by a certified dealer will cost no more than 8,000÷10,000 rubles.
Passive electric heaters
In Canada and all Scandinavian countries, almost all parking spaces are equipped with sockets where such heaters can be connected.
In our country, only a few paid parking lots offer such a service. But if you live in a private house or store your car in a garage, then, undoubtedly, this device will make your life much easier in cold weather.
The simplest technically and most economically affordable way to preheat a diesel or gasoline engine before starting it in winter is to install an electric heater in place of one of the plugs in the engine cylinder block.
Technologically, it is a regular boiler of a certain size and power. The circulation of the liquid is carried out by gravity (the heated liquid rises to the top, and the cold one goes down). The choice of product depends on the specific engine model.
There are widely available devices on the market for almost all brands of cars from a wide variety of manufacturers.
For example, an electric engine pre-heater from DEFA for a VAZ “Ten” with a power of 550 W with additional spacer bars (for better fixation on the inside of the cylinder block) and a sealing O-ring costs 1700–1800 rubles. And for the Subaru Forester, a similar device (with a threaded mount) with a power of 600 W from the same manufacturer will cost 2600–2800 rubles.
Depending on the type of plugs, manufacturers produce devices for both threaded installation and pressing. The model is chosen depending on the type of engine itself.
Having even minimal technical skills, installing such a device for heating a 220 V engine with your own hands (with a cable and socket for connection) is quite simple:
- partially drain the coolant (usually 2÷2.5 liters is enough);
- remove the plug on the cylinder block (closest to the central part of the engine to ensure better heating);
- insert a heating element instead;
- connect the electrical cable;
- The socket for connecting the electrical network is either brought out through the radiator grille (for those who are not very concerned about the appearance of the car), or we are mounted in a convenient place on the front bumper (or under it).
To make it convenient to use such a device, you can additionally set an on/off timer.
Electric heaters with forced circulation of coolant
Electric heaters with a pump (to ensure the circulation of heated fluid through the engine and the radiator of the interior heater) allow you to evenly warm up the entire engine. Although such devices are more expensive than passive electrical systems, their operating efficiency is much higher. The thermostat built into the housing automatically turns off heating when the liquid temperature reaches 80 °C.
Installing such a device is quite simple:
- drain the coolant;
- fasten the device body;
- we make an insertion into the standard cooling system (between the outlet of the cylinder block and the inlet pipe of the interior radiator);
- fill in coolant.
A Russian 220 V engine heater “Sputnik NEXT” (with a power of 1.5 to 3 kW, which is selected depending on climatic operating conditions and engine size) with a pump and automatic power off costs from 2,200 to 3,200 rubles.
By supplementing such a device with a relay with a temperature sensor to turn on the heater fan, we can count on not only easy engine starting, but also a car interior heated to a comfortable temperature.
Flexible thermoplates
The devices discussed above, which are built into the cooling system, do not provide heating of the oil in engines. This is their significant drawback. In severe frosts, even a well-warmed engine is quite problematic to turn the thickened oil.
Flexible heating plates for engine preheating allow you to easily make a homemade device that quite quickly (in just 20-30 minutes) increases the oil temperature. Technologically, they are a heating element pressed between two layers of silicone.
On one side of the plate an adhesive composition (3M) is applied, on the other there is a porous material with good thermal insulation. The power of one heating element ranges from 60 to 400 W. Such devices are produced for connection to the vehicle’s on-board network with a voltage of 12 or 24 V, or to a household electrical network of 220 V.
The cost of these products from “Hotstart” or “Keenovo”, depending on the size and power, is 2000–8000 rubles per piece.
With the help of such devices, you can easily heat the engine sump or automatic transmission. One plate measuring 127 x 152 mm and a power of 100 W is enough for a car with an engine capacity of up to 3 liters.
Installation of such products is quite simple:
- clean the installation site from dirt and paint;
- then remove the protective film and do not forget to glue the plate;
- Apply a layer of sealant along the edges;
- We secure the electrical wires and drag them to the connection point.
By installing such plates (with a built-in temperature sensor) on a car tank and fuel filter, you can create a device for heating the fuel system of a diesel engine.
The main advantages of such devices are:
- Low power consumption.
- Possibility of use for heating a wide variety of vehicle components and mechanisms.
- Easy to install (standard vehicle systems remain unaffected).
- Autonomy (when using plates with 12 V power supply).
In custody
Which heater is best installed on a car depends on your personal preferences, financial capabilities and parking location. By installing a heating system from a trusted and well-established manufacturer, you will not only save time, but also be sure that your car will start even in severe frosts.
Source: https://avto-moto-shtuchki.ru/oborudovanie/208-podogrev-dvigatelya.html


