Car body repair – main types of body work
Timely body repairs and, if necessary, car painting can significantly extend the life of the vehicle. After all, the body is the most expensive element of the car, so the owner must periodically inspect not only the top and sides of the car, but also look under the bottom and under the hood.
The sooner a car owner discovers body problems and begins to solve them, the cheaper repairs cost him. The most harmless chip exposes the metal, which becomes defenseless against corrosion. And now, after a year, rust destroys the integrity of the metal element, forming a through hole.
Classification of body repair
In modern cars, manufacturers use different materials in the manufacture of body parts. The most popular materials are:
- steel,
- aluminum alloys,
- plastic.
Accordingly, when operating a car, each of them encounters certain problems that can be classified into several groups:
- Violation of the integrity of the paintwork not only worsens the appearance of the car, but also threatens the metal parts of the body with corrosion. The longer repairs are delayed, the more serious and expensive it will be. However, to save a little money, you can paint the car yourself.
- Dents form on metal bodies for various reasons. Small concavities that appear without damaging the paintwork are quite harmless. If the appearance of the body does not suffer much from such a dent, then you can forget about its existence. If the dent is accompanied by chips, cracks and scratches, then there is no need to delay repairs.
- Cracks in body parts most often appear in plastic parts, such as bumpers and body kits. If you do not pay attention to them, then vibration and exposure to atmospheric phenomena will increase damage. Ultimately, the part may simply fall apart during movement. We recommend that you study the instructions for repairing the bumper yourself
- The possibility of restoring damaged bodies depends on the degree of their damage. If the geometry of the frame is severely damaged, it is sometimes easier to sell the remains of the car for spare parts than to restore such a body. To give the car its original shape, special expensive equipment and qualified specialists are required. However, if you have “direct” hands, in some cases body repairs can be done with your own hands, as in the video at the end of this article .
Types of body repair
Repairing a car body requires not only a lot of tools and special equipment, but also good skills in each type of work. It is rare that a master bodybuilder can boast of being highly skilled in welding, straightening, puttying and painting at the same time.
All body repairs can be divided into the following types:
Cosmetic repair of car paintwork
Minor body damage can be repaired not only in a car repair shop, but also in your garage. Especially when the car owner is concerned about preventing corrosion processes.
The negative impact of scratches, chips and other minor damage to the protective layer of paint can be neutralized with your own hands. To do this you will need materials such as:
- sandpaper,
- putty,
- solvent 646,
- primer and paint.
The motorist needs to be patient and not rush things. Fresh damage simply needs to be cleaned of dust and dirt, and then wiped with a rag soaked in solvent.
After the surface has dried, apply a layer of primer using a thin brush or foam pad. And after the primer has completely dried, paint is applied.
If the paint is chosen well, the painted scratch or chip will not stand out.
https://www.youtube.com/watch?v=FrtVi-XgtKs
The appearance of traces of corrosion requires preliminary mechanical treatment. Sandpaper is suitable for this, or even better, sandblasting.
The thin nozzle of the sandblasting gun allows you to clean surfaces of any size and shape. The cleaned metal is degreased with a solvent, and then the repair area is leveled using putty.
Grinding should be done after the material has completely cured.
It is not always possible to level the surface with one layer. Therefore, the putty can be reapplied after sanding and degreasing. As soon as the condition of the repair area satisfies the master, all that remains is to perform priming and painting.
Car underbody repair
Most automakers treat the underbody of the car with special mastics. They are able to successfully fight corrosion for decades (see how best to treat the bottom). It is important that the integrity of the protective layer is not compromised.
However, when driving on country, meadow and forest roads, the underbody of the car may be damaged. And if you do not protect the exposed metal in a timely manner, then within a year there will be through holes in the floor of the car.
Repairing the protective layer of the bottom is not difficult, but it is not entirely convenient. It is imperative to use goggles or protective masks to protect your eyes from contact with abrasives and paints.
In addition to sandpaper, solvent and primer, you must additionally purchase bitumen mastic.
Damaged areas of the bottom are cleaned of dirt and rust. After this, residual dust and greasy stains are removed using a solvent. The metal is first primed, and after drying it is treated with mastic.
Treatment of internal body cavities
In every car body there are many places where it is not possible for a motorist to reach. Among them, the most vulnerable are:
- internal surfaces of the side members,
- door niches and trunk lid,
- thresholds.
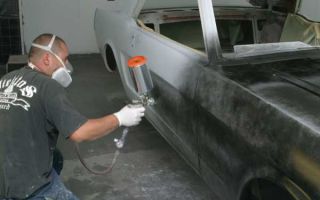
To prevent the formation of corrosion spots, preventive treatment should be done with a protective agent such as “Movil”. It is best to use a compressor and a gun with a special nozzle.
The spray gun has an elongated “barrel” with a nozzle through which protective material is sprayed inside the niche of the body element.
In some cases, you can use traditional “oil cans” and car syringes.
Before processing, thick mastic is diluted in a suitable solvent or heated in a water bath. When using protective components in cylinders, you only need to shake the contents and use the appropriate nozzle. Read more and watch a video about car anti-corrosion treatment.
Repairing dents on a car body
New technologies are now being used to combat dents.
They allow you to level the surface of a body element without resorting to puttying and painting (see detailed material on removing dents without painting).
Such restoration is possible only when the paint layer is not damaged. If there are chips and delaminations in the dent, you will have to resort to traditional operations.
And so, first of all, it is necessary to try to reduce the depth and area of the concave section. To do this, a measured force must be applied from the inside of the body element using a suitable tool.
This could be a pry bar, a screwdriver, a hammer handle, etc. To avoid scratching the inside of the body, rubber tips should be used. A piece of rubber is attached to the tool using electrical tape or a piece of rope.
When it is possible to level out the concavity as much as possible, you should proceed to cleaning the surface, puttying, priming and painting.
Car body overhaul
When a car body requires complex repairs, you will inevitably have to turn to professionals. After all, in addition to special skills, major body repairs also require specific equipment and devices.
Often, solving body problems cannot be done without the use of welding. And if you can make a patch on a spar even with a homemade welding machine, then on thin body elements the work must be done semi-automatically in a carbon dioxide environment.
Correcting the configuration of some body parts is possible if there is a slipway in the garage. The use of a hammer, sledgehammer and crowbar will not allow you to accurately restore the geometry of the body, and subsequently this will cause increased wear of tires and suspension parts.
There are a number of factors to consider before choosing a body repair method. Car enthusiasts can fix minor body damage with their own hands. If a major body repair is required, or when a motorist places high demands on the appearance of his favorite car, it is better to turn to trusted body specialists.
Video: do-it-yourself body repair without welding
Source: https://unit-car.com/diagnostika-i-remont/143-kuzovnoy-remont-i-pokraska-avtomobilya.html
Preparing for painting and painting the car yourself. Complete set of instructions
19.10.2012
One of the important issues in car body repair is painting, which must be done in accordance with repair technology and using correctly selected materials: putties, primers, paints and varnishes.
The main task of repair painting is to restore the factory paintwork while maintaining the main functional characteristics (mechanical strength, corrosion protection, etc.
), as well as achieving maximum compliance of the repaired area in color and structure with the original paintwork of the body. The repair should be invisible.
Let's consider the main technological stages of body repair: washing and degreasing, surface cleaning, puttying, applying primers and finishing coatings.
With the help of a wide range of professional products for body repair, you can qualitatively prepare for painting and paint your car yourself. If the technology is followed, the result will be impressive. And the acquired skills will help you quickly and without extra money to paint the entire car or just damaged parts.
The materials included in the repair system must meet the following requirements:
- good adhesion
- anti-corrosion protection
- leveling (filling) capacity
- color allowing for discreet repairs
- suitable gloss level
It is obvious that all these factors are closely related to each other. In order to select the optimal repair system, a good knowledge of body repair products and their characteristics is necessary.
What materials are needed for a standard painting repair?
As a rule, painting some car parts yourself may be necessary if, for example, due to careless parking, scratches or abrasions appear on the bumper and doors.
You don’t always need to immediately contact a service station; sometimes the situation can be corrected on your own. It will be enough to correctly assess the scale of the necessary repairs and choose high-quality materials for preparing the surface for painting and painting the car itself.
If the damage is minor, you can limit yourself to a set of simple standard repair operations:
- Putty
- Ground leveler
- Finishing coating: synthetic, acrylic or polyurethane enamels
- Finishing coating: base paints under varnish
If you had to deal with serious damage, which was also not repaired in a timely manner, you will most likely have to carry out a full cycle of repairs followed by painting. This process will be longer (especially if you need to remove rust) and requires the following materials:
- Epoxy primer
- Putty
- Corrosion-protective primer
- Ground leveler
- Finishing coating – enamel
- Finishing coating – base paints under varnish
Do not forget that the selection of products for preparing the surface of a car for painting also depends on the material from which the part being repaired is made (steel, galvanized steel, aluminum or plastic) and on the type of old paint coating (hard or soft).
Currently, many manufacturers make their car bodies from galvanized steel and aluminum. This provides higher corrosion resistance and durability, but at the same time requires the use of special materials for repairs. There are a number of products suitable for application to galvanized steel and aluminum.
https://www.youtube.com/watch?v=kGALsxblBSM
Any type of body repair requires careful and correct execution of a certain sequence of operations. A missed or incorrectly performed operation can lead to various defects in the paintwork.
Dust, dirt, road salt, grease, etc. are the main enemies of any painting system. Therefore, for any type of body repair, the first operation is washing.
Stage No. 1. Washing
Why do you need to wash and degrease your car when preparing the surface for painting:
- for removing various salt compounds, dirt, fats, etc. (due to unwashed salt, a defect such as “bubbling” may occur);
- for optimal adhesion of the repair coating (unwashed dirt gets clogged into the marks during cleaning);
- to save materials, time and money (due to dirt that gets on it, the abrasive material quickly becomes clogged and fails - grinding time increases);
- to eliminate the possibility of craters appearing (dirt remaining in the hazards after cleaning may contain fats or silicones);
- to eliminate low gloss (due to sanding product remaining in the marks).
Stage No. 2. Apply masking and clean the surface for painting
Once the car is washed, you can safely begin preparing the surface for painting. To do this, we designate the place where the painting work will be carried out.
If we paint a separate part, its borders need to be covered with masking tape and thick paper. Then you need to clean the defects (chips, scratches) with sandpaper (grain size P150-P280).
This will remove layers of old paint and smooth out the edges.
- Always use two clean wipes when degreasing - the first wets the surface, the second (dry) removes contaminants dissolved in the degreaser;
- Carry out degreasing in small areas (approximately 50x50 cm) in order to have time to wipe with a dry cloth before the degreaser evaporates;
- Carry out degreasing immediately before applying the material;
- When degreasing, the surface cools, so you need to give time to equalize the temperature (condensation may occur);
- It is necessary to degrease using personal protective equipment: rubber gloves, respirator, safety glasses.
Degreasing is a mandatory step in the process of preparing a surface for painting, and it must be carried out before applying each subsequent layer.
If the car has chips or deep scratches, before painting the car, you will have to use putty to level the surface.
The putty is the thickest layer in the system, so it is what affects the final shape of the car body.
When filling, you need to pay special attention to the choice of polyester putty and the preparation of the surface for the putty.
Preparing the surface for putty
| Sanding before applying putty | Cleaning to metal - circles P120, then smooth the border edges P220 |
| Shaping the putty | Sheets P120-P180 for grinding with dust extraction |
| Preparation for leveling soil | Wheels P220 – P280 – machine processing |
| Preparing a new panel for wet-on-wet primer | Wheels P320 – machine processing |
| Sanding before applying paint | Waterproof sanding paper P1000 – hand sandingDry sanding paper P320 – P500 – machine sanding |
Improper preparation of the surface for putty can subsequently lead to a defect in the paintwork such as contouring . This can be avoided by following the following technology:
Choice of putty
When choosing a putty, you should pay attention to the nature of the damage (size and depth of dents, hole in the body panel, etc.) and the type of surface (steel, galvanized steel or aluminum).
Basic rules for applying putty
- Apply putty only to bare metal surfaces or epoxy primer.
- Observe the correct proportions when mixing with hardener (maximum 3% hardener) - otherwise, if there is an excess of hardener, molecules will remain that do not react with the putty.
- Mix very thoroughly with the hardener.
- Never sand the putty “wet”, because... it is hygroscopic.
- Application of primers.
The hardener primarily affects the rate of hardening of the product. Therefore, the decisive factor when choosing a hardener will be the drying time of the product. Hardeners are mainly of three types - slow, standard and fast.
It is very important to maintain the correct proportions when mixing any paint product with a hardener:
- If there is a lack of hardener, hardening (polymerization) will not occur completely.
- If there is an excess of hardener, the hardener molecules may react with another substrate. For example, with water (humidity), causing loss of shine of the paintwork. Remember that hardeners are the most sensitive of all products to humidity and low temperatures. Therefore, never leave a can of hardener open and observe the temperature conditions for storing and transporting hardeners.
Before painting a car, any paint coating must be applied to a well-degreased and sanded surface. By grinding we make the surface “rough”. The many thousands of small scratches resulting from sanding increase the surface area, which ensures optimal adhesion of the coating to the substrate.
The time spent on surface grinding takes up more than 50% of the total repair time. For this reason, this part of the job should be as efficient as possible.
When carrying out grinding work, you need to pay attention to the following points:
- Choice of grinding type: dry or wet, manual or mechanical.
- Selecting the appropriate grinder depending on the type of work being performed: orbital, eccentric or surface grinder.
- Selection of abrasive material and grinding steps.
Is it possible to do without sanding the car before painting?
We have already said that the sanding process, carried out conscientiously, guarantees half the success of all painting jobs. During grinding, all irregularities are removed and a risk is created for better adhesion of each new layer of material to the previous one. We list the main points why the grinding stage should never be skipped and why it is needed:
- To improve surface adhesion with subsequent applied materials
- To create the required shape and surface
- To remove old coating
Dry grinding is the most advanced and promising and has a number of advantages compared to wet grinding:
- Save time
- Material saving
- Eliminating the possibility of corrosion
- Elimination of absorption and saturation of treated materials with water
- There is no need to wait for the water to completely evaporate
- Less harmful to health (in version with dust extraction)
- More diverse range of equipment for mechanical dry grinding
- Significantly wider range of abrasives for dry grinding
- For high-quality repairs, it is necessary to use high-quality abrasive materials.
Recommendations:
- Polyester materials (putties) cannot be sanded with water. Grinding of this type is allowed only at the stage of processing the leveling primer.
- When grinding, it is necessary to follow the correct steps in reducing the grain size of abrasive materials (each step in reducing the grain size should not exceed 100 units).
- The abrasive material must be marked with an international standard, which indicates the quality and uniformity of the grain.
- Border zones must overlap.
Stage No. 6. Padding
Primers provide protection against corrosion, level the surface and create good adhesion between the substrate and the finishing coating. They come in etch and acrylic primers.
Purpose of primary soils:
- Corrosion protection.
- Ensuring adhesion of the surface and the base of the subsequent coating.
Purpose of filler primers:
- Filling scratches from abrasive material, irregularities, leveling the surface.
- The basis for subsequent application of paint and varnish.
How to work with soils correctly?
- Use a measuring stick when mixing.
- Mix the soil thoroughly before diluting.
- If the primer is tinted, then paint is first added, and then hardener and solvent are added to the resulting volume in the appropriate proportion.
- Do not attempt to extend the product's pot life by adding solvent.
- Apply layers correctly - inside the stain to avoid over-spraying.
- Observe the correct drying intervals between layers and do not speed up the drying time between layers by blowing - the solvent is blocked by the film and “boiling” occurs.
- Use either dry or aerosol developer before sanding.
- Never use primers after the specified pot life after mixing.
- Do not paste too close to the priming area.
- Ensure that the primer is completely hardened (risk of deep scratches during sanding and settling).
Stage No. 7. Applying base/enamel
Rules for applying finishing coating (auto enamel)
During application, adhere to the following rules:
- Hold the gun (or spray can) strictly perpendicular to the surface to be painted.
- Move the gun (or can) at a uniform speed and at the same distance from the surface to be painted.
- Each pass should overlap the previous one by 50%.
- At the end of the passage, cut off the material by smoothly moving the gun (or spray can) to the side.
- Do not end the pass at the joints of the parts to avoid smudges.
smooth transition between the previous layer of varnish and the new one. In order for the boundary of the layers to look invisible, you need to use a solvent, and spray the varnish itself with a gradual increase in the area of each subsequent layer.
Source: http://rusautolack.ru/blog/kuzovnoy-remont-avtomobilya-podgotovka-i-pokraska-poverkhnosti/
Do-it-yourself car body repair in the garage
This Personal Data Privacy Policy (hereinafter referred to as the Privacy Policy) applies to all information that the Sam Avtomaster website, located on the domain name sam-avtomaster.com, can receive about the User while using our website.
This Privacy Policy applies only to the “Sam Automaster” website.
The Site guarantees that it will not damage the User’s computer or infect it with viruses.
The site administration does not verify the accuracy of the personal data provided by the User when sending them an email.
Visitor identification
To view information on the Sam-Avtomaster.com website, registration with personal data is not required. When a User accesses our website, no personal information is collected. It is possible to browse the site anonymously.
The email address, as well as the postal address specified when filling out the fields of the comment form, order form and contact form are not shown to other site visitors. We may store comments, emails sent by Users on the server to process requests, answer questions and improve site services.
Personal data permitted for processing under this Privacy Policy is provided by the User by filling out the contact form, order form and comment form on the site and may include the following information:
- Full name of the User;
- Email address (e-mail);
- Postal code and address;
Cookie
When a User visits a site, one or more cookies are sent to their computer. This is a small file that contains character sets and allows you to identify the User's browser.
We use cookies to improve our service by storing user preferences and tracking trends in user behavior, such as searches and advertising.
Most browsers are initially configured to accept cookies, but the User can completely disable the use of cookies or set up notifications when they are sent.
However, without cookies, some site features may not function properly.
Logging
Each time you visit the site, our servers automatically record information that the User's browser transmits when visiting web pages. Typically, this information includes the web page requested, the computer's IP address, browser type, browser language settings, and the date and time of the request.
Links
Links on this site may be in a format that allows us to track whether visitors use them. This information is used to improve the quality of our advertising.
Changes to the privacy policy
The site administration has the right to make changes to this Privacy Policy without the consent of the User.
The new Privacy Policy comes into force from the moment it is posted on the Automaster website, unless otherwise provided by the new edition of the Privacy Policy.
All suggestions or questions regarding this Privacy Policy should be reported to the Site Administration through the CONTACTS page.
The current Privacy Policy is permanently posted on the page at: sam-avtomaster.com/polit-konf.
Source: https://sam-avtomaster.com/kuzovnye
Body repair in a garage
Many of us would like to do body repair, but we hesitate for reasons: “it’s difficult,” “it’s expensive,” “I’ll screw it up,” “I don’t know how to do it right,” etc. However, gaining first knowledge is very easy and not at all expensive. Let's figure out how to restore a car body part, prepare it for repainting and paint it.
Small scratches that are only on the surface of the paintwork can be removed by polishing. And if the scratches are deep (to the ground or metal), then painting the damaged area is necessary.
Painting can be of two types: partial painting of the car (local, when the part is painted as a transition) and complete (painting the entire part).
Local painting of a car is necessary in cases where only a certain area of the body needs to be restored.
The advantage of this type of painting is that the body parts are not dismantled, and therefore the factory body assembly of the car is not disturbed. Painting the entire part is done only if necessary, if the scratches or dents are deep and occupy a large area on the car body part.
All car enthusiasts who want to try painting a car with their own hands first think about spray paint. And then the question arises:
Answer: Of course you can paint it, but you can’t paint it well. Why? Firstly, the spray can has an uneven spray, so it becomes very difficult to paint a car well. In addition, the paint stream is too saturated, so it is easy to get paint smudges as a result.
Secondly, getting the color right from a spray can is very rare, especially considering that the paint on a car fades over time. Let’s say you were able to select the color as accurately as possible, paint it, and you are completely satisfied with the result.
But do not forget about the quality of such paint; as a rule, after a year the painted area fades. In addition, it does not protect the body well from atmospheric influences and is easily washed off even with a weak solvent.
And in this case, you can completely forget about normal polishing.
It is important to remember that painting a car must take place in a special room that meets a number of requirements (no dust and wind, suitable temperature and humidity). Painting a car on the street is not allowed.
If one of the rules is not followed, the paint may turn out to be stained, there will be shagreen (the surface of the paint is not smooth, but like an orange peel), smudges, etc. Thus, if we are talking about spray painting, then there is no need to talk about aesthetics.
But if you are still determined to do such work, then try to apply thin layers of paint (at a greater distance from the part) and do at least 3 layers. A video on spray painting a car can be found in this article.
Spray paint is best used for partially painting a bumper, but it’s best to forget about completely painting a car from a spray can.
Now, let's look at how to properly paint a car at home :
Let's say a car fender begins to rust.
The first thing to do is to completely wash the car , even if only certain areas of the body are painted.
Next, you will need to get rid of rust (sand the iron with coarse sandpaper and thoroughly degrease it).
Next, you will need to restore the geometry of the part (during the process of cleaning the rust, some of the iron was removed), and this is done using putty.
For areas of the body with high vibration, putty with aluminum particles is well suited. We dilute the putty with the hardener (dilute in small portions, otherwise the putty will simply dry out) and apply it to the work surface. It dries at a temperature of 20°C for about 15 minutes. When the putty has dried, we begin cleaning (sandpaper 220-240). After processing, we putty again, and so on until the part acquires the correct shape and becomes smooth to the touch.
Now you should prime the part . The primer provides protection against corrosion, guarantees the durability of the paintwork and removes small scratches after puttying the part. In addition, it very well exposes all the “jambs” that were not noticeable. When choosing a primer, you must take into account the color of the car’s paint. For example, when using black, the primer must be dark, and when painting silver, it must be light.
To properly apply the primer to the work surface, we will already need a compressor (with a pressure gauge and adjustment), a spray gun (not necessarily an expensive one) and a respirator. We cover the entire car with paper or film. If the primer gets on the paint and has time to dry, then consider it to be there forever. Degrease the surface well and apply in a couple of layers.
We remove the paper and start processing the soil (800 sandpaper for wet sandpaper). As soon as the soil has become perfectly smooth to the touch and even with the body, the process of preparing for painting can be considered complete. Remember that a correctly and carefully prepared part is the key to good car painting! paint a car well only if you can choose the right color . The paint should perfectly match the previous coating. It is best to contact a professional colorist, who will not only select the color correctly, but also provide you with high-quality paint. Before painting, you need to decide exactly which part of the body we will cover with varnish. We seal the rest. Be sure to remove all the gloss from the wing (matte it). This is done with 800-1000 grit sandpaper on a wet surface or with a special Scotch-Brite sponge (reminiscent of a rough dishwashing sponge). Degrease and, if desired, wipe with a sticky cloth to remove small specks. Painting a car at home means working in a dusty garage. Therefore, before painting, it is recommended to beat down the dust with a spray of water.
Car painting technology always involves applying several layers of paint. When using light paints, it may be necessary to apply a preliminary coat of paint to cover the primer.
So, the first layer of paint is spread on the ground, covering it and a little of the wing itself.
Apply the second layer the third , the main one.
The air pressure when painting should be about 4 atm. Lack or excess of pressure when painting will not lead to anything good. After the third layer, we get a matte painted wing: At room temperature, the paint dries for about 15 minutes. If, after drying, irregularities appear (like after a primer), then the part was poorly prepared for painting. You cannot touch the painted surface with your hands, otherwise you will have to degrease it again, and the solvent will simply erase the paint. Next, the part needs to be varnished . It is recommended to carefully go over with a sticky cloth again, because the varnish is very sensitive even to tiny grains of sand. It is better to dilute the varnish before applying the paint, since it needs to sit for at least 20-30 minutes for air bubbles to come out. You can apply varnish at will, either while the paint is not yet completely dry, or wait for final drying.
The first layer of varnish (base) should be very thin and applied to the entire surface of the part.
Apply the second layer of varnish You shouldn’t pour a lot of varnish, otherwise it will run.
If dust gets under the varnish , then polishing will help correct the situation, but only after a week, when the varnish is completely dry!
The cost of painting a car , and in particular the wing discussed in the photo report, is:
- Emery – 100 rubles;
- Solvent 646 – 120 RUR;
- Putty – 50 rubles;
- Primer – 70 rubles;
- Paint – 300 rubles;
- Varnish – 200 rub;
Total 900 rubles.
Tips to keep in mind:
- Take your time, do the work measuredly and thoughtfully;
- After painting, do not forget to immediately wash the spray gun (646 solvent is suitable). Painted - cleaned, varnished - cleaned. After work, leave a little solvent in the remote control;
- Adjust the spray gun correctly before painting. The stream of paint should not be narrow, but should be sprayed in a wide stream;
- It is advisable to install a moisture separator on the compressor. Condensation may form in the receiver and reach the paint through the air. In this case, all work will be ruined.
- Clean the garage as best as possible before painting to remove sand and dust;
- Make sure there is good lighting on the surface to be painted, otherwise you may simply not notice that somewhere a part has not been painted;
- The garage should be quite warm and dry (an exhaust hood is also welcome);
- Do not skimp on solvent (degreaser) for degreasing;
The main problem with silver shades is the so-called apples-apple effect, when the paint becomes stained. This happens if the paint is applied unevenly and when one layer of paint is covered with another, the shade changes and, as a result, either stripes or spots of a different shade appear. To prevent this from happening, when applying the last layer of paint, the painter increases the air supply in the spray gun and applies the last layer of paint using the spray method, making sure that the layer of paint is sprayed evenly onto the surface. After the paint has dried, the primer begins to show through, or the applied layers of paint (base) look like a zebra, for example, the silver color looks black in places. The reason is an insufficiently painted surface. If the painted part becomes dull after drying, then the reason is high air humidity. Varnish runs can occur due to too thin varnish, too much varnish or insufficient intermediate drying between applying layers of varnish. No matter how many illustrations you publish, the video material has always been more visual and understandable.
Video of car painting in a garage:
Video of car painting by a professional:
Of course, it is impossible to paint a car locally without having initial skills and experience.
But you can always practice on an old bumper or paint a VAZ car, which is no longer afraid of the painter’s mistakes. Don't be afraid and don't panic, believe in yourself, because it's just a piece of iron! By the way, there are other ways to combat rust.
| Have you ever painted a car with a spray gun? |
Photo source:
Keywords:
- paintwork repair
- rust
- car care
Interesting site? Share with your friends
Source: http://xn--2111-43da1a8c.xn--p1ai/repear/571-remont-
Car body restoration
There is probably not a single car owner who has not encountered such a problem as body repair at least once in his life. This concept includes several areas of getting rid of defects on one of the most important elements of the car.
Types of body repair
There are two types of body restoration: complete and local
Just by the name of a complete body repair, everything becomes clear. But as far as local is concerned, everything is a little different here. Local repair involves the restoration of individual elements of the car body.
Local repair of body parts
Restoring a car body with your own hands is possible for car enthusiasts who can do any work, in particular working with a welding machine and painting some parts of the car body.
Car owners who find complete body repairs difficult can start with local repairs.
During local restoration, you need to use numerous devices, materials and equipment that can greatly facilitate the work and help give the car a new appearance.
Removing dents from a body without painting
It is not at all necessary that body work include painting some elements. Restoration of a car body can be done without painting, for example, if some kind of dent needs to be removed from an element of the car body.
Removing dents without painting is a fairly popular method nowadays.
Using this method, you can get rid of both small and medium-sized dents that could appear in any situation: dents from hands or feet, hail, contact with certain elements on the body, both while driving and while parking, and much more. . Damage of this kind can be removed easily and simply to such a state that it becomes completely invisible.
Advantages of car restoration without painting
Paintless dent removal is a new and quite popular way to repair a vehicle. This method has been well proven and therefore has many positive aspects.
- The car's coating does not deteriorate during repairs.
- Saving money. There is no need to waste time and money on buying abrasives, putty, and then selecting paint.
- The time spent on repairs is no more than half an hour.
Disadvantages of car restoration without painting
In addition to the positive aspects, the method of body restoration without the use of paint also has its disadvantages, which many may consider quite significant.
- This method is not suitable for the Soviet automobile industry. The thing is that Soviet cars have a fairly soft car body coating.
- Removing dents without using paint is considered a very difficult method, and that is why it will be quite difficult to cope with the task without the help of specialists.
Stages of body work
Perhaps, in work related to auto body repair, more attention should be paid to the preparatory stage, because the final type of transport depends on the quality of the preparatory work.
Stage No. 1 . The first stage in body work can include straightening. Only those cars that have been involved in an accident and received fairly serious mechanical damage go through this stage.
The car is straightened using special equipment.
Stage No. 2 . This item involves leveling uneven surfaces, i.e. putty. The putty is applied to the uneven surfaces of the car body in an even layer so that the next type of work can be carried out. If the putty is applied in too large a layer, its excess can be removed using paper and a specially designed tool.
Car body putty
Stage No. 3 . After filling, it is advisable to prime the car body. The primer must be applied to prevent corrosion from appearing on the metal parts of the car. The primer is applied immediately before applying paint to ensure that the surface of the car body is as level as possible.
Car body primer
There are three types of automotive primer, each of which has its own specific purpose:
- Acidic.
- Leveling.
- Vapor filling.
Stage No. 4 . At this stage, the entire body or individual elements are painted.
It is necessary to paint a car in a special chamber or garage, where, using special equipment, otherwise called a gun, paint is applied in an even layer.
The car must be painted indoors so that the fresh paint is not exposed to dust, moisture or sunlight. Painting should be done only with the help of special equipment to avoid defects and unevenness.
Car body painting
Stage No. 5 . The final stage is polishing the car body elements. Polishing is necessary for the vehicle to acquire a pleasant aesthetic appearance, which in turn can greatly brighten up some shortcomings after work such as body restoration.
Car body polishing
Polishing of body elements is also carried out in stages. Polishing is carried out so that there are no noticeable edges between the old layer of paint, which was applied at the factory, and the new one.
Polishing is a rather unique tool, because it can perfectly disguise a damaged area.
In addition, polishing has a distinctive feature: if this type is done well, the damaged area cannot be found without special equipment.
Painting the body, removing dents, repairing plastic body parts and much more can be done independently, without the help of experts. Repairing car body elements with your own hands will be much cheaper than repairing it at a service station, and if you know some of the nuances, then it will be much more careful.
Source: http://AvtoMotoSpec.ru/remont-avtomobilya/restavraciya-kuzova-ot-nachala-do-konca.html