Throttle position sensor - adjustment, check, malfunctions + Video

The design of a modern car includes many elements, it could be an expensive turbine or a cheap throttle position sensor. At the same time, the cost of a part does not at all indicate its significance. Thus, failure of the specified sensor can lead to disruption of engine operation and expensive repairs.
DPDZ area of responsibility
In this article we will look at the features of this part and provide detailed instructions for its repair, adjustment and replacement.
But before moving directly to the practical part, you should pay a little attention to theory and consider what the throttle valve and its sensor are, what functions they perform and where they are located.
So, the damper itself is a structural component of the engine intake system. Its functions include adjusting the amount of incoming air, i.e. it is responsible for the quality of the fuel-air mixture.
The throttle position sensor provides information to the manifold about the state of the bypass valve. This is obvious from its name. The sensor can be film or non-contact (magnetic).
Its design is similar to an air valve, and when it is open, the pressure in the system is equal to atmospheric pressure.
But as soon as the element moves to the closed position, the value of the above characteristic immediately decreases to a vacuum state.
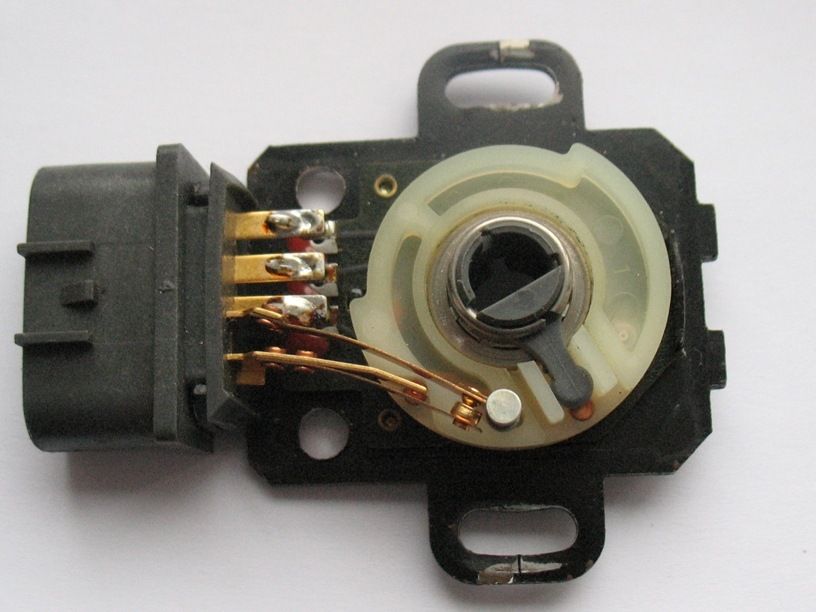
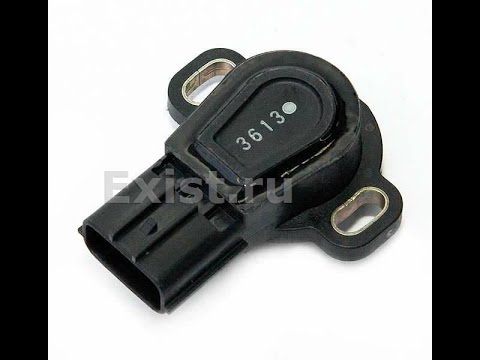
Throttle position sensor
The throttle sensor consists of constant and variable resistors, the resistance of which reaches 8 ohms. The voltage at its output, depending on the position of the damper itself, constantly changes. The entire process is monitored by a controller, and the amount of fuel is adjusted depending on the data received.
If the TPS does not work correctly and produces distorted data, then not enough fuel will enter the system or there will be an excess of it, which will lead to disruption of the engine and even sometimes its failure. In addition, the correct operation of the gearbox and ignition timing depend on this device.
We will not calculate how much it will cost to repair these mechanisms.
Why might we need to repair the sensor?
Nothing eternal has yet been invented, and this element is also breaking. Let's consider what reasons can provoke its failure and how this can be noticed. Throttle position sensor malfunctions are mainly caused by normal wear and tear. Thus, the sprayed base layer along which the slide moves wears out.
As a result, the device gives incorrect readings. Another reason for incorrect operation may be the failure of the movable core. And if one of the tips is damaged, then a number of scratches will appear on the substrate, which will lead to breakage of the remaining elements.
This will cause deterioration of contact between the resistive layer and the slider, and in some cases, its absence.
Worn throttle position sensor
You can understand that it’s time to contact a service center or carry out independent diagnostics and, if necessary, repairs, based on the following signs.
First of all, listen to your car while idling; if the speed “floats”, then do not hesitate to check the device. Another warning sign should be the engine stopping when the pedal is suddenly released.
And when accelerating, it may seem that fuel is not getting into the system, the car twitches and jerks appear.
Sometimes the revolutions seem to hang in one range (1.5–3 thousand) and do not change their position even when switching to neutral gear. In addition, the dynamics deteriorate. In general, the slightest disturbance in engine operation should alert you.
By the way, pay attention to the dashboard, the “Check engine” warning light should light up on it.
If this happens, then your car automatically goes into emergency mode, and after doing computer diagnostics, you will see that the reason lies precisely in the sensor.
Checking the sensor without the help of an auto electrician
Checking the throttle position sensor is quite easy, and anyone can cope with such a task, especially since for this you only need a multimeter, and when you don’t have one, a simple voltmeter will do. Next, perform all the steps below.
Checking the throttle position sensor with a multimeter
Turn the key in the ignition and measure the voltage between the slider contact and the minus. Its value should not exceed 0.7 V. Then we open the damper, turning the plastic sector, and take measurements again. Now the device should show more than 4 V. Turn on the ignition completely, after which the connector is pulled out and the resistance between any terminal and the slide is checked.
Now we slowly rotate the sector and observe the indicators of the measuring device. Its needle should also smoothly change its position, and any jumps are a sign of a sensor malfunction. There is a little trick. If you don’t want to disconnect the wires, you can simply pierce them with a thin needle, although it’s better not to be lazy and do everything as expected.
Adjustment in your garage
Even a novice car enthusiast can adjust the throttle position sensors; the main thing is to strictly follow the instructions given below. Moreover, this operation does not depend on the operating principle of the TPS – non-contact or not. So, first we carry out the preparatory work.
We disconnect the corrugated tube through which air passes and thoroughly rinse it with alcohol, gasoline or another strong solvent. But one liquid is not always enough; to achieve a better effect, you should also wipe the tube with a soft cloth. We carry out the same operation with the damper itself and with the intake manifold.
In addition, do not forget to carry out visual inspection, especially for the damper.
Operating principle of TPS
So, no mechanical damage was detected? Then we proceed directly to adjusting the throttle position sensor. First, take the key and loosen the screws. Then we raise the damper and sharply lower it all the way, keep in mind that you should hear a blow, otherwise repeat the operation again. Loosen the screws until the part stops “biting.”
And only then can the position of the fasteners be secured with nuts. Next, unscrew the bolted connections of the TPS and rotate the device body. Next, we set the throttle position sensor so that the voltage changes only when the valve opens.
The setup is complete, all that remains is to return everything to its place, tighten the bolts and enjoy driving your favorite car.
Replacement and selection of sensor - non-contact or film?
If the element fails, then its complete replacement will most likely save the situation. One of the important points of this stage is the correct choice of a new device.
Of course, if you do not want to carry out all the operations again in a short period of time, then you should give preference only to high-quality products, and even more so avoid cheap Chinese counterfeits. In addition, do not stop your choice on film-resistive models.
They are short-lived, and such savings can cost you a pretty penny. But contactless throttle position sensors are more reliable. They only cost a few dollars.
Non-contact TPS
The film model has resistive tracks, while the non-contact model works on the principle of the magnetic effect. Its components are a stator, a rotor and a magnet. On the first, the magnetic field has a huge impact.
The material of the second one is chosen such that the magnet does not have any influence on it. The distance between the TPS elements does not change and is selected at the assembly stage. Needless to say, the contactless sensor cannot be repaired.
The replacement itself will take you much less time than choosing a device. But despite the fact that the process is quite simple, let’s consider it in detail.
We prepare a Phillips screwdriver, an O-ring for the throttle pipe and, of course, the part itself. The replacement begins by turning off the ignition if the car has been started.
Open the hood and do not forget to disconnect the battery. To do this, remove the negative terminal.
https://www.youtube.com/watch?v=PuyQNec6FXc
Installation of TPS
Now we find the sensor on the throttle pipe and remove the block with wires from it; most likely you will have to press out the special plastic latch. Then unscrew the mounting bolts and dismantle the device. There is a foam ring between the TPS and the pipe, and it definitely needs to be replaced.
And only after this can the sensor itself be installed. Fix the device firmly with bolts, otherwise the vibration will not do it any good and will cause failure. Reconnect the block with all the wires.
Sometimes people forget to disconnect the battery; in this case, it is necessary to de-energize it for at least five minutes after installing the new device and connecting the plug to it.
You can check whether the element is working correctly as follows. Open the damper and pull the throttle cables to turn the TPS drive sector.
If the position of the sector does not change, then the sensor should be installed again. At the same time, we rotate it 90 degrees relative to the damper axis.
And finally, check the voltage with a tester; if its values coincide with those indicated above, then the device is working.
Illusory repair possibilities
It should be said right away that repairing throttle position sensors is extremely rare. Firstly, the part itself, even the most expensive one, costs only a few dollars, and it makes sense to spend the money.
Secondly, in most cases it is simply impossible to make repairs, for example, to restore a worn-out base layer.
However, in some models you can slightly shift the resistive tracks relative to the slider and thereby extend the life of the device.
Throttle Position Sensor Repair
So, there is a special screw on the sensors. With its help, the position of the tracks is fixed. If they are already worn out, then you should loosen this same screw, this will change the location of the slider a little, and you can be a little patient with replacing the device.
But don't count on long-term respite. Naturally, we remember that the contactless sensor cannot be repaired.
This completes the adjustment, repair and replacement of the throttle position sensor, now you can operate the car for several more years and not even think about such issues.
Source: https://carnovato.ru/proverka-regulirovka-datchika-polozhenija-drosselnoj-zaslonki/
Malfunctions of the throttle position sensor (TPS), check, replacement

The throttle valve is one of the key components that is responsible for the operation of a car engine. It is part of the intake system, and its proper operation determines the amount of air that enters the combustion chamber, where it detonates after mixing with gasoline.
In order for the detonation process to be as efficient as possible, the vehicle's electronic control unit must control the timing of the throttle valve opening, thereby allowing in as much air as is required to create the ideal mixture at a particular moment in time. The corresponding sensor is responsible for information about what position the throttle valve is in. If it fails, the driver will face troubles that can lead to damage to engine parts.
Types of throttle position sensors (TPS)
Depending on the type of design, throttle position sensors can be divided into the following types:
- Film resistive. Simple variants of potentiometers, and they are capable of operating for about 50 thousand kilometers before failure;
- Magnetoresistive or contactless. Their operating principle is based on the Hall effect, and the cost of such sensors is much higher than film-resistive options. At the same time, the service life of the sensor depends only on the quality of the mechanical elements, and they are capable of operating for more than 100 thousand kilometers.
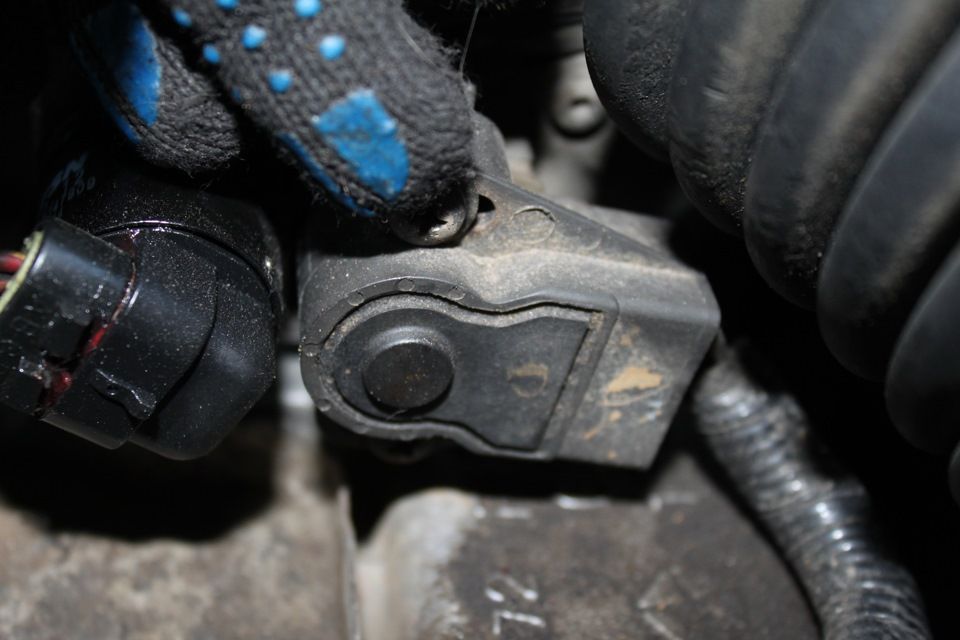
The TPS is installed, in most cases, on the throttle body on the side opposite to the air damper drive. The moving element of the sensor has a mechanical connection with the damper axis.
Symptoms of throttle position sensor failure
Regardless of the type of sensor, its malfunction can be determined by the following signs:
- Pressing the accelerator pedal causes the engine to over-throttle or stall;
- The engine is unstable and stalls at idle;
- Reduced engine dynamics, especially in low gears;
- Fuel consumption has increased;
- The engine stalls spontaneously in neutral gear.
If the above malfunctions appear on your car and the Check Engine light is on, there is a high probability that it is the throttle position sensor that has failed. It is important to note that the “Check Engine” light does not turn on if the throttle position sensor is faulty on all vehicles.
Main causes of malfunctions
Depending on what type of sensor is used on the car, the main problems to which they are susceptible can be identified.
Budget film-resistive throttle position sensors most often fail due to mechanical wear of the resistive layer. Thus, during operation, the sensor motor may be worn out. Another common reason for the failure of the film-resistive version of the sensor is the ingress of dirt onto it, which renders the working surface unusable.
Non-contact sensors most often fail due to mechanical failure of the moving unit. Also among the typical “diseases” are malfunctions in the operation of the electronic converter of the received magnetic signals into direct voltage.
How to check the throttle position sensor
Testing the throttle position sensor requires a multimeter. Depending on the type of sensor and the vehicle on which it is installed, the voltage and resistance readings from the sensor given in the instructions below will vary. At the same time, the process of checking TPS will not differ radically on different car models and sensors.
To check the throttle position sensor, follow these steps:
- Turn off the engine and remove any obstacles to allow easy access to the throttle position sensor. In most cases, this will require removing the air filter ducts from the pipe and removing the ventilation hoses;
- Next, disconnect the wires that go to the TPS; most often they snap off;
- After this, 3 contacts will be visible in the sensor: power, ground and signal for the control unit. It is necessary to determine which of them are responsible for what;
- Next, you will need to start the engine and connect the positive terminal of the multimeter to the power terminal, and the negative terminal to the ground terminal. The tester must be turned on in voltage measurement mode. This measurement should give a value of about 5 Volts (small scatter is possible);
- After measuring the voltage, you need to turn off the ignition and switch the multimeter to measure resistance;
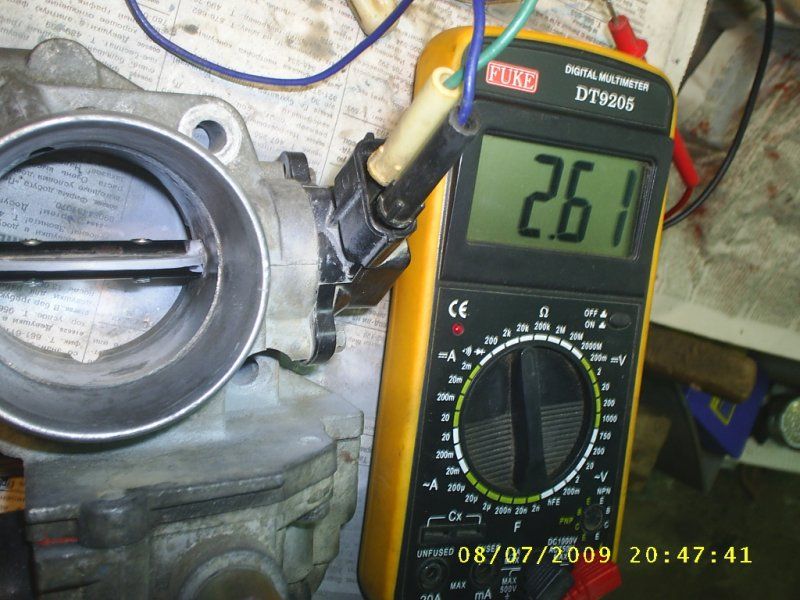
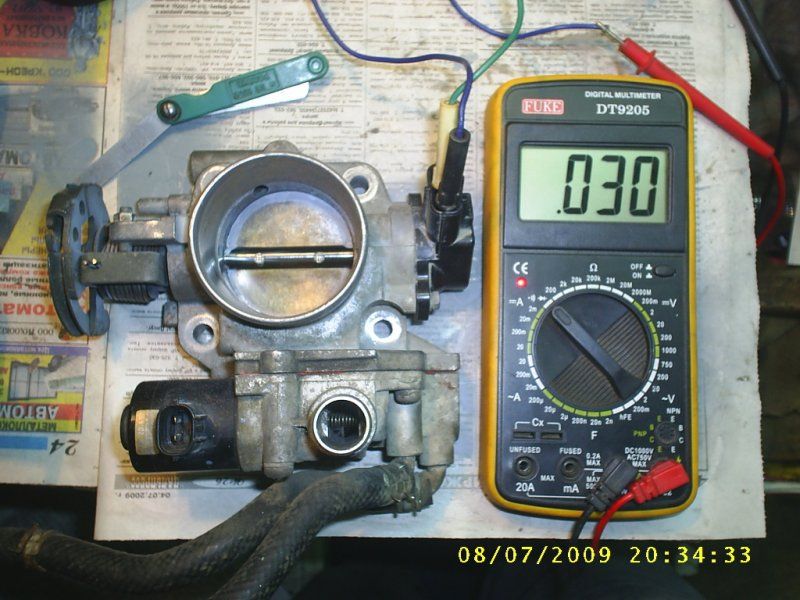
- Next, with the throttle valve closed, it is necessary to measure the resistance between the ground and signal contacts for the control unit. The result should be a value of about 1 kOhm (readings from 0.8 to 1.2 kOhm are possible);
- After this, you need to open the throttle valve and repeat the resistance measurement. You should get a value from 2.3 to 2.7 kOhm.
As noted above, measurement numbers may vary depending on the sensor model and vehicle. You can view the results for a specific machine in its technical manual or on specialized forums on the Internet.
If the diagnostics concluded that the sensor is faulty, it will need to be replaced.
How to Replace a Throttle Position Sensor
The process of replacing the throttle position sensor consists of three stages: removing the old sensor, installing a new one and resetting the error about the malfunction of the device from the memory of the electronic control unit. To replace the TPS, you must perform the following steps:
- Turn off the ignition, but you do not need to remove the terminals from the battery, since the sensor will be de-energized;
- Next, you need to remove the connector from the sensor and unscrew the mounting screws (most often two);
- After this, the procedure for installing a new sensor begins. Carefully connect the end of the damper axis to the sensor seat;
- By turning the sensor in a circle, you need to align the holes and screw in the screws;
- Next, put on the connector;
- To reset the error from the controller’s memory, remove the battery terminals overnight (more than 8 hours), during which time the memory should be reset. If you cannot remove the errors, you can try to continue operating the machine in a “gentle mode”, waiting until the electronic control unit resets it on its own. A more reliable option is to contact a service technician to reset the error using a motor tester.
It should be noted that some modern sensors require not only replacement, but also adjustment. For example, in AvtoVAZ cars, adjustment of the throttle position sensor is not required, but in many foreign cars it is necessary.
How to Adjust the Throttle Position Sensor
TPS adjustment is performed as follows:
- After installing the new sensor, it is necessary to completely close the air damper;
- Next, the multimeter probes in voltmeter mode are connected, in accordance with polarity, to the ground of the machine and the output of the sensor;
- After this, the sensor should be turned (after loosening the fastenings) so that the voltmeter shows the minimum voltage of the sensor (ideally 0 Volts, but in practice this value may be higher);
- When the minimum reading of the voltmeter can be achieved, you need to tighten the bolts.
If, after making the adjustment, problems arise with idle speed (high), it will be necessary to carry out a procedure for training the vehicle's electronic control unit with the parameters of the new sensor. This is done as follows:
- It is necessary to reset both terminals from the battery for 15-20 minutes;
- Next, you need to return the terminals to their place and make sure that the throttle valve is closed;
- After this, turn on the ignition for a few seconds, but do not start the engine;
- 10-15 seconds after the ignition starts, it can be turned off;
- Again, you need to wait about 15-20 seconds, during which time the electronic control unit will be able to “remember” the parameters of the sensor that was installed instead of the original one.
It is highly recommended not to purchase non-original throttle position sensors, especially low quality ones. This is due to the operating temperature of the element. If overheated, non-original sensors will distort the results, which will affect engine performance.
(337
Source: https://okeydrive.ru/datchik-polozheniya-drosselnoj-zaslonki-kak-proverit-zamenit-otregulirovat/
Adjusting the throttle position sensor
In the engine management system, the throttle position sensor plays a key role.
Based on the readings of this and other necessary sensors, the engine control unit determines the required concentration of the air-fuel mixture in accordance with the current operating mode of the engine, so adjusting the throttle position sensor is very important.
If the throttle position sensor is faulty, the control unit does not control the engine correctly, and you begin to notice that the car is “stupid” and it is difficult to start the engine. You will also notice “drops” during acceleration and an increase in idle speed.
Troubleshooting throttle position sensor
If the throttle position sensor malfunctions, the control unit signals this on the instrument panel: the “CHEK” light comes on. This signal only tells us that a failure or break has occurred in the throttle position sensor circuit, but does not indicate the exact location of the malfunction and its type.
If the sensor circuit is not broken, but its settings are messed up, then the control unit will not give any signal in this case.
If you are unsure of the correct settings of the throttle position sensor, and the light does not light up, then you can check its operation yourself. Using a multimeter, determine by alternately piercing the sensor wires that it is connected to ground and that it is receiving power.
Check the idle contact: open the throttle yourself and observe the change in voltage at the contact. As the damper begins to open, the voltage should begin to change from about to the supply voltage.
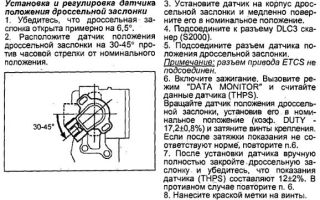
To adjust, disconnect the corrugated pipe through which air passes. It is necessary to immediately wash the pipe itself, the intake manifold, and the throttle valve with a rag soaked in gasoline.
Visually assess the wear of the latter. Next we adjust the damper. Loosen the shutter screws, lift the shutter and release it sharply. We hear a blow against the stop.
It is necessary to adjust the tension of the screws until the “biting” of the damper disappears. We fix the screws with nuts. Loosen the sensor screws. We place the multimeter probes on the idle contact and between the damper and the stop screw. Next, by turning the sensor body, we achieve a position in which the voltage changes strictly with the opening of the damper. We fix the screws.
This is how the simplest adjustment of the throttle position sensor occurs.
Source: http://vsepoedem.com/story/regulirovka-datchika-polozheniya-drosselnoi-zaslonki
Throttle adjustment
You only need to adjust the throttle position sensor (TPS) using instruments (multimeter and probes).
Under no circumstances should you adjust the TPS “by eye”!
In most cases on Toyotas, adjustment of the “initial” position of the IDL contact is carried out by setting a certain gap (usually such data is available in the repair manual) between the throttle valve itself and its thrust screw (a bolt without a “head”, locked with a nut at “8”). .
Instructions and clearances of the remote sensing sensor
For example, if you need to adjust the TPS clearances for a 2JZ-GTE engine, then you need to have feeler gauges from 0.50 to 0.75 and a multimeter.
The manual says this:
Start re-cocking the damper and at the moment of movement when you feel that the damper is “biting”. You begin to tighten the upper stop screw until the blow is still loud, but there is no biting.
Then, taking the hexagon, insert it into the stop screw and use the lock nut to lock the screw. In this case, the hexagon will not allow the screw to go out even further.
With this adjustment, THERE WILL BE NO GAP! Then carefully adjust the second lower screw to the first.
Now how it is regulated in practice, it looks like this:
We put contacts on the TPS, connect the multimeter and slightly lower the TPS screws. Having turned the sensor all the way (counterclockwise), we look at what the multimeter shows us - either 0.00 (closed) or 1 (contact broken).
Then insert a 0.65 mm feeler gauge between the first stop bolt and the throttle valve. Gently tapping with the end of a screwdriver, we move the TPS clockwise until the moment comes when the multimeter shows “1” from 0.00, after which we immediately stop.
Carefully tighten the screws securing the throttle sensor to the throttle body. At the same time, we look at the woman’s tester and nothing has moved.
Now a check is carried out: when installing a 0.50 mm probe, it should be 0.00, and when installing a 0.70 mm probe, it should be 1.
Adjusting the engine damper sensor 1JZ
If, for example, you have a car with a 1JZ engine without VVTi, then it is regulated as follows:
We remove the throttle itself, remove the remote control sensor, adjust the damper with a stop screw so that when closing there remains a barely noticeable gap (it can be seen if you look at the light bulb through the remote control).
We install the damper sensor and rotate it back and forth to such a position that when a 0.50 mm probe is placed under the thrust bolt, there is conductivity on the two lower contacts of the sensor, and if there is a 0.40 mm probe, then there is no circuit.
On a Toyota with a 3S-FE engine, the gap is 0.51 mm. The procedure for adjusting the TPS can be viewed here.
Throttle adjustment on Toyota 3C-T
On a Toyota 3C-T diesel engine, the procedure for adjusting the throttle position sensor is done as follows:
It is advisable to adjust the TPS on a completely “cold” engine so that the warm-up valve does not spoil the whole picture. If the adjustment is made on a “hot” engine, then you must first manually set the warm-up block rod to its original state!
Turning on the ignition, we find on the sensor connector a “red” wire with a “black stripe” along it (by the way, the color of the wires may be different on different models). We pierce it with a hole with the tester probe “+” connected, and minutes for “ground”.
Then unscrew the 2 TPS screws and begin to turn it slowly until the multimeter shows 3.9V.
We fix the TPS and to check it, fully press the gas pedal (you will need an assistant here), and the instrument display should display 1V.
Gaps when adjusting the throttle sensor on 5S-FE
Gaps for adjusting the position of the DZ Toyota engine 3VZ-FE
Source: https://etlib.ru/qa/regulirovka-drosselnoj-zaslonki-8548
TPS repair and signs of malfunction
Some people have nightmares about this sensor, and for others it simply caused inconvenience.
Its list of faults is extensive.
Typical symptoms of a malfunctioning sensor:
- Jerking of the car while driving;
- Poor launch;
- Unstable speed at idle;
- Loss of power;
- Increased consumption;
- The car stalls;
- Does not maintain speed in the range of 1500 - 2000 thousand.
The other day I experienced for myself how many problems it can cause.
It all started with the fact that I began to wonder why my car could not keep the speed within 1500 - 2000 thousand and there was no smooth running, the car twitched while driving, but these inconveniences did not cause any special problems.
Checking TPS
In order to check the DPZ voltage with a multimeter you need to: disconnect the connector of the damper position sensor and connect the “+” of the multimeter to the power connector, the black and white wire, and connect the “-” to the ground of the sensor, the brown wire, turning on the ignition, the readings should be within 4.7 and 5 v.
Checking the throttle sensor signal, connect the “+” of the multimeter to the signal wire, blue or blue can be red, and “-” to the terminal of the mass sensor or any other mass of the car, the voltage should be between 0.3 and 0.6 v.
You can measure resistance by connecting the “+” of the multimeter to the power connector and the “-” to ground; the readings should be from 4 to 9 kOhm.
In order to check the DPD tracks, you need to connect the connector to the sensor and connect the “+” of the multimeter to the signal wire of the sensor and connect the “-” to the ground of the sensor and smoothly press the gas pedal, the readings should change smoothly and without jumps from 0.3 to 4.5 v, if you see a jump or a break in one place or another, it means that the tracks in this position have been erased.
I checked the sensor voltage using the vag k+can commander diagnostic cord, the table clearly showed changes in the sensor voltage, the diagnostic cord allows you to determine the voltage of the sensor much faster and more accurately, unlike a multimeter.
Repair and restoration of TPS
Graphite glue
I decided to remove and disassemble the sensor to check the integrity of the graphite tracks by eye. Having taken it apart, I saw that the graphite tracks were indeed erased; I cannot determine the degree of wear. It was decided to purchase graphite glue to restore the board tracks.
Restoring the graphite tracks of the sensor with graphite glue. I removed the sensor from the remote control and carefully cut it with a hacksaw for metal because...
There is no other way to open it, I carefully bent the board and applied a thin layer of glue to the tracks.
Having done everything and glued it together, all that remained was to adjust the dpdz, which I actually couldn’t do myself, even with a diagnostic adapter, a multimeter and probes at hand.
The next day I went to the service station to set up the DPD. The slippage was terrible and when changing gears in different positions the revolutions jumped up from 2500 to 4000 thousand.
The photo shows very worn tracks
At 100, the technician reset everything to factory settings and adjusted the TPS. On the way home, I noticed slippage from 2nd to 3rd gear, the slippage was not strong, for example, if the shifts occur at 1800, it increases to 2000, if at 1700, it increases to 1800 or 1900 thousand, I noticed that if you really give it to the gas, this does not happen.
I started reading because I had thoughts in my head about burnt (worn out) clutches because... On the day of the visit, I had to drive for a couple of hours with terrible slippage, but soon I immediately discarded this reason.
I called the service station and again spoke in detail about the problem, the master suggested that I check the wiring and automatic transmission, and not blame the sensor, since I was only thinking about it, I went to disassemble this sensor again.
Bend the brushes onto entire sections of the tracks
This time I did not remove the throttle position sensor itself, so as not to have to go adjust it again, but removed the throttle position sensor completely along with the sensor, bent the sensor board with the tracks and carefully cleaned it of the graphite glue that I had applied before.
This time I planned to solve the problem by bending the brushes onto entire parts of the DPDZ tracks. I assembled it, started it and went to check it out. The ride is smooth, there is no slipping, and that’s why I got into it - now it keeps the revs at 1400, 1650, 1900 thousand, etc. in general, everything is as it should be, you can repair the sensor yourself and revive the sensor before purchasing a new one, the main thing is to do everything carefully and slowly.
Inside the DPZ there are graphite tracks along which the brushes move, the tracks can be restored with graphite glue, I found the most suitable chip and dip in the store costing 150 rubles.
But the most effective way is to bend these brushes to the sides along a whole part of the paths, this must be done very carefully, I used thin tweezers and a flat pincer.
Don’t think of degreasing the tracks or lubricating them with anything special using cotton swabs and sponges. Graphite glue can also be used for other purposes and is a very useful thing.
These brushes need to be carefully bent
Source: https://autozona54.ru/statyi/polezno-znat/datchik-dpdz.php
Throttle position sensor TPS, signs of malfunction, how to check and adjust, do-it-yourself replacement and repair
The gasoline internal combustion engine is currently the most used in the automotive industry. Naturally, the technologies used to develop engines do not stand still.
A breakthrough was the use of forced fuel injection systems. This technology made it possible to move away from the use of a traditional carburetor in favor of a more economical injector.
This decision entailed the problem of synchronizing the opening of the throttle valve with the enrichment of the combustible mixture.
The solution was found in the use of a sensor that could record the position of the damper and transmit data to the control unit or on-board computer. Actually, the topic of the article is devoted to this small device, its purpose and operating principle. It is also suggested to consider the causes and symptoms of a malfunctioning throttle position sensor.
Throttle position sensor
Operating principle of the throttle position sensor
The essence of the operation of the TPS can be formulated in one sentence - the sensor converts the value of the throttle valve position angle into an electrical signal, the strength of which varies depending on the degree of opening of the valve.
The signal is sent to the electronic control unit, which in turn sets the necessary parameters to the fuel injection system controller.
During normal operation of the sensor, the engine reaches the most optimal and economical operating mode.
There are two types of sensors produced:
Contact TPS
The operating principle of this device is based on the principle of a rheostat, variable resistor or potentiometer. The sensor is directly connected to the damper axis and when it moves in a circular motion, the contacts also move.
The contacts are located on tracks made of resistive material, the number of tracks is usually from 2 to 6, it all depends on the manufacturer.
When the contacts move along tracks with high resistivity, the voltage indicator changes, which is already an adapted signal for the control system.
Advantages: structurally simple, quickly tested for failure.
Disadvantages: presence of constantly rubbing parts.
Non-contact TPS
The operation of this device is based on the use of the Hall effect, in other words, there are no traditional contacts in this system (in fact, where the name comes from).
In place of the moving contacts of the sensor there is an elliptical permanent magnet, and in the housing there is an integral Hall sensor, which reads changes in the magnetic field when the magnet moves and converts the reading value into an electrical signal.
Advantages: absence of rubbing parts, possibility of programming, increased working life.
Disadvantages: It is very difficult to determine the malfunction without the appropriate equipment.
Main types of TPS faults
Notably, the throttle position sensor is relatively simple. This statement leads to the following - the main reason for the malfunction of the throttle position sensor is the use of low-quality materials in its production.
More specifically, the most common malfunctions should be considered depending on the design type of the device:
Possible malfunctions of the contact throttle position sensor
- Loss (weakening) of contact between moving terminals and resistive tracks;
- Deterioration of the tracks themselves;
- Failure of the resistance(s) included in the sensor circuit.
Possible malfunctions of the contactless throttle position sensor
- Failure of the programmable integral Hall sensor.
Diagnosis of sensor malfunction
If the TPS fails, this immediately affects the operation of the engine. The problem is that these interruptions can be perceived as a malfunction of other vehicle systems, for example, the ignition system.
Car owners very often confuse the symptoms of a sensor malfunction with other breakdowns and try to fix the wrong thing. It is also noteworthy that there are no clear signs of malfunction.
Checking the throttle position sensor is advisable for the following types of engine interruptions:
- The engine stalls at idle;
- Increased idle speed;
- Dips in the dynamics of increasing engine speed when pressing the gas pedal;
- Increased fuel consumption;
- Problems starting the engine;
- Popping sounds in the exhaust manifold;
- The Check Engine indicator on the dashboard is activated.
How to check the throttle position sensor, procedure:
- Organize free access to the DPS. To do this, you may have to remove the air filter and air duct pipes, it all depends on the car model;
- Determine what type of sensor is installed (contact or non-contact);
- Remove the electrical connecting chip from the sensor connector; three contacts will be revealed: ground, power and output voltage contact. Note! Further actions apply only to contact sensors;
- For testing you will need a multimeter. First you need to check the voltage between power and ground. Depending on the car model, it can be 12V or 5V;
- The next step is to measure the voltage between the output contact and ground. When the damper is closed, the sensor voltage is approximately 0.7V, and at maximum – about 5V. These indicators are standard and the range of values should not be more than 0.5V. Next, you need to smoothly change the position of the damper with your hands, and the tester readings should increase accordingly or vice versa. In this way, it is possible to identify areas where contact is absent or insufficient;
- It is also advisable to measure the resistance. This must be done without connecting to the car's electrical network. The measurement is made between the output contact and ground. With the damper closed, the average resistance value is about 2.5 kOhm, and with the damper open, 1 kOhm. In this case, the range of values should be within 0.2 kOhm.
How to check and adjust the throttle position sensorChecking the throttle position sensor adjustment
The non-contact throttle position sensor is tested using special equipment. It is possible to independently check only the voltage and its dynamics when changing the throttle position, but these actions do not always help in accurately determining the breakdown of sensors of this type.
Replacing TPS
It should be noted right away that repairing the throttle position sensor is ineffective due to its low cost. On average, a contact sensor is designed for 50,000 km of vehicle mileage; contactless devices increase the operating time several times. In principle, all repair actions can be reduced to cleaning clogged contacts; it is advisable to wash them with alcohol.
Replacing the throttle position sensor is the most reasonable solution. Moreover, this simple operation is accessible to any car enthusiast with more or less straight hands. But there are some nuances that are still worth paying attention to:
- When replacing, you should pay attention to the integrity of the boot; if necessary, it will also need to be replaced;
- When aligning the hooks on the damper axis with the grooves of the moving part of the sensor, the housing should be rotated clockwise. After entering the grooves, the sensor body is rotated counterclockwise until the mounting holes for the bolts are aligned;
- All actions must be performed with the battery terminals disconnected, otherwise the control unit will remember the error and the Check Ingine indicator will light up even with a new sensor. To reset the information, it is enough to de-energize the system for 15–20 minutes.
Replacing the throttle position sensor on a VAZ-2108 and VAZ-21099
After installation, you may need additional adjustments; read below on how to adjust the throttle position sensor:
- When the mounting bolts are loose, the sensor body should have some free movement around its axis; if there is none, then appropriate cuts should be made with a needle file;
- With the ignition on and a multimeter connected, rotate to achieve the optimal output voltage value of 0.7V (with the throttle completely closed);
- Afterwards, the terminals from the battery are reset again for 15-20 minutes;
- Then the ignition is turned on for 10 - 20 seconds without starting the engine. This is necessary for the electronic unit to “memorize” new sensor parameters;
- To start the engine, you must completely turn off the ignition and only then turn it on again.
In conclusion, several conclusions can be drawn:
- Do not purchase non-original sensors; cheap devices can distort readings when heated;
- A non-contact sensor, although more expensive, works more reliably and for a long time compared to a contact one.
If actions related to the sensor do not produce positive results, it is advisable to contact a professional auto electrician.
Source: https://SwapMotor.ru/ustrojstvo-dvigatelya/datchik-polozheniya-drosselnoj-zaslonki.html