VAZ-2110 fuse and relay block diagram: 8 and 16 valves
Any electrical circuit in any modern and not so modern car must be protected from short circuits. The VAZ-2110 is not the most technologically advanced car, but there is still progress in the layout of electrical equipment elements. Compared to classic VAZ models.
One of the positive changes in the arrangement of elements was the use of combined blocks in which fuses and relays are grouped. On the classic, all this was scattered throughout the cabin and along the entire front panel.
It has become more convenient to maintain and troubleshoot relays and fuses, which is what we will do now.
Where and what mounting blocks are located in the VAZ-2110
For the first time, such a layout scheme was implemented in the 70s of the last century on the first front-wheel drive Togliatti car VAZ 2108 . Having changed a little, it migrated to the VAZ-2110.
Now it remains to find out which of the three blocks contains the fuse or relay we need.
All three units are installed in the cabin, which is good because they are not affected by moisture and high temperature (as was the case in the VAZ 2107).
The main unit opens by pressing a button. It’s very convenient, you don’t need to remove anything, like on many foreign cars. VAZ-2110 8 valves.
To replace a failed element, it is enough to know its location.
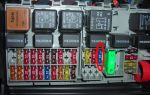
Main mounting block
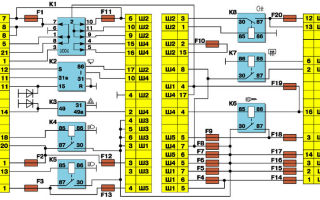
Mounting block diagram.
The button for opening the fuse box is indicated by an arrow. The hydraulic corrector control knob is not in the photo, apparently something was being repaired.
We open the cover and see the board on which fuses F1-F20 . These fusible elements protect almost all circuits, except for the generator, ignition, battery charging and engine starting circuits. A table of fuse ratings and protected circuits is given below.
Decoding of the main mounting block on the VAZ-2110
In addition to the fuses, in the main mounting block we will find seven or eight relays. Their number depends on the modification of the car. Most often, the K8 relay site is empty, since the rear fog lamp relay is installed there .
Otherwise, each of the fuses performs the following functions:
- K1 — relay for turning on the front optics;
- K2 - windshield wiper relay;
- K3 - turn signal breaker, it is also responsible for the operation of the emergency lights;
- K4 - low beam lamp relay;
- K5 - relay for high beam lamps;
- K6 - backup relay;
- K7 - relay for turning on the rear window heating filament.
This is due to the fact that the plant made certain adjustments to the electrical equipment system, without considering it necessary to warn the owners about this. In addition, the fuse table indicates all possible circuits used in the maximum configuration. Consequently, not all dozens have fuses for the electric window and central locking.
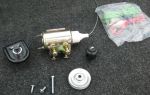
Console additional mounting block
Location of additional fuse box
The second fuse and relay box is located inside the center console and is covered with a plastic cover. The cover is attached with self-tapping screws and is located to the left of the front passenger.
Diagram of additional fuse box.
We unscrew the cover and see the entire additional block, which contains three 15-Amp fuses and three relays:
- Fuse for the ignition module and electronic engine control unit.
- A fuse that protects the circuit of the air flow meter, oxygen sensor, speed sensor and canister purge valve.
- The last fuse is responsible for the operation of the electrical part of the engine power supply system - the fuel pump, injectors.
- Fan motor relay.
- Fuel pump motor activation relay.
- Ignition system relay.
Changes in switching and layout of mounting blocks
So, in the first ten years of production, the fog light fuse was located immediately behind the main unit, without any board, it simply hung on the wiring harness. Later it was moved first to a separate board on the left side of the center console, and then to the main mounting block.
As a result, the layout of the block has changed. The mounting block for 7 relays has catalog number 2110-3722010-08 , the block for 6 relays is marked 2110-3722010, and the newest block received the article number 2110-3722010-01 .
In addition, there are blocks without legs for the relay for switching on the front optics K1 ( 2110-3722010-12 ), there is a block with legs, but without a relay (the legs are connected by jumpers and in order to install the head light relay yourself, the jumpers need to be cut), but mostly you come across blocks with legs for relays without jumpers. They involve either installing relay K1 or removable jumpers.
conclusions
In any case, when starting to troubleshoot a relay or a blown fuse, you should carefully read the diagram and table of correspondence between insert ratings and circuits. May fuses and relays never disturb you, stable twelve volts to your systems and pleasant travels!
Source: http://carfrance.ru/sxema-bloka-predoxranitelej-na-vaz-2110/
Diagram of the mounting block VAZ 2110, 2111, 2112 Zhiguli
16. Mounting block VAZ 2110
General information
The electrical equipment is made according to a single-wire circuit: the negative terminals of sources and consumers of electricity are connected to the “ground” - the body and main components of the car, which serve as the second wire.
The on-board network is DC, with a rated voltage of 12 V. When the engine is not running, all consumers are powered by the battery, and after the engine is started, by an alternator with a built-in rectifier and voltage regulator.
When the generator is running, the battery is charged.
Most electrical circuits are protected by fuses. Electric motors of gear motors - wipers of the windshield, rear window (VAZ-2111, -2112), headlights (if installed) - are protected by automatic reusable bimetallic fuses.
The power supply circuit of the fuel injection system (VAZ-2111, -2112 engines) is protected by a fuse-link made of wire with a conductor of reduced cross-section (1 mm2). The circuits for charging the battery, ignition (VAZ 2110 engine), starting the engine, “generator - ignition switch - mounting block” are not protected.
Powerful consumers (headlights, cooling system fan motor, electric fuel pump, etc.) are connected via a relay.
Location of relays and fuses - VAZ 2110 mounting block
Most fuses and relays are located in the mounting block located in the vehicle interior to the left and above the pedal assembly. The rated current of the fuses and the circuits they protect are indicated in the table. If the mounting block fails, it is possible to replace the printed circuit board or solder wires to replace the burned-out current-carrying tracks.
Mounting block connection diagram
The order of conventional numbering of plugs in the connecting blocks of the mounting block and the wires connected to them
To switch the main circuits of the car, a combined ignition switch (lock) is used, consisting of a contact part and a mechanical anti-theft device.
On cars with engines 2111 and 2112 there is a wiring harness for the fuel injection system that is installed instead of the harness for the ignition system of the 2110 engine (see Engine control system VAZ-2111 and -2112). The injection system relays and fuses are located near the controller, under the instrument panel console on the right.
Circuits protected by fuses
| Fuse No.(rated current) | Protected Circuits |
| F1 (5 A) | License plate light bulbs Instrument lighting bulbs Side light warning light Trunk light bulb Left side side light bulb |
| F2 (7.5 A) | Left headlight (low beam) |
| F3 (10 A) | Left headlight (high beam) |
| F4 (10 A) | Right fog lamp |
| F5 (30 A) | Door window motors |
| F6 (15 A) | portable lamp |
| F7 (20 A) | Engine cooling fan motor. Sound signal. |
| F8 (20 A) | Rear window heating element |
| F9 (20 A) | Recirculation valve Rear window and headlight wipers and washers Heated rear window relay coil |
| F10 (20 A) | Spare |
| F11 (5 A) | Starboard side marker lamps |
| F12 (7.5 A) | Right headlight (low beam) |
| F13 (10 A) | Right headlight (high beam). Indicator lamp for turning on high beam headlights |
| 14 (10 A) | Left fog lamp |
| F15 (20 A) | Electric seat heatingTrunk lock lock |
| F16 (10 A) | Relay-interrupter for direction indicators and hazard warning lights (in hazard warning mode) Hazard warning lamp |
| F17 (7.5 A) | Interior lighting lamp Individual backlight lamp Illumination lamp for the ignition switch Brake light lamps Clock (or trip computer) |
| F18 (25 A) | Glove box light Heater controller Cigarette lighter |
| F19 (10 A) | Door locking Relay for monitoring the health of brake light and side light lamps Turn indicators with warning lamps Reversing lamps Alternator excitation winding On-board control system display unit Instrument cluster Clock (or trip computer) |
| F20 (7.5 A) | Rear fog lamps |
| When repairing the electrical system, disconnect the “-” terminal of the battery (with the engine off). Before installing a new fuse to replace the blown one, find out and eliminate the cause of the burnout. Do not use oversized or home-made fuses - this can lead to burnt out traces of the printed circuit board, and possibly a fire. Due to the risk of short circuits, do not pry on blown fuses with metal tools (screwdrivers) unless the corresponding circuits are de-energized. |
Diagrams of electrical equipment of cars are given in the Appendices.
Removing the mounting block
|
Install the mounting block in reverse order.
Source: http://carmn.ru/vaz/2110-zhiguli/16-ehlektrooborudovanie.html
Mounting block for VAZ 2110: fuse diagram
Content:
- Location
- Replacement examples
The mounting block is presented in the form of a black box. Unlike airplanes, you can gain access to a car “black box” at any time the car owner needs. This unit is of great importance because it combines all the electrical components of your VAZ 2110.
In simple terms, the mounting block is a console with a board inside. It contains fusible links - fuses. Plus there are relays there.
Standard MB
The design is designed in such a way that the driver has the opportunity to independently replace a failed component. To do this, remove the broken fuse and insert a new one in its place. They cost pennies, but can seriously affect the performance of the equipment.
Since the release of the VAZ 2108, the domestic manufacturer has significantly improved the unit, making it resistant to vibrations and shaking.
To figure out how, if necessary, replace fuse F6 or any other of the 20 pieces that are provided on the VAZ 2110, you need to determine the location of the mounting and additional blocks, and also understand the diagrams.
More about this in our material today.
Location
Since AvtoVAZ engineers tried to do everything so that car owners would not have problems replacing relays and fuses, it would be stupid to come up with a clever arrangement. Therefore, finding them is not difficult.
- The main unit is located to the left of the steering wheel;
- You will find the first additional block in the dashboard inside the niche, directly behind the main mounting block;
- The second additional block is located in the same place, only on the opposite side.
We will get acquainted with each block separately so that you do not have any confusion when searching for one or another fuse.
On injection engines with 16 and 8 valves, the location of the MB is identical, so the instructions are equally relevant for owners of both versions of the dozen.
Main MB
Relays and fuses are located here. Let's look at their descriptions in more detail and separately.
Found the main MB
Let's start with the relay.
| Designation | What is he responsible for? |
| K1 | Car lamp operation |
| K2 | Electric windshield wipers |
| K3 | Special relay that interrupts the turning lights when the hazard warning lights are activated |
| K4 | Turning on the low beam |
| K5 | Turning on the high beam |
| K6 | Area for installation of additional device |
| K7 | Rear window heating operation |
Next comes the fuses. They are located in the same place, but are designated by the letters F.
Each fuse is indicated with a current rating and designation. This allows you to use a new fuse with parameters that meet the requirements of the equipment connected to it.
| Designation | Rated current | What is he responsible for? |
| F1 | 5A | Lamps for license plate illumination, instrument panel illumination, indicator lights on the instrument panel, left side position lights, luggage compartment illumination |
| F2 | 7.5A | Low beam left headlight |
| F3 | 10A | Left high beam |
| F4 | 10A | Right front fog lamp |
| F5 | 30A | Electric door windows |
| F6 | 15A | Carrying lamp, cigarette lighter |
| F7 | 20A | Radiator fan, horn (horn) |
| F8 | 20A | Heated rear window |
| F9 | 20A | Windshield wipers and washer |
| F10 | 20A | Backup fuse |
| F11 | 5A | Right dimensions |
| F12 | 7.5A | Low beams in the right headlight |
| F13 | 10A | High beams in the right headlight |
| F14 | 10A | Left fog lamp |
| F15 | 20A | Heated seats in the cabin |
| F16 | 10A | Hazard signal, turn signals |
| F17 | 7.5A | Stop signal, ignition switch illumination, interior lighting |
| F18 | 25A | Interior heater, glove compartment light, cigarette lighter |
| F19 | 10A | Reversing light, brake light monitoring |
| F20 | 7.5A | Rear fog lights |
First additional block
Inside the central panel there is the first of two additional blocks provided for the VAZ 2110. You can find it at the bottom left on the front passenger side.
This block provides three fuses. Each of them has the same power rating - 15A.
- The first fuse is responsible for your vehicle's ignition and controller module.
- The second protects the mass air flow sensor, heating sensor, speed sensor and purge valve.
- The third is necessary to ensure protection of the injectors, as well as the fuel pump. So if problems arise with the fuel pump, the first thing we recommend is to check the condition of the fuse responsible for it.
Additional block location
Plus, the same block includes three relays:
- Relay number 4 is responsible for the electric fan;
- Relay number five is the electric fuel pump;
- The third relay is part of the ignition protection group on your VAZ 2110.
Second additional block
The second additional block should be looked for already in the driver’s feet, on the right. Behind the protective cover on the console you will find the required board.
There are three more components on it. They are responsible for:
- Immobilizer operation;
- Additional optics (mostly fog lights);
- For the operation of the car's central locking control.
Replacement example
Since all fuses are located in a common block, the replacement principle is the same for all. Therefore, we can consider an example of only one element that needs replacement. Let this be the cigarette lighter. It is designated F6 and F18 (see table).
The first priority before replacing a fuse is to check its functionality. Many people immediately change the element without even considering whether the problem of the unit failure really lies in it.
Remove with tweezers
To check the fuse, you should perform several step-by-step operations:
- Start the car by turning the key in the ignition;
- Make sure that the cigarette lighter is inside its socket, where it should be;
- Wait about 20 seconds;
- Take out the cigarette lighter and check if it is warm. If the temperature remains the same, that is, the element is cold, then the fuse needs to be changed.
How to do it? Pretty easy.
- Get to the panel on which the board with the relays and cigarette lighters is located. The mounting block is located, as you remember, to the left of the steering wheel, at the bottom of the dashboard.
- By pressing the special latches, the cover will move away from its seat. Be careful not to break the latches.
- The mounting block has now opened in front of you.
- If you look at it carefully, you will see special tweezers on the edge. It is provided by the factory in order to carefully remove fuses and insert new elements in their place.
- Remove the affected fuse. In this particular situation, we are talking about the cigarette lighter fuse, so you need an element designated F6 or F18.
- This component burns out due to the fact that modern motorists need additional electrical equipment, such as vacuum cleaners and electric pumps. All this is connected to the fuse and overloads it. Hence the frequent breakdowns.
- Using the same tweezers, insert a new fuse with the same parameters indicated on the mounting block.
If for some reason you don't have tweezers inside your black box, small pliers can serve as an alternative to this tool. Never try to remove the elements with your fingers. The nests are quite fragile, and with your hands you can only loosen it and damage it.
Replacing relays and fuses is a simple and inexpensive repair. But if you damage the block itself, then you will have to spend more, and you will definitely have to work hard.
Are fuses repairable? No. These are fusible elements that simply become deformed when burned. Therefore, repair is possible only in one option - replacing blown fuses.
Loading …
Source: http://luxvaz.ru/vaz-2110/253-shema-predohraniteley.html
VAZ 2110 car fuse box: educational program for beginners
The main mounting BP of the VAZ 2110 8-valve injector, like other VAZ “Ten”, is located just below the steering wheel, on the left. It contains the main fuses and relays. For easy access there is a special button located next to the headlight control. When pressed, the block moves down. Two additional power supplies are located in the center and right of the console behind the instrument panel.
On top of the relay block, the package may include fuses that are responsible for connecting additional devices and devices to the electrical network.
Electrical connection diagram
Color and numbers of wire plugs
Most power supplies contain relays, each with its own purpose:
- K1 – monitors the serviceability of light bulbs installed on the car;
- K2 – is responsible for the performance of the windshield wipers;
- K3 – controls the operation of the emergency lights and repeater;
- K4 and K5 – relays for an engine with an injector, responsible for turning on low and high beams in the headlights;
- K6 – spare relay for replacing burned out ones;
- K7 – controls the heated glass at the rear.
The abbreviation F1-F20 in the diagrams denotes fuses. They protect the vehicle's electrical circuit. Each element is designed for a specific current value. This must be taken into account when purchasing new items. The failed element is replaced with a new one or a backup one (video author - IZO)))LENTA).
The table shows the purpose of fusible elements:
| Fuse, designation (current, A) | Protected section of the chain |
| F1 (5) | Lamps for lighting the dashboard, license plate light, side light, trunk |
| F2 (7.5) | Low beam lamp in the left front headlight |
| F3 (10) | High beam lamp in the left front headlight |
| F4 (10) | Right fog light |
| F5 (30) | Electric motors for glass lifts |
| F6 (15) | portable lamp |
| F7 (20) | Signaling. Cooling system fan electric motor. |
| F8 (20) | Heated rear window |
| F9 (20) | Windshield wipers and headlight washers. Recirculation valve. |
| F10 (20) | Reserve element |
| F11(5) | Side light right |
| F12 (10) | Low beam bulb in the headlight on the right side |
| F13 (10) | High beam bulb in the headlight on the right side, control for turning on the bulb |
| F14 (10) | Left fog light |
| F15 (20) | Locking the luggage compartment lock, heating the driver and passenger seats |
| F16 (10) | Controls hazard warning lights and turn signals |
| F17 (7.5) | Individual backlight lamps, interior lighting, etc. Adjustment of trip computer, clock |
| F18 (25) | Cigarette lighter, supplies current to heating system controllers, glove compartment lighting |
| F19 (10) | Monitoring the serviceability of the dimensions, stop lamps, reverse gear, generator excitation coil windings, door locks, instrument cluster |
| F20 (75) | Rear fog lights |
To get to the additional unit located in the center of the dashboard, on the right side you need to unscrew the screws on the panel and remove the plastic protective cover. It contains 6 relay fuses with the same current strength - 15A.
Elements of the additional power supply are responsible for
- 1 — ignition system controller;
- 2 - Mass air flow sensor, oxygen regulator, vehicle speed meter;
- 3 — supply of fuel to the pump, nozzles;
- 4 — fan cooling the power unit;
- 5 - fuel pump;
- 6 — ignition system.
There is also a third fuse panel on the VAZ 2110. There are three relays on it. One is related to monitoring the operation of the immobilizer. The second serves to ensure the functionality of additional lighting; for example, it may contain a fog light fuse if it is not present in the main unit. The third is the central locking relay.
Photo gallery
Instructions for removing and replacing the power supply with your own hands
If there is a need to replace the power supply, the operation consists of 2 stages: removing the old unit and installing a new one.
Tools and materials
To carry out the operation, you will need a set of tools, a new power supply and knowledge of where the old one is located. The price of a new fuse box allows you to purchase a power supply and install it yourself.
Stages
The replacement procedure consists of the following steps:
- First, turn off the power to the vehicle by removing the negative terminal from the battery.
- Next, we find the power supply to the left of the steering column. By pressing the built-in button, we lower the lid along with the block located on it.
- Using a Phillips screwdriver, unscrew the screw holding the latch and remove it.
- Next, remove the power supply from the cover and turn it over.
- Having disconnected the plug with wires from the power supply, we dismantle the device.
- Then we take a new power supply unit, attach a block of wires to it and mount it in its regular place.
- Screw the latch into place and close the lid.
- Lastly, connect the negative terminal to the battery.
Conclusion
If any system or component of the machine fails, you need to check the serviceability of the corresponding fuse or relay. If the element is burnt out, it must be replaced. To do this, you need to know how to disassemble the power supply and where exactly the burnt element is located.
First you need to find the power supply, often called the black box, and press the button to open it. In the middle there is a special tweezers for removing fuses from the socket.
Next, we find the burnt element, for example, the cigarette lighter fuse under the designation F18. Using tweezers, we pull out the failed element and install a new one in its place.
Likewise, knowing where the fuse for the fuel pump is located, it is easy to replace them.
Loading …
Video “Removing and installing power supply”
How to replace the mounting block on a VAZ 2110 is demonstrated in this video (the author of the video is Viktor Kulikov).
Source: https://avtoklema.com/predohranitelej/blok-predohranitelej-vaz-2110-3169/
VAZ 2110 fuses: block, location, diagram
Removing the mounting block from the dashboard.
The mounting block (fuse panel, black box) is an important unit that combines all the electrical elements of the VAZ 2110 car.
In simple words, there is a circuit board inside the console where all the fuses and relays are initially installed. The fuse panel is designed so that the driver can independently replace an element that has failed.
The motorist needs to remove the non-working fuse or relay and install a new element in its place.
VAZ cars of the “new” generation (starting from the eight) are equipped with a reliable unit, the connectors of which are not afraid of shaking and vibration. Old models cannot boast of this.
To replace a burnt-out relay or fuse, we need to know the location of the black box, as well as its diagram - where each element is located.
There is no need to learn the order of the elements by heart, there are so many of them, so we have attached a convenient diagram to the article, as well as explanations for it.
Where are the mounting and additional blocks located?
Location of the main mounting block in a VAZ 2110 car. In earlier versions, the black box was installed under the hood.
Finding these devices is easy. The main panel with the relay is located in the lower left corner of the steering wheel - near the driver’s left foot. You can remove it if necessary without additional materials. If you take out the mounting block, you will find another one behind it. But in domestic cars of this model range there are three of them:
- Main fuse block. Located in a convenient place - to the left of the steering wheel;
- Two additional panels. Located in the torpedo. One of them is located inside a niche behind the main block, the other is on the opposite part.
It is recommended that you examine each black box so that new fuses can be easily installed if necessary.
Main block
Layout of relays and fuses in the main mounting block.
Let's look at the relay first:
| № | Purpose |
| K1 | Relay responsible for the operation of car lamps |
| K2 | Electric windshield wiper |
| K3 | A special relay that interrupts the turn lights when the hazard warning lights are activated |
| K4 | Low beam start |
| K5 | High beam launch |
| K6 | Space for installing an additional element |
| K7 | Starting the heated rear window |
| K8 | The VAZ 2110 model does not have this element. |
A visual indication of all fuses in the VAZ 2110 car.
Additional block
Location of the additional block with fuses and relays.
There is an additional block in the central panel, the location of which can be seen in the photo. It contains three fuses with the same power of 15A:
- The first is responsible for the controller and ignition module in the VAZ 2110.
- The second takes over the protection of the mass flow sensor (mass flow meter), purge valve, heating and speed sensor.
- The third is responsible for the injectors and fuel pump.
And three relays:
- The fourth number indicates an electric fan.
- Under the fifth is an electric fuel pump.
- The last relay relates to the ignition of the VAZ 2110.
Optional relay panel in console
There are only three elements here that are responsible for the operation of the immobilizer, the launch of additional optics (most often these are fog lights), and also for controlling the central locking.
The arrow points to the additional relay panel.
Cigarette lighter fuse: replacement
Using the example of a cigarette lighter, we will look at replacing fuses, since they are changed according to the same scheme. First you need to check the functionality of the cigarette lighter, this is done as follows:
- We start the car.
- The cigarette lighter must be inside its socket. That is, at your workplace.
- We wait 20 seconds.
- We take out the device and check it by touch: if the temperature has not increased, then it is faulty.
So, we are convinced that the device is not working. Now we have to replace the blown cigarette lighter fuse. We already know the location of the black box (to the left of the steering wheel, below the dashboard). Next, you need to press the latches so that the lid opens. Inspect the mounting block carefully: there should be tweezers inside to remove the fuses.
Now all that remains is to find the cigarette lighter fuse - it is indicated in the diagram as “F18”. We remove the burnt out element and install a new one - the work is finished. We took the cigarette lighter as an example, since it most often fails.
This happens due to the desire of VAZ 2110 owners to place additional electrical appliances inside its socket: pumps, car vacuum cleaners and other equipment that overload the fuse.
If there are no tweezers inside the black box or you have lost them, then you can use pliers as a replacement. You should not try to do this with your fingers, as such an action will weaken the already fragile nest. If the relay is inexpensive to replace, then you will have to spend a lot of money to repair the mounting block. You need to unscrew the element carefully so as not to crush it.
Source: https://VAZremont.com/sxema-bloka-predoxranitelej-vaz-2110
VAZ 2110 fuses and relays, diagram of fuses and relays, where they are located. Where are the fuses on the VAZ 2110. Diagram and location of relays and fuses on the VAZ 2110
If your vehicle does not start, the turn signals stop turning on, the windshield wiper blades do not work, or, for example, the heater refuses to work, then the first thing you need to do is pay attention to the condition of the fuses, that is, see if they have blown.
The car may not start because the starter or fuel pump fuses have blown; the heater motor also has its own fuse. Often, the cigarette lighter fuse suffers from increased load, which on the VAZ 2110 has to be changed quite often. More on this later in the article.
Relays and fuses for VAZ 2110, where they are located
On the VAZ-2110, the relay and fuse box are located in the vehicle interior a little higher and to the left of the pedals.
VAZ 2110 fuses and relays, location diagram with explanation
Location of fuses and relays in the mounting block of the VAZ 2110 car:
- Relay for monitoring the good condition of the light bulbs - K1.
- Front wiper relay - K2.
- Relay interrupter for hazard warning lights and direction indicators - K3.
- Low beam headlight start relay - K4.
- High beam headlight start relay - K5.
- Additional relay - K6.
- Rear window heating start relay - K7.
- Fog lamp relay - K8.
- Fuses - F1-F20 - virtually all vehicle circuits are protected by fuses, which are rated for different current ratings. The exceptions are the following circuits - ignition and starting of the engine, the generator circuit, in addition to the excitation winding, and the battery charging circuit.
How to find a blown fuse
To find a blown fuse, you need to use the diagram below. Before doing this, you should find the cause of the blown fuse and eliminate it, after which you can install a new fuse.
VAZ 2110 fuse circuit tables
- Room lighting bulbs. Instrument lighting bulbs. Side light indicator light. Trunk light bulb. The side light bulbs on the left side are F1 (5 Amperes).
- The low beam of the left headlight is F2 (7.5 Amperes).
- The high beam of the left headlight is F3 (10 Amperes).
- Right fog lamp - F4 (10 Amperes).
- Electric door window motors - F5 (30 Amperes).
- Portable lamp, cigarette lighter - F6 (15 Ampere).
- Electric motor of the engine cooling system fan. Sound signal. — F7 (20 Ampere).
- Contacts (relay) for starting the rear window heating - F8 (20 Amperes).
- Coil (relay) for starting heated rear window. Recirculation valve. Headlight and windshield washers and cleaners (wiper fuse) - F9 (20 Amperes).
- Reserve - F10 (20 Amperes).
- The side light bulbs on the right side are F11 (5 Amperes).
- The low beam of the right headlight is F12 (7.5 Amperes).
- High beam of the right headlight. The high beam start indicator light is F13 (10 Amperes).
- Left fog lamp - F14 (10 Ampere).
- Locking the trunk lock. Electric seat heating - F15 (20 Amperes).
- Relay-breaker for alarm and direction indicators (alarm mode).
Hazard warning light - F16 (10 Amperes).
- Interior lighting bulb. Individual backlight lamp. Ignition switch illumination lamp. Brake light bulbs. Clock (or trip computer) - F17 (7.5 Amperes).
- Glove compartment light bulb. Cigarette lighter fuse.
Heater controller (fuse) - F18 (25 Amperes).
- Relay for monitoring the good condition of the side light bulbs and brake lights. Locking door locks. Reversing light bulbs. Turn signals with warning lights. Generator excitation winding. Instrument cluster. Control system display unit.
Clock (or trip computer) - F19 (10 Amperes).
- Rear fog lamp bulbs - F20 (7.5 Amperes).
Additional relay and fuse box for the fuel injection system, where the
Additional relays and fuses are located on the right side of the instrument panel, behind the console side trim, which is secured with two screws.
Diagrams of additional fuses and relays with conditional numbering
Additional fuses (all 15 Amp):
- Controller, ignition module.
- Air flow sensor, oxygen sensor (heating), vehicle speed sensor, canister purge valve.
- Injectors, fuel pump, fuel pump relay. Additional relays:
- Electric fan relay.
- Electric fuel pump relay.
- Ignition relay (main relay).
The fog lamp fuse is mounted in the dashboard niche behind the mounting block.
Conventional numbering of plugs in connecting blocks
Mounting block connection diagram
The inner number in the designation of the wire tip is the conventional number of the plug, and the outer number is the number of the block.
Pro Tips
As for replacing the fuse, everything is extremely simple. First you need to find the black box with the mounting block and press the latches to open the lid.
Carefully inspect the mounting block - there should be special tweezers in the middle for removing fuses. Next, we find the fuse we need, for example, the cigarette lighter fuse, that is, “F18”.
Then, using tweezers, remove the burnt out element and install a new one.
- Tuning VAZ 2114: modification of the VAZ 2114, a little about everything
- Throttle body, DIY throttle body cleaning
- Gestures and light signals by drivers
- Medical examination for a driver's license 2018
- Lada Vesta official versions. Advantages and disadvantages of Lada Vesta
- How to repair the gear motor of a VAZ 2110 stove
- Kalina stove control unit: design, repair and replacement of the Kalina stove control unit
- What is a pneumotester, how to evaluate its readings?
- Oil pump VAZ 2107, do-it-yourself oil pump repair and replacement
- What to do if your car is stuck in the snow, useful tips
- The headlight is sweating from the inside, what should I do?
- The VAZ 2107 stove does not heat well: how to repair the stove on a VAZ 2107
- Anti-freeze, what is it and how to choose it correctly
- Car lamps: LED, halogen, ice lamps How to choose lamps in a car
- Reasons for antifreeze leakage: faulty cooling system, cooling radiator, heater radiator, faulty connections, antifreeze in the engine oil.
- How to replace a light bulb in a car
- How to photograph a car for sale, useful tips
- How to choose a car service (and save money at the same time), useful tips
- How to start a car in winter, useful tips
- What can knock in a car? How to determine the cause of a knock?
- How to diagnose a car yourself
- Autonomous preheater, autonomous preheater with remote or programmable start
- Replacing the silent block of the front suspension arm, how to replace the silent blocks of the front suspension with your own hands?
- Idle speed sensor malfunction VAZ Signs of a malfunction of the idle speed sensor VAZ 2110, 2107, 2109. Replacing the idle speed sensor with your own hands
- Is it necessary to warm up the engine?
- How to clean the throttle valve yourself?
- VAZ injector does not start well in cold weather, what should I do?
- How to replace a VAZ clutch fork?
- Replacing a 2110 clutch disc. How to replace a 2110 clutch disc without removing the transmission?
- What is a code grabber, how does it work and is there protection against it?
- How to replace VAZ tie rod ends with your own hands?
- Generator 2115 DIY replacement and repair
- Replacing generator bearings 2110
- Automotive clutch: device, operating principle, classification, types, advantages and disadvantages
- How to check generator 2110? How to remove generator 2110? DIY VAZ 2110 generator repair
- Why the rear window of the car does not heat up, do-it-yourself rear window defroster repair
- I flooded the candles in the cold, why the candles flood in the cold, reasons and how to fix them
- Car key with a chip, how and where to make a chip key for a car?
- How to stud winter tires correctly, stud winter tires with your own hands, useful tips
- Why do cars catch fire?
Source: http://prosedan.ru/predohranitelej-i-rele-vaz-2110-shema-predohranitelej-i-rele-gde-oni-nahodyatsya