Making a braid on the steering wheel with your own hands: instructions
Most car enthusiasts complain that a car is not a luxury, but in general, they strive for the best, for the improvement of the objects around them. Leather is the best material for a car interior.
Isn't it time to get your own vehicle? You can start with the steering wheel, since the main interaction occurs with it. Do-it-yourself braiding on the steering wheel is a solvable and feasible task.
Using genuine leather for the steering wheel braid
Basically, leather braiding on the steering wheel is found in expensive cars. Does the make, age, and country of manufacture of your car matter much? And what is the reason not to install leather braiding? After all, this material is much more comfortable for the driver’s hands, and it also gives the car interior a more comfortable look.
This is more noticeable when traveling long distances. A distinctive feature of the leather steering wheel is high ventilation. If plastic does not absorb moisture, then this material copes with it perfectly. To increase the ventilation effect, perforated material should be used.
The disadvantage of leather steering wheel braid is its short service life compared to plastic. It is also difficult to remove contaminants. But these shortcomings are not an obstacle.
The cost of services for installing leather braiding in salons is quite high; you should not blindly agree with it. The installation takes 2-3 hours, but you will have to fork out some money. But in reality the work is simple.
All you have to do is start making a leather interior with your own hands!
The steering wheel braid can be ordered online, or purchased in stores that sell similar materials in finished form. There are plenty of models to choose from.
The car owner can only use the needle and thread included in the kit. It will take no more than two hours of work to bring the braid into the desired shape.
Leather is a fairly flexible material; after 3-4 days of use, it takes the shape of the steering wheel.
Leather braided steering wheel
There are situations when you can’t always find something ready-made. For example, the multifunctional steering wheel of a car does not correspond to the products offered, or what is offered does not suit the client, this also happens.
Maybe you should do the braiding yourself? If the latter option is closer, then it is worth preparing leather, needles, threads and scissors. Also, when doing this kind of work you will need a lot of patience.
How to make a steering wheel braid with your own hands
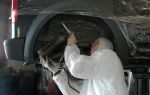
If possible, the steering wheel should be removed. This process is quite difficult; it is necessary to dismantle parts that pose obstacles. These may be adjustment buttons. The battery is switched off accordingly.
The stencil is an integral part of the sewing process. It's not difficult to do. To do this, the steering wheel is wrapped with cling film, onto which masking tape is glued. Next, a seam is drawn on it.
Cutting is carried out along the contours made. Ideally you should get three pieces. A pattern is cut out from the stencil; five millimeters must be left for the seams.
For greater tension of the material, at the joints the indents are reduced by two millimeters.
Selection of material for braiding on a car steering wheel
Leather with perforations is preferable, but leather without it is also great, but its quality must be of a high level. Pieces of leather are sewn together by machine. If you do not have this device, you can do this manually.
This is doable work, but quite hard. Therefore, you can contact the studio. The studio's specialists will sew a seam that will create more favorable conditions when tightening the leather braid on the steering wheel, since the holes for the hinges are already ready. When sewing, use synthetic threads. Synthetics are durable and last longer.
What provides the best results?
The best results will be ensured by your precision, patience and accuracy. The process of braiding the steering wheel begins with applying the blank to the steering wheel. Particular attention is paid to symmetry. Marks are made in the places where the seams pass through the joints.
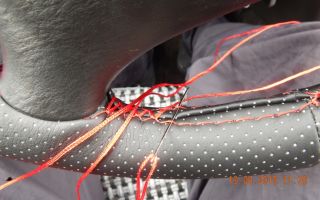
The next stage is lacing. We pass the thread through the loops on each side of the braid. Braiding the steering wheel is also possible using firmware. The main thing when performing work is not to spoil the skin. Do not tighten the thread the first time.
Take your step choice seriously. When lacing, the loops are tightened alternately. If the leather is strong enough, it can be moistened with water to provide greater elasticity. After this, the screed will be greatest.
The braid on the steering wheel is ready, now you can install it back.
Source: http://shokavto.ru/opletka-na-rul-svoimi-rukami/
Steering wheel braid: review, choice, trim, do-it-yourself braid, video
Steering wheel braids are very popular and are often purchased as an accessory for your car.
Drivers acquire this attribute for many reasons: to decorate the interior of the car, increase comfort in using the steering wheel and update its already boring appearance.
The braid also helps to preserve the presentation of the car's interior for a long time, because the steering wheel is the most visible part.
basic information
Steering braid is considered the most optimal and affordable way to tune your car.
It is sold at any automotive supply store and is inexpensive.
The assortment includes many varieties of this accessory: leather, fur, curly braids with foam inside, eco-leather.
By purchasing a braid for the steering wheel, you can easily put it on yourself and replace it without any problems if it loses its presentation or just gets boring.
At the same time, when choosing a braid for the steering wheel, you need to take into account some difficulties, which include the competent selection of size, material, style, color scheme and fixation option.
Some covers can be put on very simply, while others will require quite a long and careful work using special threads.
Why is a steering braid needed?
Very often, drivers ask the question: “Is braiding on the steering wheel necessary at all?”
The lucky ones are the owners of the luxury category of vehicles, where the car interior is equipped with leather trim, the design is consistent in the same style and the leather braid on the steering wheel perfectly combines with the overall style of the entire interior.
At the same time, owners of budget cars have to resolve issues with aesthetics on their own, because in this segment of cars there is minimalism, in which there is not even anything to “catch on to.”
Also, a steering wheel braid will be necessary for the driver of a used car, in which the steering wheel has lost its visual appeal and has acquired many scratches.
The steering wheel braid acts as a cover, which serves to preserve the attractive appearance of the steering wheel of your car in a situation if you decide to sell your vehicle.
Also, the braid on the steering wheel does not allow the hand to slide on the surface, preventing scrolling and increasing driving safety.
Also, this attribute, by increasing the thickness of the steering wheel, allows car owners with wide hands to comfortably hold the steering wheel in their hands.
How to choose the right braid for the steering wheel?
The choice of this accessory should be made according to several criteria:
- Material of manufacture. Today you can find a variety of braids that are made from different materials. Girls prefer to buy soft steering braids made of velor, fabric and suede. These types of braids are characterized by cheerful colors and are pleasing to the eye. Men opt for classic options. Therefore, leather braiding or eco-leather are very popular due to their long service life and external noble style. You should not buy foam rubber covers, because they very quickly lose their shape, sagging when touched.
- Color scheme and style. Choose braids for the steering wheel based on the color scheme of your interior. If you are the owner of a black interior, then the braiding should also be selected in dark colors. There is no need to “decorate” expensive executive cars with braids in the form of a velor dog or flowers. Such a decision completely spoils the entire impression of the owner’s good taste.
- Fixation type. Braids for the steering wheel of a car are divided into two categories: covers that do not require covering, and braids for the steering wheel, which are fixed with a special thread. Each of the models has its own advantages and disadvantages. A fixed cover will be very easy to put on, but during use they can twist and even slide off if the fit is loose. Such accessories can completely integrate into the interior of the car to such an extent that no one will even notice that the braid on the steering wheel was purchased separately. But installation of such models may be difficult. Installation will require some skills and free time to do the steering wheel trim yourself.
How to choose steering braid by size?
If you decide to buy a steering braid for yourself, then you should not have any difficulties in choosing.
You just need to measure the diameter of the steering wheel and provide this information to the seller.
If you decide to buy a case as a gift, then you need to understand the categories of such accessories, which are divided into several types.
Today, there are several sizes of steering braids in stores:
- Size S (diameter 35-37cm). This type of braiding is ideal for a small car such as Oka or Tavria. You can also purchase this size for those cars that have a sports steering wheel. In the Kia Picanto, a similar size will also fit, but when installing it, you should take into account that it will fit with difficulty, but will clearly fit the steering wheel;
- Size M (diameter 37-38 cm). This type is the most relevant for foreign passenger cars. It is considered standard because it is suitable for cars such as Kia, Nissan, Ford, Toyota, Chevrolet and even domestic “eights”, “nines”, “ninety-nines”, “tens”, Grant, Kalina and Priora. Therefore, if you own a foreign-made passenger vehicle or domestic car from the above list, you can buy this braid size;
- Size L (diameter 38-40 cm). These sizes are suitable for Niva, Volga and Moskvich. Also, the braid will be ideal for models such as “seven”, “eleventh”, “thirteenth”;
- Size XL (diameter 42-43 cm). This braid is intended for UAZ and GAZelle cars;
- Size XXL (diameter 47 cm). Designed for the steering wheels of foreign freight transport;
- Size XXXL (diameter 49 cm). Buy this accessory if you are looking for a braid for KAMAZ.
From the huge variety of online stores of auto goods, it is difficult for an ordinary person to identify bona fide sellers. When purchasing goods from dubious stores, people are faced with low-quality goods and delays in delivery.
Especially for you, we have selected several trusted online stores with the best prices, where you can purchase good quality steering wheel braid without any fear.
- Online store No. 1.
- Online store No. 2.
How to properly trim the steering wheel?
A similar procedure should be carried out from above. Pull the upper part of the braid and gradually move down, putting the cover on the steering wheel.
It is most comfortable in this situation to use the help of an assistant who will help you.
If you don’t have anyone nearby who can help, then use ordinary tape.
While stretching the underside of the braid, secure it with tape (to prevent the adhesive tape from leaving marks, cover the material with ordinary cloth or polyethylene).
After this procedure, continue to pull the cover over the lower half of the steering wheel.
When tightening, it will be convenient to use 2 flat-head screwdrivers.
When putting the braid on the upper half of the steering wheel, pull the lower side of the cover, prying it on both sides.
Next, remove one screwdriver and immediately press down on this area with your hand. Using a screwdriver, you need to pry up the back side of the braid, pointing it towards the steering wheel.
For an easier procedure for tightening the cover, it is best to soak the steering braid in warm water or heat it with warm steam.
Interesting! With this method, the leather braid will gain greater elasticity and it will be easier for you to put it on due to the stretching of the materials.
You can also stretch the steering braid by inserting spacers into it at 12 o'clock. For this action, ordinary slats are suitable, on which you will need to tension the material.
After you have been able to put the braid on the steering wheel of the car, secure it with special cords located on the inside of the steering wheel.
How to make a steering wheel braid with your own hands?
If you don’t like the range of steering braids offered by stores, you can make this accessory yourself. Initially, you will need to decide on the color scheme and the material used for the braid, and then get to work.
The most suitable option for the steering braid would be perforated leather, which is soft and elastic, which ensures ease and comfort when working with it.
Choose a material whose thickness is 1.2-1.4 mm.
To work you will need to prepare:
- Material for steering braid;
- Sewing supplies (needle, thread, scissors);
- Patience.
Before you start sewing, it is best to remove the steering wheel itself. However, if you take into account the difficulty of the procedure, it is possible to get away with removing interfering components (airbags, adjustment buttons).
Be sure to disconnect the battery before performing this procedure.
Any type of sewing begins with a pattern. It's very easy to create.
You will need to wrap the bagel using cling film, wrapping paper tape on top. Next, you should draw a seam along it with a marker and make a cut along the drawn line.
Due to this action, you should have three pieces of stencil left on your hands, which should be numbered so as not to confuse the sewing sequence.
Apply the stencil to thick cardboard and trace with a marker, cutting out patterns with a margin of 5 mm on each side.
Important! Transfer of the developed layout to the skin should be accompanied by an additional margin of 1.5-1.7 cm.
After you have completed these procedures, attach the parts to the steering wheel and check that you have done everything correctly and that the dimensions are correct. If the result is good, you can start sewing all the components in the correct order.
It is best to sew the parts together using a sewing machine using nylon threads. The use of this material will allow you to make smoother seams that will last a long time.
Also, such a seam simplifies the process of stretching the braid, because the holes for the loops will already be made.
You can carry out the sewing process yourself if you are not afraid of difficulties. If you are not confident in your talent as a tailor, then contact a tailor for this task.
Source: http://ilovekiario.ru/autosovet/opletka-na-rul.html
Making a leather steering wheel with your own hands | Do it yourself!
Do-it-yourself braiding of a car steering wheel is a simple process, but it requires care and patience. In this article I will tell you how to make a simple braid without the process of stitching the leather on the steering wheel, which is difficult for many.
The entire braiding process can be divided into three stages, the first of which will be the selection and purchase of the required amount of leather. It should be noted that the leather used in the production of clothing or furniture upholstery is not suitable for a steering wheel, as it will quickly “wipe out”, losing its decent appearance, for which, in fact, the steering wheel is being reupholstered.
Therefore, the leather must be specialized, automotive.
Choose the skin color at your discretion. It is desirable, of course, that it harmonizes with the color of the interior, front panel or the color of the car itself.
It is not necessary to buy a single piece - you can choose leather of several shades for the steering wheel, while symmetrically placing multi-colored inserts around the circumference. The most common leather used for steering wheel braiding is black and dark gray. Light-colored leather will quickly lose its original appearance even if you use driving gloves.
You can also choose different skin textures. For example, glossy leather on the top and bottom of the steering wheel, and textured leather on the sides - such leather will slip less in your hands.
Stage two - preparation. You will need cling film and narrow tape. Cover the steering wheel tightly with film and wrap it with tape.
Then, at the location of the intended connection (the inside of the steering wheel), draw a line using a thin marker and use a regular sharp blade or paper knife to make an even cut.
Cut especially carefully in the area where the spokes meet. Remove the resulting rough braid from the steering wheel.
Next, you need to make a pattern, but not from leather yet, but from thick paper. To do this, if possible, straighten the film-adhesive blank on the paper and trace it. Cut out and attach the resulting paper braid to the steering wheel.
Carefully inspect for possible inaccuracies (the workpieces at the junction should not overlap; it is better to have a small gap - after all, the skin will have to be stretched).
See if the braid fits nicely on the steering wheel spokes.
If everything fits perfectly, apply the resulting paper blank to the skin and trace. If you do make a braid from several pieces of leather, you need to add 5 mm to the transverse seams (with which you will sew the pieces of leather together). Carefully cut out the product and try it on the steering wheel again. If there are no comments, you can proceed to the third stage.
Stretch the leather around the circumference of the steering wheel. If everything is done correctly, the length of the leather should overlap a little - after all, you have to sew it in this place. Sometimes special grooves are made for the seams in the steering wheel.
Mark with chalk the locations of the steering spokes (the seam, if there is only one, is usually located at the bottom).
Remove the workpiece from the steering wheel and along the entire length, on both sides, retreating from the edge 5-7 mm and in increments of 10 mm, make many holes for the lace or thread with which you will tighten the skin. There is no need to punch holes in the areas of the knitting needles marked with chalk.
Sew the braid along the length so that it fits tightly onto the steering wheel. All that remains is to use thread or lace (the color of which you can also experiment with) to secure the leather to the steering wheel.
In this case, choose the lacing option yourself - it can be lacing with one thread at two ends (as on shoes), or circular lacing. There are many pattern options.
But the thread must be strong and not very thin, otherwise it will cut the skin.
Don't be discouraged if the skin bulges a little in some places. Leather is a material that, after some time, will definitely take the shape of the object it is stretched onto. As a last resort, you can lightly moisten the skin with plain water - this will definitely make the skin tighten!
The video shows the process of stretching the braid onto the steering wheel:
(Visited 10,010 times, 1 visits today)
Source: http://www.SdelaySam.net/2011/06/delaem-kozhanuyu-oplyotku-rulya-svoimi-rukami.html
How to make a leather steering wheel
Home » Spare parts and accessories » How to make a leather steering wheel
The steering wheel of a car is not only one of the main controls, but also the element that you pay attention to when you get into the car and on which how comfortable and pleasant it is to drive the car depends.
Intensive use of the steering wheel leads to a fairly rapid loss of its original appearance. In this article, “Do-it-yourself leather steering wheel reupholstery,” I will tell you how to return the steering wheel to its original appearance and make it even more attractive.
Do-it-yourself steering wheel reupholstery with leather. Necessary materials
To get started you will need
- Remove the steering wheel from the car (use the vehicle repair and maintenance manual).
- Construction masking tape - 1 large roll (paper tape, ordinary oilcloth tape will not work)
- Cling film or packaging film - 1 skein
- A utility knife preferably with a new blade
- Dark marker – 1 pc.
- Cardboard (preferably medium density)
- Strong nylon thread (the kind used for shoe repair is suitable)
- Sewing needles, preferably hardened ones (take several, they may bend or break)
- Two thimbles for the middle fingers (will protect your fingers from punctures)
Well, the most basic material to work with is leather. It is better to use good quality leather, and if you want to practice, it is better to use leather or leather substitute from old jackets, pants, bags, etc.
Reupholstering the steering wheel with leather and other materials begins with a pattern
You need to wrap the steering wheel with cling film. The film should fit snugly to the base of the steering wheel. Then we wrap masking tape over the film as tightly as possible so that the final result does not make the braid larger.
We take a marker and divide the steering wheel into four parts, make a mark on the inside of the steering wheel for the inner seam, preferably straight. IMPORTANT: Number or label each piece before cutting. We cut clearly according to the marks made, you should get four patterns.
We cut out the patterns and lay them on a flat surface, press them with something heavy, and leave them overnight so that they level out and take the desired shape. Next, we transfer the aligned patterns onto cardboard (this will make it more convenient to make patterns on the skin, ALWAYS make a reserve of 1-1.5 cm in the length of each element), and then transfer them to the skin.
We sew the elements cut out of leather in order from numbers 1 to 4, the first and last are sewn together to make a ring.
We try on the finished braid on the steering wheel; the workpiece should not dangle, but should fit snugly to the steering wheel (if it still does not fit, you need to sew it in one of the seams).
If everything worked out, we move on to the next stage, take the steering wheel braid and stitch the edges. It is better to perform this procedure with a sewing machine, if it is not possible to stitch, you can make a winding on the edges of the product (use only strong threads).
Stitch options for tightening the braid on the steering wheel
Do-it-yourself leather steering wheel reupholstery. Completion of work
To prevent the braid from slipping on the steering wheel during operation, the edges can be secured with glue or epoxy resin. After all the preparatory work has been completed, you can begin to tighten the braid on the steering wheel. Upon completion of the work, install the steering wheel back on the car and enjoy the result.
www.avtoavenu.ru
You will need
- – code
- – masking tape
- – cling film
- - scissors
- – needle
- – synthetic thread
- – pencil or felt-tip pen
- - stationery knife
Instructions
The leather-covered steering wheel looks impressive and presentable. Unlike plastic, this material allows air to pass through, so the driver’s palms are rarely wet. The disadvantages of leather covering include its ability to quickly become dirty and a significantly shorter service life than plastic.
On average, it does not exceed 5 years.
Before starting work on tightening the steering wheel, the car should be prepared: disconnect the battery, remove the airbag (if there is one), remove everything that could interfere with the process (buttons, decorations, etc.).
After this, you can begin making patterns. For this purpose you will need thin polyethylene (you can use cling film) and masking tape. The steering wheel is tightly covered with film so that a layer at least 1 mm thick is obtained. Then, masking tape is rolled over the film.
Its adhesive side should face the polyethylene.
Using a felt-tip pen or a simple pencil, draw lines where the seams will subsequently be. Using a stationery knife, slits are made in these places. The result should be several semicircular parts that need to be placed under the press and given time to align.
If the edges of the blanks turn out to be uneven, it is advisable to make analogues from thick paper. When the patterns are ready for use, they are placed on the skin and outlined with chalk or a felt-tip pen. In the places where the seams are supposed to be made, a 5 mm allowance is made, and along the circumference of the steering wheel, on the contrary, you need to cut off 1-2 mm (which corresponds to the thickness of the workpiece).
The next step is cutting out the details of their skin. To make the process of stitching them less labor-intensive, it is recommended to use perforated leather. You need to pull it so that the edges of the pattern coincide with the cuts on the steering wheel.
The skin can be glued to the plastic with superglue, but it will be much more secure if it is sewn. For this purpose, it is recommended to use a synthetic thread of a suitable color.
The work must be done extremely carefully, since the appearance of the steering wheel will depend on its quality.
If you get small creases on the skin, do not be upset: they will soon even out, since this material tends to take the required shape.
Pre-stitching the pattern on a household sewing machine will greatly facilitate the process. The stitching should follow the line of the technological allowance of 5 mm. It will be much easier to sew if there are holes in the leather.
All that remains is to thread a thread through them, which must be periodically evenly tightened.
www.kakprosto.ru
How to easily sew a steering wheel cover yourself
The steering wheel in the cabin is probably the most vulnerable part. He is most often pushed, stroked and even hit. To make it more convenient to control the steering wheel and keep it safe and sound, it is better to wear a braid. Driving safety also depends on the quality of the steering wheel cover.
You can buy this useful product in any store, but will it be suitable in size or color? You can do it easier, order tailoring of the product in special workshops, but this will be very expensive. But there is also a third option - to sew a cover for the steering wheel of your car with your own hands.
Advantages of making your own steering wheel cover
A steering wheel cover will help keep your steering wheel tidy for longer.
If you need a braid for the steering wheel, you can make it yourself, using your hidden potential.
Some will probably be surprised why complicate everything so much, because it is much easier to order it from craftsmen who have experience in making such products. A DIY steering wheel cover will cost less.
In fact, the car owner will only pay for the materials, and the manufacturing technology can be mastered fairly quickly.
You can choose the material from which the braid is made yourself and make, for example, a fur steering wheel cover, which will give the car dealership a little coziness and softness. Leather and leather substitutes are also in demand. Thanks to their properties, they last a long time and create an effect of completeness in the interior of a car dealership.
Making a leather steering wheel braid with your own hands is not as difficult as it seems. The most difficult part of the sewing process will be the end, when you need to properly arrange the seams so that the product does not unravel. Sewing your own steering wheel cover yourself can also save time. There may be a line at the workshop and it is unknown how long you will have to wait.
How to sew a steering wheel cover with your own hands
A car owner who decides to sew a cover himself must follow three steps in sequence. Firstly, make a pattern for the product, secondly, connect all its parts to form a base in the form of a circle, thirdly, put it on the steering wheel, pull it together and secure it.
Sewing a steering wheel cover with your own hands is as easy as saying the word “Yes” if you do everything sequentially. First, a pattern is made using available items. To do this, you need to wrap the steering wheel with cling film and masking tape on top.
It turns out like a shell. Marks are applied on top of it with a marker where the pattern elements will be sewn: the areas next to the spokes and the inner circumference of the steering wheel.
Then the “shell” is cut with a stationery knife according to the marks applied and removed.
The pattern does not straighten out completely, but transferring its shape first to paper and then to the material is not difficult. Along the edges of the outlined contour of the element, you need to add 1-2 centimeters to process the seams.
When working with materials, you need to consider their texture. For example, a fur braid will be made of a material that does not stretch at all, unlike leather.
If there are not enough centimeters for the seam, it will be difficult to pull it together and secure it.
At the second stage, you need to carefully fasten all the elements together to create a circle shape. Stitching is best done using heavy-duty synthetic threads. The resulting product must be put on the steering wheel, pulling it along the outside and wrapping the material inside the rim. This is how you try on a hand-made car steering wheel cover.
Before fastening the braid, you must first put it on, try to pull it together and cut off any excess flaps, if any. If the sewn pattern elements are the right size, then at the last stage you just need to lace the cover on the steering wheel in exactly the same way as shoes are laced. Using a needle, the thread is threaded into the stitches of the line, previously made on a sewing machine.
There are a dozen seams with which the braid is fixed. The most common of them is the macrame seam. It will beautifully decorate the joints of the fabric and prevent the cover from unraveling due to its unusual weave.
If you are puzzled by how to make a steering wheel cover, you can use another of the proven options. Purchase a sewing kit, which includes needles, threads, scissors and material that is pre-selected upon purchase. Most often, car owners choose corrugated leather in a classic black color.
Features of steering wheel constriction
Having figured out how to make a constriction, you need to immediately learn some features of self-tailoring. Before starting the pattern, the steering wheel needs to be removed to make it easier to cover it with film and cover it with masking tape.
Fur braided handlebars have a less stretchy texture, so when working with such material, you need to take into account an additional 1–2 cm for seams. Otherwise, it will be simply impossible to pull off the braid. A fur cover, just like a leather one, creates a certain aesthetics in a car dealership; its production should be as careful as possible.
Having figured out how to put the cover on the steering wheel, you need to tighten it correctly, choosing the appropriate seam for this. The problem may arise for those who, in principle, have never held a thread and a needle in their hands before. Sewing braid yourself requires enormous patience.
It’s not difficult to figure out how to sew a steering wheel cover. You need to decide what material the steering wheel will be reupholstered from, be patient and get to work. By putting a cover made with his own hands on the steering wheel, each driver can rightfully be proud of his creation, while saving a lot on a purchased model or ordering it from specialized workshops.
remam.ru
Leather - DIY steering wheel braid + Video
A car is not a luxury, we tell ourselves, but we still want to decorate the iron horse with a leather interior. Start with the steering wheel! Braiding the steering wheel with your own hands so that the leather fits like your own is a completely doable task even for those who have never done it.
Steering wheel braid - genuine leather for comfort and beauty
Leather-covered steering wheels are installed mainly on more expensive cars. Down with stereotypes - what difference does it make how old the car is, what brand it is and from what country? A leather steering wheel not only looks beautiful, but also feels much more comfortable in the hand.
You will feel this especially well when you go on a long journey. Unlike plastic parts, leather trim allows air and moisture to pass through, so it does not accumulate on the surface of the steering wheel.
To enhance the effect, you can cover the steering wheel with perforated leather.
The disadvantages include the difficulty in washing off contaminants, and the service life of the casing is not that long. But you can come to terms with all this.
But you shouldn’t put up with the cost of covering the steering wheel with leather in the cabin! After all, the work will take several hours, and not the most complicated one, but the service will cost several hundred, and far from rubles.
Why not try to do everything yourself and start making a leather interior with your own hands from this detail.
One of the simplest options is to purchase ready-made leather braiding in specialized stores or on the Internet. Ready-made solutions are offered for many models; there are also universal braids.
All you need to do is work a little with the needle and thread that come with the kit. Usually 1-2 hours are enough to bring everything to fruition.
If you have chosen the skin exactly for your model, then in a few days the braid will fit like original!
Do-it-yourself steering wheel braid – when there are no ready-made solutions
But ready-made solutions may not always suit your car. For example, you changed the steering wheel after buying a car, and now it is simply impossible to find the right braid. Or are you a do-it-yourself type? In these cases, stock up on a piece of good leather, thread, needles, scissors and, of course, patience - if you have never sewed, you will need a lot of the latter.
First, if possible, remove the steering wheel from the car. This is a rather labor-intensive process, so you can limit yourself to dismantling parts that will interfere, for example, an airbag or adjustment buttons. Be sure to turn off the battery.
As with any sewing, you can’t do without a stencil.
And it is done very simply: we cover the steering wheel with cling film, wrap paper tape (painting tape) on top, draw a seam with a “painting” marker and use a utility knife to cut through this structure according to the markings.
You may end up with at least three pieces of stencil. We cut out patterns from thick paper or cardboard using a stencil, providing 5 mm margins for the seams.
At the junctions of the pieces of leather themselves, we reduce the indentation to 3 mm so that the material can be pulled tightly.
What material to choose for cladding? Perforated leather is best suited, although you can take regular leather, the main thing is that it is strong and at the same time elastic. We sew the pieces of leather together using a sewing machine or by hand.
This is not so easy to do, so if you have the opportunity to use the services of an atelier, why not do it? The studio will also be able to stitch the seam - this should be done 5 mm from the edge. In this case, the seam will simplify the task of tightening the leather on the steering wheel, because you will already have ready-made holes for the hinges.
For stitching, use threads made from synthetic materials; as a rule, they provide better quality and last longer.
The main step is what does the result depend on?
Now the most important stage remains - the stage of the steering wheel braid itself.
The result of the whole undertaking depends on your scrupulousness, patience and accuracy! Having attached the workpiece to the steering wheel, align it symmetrically, focusing on the inside of the steering wheel.
Mark the places where the seams run, connecting the individual pieces of leather. If you wish, you can make indentations in these places so that the seams do not protrude, but in this case, without the braid, the steering wheel will lose all its attractiveness.
Next, you should thread the thread, like a lace in a shoe, through the eyelets of the seams on different sides of the leather braid. Both laced options and options with stitching are possible, the main thing is that the leather is thick enough so that your steering wheel braid does not tear into pieces. You shouldn't try to tighten the thread the first time, it won't work anyway.
Choose a specific step and follow it, make a few loops, and then go back and tighten the first loop properly. Move on at this pace. If the leather is very strong, you can slightly wet it to increase elasticity. In this case, it will tighten even more when it dries. After pulling off the braid, install buttons and other elements. That's all! Your steering wheel has become leather.
carnovato.ru
Source: http://autofluids.ru/zapchasti-i-aksessuary/kak-sdelat-rul-kozhanym.html
How to sew a braid on a steering wheel with your own hands
The steering wheel is used by the driver throughout the entire driving process. It is precisely this that first of all acquires all reactions in the form of stroking or pushing, expressing rage, joy or annoyance from the person who is sitting at the “steering wheel”. In addition, driving safety may depend on the quality of the car steering wheel.
Putting a braid on the steering wheel with your own hands will help to remove the risks from inconvenient operation of the steering wheel. One of the advantages of independent installation is the selection of personal materials and colors to match the non-specialized interior decor.
Content
1 Correct selection of the future braid 1.1 Leather braids 1.2 Fur braids for the steering wheel 1.3 Braided wire braids 1.4 Necessary braids for the steering wheel 2 thickness and color of the upholstery 3 Volume inserts 4 Basic parameters for selection 5 Independent tailoring of the braid 5.1 Spokeless steering wheel upholstery 5.2 Steering wheel upholstery with spokes
Correct selection of future braid
The choice of upholstery determines the method of its fastening, its future care, and the durability of the selected material.
Leather braids
It is customary to use natural leather as upholstery material. It is more durable and practical to process. The material is selected with or without perforation.
The presence of holes helps to add volume to the product and is an additional decoration. In addition, this does little to visually smooth out possible surface unevenness or minor technical troubles during processing.
Leather braid
Leather is the most comfortable of materials due to its own performance qualities.
It is easy to care for and more hygienic than other braid options. This point is especially relevant in cases where the car has a couple of drivers.
The leather steering wheel can be easily wiped with a disinfectant solution before driving. This procedure is not dangerous for the material, but it will protect you from receiving “unwanted surprises.”
High-quality material may at first scare you away due to its price.
But you shouldn’t skimp on such an important part of the car. The price will pay off with a long period of use, a good mood during the ride and easy care.
Fur braids on the steering wheel
The use of fur braids only in the first few days can lead to interest, then such impractical and easily soiled material will bring more negative feelings when driving. The fur soon wrinkles in areas of the most intensive use. In addition, the pile gets dirty very quickly and loses its aesthetic appearance, especially bright colors.
Fur braided steering wheel
Dirt and a large amount of dust gets clogged between the fibers, which reduces the level of hygiene for a fairly frequently used control element. In the summer, your hands soon sweat, and the pile can also get wet, which causes slipping when controlling. This factor can affect the safety of driving a vehicle.
Braided wire braids
Wire braids were once popular on cars. They were often used to decorate mostly domestic VAZ models. The practicality of this option lies in the relative strength of the plastic wire wrap. It was rarely washed out, and even with intensive use.
But, when compared with artificial leather or natural leather, the woven base is not as beautiful and lacks hygiene.
Between the loose turns there will soon be dirt that is not right. It helps to restore a neat appearance by using solutions with household cleaning chemicals.
Braided braids for VAZ
During the winter period, such material soon “stiffens” and warms up weakly. You have to use gloves while driving.
Necessary braids for the steering wheel
By independently manufacturing the braid, it is possible to make it not only beautiful, but also necessary. For this purpose, special massage inserts are made in the outer part.
They increase the ease of use of the steering wheel and help improve blood microcirculation in the fingers and palms.
Along with massage seat covers, this braid provides assistance during long car journeys.
It is possible to create heating under a self-made braid.
The option will be needed for all drivers in Russia, since the cold season here lasts for a couple of months. The button to turn on the heating can be displayed on the device panel.
thickness and upholstery color
You should not choose trendy colors.
They will soon get boring, and it will be useful to re-upholster them again. And since it is unlikely that it will be possible to sew a braid on the steering wheel soon, then for some time you will need to drive with a shabby, boring steering wheel constriction.
Unique braid
The material should be selected not too thick, so that your hands do not get tired. For short distances this is not a significant reason, but when driving a thick steering wheel for a long time, fatigue will be noticeable.
Volumetric inserts
It is unlikely that foam inserts under the braid will help. At first they will add softness, despite the fact that they will increase the thickness of the wheel. For cars with a narrow steering wheel, this may be a bonus, but during operation such a thicker will soon lose its shape. Due to the condition of the foam rubber, the outer material will sag and scroll along the diameter.
For those who do not know how to make a voluminous braid on the steering wheel with their own hands and at the same time maintain the shape of the “steering wheel” for a long time, it is possible to give advice on using linings with gel filler. It will not flatten, since it is based on containers with an incompressible substance. It is enough to protect the steering wheel from punctures and burns.
Braid with gel inserts
Basic parameters for selection
To determine the required size of material for the braid, you do not need to remove the steering wheel. It is enough to take a tailor's meter and take a measurement along the outer part of the rim. This will be the basic parameter.
In addition, you need to measure the diameter of the rim to determine the required width of the upholstery strip.
Along with this, an addition of 3-5 mm per seam is taken into account. Much more often the outer diameter is in the range of 35-41 cm. A smaller steering wheel is typical for sports-style cars, and a larger diameter is preferred for luxury cars.
Apart from aesthetic perception, there are legally approved standards for steering wheel sizes.
Types of lacing with nylon thread
In accordance with Russian GOST, the rim diameter should not be more than 40 mm.
Not all traffic police officers are on duty with calipers for measurements, but if there is an obvious discrepancy, it is possible to impose a penalty for such an excess.
Independent braid tailoring
High-quality tools and carefully selected high-quality materials will help you achieve excellent results. Let's give an example of tuning a steering wheel with leather. To make a braid you will need to stock up on the following kit:
a leather strip measuring approximately 120x10 cm and a couple of additional flaps; durable nylon cord for firmware, about 3 meters, it can be replaced with leather twine; punch for perforation under the lace; at least two needles with a length of 50 mm and a hook with a small head for tightening nylon thread; a pair of tailor's thimbles; a roll of cling film and a roll of tape; A1 drawing sheet for the pattern.
Decorative seam on braid
There are two options for steering wheel trim. In one case, only tuning of the steering wheel is used, and in the second, the spokes are also upholstered. Both options, when done carefully, look nice, but the decoration method without upholstering the spokes is usually considered less labor-intensive.
Spokeless steering wheel cover
In this case, it is possible to get by with a strip of leather, the length of which is calculated using the formula, multiplying the number pi (3.14) by the length of the diameter. Additionally, it is possible to take empirical measurements of the outer circumference using a tailor's meter. Along with this, before the last stitching of the tape into a ring, you need to put a little tension on the leather, since it will easily stretch on the steering wheel.
The ring can be made not only from a single piece, but also from combinations of perforated and smooth elements, material with extruded milling or relief embossing, using multi-color inserts of different shades of leather that harmoniously fit into the non-specialized interior of the cabin.
Types of seams
The allowances left for sewing together the parts of the braid will need to be coated with leather glue. This operation will add strength and then will not allow the threads used to connect the pattern pieces to stand out at the joints. The seams will be able to protrude due to the allowances of the skin.
This can be removed by lightly tapping the seals with a hammer.
Holes are prepared for lacing by punching. It is an iron tube with one edge sharpened. Pointing it with that side on the skin, otherwise you need to hit it with a hammer, take a hole.
The excess skin will go into the puncture hole.
Having made markings along the entire side for stitching, it is possible to punch perforations for lacing with thread or leather twine. It is not easy to purchase such string separately, and it is virtually impossible to find a long two-meter piece of genuine leather. To do this, use a device made from a knitting needle and a sharpened simple pencil.
Making a leather cord
They are held together well with adhesive tape and a spiral is drawn on a piece of leather. The tip of the knitting needle is held above the line drawn with a pencil. Parallelism is maintained between the edges of the Archimedean spiral, which most engineers studied in universities.
The thickness of the twine must be at least 3-4 mm, otherwise it will break if it is pulled too hard.
To pull the cord through, you will need to use an awl. The process will be longer, but the result will be more unique than firmware with nylon thread.
It will be more ergonomic to start lacing immediately after the knitting needle. This way the knot won’t be conspicuous. The operation is performed using several types of cross lacing.
the simplest options are cross stitches or sequential stitches. It is preferable to tighten after completing a full pass along the sector between the nearest knitting needles.
For better fixation, it is possible to pour a little shoe glue into the cut between the steering wheel and the braid with a syringe until it is completely tightened. Heating the glued surfaces with a hair dryer will better distribute the liquid. Additionally, smoothing is used on the outside of the braid.
Punch for perforation
The knots of the nylon cords must be coated with superglue so that they do not unravel. The nylon slides between each other, and a small amount of glue will fix it in one place.
Spoke steering wheel cover
A more complex option involves making a pattern for sewing upholstery. It is done using cling film and wrapping bark around all areas for new upholstery. We fix such a base with molar tape.
Then we draw the seams with a marker and number the details of the pattern. On a separate page we draw a diagram of the placement of the numbered parts.
It is now possible to carefully cut the masking tape along the marked seams. We straighten the resulting parts and outline them on page A1.
After this, we cut out the patterns taking into account the addition of dimensions for the joining seams.
Move 1. Wrap with film, then tape and number the sectors. Move 2. Form patterns for the sectors. Move 3. Try on the sewn patterns on the steering wheel. Move 4. Sew up all the seams. Move 5. Install the buttons and decor in their own places.
We sew the parts together using a machine along the length of the steering wheel. It is imperative to make a small tension.
Punching perforations for lacing. Now it is possible to fix the braid on the handlebars and lace the seam. First you need to remove the cartridge and the plastic decor with the airbag.
Once lacing is complete, return everything to its original place. If necessary, glue the gap between the upholstery and the steering wheel. Dry the glue with a hairdryer.
Source: http://www.shatak.ru/kak-sshit-opletku-na-rul-svoimi-rukami/