Design, breakdown and repair of the starter retractor relay
Today, every day there are more and more new cars on the roads, therefore, the number of car enthusiasts is growing. But, unfortunately, everyone knows that a car can bring you not only comfortable and fast travel, but also some problems, which are primarily associated with the breakdown of one or another car system.
The harsh Russian winter means that a large number of motorists are unable to start their cars. But sometimes such a problem occurs even in the absence of severe frosts, what then is the cause of the malfunction? There are three main reasons:
- Electrical system malfunction;
- Low battery;
- Starter and its solenoid relay.
If you have the first problem, then you will have to have your vehicle repaired. If the battery is discharged, it is possible to easily charge it with the help of other drivers. But what to do if the starter solenoid relay is faulty?
Checking the serviceability of the starter retractor relay
In fact, the starter has a fairly simple device, so even an inexperienced driver who has encountered such a problem for the first time can figure it out if given the instructions. After the driver finds the starter, it is necessary to check it.
To do this, you need to close the contacts, as a result of which you can assess the general condition of the system and which part of it is broken. If the starter begins to rotate when it closes, then the problem is clearly in a device such as the starter solenoid relay.
If there is no rotation when it closes, then most often the starter solenoid relay is working properly, and the cause of the breakdown lies in the starter itself.
The phenomenon that basically does all the work to start the device, as in the starter itself, is electromagnetism.
When voltage is applied, it is with its help that the starter solenoid relay begins to attract the armature until it comes into contact with the car's flywheel crown. At the same moment in time, the contacts are closed, through which voltage is supplied to the starter itself.
When the starter retractor relay operates, several processes occur almost simultaneously in this device, which are closely interconnected, so even with the slightest violation of one of them, a malfunction immediately occurs that does not allow the entire system to work.
Causes of failure of the solenoid relay
Before you begin to repair a particular malfunction, it is worth understanding what its cause is, so that you can avoid it in the future and not create unnecessary problems.
The first reason, and also the most common, is that the plates burn out inside the device itself, which indicates the need to replace them and use them more carefully. The second reason is the combustion of the device winding.
The third and final reason for failure is outdated components. In this case, you just need to replace some parts, as they have deteriorated over a long service life.
Repair or replacement?
Very often, people prefer to repair the starter solenoid relay and fix the breakdown themselves. But, as a rule, all these attempts lead to replacement of the part. That is why it is best to prefer a complete replacement of the part.
Of course, replacing the starter solenoid relay will cost you a little more, but by replacing this device, you can be sure that after a while the starter will not bother you with another problem, which will also lead to car breakdown.
Source: http://autodont.ru/jelektro/ustrojstvo-polomka-i-remont-vtyagivayushhego-rele-startera
Starter retractor relay - DIY repair
Today I will describe how you can repair the VW T4 starter solenoid relay - with your own hands.
About a year ago I was faced with a situation where my starter stopped showing signs of life. When you turn the key, you hear clicks, but the starter does not turn. I removed the starter and checked, it turned out that the solenoid relay was not working. I decided to order a new original one. I ordered online on the exist website.
The parcel arrived quickly, I printed out the box with the contents and saw the box with the number that corresponded to the invoice. When I opened the box, there was a relay there - BOSH and not VAG, and the number of the spare part itself was different from what was on the package. I was not very upset and did not argue with the sellers, since the car was needed urgently and the manufacturer seemed to inspire confidence.
But the problems began from the very first start of the starter on this retractor relay. The starter began to turn much more slowly than before, so during the first start, the smell of burnt vinyl was felt. Due to the fact that the starter turned much more slowly, the car stopped starting without turning on the glow plugs (when warm).
I had to turn on the glow plugs while the engine was warm by directly removing the relay casing and pressing the contact plate with my finger.
I drove like this for about a year and this retractor relay also failed. I couldn’t bear to buy another one just like it and it was decided to restore the old starter solenoid relay.
I’ll describe the repair principle, maybe it will be useful to someone else.
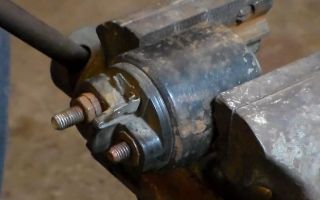
We clean the old failed starter solenoid relay from dirt and corrosion.
Let's inspect the structure. In my case, the relay was rolled. In order to disassemble it, I used a grinder.
Having cut off the rolling ring, I saw that the lid was held in place by soldered contacts. In order not to damage the wires, we do not pull the cover too hard, but carefully unsolder them. Then remove the cover. In my case, the bolt was very burnt.
The end plate was in relatively good condition.
Since my repairs took place in the evening, and I needed a car in the morning, I restored the old bolt, but if possible, it is better to find a new copper one.
I cleaned the bolt and plate down to a good condition where there would be good contact. Since the bolt was burnt and I cleaned it up a little more, it sank heavily into the seat.
For leveling, we select a washer that will make it possible to move it to its original state. The washer will most likely need to be sharpened in order for it to fit into the seat. After installing the new (restored) bolt, we reassemble in the reverse order. I welded the cut ring, you can use epoxy glue.
He copes with this task perfectly. Since after welding I had a lot of places for moisture to get in, I sealed them with sealant.
The repair of the starter solenoid relay was completed successfully. The next morning it was installed on the car and the starter turned at normal speed, the same as it should work in normal mode. I filmed all the work I did on video to make everything more clear.
Do-it-yourself starter retractor relay repair
Source: http://qrx.com.ua/remont/vtjagivajushhee-rele-startera-remont-svoimi-rukami.html/trackback
Do-it-yourself starter retractor relay repair
Greetings to all lovers of car repairs with their own hands. The topic of this article is the starter retractor relay, or, to be more precise, the repair of a non-separable starter retractor relay.
It’s just that if you really need it, you can take it apart and make it. You can see how to disassemble the starter solenoid relay in the photo or video located at the end of this article.
Note the retractor cylinder - this is its correct position in the retractor assembly.
If you put it the other way around, the bendix will not reach the flywheel.
The question is whether you will be able to repair the starter solenoid relay yourself without resorting to outside help, or maybe it’s just a matter of sport (I can do it or not).
As I wrote in the starter article, disassembling and repairing the starter relay makes virtually no sense, for the simple reason that you need to have at least basic knowledge of electricity and experience working with similar parts, so that something, perhaps, can come from this happened.
The photo shows an already flared relay, this is how you need to flare it.
When repairing things like this, you need to know exactly what you want to do there, and this will only come with experience. Otherwise, all you can do is get 1-1.5 kg of copper wire from this relay and waste a lot of time.
In these photos, the back cover with copper contacts was removed from the solenoid relay; the cover is soldered using a regular soldering iron.
If the starter retractor relay does not work or the starter relay clicks and the starter does not turn, then either you go to the store and purchase a new retractor relay or repair the starter retractor relay yourself. I think you get the idea, everything is simple - go to the store or get your car repaired. The choice is yours.
In these photos, pads made of cut washers are installed under the copper contacts. The goal is to raise these contacts a couple of millimeters.
So the situation developed in such a way that it was impossible to purchase a new starter solenoid relay; it was simply not available for sale at any auto parts dealer.
And it was only for this reason that I had to try to repair the non-working starter solenoid relay, or maybe after an unsuccessful search for a new starter solenoid relay, a sporting interest just appeared - in general, it doesn’t matter.
A symptom indicating that the solenoid relay is not working or is working but not completely simple. The relay clicks - the bendix is thrown out (the gear in the starter that turns the engine flywheel), but the starter itself does not turn the engine. So this is the problem in the copper “Pyatak” retractor relay.
The name “Pyatak” comes from Soviet cars, or rather their starters; this closing contact was flat, like a five-kopeck coin from the times of the USSR, but a little larger and thicker.
It was this “Pyatak” that closed the opposite ends of the starter, which actually set the starter in motion.
“Pyatak” must be quite powerful, since a fairly large current flows through it (650 amperes on average). In modern foreign cars, this is no longer a “Pyatak”, but an ordinary plate, but also thick and copper (at least that’s how it should be). When disassembling the solenoid relay, pay special attention to the location of the soldered ends of the copper wire.
Most likely, when the relay cover is opened, you will not see anything there, no matter how normal and serviceable everything is. But in any case, this is not all in vain - you now know how to disassemble the starter retractor relay. But in fact, the copper plate may not reach the copper contacts when the starter is turned on - did you get the hint? Here is the reason for the starter failure.
We need to raise these copper contacts a little so that the plate begins to fit well against them.
The fact is that the devices for starter retractor relays differ from each other, depending on the car manufacturer, but the principle of operation is the same for all.
In this simple way, you can try to repair your starter retractor relay from a Mitsubishi Space Wagon.
That's all for me, until we meet again.
Sincerely, the author of the site: Doctor Shmi
Source: http://salonvital.ru/remont-vtyagivayushhego-rele-startera-svoimi-rukami.html
Repair of starter retractor relay
Home » Electrical » Repair of starter solenoid relay
Have you ever heard a clicking noise under the hood when you turn the ignition key to start the engine? If yes, this means that there is a serious defect in your starter relay.
If it was not possible to determine by ear, then to check the functionality of the starter relay, we can recommend doing the following:
- Apply the parking brake.
- Depress the clutch.
- Move the gearshift lever to the neutral position.
- Turn the ignition key to the position that corresponds to the engine starting mode.
- Briefly short-circuit the operating contacts of the starter relay.
If this causes the engine to start, then the cause of all problems is a breakdown of the starter solenoid relay.
What to do if the car still fails to start, then another person should come to the rescue, it’s always easier with two people, and so, in order to revive our car, you need to cock the key to the start position, and the second person, if possible, get close to the retractor relay on the starter and simply knock on it with a hammer, in this case, be extremely careful, exclude all moments when starting the engine that hair and clothes get under the alternator belt and other moving parts of the engine.
If this does not help, then all that remains is to start the car from the pushrod, unless, of course, your vehicle has an automatic transmission.
What are the causes of failure of the starter solenoid relay?
The first thing you need to do is check the fuses in the engine compartment of the car, and only then get involved in repairs. The next step is to check whether power is reaching the retractor itself.
The most common problem with a pull-in relay is the formation of carbon deposits or a break between the contacts and windings of the relay. Even simple carbon deposits make it difficult for electric current to pass through when starting the engine.
The reason for this breakdown is simple: the driver keeps the starter on for too long when starting the engine. As a rule, if the engine does not start within 3-5 seconds, the key must be released. Excessively long starting of the starter greatly harms the starter itself, its activation relay, and the battery.
By being careful, you will significantly extend the life of the contact group inside the starter relay.
How to repair the starter relay
Firstly, do not rush and remove the entire starter. To begin with, you can try to clean all the wires and contact groups one by one from rust and oxides.
If after this simple procedure the problem remains, then you need to remove the starter. After removing the starter, you need to disconnect the starter solenoid relay.
As a rule, this procedure is individual for each type of starter, so it is not possible to describe a single algorithm.
Depending on the manufacturer, the starter relay may have 2,3 or 4 contacts. If after disassembly you notice a break or sealed/burnt wires, then their correct location can be found in the technical data sheet of your starter. Be sure to solder all wires according to the diagram from the manufacturer.
The functionality of the solenoid relay can be checked by connecting the working winding to the battery. If the relay is working, then you should hear 1 click, which will reliably close the contacts powering the starter motor. After fixing the problem, assemble the starter and try to start it from the battery or using a charger.
Remember that when connecting a jump starter to a battery, it will consume a lot of energy and do not be alarmed if you see a lot of sparks.
Only after all thorough checks can you install the starter in its place.
Retractor repair video
Source: http://remontpeugeot.ru/elektrika/remont-vtyagivayushhego-rele-startera.html
Replacing the solenoid relay on the VAZ 2110 starter yourself
- 1 Solenoid relay
- 2 Check
- 3 Replacement
Starter and retractor relay VAZ 2110
If the car suddenly stops starting, there are no characteristic sounds before starting the engine, or a strange “humming” noise appears, then the starter solenoid relay may be damaged. Naturally, the device can sometimes work normally without showing signs of breakdown, but at the most inopportune moments the car has to be started from the pusher.
In this situation, only replacing the retractor on the VAZ 2110 starter will change everything for the better. Symptoms of the malfunction are different, for example, the appearance of clicks at the relay, lack of cranking of the starter, lack of signs of life when turning the ignition key, etc. It is worth noting that replacing the VAZ 2110 retractor starter can be done with your own hands.
Solenoid relay
The VAZ 2110 starter solenoid relay is designed to remotely turn on the electric starter motor. They ensure the clutch of the bendix (see Replacing the bendix on the VAZ 2110 starter on your own) with the flywheel crown.
This element structurally consists of: a returning, contact and magnetic system, including two coils - a holding coil, connected to the control terminal and going to the housing, and a retracting coil, connected by the control element.
VAZ 2110 starter solenoid relay
The pipe where the armature is located is a core, inside of which there is a copper winding (the end and beginning of the winding are attached with terminals, one side is connected to the electric motor and the control contact, the other is connected to the control terminal and goes to the housing).
VAZ 2110 retractor clicks and the starter does not turn
The movement of the armature in the core is carried out due to the electromagnetic field, and when the voltage disappears, the armature in the core goes to its initial state. When powered, a magnetic field appears, causing the armature to retract the return springs.
When the car engine starts, the voltage begins to disappear, the spring presses on the armature and it returns to its initial position, the contacts open, and the Bendix disengages.
If the solenoid relay breaks down and before replacing it, you should first make sure that the problem is in the starter.
VAZ 2110 retractor starter
To check the functionality of the starter, you will need a battery and two wires:
- First the starter is removed;
- Using the first wire, the output of the solenoid relay is connected to the positive terminal of the battery;
- The second cable is connected to the negative terminal with the starter ground;
VAZ 2110 does not turn the starter, the retractor clicks
If, after the inspection, there is a suspicion that the starter requires repair, you should immediately go to purchase a new spare part.
If the starter is not removable, then the entire solenoid relay must be replaced. If it is collapsible, then:
- To repair the solenoid relay, unscrew the screws on the relay housing cover.
- After removing the cover, the power contacts are checked; in many cases they cause damage to the device.
- After this, the structure is assembled in the reverse order.
The retractor relay is installed under the hood and is located on the starter.
When buying a new one, you need to take the non-working item with you and ask the store for a similar one - in this case, mistakes are excluded. All manufacturers make their own markings on the solenoid relay. The device is secured with three screws.
VAZ 2110 remove starter retractor
To avoid unnecessary inconvenience, you can additionally purchase four copper washers and copper nuts. Copper nuts do not burn and are easier to unscrew, making this procedure faster and easier in the future.
Replacement
VAZ 2110 starter retractor
To replace the solenoid relay on a VAZ 2110, you will need the appropriate tools. Before starting work, it is imperative to disconnect the battery mass, which is marked with a minus sign, from the battery. To do this you will need a 10mm wrench.
After removing the contact, you need to find the starter. It is located at the bottom of the engine compartment, between the engine block and the cooling system.
Only after this can you begin to dismantle the device.
VAZ 2110 starter retractor
So:
- Two wires are connected to the solenoid relay; it is necessary to disconnect the red wire that runs from the relay to the male contact.
- Unscrew two nuts on the back of the relay; this is done using a “13” wrench.
- Using a flathead screwdriver, disconnect the cord from the front of the relay retainer.
- After releasing the relay, it must be carefully removed.
To install a new retractor, repeat the steps in reverse order.
Due to the fact that we left the old core, the new relay is mounted without it, only with a new spring. So:
- Armed with a flat-head screwdriver, you need to screw the wires in front of the relay.
- Connect to the wires and tighten the nuts using a “13” wrench.
After installing the relay, you need to tightly tighten the nuts that connect the power wire and are attached to the “male”. That's all, the machine is ready to go.
To replace this element yourself, you will need only three tools, a video review and a photo instruction.
To perform this procedure with your own hands, you will have to spend about 16 minutes of time and save about 500 rubles in your wallet, which you would have to pay for repairs in car workshops, where the price of these services is constantly rising.
Source: http://MasteraVaza.ru/starter-2/zamena-vtyagivayushhego-na-startere-vaz-2110-588
How to repair the starter solenoid relay and adjust
How to repair the starter solenoid relay
The starter solenoid relay (SR) is one of the most important elements responsible for supplying an impulse to the car’s engine. It is the BP that pushes out the bendix, which engages the flywheel crown. Let's find out how to repair the starter solenoid relay if problems arise with it.
VR device
ATTENTION! A completely simple way to reduce fuel consumption has been found! Don't believe me? An auto mechanic with 15 years of experience also didn’t believe it until he tried it. And now he saves 35,000 rubles a year on gasoline! Read more"
As it becomes clear, it is the VR that directs the bendix into engagement with the flywheel crown. The entire cycle of actions is based on the principles of electromagnetism.
The VR design includes a housing, an armature, a magnetic winding, contacts and a spring.
The anchor sits inside a hollow tube (core). The armature winding is a coil of wire. It enters the tube after an electromagnetic field is created in the bobbin. If the current stops flowing, the armature moves unhindered.
How to repair a retractor starter
The magnet inside the VR is a pair of coils. One of them performs the function of a retracting element, the other - purely retaining functions. The first retractor coil is connected directly to the electric motor and the control terminal, and the second, the holding coil, is integrated with the fuselage and the control terminal.
It is clear that a magnetic field appears in the coil after a pulse arrives at the control terminal from the battery. As mentioned above, the armature begins its work from this, compresses the spring and at the same moment the bendix is pushed out, which engages with the flywheel crown.
After the engine starts, the power to the starter stops, and the armature returns to the initial exposure under the influence of the spring. The contacts open and the bendix disengages from the flywheel.
Scheme of operation of the solenoid relay
Frequent VR malfunctions and their symptoms
The most common VR failures include:
- Winding combustion;
- Burnout of contacts;
- Destruction of internal elements;
- Wear of a mechanical property.
Obvious symptoms of VR failure can be considered:
- A situation where the starter rotates after turning on the ignition, but the engine does not start;
- If the internal combustion engine starts, but the starter does not turn off and rotates (at the same time a characteristic buzzing sound is heard);
- After turning the key in the ignition switch, the starter does not turn on, only a click is heard.
How is BP verification carried out?
Checking the solenoid relay
Understanding that the operation of VR is based on the principle of electromagnetism, one can draw certain conclusions in the process of repairing the element. For example, it becomes clear that if one of the VR components does not work correctly, the car will not be able to start. After all, in order for the engine to start, all VR work processes must occur quickly, and some at the same time.
What's good about checking the VR is the ability to determine if it's faulty without removing the element from the car. You just need to close the BP contacts located on the back of the relay. This is done using any piece of wire or a screwdriver.
Closing the contacts means providing voltage to the starter windings. If the starter starts to rotate after such “revival”, this will indicate that the starter is working and the VR is faulty.
Conversely, if the starter does not rotate after closing the contacts, but only clicks, this indicates that the relay is working properly and the starter is faulty.
Repair and adjustment of VR
Once a decision is made that the VR is faulty, repairs are carried out. In most cases, it is easier to replace a relay than to repair it.
Car owners who have non-separable VRs installed on their cars will also have to replace the VR. Such parts are manufactured for the sole purpose of somehow ensuring high reliability.
So, only those VR models that can be disassembled are repaired. As a rule, problems associated with wear of the mechanical drive and burnout of contacts are easily repaired. It is almost impossible to “cure” VR with shorted windings; it is better to replace it.
Checking the battery retractor
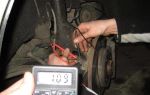
A specific malfunction can only be determined after disassembling the part. To check the integrity of the winding, it is recommended to use a measuring device such as an ohmmeter. When measuring the resistance value between the body and the ends of the probes, the value should not exceed 10 kOhm.
Common actions that are carried out during the repair process of VR:
- Unscrew the fasteners of the VR housing cover, before thoroughly cleaning the top of the relay with a metal brush;
- Additionally, unsolder the ends of the winding (if required);
- Remove the cover to provide access to the power contacts.
Some VR models are rolled. For example, such relays are found on German Volkswagen cars. To open the lid, you will need to fix the BP in a vice and carefully cut out the folding with a grinder along the entire circumference.
The relay bolts also require restoration. In most cases, the bolts rust over time and become difficult to remove. To clean them from corrosion, one brush is not enough. You should also use WD-40 fluid. It is better to replace excessively rusty bolts with new ones during the repair process of the device.
In conclusion of the article: How to repair the starter solenoid relay video
Tired of paying fines? There is an exit!
Forget about fines from cameras! An absolutely legal new product - NANOFILM, which hides your license plates from IR cameras (which are installed in all cities). More details at the link.
- Absolutely legal (Article 12.2.4).
- Hides from photo and video recording.
- Installs independently in 2 minutes.
- Invisible to the human eye, does not deteriorate due to weather.
- 2 year warranty
Source: http://ozapuske.ru/starter/kak-otremontirovat-vtyagivayushhee-rele-startera.html
How to check the starter retractor relay with your own hands
Imagine this situation: a normal day, you are about to drive your car, say, to work. You open the door, insert the key into the ignition, turn it to the “Start” position, but it doesn’t start.
If a few hours ago everything was fine and the car showed no signs of malfunction, most likely the reason is hidden in the starter.
In most cases, the starter, due to the simplicity of its design, is durable, but the solenoid relay can fail at the most inopportune moment. And in this article we will consider in detail all the points regarding the solenoid relay.
The purpose of the solenoid relay is to supply current to the starter motor, as well as to push out the bendix.
In general, any starter works according to the following principle: power is supplied to the solenoid relay, which in turn engages the flywheel crown with the bendix. That is, the retractor relay performs all the main functions in the operation of the starter.
The starter solenoid relay consists of a housing, a magnet with windings, an armature, contacts and a return spring.
The starter and solenoid relay operate on the principle of electromagnetism. When power is applied, magnetic induction occurs in the coil, resulting in a magnetic field. At this moment, the armature compresses the return spring. At the same time, the bendix begins to move to engage the flywheel and the starter motor itself rotates.
Failure can occur due to three reasons. The first is burnout of the contact plates inside the relay itself. The second is the combustion of the winding in the solenoid relay. The third is wear of parts and their fatigue failure.
How to check the starter solenoid relay
This can be done even before dismantling the starter. It is necessary to close two contacts on the back of the starter. You can close it using a wire of the appropriate diameter, or a piece of metal. Thus, current will flow to the starter winding. Here, ideally, the starter motor should start working. If this happens, congratulations! Only the solenoid relay is faulty, not the entire starter.
The opposite situation occurs when the solenoid relay clicks and the starter does not turn. In such cases, the starter motor is broken and the cause should be looked for there.
In general, checking the starter retractor relay is mandatory. Otherwise, the problem may be hiding somewhere else.
Repair of starter retractor relay
After it has become clear that the problem is hidden in the solenoid relay, we move on to repairing the starter solenoid relay. An interesting detail arises here. Almost all solenoid relays are non-separable and therefore can be replaced as a single unit. This was done for a simple reason: restoring it is often impractical or more expensive than the cost of a new part.
But consider the case in which your car has a detachable retractor relay installed.
If you are disassembling this part for the first time or have decided to carry out repairs yourself for the first time, it is commendable. Numerous instructions on various sites, as well as videos on the well-known YouTube hosting, will definitely help you.
Once you disassemble the solenoid relay, you will have the opportunity to find out the exact malfunction. Let us remind you that there are three of them: burnt contacts, a short circuit in the winding, or a breakdown of the mechanical drive itself.
The only caveat is that to check the integrity of the windings you will need an electrical tester.
After eliminating the cause of the breakdown, assembly is carried out in the reverse order of removal. Additionally, clean the terminals and apply protective lubricant to them.
In conclusion of the article, I would like to wish you trouble-free and durable units in your car, as well as good luck on the roads!
Source: http://vse-dlyaavto.ru/elektrooborudovanie/kak-proverit-vtyagivayushhee-rele-startera.html
Do-it-yourself solenoid relay repair
Finally got around to the starter... well, how we got there. If the day before yesterday the car had not completely refused to start, I would not have even thought about touching it. I do everything under pressure... oh, it’s time to radically change my life...
To be precise, the problem was with the solenoid relay. It clicks, the bendix jumps out, but the engine does not turn... And the car has had this problem for a long time.
Well, here I am at the garage, doing an autopsy... which speaks only of one thing - the 3.14-Z-Decl starter... well, if not right now, then in the near bright future... in short, the result of the “Kazakhstan 2030” program can already be assessed for sure can’t... Nursultan Abishevich, forgive me...
Well, so as not to be unfounded, here is a photo of a stator with scuff marks:
and here is the anchor.
something is clearly missing
perhaps one core in the winding... but where is it?
yes, here it is... lying around inside =)
As I understand it, once upon a time, due to the fact that a bearing flew apart, everything inside was destroyed. But the craftsmen did not begin to eliminate the consequences, they simply replaced the bearing and put everything back together, without even checking whether there was anything extra left inside.
and in general, all the insides are covered in scraps of insulation and dirt...
I consulted with the specialists, they said there’s nothing to catch here, if it’s spinning, wait until it stops completely. Cannot be repaired.
Indeed, it was lying around. Looks like a solid 4
according to the 10-point system =) .
but the main thing is that it works...
...until you put it in its place. Even he can’t handle it... it clicks, it heats up terribly - insidious induction =) but the bendix doesn’t jump out. I take it off and look - there is a spring inside, I removed the spring - the Bendix pops out, but not all the way... in short, this Chinese piece of excrement does not cope with the obligations placed on it... We don’t need this kind of hockey, we’ll take it tomorrow...
Now what should I do, spend X amount of time without a car again? To hell with the assurances of specialists! who said “non-separable”... there is nothing “non-separable”... a couple of dozen cuts around the perimeter and the object is ready for opening... you just need to unsolder the wiring from the terminals, otherwise nothing good will come of it.
I open it, look and see:
one nickel was half burned... But at the same time it remained half intact =) so I act simply.
I remove the stopper (I tried to twist it, but then I cut it off so as not to damage the thread)
I take out the nickel and polish it a little
and put it backwards
Now that's enough for another 20 years =)
I replace the removed stopper with a nut.
I also polish the plate... so that everything is as good as new.
I assemble it in reverse order, roll it up and solder the contacts. It is advisable to apply sealant along the seam... well, so that it is airtight
Thus, it turns out that the starter solenoid is not only “dismountable”, but also “assembled”, and therefore quite “serviceable”))
ee... moment of truth... - THE CAR STARTS. And this means that I again sent the specialists to hell, did it my way and got what I wanted...
Well, let me sum it up. In any case, the starter needs to be replaced, but I’ll probably kill it until the end.
The retractor is quite repairable, and if there is a desire, and most importantly there is no money to buy a new one, then a hacksaw for metal will probably come in very handy.
The quality of spare parts on the market still remains clearly dependent on price... you can’t buy anything worthwhile for pennies... it’s good if it works at all.
And I also want to note one point: if you don’t have time to do car repairs yourself, then there is an excellent resource where they will definitely tell you exactly the company or car service that will do all the work for you.
Service the starter on time. And happy travels to you.
Source: http://xn—-7sbgjfsnhxbk7a.xn--p1ai/remont-vtyagivayushhego-rele-svoimi-rukami
Starter retractor relay - check and repair
The starter solenoid relay supplies current to the starter motor and also pushes out the bendix. This means that the moment the starter starts to rotate, its bendix is pushed out. In fact, understanding the operation of the starter is not difficult. Today we will help you understand how the solenoid relay works, how to check this element and repair it.
Solenoid relay design and operating principle
In the starter, the solenoid relay engages the flywheel crown with the bendix. All work is based on the principles of electromagnetism.
The core, which is made as a hollow tube, inside which the armature is located, is equipped with a wire winding.
The current in the coil creates an electromagnetic field, as a result of which the armature enters the core. After the current stops flowing, the armature can move freely.
The starter solenoid relay includes :
- frame;
- magnet with windings;
- anchor;
- contacts;
- return spring.
The magnet in the relay is made in the form of a pair of coils - retracting and holding. The relay retractor coil is connected to the electric motor and the control terminal, but the holding coil is connected to the control terminal and is in contact with the housing.
When power is applied to the control contact, magnetic induction occurs in the coil, which leads to the appearance of a magnetic field. As a result, the armature compresses the return spring. At the same moment, the bendix rotates, which connects the starter to the car battery.
At the time when the contacts close, the retractor winding receives power from the “+” terminal, the production of current in the coil stops, but the armature is affected by the field of the holding coil, so it remains inside.
When the vehicle's power unit starts, the power is cut off, causing the armature to return to its original position under the action of the return spring.
The contacts open, which can cause the bendix to disengage.
Common solenoid relay failures
The main reasons for the failure of the starter solenoid relay are as follows:
- Physical deterioration.
- Burnout of contact plates.
- Destruction of components.
- Winding combustion.
How to determine that the solenoid relay has failed:
- The engine starts, but the starter does not want to turn off, constantly rotating. At this time you hear a characteristic buzzing sound.
- The starter rotates after starting, but cannot start the engine.
- When the key in the ignition switch is turned to its original position, the starter click is heard, but it does not want to rotate.
How to check the starter solenoid relay
As mentioned above, the operation of the solenoid relay, as well as the starter itself, is based on the principle of electromagnetism. When voltage is applied to the windings, the relay acts on the armature.
This, in turn, changes the position of the Bendix gear so that it engages with the flywheel ring. At the same time, the contacts close, providing voltage to the starter windings. In order for the car engine to start, all this must happen very quickly.
If at least one of the elements does not work correctly, you will not be able to start the car.
To check the starter relay, you do not need to remove this element from the car. Experts advise closing the contact bolts located on the back of the relay using a piece of wire or metal.
As a result of this, you will ensure the supply of current to the starter windings. If this caused the starter to rotate, you can conclude that the starter is working normally, and the problem lies in the relay itself.
If the retractor clicks and the starter does not turn, this indicates that the relay is probably working, and the cause of the breakdown must be looked for directly in the starter.
Repair of starter retractor relay
If you have come to the conclusion that the starter traction relay has failed, you need to repair it. We would like to note right away that in most cases it is much easier to replace this element than to restore its functionality.
Many manufacturers produce non-separable relays in order to make this unit the most reliable. In such situations, you will simply have to replace the solenoid relay with a new one. If the starter in your car is equipped with a detachable relay, you can repair it yourself. Often the relay does not work for the following reasons:
- the mechanical drive has worn out and failed;
- a short circuit has occurred in the winding;
- “nickels” or contacts were burnt.
Each of the above faults can be determined after disassembly. True, to determine the integrity of the windings you will have to use an ohmmeter. When measuring the resistance between the ends of the wire and the body, this indicator should be at least 10 kOhm. Otherwise, the windings have shorted, so you will need to go to the store for a new relay.
Installation of a new or restored relay is carried out in the reverse order of dismantling.
Many car enthusiasts at this stage have a problem, which is how to connect the starter relay.
In order to avoid such troubles, we recommend that you first mark the disconnected terminals. Before installing the relay, be sure to thoroughly clean the contacts and degrease them.
Source: http://avtopub.com/vtyagivayushhee-rele-startera-proverka-i-remont/
VAZ starter solenoid relay, solenoid relay device, how to check the VAZ solenoid relay, do-it-yourself starter relay repair. How to check and repair the starter solenoid relay. Self-check and repair of starter retractor relay
Sometimes it happens that the car does not want to start. This situation is familiar to many car owners. And, unfortunately, this often happens at the most inconvenient and inopportune moment. Of course, something needs to be done about this.
If the car's electrical system is in order and the battery is charged, then the problem may lie in the starter. It is possible that the starter solenoid relay is faulty. In this case, you cannot do without repairs.
More on this later in the article.
Starter solenoid relay, device
The starter traction relay is located above the starter and is firmly connected to it.
Main parts of the relay:
- Contacts.
- Return spring.
- Magnet with windings: holding and retracting.
- Anchor.
- Frame.
Scheme of operation of the VAZ starter solenoid relay
The holding winding of the relay is always connected directly to the battery, and the retracting winding is connected to the negative winding through the starter.
When the core of the traction relay presses the working plate to the bolts, and the starter receives “plus” from the battery, then a similar “plus” also arrives at the output of the “minus” of the retractor winding, as a result of which it turns off, and the current continues to flow only through the holding winding, which is weaker than the retractor, but has sufficient strength to constantly hold the core inside the housing, which ensures continuous operation of the engine. The use of two windings makes it possible to significantly save battery energy when starting the power unit.
Signs of a malfunction of the VAZ retractor relay
External signs of a malfunctioning relay include the following:
- After starting the power unit, the starter continues to rotate at high speed. This can be heard by hearing a strong buzzing sound.
- After turning the key, nothing happens, the engine does not start or starts after several attempts.
Causes of breakdowns of the starter retractor relay
There are several reasons for starter failure:
- Short circuit in the holding or retracting winding.
- Weakening or deformation of the return spring.
- Burning or breakage of the holding or retracting winding.
- Burnout of contact plates inside the relay, “sticking” or reduction of their contact area.
Types of starter retractor relays
Solenoid relays, which are used on VAZ cars, are divided into four types:
- For non-gear starters VAZ 2101-2107.
- For non-gear starters VAZ 2108-21099.
- For gear starters AZD VAZ 2113-2115, 2108-21099.
- For gear starters of all VAZ car models.
In addition, they are divided into non-collapsible and collapsible. Collapsible ones are older models. Old and new are interchangeable.
What type of relay can be repaired?
Only dismountable relays can be repaired. When broken, non-separable devices are replaced as an assembly.
How to check the VAZ starter solenoid relay
There are several ways to check the relay:
- The operation of the relay is determined quite simply - when started, a click is heard, which is produced by a moving core. This fact indicates that the device is working properly. If there is no click, then the relay does not operate. If the relay clicks, but the starter does not turn, a possible reason for this is burnt out relay contacts.
- If the relay operates, but a peculiar rattling noise is heard, then one or both relay windings are faulty. In this case, the relay is checked using an ohmmeter by measuring the resistance in its windings. Remove the return spring and core from the housing, then check the resistance between the ground and the windings in pairs. This value should vary within 1..3 Ohm. Then insert the core without the spring, close the power contacts and measure the resistance between them. This value should be within 3...5 Ohms, it depends on the specific relay. If the value is below the specified numbers, we can talk about failure of the windings and a short circuit in the circuit.
Tools, accessories, consumables
To repair a collapsible solenoid relay you will need the following tools:
- Rosin.
- Tin.
- Soldering iron.
- Flathead screwdriver.
How to repair a VAZ starter solenoid relay (step by step)
Work order:
- Unscrew the housing cover mounting screws.
- Next, you need to unsolder the ends of the winding.
- Remove the cover to open access to find the probable problem - power contacts, which may be burnt or worn out: in the first case, you can solve the problem with sanding paper, and in the second, replacing the contacts will help.
- Now assemble the relay and check its functionality.
Pro Tips
We recommend watching the following video:
- Tuning VAZ 2114: modification of the VAZ 2114, a little about everything
- Throttle body, DIY throttle body cleaning
- Gestures and light signals by drivers
- Medical examination for a driver's license 2018
- Lada Vesta official versions. Advantages and disadvantages of Lada Vesta
- How to repair the gear motor of a VAZ 2110 stove
- Kalina stove control unit: design, repair and replacement of the Kalina stove control unit
- What is a pneumotester, how to evaluate its readings?
- Oil pump VAZ 2107, do-it-yourself oil pump repair and replacement
- What to do if your car is stuck in the snow, useful tips
- The headlight is sweating from the inside, what should I do?
- The VAZ 2107 stove does not heat well: how to repair the stove on a VAZ 2107
- Anti-freeze, what is it and how to choose it correctly
- Car lamps: LED, halogen, ice lamps How to choose lamps in a car
- Reasons for antifreeze leakage: faulty cooling system, cooling radiator, heater radiator, faulty connections, antifreeze in the engine oil.
- How to replace a light bulb in a car
- How to photograph a car for sale, useful tips
- How to choose a car service (and save money at the same time), useful tips
- How to start a car in winter, useful tips
- What can knock in a car? How to determine the cause of a knock?
- How to diagnose a car yourself
- Autonomous preheater, autonomous preheater with remote or programmable start
- Replacing the silent block of the front suspension arm, how to replace the silent blocks of the front suspension with your own hands?
- Idle speed sensor malfunction VAZ Signs of a malfunction of the idle speed sensor VAZ 2110, 2107, 2109. Replacing the idle speed sensor with your own hands
- Is it necessary to warm up the engine?
- How to clean the throttle valve yourself?
- VAZ injector does not start well in cold weather, what should I do?
- How to replace a VAZ clutch fork?
- Replacing a 2110 clutch disc. How to replace a 2110 clutch disc without removing the transmission?
- What is a code grabber, how does it work and is there protection against it?
- How to replace VAZ tie rod ends with your own hands?
- Generator 2115 DIY replacement and repair
- Replacing generator bearings 2110
- Automotive clutch: device, operating principle, classification, types, advantages and disadvantages
- How to check generator 2110? How to remove generator 2110? DIY VAZ 2110 generator repair
- Why the rear window of the car does not heat up, do-it-yourself rear window defroster repair
- I flooded the candles in the cold, why the candles flood in the cold, reasons and how to fix them
- Car key with a chip, how and where to make a chip key for a car?
- How to stud winter tires correctly, stud winter tires with your own hands, useful tips
- Why do cars catch fire?
Source: http://prosedan.ru/vtyagivayushhee-rele-startera-vaz-ustrojstvo-vtyagivayushhego-rele-kak-proverit-vtyagivayushhee-rele-vaz-remont-rele-startera-svoimi-rukami