How to check the crankshaft sensor yourself
Hello, dear car enthusiasts! We hope that you know what role the crankshaft position sensor plays in the performance of a car engine. Its equally common name is synchronization sensor.
Crankshaft sensor malfunction
If you don’t know yet, then we’ll tell you a secret from the operating manual: a malfunction of the crankshaft sensor can lead to either the inability to start the car’s engine, or to a loss of power, a failure in speed, and ultimately, again, to stopping the engine.
The thing is that it is the crankshaft speed sensor that synchronizes the fuel supply and ignition timing by transmitting pulses to the ECU of your car.
Signs of a faulty crankshaft sensor
The first sign of engine malfunction, in general, is a noticeable decrease in its dynamics while driving. This could, of course, indicate any malfunction occurring in the engine. But, the controller will fix it and light up the “CHECK ENGINE” indicator on the dashboard.
Symptoms in engine operation such as:
- at idle the engine speed is unstable;
- the engine spontaneously decreases or increases speed;
- a noticeable, even without instruments, reduction in engine power;
- under dynamic load, detonation occurs in the engine;
- finally, the elementary inability to start the engine.
These are the most typical signs that the crankshaft speed sensor, timing pulley or generator is faulty.
First of all, let’s pay attention to the crankshaft position sensor, how to check it so that the test result accurately shows that it is the sensor that is faulty. Why is the crankshaft position sensor checked first?
It's simple. Although the timing sensor is usually located in an inconvenient place on the engine, diagnosing it will take the least of your time and resources. And the diagnostics will show whether the sensor is working or whether the crankshaft speed sensor needs to be replaced.
How to check the crankshaft sensor
There are several options for checking the health of the sensor. Each of them is carried out using certain instruments. Let's look at the two most commonly used methods for checking the crankshaft sensor.
Experts recommend removing the crankshaft sensor in any case. In this case, it is necessary to fix its original position on the engine with marks. Removal of the sensor is accompanied by its external inspection.
A visual check of the crankshaft sensor allows you to determine the presence of damage to the sensor body, the condition of the core, contact block and, of course, the contacts themselves. All existing contaminants on the contacts or core are removed with alcohol (or gasoline). Sensor contacts must be clean
When dismantling, pay attention to the distance between the timing disk and the sensor core. It should be within 0.6-1.5 mm. If a visual inspection does not show any visible faults, we proceed to search for “hidden threats” in the electrical circuit of the crankshaft speed sensor.
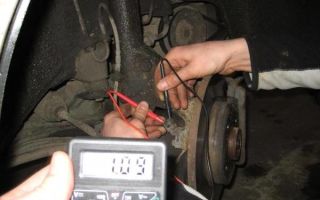
Diagnosis of the sensor using an ohmmeter. We use an ohmmeter to measure the resistance of the synchronization sensor winding. A working sensor should show parameters within 550-750 ohms.
To calm your inner doubts, before starting measurements, check the operating instructions for your car for the exact parameters specified by the manufacturer. Numbers outside the specified parameters indicate a faulty crankshaft sensor, which means the sensor needs to be replaced.
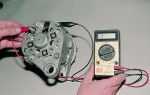
The second option for checking the crankshaft sensor is more voluminous. To do this you will need:
- voltmeter, preferably digital;
- megohmmeter;
- inductance meter;
- network transformer.
For correct indicators when measuring the sensor, the recommended air temperature is 20-220C. We measure the winding resistance with an ohmmeter and the method indicated above.
To measure the inductance of the crankshaft speed sensor winding, an inductance meter (inductive coil, capacitance and resistance) is used. The inductance should be in the range of 200-400 MHz.
Using a megohmmeter, the insulation resistance is checked. This parameter at a voltage of 500V should not be higher than 20 MOhm.
If during the repair of the sensor the synchronization disk is inadvertently magnetized, then demagnetization is carried out using a network transformer.
Based on the results obtained during test measurements, you receive data about the malfunction of the sensor, or, conversely, its serviceability. When installing an old or new sensor, carefully install it in the seat according to the marks. Do not forget about the distance that should be between the synchronization disk and the core (0.5-1.5 mm).
Good luck with checking the crankshaft speed sensor.
Source: https://carnovato.ru/kolenchatyj_val_kak_proverit_datchik_kolenvala/
How to check the crankshaft sensor? Methods for checking the sensor (DPKV)
If the serviceability of the crankshaft sensor is in question, you need to urgently look into it. You can, of course, turn to specialists, but you can do it yourself. In this article we will tell you how to do this.
The main signs indicating that the engine crankshaft sensor is faulty.
• The dynamics of a car engine are greatly reduced at the time of initial movement. If this happened for a completely different reason, then the following message will immediately appear on your instrument panel - “CHECK ENGINE“.
This indicates that this malfunction is completely registered by the controller, which means it has absolutely nothing to do with your crankshaft sensor. If there is no such inscription, the crankshaft speed sensor is definitely faulty.
• The engine speed of your car is completely unstable when working at a standstill (idling).
• The car engine can independently reduce or begin to increase speed.
• The power of your engine is reduced, which is quite noticeable even without instruments.
• When the dynamics loads increase, the detonation occurring in the engine sharply increases.
• It happens that the “engine” does not want to start at all, or it happens “every once in a while.”
These are the main points that clearly indicate that the serviceability of the crankshaft sensor is in great doubt. It is not very conveniently located, but checking its serviceability is not at all difficult. Then you can immediately understand whether it needs to be replaced, or the problem is in a completely different place.
There are several good techniques that will allow you to do this on your own. For them you will need special devices that are easy to get. Here you will learn about two of the most time-tested and experience-tested methods for diagnosing the health of your crankshaft sensor.
So, let's do everything step by step, since any incorrect execution of actions can lead to big troubles.
The sensor must be removed and its initial position in relation to the engine marked with bright markers - this will make it easier for you to return it back. Make these marks very bright and clear, you are doing this for yourself, for your convenience - don’t skimp!
Then inspect the crankshaft speed sensor very carefully from all sides. Check for mechanical damage, whether the contacts, core and terminal block are in order. Then all contacts must be thoroughly cleaned and wiped with alcohol, even if there is no contamination - this will not hurt.
Before removing the sensor, carefully measure the distance that exists between the core and the synchronization disk. This distance itself should not be greater than 0.6 to 1.5mm. When, after all the inspections, cleanings and measurements, it becomes clear that the reason is something else, we move on to testing the electrical circuit.
Using an ohmmeter, you need to measure the resistance that the winding of our crankshaft speed sensor has. When the readings are received, we carefully read the vehicle’s operating instructions; the indicators set by the manufacturer are always clearly stated there.
Typically this suggests a value between 550 and 750 ohms. If the readings do not correspond to those in the Instructions or to those we have now indicated, then in this case the sensor is definitely faulty and must be replaced.
This is the first way you can test the crankshaft position sensor.
Let's move on to the description of the second method in which you can check the sensor yourself. This is a larger-scale method, for which you need to have several instruments and carry out all testing at a temperature of at least 20 or 22 degrees, otherwise all the readings will be inaccurate.
Here are the devices you will need:
• Ohmmeter, we have already described working with it above.
• An inductance meter, with which we will measure this very inductance of our sensor, and then write it down. The norm for crankshaft revolutions is between 200 and no more than 400 MHz.
• Megameter, it will be needed to measure the insulation resistance. Such resistance, when the voltage is 500V, should not exceed 20 MΩ at all.
• A network transformer is needed in case the sensor suddenly becomes magnetized during testing or repair. It will help demagnetize your sensor and bring it back to normal.
Having received all the data from the devices, you can get a complete picture of the malfunction and begin replacing the sensor.
Reasons why a crankshaft sensor may fail
There are few such reasons, but they all lead to unstable operation of the car engine and to the replacement of your sensor.
1. Interturn short circuit in the sensor winding. Such a short leads to a failure of pulses to the electronic engine control unit, or ECU, and all modern cars are of the pulse sensor type, so this reason requires replacing the sensor with a new one.
2. Broken teeth of the drive ring. This reason cannot be attributed to the sensor itself, but it greatly affects the function of its operation.
3. Poor contacts in the winding and wire supply system. This reason is inherently easy to eliminate and does not require replacing the sensor, you just need to very well clean all the connections and the winding itself.
After all the tests have been carried out and the faulty crankshaft sensor on the engine has been determined, a new sensor must be installed. This is why you made marks for its correct location during dismantling.
Strictly according to these marks you need to install a new sensor, then carefully check all the fastenings and connections, it is advisable to use the old mounting bolts again, so your new sensor will be fixed correctly.
It is necessary to very accurately observe the distance that should be between the synchronization disk and the core itself in the sensor. Since this distance is different for different car models, you need to check the instructions again - all the parameters are always indicated there.
Complete with the sensor itself there is always a washer, a special gasket, with which you can adjust the depth of correct installation. And, naturally, you need to install the crankshaft speed sensor in the old position in strictly the reverse order from how you removed it.
We then check the crankshaft sensor to ensure it is working properly and installed correctly. To check, start the engine a couple of times and listen to it idle. If the sound is correct, the speed is stable and does not drop - therefore everything is installed correctly and the engine is now running correctly.
So now you know how to check the crankshaft sensor and how to install it after checking the engine!
A car, like a woman, requires constant care and attention, otherwise it will simply take offense at you and stop bringing you pleasure. Don’t be lazy and spare no expense in periodically diagnosing your car, then many problems can be avoided even at the moment of their hint, and not their appearance.
Source: http://sibloma.ru/avtoremont-i-tyuning/kak-proverit-datchik-kolenvala-sposoby-proverki-datchika-dpkv
How to check the crankshaft sensor with a tester?
Every car owner should know how to check the crankshaft sensor. Thanks to it, the operation of the electronic unit, which is responsible for controlling the engine, is synchronized. The name is also encrypted with the abbreviation DPKV (crankshaft position sensor).
When the crankshaft fails, the engine loses the ability to start or operates extremely poorly, which can lead to breakdowns in the future. The main breakdowns that occur with this type of problem are a decrease in the power of the engine itself or a drop in speed. DPKV is also responsible for the starting fuel supply to the engine when the ignition key is turned.
Symptoms of a problem
The main factors that can be identified when a sensor malfunctions:
- The first sign is a decrease in the dynamic characteristics of the device. There may be a number of other reasons for this problem.
- The engine, without any human intervention, lowers or increases speed. This is an indicator of a sensor failure.
- The engine does not maintain constant speed when idling.
- The chance of detonation in the engine increases.
- Under no circumstances can the engine start.
These are just the main types of breakdowns; in fact, there can be much more. It is worth carefully approaching the issue of identifying the breakdown before starting repair work yourself.
Before starting work, you need to clearly understand on the basis of what indicators to draw a conclusion about a malfunction. And what characteristics should an engine have for high-quality crankshaft operation?
The test itself is not difficult to perform. All you need is a little patience and a couple of skills.
Verification Process
There are a lot of answers to the question of how to check the crankshaft position sensor. The most popular are 3 main methods. In order to use them you will need a number of specific devices.
It is mounted in a certain position, which is why it is recommended to apply marks to make your task easier later.
After removal, a visual inspection is carried out to help determine malfunction or mechanical damage. First, you should pay attention to the condition of the block and core of the device. Using alcohol solutions or gasoline, it is necessary to remove all traces of contamination.
When removing, it is important to maintain the distance from the core to the synchronization point. It should be about 1 mm.
If, after inspection, no visual damage was found, then using various instruments, you can begin to detect hidden problems. Let's take a closer look at each of the methods to determine which will be most relevant in a given situation.
Diagnostics with an ohmmeter
This method is used to determine the resistance level of the device winding. Optimal performance will range between 550-750 Ohms.
Damage to the coil primarily affects the resistance. This type of test will give a complete picture of the winding malfunction. By placing the device in the area of the desired vibrations, you can perform a test. This method is outrageously simple, which is why it cannot give complete confidence. But it is extremely good for doing work at home.
In order to do everything correctly, you need to read the instructions for the car. The range may vary depending on the individual parameters of each type of equipment.
The next method is of higher quality, but it will require more devices and effort. To carry it out, you need not only the ability to use the equipment, but also the appropriate room temperature. It should be approximately 21C.
At the next stage, the winding is checked, the indicator of which should be 250-350 mH. After which, when using a megger at a voltage of 500 volts, the indicator should stop at 20 MOhm.
If magnetization of the DPKV is observed during operation, then for qualitative analysis it is recommended to soften it.
Having received the necessary data as a result of the work, we can draw a conclusion about what specific problem affected the crankshaft.
Diagnostics with an oscilloscope
In this verification method, it is necessary to perform certain step-by-step actions. The black crocodile is attached to the engine mass. The red crocodile is attached to output No. 5. If the clamps are attached correctly, data on the operation of the sensor can be seen on the monitor.
By selecting a parameter on the oscilloscope to check the crankshaft, you can start the engine. If this is not possible, it is recommended to crank it with a starter.
If the parameters obtained on the screen do not correspond to the norm, this indicates a malfunction of the crankshaft sensor. To carry out repair work, it is recommended to contact a specialist, since the process is much more complex and responsible than checking.
To summarize, we can say that the question of how to check the crankshaft sensor has been fully resolved.
It doesn’t matter which car you use to check the crankshaft: Gazelle, Ford Focus or Daewoo Nexia, the principle remains unchanged and effective.
Having figured out the basic principles and technology, such a task as checking the crankshaft sensor will not be difficult with some effort and patience.
Source: http://LediZnaet.ru/dom/avto-i-moto/kak-proverit-datchik-kolenvala-testerom.html
How to check dpkv vaz 2110
The crankshaft of a car is the most important organ that produces torque in a car.
Therefore, the accuracy of all related systems is important not only to maintain its activity, but also to ensure the movement of the machine.
For this purpose, in modern cars produced by the VAZ automobile plant there is a system of various sensors that notify the car owner about the occurrence of emergency situations in the units of this complex mechanism.
In the VAZ-2110 model, engine settings are controlled by a computer, the operation of which is based on sensor readings.
However, if a malfunction occurs, only one of them is capable of blocking the operation of the engine - this is the crankshaft sensor (CPS - crankshaft position sensor). This unit is responsible for matching the operation of the fuel supply system with the ignition.
If the DPKV fails, the synchronization between the mentioned systems is disrupted, after which the entire system stops working correctly:
- sparking may not occur;
- fuel supply slows down or disappears;
- problems arise in the operation of the power unit.
Any of the above problems causes the engine to stop.
Sensor operation and failure detection
The crankshaft sensor records two indicators of the operation of this mechanism - its rotation speed and position through magnetic pulses. For Togliatti car models, these devices can be of different types. When replacing a faulty device, it is necessary to replace it with the same one or an analogue with similar characteristics.
A symptom of a device failure is a “check engine” light on the dashboard. It is also worth paying attention to the feeling of a drop in engine power. Typically this problem is accompanied by the following symptoms:
- instability of idle speed;
- drop in traction;
- unexpected decrease or increase in engine speed;
- seemingly unreasonable problems with starting the car engine;
- popping sounds at the entrance to the manifold and shooting inside the engine.
The device is located in an inconvenient location, and accessing it requires a lot of time and effort. The sensor is located in the area of the oil pump cover, almost where the generator pulley is located.
Checking the DPKV for serviceability
To verify the suspicion of a breakdown of the crankshaft sensor, the two most likely cases of its malfunction are considered. In both of these cases, you will need to dismantle the device using a ten-threaded wrench. Before the operation, marks are drawn on the crankcase and the sensor itself, which will later help to tighten the device to the initial angle of rotation.
Also, the motorist should not forget to measure the clearance between the synchro disk and the sensor before dismantling, which cannot go beyond the size of 0.6-1.5 mm. If there are no mechanical damage such as scratches, dents, or damage to the material structure, the sensor is checked using other measuring instruments:
- checking with an ohmmeter. In this case, it is necessary to measure the resistance of the sensor winding. Since the standard value of this indicator, set by the manufacturer, ranges from 550 to 750 Ohms, going beyond the specified limits indicates the malfunction of this device, which is important for the correct operation of the car - which means it is faulty. It is worth noting here that the manufacturer still allows a slight discrepancy in resistance with the nameplate values, but in any case they must correspond to the data specified in the machine’s operating instructions;
- checking with a voltmeter, inductance meter and transformer. This method is more complicated, but more effective - the resistance is measured with the same ohmmeter, after which the inductance is checked (should be from 200 to 4000 millihenry), with a sensor winding voltage of 500 Volts. Next, you need to measure the resistance with a megger and make sure that it does not exceed 20 MOhm.
If the sensor still does not pass these tests, it must be replaced.
During this procedure, it is necessary not to forget about the distance between it and the synchronization disk regulated by the manufacturer, as well as alignment with the marks on the crankcase that were made on the previous device.
Before installing a new sensor, be sure to check it, since even if all installation procedures are followed correctly, it may not work correctly.
A new DPKV is checked according to the same procedure as a supposedly faulty one, and based on the test results, the device can be installed instead of the previous one or rejected. When installing, the bolts are tightened with a torque of 8 to 12 Nm.
However, in any case, before carrying out all the actions to replace a rather expensive and hard-to-reach component, you should definitely make sure that it is the one that has failed, because cars produced by our automotive industry can often bring unpleasant surprises.
Crankshaft position sensor VAZ 2110, malfunctions and replacement
Welcome, friends, to the DIY car repair website. Modern generation engines are characterized by good power and fuel economy.
The engine settings are controlled by a computer. Indicators of its operation are taken from various sensors.
Crankshaft position sensor VAZ 2110
Of these, only one can stop the engine if it breaks down. This is the crankshaft position sensor (CPS). Its main task in the VAZ 2110 car is to synchronize the fuel supply and ignition systems.
When this node breaks down, this synchronization is disrupted, causing the entire system to fail. No spark, no fuel supply. The power unit may not behave adequately and eventually stops anyway.
The operating principle of the crankshaft position sensor is that it takes readings about the rotation speed of the CV and its position using magnetic pulses. VAZ engines have slightly different PCV sensors, so you only need to change them to a similar one. We also recommend reading how to check the throttle position sensor.
If the sensor breaks down, you can check it with just one screwdriver and a multimeter. The first sign of a breakdown of the VAZ 2110 crankshaft position sensor is a large drop in power, as well as when the “Check Engine” light is on.
Here is a list of other signs of DPKV failure:
- Unstable idle.
- Increasing and decreasing engine speed.
- Drop in traction.
- Engine detonation, shooting in the intake or exhaust manifold.
- The motor does not start.
It is located in a not very convenient place on the engine; getting to it requires some time. Its location is on the oil pump cover, near the generator pulley.
How to check the crankshaft position sensor of a VAZ 2110
How to check the DPKV VAZ 2110 and make sure that it is faulty? There are a couple of options for sensor failure. But we can consider only two of them, the most common.
In any case, you need to remove it using a ten key. Before removing, we place marks on the sensor and the crankcase to fix its original position.
If there is no external or other damage to the DPKV, it is checked using other instruments. Read how to check the idle speed sensor here.
One more note when dismantling - it is necessary to measure the distance between the sensor and the sync disk. They should have a gap of 0.6-1.5 millimeters.
The first way to check is with an ohmmeter. You need to measure the winding resistance. The manufacturer specifies a number of 550 - 750 Ohms.
But they may be slightly different. If there are significant deviations in the readings, it is necessary to replace the VAZ 2110 DPKV with a similar one.
The design of the DPKV is very simple and it rarely fails, the main reasons being contamination, mechanical damage, or simply being defective.
In the second method, you also need to get a voltmeter, an inductance meter and a transformer. We measure the resistance as described in the previous method at room temperature.
Next we measure the inductance, it should be 200-4000 millihenry (mH). Using a megger, you need to measure the resistance with the power supply of the DPKV winding of 500 volts. The readings should not be more than 20 Mohm.
When replacing the sensor yourself, do not forget about its original position. And maintain the distance between the timing disc and the new crankshaft position sensor.
The torque to tighten the bolts is 8 - 12 N*m. Replacement should be carried out only if you are convinced that this unit is faulty. A new sensor may cause the engine to not operate properly; it is usually checked before installation as well.
The crankshaft position sensor (CPS) provides the ECU (electronic engine control unit) with information about the angular position of the crankshaft and the moment the pistons of the 1st and 4th cylinders pass TDC. If the sensor malfunctions, problems with engine operation occur. Let's consider the appointment, testing and replacement of DPKV.
What does the crankshaft sensor do?
DPKV synchronizes the phases of fuel injection and pulse supply to ignite the combustible mixture in the combustion chamber. In other words, based on its readings, the controller determines when and into which cylinder the fuel mixture should be supplied.
The sensor is of the inductive type and reacts to the passage of the teeth of the drive disk on the generator drive pulley near its core. The teeth are located on the disk at 6° intervals. To synchronize with TDC, two teeth out of 60 are cut off, forming a cavity.
When a depression passes by the sensor, a so-called “reference” synchronization pulse is generated in it.
Symptoms of a faulty crankshaft sensor
A completely faulty DPKV will not allow the engine to start. In other cases, sensor malfunctions can be identified by:
- — poor engine starting;
- — unstable operation of the motor;
- — reduction in engine power;
- — detonation with increasing load.
Where is the crankshaft sensor located?
It is installed on the oil pump cover.
Replacing the crankshaft position sensor VAZ 2110
To remove the crankshaft position sensor you will need a 10mm wrench. Procedure:
- Turn off the ignition and disconnect the sensor connector.
- Unscrew the sensor mounting bolt using a 10mm wrench.
- Remove the DPKV from the oil pump cover bracket.
Installation is carried out in reverse order. DPKV catalog number: 2112-3847010.
How to check the crankshaft position sensor yourself
Checking the crankshaft position sensor comes down to checking the resistance of the windings. If the readings of the device (ohmmeter) differ from 550-570 Ohms, then the crankshaft sensor is faulty. If the crankshaft position sensor error does not disappear, then you should clean the sensor from dirt and check the integrity of the wire and the quality of the connections in the circuit. The crankshaft position sensor cannot be repaired.
By the way, if replacing the crankshaft sensor did not solve the problem, then look into other causes of the problem in the engine (won’t start, runs unstable or the engine doesn’t pull).
Sources: http://ladaautos.ru/vaz-2110/datchik-kolenvala-na-vaz-2110-priznaki-neispravnosti.html, http://remontavtovaz.ru/vaz-2110/datchik-polozheniya-kolenvala-vaz- 2110-neispravnosti-i-zamena.html, http://xn--2111-43da1a8c.xn--p1ai/repear/1087-replace-sensor-kolenval-2110.html
Source: http://ladafakt.ru/kak-proverit-dpkv-vaz-2110.html
Detailed instructions on how to check the crankshaft sensor with your own hands: methods
The car won't start - every car enthusiast has probably encountered this problem. In this case, the problem could be anything from an empty gas tank to faulty spark plugs.
But sometimes this is not enough, because the reason why the vehicle does not start may also be a faulty crankshaft sensor.
You can learn how to check the crankshaft position sensor from this article.
Functions of the sensor and the threat of its breakdown
The purpose of the crankshaft position sensor (CPS) is to synchronize the supply of gasoline and engine start. The device sends a signal to the electronic control unit, which, in turn, regulates the operation of these systems. The working principle is given below.
When the crankshaft begins to move, a current pulse appears between the installed regulator and the shaft teeth. At this moment, the control unit begins reading pulses and sends a signal to open the injectors.
It also sends a signal to the ignition module, after which the latter sends a spark to the spark plugs. Since two teeth are missing on the crank pulley disc, this allows the control unit to determine the position of top dead center.
Accordingly, in this way he knows when to send signals to the injectors and a spark to the candles.
This is what DPKV looks like
The threat of device failure is fraught with the fact that if the DPKV fails, starting the engine will be impossible.
Symptoms of a problem
As for the main symptoms of a malfunction, they are listed below. This information will partially help you determine if the device is faulty.
- First of all, these are changes in the operation of the engine and the vehicle as a whole. In particular, while driving, dynamic characteristics are significantly reduced. Of course, in this case, the reasons for such a malfunction can be very diverse, but the controller will report this by turning on the Check light on the dashboard.
- While driving, the car may behave incorrectly, in particular, the speed may spontaneously either fall or rise. This can have a negative impact on your overall ride.
- When the engine is running at neutral speed, the speed may also drop and vary.
In the case of an incorrectly functioning sensor, this will be observed constantly.
- When the car goes uphill, the engine power will drop significantly. It should also be noted that a drop in power will be accompanied by the appearance of detonation.
- And finally, the last symptom is the inability to start the engine.
This happens when the device is completely out of order.
Diagnostic methods
Now let's look at diagnostic methods that involve checking the crankshaft sensor at home on your own. There are several of these methods and we will consider each of them in detail. But in order to carry out diagnostics, you must have at least minimal knowledge about using the devices, which we will discuss below.
Checking with a multimeter (winding resistance)
You don’t need any tools, just prepare a multimeter in advance, since diagnostics will be carried out with its help:
- First, you should dismantle the regulator, and then fix its original position on the motor. You can determine the location of the device from the service manual. So, you need to fix the regulator, while noting its position using the marks.
- After this, just in case, carry out a visual diagnosis of the sensor; perhaps the cause of its malfunction is damage to the housing or wires. The device itself, together with the contacts, must be cleaned and wiped; fuel can be used for these purposes.
- When you dismantle the device, pay attention to the distance between the synchronization shaft and the core. The best option would be if this gap is not lower than 0.6 mm and more than 1.5 mm. If no mechanical damage is detected, then you still have to use a multimeter.
In particular, it will be necessary to diagnose the electronic component of the DPKV, namely its winding, since in most cases the problem lies precisely in it.
- The winding diagnostic procedure involves checking the resistance.
If you know how to use a multimeter, then this process will not cause you much difficulty. The resistance value for a working sensor should be from 55 to 750 Ohms, however, before checking, we recommend that you read the service book for your car. As a rule, the working interval is indicated there.
If, during diagnostics, the signal differs from what it should be, then most likely the problem is a malfunction of the DPKV. Change the regulator before it causes you to become unable to start the car.
Checking on an oscilloscope
As in the previous case, you will not need any tools. If you don't know how to check the crankshaft sensor, then this method is more accurate.
Prepare only an oscilloscope, and for more accurate readings you will also need an alligator clip:
- The clamp is connected to the ground of the motor, and one connector of the oscilloscope should be installed parallel to the signal output of the regulator, namely to terminal A. The second connector is connected to output number 5 of USB Autoscope II. All this must be done so that you can see the signal voltage at the input of the device.
- After this, you should select the operating mode. In our case, to read the voltage readings, you need to activate the “Inductive_Crankshaft” mode, after which you need to start the engine. If the engine cannot be started, you can simply turn the starter.
- If there is a signal from the DPKV, but its output signal does not coincide with the normal one, this may indicate a breakdown of the device. In addition, this may indicate not only a breakdown of the DPKV, but also certain malfunctions of the crank pulley or broken teeth.
If the signals on the oscilloscope are incorrect, that is, they “jump” as shown in the photo, then you can safely change the DPKV.
Resistance check
The third tester diagnostic method is a comprehensive one, which allows you to measure insulation and inductance.
For this diagnosis you will need:
- network transformer;
- megohmmeter;
- inductance measuring device;
- voltmeter, preferably digital.
It is better to carry out the check in the garage, and it is desirable that the temperature be around 20-22 degrees, this will allow you to take more accurate readings. Here you will also need to measure the winding resistance, we talked about this in the first method.
- Once the resistance has been measured, it is necessary to determine the inductance value; use a meter to do this. If DPKV is working, then this indicator should vary around 200-400 mH.
- After this, take a megohmmeter; you will need to measure the insulation value. In the case when the voltage is about 500 volts, the insulation resistance should be no more than 20 megohms.
- If the timing shaft is magnetized, you will need to demagnetize it, otherwise the engine will not work. To do this, use a network transformer. Having taken all the indicators and analyzed them, we can draw a conclusion about the serviceability or failure of the regulator.
Of course, if the indicators deviate from the norm, then the device can be considered inoperable and, accordingly, it needs to be replaced.
When installing a new regulator, pay attention to the previously marked marks that you placed when removing the DPKV. Do not forget also that the distance from the core to the synchronization shaft should vary around 0.5-1.5 mm.
Video “Diagnostics of the crankshaft sensor”
To learn how to check the crankshaft sensor using a multimeter, watch the video.
Source: http://car-hz.ru/sovety/avto-stati/15387-detalnaya-instruktsiya-kak-proverit-datchik-kolenvala-svoimi-rukami-sposoby
How to check the crankshaft sensor without the help of specialists
A modern car is a computer on wheels. You know very well how many high-precision sensors modern cars are equipped with - throttle, coolant, oxygen, and so on.
However, their role is insignificant in comparison with the importance and functions performed by the crankshaft position sensor - it is one of the few car parts whose failure quite often leads to engine failure.
What is a crankshaft sensor and what is it used for?
Video of self-check of the crankshaft sensor
Most car enthusiasts know very well what a crankshaft sensor is. If you are not one of them, the following information will be useful to you. As you know, the crankshaft sensor synchronizes the fuel supply process and the operation of the ignition system.
How does this happen? The sensor determines the position of the crankshaft and timing belt, converts the collected information into electromagnetic pulses and transmits it to the engine ECU, which, in turn, directly controls the fuel injection and ignition systems.
Depending on the car model, the sensor may look different, but the principle of its operation is always the same.
Despite the enormous importance of the part, the crankshaft sensor has a fairly simple design - no moving mechanical parts, which accounts for its rather impressive average service life.
As a rule, a sensor cannot “fail” on its own initiative; a very common cause of its breakdown is the influence of reagents and salts on the sensor wiring, which results in its corrosion and failure.
In any case, the presence of problems is most easily diagnosed using a special scanner, available in every car service center that respects itself and its customers. If diagnosing the crankshaft position sensor is not included in the list of your additional costs for the car, let’s find out how to do it yourself.
The main “symptoms of illness” of the crankshaft sensor
The video shows information about the crankshaft position sensor
If there are problems with the crankshaft sensor, the most common behavior of the car is failures in engine speed, a significant drop in power, and in some cases, even a complete stop and the inability to start the engine. To avoid such disastrous consequences, it is important to determine the moment when problems arise, even before their obvious manifestation.
Of course, if the most serious repair that you ever carried out on your own was a primitive replacement of the air filter, then the only obvious and sure “symptom” for you will be the “CHECK” light on the dashboard, after which you need to immediately go to a car service center.
If you can handle more serious repairs, then checking the position of the sensor will not cause any special problems. The need for diagnosis will be indicated by:
- a significant decrease in dynamics when driving a car;
- instability and irregular idle speed;
- uncontrolled increase or decrease in engine speed;
- drop in engine power;
- when the speed increases, detonation is observed in the engine cylinders;
- inability to start the engine.
If the above “symptoms” are detected, you should immediately check. Your car may need to replace the sensor immediately.
How to check the crankshaft position sensor yourself - traditional methods
Naturally, before checking the sensor, it needs to be “removed” from under the hood. Despite the fact that it is not located in the most convenient place, this is not a problem for the average driver.
However, do not forget that you still have to put it in place, therefore, do not be lazy to note the correct location on the engine body, the location of wires, bolts, and so on.
In general, “tie” the sensor in place.
- Visual inspection. The first thing to do after removing the sensor is to inspect for mechanical damage. In addition, you need to check the condition of the contact block and magnetic core. If there are contaminants, they should be removed with alcohol, thinner or gasoline.
- An example check of the crankshaft sensor using a multimeter. This diagnostic method is aimed at measuring the resistance of the sensor winding - the induction coil. If it is damaged, a decrease in resistance indicators will be obvious. Before starting such a test, you should study the instructions for your specific sensor, which will clearly indicate the average normal resistance values. As a rule, this is 500-700 Ohms.
- More accurate check. It is particularly labor intensive. For such diagnostics you will need more serious equipment:
- network transformer;
- megaohmmeter;
- voltmeter;
- inductance meter.
The first thing to do is check the winding resistance using the above method. After that, we move on to checking the inductance. Readings in the range of 200–400 mH are considered normal.
The next thing to test is the insulation resistance. Experts say that at a voltage of 500 volts, the insulation resistance should be about 20 megohms. In case of magnetization of the synchronization disk, a network transformer is needed. Since this may cause malfunctions in the operation of the sensor, it should be demagnetized using a transformer.
By analyzing the obtained indicators, you will definitely be able to recognize a malfunction of the crankshaft sensor.
After diagnostics, depending on the results obtained, you need to make a decision: either it is enough to carry out maintenance or buy a new part.
When installing the sensor at its “working place”, remember that the distance between the magnetized core and the synchronization disk should not exceed 1.5 mm.
Good luck with the renovation!
Source: http://CarTore.ru/3833-proverka-datchika-kolenvala.html