ClutchMactuator Problems - Engine and Transmission
Posted 08 August 2014 – 10:27
Good afternoon.
I already wrote about my problem on the forum, but I still couldn’t find any answers.
Added to this is the following glitch: I usually turn on the rear - the car is moving, at this time I slow down a little. However, now, as soon as I press the brake, the clutch is depressed - the car does not move, I release the brake - the clutch is released, the car drives.
As a result, it’s not realistic to turn backwards, it’s just some kind of twitching. What could be the problem? At the beginning of the summer, I had computer diagnostics done by the officials, they said everything was normal, and they initialized the clutch. After initialization nothing changed.
I wrote to technical support through the website saying that nothing had been identified, but there was a problem. To which the officials replied that the whole reason was clutch wear. It is necessary to change the clutch with the actuator and all this will cost 50 thousand.
!!!! I don’t believe in clutch wear, the traction is good, it doesn’t knock it into neutral. What is the problem? Has anyone had this?
Mileage 67 thousand.
Sent 08 August 2014 – 11:28
Good day!
My car is 1.5 years old, 2008. release, mileage 72..., nothing was changed before, last summer, I went through diagnostics, they said the clutch was normal, they just asked the officials to flash the ECU...
But I don’t have and didn’t have any starting assistance (the car doesn’t drive without gas), but now there are, as you put it, jerks when changing gears.
I was going to change the clutch (I bought everything assembled with the bearing), but the diagnostics do not show any errors, they said the gap has increased, according to the norm it should be 18, mine is 26.77, and the critical one is 32...
I asked about the Clutch Actuator, they shrugged their shoulders, they said why, it’s not broken anymore (in the sense of “that’s it, it stopped and doesn’t move, like the gearbox is stuck in “N”...)
It's really INTERESTING whether to touch the ACTUATOR or not...
Posted 08 August 2014 – 12:46
In July I encountered this problem... there were small jerks lately (it was a sin on gasoline), after a long trip in a traffic jam in the heat (on a robot), well, not far from home, a gear fell out and a gear caught fire, it stood for min. thirty…
It started up fine, drove 500 m and the gear fell out again, and so on all the way to the house. The next day I start up... everything is fine... I get to the station, take it for diagnostics... it shows that the clutch regulator is already at maximum...
Without thinking, since I had a long trip ahead, I’m sending it in for repairs (replacing the clutch disc, basket and bearing) and further initialization!
After 5 hours I picked up the car…..since then I have driven 4000 km and everything is fine!
I think you need to get ready to replace the clutch!
Posted 08 August 2014 – 13:08
Anatole , The question I have is whether to change the actuator or not...
The clutch assembly and release bearing are already lying there, waiting in the wings...
What can you say about the actuator?
So I didn’t understand what it means to flash a new program on the ECU, otherwise you’ll read that this is the initialization of the unit, which leads to loss of operation of the clutch and actuator...
And I don’t know which ECU (new, old generation) I have... And in general, in our URYUPENSK (city.
Voronezh) ask the officials, and then consult with everyone you know so as not to get into trouble, and then decide what to do...
Posted 08 August 2014 – 13:17
Instead of the actuator, replace the oil in the box.
Posted 08 August 2014 – 13:24
Grandfather , should I change the oil after replacing the clutch? So this is probably, I think, a mandatory procedure when replacing the clutch...
Post edited by Tatiana: 08 August 2014 – 13:24
Posted 08 August 2014 – 14:14
What about the fact that when I engage the rear, the clutch switches on and off? Is there oil in the box too?
Posted 08 August 2014 – 21:23
http://toyota-coroll...0015e500cx.html
Clutch – engages the gearbox with the engine to transmit torque (force) from the engine to the wheels.
The oil in the gearbox of your car should have been changed twice already, both in terms of service life and mileage.
Posted 08 August 2014 – 22:01
Unfortunately, my problem is not there...
Posted 08 August 2014 – 22:17
Posted 09 August 2014 – 19:20
Selling a used clutch actuator, new condition 15 tr.
Sent 12 August 2014 – 14:16
In general, trouble and sadness people. Now even when moving in front there is such a glitch. I turn on “E” and the car starts moving by itself, I press on the gas and the clutch disengages, then reconnects. As soon as I press the brake the clutch opens.
But this is only at the beginning of the movement, after idle time. Then everything is fine. Help please, where to dig? There is no official dealer in our city, and in general there is no normal service. I really like the car, I don’t want to sell it...
Sent 14 August 2014 – 07:48
I want to troubleshoot the actuator. How to remove it? I read that you need to put it into dismantling mode with a paper clip?! Still jerking may be due to the gap from the actuator rod. How to set this gap? In general, instructions are needed.
Sent 19 August 2014 – 16:42
If, when you press the gas after starting, the clutch is released, and then immediately put back... I think it’s in the subsystem with the help of which the robot, when we press the brakes, “understands” when to start releasing the clutch. Here in frequently asked questions, point 4 talks about the gearbox shaft speed sensor.
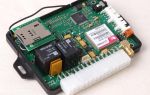
There is also such a block diagram: http://s1.postimg.or..._1379659217.jpg The same sensor is shown as an input to the MMT control unit. Actually, I assume that this sensor may be faulty. You press the gas, and for some reason the sensor shows that the gearbox shaft speed drops and the clutch releases.
Maybe try to find this sensor and check it?
Sent 20 August 2014 – 08:26
Every day it gets worse and worse. I noticed that this problem manifests itself more on a cold car. It is incredibly difficult to quietly back out of the parking lot in the morning. The car constantly jerks when the clutch is turned on and off
Sent 20 August 2014 – 09:02
AlexKey , Does diagnostics show error P0810?
Sent 20 August 2014 – 09:19
No it doesn't. I had the diagnostics done by the officials, they said there were no errors, everything was fine, they did the initialization and that’s it.
Sent 20 August 2014 – 12:21
Now I went for lunch, the car is warmed up - no glitches are observed.
Sent 27 August 2014 – 17:40
actuator repair
reading errors using a scraper
For those who have error 0810, it is also 35 .
First, we check the clutch, drive the car on a flat road at a speed of 50 km, turn on manual mode, turn on gear 5 and sharply press the gas pedal all the way. If the tachometer and speedometer needles rise at the same time, then most likely the clutch will still have life. Let's move on to repairing the actuator.
Replacing the actuator bushings . (size in the last photo, material bronze, you can use bushings from the Oka starter 80 rubles, 2 pcs material copper-graphite, just a little modification by the turner)
We adjust the clamp alignment according to the technical document (link http://toyota-coroll...00168v00cx.html). We remove the battery. then the platform from the battery, remove the chip from the actuator sensor. We climb under the car, remove the engine protection, and remove the chip from the actuator motor from below.
All you can do is remove the actuator, make marks on the actuator and box, unscrew the three bolts. The actuator was removed. Now comes the fun part. First of all, unscrew the actuator motor and remove the three hex bolts. We look at how much dirt there is and clean all the photos2,3, check the brushes, if there is less than 2mm we change them, in my case they were 6mm.
We also look at the winding (after removing it from the iron body of the engine), if it is black, then most likely the motor needs to be replaced.
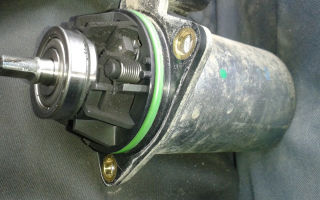
And here’s the most interesting part: disassembling the actuator, remove the actuator sensor, two bolts using a Phillips screwdriver, (let’s remember how the sensor is installed), under it, unscrew the plate with antennae, a nut number 6 (it is advisable to mark where the antennae are), then so that the spring does not shoot out and spread everything inside , as it was in my photo 4 (I thought for a long time how to disassemble it and then reassemble it, that is, cock the spring) everything turned out to be much simpler. You need to take a screwdriver and in the groove where the engine is inserted there is a slot, turn it with a screwdriver so that the rod goes inward to the maximum. After that, unscrew the bolts by 10 along the perimeter. Everything can be opened. Further inside, in order to pull out the rod, you need to unpin it and pull it out. Well, we sorted it out. Now let's look at the shirts. In my case, the top one was worn out. We press out the top one with the shaft from the actuator (which is located inside and fits in size) and press it in with it. And the bottom one is more difficult, but for me it was normal. I collected all the grease during disassembly and put it all back during reassembly. Assembly is carried out in reverse order. After assembling, we unscrew the rod all the way out and turn it half a turn, we get the clamping position. We install the sensor by placing it on the antennae, as if we were cocking the spring in the sensor (that is, move the sensor counterclockwise from the bolt holes, insert it, and then turn it along the comb until the holes from bolts) tighten the bolts. Apply lubricant to the clutch fork, install the actuator according to the marks made, check the gap on the fork and rod 0.5-1mm, tighten the bolts. We put in place the chips for the engine and sensor, engine protection, and battery. We carry out initiating the transmission ECU NE – – – – EN, setting (link http://toyota-coroll...00170f006x.html). Next, transmission ini NE – -++EN, setting.
If there is error 29, then you also need to clean the contacts of the actuator sensor.
Everything is ready ) Russian was bad at school!!!
if N is off, it means the actuator sensor was not installed correctly (correct installation link: http://toyota-coroll...00170b006x.html).
Attached files
Post edited by ALEXEY-33: August 28, 2014 – 04:17
Sent 15 February 2015 – 16:58
Tell me if the clutch starts to slip, be sure to replace it with a set
Source: http://taclub.ru/index.php?showtopic=4070
Dancing with a tambourine around the actuator))) (Modernization of the clutch actuator) — logbook Toyota Corolla 2007 on DRIVE2
Hi all! Today I will tell you about how I upgraded the actuator (clutch servo) on my corolla and what preceded it.
Let's begin! One wonderful frosty early morning, I and my family once again went to work.
Having traveled some distance through morning traffic jams at the next traffic light, my chariot refused to take me further, displaying the ill-fated gear on the instrument panel
the same gear
and a blinking letter N.
After manipulating the diagnostic connector (as described in the first entry in my logbook), lo and behold, she drove off and even drove her to work, but the happiness did not last long, exactly until the next rush hour on her way towards her home. Now the cart could not be manipulated in any way. After towing to the parking lot and disassembling in the form of removing the battery, further to the platform under it with 8 bolts of 12
Zoom
remove the battery mount with a 10mm wrench and the battery stamps with a 10mm wrench, then the battery itself
Zoom
6 bolts by 12
Zoom
2 bolts 12
we've reached our goal
Zoom
Here he is in the guise of an atkuator)))
The autopsy showed that due to excessive wear of the brushes of the actuator electric motor and accompanying physical processes, it overheated with the melting of the varnish with which the rotor was filled, and as it turned out later, an interturn short circuit of the rotor winding occurred.
Zoom
This is what's left of the brushes
Zoom
brush residue
Next, the actuator itself was opened, I won’t post a photo since there are already plenty of them on the Internet, I’ll tell you what I saw there, but I saw wear, again excessive shaft bushings and as a result of this there was a misalignment of the shaft and an increasing load on the electric motor, an increase in current strength to 25A on the electric motor and turning it off by the controller (notifying the coachman about this in the form of a gear on the instrument panel).
After some time in thought, understanding the current situation and reading a ton of information, I decided to repair, or rather modernize, the clutch actuator
Zoom
Actuator for Toyota Corolla, Auris, Corolla Verso.
The plan was to send it to the factory and use a jig boring machine to bore and install the bearings at the locations of the sliding bushings (sliding bearings) as described HERE . During the process of work and consultations, the plan was finalized. The result was that in place of 2 bearings there were 3 (lower 9-26-8, 200 rubles, upper 2 pieces 9-17-4, 200 rubles each). The original shaft is 9.8 mm. Requires grinding up to 9 mm. Boring for the bearings on the top cover was made from the side where the sensor is located. The axial displacement was adjusted using washers. The issue price is 4000 rubles. I bought the electric motor used for 3,000 rubles. since the new price is too high: 9600 rubles
Zoom
electric motor the new electric motor is equipped exactly like this
True, this was preceded by an unsuccessful repair of an old electric motor, on which I spent as much as 1,700 rubles.
After assembling and installing everything in its proper place according to the marks, the boulevard drove off, of course there was joy, but with increased attention to the sounds and behavior of the car.
After one full day of driving, the engine and gearbox were trained and by evening everything was back to normal. The shifts are smooth, there is assistance at start, the idle speed has leveled off at around 600 - 700 rpm.
I will continue from the first words of this article. One wonderful frosty early morning, I and my family once again went to work. Having traveled a certain distance through morning traffic jams at the next traffic light, my chariot refused to take me any further, displaying the ill-fated gear on the instrument panel! You won’t believe it at that traffic light, at the same one!
After manipulating the diagnostic connector (pressing the clutch), she drove off, but with delayed clutch release. While searching for an answer on the Internet, I read an interesting article on one of the forums from a ton of flood. This is how the principle of operation is described
in a muffled state and with the ignition off, the gap between the linkage and the clutch fork should be 0.5-1 mm.
Zoom
required clearance
I made the adjustment as required and the machine immediately came to life, everything that was not there appeared, assistance at start, smooth switching. Next will be test test test. All sensations will be recorded in my logbook.
Thank you everyone for your patience in reading my next article. May God, Allah, and Buddha protect you from such misfortunes. All the best!
Price tag: 9,300 ₽ Mileage 150000 km
Source: https://www.drive2.com/l/463940856559173977/
Brushes for the clutch actuator – New Colt. Engine and transmission
Posted 08 February 2015 – 10:58
Hello everyone, yesterday I finally got around to replacing the brushes on the clutch actuator, no photo sorry. I removed it, disassembled it, removed the worm itself and took it to someone who lives in St. Petersburg, this is on Marshal Zhukov Pav. 327, second floor, time 1-1.
5, price 1500 rubles, changed the brushes and at the same time told me to change the bearing, I want to note that it became very, very soft to change gears.
good luck to everyone, the problem with the abs and handbrake has been solved, we searched for a long time but found it, the fuse that hangs on the positive side at 40 am blew, while I made a temporary fix I threw it through the fuse, I ordered 1580r 8571A012 from the emergency service 8571A012 Fuse block housing 83701A, the problem with the signal (bibi) was solved, one track of the cable the ball is torn and the lowest one is at the signal, fortunately there is a good electrician I know who did everything. the wire for the signal is green with a core - they did it very simply, they took this wire on the bibi, tore it off and soldered it to a free track nearby, and soldered a jumper on the other side of the cable
Sent 11 October 2015 – 10:33
You can change the brushes yourself if your hands are not crooked. Carefully, use a 5mm diameter drill to drill a hole opposite the brushes in the non-separable plastic brush holder housing. Drill by hand, gently press the drill onto the plastic piece and twist, it will drill in 1 minute. Then, carefully prying a paper clip, the spring is removed.
Then, using a file, the hole is expanded to a square, and a triangular cut is made on the upper side of this square. Then, using an awl, the remains of the old brush are pushed into this hole. The brushes must be very hard, I checked it personally. If you use soft ones, they spark and stick. I took it from some Russian generator, they also cast it lightly in copper.
I pulled them out of the brush assembly. The price of the knot is ridiculous, it seems 33 rubles. The brushes need to be sharpened to a size of 4x5 mm and about 8 mm in length, with a beveled edge, similar to the original ones.
After making sure that they slide well in their places and do not dangle, we insert them into the bored hole so that the wiring is on top and just fits into the triangular cut above the hole for the brushes. We solder the wiring. Carefully insert the springs into place and after them insert a plug cut out of thin plastic.
Holding it all with your finger, carefully fix the cork with tape. That’s it, we put on the top cover of the engine, after wiping the tip of the shaft and lightly lubricating it with graphite, just a little, so that it doesn’t spread when it heats up. We check the engine by connecting the two terminals of the chip farthest from the engine to the “+” and “-” of the battery by directly plugging the wire into them.
The polarity does not matter, it will just spin in different directions... We turn the engine for a couple of minutes in one direction, break, and a couple of minutes in the other. To grind in the brushes. If it spins well, we install the electric motor on the actuator and continue to enjoy riding the robot... After the first replacement, I drove 30 thousand, after the second another five, the flight is normal...
Considering that the actuator is removed in 10 minutes, and brushes with smoke breaks are installed in 2-3 hours, if you do it for the first time, you get good savings... since the actuator costs no less than 15,000 rubles, and a used one. there is no point in buying. Yes and more. Under the brushes there is a toothed ferrite ring, which is quite fragile.
It allows the sensors to transmit a signal to the brain about the position of the rod that presses the clutch fork... Therefore, despite the fact that the entire assembly with brushes is supported on the rotor with play, do not under any circumstances try to remove it from the rotor. The ferrite gear disk will break and even the repaired engine will not work, since the brain will not understand what position the rod is in. Look like that's it.
Sent 07 February 2017 – 11:32
Hi all. Although I didn’t read the post earlier, I did the same manipulations. Only I sealed the holes for the brushes with thermal glue. I drilled a hole of 3.2, then with a knife to a rectangular hole 4 * 5.
image-0-02-05-dfd48c4a7693c5b892ff8c482cca6caa0530381125e56f8c39a28020abd9c253-V.jpg 48.05K 5 Number of downloads:
Next, take a suitable brush and grind along a 4*5 section
image-0-02-05-23ba989ec657587a43c433adf614d37137ee703cb425cea7797c3067c3dc0ace-V.jpg 59.89K 3 Number of downloads:
image-0-02-05-06e23a91fd987d1f8b2c921d4c6847654e163fe116200a505f9fc3e9b0e2f796-V.jpg 35.73K 5 Number of downloads: Fill with hot glue and grind flush with the body Assembled actuator and voila novi don't beat it, don't paint it Another moment, the broken worm can be welded with a semi-automatic device and forged a little bit And gentlemen, he does all these tricks those with straight hands
Sent 08 February 2017 – 09:47
why “shackle it a little”?
did you manage to brew a worm?
How did you then grind the seam from welding to perfection? How does it work? how far have you run? and find the reason for the worm rod breaking off))
ps what brushes did you take? copper-graphite?
Sent 08 February 2017 – 10:29
You need to forge while the seam is hot. Be sure to do the cutting. + welder so that your hands don’t shake. Otherwise you’ll weld it crookedly and it’s all screwed up. Processing with an angle grinder is almost ground off, about 60 mm in diameter, no more than 1.2 mm thick. I did everything myself and drove 5 thousand.
The worm is normal ps what brushes did you use? copper-graphite?[/quote] I took copper-graphite brushes from some kind of electrical tool. The main thing is that the tail is on the corner or to the side
image-0-02-05-7938921ea8024bad0b2e9ac0598590bcb5e83bbeb16d18ac54cf194a80937c46-V.
jpg 33.5K 1 Number of downloads:
If you look closely at the worm you will see welding
Attached files
Sent 08 February 2017 – 04:01
Power tools come with carbon brushes, they are soft and not suitable. Look at your old ones, they are even different in color.
Sent 08 February 2017 – 04:17
And God bless them for how long they will last, now they are completely repairable, but in the meantime you can find something better
Sent April 18, 2017 – 10:04
I opened my actuator today, the brushes can be said to be missing on the motor, the wires fit closely. At the same time, errors p1705 p1710 rained down. Sometimes, for some reason, reel errors p1862 and p1867 also popped up. Tomorrow I will change the clutch, at the same time I will look at the condition of the brushes on the gear actuator. But how to watch them?
Sent April 20, 2017 – 10:15
I bought brushes size 4x4, length 13 mm. I ground it at an angle, so I put the springs back in and fill it with epoxy, that’s the problem, I cut the lid out of the plastic lid, fixed it in the hole and filled it in half with grief, I hope everything will work) Copper-graphite brushes with a copper sheen.
Source: http://www.colt-club.ru/forum/index.php?showtopic=45687
Toyota Corolla actuator repair
We offer professional Toyota Corll actuator repairs, performed by the best specialists.
Our specialized workshop guarantees the highest quality of service, impeccable service and the most affordable prices.
The cost of repairing a unit on a Corolla is from 8,980 rubles. The complexity of the breakdown and the need to replace damaged components can affect the final price.
A guarantee is provided for the work performed. You can forget about any problems with mechatronics for 2 years.
Our prices for services and auto parts.
On average, the recovery procedure takes us about 4-6 hours.
There is a serious malfunction, it may take more time - you will find out about it immediately after inspection and diagnosis.
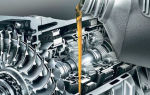
Functional and design features
The actuator is the most important element of the gearbox. Its main task is to change modes while the car is moving. This relatively small node is responsible for switching without delays or failures.
Also, thanks to direct gear shifting, a smooth transition to the next stage is ensured without a break in power.
In addition, the device regulates the pressure in the clutch drive circuit and controls the transmission supply.
This device consists of electronic, mechanical and hydraulic units.
Unit breakdown: why and what to do?
Due to the fact that the Actuator is a connecting control element of the transmission, it operates almost continuously while the machine is running. The driver becomes aware of a problem by activating the emergency mode on the instrument panel.
If you ignore the warning and continue to operate the machine, this will inevitably lead to further deformation of the transmission elements.
To avoid worsening the situation, we recommend that you make an appointment to visit our workshop. We have advanced equipment at our disposal and vast experience behind us.
By conducting electronic diagnostics of the units (free of charge), we will be able to accurately determine which of the links require intervention, after which we will carry out the necessary work.
How to make an appointment for repairs?
For additional advice, please contact our manager by phone. You can also use the “call back” option or send an email request.
With us, actuator repairs for Toyota Corlla will be carried out responsibly and in the shortest possible time.
Source: http://remont-dsg.com/remont-aktuatora-toyota-korolla
MMT Corolla Verso repair
problems with MMT on Corolla Verso from 2004 to 2009.
The essence of the problem 1: error P0810, problems with the clutch actuator (drive). Symptoms: while driving, a red gear with an exclamation mark lights up on the panel, the gearbox is reset to neutral, the letter N blinks, gears do not engage. You turn off the car, stand there for a couple of minutes and move on. More often appears in hot weather or severe frost.
The essence of the problem2: vibration of the car during acceleration and when shifting 1st, 2nd, 3rd gears. Symptoms Vehicle vibration WHEN accelerating and WHEN shifting 1st, 2nd, 3rd gears.
Reasons: after a long search for information on this problem, it turned out that these were factory defects, Toyota recognized this and made a service campaign (SC) to replace the clutch elements (here is ITS description http://www.toyota-tech.eu/toms_cabs/EN/ 9K3E-059.pdf “TARGET =” _ empty ). Previously, the control unit, clutch, and actuator were replaced using this system.
Currently (2012), as far as I know, our dealer is only changing the clutch and actuator (possibly only the actuator motor). If you experience the problem described above, the first thing you need to do is ask your dealer whether you are covered by the insurance policy.
After a long search, it was found that the main problem was a weak actuator motor and partly in the design of the clutch basket and disc. For cars before 2008, the actuator was offered only as an assembly and cost more than $500. But for cars of 2008, the motor can already be ordered separately
List of original parts that need to be replaced:
- 31363-12040 Clutch actuator motor (~$100)
- 31250-19076 Clutch kit
- 04008-41121 Service kit (I don’t know how useful it will be, but it costs a penny, so I ordered it)
- 31230-17011 Release bearing
- 31237-12010 Release boot (it didn’t exist before, it appeared in 2008)
Problem No. 1: you can try to change only the motor, but if the clutch has been changed, you don’t understand when, for reliability, it is better to change the clutch as well.
Problem #2: Replacing the clutch. There is nothing mystical about replacing the clutch with an MMT, since it is a regular mechanic with only an electric clutch drive and gear selection. The only distinctive and very important point: .
Before starting work, the box must be put into service mode, and upon completion, initialize the Clutch and train the Control Unit. This can be done using simple manipulations with the gear shift lever and brake pedal or using the TechStream dealer program, but you need a special cord.
Here are excerpts from the manual:
Precautionary measures
05-659 Adjustment of the clutch full engagement position (service mode)
After repair work
05-661 INITIALIZATION AND TRAINING
05-664 CALIBRATION OF SYNCHRONIZATION POSITIONS
Thanks to Keeper user from TOYOTA Club Belarus for the information
We offer computer engine diagnostics to identify faults, activate additional functions, and carry out on-site diagnostics and diagnostics when purchasing a car. Chip tuning for all brands of cars. Repair of engines of any complexity.
We will answer any questions about computer diagnostics, chip tuning and engine repair: tel: 8 (904) 946-80-35
Source: http://avtosfera74.ru/remont-mmt-corolla-verso/