What density of electrolyte should be in the battery: increase in density and density after charging the battery

During the operation of vehicles, drivers often encounter a situation where the car starter does not turn from the battery, the crankshaft rotation speed from the starter is insufficient to start the engine, etc. In other words, the battery is severely discharged.
An equally common situation is that a battery fully charged from a charger quickly discharges, and recharging (even taking into account all the rules and recommendations regarding how to charge the battery) still fails to eliminate the problem.
It should be noted that electrolyte density and battery discharge are interrelated. The electrolyte is one of the main components in the battery device, allowing it to accumulate and retain a charge.
It turns out that it is the low density of the electrolyte in the battery after charging that does not allow the battery to retain the accumulated energy, and the charge is not restored from the car generator after installing the battery in the car.
If this happens, then the element requires maintenance, which involves equalizing the density of the electrolyte in the battery or completely replacing it. Let us note that in some cases, to restore the functionality of the battery, it is enough that the density of the electrolyte in the battery banks is brought back to normal.
In this article we will look at why the density decreases, how and in what way the density of the electrolyte in the battery is measured. We will also talk about what a driver should do if a low density of electrolyte in the battery was detected during measurements.
The electrolyte density in the battery has dropped: causes and consequences
As a rule, a decrease in density occurs as a result of evaporation of the water-acid solution in the battery sections. In this case, we are talking about boiling of the electrolyte in the banks, which occurs when the battery is recharged. Also, water gradually evaporates from the battery for natural reasons, and the process proceeds slowly, allowing the battery to remain in working condition for a long time.
Taking into account the above, it becomes clear why serviced batteries are needed. Access to the banks allows you to control the electrolyte level. Often this level is maintained within specified limits by adding distilled water. Many car owners are familiar with this process.
However, not everyone understands that adding water alone cannot solve the problem in all cases, since at the same time it is necessary to check the density of the resulting solution. The fact is that the electrolyte itself partially evaporates along with the water. For this reason, you need to add not only water, but also an electrolytic solution.
Afterwards, it is mandatory to measure the density of the electrolyte in the battery with a hydrometer. It must be taken into account that the correct density of the electrolyte in the battery will not only effectively accumulate and retain a charge, but will also protect the battery from freezing when cold weather sets in.
In practice, this means that if the driver regularly added only water to the jars and did not monitor the density of the solution, then in winter such a battery may freeze and/or fail.
The fact is that when in winter the temperature of the battery electrolyte in the sections decreases, and the solution itself is not dense enough, then the water in its composition turns into ice.
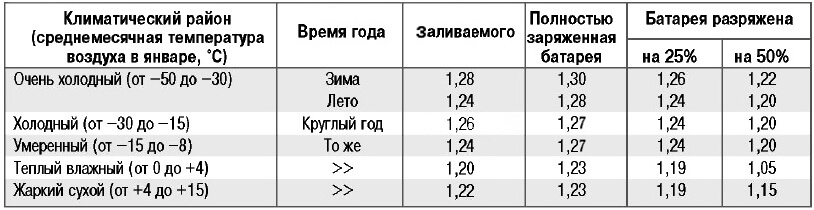
It is quite obvious that the summer or winter density of the electrolyte in the battery is a relative concept.
It is necessary to constantly maintain the recommended density, regardless of the season. Also, the density for regions with cold climates can be increased slightly, while leaving the value within the acceptable limits, that is, without exceeding.
It is also important to understand that the minimum density of electrolyte in the battery may not cause problems in the warm season, however, with the onset of cold weather, the battery fails even with a normal level of solution in the jars. We also note that the electrolyte in the battery may turn black or become cloudy. In this case, replacing it helps, during which the density is also adjusted.
How to properly increase the electrolyte density in a battery
As you can see, the need to increase battery density may arise for various reasons. First of all, you need to figure out what density of electrolyte to pour into the battery in a given case. Please note that solutions are available for sale, the density of which is initially somewhat overestimated.
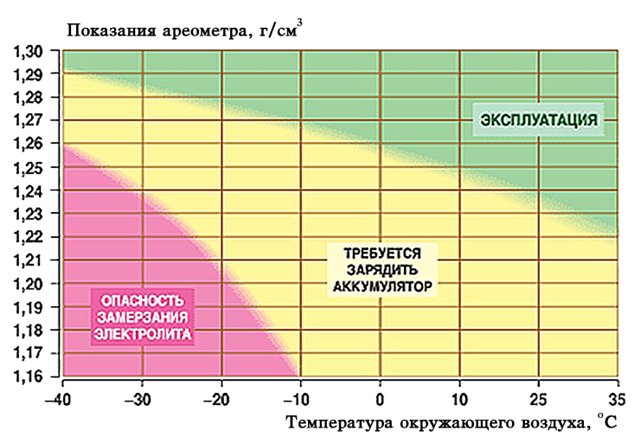
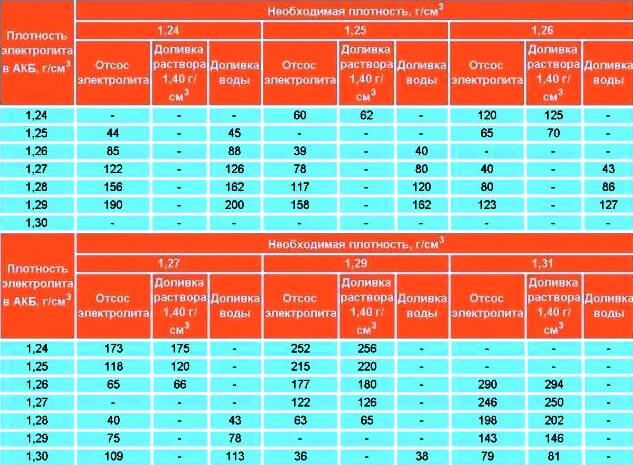
This means that during the adjustment process, distilled water may be needed to reduce the density. It should be taken into account that filling with ordinary running water, technical water, etc. is not allowed. So, let's move on. To determine what density is required, we recommend that you familiarize yourself with the electrolyte density table (see above).
The next step is to prepare the necessary equipment, tools and basic components to create the solution:
- hydrometer;
- glass (measuring);
- container for draining;
- rubber bulb;
- distilled water;
- battery electrolyte;
Before you begin, please note that performing operations with acid requires compliance with safety precautions. To protect your skin and eyes, it is advisable to use rubber gloves and safety glasses. Also, in cases where the electrolyte solution is diluted independently, it is forbidden to add water to the acid! It is necessary to first pour in water, after which acid is carefully and carefully added to it! This will avoid injuries and chemical burns.
If the electrolyte is completely replaced or the liquid needs to be drained, do not turn the battery over or tilt it too much. The fact is that such actions can lead to shedding of lead plates, after which a short circuit occurs and the battery fails.
As for density measurements, it is necessary to take measurements when the outside air temperature is around 20 degrees Celsius. It turns out that if it’s cold outside, you must first bring the battery into a heated room and give it a chance to warm up.
It is also important to remember that battery density decreases with discharge and increases after charging. For this reason, to obtain the most reliable indicators, you need to fully charge the battery before taking measurements.
If it is not possible to replace the battery, and there is a maintenance-free type of battery available (that is, work is carried out with a maintenance-free battery), then to gain access to the banks you will need to drill holes in the case using a drill. You also need to prepare a soldering iron for further sealing of the cans.
The plastic that will be used for sealing must be acid resistant.
To drain the old electrolyte or collect its excess, you need to prepare a container in advance. Glass jars or bottles are best suited for such purposes. You will also need to take care of further disposal.
Do not pour electrolyte down the drain, onto the ground or into water bodies!
The acidic solution must first be neutralized with alkali. If you do not have certain skills, then you need to consult with specialists in advance, study the issue on specialized forums, contact a similar question at collection points for old batteries, etc.
After all the nuances have been taken into account, you can proceed to servicing the battery. Next we will look at the process using an acid battery as an example. Note that if the battery is alkaline, then some indicators will differ from those given below.
How to increase electrolyte density
So, density is measured in grams per cubic centimeter, that is, g/cm3. Density measurements must be made in each battery bank. The density of the solution should be from 1.25 to 1.29.
The spread of indicators across battery sections should not be higher than 0.01. In cases where the indicator has dropped to about 1.20, then the density in the banks can be increased by adding electrolyte, which has a density of 1.27.
To implement the task you will need to perform the following steps:
- Topping is done in each individual jar. To do this, use a bulb to pump out as much of the old electrolyte as possible from the jar.
- The electrolyte is then poured into a measuring cup, allowing its quantity to be measured.
- Next, fresh electrolyte is poured into the jar, and only ½ of the volume that was previously pumped out needs to be poured.
- Next, the battery needs to be rocked from side to side, avoiding strong tilts and overturning. Such actions will allow the remaining fluid in the battery to mix with fresh fluid.
- Now you can measure the density. If the value does not reach the desired value, you can add another half of the volume that was previously pumped out.
- Such actions are repeated until the desired density is achieved.
- After the density has returned to normal, you need to add distilled water to the level, and then move on to working with another jar.
If the density in the battery is reduced to 1.18, then you need to add battery acid rather than electrolyte. The density of such an acid is much higher. In cases where it was not possible to immediately increase the density, the process is repeated until the desired value is obtained.
We also recommend reading the article on how to replace the electrolyte in a battery yourself. From this article you will learn about the features of replacing the electrolyte in a battery, and also become familiar with the basic requirements regarding this procedure.
When work with all sections of the battery is completed, the battery can be charged.
After charging the battery, the density of the electrolyte is measured again, and if necessary, the indicator is adjusted using distilled water or electrolyte.
Tips and tricks
In some cases, you may encounter a situation where the density of the electrolyte is initially very low, but after topping up it is not possible to increase it. Also, the electrolyte is gray, black, cloudy or red in one jar or in all sections at once. This indicates the need for a complete fluid change.
- To replace the electrolyte with a pear, you need to completely remove the liquid from the cans.
- Next, you will need to close the control ventilation plugs on the sections.
- After this, the battery is placed on its side or propped up.
- Then a small hole (diameter 3-5 mm) is drilled in the bottom of each section one by one.
- Through the indicated holes, the remaining electrolyte in the battery case is drained into a previously prepared container.
- Then the plugs are unscrewed and the jars are thoroughly washed with distilled water.
- The next step is to seal the holes with acid-resistant plastic.
- Next, you can pour fresh electrolyte into the battery, repeating the steps described above to adjust the density of the solution.
Finally, we would like to add that in some cases such operations make it possible to restore the battery’s functionality for a fairly long period of time, but this does not always happen. Certain chemical processes in the battery, as well as the gradual shedding of the plates, lead to the fact that even after a complete replacement of the electrolyte, the battery may not hold a charge.
If, after all the work done, the density of the liquid still drops quickly or does not rise to the required values after charging, then you should think about replacing the battery.
The driver may also notice that during the operation of the battery, the fresh solution turns black again, becomes cloudy, and boils away (taking into account that the battery is correctly charged from the charger, and the generator and relay regulator on the car are working properly), then such a battery will need to be replaced.
Source: http://KrutiMotor.ru/plotnost-elektrolita-v-akb-kak-povysit/
Reasons for the decrease in electrolyte density in the battery

A car battery consists of a housing, containers with electrodes filled with electrolyte placed in it, a density level sensor for this liquid and terminals. The connection is simple - to the outputs of the vehicle's electrical circuit.
If the charge of the device decreases, the car cannot be started. When fully charged, the occurrence of such a problem indicates a decrease in the density of the electrolyte and the inability of the battery to produce the required current parameters.
This can be diagnosed using the appropriate probe in the serviced batteries or a special indicator mounted in one of the cans.
Normal battery operation involves constant recharging and high-temperature chemical processes on the electrodes and in the electrolyte. The result is a constant decrease in fluid in the battery banks, which is replenished with distilled water. Among the most common reasons that reduce the density of the solution in a battery are:
- The concentration level of the solution in containers with electrodes is not controlled after each replenishment of distillate. With each new dilution of the concentrate, the proportion of electrolyte decreases due to the evaporation of water and a small amount of electrolytic liquid;
- Repeated charging of the battery leads to boiling of the solution and its evaporation, which reduces its amount and increases its concentration. In this case, there are fewer active molecules for the ionization of lead and its salts, and the density of the liquid decreases accordingly;
- The battery is low.
IMPORTANT: Long-term operation of the battery in a mode of reduced electrolyte density is the road to sulfation of the plates and failure of the device.
To determine the cause of a low battery charge, measure the concentration of the solution in the battery jars using a hydrometer. The optimal temperature for this procedure is from 22 to 25 °C. The electrolyte density may be higher or lower than normal.
In the first case, the likelihood of corrosive destruction of electrodes with a positive charge increases. In the second, danger lurks during cold periods of the year, when the electrolytic solution can cool and harden.
Therefore, controlling the level of density in winter is the primary task of any vehicle owner.
Preparation before raising the electrolyte density
To measure the electrolyte concentration in a battery, the following conditions must be met:
- There are no chips or cracks on the battery, the case is absolutely intact and the terminals are without damage;
- Normal level of liquid in each of the cans;
- The temperature regime of the electrolytic solution is in the range from 20 to 25°C;
- Battery charge is full.
If there is damage to the terminals or housing, the data may be inaccurate, and the reason for the lack of ability to deliver the required discharge to start the vehicle is not at all the low density of the electrolyte.
A low liquid level is more concentrated than the normal amount diluted with distillate. At low temperatures, measurements differ significantly from actual values under normal conditions.
In a discharged battery, the density of the solution is always lower, since most of the ions have accumulated on the plates.
IMPORTANT: Adding sulfur concentrate to correct the electrolyte density must be done very carefully, since higher values contribute to shedding of the plates and damage to the battery.
The battery is not charged in full from the car's generator, but only 80-90%, which requires recharging the device to measure the concentration of the solution.
Preparatory work to increase the density of the electrolyte includes:
- Removing the battery from the vehicle;
- Storage in a warm room before purchasing the battery at a temperature of 20-25 ° C;
- Checking the saturation level of the solution;
- Charging and cleaning the terminals as necessary before replenishing the liquid in the jars.
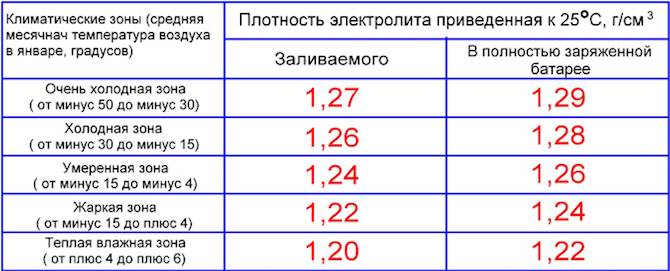
To determine the norm, there are special tables, according to which the performance indicator for the warm period should be no lower than 1.27 g/cubic meter. cm, and for winter – 1.3 g/cubic. cm.
Raising the electrolyte density in the battery
To increase the concentration of the active solution in the battery jars, it is necessary to prepare:
- Personal protection equipment when working with caustic substances: old clothing, safety glasses, a respirator or protective mask, rubber gloves;
- Beaker;
- A container into which the old solution will be drained;
- An aerometer with a rubber bulb for pumping out the liquid in the jars;
- Drill with a drill with a diameter of 3-4 mm;
- Blowtorch or soldering iron;
- Acid plastic.
The electrolyte contains sulfuric acid, which can corrode skin or clothing, so you should take care of personal protection and try to do all manipulations with the utmost care. Increasing the density of the solution is achieved in several ways:
- Complete replacement of electrolyte in jars at a concentration below 1 g/cubic meter. cm;
- Adding battery acid to the solution;
- By pouring distillate and sulfuric acid to the desired level and density.
Complete electrolyte replacement
This is an extreme radical measure in the event that the electrolyte has completely exhausted its resource when its density is reduced to 1 g/cubic meter. see Actions are carried out in the following order:
- After preparation, the battery undergoes complete pumping of the solution from the cans using a bulb;
- Turning the battery on its side, it is necessary to drill holes in the bottom of each container with electrodes and drain the remaining liquid;
- In this position, you need to hold the device and rinse the internal cavities with distillate;
- The cleaned battery is again made sealed by sealing the previously made holes with a drill with acidic plastic. To do this, use a blowtorch or soldering iron;
- The required amount of distillate is poured into each jar, which is calculated in the ratio of the total volume of the jar and the required amount of battery acid for a solution with a concentration of 1.25-1.27 g/cubic meter. cm;
- The jars are well sealed, the battery is slightly shaken without much deviation from the vertical.
IMPORTANT: The distillate is poured into the jars first, and then the acid is added, otherwise the liquid will boil.
Adding Battery Acid
When the density of the solution is below 1.2 g/cubic. cm it is necessary to take drastic measures to increase the electrolyte value. You should purchase battery acid, the density of which is 1.84 g/m3. cm, and fill in the same way as a regular electrolyte.
Adding distillate and sulfuric acid
You must first pump out the existing solution from each battery jar. Then pour in new liquid with a density of 1.25-1.27 g/cubic meter. see. Having filled the jars to the “Norm” mark, close the lids well and shake the battery slightly.
IMPORTANT: Do not turn the battery upside down. With such manipulation, pieces of lead salt may break off from the grid and fall onto the adjacent electrode, thus short-circuiting the jar. After this, the damaged container will become unusable.
Concentration measurements will indicate the need to repeat the electrolyte replacement process. If the figure is below 1.25 g/cc. cm, then the operation should be repeated until the desired result is obtained.
Corrective battery charging
After replacement or manipulation to increase the density of the electrolyte, a solution with a different indicator is installed in the battery banks. Allowed separation in the range of 0.01 g/cubic. cm. To equalize this value, it is necessary to perform corrective charging. The essence of the method is to supply current for 1-2 hours while charging 2-3 times lower than the nominal value.
In the absence of a positive result, more radical alignment methods are used. Charging is used with devices equipped with regulators that provide a stable input voltage.
Instructions for restoring density using corrective charging:
- The battery is fully charged;
- At the moment of reaching the maximum charge when observing the boiling of the electrolyte, the current strength decreases to the level of 1-2 A;
- During the boiling process, the distillate evaporates and the density of the liquid increases;
- For each individual case, the evaporation time can be different and sometimes reach 1 day;
- When the density decreases below 1.25 g/cu. cm the electrolyte is added, the concentration is measured when the device cools down to 25 ° C;
- A repeat operation is performed if necessary.
The only drawback of the procedure is its long duration.
Correction electrolyte
The corrective mixture is understood as an electrolyte whose density is 1.4 g/cubic meter. cm. Simply adding such a solution is unacceptable; you should first measure the existing level of density of the liquid. Determining the cause will help you choose the most appropriate method of applying corrective electrolyte. The purpose of this solution:
- Adjust the electrolyte level when the solution leaks;
- Raise the density level of the liquid in the jar when pouring more distillate than necessary.
How to use correction electrolyte:
- Using a syringe or aerometer, pump out the liquid from the cavity of the jar;
- Replace the pumped out solution with the same volume of correction composition;
- Let the battery charge for 30 minutes to an hour;
- At the end of charging, keep the device in a calm state for 2-3 hours;
- Carry out a control measurement in each of the cans;
- Repeat the procedure if necessary.
IMPORTANT: When pumping out the electrolyte, it is necessary to leave the surface of the plates covered with liquid.
Conclusion
In conclusion, we would like to note that working with batteries and electrolyte is not easy. Therefore, if you have little experience in servicing your car, then it is best to contact a service center and entrust this matter to professionals. In any case, monitor the density of the electrolyte for reliable operation of the battery, even in summer or winter.
If the material was interesting or useful for you, publish it on your social network page:
Source: http://jrepair.ru/interesnoe-na-jrepair-ru/agregats/prichiny-padeniya-plotnosti-elektrolita-v-akkumulyatore
What electrolyte level should be in a car battery?
Passenger cars equipped with internal combustion engines use lead-acid batteries. The battery plates are in a special liquid that can conduct electric current - electrolyte. Battery electrolyte is a solution of hydrochloric acid in distilled water.
Foreign impurities in the electrolyte are not allowed, since they worsen the characteristics of the liquid - density and electrical conductivity.
A lead-acid battery uses three components to carry out current-generating processes:
- lead dioxide PbO2 located on the positive contact (cathode);
- spongy pure lead present on the negative terminal (anode);
- electrolyte.
As the battery discharges, pure lead at the anode is converted into PbSO4 sulfate. In this case, the substance changes color and gives up two electrons to the electrical circuit. At the cathode, electrons are absorbed and lead dioxide is converted to sulfate. The movement of electrons is carried out through an external circuit.
The design and principle of operation of a lead-acid battery
When lead sulfate is formed at the cathode, sulfuric acid is consumed from the electrolyte solution, which leads to a decrease in density. If the battery is charged, then the processes go in the opposite direction.
Recharging continues until a certain point, after which the density of the solution does not increase further. This moment is considered the point at which the battery is fully charged. Further charging leads to the decomposition of water into oxygen and hydrogen, which are released from the electrolyte in the form of gas bubbles.
This process is called battery boiling.
Density and level of electrolyte in the battery
Since the electrolyte is an integral part of the electrochemical process occurring in the battery, it is necessary to maintain its parameters. To assess the state of a solution, the concept of liquid density is used.
The battery provides the required voltage only at a certain value of this indicator. If the parameter is increased or decreased, the current source does not work correctly and fails. The liquid level in the cans ensures the functioning of the entire surface of the plates.
When a part is exposed, the element is subject to intense destruction, which will quickly damage the battery.
Why is it necessary to check the electrolyte level and its density?
To maintain the operating condition of the battery, it is necessary to ensure the density and level of electrolyte within specified limits. Exceeding the tolerance standards leads to destruction of the plates and loss of battery capacity. By changing the parameters, you can indirectly judge the serviceability of the generator installed on the car.
Electrolyte level monitoring
The electrolyte level on serviced batteries is monitored using a special meter. Maintenance-free batteries may have minimum and maximum liquid marks on the side. It is impossible to restore the level on such sources. If the volume goes beyond the range, the owner should prepare to buy a new battery.
How to properly check the electrolyte level in a battery?
Steps to measure the electrolyte level in a car battery:
- Wipe the battery cover with a clean cloth.
- Open the ventilation plugs. To unscrew, use a coin that fits tightly into the grooves of the plugs.
- Lower the glass measuring tube (5-6 mm in diameter) into the jar until it touches the plates or safety mesh.
- Pinch the top of the tube and then remove it from the jar.
- View the resulting value. The norm is considered to be a level within 12-15 mm above the surface of the plates.
Level measurement with a tube
Why might electrolyte levels drop?
There are reasons for a drop in electrolyte levels:
- evaporation of water from solution;
- overcharging of the battery due to a faulty relay regulator;
- leakage of solution through cracks in the housing.
If the battery has a low electrolyte level, what should the car owner do?
Depending on the reason for the drop in level, various methods are used to restore the amount of electrolyte in the battery.
The owner can restore the amount of fluid:
- If there are no signs of electrolyte leakage on the battery, then the level is restored by adding distilled water. After this, you need to wait some time and measure the density of the liquid. If a parameter deviates from the norm, it must be restored. Density adjustment techniques are given below.
- To check the voltage, a tester is used that is connected to the battery terminals. The voltage in the on-board network when the engine is running should not exceed 14.4 V (at any crankshaft speed).
- If damage is found on the case, you can try to solder it using acid-resistant plastic. After this, electrolyte with the same density is poured into the jars.
A video tutorial on increasing the density of the electrolyte is provided by the Denis MECHANIC channel.
Consequences of incorrect electrolyte level in the battery
An incorrect fluid level leads to negative consequences:
- A low level leads to exposure of the edges of the plates, which begin to collapse. Fragments of elements crumble inward, forming conductive bridges. Because of this, active internal discharge of the battery begins, leading to a drop in capacity. Constant self-discharge additionally destroys the plates, which quickly renders the battery unusable. Restoring such a voltage source is impossible.
- With an increased amount of electrolyte, liquid leaks onto the body and subsequent corrosion. Electrolyte leaks form conductive paths that short-circuit the terminals. Eventually, the battery capacity begins to decline.
Electrolyte density control
Checking the electrolyte density is one of the main ways to monitor the condition of the battery. The measurement is carried out using a special device - a hydrometer. Based on the measurement results, we can draw a conclusion about the condition of the battery and the charge level.
The procedure for measuring density in serviced devices:
- Wipe the battery cover with a clean rag and open the plugs.
- Wipe the hydrometer and collect liquid from the jar.
- Wait 1-2 minutes and check the density value.
- Drain the liquid back.
- Take measurements for the remaining banks. The norm is considered to be a density in the range of 1.25-1.29 g/cm³ (for the southern and northern regions of Russia, respectively).
Maintenance-free batteries may be equipped with an inspection eye designed to provide a rough estimate of the charge level. You can unscrew the eye from the cap (not on all types of batteries) and measure the density in the jar. The remaining banks are not available for measurement, so the condition of the battery will have to be judged by one measured value.
Battery electrolyte density table
Below is a table of correspondence between density and charge level, compiled for a temperature of 20-25 ºС. The dynamics of the voltage drop as the battery discharges is clearly visible. Voltage data may differ for batteries from different manufacturers.
Table of correspondence between density and charge level.
| Charge degree, % | Discharge degree, % | Density, g/cm³ | Terminal voltage, V |
| 100 | 1,277 | 12,73 | |
| 90 | 10 | 1,258 | 12,62 |
| 80 | 20 | 1,238 | 12,50 |
| 70 | 30 | 1,217 | 12,37 |
| 60 | 40 | 1,195 | 12,24 |
| 50 | 50 | 1,172 | 12,10 |
| 40 | 60 | 1,148 | 11,96 |
| 30 | 70 | 1,124 | 11,81 |
| 20 | 80 | 1,098 | 11,66 |
| 10 | 90 | 1,073 | 11,51 |
| 100 | 1,060 | 11,40 |
How to properly check the density of the electrolyte in a battery?
When measuring density yourself with a device, you must follow the following rules:
- measurement is carried out in each bank;
- during the measurement process, it is forbidden to try to equalize the density value by turning the battery over;
- ventilation plugs, battery surface and hydrometer must be clean;
- The battery being measured must be fully charged;
- The battery must be kept for 3-4 hours at room temperature.
Density measurement is only possible on serviceable batteries. On maintenance-free batteries, the banks do not have inspection holes.
How to increase the density of electrolyte in a battery?
The first step in increasing the density of the electrolyte is to dissolve the lead sulfate deposited on the plates.
For this purpose, special chargers and cyclic charging and discharging of the battery are used. The method helps to dissolve part of the substance, which will increase the density of the electrolyte.
After this, it is necessary to re-measure the parameter. The spread of values across banks should not exceed 0.01 g/cm³.
If a density is found in the range of 1.18-1.20 g/cm³, then it is necessary:
- Use a rubber bulb to pump out some of the electrolyte in the jar.
- Add liquid with a density of 1.27 g/cm³ to normal.
- Wait several hours for the liquids to mix completely. You should not rock or shake the battery to speed up the procedure.
- Remeasure value.
- Carry out the pumping and refilling procedure again.
If the density is below 1.18 g/cm³, the procedure for restoring density consists of adding pure battery acid.
Since the electrolyte has an aggressive effect on the skin, it is recommended to carry out operations to increase the density of the liquid using rubber gloves.
There is another recovery method, which involves recharging the battery:
- Pump out the electrolyte from the cans using a rubber bulb.
- Close the plugs.
- Place the battery on its side. It is not recommended to turn the battery 180º, as there is a risk of the active mass shedding and short circuits inside the cans.
- Using a drill with a diameter of 3-4 mm, drill holes in the bottom of the cans. Drilling is done carefully so as not to damage the plates.
- Place the battery in its normal position and rinse the jars with running distilled water.
- Seal the holes with plastic similar to that used for battery cases. Usually they use old plugs or debris from broken batteries.
- Fill the jars with electrolyte to the required level. Some owners add liquid with a slightly higher density.
This density restoration technique extends the life of the battery for a short time. If sulfation processes have begun in the battery, then the car owner needs to prepare to purchase a new power source.
Photo gallery
Corrosion of the area under the battery is the mildest consequence of electrolyte ingress. One of the hydrometer samples
Video “Design of a homemade battery desulfator”
The video from the Spectrum channel shows the design of a homemade battery desulfator.
Source: http://AvtoZam.com/elektronika/akb/uroven-elektrolita-v-avtomobilnom-akkumulyatore/
How to increase the electrolyte density in a battery. On your own, with or without a charger. Simple steps
Surely most motorists have encountered a situation where a car left for some time stops starting. In this case, the starter may not show any signs of life at all.
The main reason for this is most likely the battery, which was completely discharged in a few days. Trying to charge it in this case will not lead to a positive result.
This problem is the result of a decrease in the density of the electrolyte that is poured into the battery banks...
After all, this liquid is essentially a catalyst for the electrochemical process; without it, the battery is a set of lead and plastic that will not work.
As you and I know, it consists of distilled water (approximately 65%) and sulfuric acid (35%), this liquid has a certain density, which can decrease and increase, depending on the charge.
Why does the electrolyte density decrease?
Most often, in order to maintain the required level of liquid inside a car battery, car owners add distilled water to it.
In this case, the density of the resulting solution is rarely checked.
At the same time, when the amount of distilled water is large enough, when recharging, the electrolyte will boil away along with this liquid, which leads to a decrease in its density.
Sooner or later, this indicator will drop below a critical level, and it will no longer be possible to start the vehicle.
In this case, it becomes necessary to increase this parameter of the solution in the battery, which will restore its functionality.
Preparing to restore the battery
Before increasing the density level of a battery on your own, you should carefully prepare for this process. First of all:
- This basic indicator of a car battery is measured at a temperature of about 22 degrees. This can be done using a special device - a hydrometer. In this case, you can only work with gloves and safety glasses to avoid possible burns.
- When preparing a new electrolyte, acid is added to water. If you do the opposite, the liquid will begin to boil , which can lead to acid burns.
- It is strictly forbidden to turn the battery over when working with it, as this may cause its plates to fall off, which will lead to failure of the device.
- You should prepare containers in advance into which the old liquid will be drained and the new liquid will be prepared.
- Accurate calculations of the required volume of acid will be required, since during the charging process the density of the liquid in the battery will increase.
Increasing electrolyte density
There are several jars in the battery; each of them contains an electrolytic solution. It is necessary to check and, if necessary, increase the density level in each jar.
The normal level of this indicator depends on several factors, primarily on air temperature. A value of 1.25-1.29 g/cm3 is considered normal. The difference in such indicators between banks should not exceed 0.1.
If the measurement of this indicator is below normal, you need to increase the density of the electrolyte in the battery.
Using a syringe, the solution is pumped out of each jar. In this case, you need to draw as much liquid as possible, measuring its volume, and then add exactly the same amount of fresh electrolyte.
Having filled in the same amount of fresh solution as the old one was removed, the battery is thoroughly pumped in order to mix the new and old electrolyte.
After this, this indicator is measured again: if it is still below the norm, all actions are repeated until the desired density value is achieved. Upon completion, distilled water is added to the car battery jars if necessary.
Density below minimum value
There are cases when the level of this indicator drops below 1.18. In this case, the above method will not help.
To restore the functionality of a battery, instead of an electrolytic solution, you need to use an acid whose density is higher than that of the electrolyte. In this case, all actions are carried out in exactly the same way as in the previous case until the indicator returns to normal.
Is it possible to increase the minimum density?
If the density level of the solution that conducts current in the car battery has fallen much below 1.18 g/cm3, there is no point in raising it. In this case, it is necessary to drain the entire solution, replacing it with fresh one.
First, as much electrolyte as possible is pumped out from the jars using a syringe. Next, the battery is placed in a large container, carefully turned on its side, and a small hole is drilled in the bottom of each can. By turning the device over, all excess remaining liquid is drained from it.
Next, distilled water is poured through the lids of the jars to rinse them. After this, the holes made are sealed with plastic that is resistant to electrolytic fluid.
Having done this, fresh solution is poured into the battery, after which the device will be ready for use. The disadvantage of this method is that the end result is a reduced service life of the device, but it will still work for some time before purchasing a new one.
How to boost using a charger
Everything here is also simple, we need to charge the battery at a low current for a long period of time. The bottom line is this: when a full charge is reached, the electrolyte will begin to boil, bubbles will appear, it will disintegrate and the water will evaporate.
To increase the density, we need the excess water to evaporate, but the acid remains. Of course, the level in the battery will drop - but instead of the lost level, we add the required electrolyte density.
This process is long and tedious (boiling - adding), but after about a couple of days you can reach a density of 1.27 - 1.29 g/cm3, which is already normal.
As you can see, you can increase the density, and this process is often done with your own hands, but in different ways - choose the one you need.
Now a short but useful video.
Source
Source: https://zabarankoi.mirtesen.ru/blog/43243701963
How to check a battery: density and electrolyte level
Hello again! In previous issues, we have talked more than once about how to care for different types of batteries, including maintenance-free ones. It is these devices that generate the current necessary to start the engine and operate numerous devices. I propose to discuss how to check the battery in different ways: from folk to engineering.
We start with an external inspection
Since there is no way to start the engine without a car battery (you can, if you cheat), it is simply necessary to monitor the condition of the battery. Therefore, we need to have knowledge of how to check its functionality. Let's start with a visual inspection of the battery.
It is necessary that its outer surface is clean and free of visible damage. The same applies to the condition of its terminals. It is often clear at this stage whether there are any problems with its performance.
Oxidized and dirty terminals may indicate that the battery is overheating due to the shorting of sections inside it.
So, a visual assessment of battery performance includes the following points:
- integrity and general safety of the product body;
- cleanliness of the terminals and absence of white and green streaks;
- absence of large amounts of dust, dirt, traces of electrolyte leakage;
- tight fixation of the terminals with fasteners.
Why is this important to pay attention to?
Accordingly, the engine starts with great difficulty, and the charge deteriorates while driving.
The most common and reliable way to check the battery's performance is to use a special device for this. This is usually done with a multimeter. With its help, the voltage at the terminals is set. It is better to do this after the car has been parked or in the garage overnight.
The device parameters must be set to measure DC voltage.
The wires should be set accordingly: red - to positive polarity, black - to COM. The battery condition is assessed as follows.
If the device readings are at the level of 12.6–12.9 Volts, then the battery is fully charged. Slightly lower values of 12.1–12.3 will already indicate that the battery capacity is only 50% of its intended capacity.
If they are at the level of 11.5–11.8 Volts, it means that your battery is discharged.
What does the level in banks indicate?
Electrolyte density is another criterion that needs to be checked.
To check the density of the contents you will need a hydrometer. This is a type of device that is a special float. To take measurements, the jars are opened one by one and the device is immersed in them. Density firstly depends on the air temperature at which measurements are taken, and secondly on the climate in which the car will be operated.
Of course, this only applies to batteries of the type being serviced. It is also necessary to carry out periodic external inspection of the presence of electrolyte in the banks.
The level is checked with a glass tube, which is lowered into the jar up to the plates, then the upper end is closed with a finger (as shown in the figure).
If the electrolyte level is not enough, you need to add distilled liquid inside, but first make sure that the housing does not have obvious damage through which leakage could occur.
But remember that the battery has a lifespan and trying to revive a very old battery is almost useless.
Other charge testing techniques
There is another way to check the condition of the battery - the so-called load fork. In fact, this is not a cutlery, but a device that combines the functions of a voltmeter and a device for measuring load voltage. To carry out measurements, polarity must be strictly observed. The duration of the measurement should not exceed 5 seconds.
When connecting the device to the terminals, sparking should occur. This is due to the fact that a load is created that is approximately the same as at the moment the engine starts. This check should not be carried out too often, so as not to damage the battery prematurely. If the device shows a voltage of more than 10 Volts, this indicates that the battery is working properly.
In cases where it is not possible to measure the charge with a tester, you can check the serviceability in the “old-fashioned” way.
If an external inspection has already been carried out, as described above, and the condition of the terminals has been checked, then we turn the key in the lock, but do not start the engine. Now you need to turn on all the lights in your car.
Leave them on for 5 minutes and observe. If the brightness of the light has not changed during this time, then the battery is in good condition.
As you can see, dear motorists, there are many techniques and methods for checking the condition of a car battery at home or in the garage.
A discharged battery should serve as a signal - it must, firstly, be charged, and, secondly, understand why this happened.
And be sure to check the battery of your car before your upcoming long trip, and with a working car you can go even to the ends of the world)) For today we will say goodbye. Meet us on the pages of new publications. Bye!
Sincerely, blog author Andrey Kulpanov
Source: http://avto-kul.ru/tehnicheskoe-obsluzhivanie/kak-proverit-akkumulyator.html