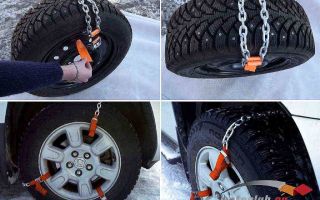
Do-it-yourself snow chains: what do you need for this?


How can you make snow chains with your own hands?
Hi all! Winter operation of any car brings a lot of trouble and problems to the driver, unless he lives, of course, somewhere in Thailand or Bali.
And in our latitudes there is often a multi-centimeter layer of snow, plus ice, frost, and so on. In such conditions, it is necessary to provide various devices that will increase traction.
How to make snow chains with your own hands, and what they even are - we’ll figure it out further.
Preparation for production
Experienced drivers prepare for winter in advance - some simply install tires equipped with studs, while others try to provide their car with more reliable means of withstanding slippery surfaces.
Many devices are expensive or do not provide high-quality contact of the wheels with the road in icy conditions.
At the same time, manufacturing such chains will not be difficult, and the necessary components can be found in stores even in small towns.
To make a simple design you will need to stock up on:
- 15 meters of durable steel chain;
- tension mechanism;
- nuts, bolts, washers;
- carabiners and hooks.
From the tools you need to prepare a grinder, a vice, a set of wrenches, a hammer, and screwdrivers.
In order to start preparing a steel body kit at home, you should know the size of your tires, or take preliminary measurements. You will need to know the diameter and width of each slope.
For each car model, transverse elements, the so-called lugs, must be selected individually.
How to make chains - read the instructions
Now let's see how to make anti-slip chains that will increase the maneuverability of your car. The algorithm for performing the work will be approximately as follows:
- Using a grinder, we cut the transverse and longitudinal elements from the prepared chain.
- We find the 6th link and fix the first transverse element on it. This can be done by welding or bolts and hooks.
- Every few links we install the following transverse elements.
- To ensure good tension of the entire structure, we place a segment containing 7–8 links on one longitudinal element. It will provide additional reliability.
- At the ends of the longitudinal sections we attach carbines, the diameter of which must be at least 5 mm.
If you stock up on all the necessary tools in advance and have some skills in using them, then the operation of creating chains for passenger cars will not take more than an hour of time. The use of welding will make it possible not to use fasteners, and this will have a positive effect on the overall structural reliability. Now all that remains is to install the assembled chains on the car wheels.
It is best to carry out this operation in a garage. You will need to jack up the vehicle in order to place a length of chain on each wheel. To make dressing easier, you need to release some of the air from the wheel.
If it is not possible to use a jack, you can proceed in another way. The chains are laid out in front of the wheels so that there are no twists anywhere.
The car drives its wheel onto the structure and puts on the handbrake.
After this, the chain for SUVs and other types of cars is put on in such a way that the hook with a carabiner is located on the outside of the tire. The carabiner coupling is placed externally on the tension system and fixed.
Transverse elements are evenly distributed along the perimeter of the car ramp and general tension can be performed. Now you can start the engine and drive a few tens of meters.
After this, final fitting and adjustment is made so that the chain fits as tightly as possible to the wheel.
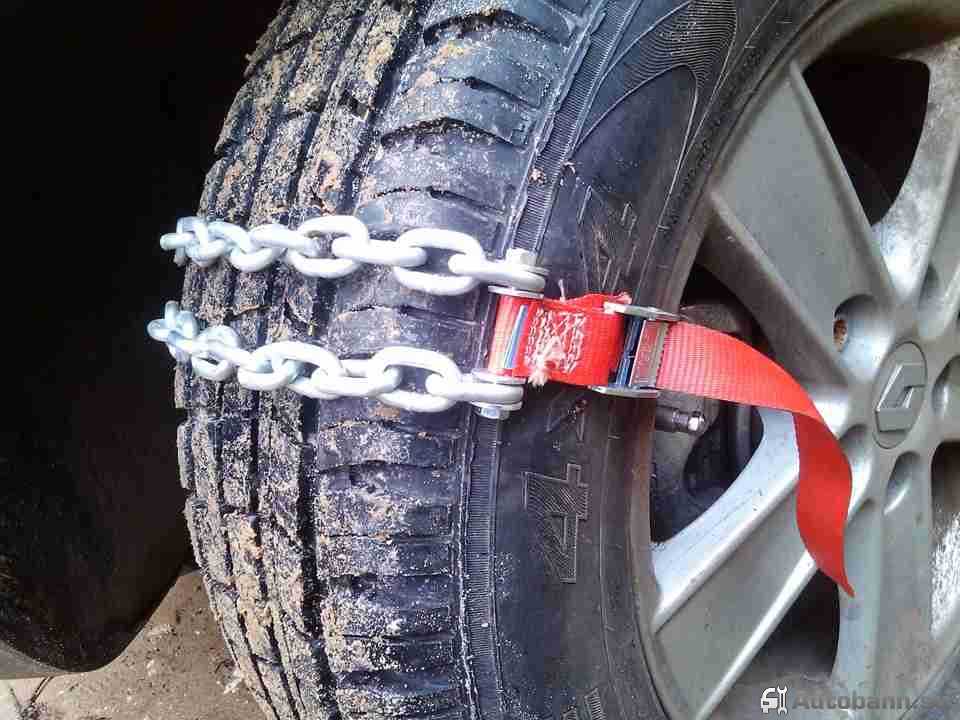
Some drivers simplify the design and install so-called bracelets. They have no longitudinal elements, but only transverse ones. They require a more modest set of tools and up to 5 meters of steel chain. They are convenient because they do not take up much space in the trunk, but will always be at hand in the winter season.
For those who still have questions about the technical part of the assembly, we recommend watching a video on the topic described.
If you like to improve your car yourself, then there is a whole block of articles for you, from making your own air freshener and body polish to implementing a heated steering wheel.
For today we will say goodbye to you. Don't forget to subscribe to updates and tell your colleagues and friends about the blog. Thank you for your attention!
Sincerely, blog author Andrey Kulpanov
Source: http://avto-kul.ru/ekspluatatsiya-avtomobilya/tsepi-protivoskolzheniya-svoimi-rukami.html
How to make snow chains with your own hands and video of work processes
Experienced motorists can give thousands of examples when mud, ice or deep snow prevent the successful completion of a trip. The power of the driving wheels is powerless in such situations - only a tug or a winch.
After such unpleasant moments, some owners refuse to travel in bad weather, others install studded tires .
However, there is another category of drivers who prefer to independently manufacture additional equipment to increase cross-country ability.
Design features of homemade chains for car wheels
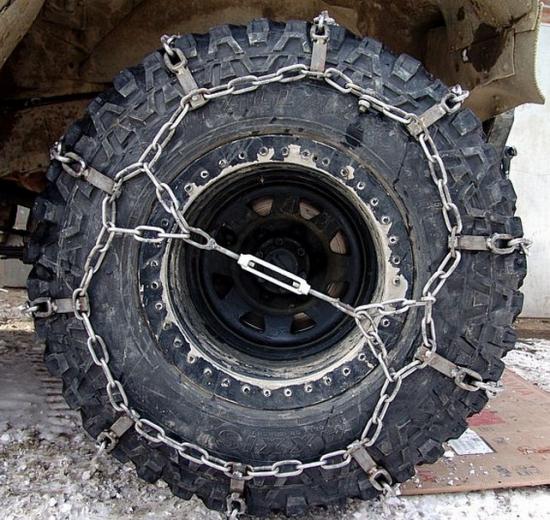
The basic design is a simple structure that consists of a set of steel links or reinforced wire. Uniform distribution of components over the entire tire area is the key to successful operation of the product.
Classic DIY snow chains in the video look like two elements that are located longitudinally along the radius of the wheel on the outer and inner sides.
They are connected to each other by transverse parts, the so-called lugs. The manufacturing method is not difficult even for novice motorists.
The arrangement of parts is carried out according to three schemes:
Each of the above types has its own disadvantages and advantages. The first option with a “ladder” is the most affordable in financial terms, as well as in terms of labor costs. No less interesting is the solution with bracelets, which are also convenient when installed on a wheel.
What is needed to make homemade car snow chains for wheels?
The inability to purchase factory-made devices that increase cross-country ability, as well as their high price, push car enthusiasts to solve the problem on their own. It should be noted that this is a completely reasonable choice - the necessary components can be found in any hardware store, and every self-respecting driver has a minimum set of tools.
It should be said that information on how to make snow chains with your own hands and videos include a list of design elements. Let's focus on the simplest model, made according to the “ladder” scheme. To implement it you will need:
- chain with a cross section of at least 5 mm made of steel;
- carabiners with a threaded coupling;
- tension mechanism;
- washers, bolts and nuts;
- hooks, carbines.
On average, about 15 meters of chain ; more accurate figures will be known only after specific measurements. It is recommended to use stainless metal hardware as chains. The preparatory process ends with the collection of tools:
- Bulgarian;
- vice;
- hammer;
- set of wrenches.
Experienced motorists assure that at critical moments a cable or even simple rigging comes to the rescue. You can simply wrap them around a wheel, another question is that such things are not always at hand.
Moreover, this method is strictly contraindicated for cars equipped with a disc brake system. Therefore, it is better to be patient in advance and make a “chain body kit” yourself.
When making snow chains with your own hands using available videos, where the footage of the blanks is not always indicated, it is important to make accurate measurements of the radius and width of the tire. Based on the results obtained, calculate the parameters of the future product.
The number of transverse elements ( lugs ) is also selected individually for each car model.
Experts recommend focusing on the fact that there should be two transverse parts at once in the plane of the contact patch of the coated rubber.
The procedure for assembling a device to increase cross-country ability consists of performing the following points:
- cut longitudinal and transverse chain blanks with a grinder;
- secure the first transverse element to the 6th link of the longitudinal part using bolts and washers, hooks or welding;
- mount all subsequent crossbars every 8-9 links;
- in the center of one longitudinal element, install a segment consisting of 6-8 links and a tension device to securely fix the product;
- Install carabiners with a diameter of at least 5 mm at the ends of the longitudinal sections.
If you have certain skills and tools, the operation will take about 40-60 minutes. It will be useful to have experience in welding work, which will allow you to avoid threaded connections in practice, which will have a positive effect on the quality of the device.
Details: which locks on homemade snow chains are better and why?
When making traction control devices in garage conditions, drivers most often use the following types of locking mechanisms to secure them to the tire:
- S-shaped;
- hook-shaped;
- with ratchet mechanism.
Some homemade wheel chains are equipped with an S-shaped lock structure, which is locked with a four- or hex key. However, many complain about unreliable fixation and lack of adjustments for this option. In addition, installing such equipment is a complete inconvenience.
The second option for fixing the chain device is more common and holds quite well. If the chain is correctly laid, fastening can be done with a screwdriver without any problems. For a complete guarantee, car enthusiasts advise tying the contact point with 1-3 mm soft wire. Disassembly of the equipment also occurs quickly without much effort.
The ratchet lock model was previously used on trucks. It is characterized by high reliability and ease of operation. The sample provides fixation without the use of additional materials.
How to install snow chains on a car with your own hands and video operation
Experts recommend installing traction control equipment on all wheels, and not just on the drive ones.
Incorrect installation can lead to damage to ABS sensors, brake system components and wheel arch liners, as well as side tire cuts .
On SUVs with a plug-in second axle, the device is installed primarily on the pair that is constantly in operation. The installation operation is performed in two ways:
- With jacking.
- On a stationary car.
The essence of the question is not only how to properly make snow chains on a car with your own hands using a video - you should think about installation work even before entering the problem area. This is the only way to enjoy the operation, save your time and avoid annoying mistakes.
There is no point in describing the first method using a jack - the procedure is elementary and will not cause any difficulties even for a novice driver. The only recommendation is to reduce the tire pressure to make the work easier.
Another question is when this device is not at hand. In this case, you can install chains on snow wheels with your own hands using the following technology:
- place the product in front of the wheel pair, avoiding twisting of the links;
- run over the product with wheels;
- apply the handbrake;
- put on the device so that the hook and carabiner are on the outside of the wheel;
- connect the hook and the last link of the longitudinal part to the inside of the wheel;
- put the carabiner coupling on the tension system from the outside and fix the knot;
- distribute the transverse elements along the entire perimeter of the tire and tighten it.
Alternative options
Automotive stores sell traction control bracelets - a worthy alternative to chain equipment. They are distinguished by the possibility of quick installation and low price. But even here the engineering thought of our motorists does not stand still; they have skillfully learned to copy factory copies.
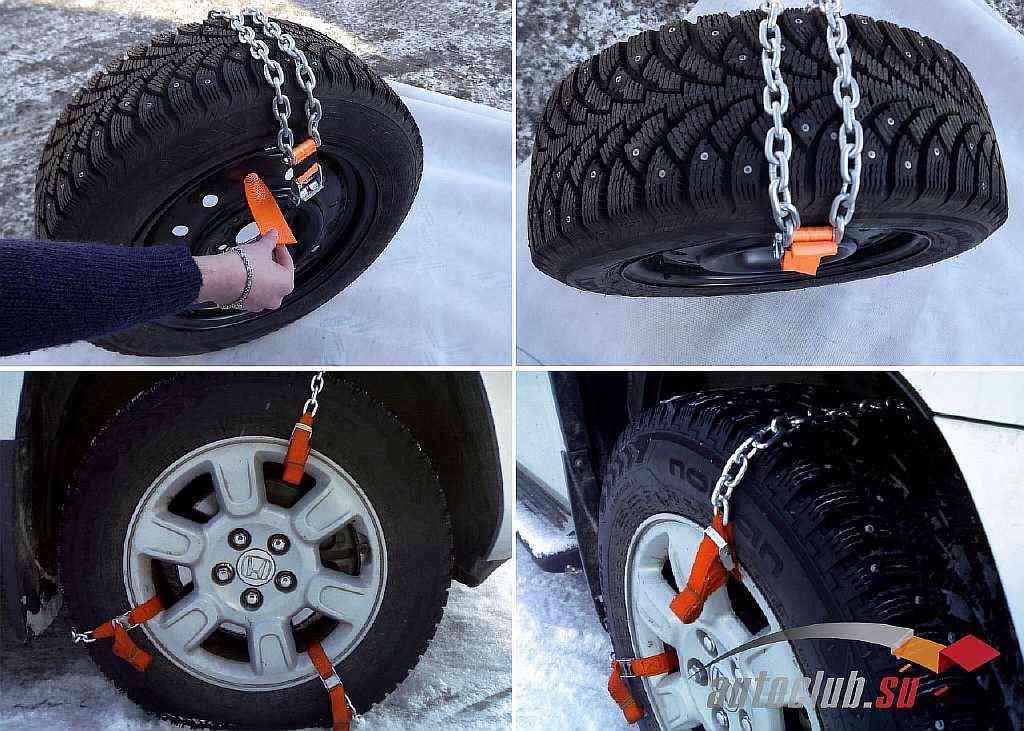
Bracelets are the same homemade snow chains , but without longitudinal elements, their advantages are as follows:
- Ease of manufacture.
- Quick installation.
- High efficiency and reliability.
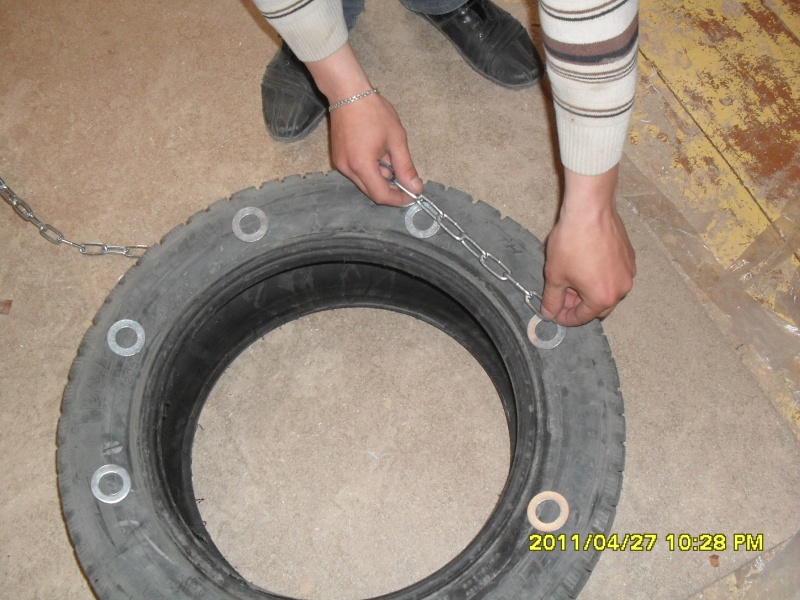
To make it you will need a modest kit:
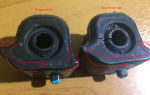
- VAZ muffler mounting element made of rubber;
- bolts 40-60 mm long, washers and nuts;
- a tube with a diameter equal to the diameter of the bolt;
- steel chain with a diameter of at least 5-6 mm.
To equip wheels with standard sizes 195 and 205 mm, 4-5 meters of hardware products will be required. Stores also sell ready-made kits for self-assembly of bracelets, with the exception of Chinese kits, they are of fairly decent quality and inexpensive. It consists of:
- blanks;
- fastening accessories;
- sling;
- clamp lock.
The kit is easy to use, transported in a special case and does not take up much extra space. An important advantage of metal bracelets is the possibility of installation on wheels with disc brakes. And if you take into account the reviews, then owners of expensive foreign cars do not hesitate to use such devices, which also says a lot.
Important to remember
Any traction control equipment adversely affects the safety of tires, as well as the condition of the chassis. You need to be especially careful when choosing locks for homemade chains on car wheels , since the trouble-free operation of the car depends on them.
Moving on hard surfaces is unacceptable. When driving on loose snow or mud, you should maintain a driving speed of 20-30 km/h; it is not recommended to allow wheels to slip. Experienced drivers advise periodically checking the tension of the equipment along the entire inner and outer perimeter of the tire while driving.
Source: http://autobann.su/kak-sdelat-zepi-protivoskolgeniya.html
DIY snow chains

DIY snow chains.
Snow chains are designed to significantly increase the vehicle's maneuverability both on ice, in snowfall and other off-road conditions. This article will discuss how to make snow chains with your own hands.
Snow chains - structurally, are a structure made of reinforced wire or chain, connected so that it evenly braids the tire around the entire circumference. This structure consists of two longitudinal cables - external and internal, passing along the circumference of the wheel, which are connected by transverse elements or rubber “lugs”.
The snow chains themselves come in 3 types:
-
snow chains in the form of a ladder;
-
diamond-shaped snow chains;
-
honeycomb-shaped snow chains.
Each has its own advantages and disadvantages, but making ladder-shaped snow chains is easier. Therefore, we take them as a basis:
Ladder-shaped snow chains are composed of longitudinal and transverse chains, tail chains, locking hook, locking hook and locking ring. The elements of the chain are connected using connecting rings (Fig. 1)
Fig. 1 Diagram of the snow chain (ladder)
1 – transverse branch, 2 – longitudinal branch, 3 – tail branch, 4 – locking hook, 5 – locking hook, 6 – locking ring.
To make a snow chain with your own hands you will need:
- Chain with a bar diameter of 4-5 mm – 15 meters;
- Hooks – 32 pieces;
- Tensioner – 2 pieces.
Making your own snow chains
We cut 4 pieces of chain of 83 links for longitudinal chains.
We cut 16 pieces of 13 links each for the cross chains.
We fix the first transverse chain on the 6th link of the longitudinal chains, and all the others, except the last one, on every 10th link from the previous one, the last one is fixed on the 12th.
We attach the longitudinal links to the transverse ones using hooks or rings.
After the 4th transverse chain, we fasten a section of 5 links to one side, and at the ends of both longitudinal links we put on such carabiners with a diameter of 5 mm.
On the side where the segment of 5 links is fixed, we attach the tensioning device to the carabiner.
We attach a hook to its other end.
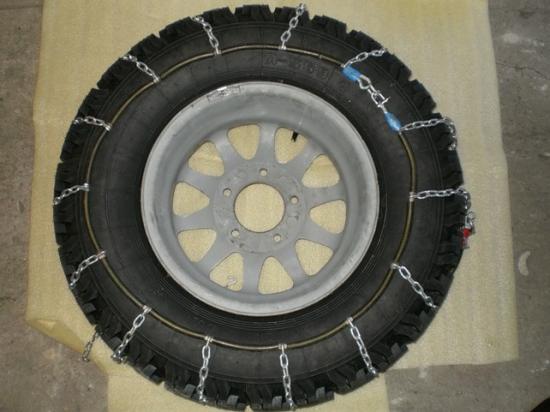
We put chains on the wheels.
We test the chains on our car.....
Snow chain installation
Snow chains are mounted on the drive wheels of the vehicle. Installation of a snow chain can be done in two ways:
1 – without jacking up the car;
2 – with jacking up the car.
The installation method is chosen by the driver depending on skills and road conditions. It is advisable to install snow chains before entering a difficult section of the road.
1st method - without jacking up the car:
– carefully straighten the snow chain (the chain links should not be twisted);
– spread the snow chains on the road surface and drive over them with the drive wheels;
– secure the car in a position that prevents spontaneous movement on the road;
– put the chains on the tire so that the locking hook (pos. 4) with the locking ring (pos. 6) is on the outside of the wheel;
– hook the locking hook (pos. 5) from the inside of the wheel to one of the links of the tail branch (pos. 3);
– spread the transverse branches (pos. 2) evenly around the circumference of the wheel;
– insert the locking hook (pos. 4) into one of the end links of the tail branch (pos. 3);
– turn the locking hook towards the locking ring (pos. 6);
– insert the locking ring into the groove of the locking hook;
– if necessary, make additional tension on the chain (re-hook the locking hook and hook onto the next tail links).
The longitudinal and transverse branches should tightly grip the tire. Removing the device from the wheel is carried out in the reverse order.
2nd method - with jacking up the car:
– install stops under the front wheels of the car;
– set the car to the handbrake;
– jack up the car, hanging the wheel above the road to a height of 20-30 mm;
– put on the device in the same way as method 1.
Author-compiler: Alexander Borisov, Samara
Especially for the site:
Source: https://www.freeseller.ru/2994-cepi-protivoskolzhenija-svoimi-rukami.html
What and how to make wheel chains with your own hands in an hour
Any experienced car enthusiast has had unpleasant moments when the driving wheels of the car began to slip in mud, ice or deep snow. It is often almost impossible to get out of such situations on your own - only with the help of another vehicle.
What are our colleagues doing? Some people buy tires with studs after such incidents, others simply park their car during natural disasters.
But there is another category of motorists who use homemade wheel chains and, I must say, quite successfully.
Design and types of anti-skid means
These devices are based on a simple design consisting of steel links or reinforced wire. A successful application is to distribute the elements evenly over the entire radius of the tire. Failure to comply with this condition may result in rupture of the product and loss of anti-slip properties.
The classic scheme, tested by more than one generation of motorists, consists of internal and external components that run along the entire circumference of the tire. They are connected to each other by transverse parts, the so-called “lugs”. The technology for making a chain for wheels with your own hands is accessible even to beginners.
Depending on the arrangement of structural elements, there are three types of devices :
- in the shape of a ladder;
- in the form of a honeycomb;
- in the shape of rhombuses.
Each type has its own advantages and disadvantages. In terms of labor costs, the first option is the most accessible - “ladder”.
Making a simple homemade chain for car wheels
It is not always possible to purchase an anti-skid device - the high price and lack of availability of the required size forces car owners to solve such issues on their own. I must say that this is a pretty good choice - all the necessary components are always available in hardware stores.
In a critical situation, you can simply try to wrap the tire with a cable or a piece of metal rigging, but not everyone carries such a kit with them. Moreover, for a disc brake system this option is absolutely contraindicated - such a design will disrupt the operation of the mechanisms.
Therefore, it is worth preparing homemade wheel chains in advance, for which you will need :
- steel chain with a cross-section of at least 5 mm;
- hooks;
- carabiners with a screw-on coupling;
- tension device;
- bolts, nuts and washers.
The dimensions of the blanks depend on the dimensions of the tire used, so it is important to first measure the required indicators.
The number of transverse parts is also individual - craftsmen recommend making sure that there are two “cross members” at once in the plane of contact of the tire with the ground.
Thanks to this scheme, the traction characteristics and reliability of the entire product will increase. The process of preparatory actions and assembling chains on wheels with your own hands consists of the following points:
- cutting longitudinal blanks;
- cutting of transverse parts;
- securing the transverse element to the 6th link of the longitudinal chain;
- installation of subsequent “crossbars” every 9 links using rings or hooks;
- In the middle of one longitudinal workpiece, fasten a segment consisting of 6 links and a tensioning device with a hook.
After checking the reliability of the finished product, all that remains is to install it on the car.
How to install chains on wheels with your own hands
The anti-skid device is mounted primarily on the leading pair and this is done using two methods :
- directly on a stationary car;
- with jacking up the desired side.
The choice of method is up to the driver, but it is worth focusing on one recommendation - you need to think about installation in advance, even before entering a difficult area . This is the only way to avoid annoying mistakes and save a lot of time.
Installation method without jacking the car
Before you begin installing a homemade chain on car wheels , you should carefully lay it down, preventing the links from twisting. Next we proceed point by point:
- Drive the drive wheel onto the product.
- Put the car on the handbrake.
- Place the chain so that the tensioning device with hook and carabiner is on the outside.
- From the inside, connect the hook and the last link of the longitudinal element.
- From the outside, place the carabiner coupling onto the tensioning mechanism and secure it.
- Distribute the transverse parts and tighten them.
Installing a chain on car wheels with your own hands using a jack is similar to the technology described above, its only advantage is that it makes the task easier.
For a better installation, you must first reduce the tire pressure, but after the operation do not forget to restore normal parameters.
This procedure will allow the product to fit as tightly as possible to the tire.
Alternative solutions
The thoughts of folk craftsmen do not stand still - and now they are offering an alternative solution: anti-slip bracelets . In principle, these are the same homemade metal chains for wheels, only with the difference in the absence of longitudinal elements . The advantages of bracelets are:
- ease of manufacture;
- quick installation;
- high reliability and efficiency.
So, what is needed for production:
- rubber mounting element for the VAZ muffler;
- metal chain with a diameter of at least 6 mm.
Tires with a width of 195 and 205 mm will require about 4 meters of chain. As you can see, the costs are minimal and you only need to cut the material to the required length. Another alternative option is kits for making DIY wheel bracelets using chains, which are quite affordable and of good quality (with the exception of Chinese ones).
The set consists of:
- chain blanks;
- fastening accessories;
- sling;
- clamping mechanism.
The kit is very easy to use and does not take up much space. An important plus is the possibility of use on cars with disc brakes .
Judging by the reviews, owners of expensive SUVs do not hesitate to use it, which once again speaks of the practicality of the device.
For more information on how to make snow bracelets with your own hands, watch the video:
Things to remember
After installing the anti-slip device, after driving the first 100 meters, you should stop and check the reliability of its fixation, as well as the tension around the entire perimeter. A poorly tensioned chain can cause damage to suspension and steering components.
Source: http://autoclub.su/samodelnye-cepi-na-kolesa/
How to make snow chains for a Niva Chevrolet with your own hands
Snow chains are a replaceable tread that allows motorists to improve the off-road performance of regular road tires.
Increased cross-country ability allows you to overcome ice, snow and deep mud.
It is important to know how you can make snow chains with your own hands, since when climbing into off-road areas in a car like a Chevrolet Niva, there is always a risk of getting stuck and you need to help yourself with the help of improvised means.
A snow chain is a fairly simple device, consisting primarily of reinforced wire, which stretches around the wheel in such a way as to almost completely braid its surface. The chain is formed by internal and external cables, which are connected to each other by transverse fastenings. They are also called lugs. They provide reliable grip on any road surface.
Types of chains
At the moment, several main types of chains are widely used:
- rubber - they are suitable for any type of tire. The design of this type of chain allows you to quickly and evenly install them on the wheel. the special composition retains its elasticity even at low temperatures.
- metal ones have higher strength. There are several basic weaving options.
- budget models - installed on wheels to overcome obstacles, for example, to pull out a stalled car. not suitable for long-term use.
In addition to differences based on the materials used, there are several different options for external chain manufacturing. For example, at the moment, most manufactured chains can be divided into three groups according to appearance. Each type imparts certain properties and allows you to increase certain qualities of the car:
- Ladder. It is named so because it consists of parallel straight links connected to each other by transverse bridges. It can be made with different patterns in order to provide the greatest adhesion to the surface. The cheapest to manufacture and at the same time the most practical. But it has one drawback - while driving, due to uneven traction, the vehicle can move jerkily.
- Rhombus. Unlike a ladder, here the jumpers are positioned slightly at an angle, forming a pattern a little like a spider’s web.
- Honeycombs. A more complex pattern, in which there are elements located parallel to the main lines. This weaving allows you to minimize jerks that occur during movement.
Making snow chains at home
Even a novice car enthusiast can make chains on his own. In this case, you will most likely need skills in working with tools. In order to do everything you need, you will need the following kit:
- it is better to stock up a chain of sufficient length in advance
- hooks and carabiners for connecting links
- tension devices
- vice and grinder for work
Stages of work
First you need to stock up on enough material. To do this, you need to know the diameter of the wheel in order to calculate the required length. Approximate results can be seen in the table
It turns out that to make a ladder-type chain you need almost 3 meters of chain only for the longitudinal sections, with a wheel radius of 16 inches. In this case, it is necessary to pay attention to the properties of the chain. All its links must be welded and not soldered. If it is necessary to secure some areas, then only reinforced wire is used. Otherwise, it may break when moving.
For those who are doing the work for the first time, it is best to stick to a simple design, such as a ladder.
The chain is cut into sections of the required length. For this it is better to use a grinder.
Carabiners are attached to the longitudinal chains to make it easier to install the structure on the wheel.
After this, the transverse sections are fastened. The more crossbars are used, the better cross-country ability is provided for the car.
Then the side branches are mounted, onto which tension devices are attached.
Installation of snow chains.
Before installation, the integrity of the circuits is always checked. Do not install it on the wheel if any parts are twisted or there are signs of damage.
If everything is in order with the chains, then you need to lay them out in front of the wheel so that the locks are on the outside of the body.
Then the car must drive the drive wheels over them and stop in a position in which rolling back will be guaranteed. After this, all the locks on the chain are firmly latched.
If conditions do not allow installation in this way, then you can use a jack and put shoes on each wheel separately.
It is important to remember that homemade snow chains are not intended for permanent use and are only worn when overcoming obstacles. It is also prohibited to travel in chains at a speed of more than 50 km/h. Otherwise, breakage and damage to vehicle parts may occur.
If it is necessary to operate the car at high speed, soft snow chains are used. But they have significantly worse performance in terms of cross-country ability.
Source: https://expertniva.ru/hodovaya/kak-sdelat-tsepi-protivoskolzheniya-svoimi-rukami.html
Types of snow chains for cars, which ones are better and how to make them yourself
Sometimes it happens that the vehicle’s capabilities are not enough to overcome a certain section of the route. This could be a steep icy slope, deep mud, or a stretch of road covered in snow.
In this situation, plastic bracelets or snow chains can help out. Even an ordinary tire intended for driving exclusively on asphalt, with their help, acquires impressive off-road characteristics.
By putting such bracelets on the wheels, the driver receives good cross-country ability in deep snow, improved traction properties and, therefore, controllability on ice, and greater opportunities for overcoming muddy areas. Many fans of off-road travel post their photos and videos on thematic forums, where you can see firsthand how a car is transformed when shod with snow chains.
Of course, snow chains also have certain disadvantages that limit their use.
- First of all, it is necessary to take into account that the suspension and steering are subject to increased loads, leading to increased wear. The steering rack suffers especially badly if the bracelets are mounted on the front wheels.
- The second important factor is severe wear of the tire and a significant reduction in its service life.
- The gearbox suffers, although to a lesser extent.
- Movement speed is limited to 50 km/h.
- Don't forget about acoustic comfort - chains make a lot of noise.
There is also a more gentle option for increasing the vehicle's cross-country ability - plastic or rubber snow chains. Their off-road qualities are somewhat worse, but the impact on tires, suspension and gearbox is not so destructive, and you can drive at speeds of up to 90 km/h.
Installation of snow chains
Wheel snow chains are conventionally divided into hard and soft. Both of them are two longitudinal cables or chains stretched around the circumference of the wheel, between which, in the first case, transverse chains are stretched, and in the second - rubber or plastic lugs.
The crossbars are arranged either as a ladder, or in the form of rhombuses or honeycombs. Each option has its own advantages and disadvantages. The “ladder” has better rowing abilities, so it is preferable to use it to overcome muddy areas.
At the same time, a wheel “shod” with such snow chains is prone to digging in, so you only need to drive with them “pull-in”.
Other dangers await the driver, namely poor lateral stability of the vehicle, very rapid tire wear and strong shock loads on the gearbox and steering.
Wheel snow chains with a “honeycomb” pattern cause much less damage to vehicle components, and tires with them will also last much longer. Unlike “ladders,” such bracelets provide good lateral stability of the machine and constant contact with the surface.
Which snow chains are better?
It is impossible to say unequivocally which snow chains are better. Each variety is better suited for certain conditions, and choosing a universal option will not work.
Thus, rigid chains are preferable to use in complete off-road conditions.
Thanks to their more pronounced rowing abilities, they allow you to overcome difficult areas with less difficulty.
Soft rubber or plastic bracelets are more suitable for those who do not venture off-road, but are periodically forced to overcome difficult places.
The advantage of this option is that there is no need to remove the plastic bracelets immediately after the car has passed the problematic section - you can move on at a fairly high speed, without the risk of damaging the tires, gearbox or steering.
If the driver decides to choose rigid chains, he should pay attention to the size and cross-section of their links. The larger they are, the better the rowing ability of the chains, and the more wear the tires, gearbox and steering will wear out. Square links also provide better rowing performance.
DIY snow chains
Since the cost of a good kit is quite high, many drivers, wanting to save money, prefer to make snow chains with their own hands.
This process is not very complicated, and everything you need can be found in any hardware store. Homemade chains will cost several times less, while their main qualities are no worse than those of branded products from stores.
There are many tutorials on the Internet with detailed photos and videos of how to make such a device with your own hands.
The easiest way is to make a “ladder” with your own hands. To do this, two identical sections of chain are measured so that their length is slightly less than the circumference of the wheel. Between them, transverse sections of equal length are attached at equal intervals using S-shaped hooks or rings. Their length should be slightly larger than the width of the tire.
The ends of the longitudinal sections are connected to each other using carabiners. In the middle of each longitudinal chain you need to attach a tensioning device, which at the other end will be attached to the carabiner using a hook. With the help of such a device, you can securely fasten homemade snow chains to your wheels.
Making chains with a diamond-shaped pattern with your own hands is somewhat more difficult, although this task can be accomplished, especially if you use photo or video instructions from more experienced car owners.
Installation of snow chains on wheels
Installation methods do not depend on what kind of chains are put on the car - homemade or factory-made. There are two ways to put chains or plastic snow bracelets on your car wheels. The first option is simpler, but takes more time. The car is jacked up and a bracelet is put on the hanging wheel.
The second method is faster, but requires certain skills.
First, you need to lay out the chains or bracelets on the ground, carefully straightening them, and then drive over them so that about 30 cm remains to the end. After this, the long part of the chain is put on the wheel.
On the inside, the chain is fastened with a hook, all the links are straightened, then the outer part is also fastened, and the chain is tightened with an adjusting cable.
Before you go on an off-road assault, you need to drive 30-50 meters and tighten the chains again. This will extend the life of the tires. It should be noted that there is no need to put chains or plastic bracelets on all wheels unless the vehicle is four-wheel drive. For an ordinary car, it is enough that the chains are only on the drive wheels.
Source: http://ZnanieAvto.ru/skaty/cepi-protivoskolzheniya-svoimi-rukami.html
Making your own snow chains
The onset of the autumn-winter season means a worsening situation on the roads. Snow, mud and icy roads lead to poor wheel traction and poor vehicle handling. Since you can’t put tracks on a passenger car anyway, another way was invented long ago to increase the vehicle’s cross-country ability.
This article will tell you how to make high-quality snow chains with your own hands and you will be able to drive on the road, even if it is all covered with wet snow.
According to its design, a snow chain is a flexible structure made of chains or strong reinforced wire, all parts of which are connected so as to evenly braid the wheel around the entire circumference.
In their shape, snow chains differ in their “pattern”, which forces the wheels to adhere firmly to any road surface. There are three types of snow chains:
All types of chains perform their anti-slip function and have pros and cons, but this article will describe the “ladder” design, since this is the easiest version of an anti-skid chain to make with your own hands.
This anti-slip chain consists of six types of elements connected to each other by connecting rings:
- Longitudinal branches;
- Transverse branches;
- Tail branches;
- Locking hook;
- Locking hook;
- Locking ring.
Before making such a chain, you need to prepare hooks (32 pieces), 15 meters of chain with a rod diameter of four to five millimeters and two tensioners.
How to make snow chains with your own hands
Cut four fragments from the chain, 83 links each, these will be the longitudinal branches of the chain. For transverse branches you need to cut 16 fragments of 13 links. Next we move on to connecting the pieces of the chain.
On the sixth link of both longitudinal chains we fasten the first of the transverse fragments, then the transverse branches should be fastened on every tenth link, and the last fragment should be fixed on the 12th. The connection of transverse branches with longitudinal ones is carried out either using rings or hooks.
We place carabiners of 5 mm diameter at the ends of the longitudinal fragments of the chain; also, after the fourth transverse branch, a piece of chain of five links must be secured to one of the longitudinal branches. We attach a tension device to the free end of this fragment with a carabiner, and attach a hook to the second end of this device.
How to install anti-slip chains on wheels
Now the chains are ready, you can put them on the wheels of your car and test them in practice. Snow chains are installed on the drive wheels in one of two ways: with the vehicle jacked up and without jacking it up.
How to install chains without jacking
- Align the chain against slipping, carefully check that the chain links are not twisted;
- Spread the chains on the road and drive over them with the drive wheels;
- Secure the car so that it cannot involuntarily start moving;
- Place the chains on the wheel so that the locking ring and locking hook are located on the outside of the wheel;
- Locking hook, hook from the inside of the wheel to any link on the tail branch;
- Straighten the transverse fragments so that they are located evenly around the circumference of the tire;
- A tail hook must be threaded into one of the links at the end of the tail fragment;
- Turn the locking hook towards the locking ring;
- Place the locking ring into the groove of the locking hook;
If you see that the chain still needs to be tightened, then the locking hook needs to be hooked onto the next links of the tail branch;
Make sure that the longitudinal and transverse fragments fit tightly around the wheel.
The jacking method is like this
- Secure the vehicle with the hand brake;
- Place stands under the front wheels of the machine;
- Raise the wheel above the road by 2-3 centimeters with a jack;
- Place the chain on the wheel as described in the previous method.
- This device is removed from the wheel in the reverse order.
So, now you know how to make snow chains with your own hands and how to install them on the wheels of your car.
We hope this article will help you face off-road conditions and bad weather fully prepared.
Homemade snow chains - the easiest option
Source: http://sdelaj-sam.com/delaem-tsepi-protivoskolzheniya-svoimi-rukami/