Toyota Corolla CV joint replacement. Instructions on how to change the CV joint on a Corolla E110, E120 and E150
Constant velocity joints (CV joints) are the main culprits of problems associated with front wheel drives. At the same time, they themselves are quite durable, and fail mainly due to damage to the anthers , which protect the hinges from water and dirt.
Replacing a Toyota Corolla CV joint is not the easiest or cheapest thing, so it is important to periodically inspect the protective covers and change them as soon as possible. If water or dirt gets into the hinges, they can fail after just a few hundred kilometers , while intact anthers will ensure their long-term operation.
The original CV joint (outer right Toyota 4346009R20, 4346009R30) comes with the drive, so it is quite expensive, around 16,000-19,000 rubles.
But the internal 4304002030, although separate, is not significantly cheaper.
So most often, the owners of this car buy separately granules from HDK, FEBEST (0110ZZE150 external and 111ZZE120 internal) or intended for installation on another Corolla or Auris.
Faults associated with Toyota Corolla CV joints
Vibration when driving - there may be severe wear on the outer wheel drive joint, deformation of the wheel drive shaft, or wear on the rollers of the inner wheel drive joint. In this case, you will have to replace a worn joint, CV joint assembly or inner CV joint.
The car pulls to the side - the inner CV joint race is damaged or worn out, or the outer CV joint is worn out/damaged. Replacement to come.
Lubricant leaks on the CV joints - either the clamps are not tightened properly, or the boots are torn. Clamps - tighten, boots - replace.
Noise or knocking noise while driving in the area of the front wheel - the rollers of the inner CV joint of the wheel drive are worn out and it’s time to change it.
Knocks when turning - extreme wear of the outer CV joint; replacement is needed.
What will you need for replacement?
- circlip puller or round nose pliers;
- thin pliers;
- metal hacksaw for removing clamps;
- beard and hammer;
- flat screwdriver.
How to change CV joints on a Toyota Corolla
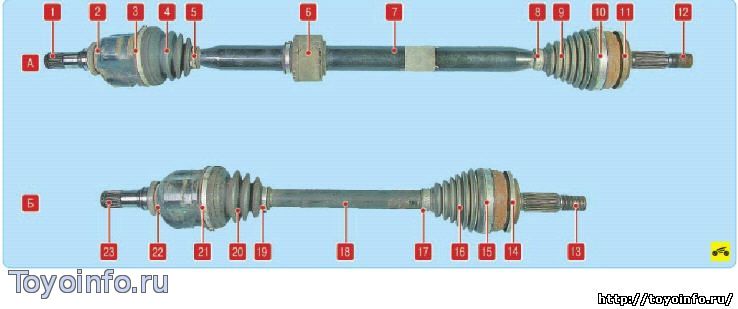
To do this, you will need to remove the front wheel drive assembly. Then proceed to disassemble the grenades (external or internal) by holding the drive in a vice. So, first of all, look at the visual dismantling of the Toyota Corolla drive shaft using the example of a car in the E110 or E120 body, since the procedure is similar to that on the Auris and Corolla E150 cars produced after 2006.
When replacing an external or, especially, an internal CV joint, you have to pull the entire drive shaft out of the box, so first of all, don’t forget to drain the oil from the Toyota Corolla gearbox (at least half).
Remove the wheel and unscrew the hub nut with a 30mm socket.
According to the instructions, you need to unscrew the two nuts (at “19”) securing the strut to the steering knuckle...
but then the alignment will go wrong, so it will be easier to unscrew the ball joint from the lower arm (there are 2 nuts and a key bolt at “17”) and disconnect the stabilizer bar link (the so-called bone).
Then we remove the drive with the external CV joint from the steering knuckle and pull it completely out of the box. To do this, turn the steering wheel a little to the side, tapping a little with a hammer (preferably with a mallet) on the axis of the outer CV joint, so as not to damage the thread, and pull the axle out of the hub. At the other end, in order to remove the inner CV joint, you may need a pry bar.
If you are going to change only the outer CV joint or its boot itself, then you can also do without dismantling the inner grenade along with the shaft and draining the oil. Simply remove the clamp that secures the inner boot on the grenade and pull out the shaft with the tripod.
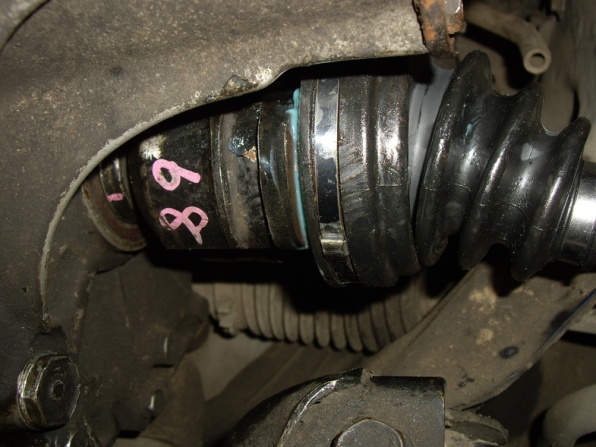
By the way, before removing the shaft from the inner CV joint, it is recommended to put marks on the shaft and the grenade itself. Using a screwdriver, press out the small clamp of the CV joint boot; by the way, it is disposable and cannot be reused.
We install a special puller for removing CV joints. We secure it more reliably. Using a baited nut and a ratchet with a head, we “squeeze” the CV joint out of its seat. We remove the puller. Moving the part from side to side, we remove the CV joint.
To remove the anthers, you need to remove the retaining ring holding the tripod and knock it off the shaft with the bearings. Then continue disassembly, rinse everything well to remove old grease and refill the hinges with fresh grease.
Next, how to disassemble the drive shaft and replace the Toyota Corolla CV joint will be shown in this instruction:
When everything was changed, both grenades were filled with grease, we installed everything removed in the reverse order.
By the way, the manufacturer does not recommend graphite-containing lubricants of the CV joint type used in ball joints for internal joints with needle bearings.
Then we put everything back together, replacing the boots and clamps. We insert the tripod into the grenade, put on the boot, and insert the outer grenade into the hub.
Did not find an answer to your question?
Ask in the comments. We will definitely answer!
Source: https://etlib.ru/blog/276-zamena-shrusa-tojota-korolla
How to replace the CV joint boot on a Toyota Corolla E11 yourself | Motorist's benefit
It all started with the fact that I somehow noticed a hole in the boot of the left outer CV joint.
I bought anthers from 1-56 Maruichi. I also decided to change the internal one, because... the old one had small cracks.
External:
Internal:
We remove the wheel, pull out the cotter pin and remove the star lock washer.
We unscrew the hub nut with a deep socket of 30. It is advisable to have someone hold the brake pedal down.
It is recommended to replace the external boot by removing the internal one, after first pulling the tripod off the shaft.
To remove the drive shaft, it is sufficient and least painless for wheel alignment to unscrew the ball joint from the lower arm (two nuts and one bolt 17), and unscrew and disconnect the stabilizer bar link (bone). Yes, when unscrewing the nut, it can turn along with the finger.
On the boot side there are slots where you can hold your finger with a 14mm wrench.
First, spray all the bolts and nuts with WD-40 and let them soak for half an hour.
Then unscrew it.
The drive shaft can be removed completely, i.e. remove the outer joint from the hub and pull the inner one out of the gearbox, while not forgetting to drain the transmission oil from the box. I drained the oil
but it was not possible to pull out the internal grenade, so I used the second option - I removed the clamp securing the internal boot on the grenade and pulled out the shaft with the tripod. In this case, there is no need to drain the oil and the inner grenade remains in the box.
We turn the steering wheel slightly towards the boot being replaced, tapping it with a wooden mallet on the axis of the outer CV joint so as not to damage the threads. We pull the axle out of the hub, while pulling the stand slightly to the side. Next, remove the large clamp from the boot of the inner CV joint, remove the boot from the grenade and remove the tripod.
It is recommended to make notes on which bearing should go into which hole in the grenade during assembly. In a hurry, I forgot to do this; after assembly, I didn’t notice any difference while driving.
The drive shaft has been removed.
To remove the anthers, you need to remove the retaining ring holding the tripod and knock the tripod with bearings off the shaft.
Next, remove the inner boot and then the outer one, after loosening the clamps.
Now you need to wash both hinges in gasoline or some solvent to remove old grease, sand and dust that got through the crack in the boot.
Old grease can be easily washed off with a brush.
It is worth noting that at first I washed the tripod and the gasoline did not change much in color and remained transparent, although the lubricant was dark gray in color, but when I washed the outer CV joint, the gasoline in the bath turned black (a graphite-containing CV joint lubricant was used). It follows from this that I used different lubricants for the external and internal hinges (as it should be).
Wipe everything with a clean rag and let the solvent dry a little.
For the outer joint I used Liqui Moly 47 Langzeitfett + MoS2 CV joint lubricant with molybdenum disulfide.
We fill the outer CV joint with lubricant. It is required to put approximately 100-120 grams into the hinge and boot. We put on a new boot and secure it with clamps.
Next, we assemble the internal tripod hinge. You must remember to first put the small boot clamp on the shaft, then the boot itself.
The tripod fits on with difficulty, the easiest way to seat it is with a 24mm socket. We place it on top of the tripod and lightly tap the hammer to seat it onto the shaft, while trying not to damage the bearings.
We also use a socket to fix the retaining ring.
For the inner joint, I used Slipkote Polyurea CV Joint Grease, a polyurea-based lubricant specifically designed for tripods with needle bearings. Apply the grease to the tripod.
Manufacturers do not recommend using graphite-containing CV joint lubricants, which are used in ball joints, in internal tripod-type joints with needle bearings.
We remove the old grease from the internal grenade and put the remaining grease into it. The internal hinge requires 180-190 grams.
We insert the tripod into the grenade, put on the boot, insert the outer grenade into the hub and secure it with the hub nut.
We screw the ball joint to the lower arm (2 nuts and 1 bolt, tightening torque 142 Nm). We insert the stabilizer link pin into the mounting ear on the lower arm and tighten the nut to a torque of 44 Nm.
The drive shaft is in place.
The drive shaft is in place.
Well, I filled in the oil using a rubber tube and a funnel.
For the C150 box you need 1.9 liters, I could fit both liter cans (maybe because the car was jacked up on one side, on the left). The drain and filler plugs are the same, both 24, the washers under them were not wrinkled, I left them, the tightening torque of the plugs is 39 Nm.
Source: corolla.ws
.
Related publications:
Source: https://sanekua.ru/kak-samostoyatelno-zamenit-pylnik-shrusa-na-toyota-corolla-e11/
Toyota Corolla 120. Problem with gearbox, CV joint, or bearing??? – CAR72.RU Tyumen Portal of Car Enthusiasts Tyumen
Manual and automatic transmissions, CVTs and tiptronics, transfer case, differentials, locks, drives, etc.
VLADiAutoSpets
Messages: 848 Registered: December 12, 2008, 00:00 From: Tyumen Experience: 2005 Car: Toyota Corolla
| Rating: 1 448 |
| Reputation: +3 |
Thanked: 6 times
Post by VLADi » 09 Oct 2016, 16:43
Forum members, we need your help. We have a Toyota Corolla E120, 1.6, manual transmission, left-hand drive, mileage 180 thousand. Strong vibration appeared during acceleration. We immediately dismiss the problem with the wheels, because the wheels are new, the same on the winter set, and when you release the gas, the shaking goes away. The left boot of the inner CV joint was torn, I thought it was dead.
The CV joint is intact, the grease is clogged, a new boot is installed. The mechanic says the differential bearing is worn out, you need to remove the box and climb inside. Work only for 12 thousand plus spare parts. I searched the forums, they write that in a CV joint, a pit in the form of a pit on one plane occurs, which is why vibration occurs.
Who came across it? Who to contact?
GrigorichMegaGuru
Messages: 12406 Registered: Dec 06, 2010, 00:00 Warnings: 1 From: Tyumen Center Experience: 1976 Car: really like it :
Awards: 2
| Rating: 70 345 |
| Reputation: +157 |
Thanked: 721 timesThanked: 902 times
Post by Grigoryich » 09 Oct 2016, 19:10
They write correctly. The internal CV joint vibrates under load.
When the load is removed, the vibration disappears.
-Tell me, how did you manage to maintain optimism and an excellent nervous system at such an advanced age? -And I never argue with anyone! -But it doesn’t happen that way!
- Well, it doesn’t happen, it doesn’t happen!
derzkiy86Car enthusiast
Messages: 47 Registered: June 22, 2014, 00:00 Experience: 2008 Car: Toyota Corolla
| Rating: 247 |
| Reputation: 0 |
Thanked: 3 timesThanked: 4 times
Post by derzkiy86 » 09 Oct 2016, 22:14
I bought the car a couple of months ago, same story, all signs point to an internal CV joint, haven’t changed it yet. Vibration from 30 to 40 km/h, then goes away
David1986Instructor
Messages: 3581 Registered: July 21, 2012, 00:00 From: Tyumen Experience: 2005 Car: Lancer x
| Rating: 13 205 |
| Reputation: +18 |
Thanked: 32 timesThanked: 147 times
Post by David1986 » 09 Oct 2016, 23:26
VLADi, in what speed range is vibration? I drove a Corolla for 4 years - and within the range of 80-110 there was the same vibration - an internal grenade gives such problems... how did I get out of the situation: they filled in new lubricant and the problem disappeared... do not allow me to get into the box - contact trusted specialists, especially you someone's number was dropped
GhosteverestAutoSpec
Messages: 974 Registered: May 16, 2008, 00:00 From: Made in USSR Experience: 2006 :
Awards: 1
| Rating: 5 550 |
| Reputation: +4 |
Thanked: 62 timesThanked: 54 times
Post by Ghosteverest » 09 Oct 2016, 23:38
The main thing is that a specialist with the right tools is in a good Robit service station.
One hundred in the center. I personally service several cars with him. And most importantly, he does everything carefully, which is good news. He won’t say too much, he won’t deceive. Verified.VLADiAutoSpets Messages: 848 Registered: Dec 12, 2008, 00:00 From: Tyumen Experience: 2005 Car: Toyota Corolla
| Rating: 1 448 |
| Reputation: +3 |
Thanked: 6 times
Post by VLADi » 10 Oct 2016, 20:52
David1986, yes approximately in this range. I read that this is a problem on Corollas and Avensises with a manual transmission.
Last edited by VLADi on Oct 10, 2016 10:13 pm, edited 1 time in total.
Reason: edited by vova72tmn Experienced car enthusiast
Messages: 142 Registered: July 02, 2008, 00:00 From: we are all from the same place Experience: since 1996 Car: Kia Sportage KM :
Awards: 1
| Rating: 1 392 |
| Reputation: +3 |
Thanked: 1 timeThanked: 19 times
Post by vova72tmn » Oct 10, 2016, 10:22 pm
I had the same problem on a KIA Sportage. I sinned on the rims, on the summer wheels, on the winter wheels, on the outer CV joint, on..... mother-in-law. I found a competent mechanic replacing the outer CV joint (the tank crunched). I complained to him about a problem - vibration during acceleration.
The locksmith says like a magician - watch my hands. He pulled out the drive, disassembled it, and showed the wear on the inner CV joint.
I replaced the entire drive assembly (the price was cheaper than taking both grenades separately) - Ai Shaitan!!!! The problem is gone!!!
Sent after 3 minutes 35 seconds:
Py Sy. Then he told me that a driver contacted them with the same problem. The internal grenade was also removed - the workings are not visible. We persuaded the client to change the internal grenade. The problem has disappeared. Visible wear was minimal - not noticeable to the eye, but sufficient to cause vibration during acceleration.
The best Volvo is Toyota!
NIK210678840Car enthusiast
Messages: 59 Registered: May 10, 2009, 00:00
| Rating: 179 |
| Reputation: 0 |
Thanked: 2 times
Post by NIK210678840 » 21 Oct 2016, 06:47
There was a problem on the left side, inside the CV joint there was not significant wear on the walls, although the bearings were intact, we removed both sides and looked, we didn’t take the original SAT for 2100, the boot left the original, they also applied good grease because they said there was no grease in the kit. to lubricate the bolts, I replaced it at a service station under the Permyakovsky bridge where the SAI school charged 1200 for the work; it was necessary to drain the oil from the box.
Source: https://www.car72.ru/forum/viewtopic.php?t=120841
Toyota Corolla Forum
Toyota Corolla transmission problems, repairs and spare parts
mimai Messages: 42 Registered: Oct 23, 2013, 2:04 pm Car: corolla 2010 1.6 automatic transmission elegans Location: Cheboksary Thanked: 1 time
#1
Post by mimai » 08 Jul 2016, 23:52
Today I crawled under the car. change the oil and see what happens. The knocking noise does not go away during bumps at low speeds. I changed the entire suspension - new, steering to 5. But I have doubts with the CV joints. Maybe someone can give me a real review. it should be like this or not.
Can anyone check it on their own car? Dyusha Honorary Korollovod Messages: 11430 Registered: March 30, 2013, 1:53 pm Car: Corolla, 2011, 4 automatic transmission, 1.6 l petrol diesel, Comfort+, drank more than 9700 l/Ai92, Toebta 0W20 Place location: 133, Kovrov Thanked: 7 times Thanked: 24 times
#2
Post by Dyusha » July 09, 2016, 01:19
No.
Also, only the amplitude has been smaller since new, about 1 mm, I don’t know now, but it clearly does not decrease with time.
It doesn’t leak, doesn’t drip, doesn’t sweat, doesn’t crunch while driving or during intense acceleration, which means everything is fine.
tabensik Messages: 287 Registered: 20 Dec 2015, 12:42 Car: Toyota corolla 2008 Location: 96RUS
#3
Post by tabensik » 09 Jul 2016, 08:19
And it’s your CV joints that are dangling, this is a development on the differential, where the CV joints go in, if there is no leakage or beating while driving, don’t interfere, everything is fine with you.
exxittusHonorary Corolla Messages: 4555 Registered: Jan 18, 2013, 03:46 pm Car: Corolla,2010,6MT 132hp/1ZR-FAE/Valvematic
Avensis,2002, 2L/149hp/1AZ-FSE(D4) Location : Cologne, German Thanked: 7 times
#5
Post by exxittus » 09 Jul 2016, 12:45
There should be a gap. There is a side gap in any spline connection, without it the assembly cannot be assembled. The sound from it, as well as from the entire transmission, is heard during the “coasting/load” transition, that is, if you sharply apply the gas from a coaster. Under load, this gap selected and silent.
The causes of knocking are in the suspension, not the transmission.
mimai Messages: 42 Registered: Oct 23, 2013, 2:04 pm Car: corolla 2010 1.6 automatic transmission elegans Location: Cheboksary Thanked: 1 time
#6
Post by mimai » 09 Jul 2016, 12:52
[quote=”[url=http://tc-club.ru/viewtopic.php?p=162346#p162346]exxittus » 07/09/2016, 12:45[/url]”][quote=”mimai” ] it should be like this or not. [/quote] There should be a gap. There is a side gap in any spline connection, without it the assembly cannot be assembled. The sound from it, as well as from the entire transmission, is heard during the “coasting/load” transition, that is if you sharply give the gas from a coaster. Under load, this gap is selected and silent. The reasons for the knocking are in the suspension, not the transmission. [/quote] I’m saying the whole suspension is new, all of it.
Today I climbed under the Avensis, tried it, the tripod inside the cup does not play, but I have strong beating of the tripod in the cup. This means wear and tear.
zheka51Honored Korollovod Messages: 298 Registered: 04 Nov 2013, 10:40 Car: Toyota Corolla 1.4 2008 Location: 51 rus and 35 rus Thanked: 1 time
#7
Post by zhek51 » July 9, 2016, 1:09 pm
New new discord.
from the video I wouldn’t say that there’s play in the spline connection
Those Who Tell You About Me; Tells Me About You; Never forget about it!!!
zheka51Honored Korollovod Messages: 298 Registered: 04 Nov 2013, 10:40 Car: Toyota Corolla 1.4 2008 Location: 51 rus and 35 rus Thanked: 1 time
#8
Post by zheka51 » July 9, 2016, 1:29 pm
I agree with the above speakers that there is play in the spline connection, I just went and checked it specifically, but not with such a large amplitude as yoursmimai (although I can’t say for sure)
Those Who Tell You About Me; Tells Me About You; Never forget about it!!!
zheka51Honored Korollovod Messages: 298 Registered: 04 Nov 2013, 10:40 Car: Toyota Corolla 1.4 2008 Location: 51 rus and 35 rus Thanked: 1 time
#9
Post by zhek51 » July 9, 2016, 1:36 pm
Even if the CV joint is the cause of the knocking (which I think they’re lying about) 43040-02030 = 14,500 rubles, well, let it knock. Just where is the likelihood that when installing a new one there won’t be such a play? For that kind of money you can buy a lot of things for your loved one
Those Who Tell You About Me; Tells Me About You; Never forget about it!!!
mimai Messages: 42 Registered: Oct 23, 2013, 2:04 pm Car: corolla 2010 1.6 automatic transmission elegans Location: Cheboksary Thanked: 1 time
#11
Post by mimai » 09 Jul 2016, 13:49
Let the knocking be constant impacts when driving over uneven surfaces, reverberating throughout the entire suspension. This is a beating on the differential in the box, and this is another repair.
This oil seal may soon go to waste. I think it’s better to take care of the automatic transmission.
mimai Messages: 42 Registered: Oct 23, 2013, 2:04 pm Car: corolla 2010 1.6 automatic transmission elegans Location: Cheboksary Thanked: 1 time
#12
Post by mimai » 09 Jul 2016, 13:52
Ammorts, supports, links, bushings, balls, silents, everything. I overdid the rail. The rods and lugs remain, but there is no hint of any knocking or play in the hinges.
mimai Messages: 42 Registered: Oct 23, 2013, 2:04 pm Car: corolla 2010 1.6 automatic transmission elegans Location: Cheboksary Thanked: 1 time
#14
Post by mimai » 09 Jul 2016, 13:59
A friend offers to check the assembled shaft, but it is from 150 pre-Restyle mechanics. Will it fit my Restyle automatic?
zheka51Honored Korollovod Messages: 298 Registered: 04 Nov 2013, 10:40 Car: Toyota Corolla 1.4 2008 Location: 51 rus and 35 rus Thanked: 1 time
#16
Post by zheka51 » July 9, 2016, 2:09 pm
I watched Kulibin’s video to the end https://www.youtube.com/watch?v=NFOOx_LltI8 and it makes sense that I’m bothering the same way as he is now with new bushings, well, as in your video And buying a new one 41301-12041 = 20500 is like death
There’s no need to worry too much about this, I think everything is fine with you
https://www.youtube.com/watch?v=4yO-p6J5vPc
Last edited by zheka51 on July 9, 2016 at 2:17 pm, edited 1 time in total.
Those Who Tell You About Me; Tells Me About You; Never forget about it!!!
zheka51Honored Korollovod Messages: 298 Registered: 04 Nov 2013, 10:40 Car: Toyota Corolla 1.4 2008 Location: 51 rus and 35 rus Thanked: 1 time
#18
Post by zheka51 » July 09, 2016, 2:19 pm
Those Who Tell You About Me; Tells Me About You; Never forget about it!!!
DyushaHonored Korollovod Messages: 11430 Registered: March 30, 2013, 01:53 pm Car: Corolla, 2011, 4 automatic transmission, 1.6 l petrol diesel, Comfort+, drank more than 9700 l/Ai92, Toebta 0W20 Location: 133, Kovrov Thanks : 7 times Thanked: 24 times
#19
Post by Dyusha » 09 Jul 2016, 23:18
+1.DyushaHonorary Korollovod Messages: 11430 Registered: March 30, 2013, 13:53 Car: Corolla, 2011, 4 automatic transmission, 1.6 l petrol diesel, Comfort+, drank more than 9700 l/Ai92, Toebta 0W20 Location: 133, Kovrov Thanked (a): 7 times Thanked: 24 times
#20
Post by Dyusha » 09 Jul 2016, 23:23
Nothing will happen to either the differential or the automatic transmission itself. Shafts, like CV joints, do not have the instantaneous speed to create vibration.
Go
Source: http://tc-club.ru/viewtopic.php?t=3090
Toyota Corolla CV joint replacement
Toyota Corolla CV joint replacement
As you know, the CV joint is one of the important parts of the car that requires an eye-to-eye. What is he like? This is a kind of constant velocity joint that makes the drive front wheels rotate, and in addition, allows them to turn.
The peculiarity of this product is that it transmits rotational movements to axle shafts located at a constantly changing angle relative to each other. The hinge will be subject to significant load, so the developers took this fact into account and made it from very strong alloys.
That is why many experts believe that a CV joint in good and well-maintained condition can even outlive the car.
How to determine a CV joint failure
Failure of the inner CV joint is a rare occurrence, but if it happens, it is necessary to replace it as quickly as possible. A malfunction may occur due to driving on a poor-quality road, making itself known with a loud crunch.
Such a breakdown is not so easy to calculate, much more difficult than a breakdown of the external hinge, because it begins to crunch at the very beginning of the ride.
If you still have to resort to replacing the CV joint on a Toyota Corolla, then this procedure for replacing the unit will not seem complicated and will not take a lot of time.
So, to replace this element yourself, you do not need to be an auto mechanic or mechanic, plus, this procedure will take you a maximum of 2 hours. It is important to know that this unit cannot be repaired; if it breaks, it can only be replaced.
How to replace a CV joint
Since many drivers prefer to replace parts in their car themselves, they do not contact service centers because they trust themselves more. In addition, if you do this kind of work yourself, you can save a good amount of money.
Tools needed for work:
- Pliers with thin jaws
- Puller for removing multiple circlips
- Instead of a puller, you can also use round nose pliers with thin jaws bent at an angle of 90 degrees Celsius
- Side cutters or hacksaw (used to remove clamps securing covers
- Hammer
- Beard
- Flat blade screwdriver.
What actions need to be taken to replace the CV joint on a Toyota Corolla:
- First you need to remove the front wheel drive assembly.
- Using side cutters, you need to carefully cut off the clamps. These clamps for securing certain protective covers of disposable hinges must be replaced with new ones. Typically, such clamps are included in the kit of the new hinge.
- Now try to move the protective cover from the hinge, then remove a small part of the grease from it and mark the position of the hinge.
- Next, you need to disconnect the inner joint housing from the drive.
- Using a puller, it's time to loosen the retaining ring at the joint hub and remove the ring. This is done by removing it from the shaft groove.
- Now you need to move the hub with the rollers along the shaft splines.
- Next, remove the same hub with rollers from them (from the splines).
- After the work has been done, it is necessary to free the shaft from the protective cover. Be careful when installing the hinge; replacing the cover with a new one is simply necessary. As a rule, the case is included with a new hinge.
- Now wash all the necessary metal parts with kerosene until not a single gram of old grease remains on them. To avoid damaging the hinge cover during assembly, it is necessary to wrap the splined part of the shaft with insulating tape. To make the installation of the cover more successful, lightly coat the shaft with a layer of lubricant, which is needed to fill the hinge.
- Next, you need to press the hub with rollers onto the shaft spline, aligning the marks made during disassembly.
- And now you can finally install the retaining ring. The main thing is to make sure that it completely fits into the shaft groove.
- Before putting everything back together, you need to fill the housing cavity with lubricant in the same way as the inner joint boot.
Read also
Source: http://grandrepairauto.ru/zamena-shrusa-toyota-corolla.html
Replacing a Toyota Corolla CV joint: photo instructions
Every car requires periodic maintenance of its main components. These include the engine, gearbox, chassis, etc.
There are elements that play a very active role when a car is driven and require major maintenance over a certain period of time, such as CV joints on a Toyota Corolla. These parts provide torque transmission at various angles, which can reach 70 degrees relative to the main axis.
This is a kind of hinge that does not often fail. It begins to deteriorate due to dirt and therefore needs either major maintenance or complete replacement. In this article we will talk about both.
A little more about CV joints
The hinge provides torque transmission at different angles. Its main purpose is to transmit torque to the wheels. In the automotive industry it is used only for front-wheel drive cars, which is exactly what our Corollas are.
The hinges wear out quite quickly, especially under the influence of the environment and careless operation of the car. It is very important that the rubber tightly covers the hinges themselves, and also keeps all the lubricant inside, which is intended to increase the service life of the part.
Most often, replacement is necessary precisely because the rubber band breaks. When this happens. All the lubricant is used up very quickly, and dirt gets inside, which quickly wears out the CV joints.
At such moments, the part requires complete replacement.
However, if you notice that the rubber band has burst or just torn, you should buy a repair kit and change the rubber band, having first washed, polished and lubricated the part itself.
Replacing the constant velocity joint on a Toyota Corolla
Before we begin the procedure, we will tell you what we needed and how long it took us. Let's start with spare parts, materials and tools.
First of all, we needed a repair kit - a rubber band and a metal insert from the company 1-56 Maruichi, we also needed a special lubricant - we used NEO LUBRICANT and Liqui Moly 47 Langzeitfett + MoS2.
We will also need a garage - it is important to have a completely dust-free environment, as well as a set of tools that will help disassemble the car.
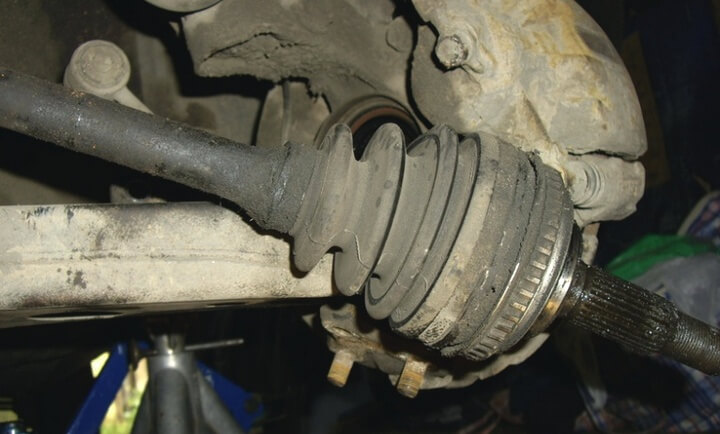
So let's get started. For us it all started when the CV joint rubber broke. We decided it was not too late to replace it, but if you want to install a new part, this instruction will also help you. Let's look at the photo. This is exactly what our torn CV joint rubber looked like.
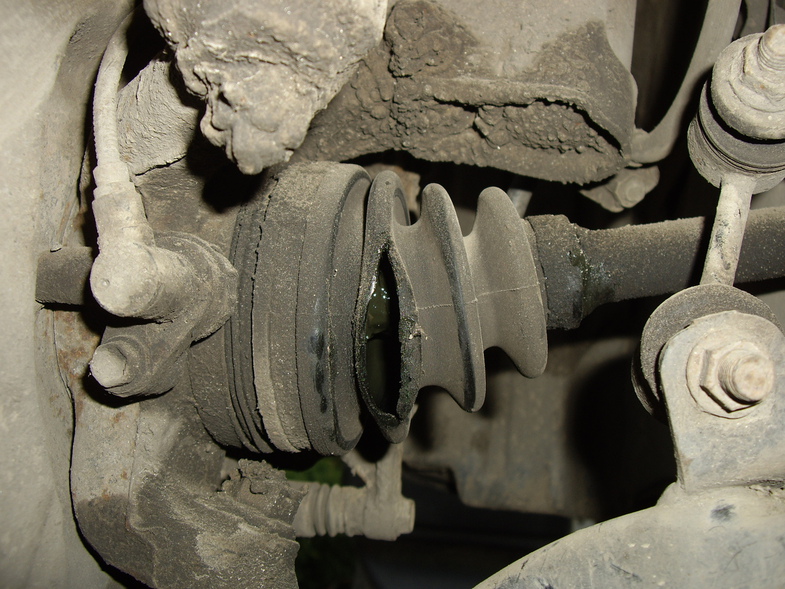
After examining the inner rubber, as well as both on the other side of the car, we decided that we needed to change them all at once so that there would be no problems in the future. All the CV joint rubber bands have small cracks and are already quite worn out.
The first thing we need to do is simply remove the wheel, after first jacking up the car from the front. Next we need to remove the cotter pin and control washer. This is not difficult to do if you have a suitable and convenient tool.
Let's look at the photo.
After the sprocket has been removed, let's unscrew the hub nut. The most convenient way to do this is with a 30-degree deep socket. For convenience, just turn on the gear or ask someone to hold the brake pedal. For easy unscrewing, we use a large wrench, possibly with an additional lever. The photo shows the nut that needs to be unscrewed.
It is recommended to replace the external boot by removing the internal one, after first pulling the tripod off the shaft.
In order to remove the drive shaft, you just need to unscrew the ball joint from the lower arm in the least painless way for wheel alignment - there are two nuts and only one bolt size 17.
and also unscrew and disconnect the anti-roll bar strut (as it is popularly called - a bone).
To make things easier, we treat all the bolts we need with a special liquid - liquid wrench, it will help unscrew even the most dried-on bolts and nuts. After applying the liquid, it takes some time to soak.
After the liquid has done its job, which is 15-20 minutes, we take the keys and begin to unscrew the bolts and nuts we need. Let's look at the photo.
The drive shaft itself can be removed entirely, that is, the outer joint can be removed from the hub and the inner one can be pulled out from the gearbox. At the same time, it is important not to forget to drain the transmission oil from the box itself. We previously drained it.
But as for pulling out the internal grenade, nothing worked here, so we used the second option and removed the clamp that secures the internal boot on the grenade and pulled out the shaft with the tripod. In this scenario, there is no need to drain the oil, since the internal grenade remains in the box.
Next, we turn the steering wheel a little in the direction from which we will change the anthers or the CV joint itself. Lightly tap with a wooden mallet on the axis of the outer CV joint. This is necessary in order not to damage the thread. And slowly pull the axle out of the hub, while pulling the stand slightly to the side.
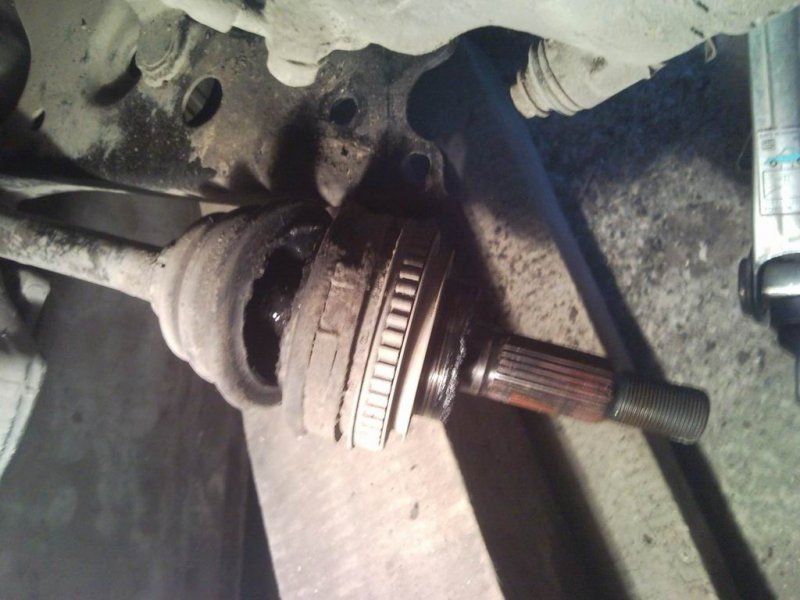
Next, remove the boot clamp from the inside of the CV joint, remove the boot from the grenade and remove the tripod. This is not difficult to do, look at the photo.
It is, of course, recommended to make notes which bearing should go into which grenade hole during reassembly. So, our drive shaft is removed.
Next, remove the retaining rings and knock off the ring holding the tripod with bearings from the shaft.
Next, remove the inner boot, then the outer boot.
Then we clean, lubricate and install everything in the reverse order, replacing the anthers with new ones. Let's look at the whole process in photographs. We clean exclusively with gasoline, wipe with any lint-free cloth, and use a brush when cleaning.
This completes the process of cleaning and replacing CV joint boots. As we see everything is very easy and simple, we did the same on the other side. If for some reason you want to change the CV joint completely, buy the entire assembly and install it after removing the drive shaft.
Robot box for Toyota Corolla
Sources: http://corollafan.ru/obsluzhivanie/zamena-shrusa-tojota-korolla.html
Source: http://master-informa.ru/remont-vaz/zamena-detalej/5569-zamena-shrusa-tojota-korolla-foto-instruktsiya