Adjustment of valves (clearances), signs and symptoms of incorrect adjustment, work order, etc.
Simple in appearance, the valves of an internal combustion engine perform the most important job in it: they control the processes of supplying the fuel-air mixture and removing exhaust gases from the engine cylinder. The efficiency of the engine depends on how timely these processes occur: its power, efficiency, toxicity, and even the ability to operate.
How ICE valves should work
The work cycle of a four-stroke engine consists of four strokes: intake, compression, power stroke and exhaust.
Based on the purpose of these strokes, one can understand how the gas distribution mechanism should work: on the intake stroke, the intake valve is open, allowing the fuel-air mixture to enter the cylinder; on the compression stroke, both valves are closed (otherwise you won’t compress); during the working stroke, the valves are also closed so that all the expansion energy of the burning mixture is directed only to moving the piston; During the exhaust process, the exhaust valve is open and the exhaust gases leave the cylinder through it.
This is exactly how it would be if the valves had the ability to open and close instantly while the piston is at its dead center, top or bottom.
To imagine what an instant is for the period of time during which an engine's operating cycle occurs, we must remember that modern engines easily reach six thousand or more revolutions of the crankshaft per minute.
During one working cycle, the crankshaft makes two revolutions, which means that each of the valves opens and closes three thousand times per minute.
And the piston ends up in its dead spots six thousand times! For comparison, the rate of fire of the legendary Kalashnikov assault rifle is only six hundred rounds per minute, exactly ten times less! Under such conditions, even a few milliseconds of engine operation is a noteworthy time period during which very important processes occur.
In theory, both valves are closed during the compression and power strokes. In the figure: I - intake stroke, intake valve open; II - compression stroke; III - working stroke; IV - exhaust stroke, exhaust valve open
Valve timing
And even if modern valves can move much faster than their ancestors a hundred years ago, the properties of the flammable gases they control have remained virtually unchanged. They also easily compress when impacted, and also stubbornly continue to strive in all directions equally, obeying Pascal’s law, which means they are not in a hurry to move to where they are asked.
And to ensure that the cylinder is filled as much as possible in such a short period of time, the intake valve begins to open before the piston completes its exhaust stroke. And the exhaust will begin to open before the power stroke is completed, so that the hot gases under pressure in the cylinder do not create excessive resistance to the movement of the piston when the exhaust stroke begins.
The moments of time when the opening begins, the duration of their stay in the open and closed states, form the engine valve timing phases. The movement of the valves is controlled by the camshaft, in the form of cams the information about the valve timing of your engine is “encrypted”.
The phase values are selected when designing the engine depending on its design, purpose, and operating conditions. In the most advanced engines, these phases can change for specific operating conditions and loads at a given time. In conventional engines, the only effective way to change valve timing is to replace the camshaft.
Changing the valve timing by installing an original camshaft is one of the methods of advanced engine tuning. Agreeing to such a procedure, we must understand that an increase in engine power will occur at the expense of deterioration in efficiency and a decrease in the service life of its parts.
Therefore, this setting is usually used on sports cars, where the resource, efficiency and environmental friendliness of the engine are of secondary importance.
In a real engine, when the piston is near its top dead center (TDC) and bottom dead center (BDC), the intake and exhaust valves are open simultaneously
Where to install the camshaft
There are different options for the location of the camshaft in the engine and the design of the mechanisms that transmit pressure from the surface of the camshaft to the valve stem.
However, the increase in the speed of modern passenger engines has led to the fact that a scheme with the location of the camshaft in the engine head - an overhead design - has become established everywhere in them.
The proximity of the camshaft to the valves makes it possible to increase the rigidity of the system, and therefore improve the accuracy of operation.
The lower camshaft design is easy to maintain, but lacks rigidity when operating at high speeds.
The overhead camshaft timing mechanism is much more rigid due to the absence of long pushrods
Why are gaps needed?
The valve closes under the action of a special spring. To ensure that the cam profile under no circumstances prevents the valve from completely closing, a strictly defined gap is set between it and the pusher. Moreover, this gap should also take into account the increase in the length of the rod when heated. And the valve can get very hot during operation.
Methods for providing thermal clearance
With an overhead design, the camshaft acts on the valve stem either directly or through a rocker arm. The use of a rocker makes it possible to reduce the difference in the camshaft profile relative to the maximum valve movement when opening.
When the camshaft directly impacts the valve stem, the stem experiences significant lateral force, which leads to increased wear. To avoid this, the end of the rod is covered with a special glass, which takes on the lateral force, moving in its own guide seat, and transmits the axial force to the valve.
Adjusting washers are installed between the cup and the camshaft cam. If the design has rocker arms, then special adjusting screws with locknuts are installed on them.
Many modern engines, especially those with more than two valves per cylinder, are equipped with hydraulic valve lash adjusters. In these designs, adjustment of thermal gaps is not required.
The hydraulic compensator allows you to have zero clearance in the drive at any valve temperature
Valve adjustment: when and how
As a rule, the clearance is checked and adjusted at every maintenance. The procedure is performed on a cold engine. To complete the job, you will need a feeler gauge and regular hand tools, depending on the fasteners used on your vehicle.
For valves with adjusting washers, tweezers are also useful. Before you begin, be sure to read the repair manual for your car, which indicates the clearance values, engine design features and describes the sequence of its disassembly and assembly.
In general, the order of work is as follows:
- remove the valve cover;
- look for marks on the engine block and crankshaft (usually on the timing belt pulley);
- Turning the crankshaft using a suitable wrench (but never the starter!) in a clockwise direction, as viewed from the front of the engine, align the marks with each other. In this position, the piston of the first cylinder is at top dead center, both valves are closed;
- check the gap between the first - from the pulley side - camshaft cam and the adjusting washer (rocker arm striker);
- if the gap is larger than required, the washer should be replaced with another one of greater thickness; if the gap is smaller, then the thickness of the washer must be reduced accordingly. The nominal thickness of the washer is usually marked on it itself. If the thickness of the washer is unknown, you will need a micrometer to correctly select a new washer. In designs with a rocker arm, the procedure is simpler, since we achieve the required clearance by screwing in or out the adjusting screw. After adjusting the screw, be sure to tighten the locknut.
- After making the adjustment, the clearance check must be repeated. Permissible deviation: plus or minus 0.05 mm.
- Please note that the clearance for the intake and exhaust valves is usually different. This is due to different heating temperatures, as discussed above. So, for an eight-valve VAZ engine, the clearance on the intake valve is 0.20 mm, and on the exhaust valve - 0.35 mm.
- Repeat the work for all cylinders, determining their sequence and crankshaft rotation angle in accordance with the engine manufacturer's recommendations.
Video: how to adjust gaps on front-wheel drive Ladas
In general terms, the design of the gas distribution mechanism and the procedure for adjusting the valve clearance on a diesel engine are the same as on a gasoline engine.
There is an opinion that after installing gas equipment on the engine, it is necessary to increase the thermal clearance in the valves. This is explained by the higher combustion temperature of the gas.
In fact, this is not required.
The features of ignition and combustion of the gas mixture in the cylinder are taken into account by changing the ignition angle, and the process of filling and removing gases from the cylinder does not differ from that when the engine is running on gasoline.
When the gap is not only visible, but also heard
You can often hear valve clearances, especially in cold weather. This is expressed in a slight metallic clicking sound when the engine is not warmed up. As it warms up, the sound weakens. If you can hear it even when the engine is warm, then most likely all or some of the gaps are larger than normal.
An increased thermal gap reduces the time the valve is in the open state, which reduces the efficiency of the engine, it begins to work intermittently, starts poorly, and detonation combustion may occur, which has a detrimental effect on engine parts.
A reduced gap is even more dangerous, because it completely disappears when the engine is warmed up to operating temperature and the valve stops closing completely.
As a result, the power and economic performance of the engine also decrease, but the most unpleasant thing is when the conical chamfers on the valves and on their seats burn out, and this problem cannot be corrected by simply adjusting the gap.
The engine is the heart of the car, so any signs of deterioration in its performance should make you wary and, at the first opportunity, start diagnosing it. If power has dropped, fuel consumption has increased, if the engine “troubles” or you hear popping noises in the exhaust system, check the serviceability of the spark plugs and check the valve clearances.
Source: https://carnovato.ru/kak-otregulirovat-klapana/
Adjusting valves on different engine models
The normal operation of a car engine depends on many factors - temperature, oil pressure, correctly set ignition, etc. Correctly adjusted valve clearances are also of great importance; if this is not done, various problems arise with the engine.
To correctly set thermal clearances, you need to know the adjustment procedure, the size of the gap between the valve and the pusher (adjusting screw or washer). This article will discuss what the adjustment procedure is for different models of passenger cars, what gaps should be set, nuances and characteristic features in regulation.
Procedure for adjusting valve thermal clearances
Almost all internal combustion engines of modern cars have a right-hand rotation of the crankshaft - the crankshaft rotates clockwise. The camshaft is driven from the c/shaft, and rotation is transmitted to the camshaft through a belt or chain. There can be several camshafts in an engine; how many there are in an engine depends on the design features of the power unit.
Each camshaft (CV) must have cams, which ensure the opening and closing of the valves and the filling of the internal combustion engine cylinders with the air-fuel mixture. In order for compression to be created in the cylinders, the valves in the cylinder head must be tightly sealed against their seats at the moment of closing.
There must be a thermal gap between the valve and the RV cam; it is measured when the valve is completely closed and the R/shaft cam does not press on the valve. For normal operation of the cylinders, the valves must be adjusted in accordance with the recommendations of the engine manufacturer, and each internal combustion engine model has a certain procedure for adjusting the valve thermal clearances (VTRZK).
PRTZK depends on:
- on the number of cylinders in the engine;
- cylinder operating order;
- specific engine model.
For example, the order of operation of the cylinders for many Russian internal combustion engines:
- four-cylinder – 1342;
- six-cylinder – 153624;
- eight-cylinder - 15426378.
But not all 4-cylinder internal combustion engines operate in the above order, for example, the ZMZ-24/402 and UMZ-414/417/451 engines and some of their other modifications operate in the 1243 order.
Eight-cylinder V-shaped engines of the German concerns Audi/Volkswagen, BMW, Mercedes have a cylinder operating order of 15486372.
It should be noted that passenger cars also have 2, 3, 5 and 12 cylinder internal combustion engines, respectively, they have their own order of operation of the cylinders.
The valves on the engines can be adjusted in different ways:
- for each cylinder when the piston in it is at TDC (top dead center);
- for two revolutions of the crankshaft (in the TDC positions of two cylinders, for example, for a 4-cylinder engine - the first and fourth).
Thermal gap size
The clearance in the internal combustion engine valves is also set differently, and it also depends on the specific model of the power unit.
The value of the thermal gap (GG) is calculated by developers based on the thermal expansion of the metal used in the motor, and manufacturers use different materials for manufacturing.
It should also be noted right away that the factory-recommended specifications are not always strictly followed by repairmen, since in practice it turns out that other clearance values are in practice more suitable for a particular engine model, and with them the engine operates in optimal mode.
Technical specifications must be optimal, no more and no less than required. If the gap is too small:
- the valves do not fit tightly on the seats, compression in the cylinders decreases, and the power of the internal combustion engine is lost;
- over time, valves (usually exhaust valves) burn out due to a loose fit to the seats;
- The engine runs rough at idle.
If the gap is too large:
- an unpleasant clicking noise occurs in the engine (similar to the sound of a whirring sewing machine);
- parts are quickly produced - the cams of the valve, pushers, adjusting washers, and valve ends wear out;
- the motor does not develop the required power, since when the valves are not opened sufficiently, the necessary filling of the TV cylinders with the mixture does not occur.
On average, the valve specifications are in the range of 0.15-0.45 mm, and for exhaust, the gaps are always set larger - with small specifications, the exhaust valves are prone to burning out.
Valve adjustment (VA) is usually done when it is cold, but on some models, car manufacturers recommend performing adjustment work on a warm internal combustion engine.
Valve Adjustment Tools and Accessories
Traditionally, AC is produced using feeler gauges, which are sold in car dealerships and stores that sell special tools. The standard set contains probes from 0.05 to 1.00 mm; probes usually come with an increase in thickness through 0.05-0.1 mm.
Also, special probes are produced for some models; they are sold one at a time.
For example, for the engines of rear-wheel drive VAZ cars, the industry produces special wide probes with a thickness of 0.15 mm and 0.2 mm, but the latter size is less common.
The valve can be adjusted using a dial indicator; such an indicator turns out to be more accurate, since it is difficult to “catch” the wear at the end of the valve or rocker with a feeler gauge; the gap is “caught” accurately by the indicator. Automotive stores sell special kits with indicators for certain internal combustion engine models, but homemade devices are also made.
There are adjustment devices that are used to remove and install shims; for example, a tool for front-wheel drive VAZ-2108-09 cars is very widespread. Of course, the same “devices” exist for Ford, Audi/Volkswagen, Toyota, Mitsubishi engines - for all internal combustion engines that have shims in their design.
Features of valve adjustment VAZ-classic
Rear-wheel drive VAZ cars are equipped with power units of models 2106/2105/2103/2101, and structurally similar internal combustion engines 21213/21214/2123 are installed on Niva and Chevrolet Niva SUVs. The check on these engines is carried out mainly on a cold engine; a wide 0.15 mm feeler gauge is used for all valves (intake and exhaust), which measures the gap between the valve and the rocker.
The exception is some engine models that have hydraulic compensators installed; in them, due to hydraulics, the gap is selected automatically, and therefore no adjustment is required.
RK on the VAZ-classic internal combustion engine is produced in the following order:
- TDC of the 4th cylinder – valves 8 and 6 (counting is carried out from the front of the engine);
- TDC of the 2nd cylinder – 7 and 4;
- TDC of the 1st cylinder – 3 and 1;
- TDC of the 3rd cylinder – 5 and 2.
After the shafts on the 4th cylinder are aligned to the marks (crankshaft and distribution), for the RO on the next cylinder the shaft is rotated 180 degrees.
For a warm VAZ classic engine, the gap is set with a feeler gauge of 0.20 mm. Thermal clearances are set using adjusting bolts, which are fixed in a certain position with two locknuts.
Valve clearances VAZ-2108-09-099
On front-wheel drive VAZ cars, unlike the “classic” Zhiguli, the adjustment is carried out by selecting the thickness of the adjusting washers; washers with sizes from 3.0 to 4.5 mm are available for sale. In some cases, smaller washers are required, for example, 2.5 or 2.8 mm, but they are needed mainly when the valve seats in the cylinder head wear out.
TZ 2108-09 are adjusted on a cold engine, the gap is set:
- for exhaust valves - 0.35 mm (plus or minus 0.05 mm);
- for intake – 0.20 mm (plus or minus 0.05 mm).
Practice shows that a gap of 0.35 mm or more is too large, the valves knock, so the best option is to set 0.25-0.3 mm in a circle.
According to the factory instructions of the Republic of Kazakhstan on 8-valve engines 2108 and 21083, it is carried out as follows:
- we install the shafts according to the marks of the first cylinder (crankshaft and camshaft) and scroll another clockwise 40-50 degrees, adjust the 3rd and 1st valves (counting from the front of the internal combustion engine);
- we turn the shaft 180 degrees, adjust the 5th and 2nd valves;
- after another 180 – 8th and 6th;
- after another 180 – 7th and 4th.
In practice, technical specifications do not regulate everything this way; the simpler adjustment is done as follows:
- at TDC of the first cylinder - 1, 2, 3, 5 valves;
- at TDC of the 4th cylinder (when the crankshaft is rotated 360 degrees) - 4, 6, 7 and 8 (all others).
Adjusting valves on FORD cars
Depending on the engine model on Ford cars, adjustment can be done using both adjusting washers and screws. Washers are installed on modern motors of the Zetec series, on many Duratec models. On older Ford models such as Sierra, Granada, etc., the valves are adjusted by screws.
On Ford Focus or Mondeo cars, RK is performed as needed (after about 150 thousand km), this work is not included in the maintenance regulations. For intake valves, gaps are set at 0.17-0.23 mm, for exhaust valves - 0.31-0.37 mm.
RK on the Zetec-E internal combustion engine of Ford Focus cars is a labor-intensive job; to replace the washers, you will need to remove the camshafts (DOHC engines).
It is better to carry out such work in a car service center and trust the adjustment to mechanics with sufficient experience. It should also be taken into account that over time the valves do not begin to knock, as the seats gradually wear out.
Therefore, you should check the gaps more often, say, every 80-90 thousand km.
PRTZK - according to the order of operation of the cylinders 1342.
Honda valve adjustment
On almost all Honda internal combustion engines, the control is carried out using adjusting screws. The most common valve arrangement is on both sides of the camshaft, which is installed in the middle of the cylinder head. In some ways, this scheme is reminiscent of the engines of the Ufa Motor Plant, only Moskvich cars have two valves in the combustion chamber of the cylinder head, and Hondas have four.
Honda RK is produced on a cold internal combustion engine, the gaps are set;
- 0.17-0.25 mm – for “release”;
- 0.23-0.32 mm – for “intake”.
The size of the gap depends on the engine model.
Adjusting valves with screws is much easier and faster than with washers, but adjustments must be made more often.
Let's look at how you can adjust the valves on the K24 engine (2.4 l), such a power unit is installed on the second generation CR-V model. We carry out the work as follows:
- dismantle the upper decorative covers of the internal combustion engine, disconnect from the valve cover everything that prevents its removal;
- remove the valve cover to make it easier to turn the shaft, unscrew the spark plugs;
- since the engine turns over quite easily without spark plugs, you can turn it with a wrench using the power steering pulley nut;
- scroll the c/shaft to TDC, the marks on both camshaft sprockets should look up, two more marks should be opposite each other;
- also, when setting marks, you can focus on the shafts themselves - on the 1st cylinder, the cams of the r/shafts on each side look up, towards each other;
- loosen the locknut on the intake shaft rocker arm (the first one), make adjustments using a 0.25 mm feeler gauge, setting the required clearance, tighten the locknut;
- then we adjust the second engine valve on the intake manifold side;
- We make the DC in the same way from the side of the exhaust manifold, but with a 0.3 mm probe;
- rotate the crankshaft 180 degrees, adjust the gaps on the 3rd cylinder;
- in the same way, after turning the shaft another half turn, we make adjustments on the 4th cylinder, and after making another half turn, on the second.
We close the valve cover, put the casings in place, and connect the pipes. That's it, the work is finished.
Adjusting valves on the GA16 Nissan engine
Adjusting the valves on a 1.6 liter Nissan GA16 engine is quite simple; all you need is:
- set of probes;
- flat powerful screwdriver;
- tweezers;
- keys for removing the valve cover.
But there is one nuance in this process - since shims usually have to be ordered, you should first simply measure the gaps in all valves, and only based on the data obtained, order washers of the required size. With VAZ “eights” and “nines” it is much easier - all the washers of the required sizes are sold in car dealerships.
We carry out the work in the following order:
- dismantle the valve cover;
- set the TDC of the first cylinder, rotate the crankshaft so that both cams point upward;
- press the pusher with a screwdriver and remove the adjusting washer. The gap is usually set at 0.35 mm on exhaust valves, and 0.2 mm on intake valves;
For example, when measuring the exhaust valve, the gap turned out to be 0.5 mm, and the removed adjusting washer has a thickness of 2.4 mm (240). The mathematics here is simple - the gap is 0.5 - 0.35 = 0.15 mm larger than the permissible one, which means the washer should be thicker by this amount. 2.4 + 0.15 = 2.55 mm, it turns out that you need to order a washer with a nominal value of 255.
Further regulation is carried out in the same way as on any other engine - by turning the crankshaft and adjusting for each cylinder, in the order of their operation 1342.
Adjusting valve clearances: video
Source: https://avtobrands.ru/regulirovka-klapanov-na-raznyh-modelyah-dvigatelej/
Adjusting engine valves on a car
The gas distribution mechanism (or timing for short) of any four-stroke power unit is necessary to ensure full cycles of its operation: intake, compression of the combustible mixture, piston stroke and exhaust gas release. If the valves are adjusted correctly, then you will not have problems with the timing belt: otherwise, the synchronization of the cylinders will be disrupted and the engine will not be able to function at maximum efficiency.
Symptoms of out-of-adjustment valves
There are quite a lot of them. One of them is a loud metallic knocking sound in the engine. The sound becomes stronger as engine load increases and may be accompanied by a burning smell. If the valves in the cylinders are not adjusted, the compression drops noticeably - this can be determined using a compression meter.
The engine “troits” - it vibrates at low speeds, it does not develop full power: there is sluggish acceleration and increased fuel consumption. All these signs indicate that the distribution mechanism is not working correctly: the valves need to be adjusted. What will it give? More on this below.
Why is valve adjustment necessary?
Correctly adjusted clearances guarantee stable operation of the power unit at low and high speeds. At the same time, the best engine response and optimal fuel consumption are maintained. But the question arises: what is the valve clearance for? The fact is that they close thanks to a special spring resting against the cam.
To prevent it from preventing the valve from closing completely, it is necessary to set a certain gap. And here you also need to take into account the heating of the valve stem (intake up to 300-400, exhaust up to 700-900 degrees), which causes an increase in its length.
If the camshaft is located on top, then it directly or through a rocker arm acts on the rod, which causes increased wear. To prevent such a development of events, the end of the valve in some car models is covered with a “glass”: adjusting washers are placed between it and the camshaft cam.
In other car models there are rocker arms: then adjustment between the metal parts is made using screws and locknuts.
Compensators
Most car engines are equipped with these devices today. Hydraulic compensators are installed on engines with more than two valves per cylinder.
These products themselves “select” the required valve clearance and guarantee the best timing operation under any conditions without adjustments.
However, some car enthusiasts, not without reason, consider the traditional gas distribution mechanism with periodic checks of the gap to be more reliable. The thing is that compensators tend to break.
How to adjust valves
All procedures must be carried out only on a cold engine. This is done to ensure that the setup results remain standard: this is exactly what they do at the manufacturing plants.
It is worth noting that the procedure for adjusting the valves on each car is different: you can find it out from the instructions for the car or the relevant literature.
The process is carried out by screwing in or unscrewing special adjusting screws, or by selecting flat washers. Each of these options is considered separately.
Using special tools
Engine valves are adjusted using a set of feeler gauges or a special rack and indicator. Both methods are quite widespread: the first is simple, accessible and requires minimal financial and time costs. To apply the second method, you will have to buy a device and a special device.
Adjustment using feeler gauge and locknuts
This method of setting the timing belt is typical for Russian rear-wheel drive cars (“classics”). Algorithm of actions:
- Remove the air filter housing and disconnect all tubes, cables and levers from the valve cover. To make it easier to turn the engine crankshaft, remove the spark plugs.
- Remove the valve cover and the front timing belt cover (if there is one, it may also be a chain).
- Set the piston of the cylinder from which the procedure will begin (for example, in the Zhiguli “classic” it is the 4th) to the top dead center position: the valves will be in the closed position.
- Observing the indentation mark on the engine shaft pulley, rotate it until it coincides with the mark on the lower front cover of the BC. The recessed point on the timing shaft sprocket should also coincide with the mark on its “bed” (housing).
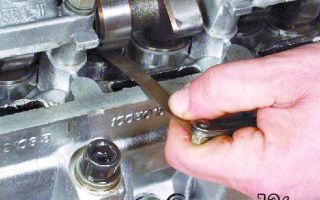
- Use an open-end wrench to hold the adjusting hardware and at the same time loosen the locknut. Next, you need to use a set of feeler gauges to adjust the valves. Select the thin plate you need and insert it between the rocker arm and the valve stem. When adjusted normally, the feeler gauge will pass through with little friction. The gap value must be adjusted according to the table, which is different for each car (for VAZ2101-07 - 0.15 mm). Now tighten the locknut and check the clearance again. Repeat the operation if necessary. Follow the order of valve adjustment: for example, for a VAZ classic: 8-6, 4-7, 1-3, 5-2.
Adjustment using washers
This type of timing adjustment is more typical for front-wheel drive cars. To produce it, you need:
- Remove the valve cover.
- Find the marks on the engine block, timing belt pulley and, turning the crankshaft clockwise, make sure they match. As a result, the first piston will be in the TDC position.
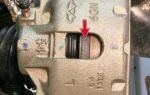
- Determine the gap between the shim and the camshaft cam (they are the first when viewed from the pulley side).
- If there is a larger or smaller gap, select another washer (each has a corresponding marking; if not, use a caliper, or better yet, a micrometer).
- After installing the washer, check the gap again: the permissible deviation is no more than 0.05 mm in both directions.
- Do not forget that the gap size for the intake and exhaust valves is different - this parameter must be found out from the operating instructions for a particular car.
Adjustment using indicator and rack
This method is considered more accurate and was especially popular during the USSR. This adjustment method is good for engines that have been in operation for a long time, since the device and measuring rod take into account the wear on the surfaces of the parts. Progress of the procedure:
- Remove the valve cover, having first disconnected the levers and cables from it.
- Rotate the engine shaft until the marks match, just as when adjusting the valves using a feeler gauge.
- Take the rack and fix it on the cylinder head (fastening is carried out to the studs of the camshaft housing). There is a small nuance: you do not need to completely screw in all 3 nuts securing the rack, otherwise it will dangle. First of all, tighten the outer hardware, then begin to unscrew the middle bolt until the rail becomes motionless.
- Take the dial indicator and secure it to the rail, and place the device’s foot on the edge of the valve cam.
- Using the included grip, grab the cam and pull it up: the indicator needle should pass 52 divisions (at an air temperature of +20 degrees). If this is not the case, then you need to adjust the valve using one of the two methods described above.
Consequences of incorrect valve adjustment
If the described timing elements are adjusted incorrectly, the engine’s operating efficiency will noticeably decrease. If the clearance is insufficient, the valves themselves and their seats will experience increased loads, which can lead to burnout.
With an increased gap, an unpleasant metallic knock will be heard in the cabin, and the power of the power unit will drop.
In any case, the result of incorrect or untimely valve adjustment will be the failure of timing parts, which leads to significant financial expenses.
How to adjust the valves if there is a gas system
When the engine runs on liquid fuel, the temperature of the valves reaches 350, and the “plates” - 900 degrees. When using gas as fuel, this parameter increases by 50-70 degrees. Such an increase in itself is not dangerous: the valve will not burn out or collapse.
A much greater risk is posed by incorrect adjustment of the power system when a lean mixture is formed. In this case, the temperature on the surface of the valves increases by 200-250 degrees, which leads to burnout of the valves.
Conclusion: using gas for timing is not dangerous, but you need to watch the quality of the mixture.
How often are adjustments made?
If we talk about mileage, then it is 20-30 thousand km.
Adjustment of the thermal clearances of the valves should be carried out even if you do not experience a loss of power, increased fuel consumption and black smoke from the muffler (you should not wait for the first symptoms to appear). It is best to carry out the procedure in a car service center, but if you have the appropriate tools, equipment and experience, this can also be done in your garage.
Source: https://djago.ru/dvigatel/kak-otregulirovat-klapana-i-dlya-chego-eto-nuzhno/
We adjust valves of VAZ 2106
Owners of classic cars designed during the Soviet period often have to deal with the issue of repairing and tuning their car.
Due to the high popularity and fairly strong density of cars on the roads of that time, some repair procedures and tuning operations remain quite relevant.
The design difference between classic cars and products of the modern automotive industry is the need to manually adjust many parameters.
The valve adjustment procedure on the VAZ 2106 is necessary for a number of specific reasons. The main reason is the significant heating of the power unit during operation. The laws of physics state that during heating there is a linear increase in the size of solids.
This applies to many internal combustion engine parts, which necessitates periodic adjustments according to the parameters determined by the designers at the factory.
One of the most important elements that require adjustment under operating conditions is the gas distribution mechanism. The key element of this mechanism is the valve.
Valves are usually divided into intake and exhaust; they are responsible for opening access for the penetration of the air-fuel mixture into the working combustion chamber through special windows in the cylinder head. They are also responsible for the release of exhaust gases.
At the point of contact of the valve, a gap is formed, which is usually called thermal. It is this gap that is subject to careful adjustment.
Valve adjustment gauges
The result of incorrect valve adjustment is an increase in fuel consumption and a noticeable decrease in the power characteristics of the power unit.
Preparation for work and disassembly
I would like to immediately note that this procedure requires time and is conditioned by an understanding of the process. There is a certain algorithm for implementing this task. To begin with, place your car on a level surface and provide free and well-lit access to the engine compartment.
The engine must be cooled and at ambient temperature.
Before starting the adjustment process, you need to prepare:
- a set of different wrenches in sizes “10”, “13”, “14”, “17”;
- 0.15 mm feeler gauge;
- key for turning the crankshaft;
- screwdrivers;
- spare valve cover gasket.
The disassembly process includes removing the air filter, disconnecting all pipes from the air filter cover, removing the choke cable, accelerator linkage and cylinder head cover.
It is advisable to remove the distributor cover so that it does not cause inconvenience during the adjustment process. There will be marks on the pulley and oil seal cover. The crankshaft must be turned until they coincide.
This position indicates that in the 4th cylinder the piston is on the compression stroke.
The procedure for carrying out the valve adjustment process
Table of the sequence of adjusting valve clearances on a VAZ 2106 car:
Crank angleCamshaft angleCylinder numbersAdjustable valve numbers| 0° 180° 360°
540° |
0° 90° 180°
270° |
4 and 3 2 and 4 1 and 2
3 and 1 |
8 and 6 4 and 7 1 and 3
5 and 2 |
The valves must be adjusted according to a strictly defined sequence. The following data indicates the degree of rotation of the crankshaft to adjust one valve or the other:
- The initial position, when the marks coincide, makes it possible to adjust valves 6 and 8.
- Having turned the crankshaft 180 degrees, we adjust valves 4 and 7.
- Rotation 360 degrees provides access to work with valves 1 and 3.
- A 540 degree rotation allows you to adjust valves 5 and 2.
For convenience, car enthusiasts and craftsmen apply their own marks to the crankshaft pulley. Most often it is divided into two parts, leaving a mark opposite the one made at the factory.
The process of adjusting valves on a VAZ 2106
From this video, you will learn how to adjust valves for a VAZ 2106. Enjoy watching!
During the adjustment process, you should adhere to this algorithm:
- Having maintained the position set according to the marks, we check the gap on cams 8 and 6 of the camshaft. An important fact is that the gaps are calculated starting from the star mark, which is located closer to the windshield. From this cam we begin counting. Next, under the camshaft, slightly above the rocker itself, we place the dipstick. If the probe penetrates freely, then it is necessary to loosen the nut 17 of the rocker where the measurements take place. To avoid any problems with scrolling, you need to loosen the nut by 13. Next, tighten the nut by 17 and the gap is measured again. It is necessary to ensure that the probe, penetrating into the gap, does not bend, but at the same time fits into it quite tightly with a certain force. After achieving the desired result, you can begin adjusting the next cam.
- For approximately 6 strokes, use the key to rotate the engine shaft. The mark on the sprocket should be in the 9 o'clock position and aligned with the mark on the pulley. Next, we adjust cams 4 and 7. The adjustment process is identical to that described above.
- Then we rotate the shaft 180 degrees. The mark on the star is at the 6 o'clock position. The mark on the pulley must strictly coincide with it. In this position, cams 1 and 3 are adjusted.
- By turning the shaft so that the mark is at the 3 o'clock position, we will be able to adjust the 2nd and 5th cams.
- The last step is to crank the crankshaft with the starter, then check all adjustments and tighten the nuts. We reassemble all dismantled elements in the reverse order. If necessary, we replace the valve cover gasket during the assembly process.
Useful tips
Particular attention should be paid to the timing chain before adjusting the valves. The chain must be installed correctly.
The degree of tension should be carefully monitored.
An uneven knocking sound in the area of the upper part of the valve cover is evidence that the thermal clearances of the valves are increased and their adjustment is necessary. To adjust and measure the gap, it is necessary to use special feeler gauges aimed at adjusting classic VAZ engines.
These probes are wider. Standard feeler gauges are quite narrow and are not able to cover the entire width of the gap in the area of the pressure arms and camshaft cams. This makes it impossible to determine the correct gap size.
In most cases, the cover accompanying the dipstick contains a valve adjustment diagram. It is presented and designed in the form of a table. A well-tuned engine on a VAZ model 2106 is a fairly reliable design.
Adjusted valves reduce engine noise, ensure maximum performance and fuel efficiency. To achieve and maintain the maximum performance indicators specified by the manufacturer, adjustments must be made at a preferable frequency of 15 thousand kilometers traveled.
Based on the above information, the process of adjusting the valves can be carried out either in a specialized car service center or independently, by carrying out all the work by the car owner.
We also recommend watching
Source: http://natapku.ru/obsluzhivanie-remont/regylirovka-klapanov-vaz-2106.html