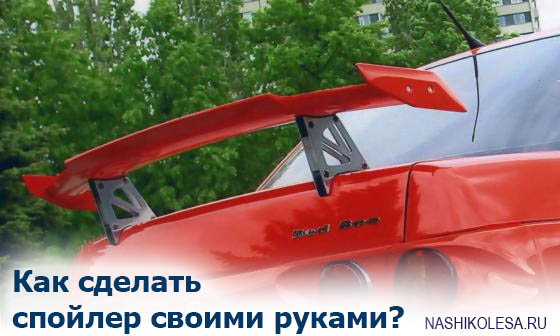
How to make a spoiler with your own hands

Spoilers from a car store are not always suitable for your car. It happens that a few centimeters are missing.
You can, of course, cut a brand new spoiler, making an insert of the required length, but you can make a spoiler yourself, reducing its cost by almost half! A nice bonus is that you can shape the spoiler to your own taste. We stock up on time and get to work.
When choosing between polyurethane foam sealant and polystyrene foam, we are inclined to favor the latter, due to its obviously low comparative cost. We will need a sheet of polystyrene foam, 5 cm thick and 1 x 1 m in size. We cut the wing blade diagonally, otherwise the width of the sheet simply will not be enough. Next we make a stand for the number.
As you know, Japanese numbers are smaller than Russian ones and more square, which is why our numbers don’t look right in the places allocated for them. We cut out the blank and take epoxy glue in a paper box.
Instead of fiberglass, old silk fabrics from unnecessary things are suitable. It will take you a couple of days to glue the stand, and sanding and painting will also take a few days.
In this case, it is better to take the paint in cans and cover it with varnish on top.
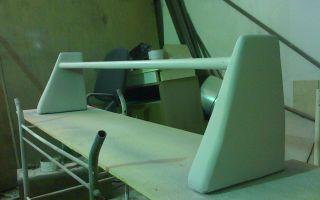
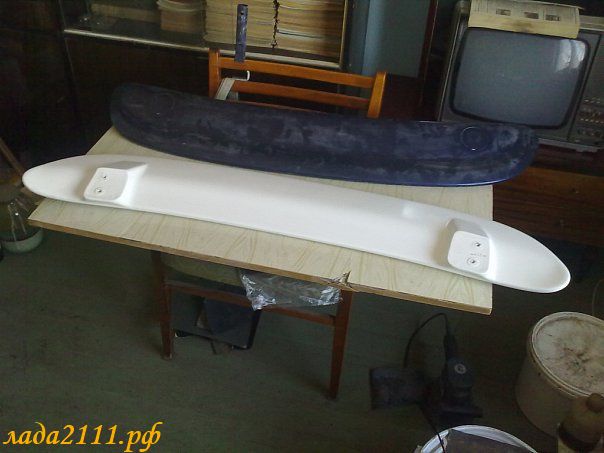
The result is this:
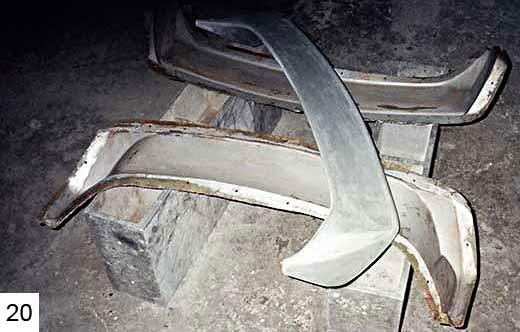
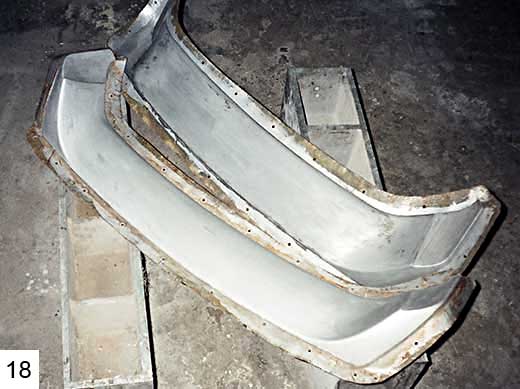
Then... not a spoiler - the lip. It's easier to do. We remove and turn over the bumper, glue the foam blank. It was weakly held on the bumper with the help of silicone auto sealant. We remove it and give it shape.
Then we wrap it in polyethylene bags. You can use women's tights. We simply stretch them in two layers onto the mold and coat them with epoxy glue. Once they are completely dry, remove the blank from the lip.
And in order to avoid problems with this, bags are exactly what is needed, since epoxy does not stick to them.
Only after a few days or even a week does it completely polymerize, although it seems to have dried out within a day.
However, a lot here depends on the hardener, or more precisely, on its quantity: the more of it, the faster the epoxy polymerizes, but at the same time it becomes more fragile. It’s also good to add a payer for flexibility.
Even after this, the glued lip does not have the required strength, so we glue two more layers of silk fabric and a reinforcing mesh from the inside for strength. But instead of silk, it is better to use fiberglass or carbon fiber so that the lip does not crumble! Even the reinforcement mesh doesn't help! Then we start sanding, after which we apply a primer, and start painting.
Let's get to the spoiler. We make fastenings by cutting out plates from 1.5 mm sheet steel, drilling holes in increments of 2-3 cm, 3 mm wide, and welding two 6 mm nuts at the base. After that, we glue them into the foam blanks we have.
Then we cover the wing blade with two layers of fabric and assemble it. Apply the glue with a brush, then wash it in a solvent or under running hot water. You should not prepare a lot of glue at once, more than 200 ml, it is difficult to use it all in one go.
To prevent foam chips from sticking to you, touch the faucet often - this will help relieve static. It is best to glue up to 3 layers of fiberglass at intervals to allow the resin to polymerize. This process accelerates several times at temperatures up to 120 C.
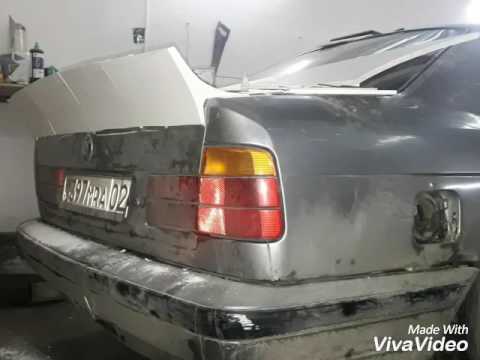
We glue the spoiler, putty and paint it with three cans of black paint.
You can make a piece of glass for the stop bar from plexiglass or plexiglass, but in this case, it is made of epoxy.
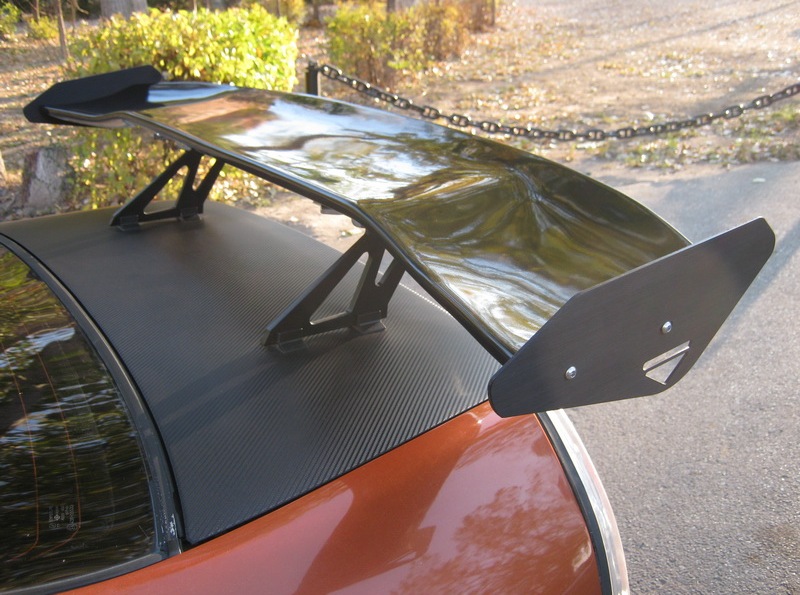
New spoiler installed. Let's summarize the materials spent:
And all this work took 2 months. If you are enthusiastic enough, get started! But it’s still better to paint it in a salon.
Source: http://xn—-7sbgjfsnhxbk7a.xn--p1ai/kak-sdelat-spojler-svoimi-rukami
DIY spoiler
Content
Tuning or functionality?
We create a spoiler ourselves
It takes a lot of skill to make a high-quality spoiler with your own hands. But the main thing is to be patient and take your time in your work. The manufacturing process may be different, but it is always not rushed.
DIY spoiler
Tuning or functionality?
When people talk about tuning a car, a spoiler or a wing is most often thought of.
The wing is an additional part of the car, which, thanks to the gap, increases downforce at high speeds, above 80 km/h.
This ensures greater vehicle stability and traction on the road surface. Calling it a spoiler is not entirely correct, but most car enthusiasts know it by this name.
A spoiler or, more precisely, a lip spoiler is a part for a different purpose and does not need a gap for this. Its task is to reduce air turbulence and reduce the aerodynamic drag coefficient. It is usually mounted on the trunk lid, especially if there is a sharp transition from a horizontal to a vertical surface.
The wing and spoilers can be installed on the car initially during production or during operation by the car owner himself.
Those installed and made independently usually have a decorative function and do not fulfill their intended purpose.
If the rear wing is installed incorrectly or incompletely, the car also loses its technical characteristics, and in this case the spoiler has a negative effect on the car.
The wing is a mandatory element of sports cars when driving on race tracks. The cars are equipped with an adjustable rear wing, which is automatically activated when the pilot presses the gas pedal. This detail significantly increases speed on straight sections and helps when overtaking.
Wing - a mandatory element of sports cars
In order for the wing to cope with the task, it is installed not only on the rear of the car, but also on the hood and on the sides, the so-called body kit and sill extension, respectively.
Otherwise, at high speed, as a result of the operation of the rear spoiler, the car will rise above the road front.
The body kit in the car also serves as an additional cooler for the internal parts of the car, thanks to the redirection of the air stream.
The disadvantages of the wing include:
- reducing vehicle ground clearance;
- poor visibility in the rear window;
- considerable cost if you buy ready-made and high-quality ones.
The material for making the wing can be:
- fiberglass is the most popular;
- ABS plastic is lightweight, flexible, and becomes brittle over time;
New style spoiler made of ABS plastic
- silicone with organosilicon polymers;
- carbon – excellent characteristics, but high price.
Spoilers can also be custom - these are designer single copies - and factory ones, which are produced in large quantities. The wing can be attached to the car body with double-sided tape or self-tapping screws if the structure has racks. Depending on the design, steel or aluminum is used for the racks.
We create a spoiler ourselves
Many motorists make their own trunk spoiler. This significantly saves money and in some cases looks no worse than expensive tuning parts.
Before you start making a wing yourself, you should purchase materials and tools for the job. You will need:
- foam for the base, thickness 5 mm;
- spray paint to match the car;
- metal sheet, thickness up to 1.5 mm;
- epoxy adhesive;
- carbon fiber.
You will also need brushes, sanding paper and other small items.
Spray paint
The work of creating a wing with your own hands begins with cutting out the base from foam plastic. Racks are made according to your preferences from sheet metal. The foam piece should then be glued to the posts and layers of carbon fiber or fiberglass should begin to be glued onto the foam using epoxy glue. Before gluing a new layer, let the previous one dry.
We paint the spoiler and, after complete drying, install it in the intended place of the car.
There is another way to make a spoiler with your own hands. The manufacturing technology is similar to the previous one. But the base is not polystyrene foam, but gypsum.
To do this, cut out the shape you like from polystyrene foam, line it with film and fill it with plaster. There should be two such parts, they are glued together and begin to be covered with fiberglass. Next, the process is the same as in the previous method.
This option, how to make a spoiler yourself, is more labor-intensive, but also quite simple and affordable.
Making a spoiler for a car with your own hands
On the Internet there is also a method for self-production based on polyurethane foam. You can spend a lot of effort on it, but the result is amazing. The base is formed from polyurethane foam on a car previously wrapped in film. Then they cut out the desired shape and polish it.
Then they also use epoxy resin and fiberglass, but the top layer is putty mixed with fiberglass and only then regular putty. The further process is similar to the others: priming, sanding, painting, polishing.
But as a result, the visor you made yourself for the rear window is indistinguishable from the factory one and looks like an original part of the car.
When making it, you should remember that it doesn’t matter how to make a spoiler for a VAZ or a foreign car, the main thing is that the result is worthy of attention and brings aesthetic pleasure to the owner.
And here are ways on how to make a motorcycle fairing yourself. According to the manufacturing principle, they do not differ from those given above. The only difference is in the shape of the fairing and its layout.
Polyurethane foam spoiler
Some car owners, before starting work on creating a spoiler with their own hands, draw patterns on available materials - plywood, hardboard. They make it easier to adjust sizes on a machine. You can also find ready-made drawings of various modifications of the wing on the Internet.
Whatever your decision regarding the choice of wing, spoiler and fairing, always be guided primarily by what functions you expect from them. Installing a part just to improve appearance without considering its capabilities can lead to unexpected results on the track.
Buy a factory spoiler or make it yourself - the decision is made by the car owner, based on his capabilities. But it’s worth studying various photo and video materials on the Internet, manufacturers’ offers and other nuances. If you are not confident in your own abilities, remember that sometimes it is easier to buy than to spend time making it yourself.
Source: https://1000sovetov.ru/article_spoiler-svoimi-rukami
Making a spoiler with your own hands
 One day, while walking around the city, I decided to drop into an auto parts store; I really liked the sign.
And what a surprise it was when such a wide range of car spoilers appeared before my eyes, of various shapes and sizes, made of fiberglass material, and at fairly low prices (1500-2000 rubles). Well, of course, one model really caught my attention.
Without wasting any time, I left the cost of the spoiler as a deposit and, leaving the store, went straight to my car.
I came up and tried it on the car - it doesn’t fit, it’s too small, the length I need is about 10 centimeters longer.
Of course, after such trouble, a variety of feelings came into my head - resentment, anger, but these were only momentary impulses, then an insight descended on me, and I thought, why not buy a spoiler I liked, cut it and make a small insert, instead of the missing ones centimeters.
It won’t take much time, and the price will only increase by 250 rubles. - so we get a spoiler (2000 rubles) plus insertion and painting (250 rubles), in total 2250 rubles. It's not that bad.
Then my imagination led me to search for a more interesting solution to the problem, namely, to buy everything necessary to make a spoiler with my own hands. This option seemed more attractive - minimal costs for materials, no restrictions in form and time. Yes, exactly, this option is what you need if you want to show your imagination and stand out among the gray mass. And, of course, no one will limit you in time, and you can make your creation whenever you want.
It is not surprising that the beginning of the journey of these adventurers is a trash can or trash can. The reason for this lies in ignorance and lack of understanding of what needs to be done. Usually, having learned that you can buy polyurethane foam sealant and make a frame from it, everyone rushes headlong to the store.
So, let's make a spoiler with our own hands . The best place to start is to protect the floor from foam by covering it with something.
The next step is to purchase several cylinders of foam, with a total yield of forty liters. But this method has significant drawbacks. Firstly, instead of forty liters, the maximum is fifteen.
Secondly, the more the balloon heats up, the larger the pores become, up to five centimeters.
After using several cans of foam and not getting the shape you want, you will most likely quit.
But not everything is as bad as it might seem at first glance. Foam sealant can be replaced with foam plastic. To do this, you need to find a sheet of foam plastic measuring one meter by one meter and about five centimeters thick.
The upper part of the wing should be cut diagonally from this sheet, otherwise you will not have enough width. The next step is to make a frame according to the number.
As you know, Japanese and Russian license plates have different sizes, and try to put a Russian license plate in place of a Japanese one and you will understand how terrible it looks.
So, let's start making a frame for the number. First we cut out the blank.
After this, you will need some fiberglass, but if you don’t have it on hand, you can use an old silk shirt and a little epoxy glue, available in paper or plastic packaging.
After the blank is pasted over, it will take a day or two to paint and sand it, and it is worth noting that for painting it is best to use aerosol paint from a can.
The next step is to make the lip. When making a spoiler with your own hands in this step, do the following:
– remove the car bumper, glue a foam block onto the bumper, first turning it over.
– give shape to the glued blank.
– now wrap it in polyethylene or, alternatively, use tights coated with epoxy glue. To speed up the drying process, you can use a hardener, and accordingly, the more you use it, the faster the glue will dry and become a polymer. But this polymer turns out to be quite fragile and to give it the properties of a more flexible mass, it is worth using a plasticizer.
– after the tights have dried, remove the blank from the lip.
– to give greater strength to the lip, it is covered with a reinforced mesh, after which it is sanded, primed and painted.
Very often, the above methods of increasing the strength of the lip do not help, and a lip not made from fiberglass is destroyed at the slightest impact; in this case, neither a layer of reinforced mesh nor a layer of paint helps.
Therefore, to make the lip, it is still recommended to find either carbon fiber or fiberglass, otherwise at the first bump, all your efforts will come to nothing.
If you find one of the materials you need, you need to apply glue to its surface with a thin brush.
If you get dirty with epoxy glue, you can wash it under hot water.
Let's make an important note - epoxy glue does not dry, but polymerizes. This process can be accelerated several times if the polymerization temperature is increased to one hundred and twenty degrees Celsius or more.
Now let's move on to the spoiler. First, the fasteners are made. They are cut from a sheet of steel, one and a half millimeters thick. After that, holes of three millimeters are drilled in them, in increments of two to three centimeters.
The fasteners are then bent into an “L” shape to improve fastening properties. Then two nuts with a six-millimeter thread are welded to the base of the spoiler on each side. After which all this is glued into foam blanks.
The wing blade should be covered with several layers of fabric. Now all the resulting components are assembled into one whole.
It is worth noting that carbon fiber is better suited for making a spoiler, but it is difficult to find.
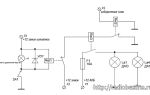
After the spoiler is ready and installed on the car, you can also install side lights on it; to do this, just run a few wires from the inside of the car.
So, the self-made spoiler is ready and installed. Now it’s time for the puttying stage. If you skip it, there will be a problem in obtaining a flat surface, because... with paint it is very difficult and time-consuming.
After we get a flat surface, we need to start painting and here you can choose one of the options - entrust your brainchild to specialists, of course, they will definitely do better, but since you started doing everything with your own hands, you can do the painting yourself.
To do this, you will need several cans of the paint you want to use.
Let's make a short list of everything you need to make a spoiler yourself:
– polystyrene foam, if only one sheet was used – 60 rubles.
– LEDs 13 mm – 2 pieces for 615 rubles.
– brush – 3 pieces, 15 rubles each.
– reinforced mesh 24 rub.
– paint – three cylinders 210 rub.
– fiberglass – approximately 2 m. 100 rub.
– primer 2 cans 150 rub.
– shirts and other rags 0 rub. (if you find yours, of course).
– fastening and welding – about 300 rubles.
– epoxy – 2 kg 450 rub.
– wiring about 2 meters 10 rubles.
– sandpaper 90 rub.
– neon lamp built into the spoiler RUB 300.
In the end, it turns out to be 1,700 rubles, not taking into account the stop bar and foam sealant, and this price is less than if you buy a ready-made spoiler. All work usually takes a month, and if you want to try to do it yourself, then be sure to do it.
Source: http://motor-good.ru/tyuning/1598-delaem-spoiler-svoimi-rukami.html
How to make a spoiler
Home » Repair and service » How to make a spoiler
To improve the appearance of the car, the market offers various tuning elements, including a spoiler. A spoiler will make the car more attractive and give it positive driving characteristics. You can make such an accessory with your own hands, giving it the desired shape. For independent work, expensive materials and special tools are not required.
What is a car spoiler
A spoiler is one or more special elements designed to change the aerodynamics of a car body by redirecting air flows. The main purposes of installing this part are:
- reduction of aerodynamic drag;
- increased downforce;
- combating vehicle body pollution.
It is worth mentioning that many install a spoiler as a decorative (tuning) element. Its mounting can be done in front, behind, on the roof or on the side of the car. With an individual approach, you can make a custom-made spoiler, which will allow even a production car to stand out in traffic.
An original spoiler from a tuning studio will make your car stand out on city streets.
Pros and cons of installation
The spoiler gives the car the following qualities:
- attractive appearance;
- improved dynamics;
- increased adhesion to the canvas;
- reducing fuel consumption;
- increasing braking efficiency.
It should be clarified that the positive qualities of the element in question appear at speeds above 100 km/h.
Installing a spoiler on a car gives it a number of advantages, but they appear at speeds above 100 km/h
The disadvantages include:
- high cost of structural elements;
- increased fuel consumption due to incorrectly selected form or installation;
- fragile material of manufacture (plastic).
Car tuning options
Today you can choose a spoiler for almost any car, regardless of body type: from a sedan to a minibus. To make the choice easier, you need to understand in more detail the criteria by which this tuning element is classified:
- at the installation site;
- by installation method;
- by material;
- according to form.
You can secure the spoiler using double-sided tape, but only if the part is small in size
The main location for installing the spoiler is the rear of the roof or trunk lid. This depends on the body type, as well as the size of the spoiler and its shape. You can attach a tuning element:
- using double-sided tape. This option is appropriate for small spoiler sizes;
- bolted fastening. Many motorists do not like this method because of the need to make holes in the body part;
- fastening with staples. This option is suitable for those cars that have a certain shape of the rear cover and a gap between the body.
What material is suitable for tuning
As for the material for making the spoiler, the most common are:
- ARB plastic;
- ordinary plastic;
- fiberglass;
- polyurethane;
- aluminum.
To give preference to a design made from one material or another, it is first necessary to consider each of them in more detail, taking into account its chemical and technical characteristics.
Which form to choose
Spoilers can be quite varied in shape. To conclude whether this option is suitable or not, you need to see the part in front of you. There are cases when the shape of an element complements a part of the body, but generally spoilers are represented by the most non-standard designs. With their help, you can give your car not only exclusivity, but also aggressiveness.
Spoilers can also be classified by design:
- custom - presented, as a rule, in a single copy; Custom spoilers are produced in single copies, which allows you to make the car unique
- factory - the part is produced on an industrial scale and looks the part. A spoiler purchased at a car store will decorate the car, but will significantly lighten the pocket of its owner
Rules for selecting a suitable spoiler
Today, many spoilers are produced for a specific car make and model, but there are also universal options that are suitable for almost any car. The only difference is where they will be attached. The car itself should also be taken into account: if we are talking about the executive class, then the spoiler will obviously be an unnecessary element in the design.
It is important to evaluate how the chosen accessory will look. To do this, just take the part, apply it to the car and see from the outside how well it matches its appearance.
Many tuning studios have a special program with which you can choose the best option, after which they determine the location of the element’s installation.
If the spoiler is designed for a specific car, then this question does not arise.
It is better to purchase a spoiler without a paint layer, which will allow you to find a color that matches the car. An important point is the selection of a suitable fastening method.
In order not to make a mistake with your choice, it is better to contact only reputable tuning companies. Only in such studios can truly high-quality products be installed.
When choosing a spoiler, attention should be paid to the material: in many cases the part is made of plastic, which is characterized by both low cost and short service life. The plastic spoiler quickly fades when exposed to sunlight and breaks with minor impacts.
In addition, there is such a material as fiberglass. A part made from it quickly loses its original appearance and fails.
Carbon fiber products are of higher quality and, therefore, more expensive. It is important to understand that a high-quality spoiler must be made for a specific make and model of the car, taking into account the improvement of its aerodynamic characteristics. Therefore, all that can be said about universal options is that their level of quality is questionable.
Only when installing a high-quality spoiler can you be sure of the durability of the structure and the performance of the element’s direct functions
How to make a spoiler for a car with your own hands
When and why do you have to ask yourself the question of making a spoiler yourself? Today, a large selection of the element in question is offered and, it would seem, doing something with your own hands in this regard is not required. But then the cost of a high-quality spoiler turns out to be quite high, and this indicator is not a guarantee that the desired effect will be achieved.
Therefore, some car owners design spoilers themselves, obtaining the desired design and the desired effect from installing such an element. A homemade accessory can be made using various materials, which the owner chooses based on his imagination and free time.
Tools and materials
To start making a spoiler, you will need to prepare the following list of materials and tools:
- foam sheet;
- fiberglass about two meters;
- fastening and welding;
- spray paint (2 pcs.);
- primer (3 cans);
- epoxy glue 2 kg;
- tassels;
- spatulas;
- mesh for reinforcement;
- sandpaper.
Depending on the specific design of the product, the main material is:
- gypsum;
- Styrofoam;
- polyurethane foam;
- metal carcass.
Stages of making a homemade spoiler
The entire process of creating a structure can be divided into several stages:
- mold making;
- material reinforcement;
- putty;
- painting;
- installation.
One of the stages of creating a spoiler is strengthening, i.e. imparting rigidity to the structure
It is best to use cardboard as a pattern. You can also use plywood, but this will lead to additional costs.
Regardless of the material chosen, after realizing the desired shape, be sure to try on the pattern on the machine. You need to make sure that the size is correct and the attachment points correspond to the intended locations. You should make sure that the future product is symmetrical, for which the pattern is bent in half.
The frame can be made of different materials, but its main role is to hold the given shape at the beginning of the manufacture of the part. The spoiler will be given rigidity by fiberglass, as well as a layer of putty and paint. When choosing a filler, you need to take into account the planned shape of the future product.
Video: making tuning elements with your own hands
Making a spoiler from foam plastic and fiberglass
One of the important stages in creating a spoiler is proper design. This element cannot be done “by eye”. The ideal option at the design stage would be to involve an engineer or an experienced person who is involved in this type of tuning.
After determining the dimensions and design, you can begin to create a metal frame.
- Quite often, when making a rear spoiler, a sheet of galvanized iron 1.5 mm thick is used, the edges of which are bent upward. M6 nuts should also be welded to the base for subsequent installation of the product.
Galvanized iron is often used as a frame for the spoiler, to which nuts are welded to secure the future product.
- The resulting frame is glued on all sides with foam blanks to increase the volume; polyurethane foam is also often used. The thickness of the foam is chosen at the discretion of the owner. You can cut it with a regular stationery knife or a metal blade. As a result, we obtain a matrix.
To increase the volume of the workpiece, foam plastic is used, which is pasted over the metal frame.
- When the spoiler blank is ready, fiberglass (glass carbonate, fiberglass) is used to impart rigidity. A minimum of three layers of material should be applied with short time intervals for the resin to polymerize. Each subsequent layer should be denser than the previous one. You must strive to ensure that there are no air bubbles between the layers. The last layer of fiberglass must be coated with polyester resin. If desired, a brake light can be installed in the spoiler; then the wires should be laid at the stage of gluing with fiberglass.
To give the product rigidity, several layers of fiberglass are applied, and drying is performed before applying the next one.
- To obtain good adhesion, the surface of the product should be primed, after which putty is applied.
The surface of the spoiler is primed to improve adhesion, puttied, primed again, cleaned and covered with several layers of paint and varnish.
- The subsequent steps are aimed at cleaning the surface with sandpaper, this will give the spoiler as smooth a look as possible.
- At the final stage, the part is primed and covered with several layers of paint, and then varnish.
After applying the paint layer and drying, the spoiler is installed on the car
Video: tuning the rear window of the Audi A8
Step-by-step production of a plaster spoiler
Using a material such as gypsum, you can make not only a matrix, but also a copy of your favorite spoiler.
- To pour the gypsum, we make a polystyrene foam box. Then we place the part matrix or the finished spoiler into it, after wrapping it in cling film to avoid damage.
To make a spoiler from gypsum, a polystyrene box is prepared, into which the matrix for the new spoiler is then placed.
- Fill the box with plaster. After the material has hardened, we cut it into two parts. After removing the original, we will receive an exact copy of the form.
After filling the matrix with gypsum, you must wait until it hardens.
- To make a blank, line the mold with film and fill it with plaster.
- After it hardens, open the halves of the matrix and remove the workpiece.
After the plaster has hardened, all that remains is to open the halves of the matrix and take out the future spoiler frame
- Subsequent steps are aimed at finishing, reinforcing and painting the spoiler.
To give the matrix strength, you should follow the same recommendations that are given for making a spoiler from foam plastic.
How to make a foam spoiler at home
The procedure is simple, but requires care to avoid damage to the bodywork.
- We cover the upper part of the trunk lid with polyethylene, you can also use masking tape.
Before applying foam, protect the surface of the trunk lid with plastic film or masking tape.
- Cover the prepared surface with polyurethane foam.
Polyurethane foam is applied to the prepared surface, which should preferably be moistened for better hardening.
- We wait for the foam to harden, then use a sharp knife to form the future part.
When the foam hardens, use a knife to form the future spoiler
- In order to bring the product to the required shape, you should use sandpaper.
- We also add rigidity to the product through the use of fiberglass.
To impart rigidity to the structure, fiberglass is used, which covers the product in several layers.
- The final stages are similar to the previous methods of making an accessory.
The matrix can also be made from plasticine. The process is similar to the described sequence of actions for making a foam spoiler. Regardless of the chosen method, care must be taken to ensure sufficient rigidity of the structure. In addition, fastening such a tuning element should prevent its loss, ensuring reliable fixation.
Not only foam plastic, but also plasticine can be used as a material for making the matrix.
Video: installing a “duck tail” on a VAZ 2109
Anyone can make a spoiler for their “iron horse” if they wish. To do this, it is enough to select the necessary materials and tools. It doesn’t matter which car is being tuned - Niva Universal or Mercedes Benz ML. If you scrupulously follow the step-by-step instructions, you can make the car much more attractive, and also significantly improve its technical characteristics.
Source: http://autofluids.ru/remont-i-servis/kak-sdelat-spojler.html
How to make a spoiler with your own hands: tips and tricks
#1
Few people perceive such a device as a spoiler, called a wing among auto mechanics, as something functional, taking it as one of the simplest and most accessible tuning methods.
Meanwhile, we are talking about a device that can qualitatively improve the handling of a vehicle by increasing the load on its rear part (relevant for sedans) and, as a result, increase the traction of the rear wheels with the road, and this article will describe in detail how a spoiler can be made with your own hands. Perhaps someone will be skeptical about this idea, believing that it is best to contact specialized auto repair shops with this issue, but in fact, coping with the task is not at all as difficult as one might think at first glance, especially if you take into account the fact that there are a lot of simple and affordable ways to make a spoiler with your own hands.
#2
So, for example, any, even the most inexperienced car enthusiast, can, if desired, construct a wing using a matrix method, and the emphasis should not be on the dimensions, because it is not a football goal that is being designed, but on the compliance of the finished design in relation to his own car.
As for the matrix itself, which means a form for filling and subsequent connection of two longitudinal halves of the future spoiler, it can be purchased in a ready-made form, or you can easily make it yourself, taking into account all the structural features of your car’s body.
There are undoubted advantages in making a matrix with your own hands, the first of which boils down to saving money, and the second to the possibility of reusing forms when the need arises.
As for the materials, there shouldn’t be any problems with them, because almost any available means are suitable for this.
#3
Thus, the simplest method of manufacturing a double-sided matrix for casting a spoiler is to give a conventional chipboard strip a streamlined shape, for which hardboard mounted on two perpendicular supports is attached to its lower part.
Under the influence of gravity, the hardboard, or rather its free ends extending beyond the supports, begin to fall down, automatically taking on an optimal streamlined shape.
In order to fix the result obtained and give rigidity to the matrix structure, they begin to perfect it with the help of ordinary plasticine, having previously sealed all the places with ordinary construction tape.
This material allows you not only to adjust the angle of inclination, setting it to the required value, but also to make temporary struts for the future wing. After this, they begin to manufacture the side brackets, for which hardboard will again be needed.
#4
The final stage of forming the matrix template consists of gluing all its sides with special fiberglass, and this should be done using a special glue that contains polymer resins.
When the polymerization process is completely completed, you can safely begin separating the resulting template from the temporary base with chipboard, plasticine, tape and other unnecessary materials that should not be thrown away in a hurry for the simple reason that they will serve as the basis for forming a template for the lower part of the matrix of the future spoiler. After this, the glass material in its already hardened state is covered with a dense layer of glass mat, the workpiece is allowed to dry completely and the final adjustment begins. This stage involves checking and “aligning” the corners and cutting off all excess glass materials that have undergone polymerization (this is best done with a grinder).
#5
In order to make all further stages of work as comfortable as possible, it is advisable to carefully grind and polish the resulting matrix, or rather its surface, otherwise the likelihood of getting hundreds of splinters in your hands increases greatly.
After this, they begin to form the second half of the matrix using a ready-made template from chipboard, plasticine and hardboard. The most difficult step in this task is separating the halves of the resulting matrix, for which at first you should use a sharp stationery knife.
It is necessary to insert wedges made from readily available means into the resulting lumen, and the greater the number of them provided, the faster and safer it will be to open the halves of the matrix.
However, this does not mean that you can start pouring, because the inner walls of the resulting workpiece should be cleaned of foreign materials.
#6
So, having completely eliminated all dust, fragments of plasticine, adhesive tape and eliminated all existing irregularities and defects, you can begin filling the molds with aluminum powder. This gelcoat has a number of advantages and disadvantages, but in principle it is excellent for implementing the plan.
The formation of the wing in the matrix is carried out in several layers, because for reinforcement the gelcoat is alternated with sheets of glass mat.
Also, you should be prepared for the fact that the texture of this same glass mat will appear on the surface of the finished spoiler in the future, although there is nothing to worry about, since the finished product can be easily sanded and polished.
Source: http://uznay-kak.ru/avtomobili/tyuning/kak-sdelat-spoiler-svoimi-rukami-v-domashnih-usloviyah
Homemade spoiler-wing
Many people, when buying a powerful and playful car, especially one with a sporty design, eventually develop a desire to install a wing - a spoiler - on the rear hood. After installing the spoiler, the car takes on an aggressive and swift look and an attractive design.
But, in addition to its attractive appearance, this device also has a practical meaning, which does not appear until a speed of 100 km/h, but after a hundred, the spoiler begins to work as intended.
Namely: at high speeds, especially on a wet road, and with a sharp supply of gas, the car seems to float up (comes off the asphalt) and begins to wiggle backwards, which at high speeds is, to put it mildly, unpleasant. This is especially evident with low-quality hard rubber (tires) and a slightly worn chassis.
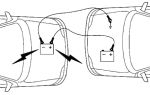
The main practical purpose of a spoiler is to press the rear of the car against the asphalt due to the air downforce that appears at high speeds. More precisely, the conversion of the oncoming air flow into downforce, which puts pressure on the spoiler and the rear of the car, due to the angle of inclination of the transverse spoiler panel.
And the larger this angle, the stronger the pressure, but also the greater the air resistance. The optimal angle of inclination of the spoiler panel is 5 - 10 degrees. By the way, on Formula 1 cars, at a speed of 250 - 300 km. h.
, the downforce on the spoiler is several tons and is capable of keeping the car glued to the road in motion if the road turned into a ceiling.
Nowadays there are a lot of factory-made spoilers on sale in large cities, but decent and high-quality products, for example, made of carbon fiber, cost a lot of money, and I think that cheap parts from dubious companies are generally not worth buying.
They either don’t work, or have an unattractive appearance, make noise at speed, and sometimes they are simply blown off by the wind. In addition, choosing the size to suit the dimensions of your hood is not so easy and sometimes, after paying money for a spoiler, you also have to modify it (widen or narrow).
In peripheral towns there is no choice of spoilers in stores at all, and if something does appear on sale, it is of very dubious quality.
templates for checking edges.
cross-section of the spoiler.
You can make a spoiler yourself, and, moreover, of a design that no one else has on their car or on sale. The main quality of a spoiler is its lightness and rigidity, and this quality can only be achieved by manufacturing a part with a certain hollow profile.
To achieve this goal, the lightest building material, foam, is used. But it does not perform a power function, but only as a basis for achieving a given spoiler shape.
To work, you will need a sheet of yellow (more dense) foam, the same length as the width of your hood, minus 30 mm from this length, and 25 - 30 mm thick, 150 - 200 mm wide, depending on the dimensions and length of your car.
Having bought a sheet of foam plastic and cut out the necessary strip with a sharp knife, we check its dimensions by attaching it to the hood. Let me remind you that the length of the strip should be 30 mm less than the width of your hood. The next operation will be to sharpen the leading and trailing edges of the strip so that in profile it looks like an airplane wing (or float, see below).
figure), and at the leading edge the sharpening angle is greater in degrees than at the rear. This is done first with a sharp knife and then with sandpaper, first coarse (60 - 80), and then fine (180 - 200).
After processing, we check the uniformity of the angle along the entire length with a cardboard template, both in front of the future spoiler and in the back.
After achieving a flat and smooth surface of the foam panel along the entire length, you need to make an important element for attaching the spoiler, or rather, two elements.
It is necessary to cut two 70x100 mm plates from a sheet of duralumin 5-6 mm thick, and then drill many holes in these plates, 4 mm in diameter and at intervals of 10 mm; the holes will help the plates to stick firmly to the spoiler.
Moreover, in the center of the plates (and along the length) we drill six holes with a diameter of 5 mm and cut M6 threads into them. The spoiler struts will be attached to these holes. It is advisable to clean the plates with a coarse metal brush, this will also help the plates to adhere well to the spoiler.
Now, you need to implant the mounting plates into the foam spoiler mock-up. To do this, turn the layout over with the bottom side up and, placing the plates on the marked places, outline them with a marker. You need to mark the places where the plates will be glued in according to your preferences.
It’s better to do this by hanging a model of the spoiler over the hood of the car and attaching a couple of plywood plates as stands, finding the places you like best and marking them with a marker. But the spoiler struts are usually attached at a distance of about 300 mm from the edges, but in general, as you like.
Having decided on the location of the struts, we glue duralumin plates into the spoiler model, but they need to be glued flush. And to do this, you need to cut out the rectangles marked with a marker (70x100) with a knife, to a depth of 5 - 6 mm, depending on the thickness of the duralumin fastening plates.
After gluing the fastening plates into the foam spoiler mock-up (using liquid nails for glue), the plates should not protrude above the surface of the mock-up.
The next step is to cut out and stick the anti-roll bars along the edges of the spoiler. I believe that it is advisable to make them in the shape of an airplane tail, but you can come up with something more original.
First, as usual, a cardboard template is cut out, fitted to the spoiler mock-up, something is added or cut off, and once the shape is established, we place the template on a sheet of foam plastic, 10 mm thick, and trace two identical parts with a marker.
Having cut out the parts from foam plastic, we process the edges with a knife and sandpaper to give the parts sharp edges (for effective cutting of air).
All that remains is to glue the foam stabilizers to the edges of the spoiler, at the same level (letter T), you can use liquid nails when gluing them with glue, or you can also use self-tapping screws lubricated with glue. The spoiler layout is ready.
The next operation will be quite boring, but it’s impossible without it, it will turn our foam spoiler mock-up into a real hard and light spoiler. You will need to cover the entire spoiler mock-up with fiberglass and epoxy glue. The glue consumption depends on the number of layers, and the number of layers depends on the thickness of the fiberglass.
The thinner it is, the more convenient it is to work with it on corners, but the number of layers will have to be increased. I don’t know what kind of fabric you will work with, but I would advise you to use thinner fiberglass for gluing the corner transitions in the area of the stabilizers. And where the spoiler plane is even in length, I advise you to glue thicker fabric, it will be faster and more convenient.
The number of layers of coarse fabric is approximately three to four, and of thin fabric - five, six.
I almost forgot to warn you: I advise you to insert (screw in) ordinary wax or paraffin thin candles (for cake) into the holes with M6 threads, before gluing the fiberglass - this will prevent the epoxy glue from flowing into the threaded holes and you will not have problems with it after the glue has dried. screwing in the M6 mounting bolts. You will only need to remove the wax, and this is much more pleasant than removing hard epoxy glue and looking for mounting threaded holes underneath it.
Before gluing the first layer, we first apply epoxy to the foam plastic and duralumin plates, glue the fabric, then apply glue to the fabric of the first layer and glue the second layer, and so on. We dilute the glue little by little and use it all within an hour; if you dilute it too much, you may not have time to use it and after an hour it begins to thicken.
In this case, acetone will help. We dilute the glue that is beginning to thicken and quickly use it. Layers of fiberglass must be glued onto an uncured layer, and if you take a break between layers and the glue dries, you will have to sand the previous layer for normal adhesion of the subsequent layer.
Therefore, I advise you to apply all the layers within a day, before the glue is completely dry.
As a result, after the layers dry, you should get a fiberglass layer 3 mm thick, and the result will be a plastic part, very light and rigid.
Of course, its rigidity is far from that of an expensive carbon fiber part, but you get a part of your own design, and I described the lightest design, but the basic principle of operation is clear. And besides, the design can always be more original and not the same as everyone else’s.
And your spoiler will have a very rigid attachment to the struts, unlike cheap spoilers from dubious companies that are blown off by the wind.
Now you need to sand and level everything, and if there are any pits on the surface, then re-putty. Next, we sand again, sand, prime and paint. By the way, having primed the surface, you can not paint the spoiler, but cover it with a sticky carbon-fibre film, which has recently appeared in companies that deal with car wrapping. All that remains is to make the racks.
I believe that the most suitable material for racks is sheet duralumin, 15 mm thick.
It’s not so easy to find it on sale, but if you succeed, then by ordering openwork racks made of duralumin sheet from a milling machine and then polishing the side surfaces to a mirror shine, you will achieve an elite appearance, no worse than expensive branded products for “Mustangs”, “Komaro”, and Porsche.
If you cannot find sheet duralumin, then as an alternative for the spoiler struts you can use 16 mm plywood covered with fiberglass.
It is necessary to cover the plywood with 1 layer of fiberglass, otherwise no matter what you paint it with, even the most expensive paint, it will still absorb moisture and the wooden structure of the veneer will appear through the paint over time (time-tested). But the main advantage of this spoiler is that it is attached to the racks not with self-tapping screws, but with M6 screws (preferably with a hex head).
This will allow you to use plywood struts as a temporary option, and when sheet duralumin or titanium comes on sale, then by unscrewing 12 bolts and removing the struts from the hood, you can always replace them with cooler ones.
I don’t describe the specific shape and height of the struts, it all depends on your preferences and personal taste, especially since there are a lot of options on the Internet (pictured), there are even spoiler struts welded from thin stainless tubes.
I can only advise you to attach the struts with the spoiler to the hood through rubber gaskets and when drilling mounting holes in the hood, use the proven principle - measure seven times and cut or drill once.
Good luck!
Source: http://suvorov-castom.ru/samodelnii-spoiler-antikrilo/