Replacing brake fluid yourself
As you know, modern cars have a hydraulic braking system. This helps make her more empathetic. However, the working chemical elixir ages as it is used. Therefore, a mandatory replacement of the brake fluid is necessary. To make it clearer why this is so necessary, we will simply list what exactly happens to an obsolete chemical.
- It fills with dirt particles from the friction of parts.
- Absorbs air pockets.
- The components absorb moisture through compensation holes, the composition is replenished with water, which noticeably deteriorates its quality.
- Additives lose their chemical properties.
All this leads to a sharp decrease in braking efficiency.
Content
- Our brand
- Not our brand
- Service price
Next, we will consider several important issues related to the hydraulic drives of the mentioned systems. Namely, let’s figure out what the frequency of brake fluid replacement is. We will also study the process of replacing it on a car.
As for the period after which it is necessary to update the working environment, its average value ranges from 40 to 60 thousand kilometers. In general, it depends on the make of the car. However, in many cases, manufacturers prescribe that the brake fluid should be replaced after two years - if this period occurs earlier than the specified mileage.
Now let's talk about how to replace brake fluid with your own hands. For example, let's take several different brands. First, let's look at VAZ cars, and then at foreign cars.
Our brand
General recommendations in all cases of work when changing the fluid on a car with your own hands:
- Do not allow the chemical to come into contact with your hands, inside the body, or on wires or paintwork;
- it is necessary to use exactly the chemical specified by the manufacturer of the car brand;
- Store leftovers in containers tightly closed.
So, as an example, let’s look at the operation of replacing the brake fluid on a VAZ 2110 car. We’ll describe what you need to have on hand below:
- set of wrenches;
- screwdriver;
- capacity;
- hose.
How much liquid we need is indicated by the car's passport. For VAZ 2110 this is 0.55 liters. Let's get started.
- Open the system reservoir.
- We lift the rear of the car, unlock the rear brake pressure regulator - insert a screwdriver between the piston and the plate.
- We release the air release valve of the right rear brake from the rubber cap, insert a hose, the end of which is connected to a container.
- The partner must sharply press the pedal 5 times, and leave it pressed the last time.
- At the same time, we unscrew the valve with a wrench - just make three quarters of a turn, the spent medium should begin to flow out. After the leak stops, tighten the valve, and your partner should not release the pedal until the fitting is tightened.
- It is necessary to add new medium as soon as the tank is empty to the bottom mark. When clear liquid flows out, the operation stops.
- We repeat everything completely on the left front brake mechanism.
- Then we repeat the manipulations again for the second circuit - first we move to the left rear mechanism, and at the end - to the right front.
- We install the caps back, remove the screwdriver from the pressure regulator, and check the efficiency of the system.
This is how the brake fluid is replaced on a VAZ 2110. Dividing the system into two independent circuits for greater safety should not be a surprise - just remember the driving school lessons.
Replacement for the VAZ 2114 is carried out in exactly the same way. If we talk about the Lada Kalina, then there are no differences either. Changing Kalina's fluid is done according to the same instructions. The only thing worth paying attention to is how much brake fluid Kalina needs for a complete replacement. The volume here is 0.45 liters.
On the Lada Priora we act identically. Replacing Priora also does not cause any particular difficulties. The volume of the new medium is also 0.45 liters. For all these cars, it is recommended to use DOT 3. The replacement frequency for front-wheel drive VAZs is from 2 to 3 years or from 50 to 60 thousand km. mileage
Not our brand
Now let's move on to foreign cars. To replace the brake fluid in a Ford Focus 2, we will prepare the following:
- set of wrenches;
- rubber hose;
- capacity.
Also find out why oil appears in the air filter of the VAZ 2109 and the oil pressure lamp on the VAZ 2114 is on.
We proceed as follows.
- Unscrew the cap of the system reservoir.
- Remove the cap from the valve of the working cylinder of the right rear wheel. We put on the hose. The end of the hose is connected to the container.
- The assistant presses the pedal 5 times, holding it pressed for the 5th time. At the same time, unscrew the valve - three quarters of a turn is enough. The spent medium begins to flow from the hose. After the leak stops, immediately close the valve.
- We top up the tank as soon as the old chemical reaches the bottom mark.
- We continue the operation until a clean new medium flows from the valve.
- We repeat the manipulations for the left front wheel, as well as for the second circuit, similar to how it was described earlier.
Next, let's see how the replacement is made in the Skoda Octavia A5. Here, however, as in the previous case, the manufacturer recommends the following period - 2 years or 30 thousand kilometers. To carry out the procedure, exactly the same things are used - keys, a hose and a container.
The instructions for this car will completely repeat the previous instructions. Therefore, we will not focus on it here.
Let's move straight to another popular foreign car. For owners of Renault Logan, the manufacturer allows them to avoid updating the brake operating environment for a long time. The period here is as much as 90 thousand kilometers or 6 years. Renault Logan brake fluid is changed according to the same scenario, with the same tools. We will just add a few additions to it.
After point 1 of the instructions for Ford, many masters recommend inserting another point, let’s call it this:
- We pump out the old chemical from the tank with a syringe until the level drops to the bottom mark, then we replenish the tank with new medium.
- Next, remove the cap from the cylinder valve of the right rear wheel.
We repeat the rest according to the instructions for Ford.
If we recall another popular car - Chevrolet, we are unlikely to find any differences in its braking system from the described cars. Replacement for the Chevrolet Lacetti is also carried out according to the previously described path. Let's repeat it briefly.
But here for work we take in addition to wrenches:
Let's get started.
- We open the hydraulic drive reservoir, use a bulb to pump out the old preparation to the bottom mark, then fill the reservoir to the top with the new medium.
- Remove the bleeder fitting from the rear right mechanism from the cap and insert the hose with a container.
- With the help of a partner, we pump the system with the pedal, unscrew the fitting, according to the previous instructions, and drain the liquid.
- In this car - this is how all cars are designed - the contours are located exactly as in the previously described cases. We repeat the operations at all four points.
Don't forget to put the caps back in place.
We noticed that the contours are always located in the same way, so another car under the Chevrolet brand, the well-known Chevrolet Niva, has work done in the same way. However, there is one caveat. You need to refer to the very first instructions we described for the VAZ 2110. You need to be guided by it. The only change is indicated below.
It's in the second paragraph.
- We unlock the brake pressure regulator. To do this, insert a screwdriver between the bracket and the screw.
- Next, we repeat everything as for the VAZ 2110.
We looked at several different car models. There is only one conclusion - everywhere this repair is done according to the same principle. As for systems equipped with ABS, more on that below.
Service price
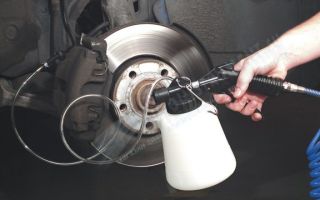
Note that there is a special device for completely replacing the brake fluid. It is used by car service technicians. It is also extremely necessary when there is an ABS system! It is not profitable to buy it for independent work, although if you ask someone... The operating principle is as follows.
The device has a set of adapters. The adapter is put on the neck of the tank. Next, a faucet with a hose belonging to the installation for a complete replacement of the brake fluid is inserted.
Now you don't need a partner. We follow the same path - we start from the right rear wheel. When unscrewing the fitting, we start the device by opening the tap, and it itself pumps a new working medium instead of the old one. In this case, the ABS pump must be turned on, that is, the ignition is on. But this is not suitable for all models. Many cars with ABS also require a special stand.
Return to top
Let's see how much servicemen charge for all this. The table below shows average data for different Russian cities.
| City | Price |
| Moscow | 800 rub. |
| St. Petersburg | 800 rub. |
| Ekaterinburg | 500 rub. |
| Samara | 400 rub. |
| Novosibirsk | 400 rub. |
Now find out how to check the oil level in the engine and about replacing the silent blocks of the front control arms.
Source: http://DaciaClubmd.ru/repair/hodovaya/zamena-tormoznoj-zhidkosti-svoimi-rukami
How to change brake fluid
Is it necessary to change the brake fluid, how often and when should it be changed, how to replace the brake fluid and how much brake fluid is needed for replacement - we will examine these questions in this article.
Brakes are a very important element of motorist safety, and if they have problems, people risk their lives.
The effectiveness of the braking system depends proportionally on the quality of the brake fluid.
Usually, if the fluid in a hydraulic drive does not leak, car enthusiasts rarely think about it or pay attention to it. And this can cause accidents and breakdowns, which, of course, we don’t need.
Do I need to change the brake fluid?
Necessarily. Her working conditions cannot be called simple. When driving around the city, it can heat up to 150 degrees Celsius, and in rare cases up to 180!
Of course, competent engineers foresaw this, but in addition to overheating, the liquid simply changes its properties over time.
By pressing the pedal, you open access to air, which in turn enters the compensation holes of the system.
The brake fluid then absorbs moisture. Due to an increase in the percentage of water, the boiling point of the liquid decreases, and the viscosity also increases.
An increase in the permissible percentage of moisture and, as a result, a decrease in the boiling point can immediately become noticeable in the behavior of your car.
Specifically, this manifests itself in the form of a single brake failure, after which everything falls into place. When the liquid is heated excessively, a vapor lock is formed.
If you notice this with your car, it makes sense to replace it urgently in order to avoid emergency situations.
To the question: “Do I need to change the brake fluid?” - specialist Alexander Nikolaev answers that untimely replacement leads to failure of the caliper pistons and brake cylinders.
Increasing the load negatively affects heat transfer, which can lead to boiling of the liquid.
How often to change brake fluid
Different sources provide different information. Manufacturers usually recommend changing it every 30-40 thousand kilometers, or once every two years. It all depends specifically on your car and driving style.
For example, manufacturers of sports cars advise changing the fluid more often than in conventional road cars, which is about 10 thousand kilometers.
Therefore, you can always choose for yourself, based on expert opinions, how often to change the brake fluid of your car.
It is worth noting that the presence of electronic systems such as ABS does not affect the replacement cycle.
Bosch experts advise updating it at 3% moisture content and immediately after purchasing a new car.
It is also better to change the fluid as early as possible if impurities become noticeable, as well as loss of transparency.
You are unlikely to be able to accurately determine the state of the liquid. Color can be a good indicator for you.
If it is the same color as it was just when it was flooded, then most likely everything is fine with it and there is no reason to worry.
It’s worse if it becomes cloudy or a noticeable sediment appears. Using a car with such liquid can lead to swelling of the cuffs or breakage of the piston mirrors of the cylinders.
There is also a more reliable method for checking the condition of the liquid - special testers.
You can find such testers in auto parts stores; while they are relatively cheap, the error is no more than 2-3%.
They are connected to the battery and installed on the hydraulic system tank.
There are two ways:
- Contact the service station and update it using special equipment.
- Will cope with the task independently.
At service stations, fluid is replaced under pressure of two atmospheres, which helps avoid the possibility of air getting into the brake system.
If everything is clear with the first point, then the second one is worth considering in more detail. Of course, replacing it yourself will take you a couple of hours, versus 15 minutes at a service station, but it will save you a good amount.
The easiest way to replace brake fluid is on cars without a pre-installed ABS system.
If you are the lucky owner of such a system, you still have the opportunity to replace the fluid yourself using a proprietary scanner.
You will also need to make sure whether the accumulator, pump and valve are combined in one unit.
If you've never changed the fluid before, it's best to ask for help, or at least ask someone knowledgeable about how to change brake fluid.
Fluid replacement should be done separately in each circuit of the brake system.
You need to get to work from the right rear wheel, and from the side where the brake master cylinder is located.
Next, remember the circuit diagram of the brake system of your car. If it is parallel, then after replacing the fluid of the rear right wheel, the rear left one goes, followed by the right and left front ones.
If the car uses a diagonal pattern, the order will be: rear right, left front, then left rear and right front.
It will be more convenient to change the fluid by first removing the wheels. Also, the car must be in gear.
The angle at which the bleeder fitting on the cylinders will be located affects the ease of performing the work.
If your car is equipped with a pressure regulator and the wheels are hanging, then you need to unlock the regulator in advance.
How much brake fluid do you need to change?
Typically, the brake system contains a small amount of this fluid.
You can find out the exact value in your owner's manual, where the manufacturer has indicated how much brake fluid you need to replace in your car.
Most likely it will be from 0.7 to 1.5 liters. To replace, you will need brake hoses with a diameter of 4 and 6 mm, respectively.
It is advisable to have a small container of the same volume, for example, a regular plastic bottle and 9 and 11 mm socket wrenches.
Changing your brake fluid is just as important as changing your engine oil. It may make sense to change them at the same time, since the service life is approximately the same.
But the engine is a slightly different story; it will definitely have to be flushed for a quality oil change.
Source: http://avtohomenew.ru/kak-zamenit-tormoznuyu-zhidkost.html
When to change the brake fluid in a car
All motorists sooner or later begin to ask questions about the maintenance of their car. When to change brake fluid, gearbox oil, antifreeze - these and other issues are on the agenda if you have decided to service your car.
But before you start, we recommend that you familiarize yourself with how to do it correctly.
Today we will talk about replacing the brake fluid. Since this is one of the first things you need to start car maintenance.
Brake fluid is a necessary element that transmits your actions to the main control units of the car.
What is brake fluid used for?
To understand why brake fluid is needed, you need to understand where it is used in the car.
Brake fluid is used in the main components of the car, namely the clutch system (if a manual transmission) and the brake system.
The operation of one or another system is based on two cylinders - the main and the working. They are connected to each other by special copper tubes through which the brake fluid passes.
When squeezing the master cylinder, the fluid flows forward through the pipes, thereby squeezing the working cylinder.
Why change brake fluid?
Car brake fluid has a variety of chemical properties that are unique to it.
Main properties of brake fluid:
- High temperature resistance
- Hygroscopicity (ability to absorb water)
Since the car’s braking system operates under extremely difficult conditions (especially during city use), the brake fluid can heat up to very high temperatures (up to 180 and above).
Nowadays, special formulas of brake fluid have already been invented that can withstand up to 300 degrees; however, in one way or another, condensate accumulates in any brake system and gets into the brake fluid, thereby lowering its boiling point.
When the brake fluid begins to boil, air will begin to form in the form of bubbles. The necessary pressure ceases to be generated and the system will not work properly. Braking or pressing the clutch will not be effective.
How to determine when you need to change the brake fluid
You can determine that the fluid has already drained by visual inspection. To do this, you need to unscrew the tank cap and look inside.
If the fluid is black or brown, with a black sediment present in it, then it needs to be changed.
But a visual inspection will not always give an accurate idea of the condition of the brake fluid. For a more accurate assessment, there are special testers.
This tester is equipped with a special sensor that is immersed in the liquid fluid. The results that the tester shows:
- 175 C° and above. Can be used.
- Between 175 C° and 165 C°. Can be used if the vehicle was replaced no more than one year ago.
- If it is less than 160 C° degrees, then such a liquid cannot be used and must be replaced.
How often to change brake fluid
According to the regulations, it is recommended to change the brake fluid every two years. Some car manufacturers generally advise changing the vehicle every hundred thousand kilometers, but this is wrong.
Modern brake fluids are divided into three main types:
- Synthetic base - silicone (DOT - 5). Used in expensive modern cars. It is not hygroscopic and is fully compatible with all rubber parts of the system. Withstands heavy loads. Service life 5 years.
- Synthetics based on polyglycols and ether (DOT-3, DOT-4). Absorbs moisture very well. If the moisture content is high, it can cause corrosion of the system. Manufacturers recommend changing every 40,000 km if the average temperature during operation does not exceed 150 degrees.
As we see, each type of brake fluid has its own service life.
| Brake fluid classes | Requirements according to standard fmvss 116 “brake fluids for motor vehicles” | ||||
| Boiling temperature | Kinematic viscosity | color | |||
| "dry" brake fluid | “wetted” brake fluid (water 3.5%) | humidified at a temperature of 100 C° | at a temperature of -40 C° | ||
| DOT 3 | not less than 205 C° | not less than 140 C° | no more than 1.5 | not less than 1500 | Light yellow to light brown |
| DOT 4 | not less than 230 C° | not less than 155 C° | no more than 1.5 | not less than 1800 | |
| DOT 5.1 | not less than 260 C° | not less than 180 C° | no more than 1.5 | not less than 900 | |
| DOT 5 | not less than 260 C° | not less than 180 C° | no more than 1.5 | not less than 900 | Dark red |
Classification of brake fluids
Mineral based brake fluid
We should also talk about the liquid, which is based on castor oil. This liquid is popularly called mineral water.
Nowadays this type of brake clutch is not popular on modern cars. It was used to a greater extent on older foreign cars and some small trucks.
This type of brake fluid is very resistant to moisture. A huge advantage is its gentle attitude towards rubber elements, of which there are a huge number in the brake system (cuff seals, etc.).
The main disadvantage of this type of fuel oil is its low boiling point compared to synthetics, and high viscosity at sub-zero temperatures.
How much brake fluid do you need to change?
On average, the fluid in the brake system is about a liter. The clutch system has a little less. But these are fairly approximate values.
Typically, the amount of brake fluid for replacing and bleeding the system on a passenger car is one and a half liters.
Is it possible to mix brake fluid?
There are often situations when your diesel fuel is still ok, but you need to add a little to the tank. Changing all the brake fluid is not that expensive, but rather troublesome, since you need to re-bleed the brakes on the cars or the clutch if you change the fluid in the clutch.
It is highly not recommended to do this, but if the situation is hopeless, then it is best to mix it with an identical base component.
For example, DOT – 5 CANNOT be mixed with DOT – 4 or DOT – 3. Since the first is a silicone-based liquid, and the second and third are glycol-based. But DOT - 4 and DOT - 3 can be mixed since they are TF identical to the base component.
It is best to add brake fluid from one manufacturer, then you certainly can’t go wrong.
Difference between the brake system and the clutch system
Although these are completely two different systems, their operating principle is almost the same. Both systems have a master and slave cylinder.
As for the brake fluid for these systems, it is used the same and is no different. When you need to change the brake fluid in the clutch, it is reasonable to replace it in the brakes.
Bottom line
Timely replacement of brake fluid is a very important procedure. Many people don't understand this. Because if you don’t do this, you can simply be left without brakes or without a clutch.
As mentioned, over time, synthetic brake fluid can absorb water. Water can cause corrosion within these systems. Water can freeze in severe frost. Water destroys working and master cylinders, which are not cheap even for a domestic car.
From this we can conclude that it is necessary to change the brake fluid on time and it is better not to skimp on it.
Source: https://djago.ru/tormoznaya-sistem/kogda-menyat-tormoznuyu-zhidkost/
How much brake fluid is needed to replace and how to check its condition?
- Original German autobuffers Power GuardAutobuffers - save money on suspension repairs, increase ground clearance +3 cm, quick and easy installation...Official website >>>
Brake fluid largely determines the effectiveness of your brakes. Its level and quality should be constantly monitored, otherwise even a fully functional mechanism will not work. It needs to be changed after a certain time or when unforeseen situations arise.
1 Brake fluid - types and properties
How much brake fluid (BF) is needed for replacement can be found out from the technical specifications of the car model. This information is not that important. It is more important to know what kind of fluid is poured into the brake system, what its properties are, and when and how to replace it.
Each car needs its own composition, which is suitable specifically for this brand. If you fill in a fuel oil that is not suitable for this model, the brakes may fail in an emergency. TJ must maintain its characteristics for a long time, not freeze, not boil.
Over time, its properties are lost, so it is important to replace it in time before its condition becomes critical.
- They will protect the chassis and save you money, increasing ground clearance by 3 cm.Read more >>
The chemical composition is of great importance. Using fluid with components that are not suitable for this model is fraught with trouble.
The substance has a certain effect on the braking system, and if the components do not fit the car, deformation of the parts may occur and their performance may decrease. Previously, the composition of TJ included, in principle, neutral substances: alcohol and castor oil in equal proportions.
These are mineral fuel fluids that did a good job, but boiled early and oxidized the metals. In addition, they cannot be used for disc brakes.
A way to find out why the CHECK light is on!
Using a universal auto scanner, you can do the diagnostics yourself in 2 minutes and find out why CHECK is on. Suitable for all cars..." Read more >>
Now the base is a glycol substance or silicone. Such fuel fluids have a high boiling point, which allows them to be used in modern cars with disc brakes. A significant disadvantage is high hygroscopicity.
The composition takes water from the air, which leads to a decrease in performance characteristics. It is for this reason that the TJ has to be changed quite often. The exception among the entire family is DOT 5, which does not react to extreme temperatures, is inert towards parts, and is not hygroscopic.
Therefore, its area of application is sports and racing cars.
https://www.youtube.com/watch?v=nRIqw6EZ4Dc
Only glycol fluids of different classes can be mixed: DOT 3, DOT 4 and DOT 5.1. Silicone DOT 5 is not compatible with any other compound. Mixing mineral and glycol fluids will damage the rubber seals.
2 When to carry out planned and extraordinary replacement?
The brake system must operate at a fluid temperature of 200°–265°, which is possible if the fuel fluid has retained its properties. What happens to it if it is replaced (rather than topped up) at the wrong time? The liquid absorbs moisture, which leads to undesirable consequences:
- in winter it thickens greatly;
- in summer it does not lubricate brake units well;
- provokes corrosion of metal parts;
- the boiling point decreases, which is unacceptable.
A liquid with an amount of water of 3–5% is capable of boiling at a temperature that is 100° lower than the calculated one. Some of the fluid returns to the reservoir, and the required braking is not provided.
For each model, the manufacturer sets a period for complete replacement of the brake fluid. On average it is 2–3 years or 60 thousand km. But there are situations when replacement needs to be carried out unscheduled:
- when repairing brakes;
- if the liquid is visually dirty;
- when braking efficiency is significantly reduced, but the mechanisms are in good working order;
- after a long period of vehicle inactivity.
IT IS IMPORTANT TO KNOW!
Every motorist should have such a universal device for diagnosing his car. Nowadays you can’t live without a car scanner!
You can read, reset, analyze all sensors and configure the car’s on-board computer yourself using a special scanner...
Read more.. "
3 Checking the condition of the fuel fluid - visually and with instruments
First, let's check the brake fluid level and its quality. Visually checking the quantity is very simple. Under the hood there is a translucent fluid reservoir: it has minimum and maximum level marks.
One glance is enough to understand how many fuel fluids are in the system. If the tank is metal, which is quite rare on modern cars, you should remove the cap and look at the level. If topping up is needed, it’s a good idea to make sure there are no leaks anywhere.
The level may drop due to wear on the brake pads.
Also, from the sensor located in the tank lid, a signal is sent to the instrument panel about the fuel level.
A simple mechanical float sensor continuously records the liquid level in the tank. When it falls below the permissible level, the warning light comes on.
When driving, you should stop and add fluid to the required level. If this is the only reason, you can continue moving.
Braking efficiency is affected not only by the quantity, but also by the quality of the brake fluid. Absorbed moisture reduces its performance. To some extent, visual assessment is also possible here.
If dirt in the tank is clearly visible, this ambiguously indicates that the fuel fluid needs to be changed. A change in color also suggests that something is wrong with the liquid. It is impossible to accurately determine its condition visually.
This can be done at the station, or you can use an electronic tester.
The device is relatively inexpensive and easy to use. They check the boiling point of the fuel fluid. The electronic display of the device displays the following messages: 175° is the normal temperature, the fuel tank is suitable for use.
At 165–175°, TJ can be used if its age is no more than 2 years, but it is advisable to replace it as soon as possible. If the boiling point is less than 165°, urgent replacement is needed.
Such a check, together with an inspection of the entire system, will allow you to correctly assess its condition.
4 How to change the fluid - is the order of the wheels important?
At the service station, the replacement is carried out with a special installation, but at home you can do without it. You will need 1–1.5 liters of brake fluid for foreign cars and 0.5–1 liters for domestic cars (the amount is individual for each model), a transparent plastic bottle or glass and a transparent hose. It is advisable to have an assistant. The process is simple, carried out in the following sequence:
- Use a syringe to pump out the old liquid from the tank and fill it with new liquid to the maximum level;
- jack up the car and remove the wheel;
- We put a hose on the fitting, lower the other end into a bottle with drained liquid;
- the assistant pumps the brake pedal several times and locks it in the pressed position;
- Unscrew the fitting a little - liquid will run through the hose, possibly with air bubbles;
- we tighten the fitting, the assistant releases the pedal and pumps it again;
- repeat the procedure until clean fuel fluid without air runs through the hose;
- tighten the fitting, put on the protective cap and move on to the next wheel.
It is important to follow the order of the wheels when replacing the vehicle. It depends on what type of brake circuit is used in the car. If diagonal, the first wheel will be the right rear, then the left front, then the left rear and again diagonally. If the contours are parallel, the first is again the right rear, then the other rear, in front - first the right, then the left.
Source
Source: http://carsliga.ru/skolko-tormoznoj-zhidkosti-nuzhno-dlya-zameny-i-kak-proverit-ee-sostoyanie/
Amount of brake fluid to replace – Automotoguru
A working brake system is the key to safe driving, which is why it is so important to monitor the brakes and change the brake fluid on time. Those drivers who do not neglect their own and other people's lives are often interested in how often to change the brake fluid in order to comply with one of the most important intervals for replacing consumables.
Looking ahead and without forcing you to read the entire article, I will answer right away - you need to change the brake fluid at least once after two years of operation, and if it is a sports car , then two or three times more often .
Why change brake fluid?
Manufacturers do not come up with figures for the frequency of brake fluid replacement, but regulate them based on the composition of the fluid and its properties.
For reference: the boiling point of brake fluid is about 200 - 260 ° C , but hygroscopicity (moisture absorption) lowers this threshold, while the fluid can heat up to 150 - 180 ° C when driving around the city. And when this boiling point is reached, air bubbles form, which leads to the release of brake fluid into the reserve tank, and as a result, the low level will not allow creating the required pressure during heavy braking, and failure of the brake pedal is inevitable!
When the moisture content in the brake fluid exceeds more than 3%, the boiling point drops from 30 to 50°C.
An equally significant reason for replacing the fluid is the chemical properties of various additives, which today begin to decompose, contributing to the loss of their properties.
When to change brake fluid?
Often the replacement schedule proposed by the manufacturer is about 30 – 60 thousand km. mileage, which is about once every two years , and the presence of such an additional system as ABS does not in any way affect the frequency.
And if the question concerns sports cars such as Lamborghini or Ferrari, then the brake fluid must be replaced after 15 thousand km. because Speed limits on such cars are much higher.
But such data is only indicative, because if the color of the fluid has changed (turbidity or sediment has appeared), then sometimes you have to change the brake fluid earlier than agreed.
Operating a vehicle with cloudy fluid or sediment in it can lead to malfunctions in the brake system.
Therefore, in addition to mileage indicators, a good indicator of the need to change the brake fluid is its color. Although visual inspection is not the only way to monitor the condition. For example, at a service station, special testers are used to check the fluid, determining the percentage of moisture and displaying data on the need for replacement on the display.
Automotive DOT color coding.
Tester for checking the amount of moisture in fuel fluid.
Sediment and cloudiness of brake fluid.
glycol-based brake fluid in an ideal ratio every 40,000 km. And if you have a silicone fluid filled in, then there may be completely different data on the frequency of replacement, which can reach up to 5 years.
An additional reason for an unscheduled change of brake fluid can be depressurization of the brake system, since in addition to the fact that some of the fluid may leak out, the remaining fluid is quickly saturated with oxygen and the boiling threshold of the fuel fluid decreases.
When changing brake fluid, you should remember and take into account the characteristics of different brands of fluids , and if they are of different classes , then under no circumstances interfere !
The driver must always remember the responsibility of the question of how often to change the brake fluid, because the brakes have no right to failure.
Source: https://avtomotoguru.ru/kolichestvo-tormoznoy-zhidkosti-dlya-zameny/
When and how to change brake fluid | Motorist's benefit
Every service book for any car says: change the brake fluid every two years. However, some motorists not only don’t know how and where to change it, they haven’t even seen this very service book... Today I want to talk about brake fluid, replacing it and everything related to this topic.
Often, instead of a full replacement of brake fluid, motorists make do with “topping up”, ignoring the instructions of the car manufacturer, which clearly stipulate the timing of its complete replacement.
Most cars have a brake fluid of 36-60 thousand km, which is about 2-3 years of operation.
For example, for supercars this range is much smaller - the brake fluid of a sports car such as a Maserati must be replaced every 10 thousand kilometers, while its competitor Ferrari has even less - after 5 thousand km. mileage Why is that? Will explain.
The fact is that brake fluid works under rather difficult conditions, and even during normal “city” driving, its temperature can reach +150°C.
In the case of particularly heavy loads (mountain roads, driving with a trailer or aggressive driving style), the temperature of the brake fluid can reach +180°C.
Moreover, when the car suddenly stops, it can even jump to +200°C.
Of course, brake fluid is designed to withstand such loads. According to the temperature characteristics declared by the manufacturer, the boiling point of the liquid begins at +205...+265°C, depending on the specific brand of the liquid itself.
However, one way or another, during operation, the brake fluid absorbs moisture, after which the liquid comes out somewhat diluted, and accordingly its boiling point decreases significantly.
Let me give you an example: if over the course of a year the brake fluid is diluted with 2-3% water, then with a simple calculation we can conclude that its boiling point will decrease by about 30-50°C, in other words, the brake fluid will already boil at 145-160° WITH.
This is a serious violation that is absolutely unacceptable. Because of this, the so-called “vapor locking” of the brakes can occur.
The sharp expansion of the bubbles formed from boiling leads to the fact that some of the liquid begins to be squeezed out into the reserve tank.
After sharply pressing the brake pedal, the liquid remaining “down” is not able to recreate the pressure necessary for braking, since it consists of air bubbles, therefore, the pedal itself “fails”.
All of the above is evidence that brake fluid is quite a serious thing and requires special attention and proper treatment. It consists in constantly monitoring the condition of the brake fluid , as well as keeping a conditional record of when it was replaced.
There are also all sorts of special testers that automobile companies produce, one of which is the Felutest 1405 tester. The tester itself is something vaguely reminiscent of a probe, which is immersed in the brake fluid “for inquiry.”
When heated, the probe determines the boiling point of the liquid with great accuracy (3%). After which the tester’s “conclusion” is displayed on the display of the device: “replacement is necessary,” “it wouldn’t hurt to replace it,” or “everything is normal.”
The process of such diagnostics takes no more than one minute.
That's all for me! I hope the article will be useful to you. Monitor the condition of the brake fluid and replace it in a timely manner, avoid “thinning and topping up”.
.
Related publications:
Source: https://sanekua.ru/kogda-i-kak-neobxodimo-menyat-tormoznuyu-zhidkost/
Replacing brake fluid under pressure
Manufacturing a device for self-replacement of brake fluid in a pressurized system...
Hello, dear reader of the autoblog AAuhadullin.ru!
Today's video will be devoted to replacing brake fluid with your own hands and making a special device for bleeding the system without pressing the brake pedal.
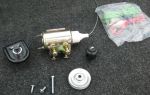
First of all, we need two spare parts...
This is the cover of the main brake cylinder of Gazelle and Volga cars, as well as the nipple of a tubeless wheel.
You will need to drill a hole in the lid itself to fit the diameter of the nipple so that it fits snugly against the edges of the drilled hole. When the modified cap is ready, we will screw it onto the expansion tank of the Renault Logan master brake cylinder.
Through the existing nipple, we will carefully pump pressure into the cylinder reservoir. This is done in order to expel the old “waste” brake fluid under pressure.
Before you start drilling the lid with a drill of a suitable diameter, you need to remove the cast edges on the lid using a knife or file. In my opinion, they prevent the nipple of a tubeless wheel from sitting tightly.
So, we removed the edges and then polished the top of the lid on a sharpening stone (in a circular motion) to completely erase the marks of the edges.
In general, this device is made in order to pump the brake fluid alone. And also in cases where it is not possible to expel the air lock from the system for a long time.
Next, take an X10 mm drill and drill a hole in the prepared lid. The material of the cover is quite pliable and it can be easily drilled simply by hand. Excess plastic cover from drilling is also removed using a knife.
We insert the nipple of the tubeless wheel into the hole in the cover. However, the drill bit on the X10 is slightly smaller in diameter, so we will refine the hole using an electric drill using a conical stone attachment.
After modification, the nipple “sat” tightly in the lid, which is what we needed to achieve...
After a little work, the device is ready and we will try to place it on the Renault Logan master cylinder reservoir.
In order to prevent air from bleeding out, we will try to install a rubber seal under the cover from the oil filler cap of the VAZ 2101-2109.
Oil filler cap gaskets 2101-1009140-R
The rubber gasket for the oil filler neck must be adjusted to fit the cover of the device; to do this, you need to cut off the excess rubber on the seal. In order for the gasket to fit inside the filler cap, you need to remove the edges a little. It is convenient to cut the edges of the gasket in a circle using small scissors.
Next, we remove the standard reservoir cap and try to install the device we made for bleeding the brake system.
To ensure that the air does not bleed out when applying pressure, I also decided to wrap the base of the threaded part of the tank with fum tape. I don’t recommend winding a lot of tape, since then it’s impossible to screw the lid onto the thread. How much fum tape you need to wind exactly will be determined by location.
Now the lid is seated tightly and you can try to apply pressure in my case using an electric pump. In my opinion, it is safer to use a hand pump, so that the barrel does not burst under pressure.
Next, screw the tip of the pump hose onto the nipple...
There is no need to apply a lot of pressure so as not to rupture the expansion tank. We create a pressure of about 1 kg, controlling the air supply using the pump pressure gauge.
On the first try, it immediately became audible that some of the air was being vented through the gaps between the lid and the threads. Therefore, it is necessary to add another gasket to strengthen the seal.
I came to the conclusion that the fum tape does not allow the lid to wrap tightly until it completely touches the seal that we inserted into the lid.
The best option is to find a “original” cap that will exactly fit the tank thread without any adjustment operations.
We try to apply pressure to the tank again, the lid is screwed on tightly, now we need to check whether it will hold the forced air. The result is again negative.
Let's try adding another homemade gasket from the filler neck under the cap on top. As a result, with two gaskets, the lid began to hold pressure well!
Even if some of the air bleeds out, it does so very slowly and during this time you can slowly bleed the brake system.
Procedure for bleeding the brake system under pressure
While the pressure created in the tank is maintained, you need to unscrew the bleeder fitting in order to expel some of the old brake fluid. We repeat this procedure until light, fresh brake fluid runs through the transparent hose.
Bleeding the brake system should begin with the right rear wheel, as it is the farthest from the brake fluid reservoir. Next, according to the fluid renewal scheme, there are front left, rear left and front right.
Before replacing the brake fluid, it is necessary to pump out the old fluid from the master cylinder reservoir. We use a medical syringe for this purpose (50 mg is more convenient). Once you pump out the brake fluid, you need to wipe the inside of the reservoir with a piece of a clean rag.
After pumping out the dirty fluid and cleaning the reservoir, clean DOT-4 brake fluid is poured into it and you can begin to pump the system.
In addition to the syringe, you will also need a medical system for droppers; it will be useful when dumping old fluid.
You need to attach a piece of tubing to the tip of the syringe to make it convenient to pump out the fluid to be replaced.
We begin pumping out, pouring the waste into a specially prepared container.
Brake fluid is hygroscopic, that is, it has the ability to absorb moisture, which accumulates in the system during operation. This can cause vapor locks, corrosion pits and reduced brake efficiency.
Therefore, the manufacturer recommends replacing the brake fluid every 2-3 years or 90 thousand kilometers, whichever comes first...
The LoganMachine has covered 80 thousand kilometers over 5 years of operation and in the container for testing it is clearly noticeable that the liquid is cloudy. We will fill with DOT4 liquid. When refilling, be careful not to get the liquid on your hands. Brake fluid is quite toxic and you should immediately wash your hands with soap and water if you come into contact with the fluid.
For the convenience of adding liquid, you need to use a funnel and, if you don’t have one at hand, you can easily make one from an unnecessary plastic bottle.
Bleeding the system on the rear right wheel
Before starting work, we install wheel chocks under the opposite wheels of the car, or block them with any available means (brick, stone, etc.). So if you need to remove the right wheel, then block the left one.
Next, we release the mounting bolts on the rear right wheel, but do not unscrew them completely. Raise the body with a jack (you can use 2 jacks), install an additional support, completely unscrew the wheel bolts and remove the wheel.
We clean the pumping area from dust with a brush, then treat it with any cleaner. Place a spanner set to “8” on top of the bleeder fitting and place the end of the bleeder hose on top. We install the second end of the transparent hose into a specially prepared container for draining the waste.
The container must be placed securely so that it does not tip over during pumping. If you are using a plastic bottle, you can make a hole in its cap to prevent the tube from popping out during operation.
Then we close the reservoir of the master brake cylinder with a manufactured cap, connect the pump tip and you can apply pressure to the system.
In our case, we raised the pressure in the brake system to 2 kg and the lid holds air well.
Then we return to the wheel bleeder fitting and release it so that the pressure begins to expel the old brake fluid.
Video instruction:
The video clearly shows that immediately after lowering the fitting, waste liquid began to flow out, which means that the device works as we intended.
We tighten the fitting and go to the expansion tank. As we can see, the pressure is still holding well. There is still liquid in the tank and you can continue to drain the liquid, making sure that the tank does not “grab” air into the system.
We loosen the fitting again and release part of the brake waste. The fitting works like a faucet; when you open it, the liquid flows; when you close it, it doesn’t flow.
We close the fitting and go to check the level in the expansion tank. We see that there is half a tank of fluid and we can still release some of the old fluid. We open the “faucet” fitting and continue to drain the old liquid further.
We close the “faucet” and look at the pressure, 0.5 kg is still holding, this is enough to continue releasing liquid, which is what we do.
As you can see, having made such a device for bleeding the brake system, you can replace the fluid in the brake system alone.
Through the transparent tube you can see that clean liquid has already flowed and you can “round up” on this wheel. You need to close the fitting and refill the expansion tank and continue replacing on other wheel units.
After you have screwed the fitting securely, you must remember to put the protective rubber cap back in place. The fitting is closed with a cap to prevent water and dirt from the road surface from getting into it.
Do-it-yourself bleeding on the front left wheel
Next, according to the scheme described above, we remove the front left wheel to perform similar actions to replace the fluid. We install wheel chocks and an additional support under the body for safety.
And we also clean the fitting with a brush from dirt, apply a cleaning composition. We put a bleeder key on the edge of the fitting, and a tube for draining the liquid onto the fitting itself and install its second end into the drain container.
Add new fluid to the expansion tank, connect the compressor hose and apply pressure. You can risk up to 2 kg, the plastic of the tank can withstand such pressure.
We start draining and wait for clear liquid to flow out. This circuit is short and clean liquid has already flowed out quite quickly, so close the tap, remove the tube and put on the protective cap.
If the cap is lost or it has become hard and inelastic and can simply jump off the bleeder fitting, then it can be replaced from a VAZ car.
Replacing brake fluid on the rear left wheel
We move on to the rear left wheel, where we carry out the replacement steps in the same order as on the previous wheels. And we also clean it from dirt, apply liquid cleaning agent, put on the key, install the drain tube, placing the other end in the drain container.
Add fresh liquid to the tank, close it with the device and pump up the pressure. We go to release the liquid and wait for clear liquid to start coming out.
After waiting for clear liquid to appear, close the tap, remove the tube, and put on the protective cap.
Changing the fluid on the front right wheel
We put the wheel in place and move to the right front wheel, where we perform the same actions as on the previous wheels. We will install shoes and an additional support under the body, or use a second jack.
We remove the dirt with a brush, rinse it with a liquid compound, put on the key, install the tube and go check the pressure in the tank. Add pressure, open the fitting and drain until clear liquid appears.
The main thing is to always monitor the level in the tank so that air cannot enter the system.
After you have completed the fluid replacement process, start the engine and press the brake pedal several times. We made sure that the pedal is hard and the braking system is working properly, and we go about our business.
That's all. Write your comments, ask questions and like.
Please also find out:
How to remove an air lock from the Logan system
Replacing wiper rubber bands
Source: https://www.aauhadullin.ru/2017/11/zamena-tormoznoj-zhidkosti/