How to check the ignition coil with a multimeter for an open circuit in the windings, a malfunction of the ECM and the electrical circuit of the distributor

The ignition coil is an integral part of the vehicle's starting system. Without it, it will not be possible to start the engine, whereas it is possible to start the engine without a battery, which also plays an important role in the formation of the first spark.
The ignition coil is designed quite simply, but even it can become unusable due to various vehicle malfunctions or due to a factory defect. At the same time, when starting the engine, the operation of the ignition coil is not limited, and if it fails when the engine is already running, this will lead to its complete stop.
Checking the ignition coil with a multimeter is a sure and easy way to determine the health of the unit and the need to replace it.
How to check the ignition coil
Checking the ignition coil is a three-step process that begins with preparation, then undergoes a visual inspection and ends with instrument testing.
The unit can be checked on specialized diagnostic stands in dealer workshops or professional services.
An independent check of the ignition coil is carried out using a multimeter - a universal diagnostic device with a wide range of applications.
Preparatory stage
Before proceeding directly to diagnosing the ignition coil, you need to acquire a multimeter (capable of determining voltage and electrical resistance, Ohms) and find technical documentation for the car. Various ignition coils are installed in cars, and the parameters of a specific model are written down in the car’s “passport”. If the car was bought second-hand, technical information about its units can be easily found on the Internet.
The ignition coil parameters required for its diagnosis are the resistance of the primary winding and the resistance of the secondary winding. If you were unable to detect them, you can rely on general numbers when testing the element, which will be discussed below.
We recommend reading: How to check the battery charge level in a car using a multimeter
Visual inspection of the ignition coil
The appearance of the ignition coil may vary depending on the model. At the same time, it has characteristic parts - a housing, a cover, two contacts and a central terminal.
During a visual inspection, just look carefully at the body and look for chips, cracks or burnt areas on it.
The body is made of hard rubber and does not allow current to pass through; in most cases, coil failure is due to internal damage.
Checking the ignition coil with a multimeter
Diagnostics of the electronic engine control system and the electrical circuit of the distributor
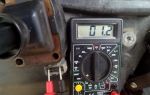
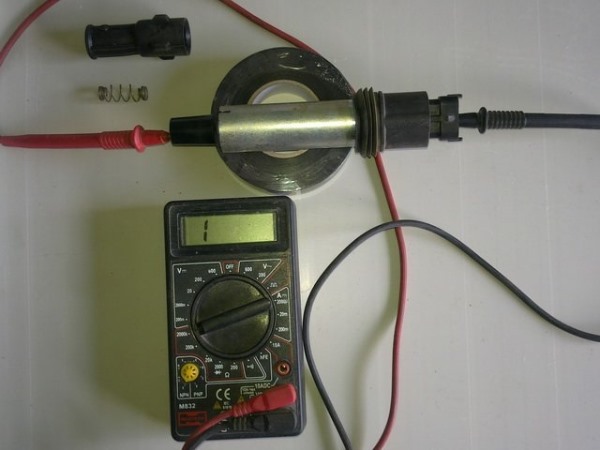
The ignition coil is located in the distributor, and to check the voltage it is necessary to bend the latched clamp and remove the wires that go to it from the distributor. Next, you need to take a multimeter and set the parameters on it for measuring voltage. After this, one of the multimeter wires is applied to the terminal of the ignition coil, and the second to the car body (that is, to ground).
The result of such a measurement, with a working ignition coil, should be 12 Volts, displayed on the multimeter. If there are problems with the electronic engine management system or the electrical circuit of the distributor, the multimeter will show 0 Volts.
Checking the secondary winding for open circuit
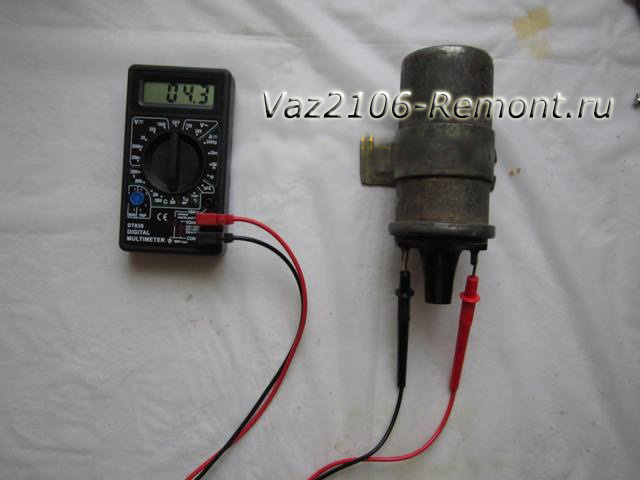
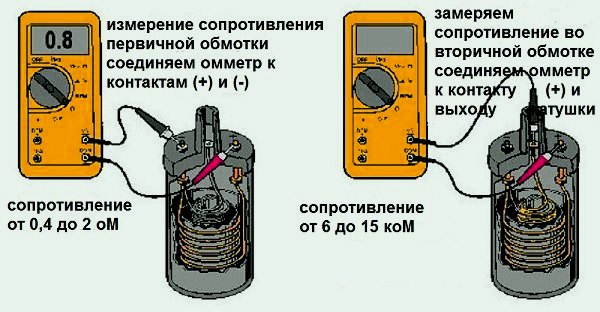
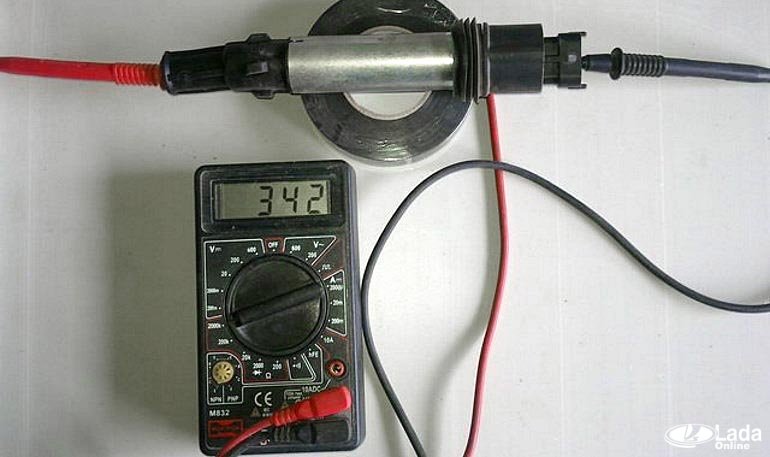
To carry out such a diagnostic procedure, you need to set the multimeter to the mode for measuring electrical resistance (Ohms). Next, we connect one of the wires of the diagnostic device to the positive or negative terminal of the ignition coil, and the second to the central terminal.
If your measurement results in a value of about 6-8 kOhm, this is considered normal for most coils.
Some can produce values up to 15 kOhm, which is also considered acceptable, but it is better to clarify this parameter in the technical documentation of the car.
In the case where the deviations in the measured results are serious, in relation to the figures indicated in the technical documentation, we can talk about a break in the secondary winding.
Checking the primary winding for open circuit
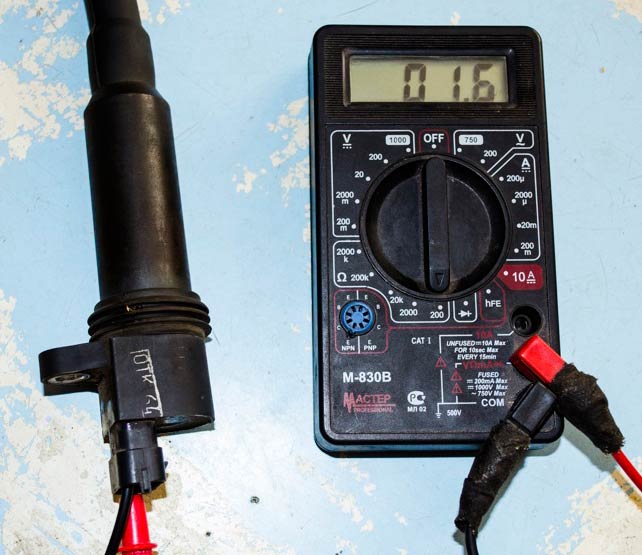
The procedure for diagnosing the primary winding of the ignition coil is practically no different from checking the secondary winding. Again, take the multimeter, which is set to measure electrical resistance, and connect its wires to the positive and negative terminals of the ignition coil, that is, to the external contacts (in most cases).
If, as a result of the measurement, the multimeter shows values of about 0.5-2 Ohms, then there are no problems with the primary winding and it is operating normally. When the resistance differs from these values, the fact of a break in the primary winding is stated.
(307
Source: https://okeydrive.ru/sposoby-proverki-katushki-zazhiganiya-multimetrom-na-osnovnye-neispravnosti/
Checking the Ignition Coil - 2 Main Methods
The ignition coil is designed to create high voltage, which is then used by the spark plug to produce a spark. Therefore, its proper operation is necessary for the normal functioning of the ignition system.
Essentially, the coil is a small transformer, the primary winding of which receives standard 12 V from the battery, and outputs a voltage of several kV. It is used in all ignition systems - contact, contactless and electronic. The reasons for coil failure are typical.
As a rule, this is a wire break, insulation damage, or mechanical deformation. Next, we will look at the signs of a malfunction and methods for diagnosing the ignition coil.
Content
The principle of operation of the ignition coil
As mentioned above, the ignition coil is a step-up voltage transformer that converts the resulting 12 V voltage into a voltage of several kilovolts. Structurally, the coil consists of two windings - primary and secondary (low and high voltage, respectively). However, depending on the type of coil, the windings and their arrangement differ.
Let's start the description with the simplest common coil . Here there are 100...150 turns on the primary winding. The winding is wound with insulated copper wire. Its ends are brought out onto the coil body. The number of turns of the high voltage winding is 30...
50 thousand (depending on the model). Naturally, the wire used here is of a much smaller diameter. The “minus” of the secondary winding is connected to the “minus” of the primary. And the “plus” is connected to the terminal on the cover. This ensures that the resulting high voltage is removed.
To increase the magnetic field, the windings are wound around a metal core. In some cases, to avoid overheating, the windings and core are filled with transformer oil (it not only cools the system, but also acts as an insulator).
Now let's move on to considering the individual ignition coil . There are also two windings here, but the difference is in their location. In particular, they are wound in reverse order. The primary winding has an internal type core, and the secondary winding has an external type.
Individual ignition coils are installed in systems with electronic ignition. Therefore, their design is complicated. So, to cut off significant current, a diode is provided in the secondary winding.
Another feature of the individual coil is the fact that the resulting high voltage does not go to the distributor (as in classical systems), but directly to the spark plugs.
This was made possible by a design that included an insulated body, rod and spring.
Another type of coil is two-terminal . It supplies voltage to two cylinders at once. There are several varieties of them. As a rule, such coils are combined into one common unit, which is essentially a four-terminal ignition coil.
Regardless of the type of ignition coil, its main technical parameter that you should focus on when diagnosing is the resistance of the windings. In particular, the resistance of the primary winding is usually in the range of 0.5...3.5 Ohms, and the secondary - 6...
15 kOhm (these values may vary between coils, so it is better to find reference information specifically for the model that is used in your car). Measurements are made using traditional instruments - multimeters or ohmmeters.
If the obtained value differs greatly from the specified value, then there is a high probability that the coil has failed.
You also need to be aware that each coil has different indicators:
- winding resistance;
- spark duration;
- spark energy;
- spark current;
- inductance of the primary winding.
Therefore, in order to understand how well the coil readings correspond to the norm, it is necessary to clarify the technical characteristics of your individual coil. This will be especially useful if the spark is lost, since the ignition coil is one of the first elements of the system to be checked.
Signs of trouble
There are several characteristic signs of a faulty ignition coil. Among them:
- the motor begins to “trouble”, and this problem gets worse over time;
- in the cold the engine “troubles” until it warms up;
- interruptions in engine operation in wet weather;
- When you sharply press the accelerator pedal, there is a failure in the engine.
If the coil is faulty, on cars with an ECU, the Check Engine icon on the dashboard is activated. However, the listed signs may also indicate other malfunctions, in particular with the spark plugs. But if at least one of them appears, you need to diagnose the ignition coil(s).
Causes of malfunctions
There are several reasons why the ignition coil completely or partially fails. Among them:
- Mechanical damage . This may be simple aging, due to which the insulation is destroyed. There is also the possibility of oil leaking through the seals, which gets onto the insulation or coil body and destroys them. Repair in this case is hardly possible, so the best option would be to completely replace the unit.
- Damage to the contact connection . In warm weather, this may be caused by moisture getting into the engine compartment. For example, during heavy rain, driving through deep puddles, washing a car. In winter, it is likely that the reel will get hit with the composition that is sprinkled on the road surface to combat ice.
- Overheating . Individual coils are often susceptible to it. Overheating can significantly reduce the life of the ignition coils. The overheating process is difficult to control, but try to use high-quality coolant and ensure that the engine cooling system is working properly.
- Vibrations . They are especially harmful to individual ignition coils. Vibrations usually come from the cylinder head (cylinder head). To reduce the number and amplitude of vibrations, make sure that the engine is operating in normal mode (without detonation and with working mounts).
Ignition coils are quite reliable and durable components, and their failure is most often associated with aging and/or insulation breakdown. Next, we will consider methods for diagnosing coils.
How to check the ignition coil
There are two main ways in which you can independently check the performance of the ignition coil. Let's list them in order.
Checking the VAZ ignition coil
Checking the Cherry Tiggo ignition coil
Spark test method
The first of them is called “to spark” . Its advantage is the ability to perform it in “marching conditions”. Among the disadvantages, it is worth noting that it is labor intensive and inaccurate, since the causes of the detected malfunctions may not be the ignition coil at all. To perform diagnostics, you will need a spark plug wrench, a known good spark plug, and pliers.
First, visually check the integrity of the high-voltage wiring insulation. Starting with the spark plugs and ending with the coil. In this case, the ignition must be turned off (the key is in position 0). If everything is in order with the insulation, the algorithm for further actions will be as follows:
- Remove the tip from the spark plug of the first cylinder and connect it to the previously prepared working spark plug.
- By yourself or with the help of an assistant, turn the ignition key to position II (start the car).
- If the coil is working properly, a spark will appear between the electrodes of the spark plug. In this case, you need to pay attention to its color. A normal working spark has a bright purple hue. If the spark is yellowish and weak, then there are problems with the wiring or coil. If there is no spark at all, then the ignition coil is faulty.
- Repeat the described steps for all coils if they are individual in the machine.
Be careful when working with the ignition system. Do not touch live parts that are live.
If you do not have a known working spare spark plug, you can remove any spark plug from the engine. To do this, disconnect it and use a spark plug wrench. In this case, you can check the coil on all available spark plugs. This way you will also check the condition of the spark plugs.
If the engine has individual coils installed, you can check them by replacing them with other spark plugs. In this case, it is better not to touch the wiring so as not to damage its integrity.
Ignition coil module
Insulation resistance test
The second popular test method is to measure the insulation resistance value of the wires in the coil windings. To do this, you will need a multimeter that can measure resistance.
It is better to remove the ignition coil from the car to make work more convenient. The measurement procedure is simple.
The main thing is to know where the terminals of the primary and secondary coils are located, since measuring resistance must be checked on both of them.
Before starting work, make sure the multimeter is working properly. To do this, turn on the resistance measurement mode and connect the probes to each other. One should appear on the screen.
Two multimeter probes are connected (touched) in pairs to the terminals of the primary winding. The resistance value should be within 0.5...
3.5 Ohm (some coils may have more, see the reference literature for exact information). A similar procedure must be carried out with the secondary coil.
However, here the range of values will be different - from 6 to 15 kOhm (for similar information, check the reference literature).
Procedure for measuring the insulation resistance of the ignition coil
If the value is small, it means that the insulation in the winding is damaged, and you are dealing with a short, most likely interturn, circuit. If the resistance is too high, this means that the winding wire has broken and there is no normal contact.
In any case, it is necessary to carry out repairs, that is, rewind the winding. However, in most cases it is better to simply replace the ignition coil , since this method will save you from unnecessary hassle and expense.
This applies to almost any car, because the cost of repairs will exceed the price of the coil itself.
If you are dealing with individual or two-terminal coils, then the situation here is somewhat different. The value on the primary winding should be similar. As for the “secondary”, the resistance value will be identical at both terminals. If a coil with four terminals is installed on the machine, then the check must be done on all terminals.
Also note that polarity is important when measuring secondary resistance. In particular, touch the central terminal (“ground”) with the black probe of the multimeter, and touch the tip rod with the red one.
Results
Checking the ignition coil is not difficult at all. Anyone, even a novice car enthusiast, can do this. The simplest and most effective method is to measure the insulation resistance on the primary and secondary windings. To do this, it is better to remove the coil for ease of work.
Remember that when a malfunction is identified, it rarely makes sense to carry out repairs, in particular, to rewind one or the other winding. It is much easier to buy and replace a new entire ignition coil.
Did not find an answer to your question?
Ask in the comments. We will definitely answer!
Source: https://etlib.ru/blog/155-kak-proverit-katushku-zazhiganiya
How to check the ignition coil with a multimeter or brute force method
The ignition coil is one of the main units in the control system of gasoline internal combustion engines. Its malfunction will certainly lead to failure to start the engine.
Computer diagnostics cannot always determine a coil malfunction. The maximum that diagnostics can show is a “misfire” in one of the cylinders. The rest of the ignition coil diagnostics have to be done using “old-fashioned” methods, which are the most productive.
What is it for?
The main purpose of the ignition coil is to convert a low-voltage electrical pulse coming from a breaker, ignition amplifier (switch) or engine control unit into a high-voltage pulse necessary to produce a spark in the spark plug.
The spark plug has a one-, two- or three-lobe electrical breakdown gap with a distance of 0.4 to 1.1 mm, depending on the characteristics of the engine. It is believed that in an air environment, to form an electric spark between two conductors, an impulse of at least 6 kilovolts per 1 millimeter of gap is required.
Thus, the electrical impulse generated by the ignition coil must be at least 10 kilovolts to ensure reliable ignition. Taking into account the voltage drop across the limiting resistance and high-voltage ignition wires, the electromagnetic pulse voltage is usually chosen to be about 12 - 20 kiloVolts.
Such lesions are especially dangerous for people suffering from heart disease; they can lead to heart rhythm disturbances. Ordinary rubber electrical protective gloves do not protect against impulses greater than 15 kV; their standard breakdown voltage is only 6.3 kV.
You must be extremely careful when working and monitoring the performance of the ignition coils. Even when measuring the resistance of the primary winding, you pass a multimeter current through it, which transforms the high-voltage pulse into the secondary winding.
How it works
In general, the ignition coil is a transformer or an autotransformer (a transformer with one common contact).
The primary winding is made of a thick copper conductor with varnish insulation, and contains, as a rule, from 100 to 200 turns.
The secondary winding is made of thinner wire, since less current flows through it. The number of turns in it is from 20,000 to 30,000 thousand.
Simplified, the coil for the ignition contact circuit can be represented as:
Here: 2 – ignition coil, 1 – battery. When the engine rotates, the cam mechanism 5 installed in the distributor moves, which opens the contacts 4. During a short opening, a large current flows through the primary winding of the ignition coil 2, which induces high induction in the secondary winding. The high-voltage pulse arrives at the spark plug gap 3.
Such ignition circuits were used in cars until the early 90s. The main disadvantage of such circuits is the burning of electrical contacts 4, since a large current flows through them. Many car enthusiasts supplemented the circuit with an electronic amplifier similar to the circuit:
In such a circuit, the main current load is assumed by the amplifying transistor T1, a small current flows through the breaker Pr, it is not destroyed.
Since the 80s, most manufacturers began to use switches in electronic ignition systems. Instead of breakers, more reliable Hall sensors, electromagnetic sensors, and optoelectronic sensors were used. Such sensors are much more durable than switched ones; during their operation, the ignition angle does not change during operation, as in contact ones.
The ignition circuit for the VAZ 2110 is shown in the figure:
In the diagram: 1 - contact group of the ignition switch, 2 - ignition coil, 3 - switch, 4 - ignition distributor.
Currently, the operation of the ignition coils is controlled by the engine control unit. The switch (ignition amplifier) in some models is built into the engine control unit.
Since the probability of breakdown of control transistors is high enough to simplify car repairs, in many cases an electronic switch is built into the ignition coils. However, this complicates monitoring their performance. Sometimes, if the coil is working properly, it has to be changed, since it is structurally inseparable from the commutator.
Kinds
Currently, three types of ignition coils are used:
- common for systems with ignition distributor;
- twin (built in six-cylinder engines) for simultaneous operation of cylinders operating in the same phase;
- individual for each cylinder (together with the ignition amplifier).
Where is the ignition coil located?
In cars of earlier years, the ignition coil (or bobbin, as it used to be called) was easy to find. She was always in plain sight. As a last resort, its search could be carried out starting from the central wire of the ignition distributor.
Individual ignition coils are also easy to find: they are located above the cylinder spark plugs. But in some car models, especially with a V-shaped engine, in order to provide access to it, even to remove spark plugs, it is necessary to dismantle the intake manifold, part of the engine structural elements.
Dual ignition coils are usually located on the engine compartment bulkhead. But sometimes manufacturers can place them in places that are difficult to access for replacement and, even more so, for performance monitoring.
For example, in some Rover 200 series models the ignition coil is located under the exhaust manifold in the engine compartment between the engine and the passenger compartment. It is possible to measure its parameters when monitoring performance only from the connector of the engine control unit.
Sometimes ignition coils are mounted on the engine cylinder head (for example, some GAZ models). Although this is convenient for checking, during engine operation they heat up to a temperature of more than 100 degrees Celsius, the insulating compound dries out and cracks, which leads to a decrease in their durability.
In some cars, individual ignition coils are combined into a common, non-separable housing. Even if one coil fails, it is necessary to replace the entire expensive unit.
Main symptoms of malfunctions
The main signs indicating a possible malfunction of the ignition coil are:
- the engine does not start, there is no spark;
- the engine troits during operation, especially at high humidity;
- computer diagnostics indicate misfires in certain cylinders;
- there are dips in traction when pressing the accelerator pedal;
- difficulty starting the engine “cold”, especially at low temperatures;
- the ignition coil overheats;
- cracks and paint changes appeared on the ignition coil housing;
- the low voltage wires going to the ignition coil have changed color.
Main causes of malfunction
The main causes of coil failure include:
- installation of non-standard ignition wires during vehicle servicing (there were wires with distributed resistance, but the usual ones were installed without resistance, therefore, the ignition current is not limited);
- natural wear and tear;
- interturn high-voltage breakdown (the coil will ring like a working one, but the quality factor decreases, and the pulse amplitude on the secondary winding decreases significantly);
- ignition coil overheating;
- accidental battery reversal;
- mechanical damage to the coil;
- installation of non-standard spark plugs (with a smaller or larger gap;
- sudden temperature changes (the car got into a puddle while driving, water got on the coil);
- electrical wiring shorted;
- drizzle on high-voltage wires.
How to check the serviceability of the ignition coil
Checking the ignition coil for systems with an ignition distributor begins with “continuous testing” (measuring resistance) of the windings.
What resistance should be on the ignition coil
To do this, first set the multimeter switch to the 200 Ohm position and measure the resistance of the primary winding by applying the multimeter probes to the “+” and “K” terminals.
The resistance should be in the range from 0.2 Ohm to 3 Ohm (depending on the coil model and the accuracy of the multimeter readings). In any case, contacts “+” and “K” must be dialed.
Then the multimeter switches to the “20 kOhm” position, that is, the measurement limit is set to 20 kiloohms. Next, the resistance is measured between terminals “K” and the central terminal of the high-voltage wire (to do this, the probe must be rested against the contact copper zone inside the round niche for installing the high-voltage wire). The resistance should be between 2 and 4 kiloohms.
It is more effective to check the ignition coil directly in operating mode. To do this, you can build a circuit similar to that shown in Figure 7:
But it’s even easier to connect the “+” contact to the positive terminal of the battery with a wire at least 2 sq. mm thick.
Connect the ignition wire to the high-voltage terminal of the coil with a known-good spark plug attached.
Connect the spark plug body to the ground of the car, the car engine or the negative terminal of the battery if the battery is removed from the car and the test takes place under stationary conditions.
Next, connect a wire with a cross-section of at least 2 sq. mm to terminal “K” of the ignition coil. If the other end of the wire touches the negative terminal of the battery, sparks should appear in the spark plug.
The touches must be short-lived so that the primary winding coil does not burn out and a good spark slips through.
In this case, it is better to generally run the stripped end of the wire along the battery terminal so that a spark flow occurs.
However, sometimes the second test method is not suitable for electronic ignition coils . A spark may not be observed if the coil is working properly.
It is more difficult to check dual ignition coils. Their primary winding is usually connected to the connector. You can test it with a multimeter only if you know the ignition coil circuit . The secondary winding is connected between two high-voltage terminals. The secondary winding resistance may be slightly higher than 4 kiloohms.
It is difficult to determine the malfunction of individual ignition coils without knowledge in the field of radio engineering, since for testing it is necessary to assemble an electronic circuit.
However, there is a 100% way to find a faulty coil. If the engine stalls, you can sequentially disconnect the connectors from the ignition coils while the engine is running.
If, after disconnecting the coil, the engine speed changes, the engine begins to double, therefore, an ignition spark is present in this cylinder. Then they reconnect the connector and move on to checking the next coil until they find a cylinder in which, when the connector is disconnected, the nature of the engine operation does not change.
Video - how to check the functionality of the ignition coil by sequentially disconnecting it:
Of course, it is easier to do this using computer diagnostics. It can immediately show the error code and interpretation, for example, “misfire to cylinder 3.”
But the absence of a spark in a particular cylinder is not yet a reason to claim that the coil is faulty. Individual ignition coils have an additional resistor built into them (position 8 in the sectional diagram of an individual coil below).
It is usually easy to get out by removing the rubber tip 9. Next, you should measure its resistance (from 500 Ohms to several kiloOhms). If it does not ring, you should change it.
The ignition coil of the cylinder with no spark is then swapped with a known good coil from the adjacent cylinder. If misfire is now observed in the adjacent cylinder, and the non-working cylinder starts working, then the problem is definitely in the ignition coil.
Video - how to check an individual ignition coil without equipment:
Usually, the built-in switch fails first; the high-voltage coil itself is fine, but the whole thing has to be replaced. There are craftsmen who resolder the output transistor in the built-in switch, but experience shows that restored individual coils do not work for long .
Replacement
Individual ignition coils should be replaced with similar models, otherwise there may be problems with ignition timing. It is also advisable to install dual and common ignition coils in accordance with reference data and equipment catalogs, especially since there are not many standard sizes of ignition coils.
Experienced auto electricians often replace the ignition coils of imported cars with domestic Zhiguli ones, and quite successfully. This does not in any way affect the driving performance of the car.
A factory coil from Lada costs two to three times less than a second-hand original or a new Chinese one. If there is a problem with the ignition coil, you can scour the Internet and find what can replace it. Only in this case, in most cases, you have to reconnect the connector to the coil. It is better to entrust this to a specialist.
To make the ignition coil last longer, follow these rules:
- Wipe high-voltage wires regularly (preferably at the end of the seasons);
- Make sure that the reel does not get wet or oily liquids;
- check the quality of the coil connector, it should not spark or get hot;
- change spark plugs regularly;
- it must be firmly fixed in place, and not dangle;
- at the slightest suspicion of a malfunction of the ignition coil (misfire, etc.), it should be tested immediately.
Remember, a faulty ignition coil leads to uneven operation, increased loads, and mechanical beats, which ultimately reduces engine life.
Video - VAZ ignition coil and its possible malfunctions:
May be of interest:
Source: http://voditeliauto.ru/poleznaya-informaciya/to-i-remont/proverka-katushki-zazhiganiya-multimetrom.html
Methods for checking a car ignition coil
During the operation of a car, various problems with the engine occur; the engine may trip, not develop speed, or stall at idle.
In some cases, the internal combustion engine does not start at all; often the cause of the malfunction is the ignition coil.
In this article we will look at what kind of ignition modules there are in passenger cars, their main problems, as well as how to check the ignition coil with a multimeter and other devices.
Types of ignition coils on a passenger car
Depending on the car model and engine brand, different ignition coils (IC) are installed; they can be of different designs:
- cylindrical shape;
- double;
- monolithic (four cylinders);
- in the form of a separate module for each cylinder of the internal combustion engine.
Cylindrical short circuits were mainly installed on cars of previous years; now such coils are considered an outdated design. There is one cylindrical short circuit per four cylinders; it is used on engines with a distributor ignition system. There are engines with a different number of cylinders, but in this case we are not considering them.
The common module is a short-circuit unit combined into one housing; this device supplies a spark to four cylinders.
Recently, separate ignition modules (IMs) have been increasingly used, where each coil is installed on its own cylinder, and if the engine is 4-cylinder, then there should be four short circuits.
The MZ is mounted directly on the spark plug, so there are no high-voltage wires in such a system.
Cost of ignition modules
The price of an ignition coil varies, depending on the car model, engine type, and spare parts manufacturer. All parts can be original or non-original; the original always costs more.
The most inexpensive short circuits for GAZ and VAZ cars of the 80s and 90s, for example, you can buy a coil for a VAZ classic and VAZ -2108-09 with contact or contactless ignition for an average price of 500 to 800 rubles.
Monolithic modules for 4 cylinders 2111-2112 are already sold from 1000 to 2000 rubles; for some foreign cars MZ can cost more than 10 thousand rubles.
Basic malfunctions of ignition coils
In any automobile ignition coil there are always two windings - primary (with a small number of turns and a thick wire) and secondary (thin wire with a large number of turns). With the help of a short circuit, the low voltage in the circuit is converted into a high one, and if in the primary circuit there is a voltage of 12 Volts, then in the secondary circuit it already reaches several tens of Kilovolts.
Under the influence of the environment, MHs are destroyed, and they are also subject to aging over time. There are defects in the coils:
- break in the primary or secondary winding;
- interturn short circuit in winding wires;
- cracks in the case (if the case is plastic).
If there is a short circuit in the short circuit, the coil overheats and, as a result, may completely fail. If a crack appears in the housing of the MZ, a spark begins to break through to ground, the engine troits, and in some cases it even runs on two cylinders.
Instruments and equipment for testing ignition coils
You can check the functionality of the short circuit in any way, including various devices:
- multimeter;
- oscilloscope;
- arrester.
The simplest and most accessible device for checking ignition coils is a multimeter, which can be used to measure the voltage and resistance of the windings. As a rule, the voltage is measured only in the primary circuit, and the measurement is made on the car with the ignition on.
It is more convenient to measure the resistance on a removed coil; the measurement is done on both windings. The resistance depends on the short circuit model, but approximately the readings are close in their values. On a working ignition coil, the ohmmeter should show resistance:
- on the primary winding - from 0.4 to 3.5 Ohms (depending on the ignition system);
- on the secondary winding - from 4 to 17 kOhm.
Checking the ignition coil with a multimeter
First, let's look at how to measure the resistance of the primary winding on a cylindrical coil. We set the lowest limit on the device (200 Ohms), take readings by placing probes on the winding terminals.
To measure the resistance of the secondary winding, switch the multimeter to kiloohms. On a round coil, one probe is installed at the fastening point of the high-voltage wire, the second - on the side contact.
Checking ignition modules with a spark gap
High-voltage arresters are produced in a wide range by industry, for example, as part of Motor-Master there is a device MM-VR-01, which is intended for testing MZ type 043.3705 5 or 42.370 (on VAZ vehicles).
Also, to check VAZ coils (non-contact ignition), you can make a spark gap with your own hands, for this you will need:
- ordinary clamp;
- a small piece of wire, stripped around the edges;
- wooden block;
- self-tapping screws 2 pcs., length 40 and 60 mm;
- used spark plug,
- scotch;
- pen;
- ruler;
- small hacksaw;
- high voltage wire.
To make a simple device, first unscrew the metal cap from the candle and attach it to a long self-tapping screw. It is better to tighten the tip thoroughly with pliers so that it does not fall off in the future.
Next we proceed as follows:
- screw one end of the stripped wire onto a short self-tapping screw;
- We insert the high-voltage wire into the cap, which is screwed onto a self-tapping screw;
- We apply the workpiece to a wooden block, make a mark on the head of the screw with a pen;
- Make a cut to a depth of approximately 10 mm with a hacksaw;
- we measure 14 mm from the edge of the cut, it is necessary that the distance between the electrodes be equal to 10 mm (2 millimeters each is compensated by the thickness of the screw heads);
- make a second cut, knock out the middle of the block;
- Using tape, we attach both self-tapping screws to the block, with their caps facing each other;
- At the second end of an ordinary wire we attach an alligator clip (clip), it will connect to the ground of the motor or coil.
How to use such a device? We take the ignition coil, connect it to the manufactured device with a high-voltage wire, and connect the second wire to the short-circuit ground.
We turn on the ignition, crank the engine, while connecting the coil with wires, supply power to it (+12 volts and ground). If there is no spark discharge between the screws, most likely the short circuit is faulty. But here the high-voltage wire can also be broken, so we remove it and install the probe directly on the coil itself.
Let's check again. If a spark appears, the high-voltage wire is to blame; if not, the short circuit is faulty. It should also be clarified that the gap between the heads of the screws to check the VAZ cylindrical coil should be 10 mm; if it is different, it is necessary to adjust the gap.
Checking the ignition coil with an oscilloscope
The ignition module may produce a spark, but the parameters will not correspond to the required values. The most accurate way to determine a short circuit fault is with an oscilloscope.
On modern injection engines, the signal is removed from the plug that goes to the coils.
But this is how a low-voltage circuit is checked; to check a high-voltage signal, an inductive or capacitive sensor will additionally be needed, and the oscilloscope probes are connected directly to the short circuit.
Some tips
- Before you begin measurements, you first need to inspect the ignition coil - there should be no chips, cracks, or burn marks on it. If there are external defects, it is better to replace the part immediately.
- When working with high voltage, care should be taken, as careless handling can result in severe electric shock.
- If the resistance values obtained using a multimeter coincide with the passport data, this only indicates that the coil is generally operational. But a more accurate check is carried out using an oscilloscope.
- If your car has a contactless ignition with a distributor, very often the ignition coil overheats due to the switch.
In this case, it is necessary to check the heating of the switching device itself - if it gets hot, most likely it is the problem.
- If the ignition coil is inexpensive, it is better to have it in stock - it can be very useful on the road.
The failed part does not need to be replaced for long, and the driver does not have to waste time - after replacing the short circuit, he can immediately continue driving.
How to check the ignition coil with a multimeter: video
Source: https://avtobrands.ru/sposoby-proverki-avtomobilnoj-katushki-zazhiganija/
How to test an ignition coil with a multimeter
There are times when the battery is fully charged, but the car does not want to start.
In this situation, uninitiated drivers think about the causes of the breakdown, and experienced car owners first of all try to check the ignition coil.
This is one of the most important engine components and it is a malfunction in it that leads to the fact that the car refuses to start. Let's figure out how to check the ignition coil with a multimeter to identify the cause of the car breakdown.
Possible signs and causes of failure
The ignition coil converts low voltage from the battery and generator into high voltage and directs it to the spark plugs. In the latter, a spark appears that ignites the fuel. This unit is considered the leading one in the launch system, and its failure can immobilize the vehicle for quite a long time.
What are the signs that indicate damage to the electrical transformer?
If the car owner notices such changes in the operation of the car, then most likely the cause is a malfunction and you should know how to check the ignition coil with a multimeter.
For what reasons can this be observed? Most often these are mechanical damage, regular overheating, low-quality candles, as well as the negative impact of the external environment.
For example, after strong heating and vibration during operation, the insulation is damaged. The latter leads to a short circuit in the coil windings.
If the spark plugs installed in the car are of poor quality, the high-voltage wires are overloaded and the winding breaks.
There are two ways to check the functionality of an electrical transformer: creating a spark between the spark plugs and the housing and using a multimeter. In modern cars, the former can lead to unforeseen consequences from the electronics. Therefore, it is worth using exactly the specified device to diagnose the performance of the reel.
How to check the ignition coil with a multimeter: instructions
Experienced car owners with minimal mechanical knowledge divide the process into three main stages: preparation, visual inspection and diagnostics using a device. You can take your car to a service center and entrust the process to professionals. But, having a multimeter, the car owner will be able to perform the test independently. In addition, such a process will be useful for understanding the principle of operation of the car.
The first stage is preparation
Actually, the preparation process consists of purchasing the device itself necessary for testing. You can buy it in a specialized store, and those who are especially thrifty can ask their neighbor in the garage (it’s worth checking there). The device is capable of determining voltage and resistance. If the coil shows a result that corresponds to the standard, it means it is working.
Another question is how to find out the necessary indicators. You can focus on the average value. But it is better if the car owner finds information in the technical documentation for the car. If the document is lost or the car was purchased on the secondary market, then the necessary data can be found on the Internet. An individual approach in this matter is more preferable than using average indicators.
What do you need to know about a car's ignition coil? For diagnostics, resistance indicators of the primary and secondary windings are required.
Stage No. 2 - visual inspection
Reels of different cars may have different appearances, but the basic type of configuration is still the same. The following parts can be clearly distinguished: the housing, two contacts, a cover and a central terminal.
A visual inspection is aimed at identifying mechanical damage to the device. That is, the car owner must carefully inspect the body and try to find cracks, burns or chips. But since the coil has an ebonite body that does not allow current to pass through, the cause of the malfunction should be sought in the winding.
The third stage is checking with a multimeter
Here we will directly figure out how to check the ignition coil with a multimeter.
Diagnostics of the electrical circuit of the tumbler
- Before you start checking with the device, you need to open the latch and disconnect the wires from the toggle switch (it contains the coil).
- Set the multimeter to measure voltage.
- Attach one contact of the device to the output of the reel, and the second to ground (for example, a car body).
Look at the device readings.
If the ignition coil is working properly, the panel will display 12 Volts or an indicator corresponding to the technical documentation of the vehicle. If the voltage is zero, then there is a problem with the electrical circuit of the tumbler.
Secondary winding
Next, you should check the resistance to understand where exactly the break occurred, in the primary or secondary winding. Change the multimeter settings to measure resistance readings. Then we apply contacts to the central terminal and to one of the coil terminals (positive or negative does not matter much).
The required indicators should be clarified in the car’s passport. Typically they are in the range of 6-15 kOhm. If there are significant deviations from the norm, then we can say with confidence that the break is in the secondary winding.
Primary winding
To detect a break in the primary winding, it is necessary to measure the resistance by placing contacts on the positive and negative terminals of the coil. Normal values correspond to the documentation or are in the range of 0.5-2 Ohms. If significant differences are visible, there is a break.
This concludes the question of how to check the ignition coil with a multimeter. If a malfunction is detected, the coil will have to be replaced with a new one. Diagnostics should be carried out regularly, because a malfunction of the ignition system has a bad effect on the engine and the longevity of its operation.
Source: https://proautoprom.ru/kak-proverit-katushku-zazhiganiya-multimetrom/