Cleaning the throttle body, idle air valve — logbook Toyota Corolla Fielder 2002 on DRIVE2
Greetings to everyone reading my blog!
Finally got around to completely cleaning the throttle body. There is information on this matter on the Internet, but, in my opinion, it is not entirely correct. I'm talking about cleaning the damper itself, they say it was dirty, I sprayed it with carb cleaner, it started to shine, the car is unrecognizable and so on.
dirty valve
I don’t understand how such dirt can worsen engine performance, because the throttle is responsible for engine operation only when you press the gas pedal, and when you press the gas pedal, such a “hole” is formed that it takes an unrealistically lot of dirt to fill it up.
Summary: cleaning ONLY the damper from such dirt is a waste of time and money, and also leads to a number of problems (more on this below).
Next we will talk about cleaning the throttle valve block and the idle air valve of the 1 nz-fe engine with a mechanical damper drive.
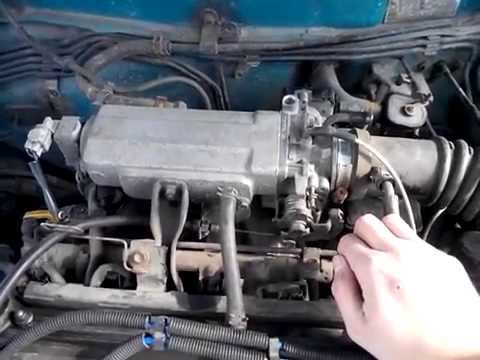
— removed the battery — unscrewed the cover with the inscription “vvt-i” from the engine — removed the terminals from the air flow sensor, throttle position sensor, idle air valve — removed the crankcase ventilation hoses — loosened the clamps on the throttle valve block and air filter housing, removed the rubber tube between the block and the housing - removed the air filter cover, took out the filter, unscrewed the housing for the air filter - removed the throttle cable - removed the coolant hoses from the throttle body, unscrewed the block and removed it.
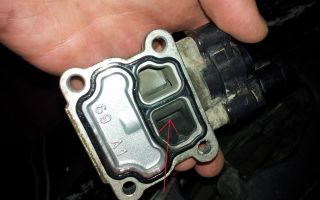
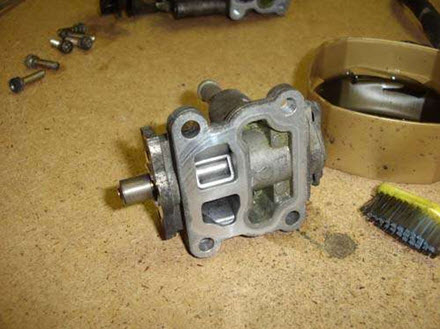
At the bottom of the block there is an idle air valve, it is screwed on with three bolts, unscrew it
Idle valve. Responsible for reliable engine starting and idling.
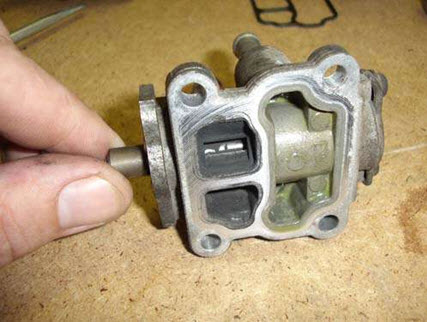
Then unscrew the idle air valve motor
Valve motor
The engine is fastened with interesting bolts, to unscrew them you need a screwdriver bit in the shape of a five-pointed star, there are no such ones in Barnaul, at least I couldn’t find them, I found them only in China on order, but I didn’t want to wait 1.5 months.
I took a grinder, the thinnest metal disc, cut a slot in the bolt for a screwdriver and unscrewed it. Then I removed the engine, remembering the position of the valve rotor . I tried to turn the idle speed valve behind the rotor, but it did not rotate as it should, the stroke was 3-4 mm. I washed it with carb cleaner, the valve began to rotate 360 degrees without difficulty.
Clean valve
Then I washed the block itself from the inside (there is no photo because everything is simple there)
We screw the motor onto the valve rotor, install a new gasket and screw the valve body to the throttle body
We put everything back together, put it in place, start the car at 1.5 thousand rpm, warm it up to operating temperature, rev it up to 5 thousand rpm, after 10 minutes the idle rpm dropped to 800, it doesn’t go lower, then after cleaning I drove 35 km, the idle rpm is still 800 , I have an idea, but haven’t tried to implement it yet
The idle valve motor rotates around the axis of the valve; perhaps it can or should be used to adjust the idle speed
Actually, that’s all about cleaning. Now let’s remember everything that I wrote, let’s go back to the beginning of the post about cleaning the throttle body without removing the idle air valve, because
the hole in the BDZ leading to the XX valve is located at the bottom, then all the dirt washed off from the flap will flow into the valve, clogging it even more, then unstable idle, idle that does not drop at all, etc.
, so it’s better to disassemble everything and ALWAYS clean the idle air valve.
I also replaced the spark plugs and air filter.
Old spark plugs, covered 24 thousand km
Thank you all for your attention, I will be glad to see your comments)))
Source: https://www.drive2.com/l/4749263/
Cleaning the BDZ and IAC on the 4E-FE engine - Photo report
So, first I will describe the problem and symptoms, and then the process itself with photos.
Since buying the car, the warm-up rpm was 1200, idle 700-750. Sometimes, when additional electrical equipment was turned on, the rpm dropped to about 500 and terrible vibrations began in the body, the whole car began to wobble at idle.
When starting from a stop (especially in traffic jams), it was necessary to press hard on the gas (up to 1500-1800) and smoothly release the clutch, otherwise the revolutions dropped sharply to 200-300, the car would stall, it was necessary to somehow pull out the revolutions.
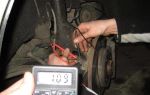
And one more point regarding electrics . I connected a multimeter to the battery terminals while the engine was running at idle. Without turning on additional electrical equipment, there was a stable charge from the generator of 14.4 V.
If you sequentially turn on the dimensions, low beam, heated rear window, brake lights, heater fan, hold down the power window button, the voltage in the network dropped by 0.2-0.4 V for each consumer and eventually reached 11.8 V at idle speed at the same time, 500 also fell and terrible vibrations began.
Although the brains must open the XX valve shutter and raise the speed in these situations.
One day the car didn't start the first time. Those. The engine started, but when the key was released from the position, the starter stalled.
It started the second, third, fourth time, after a few weeks it stopped holding idle at all, and I had to keep the gas pedal at 1200-1500 until the engine warmed up a little.
Then when hot, the XX speed is normal. It was decided to wash and clean the throttle valve block (TDV) and the idle air valve (IAC).
We remove the negative terminal from the battery so as not to short anything to ground.
Remove the air filter cover and the corrugation that supplies air and vacuum tubes.
We remove the connectors from the TPS and from the KXX.
We unscrew the 4 bolts securing the BDZ to the intake manifold.
Disconnect the BDZ from the intake manifold.
Remove the old gasket. We see some oil in the intake manifold.
Disconnect the vacuum tubes coming from the power steering pump.
The tubes stick well and it is easier to move them using a wrench of the appropriate size so that it fits onto the metal tube, but rests against the rubber hose.
Remove the accelerator pedal drive cable.
Disconnect the antifreeze supply hoses. You need to use pliers to move the clamp down, then pull the hose down. The hoses stick well; you will need to apply force and not tear off the hose.
The hoses must be kept vertical to prevent antifreeze from flowing, and then plugged. I used a pre-prepared screw wrapped in polyethylene.
The BDZ has been removed and can be washed and cleaned with further disassembly.
We unscrew the four screws securing the KXX to the BDZ. To avoid tearing off the Phillips slot on the screw heads, it is better to use an impact screwdriver.
We clamp the BDZ either in a vice through soft spacers, or between the knees, as I did, forcefully press the screwdriver into the slot and, tapping the handle of the screwdriver with a hammer, unscrew the screws.
It is advisable to purchase a rubber gasket in advance between the IAC and BDZ, although the old one is in good condition, only flattened.
There didn't seem to be much dirt in the IAC and air ducts of the BDZ. But the valve itself was jammed and it could barely turn with your fingers.
Unscrew the valve stepper motor. In the original it is secured with two screws under a five-pointed star.
It is difficult to find such keys for sale, but they exist. I saw and bought such a set at Leroy Merlin.
Some people make a cut in the head for a slotted screwdriver. I had one replaced with a Phillips head screw.
I bought this carb cleaner and washed everything with it, it’s very cheap, but the skin on my fingers was a little corroded.
You can rinse and clean everything with a toothbrush, but I forgot to take it with me, so I cleaned it with cotton swabs.
We wash the IAC until it rotates freely.
In the BDZ we wash all the air channels, tubes, and blow them with compressed air or a pump.
We install a new gasket.
Particularly stubborn dirt was not washed off, but overall the valve was washed well and began to rotate freely.
I lubricated the bearing on which the valve axis rotates with lithol.
I’ll give a photo with the dimensions of the screws securing the stepper motor, maybe someone will want to buy similar ones in advance, but for a regular screwdriver.
And the sizes of the screws securing the KXX to the BDZ.
We put everything back together in reverse order. I decided to replace all the screws. I bought four original new ones for the valve (before disassembling, I didn’t know what diameter and length they were). I picked up two fastening stepper motors in the garage.
Wiped off the oil in the intake manifold.
We change the gasket between the BDZ and the KXX.
Tighten the four BDZ mounting bolts to a torque of 13 Nm.
So, here's the result. I have long had a suspicion that there is something wrong with the IAC (not only that it is dirty and requires cleaning). He was slowly dying for me.
When I assembled everything and started the engine, the warm-up speed was set at 400 rpm, and did not want to rise. I had to hold the gas pedal at 1200-1500 until the temperature needle started to creep up.
When the engine warmed up, the idle speed remained at 900-1000. And so from day to day nothing changed. The KXX training procedures given on the Internet did not help.
I decided to buy a new XX valve, although it is expensive and the toad was choking on throwing away money, but I bought it, and also bought a new throttle position sensor (TPS). I really wanted to see my little queen healthy and cheerful.
I will outline the continuation of the replacement, as well as the stages of adaptation and training of the new ICC in the next post.
After cleaning the IAC, I was convinced that the valve was slowly dying, warm-up 400, idle after warming up in operating mode 900-1100. I decided to change it for a new one.
A new KXX number 22270-11020 was purchased:
and throttle position sensor number 89452-20130:
Let's put everything back together in reverse order:
The engine started the first time with a new IAC and a new TPS. The idle speed when cold was 1500-1700, but as it warmed up they did not drop. While driving, the idle speed of the already warmed-up engine fluctuated from 1300 to 1500.
I tried to teach the IAC according to the methods outlined on the Internet (disconnect the terminal from the battery, wait a few seconds, put it on again, start it, turn it off, remove it again), but this did not help, the IAC speed increased again to 1500.
Well, I didn’t know what to do, I thought that maybe I had assembled it somehow wrong. I read somewhere that you need to drive 50 kilometers by car. I went for a ride. I noted the number on the odometer.
I accelerated, stood in traffic jams, turned on and off the headlights and low beams (all this happened in one day).
And suddenly, at some point, the idle speed dropped from 1500 to 800-900. At that time I had traveled 40-50 kilometers. The brains slowly adjusted to the new XX valve.
Well, that’s all, after that the warm-up speeds were 1200, idle 800-900, slightly too high, sometimes dropping to 750, vibrations disappeared, when additional electrical equipment was turned on, the speed rose slightly. In general, the problem described at the beginning of the photo report has gone away.
And one more point (assumption) that a finer adjustment of the XX speed can be set by turning the stepper motor at a small angle, which rotates the XX valve shutter due to the oval mounting holes:
but I haven’t tried to twist it, so far everything is fine. If I adjust the XX speed, I will post the results in this thread.
Source: https://corolla.ws/forum/showthread.php?t=26819
Toyota Corolla idle speed sensor: causes of clogging and cleaning
You must be careful not to damage the gasket between it and the car’s power unit.
Cold sausage 1ZZ-FE
To do this, you need to disconnect the valve connector and unscrew the mounting bolts. Thanks to the operation of this sensor, the computer that controls the operation of the car controls the flow into the engine of a strictly defined amount of air necessary for uniform idling.
There were two options - either the CXX is clogged and as a result does not give a normal signal to the computer, or the electronics in it are dead. The Toyota idle speed sensor is one of the most important elements that stabilize and regulate the operation of a car engine. Reinstalling the clean parts on the throttle body should not be too difficult.
When unscrewing them, it is best to use a socket and a wrench.
Toyota Corona 2000, 115 l. With. — scheduled maintenance
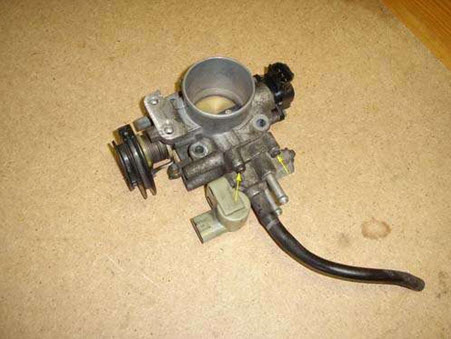
The throttle in the place where the IAC is attached is also in shit: In general, after what was done, the error, naturally, went away even 15 km away. The car started up cheerfully, the idle speed was a little high, but stable and did not jump, it warmed up and dropped to about .
Therefore, it will be easier to clean. So, carefully using a special liquid, a brush and rags, we wash the entire assembly, trying to get to every corner inside the sensor. Then rinse it thoroughly again and dry it. Be sure to dry it before installation.
Before installing it on the throttle valve, it should also be washed and cleaned - this must be done carefully so as not to damage the mechanisms. Next, the removed sensor winding should be cleaned of dust and coated with sealant, as shown in the photo. Reinstalling the clean parts on the throttle body should not be too difficult.
We put everything back together in the reverse order and are happy that the part is almost new, cleaned of dirt and burning. The throttle body and the valve are very clogged.
Toyota Yaris 2SZ-FE (1.3L) idle speed fluctuates #LIVE HD
The valve curtain does not rotate but should do so easily! For cleaning I used carburetor cleaner and rags, and with their help I washed the throttle body and valve, all the channels and the curtain.
Toyota RAV 4
To clean the valve completely, you need to remove the cap with the connector, screwed onto two hexagons, in order to be able to manually turn the valve shutter, highlighted in green in the figure.
After washing, everything is very carefully reassembled in the reverse order.
When the Toyota engine is warmed up to a certain temperature, the sensor maintains a certain idle speed. If the engine heating level is insufficient, the idle speed sensor will specifically increase its speed for better heating at higher crankshaft speeds.
Other articles
In this mode, impatient motorists can already start driving. Where is the idle speed sensor located and how to replace it Contents 2 Is it possible to save money by replacing this IAC part on the throttle body? This device on Toyota cars is installed on the throttle body using several screws.
In some cases, these screws may have specially drilled heads to make removal difficult. Then experts recommend completely dismantling the damper to avoid damage to the valve fasteners.
Common signs of a bad idle air valve include extreme roughness when idling. The valve is supplied with power and a control signal of a rectangular shape with variable duty cycle.
To make it impossible to remove the winding, non-standard fasteners were installed. But the wedge problem remained. Now if you clean with a regular cleaner, the grease is washed out of the bearings; the further result is predictable, the same wedge, but because of the bearing.
Source: http://psk-nnow.ru/toyota/d0-b4-d0-b0-d1-82-d1-87-d0-b8-d0-ba-d1-85-d0-be-d0-bb- d0-be-d1-81-d1-82-d0-be-d0-b3-d0-be-d1-85-d0-be-d0-b4-d0-b0-toyota-premio.html
How to disassemble pxx toyota 1nz

We disassemble the idle speed control - Duration: Ruslan K 68,415 views. Cleaning the IAC sensor Toyota Corolla – Duration: 3:25 auto+ 241 views.
Engines 1 nz fe. These engines were installed on cars from 2000 to 2007 on many cars of the Japanese concern Toyota.
About the logo. The Toyota logo is a triple oval. Two internal ovals located perpendicularly symbolize the strong relationship between the client and the company. In addition, if you look closely and use your imagination a little, in these ovals you can see an image of all six letters of the brand name T, O, Y, O, T, A.
Cleaning the idle speed sensor on a Toyota Corolla. Sometimes it happens that after buying a used car or after years of driving your own car, the idle speed begins to jump.
I invited him to come to my work today. A powerful flashlight was very useful. City: Angarsk - Irkutsk region. To achieve a positive result, conditions must be met. HoMeR, when the engine is running, turn it off with your hand; if it stalls, there is no suction rate.
Toyota Corolla idle speed sensor: causes of clogging and cleaning
A year has passed and there have been no problems over the winter. But then something bad happened: the check light came on. In fact, the car itself either adds speed or drops it. When you turn on the air conditioner, it almost stalls. Is there any way to fix it? Maybe there is some analogue that is not expensive? Send a private message to AlexanderS. Find more posts by AlexanderS. Send a private message to Skiprus. Find more posts by Skiprus.
Once again, disassemble the rcx, wash it “like a cat’s eggs” the rotor and stator are what rotates and where they rotate in the chamber. Heat the lubricant and use a syringe to drive it a little into the bearing cavity.
Next, twist the “magnet” shaft - the shaft should make several revolutions on its own. There should be no sand felt when twisting. Next, position the magnet with the antenna in the sample in the electronics.
Install the coil and tighten it slightly, then on a cold engine - when starting, set the warm-up speed.
Inspect the contacts in the coil for oxidation, and if there is any, carefully clean it. If xx is still low and ixxx is completely closed or so, then the remote control needs to be adjusted. Before adjusting the remote control, you need to wash it well.
You can wash it when washing the IAC, also “Like a cat.” Then we pick up the remote control; on the side there is a screw for setting the initial gap.
We turn the screw until the DMZ rests on the body, look at the clearance in the BDZ and DS, then turn the screw until a minimum gap appears between the BDZ and the DS, sharply open the DS several times and throw it.
Under no circumstances should the DZ bite even a drop of the DZ. We tried it, installed it, started it, warmed it up.
You don't need to learn anything!!!! Training is a myth. Unscrew the corrugation from the filter block. We start the internal combustion engine, as soon as there are at least some revolutions, then SHARPLY with the palm of your hand, close the corrugation very tightly and let the engine suffocate. If the engine continues to run, this is a leak of left and unaccounted air. We listen to where he is sucking it from - hissing.
If the engine still stalls, then again we listen to where it hisses. If the engine stalls and the hissing quickly stops, this is a strong suction.
If the engine stalls but hisses for a long time, this is normal; it hisses through the compression rings. You can reset the MAF error by removing the terminal from the battery. Send a private message to lecsa. Find more posts by leksa.
Photos of repairs and junk. The IAC is located approximately in the middle. Even so, otherwise it’s impossible to drive at all and I don’t have time to refuel. I'll drive around a bit and see what happens, how much they'll adjust.
If it eats like that, then I would look at the DMRV.
Send a private message to electrovovik. Visit the electrovovik home page. Find more posts by electrovovik. Send by email. FORUM AND CHAT RULES. Reviews from Toyota Corolla owners.
News – Russia, CIS. News - in the World. Repair and Operation general issues. Steering and chassis. Cinema, music, books, museums. Oh sport, you are the world. Hunting and fishing, hobbies.
The administration is not responsible for the content.
Search by tag Advanced search. View profile Send a private message to AlexanderS Find more posts by AlexanderS. View profile Send a private message to Skiprus Find more posts by Skiprus.
View profile Send a private message to lecsa Find more posts by lecsa. Either endure it for a while, then everything will return to normal. Life is about taking responsibility for your own behavior.
Address: Chernyakhovsk, Kaliningrad region.
cleaning and adjustment of the 3s-fe control unit
- RSS subscription
- Share Vkontakte
Source: http://bestworldcars.ru/automobils22/kak-razobrat-rhh-toyota-1nz.php
How to clean idle speed sensor
On any vehicle, the idle air speed sensor or control is an actuator that needs to be checked periodically. None of the components of the car can work forever, so sooner or later car owners are faced with the problem of a malfunction of the DHW. You can learn more about diagnosing and cleaning the device from this article.
Before you repair the device, you need to find out where the idle speed sensor is located. It all depends on the specifics of the vehicle, but as a rule, this controller is located on the throttle assembly, under the throttle position control. If the location of the DXX is clear, then you can find it without any problems.
Before checking the idle air control, familiarize yourself with the main faults specific to the part:
- the power unit has become less stable at idle;
- engine speed may increase or decrease for no reason;
- when switching to neutral speed, the engine may simply stall;
- if the power unit starts cold, there will be no increased speed;
- when an additional load in the form of a stove, air conditioner or optics is turned on, the engine speed drops significantly.
Idle speed sensor device
Cleaning Rules
It often happens that cleaning the idle speed sensor can solve the problem of device inoperability. In general, this procedure is quite simple. Therefore, almost anyone can cope with it.
So, how to clean the idle air regulator:
- First of all, the IAC must be disconnected from the wiring.
- Next, take the WD-40 liquid and apply it to a Q-tip. This stick is used to clean contacts.
- Next, take a small Phillips head screwdriver and unscrew the controller latches, there are two of them. If the fastenings are completely missing, this indicates that the IAC is mounted on varnish; if this is the case, then, most likely, the entire throttle will need to be dismantled.
- Dismantle the DXX and inspect it. If there is dirt or traces of motor fluid on the device, then in addition to the regulator itself, you will need to clean the entire throttle assembly.
- Now take a cleaning fluid (you can use carburetor cleaner instead of WD-40) and apply it to the cone needle and spring. Although carburetor cleaner is better for cleaning! Having done this, you need to dry the controller and put it in place. Before installation, make sure that the distance from the device body to the needle is 2.3 cm. If cleaning does not help fix the problem, then most likely you will have to change the DHC.
Controller connection diagram
Main aspects of checking IAC
We figured out how to clean the idle speed sensor, now we’ll take the time to diagnose it. Like cleaning, testing can be done at home.
How to check the idle speed sensor:
- Find the IAC and remove it along with the wires. Unscrew several clamps that secure the throttle assembly with the receiver, then move these elements apart by about 1 cm.
- Using a diagnostic tester, check the IAC circuit - now you should make sure whether there is voltage in the network or not. Connect the tester probes to contacts A and D - as a rule, they are marked on the body. Having connected the probes, you need to activate the ignition and look at the results. The best option is 12 volts. If this parameter is lower, then most likely the problem lies in a poor battery charge, and if it is completely absent, then it is quite possible that the problem lies in the control unit.
- Make sure that the circuit is on the IAC itself. To do this, the tester's probes must be connected to pins A and B, and then to C and D, and you need to set the tester to ohmmeter mode. When checked, the diagnostic parameters should be about 53 ohms. Then the same actions should be repeated with other pairs of contacts, for example A and C, and the resistance should tend to infinity (the author of the video is Ivan Vasilyevich).
There is another option; for this, checking the idle speed sensor must be carried out with the IAC removed. Connect the power cable, then touch the end of the needle with your finger (no force required). During shutdown, the regulator should begin to extend the needle fully, so when you turn, there should be a slight push of the finger.
As you can see, in general, diagnosing a device is not that difficult, but for a quality test you need to understand how to use the tester.
If you have no idea how to do this, it is better to seek help from an electrician, but in practice, after studying the instructions for the multimeter, there should be no problems with its use.
Of course, the tester itself must be working, otherwise the readings will not correspond to reality and you will only get confused.
Loading …
Features of dismantling
As for dismantling the controller, there is nothing difficult about it. Of course, some points may vary depending on the design features of your vehicle.
But in general the withdrawal procedure looks like this:
- First, the ignition is completely turned off. Just in case, to prevent a short circuit, you can disconnect the negative terminal from the battery.
- The next step is to disconnect the regulator's power wiring. Typically this connector is a four-pin output and can simply be disconnected. On some cars, the wiring block can be fixed using an additional fastener - there is nothing complicated here, you just need to disconnect the fastener.
- After this, the regulator mounting bolts are unscrewed and the controller itself is removed.
Video “Replacing the sensor at home”
The procedure for replacing the regulator is described in more detail in the video below (author - Ovsiuk channel).
avtozam.com
How to clean the idle speed sensor and when to do it
The idle air regulator, also known as IAC, also known as the idle speed sensor, or idle air valve, is a very modest in size, but despite this, a very important component of your car. From the name you can already understand what function it performs - stabilizing engine idle speed by changing the flow area in the channel through which air passes.
Source: http://ChistVill.ru/chistka/datchik-holostogo-hoda-kak-pochistit.html