DIY tubeless tire repair kit: how to use

DIY tubeless tire repair: instructions for using a special kit
Almost any driver can fix a tire puncture on his own. This is especially true in the case of a problematic spare tire or several simultaneous tire punctures. To do this, you should have a tubeless tire repair kit in your own garage, which will come to the rescue of a competent car owner.
In addition to saving money on repairs, the driver will continue to be able to independently get rid of punctures at any time, without the help of repair company employees.
Determining the tire type
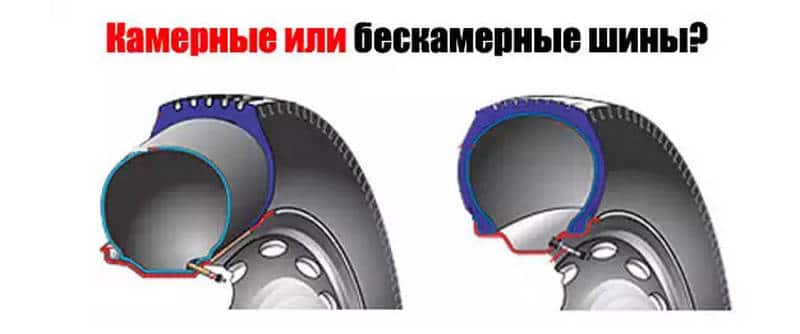
Before carrying out repairs, you must definitely determine the type of tires that are installed on the car. The difference between tubed and tubeless wheels is that the latter do not have an additional element - a rubber chamber filled with air. Instead, there is a thin, no more than 3 mm thick, airtight layer inside the tire.
This is what the pump or compressor fills when inflating the tire. Restoring the tightness of this cavity is the main task of the process. This usually takes about half an hour, and the cost of resuscitation practically does not exceed 200-400 rubles.
Tubeless tires can be of two types:
For the first option, a minimal amount of air is vented through the puncture. This type is the safest for driving on problematic roads. For the second type, it will be necessary to plug the hole using a self-tapping screw. This will allow you to get to the garage or the nearest repair shop.
If you have a repair kit, you can even repair the side cut of a tubeless tire. The advantages of using this rubber are in the following positions:
- safety is higher than that of wheels with tubes;
- significantly less heating while driving;
- longer service life;
- less weight when compared with chamber analogues.
Almost all cars produced over the last 5-6 years are equipped with this type of wheel tires. Even in the behavior with a puncture, one can distinguish a tubeless wheel, which goes down much more slowly than tube-type ones.
Before you repair tubeless tires yourself, you need to make sure the type of wheel. It is customary to pay attention to the nipple. For tube wheels it will have a conical or cylindrical appearance, and for tubeless wheels a slight seal with a visible lip will be noticeable at its base. The latter is necessary to trap air inside the cavity.
If the driver is not sure, then he can try to push the nipple inward; if the attempt is successful, the wheel will have a tube.
How to identify the puncture zone
Not in every situation it is possible to immediately determine the point through which the tire goes flat. This is due to the fact that air leaks occur in different areas:
- air is released through the nipple;
- the fit to the sides is not tight enough;
- weak valve fastening;
- long-term operation of wheels without additional pumping.
Mechanical damage most often occurs when the surface is ruptured by sharp metal elements or broken glass. To detect leaks, apply a foamed soap solution or other similar mass to suspicious areas, and you can also lower the inflated wheel completely into a container of water. The puncture will reveal itself as air bubbles.
If applying a soap solution is not successful, you can spin the wheel less than a full turn and repeat the procedure, and then use a tubeless tire repair kit.
Preparatory work
We will remove the identified puncture or foreign object ourselves. Difficulties may arise when eliminating damage larger than 5 mm in diameter. Small punctures are easier to repair.
You need to know that you can often fix a puncture without even removing the wheel from its seat.
The kit must include the following components:
- a device that expands the impulse;
- tourniquet for raw rubber;
- auxiliary elements for installing the harness;
- special glue or paste for repair.
You will also need a fairly sharp and durable knife that can handle reinforced rope, which is difficult to cut.
When selecting a hole expander, it is necessary to take into account that all layers are quite dense, and its working part must pass through all layers.
In classic repair kits, its role is played by a tapered file with a T-shaped handle. With this shape it is easier to overcome the resistance of the rubber.
A device for inserting a tourniquet is also an integral part of the kit. Using a special cut at the bottom, the patch is fixed. After removing the steel rod, the raw rubber bundle goes inside the cavity and remains there. Most patches can withstand many tens of thousands of kilometers.
Carrying out repairs
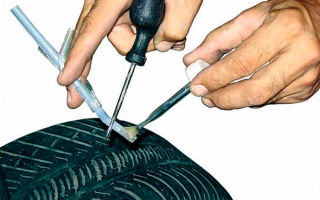
After preparing the tools and identifying the puncture site, you can begin repairs. First of all, the treatment site is pre-cleaned. Next, we determine whether it will be possible to patch the problem area with the available tourniquets, since you can independently treat punctures up to 5 mm.
You need to know that several harnesses will help you get to the service center when it is not possible to call a tow truck and the tire has a significant puncture.
When working with the wheel, the pressure should be about 0.5 atmospheres. This parameter will provide sufficient flexibility to the rubber, relieving excessive stress. A tool with a T-shaped handle is placed into the puncture and scrolled several times, and then removed. We repeat this operation two or three times.
We install a special harness into the resulting space, which is coated with special glue or special paste in advance. After this, we give it a little time to dry and inflate the tire to operating pressure.
Apply a little soap solution to the area to be treated to check the quality of the patch. If air bubbles appear, repeat the operation. The work can be viewed in detail on the page.
We cut off the excess “tails” of the tourniquet with a sharp knife.
You need to know that the mass of the harness does not have a significant effect on the balancing of the wheel, so the ramp does not need additional operations.
Working with other defects
Carrying out repair work on tubeless tires involves not only eliminating pinpoint radial punctures, but also getting rid of other damage that interferes with normal driving. However, not all of them can be eliminated even by qualified tire fitting companies.
Most often, such problems include side damage to the tire. This is usually the final verdict on the wheel. In non-critical cases, you can restore the ramp and throw it in the trunk as a spare wheel. Before doing this, it is advisable to balance the wheel.
Side cuts often tear the cord, and after that it is difficult to predict the behavior of a car with such a wheel. Vulcanization with a patch from the inside can correct the situation. A well-installed patch can last for many years.
For bent rims on the road, you can use a hammer to pre-align the sidewall in order to get to the service station. A special sealant is used on discs damaged by corrosion processes. The contact area with the disc is processed along the entire perimeter.
If for some reason the spool or nipple is damaged, they must be replaced. You won't be able to drive for long with damaged ones.
Conclusion
Even a novice driver can carry out minor repairs on tubeless tires. The repair kit can be carried in the trunk. More serious tears or large side cuts will have to be left to specialists.
http://ktonaavto.ru
Source: http://legkoe-delo.ru/remont-avtomobilya/avto/89070-nabor-dlya-remonta-beskamernykh-shin-svoimi-rukami-kak-polzovatsya
Do-it-yourself tire repair - useful tips - Behind the wheel magazine
 If you find a puncture, prepare the compressor. If you have to go at any cost, you will hold out for some time. If you are planning to repair, remember: under pressure it is easier to detect the puncture site. And easier to repair.
If you find a puncture, prepare the compressor. If you have to go at any cost, you will hold out for some time. If you are planning to repair, remember: under pressure it is easier to detect the puncture site. And easier to repair.
In ancient times, there was GOST 5170–73 “First aid kits for repairing pneumatic tires.” There were so many components that were not in these first aid kits! And a fungus, and a grater with a plaster, and a roller... And now each manufacturer decides for himself what to put in his kit.
Let's check what the descendants of those travel first aid kits are capable of. Grant's editorial office, one of whose wheels gave up the ghost, pushed for decisive action. Instead of a tire shop, we visited several stores where we purchased 16 different kits for repairing tubeless tires.
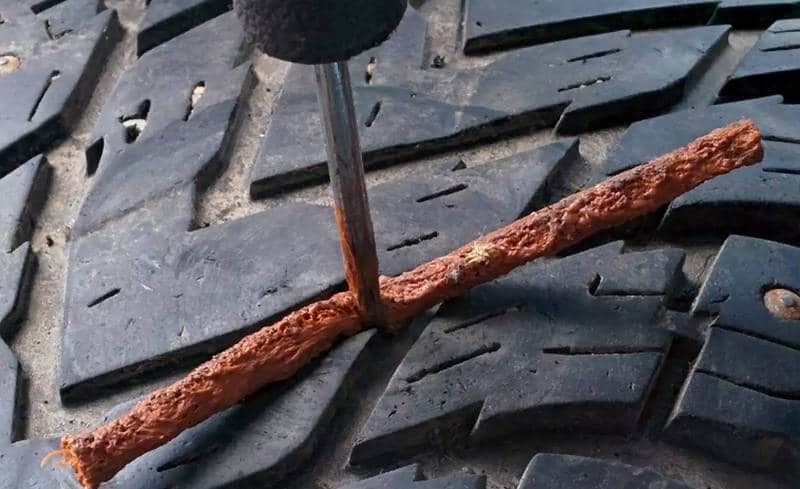
The price range is sevenfold, although the principle of operation is the same. After finding a puncture, you need to remove the culprit of the problem (screw, nail), then widen the hole and tightly insert a folded rubber band into it.
The nuances of technology and tools may vary, but in general the repair algorithm is exactly the same.
Related materials
Having repaired a tire that encountered a self-tapping screw on the road, we decided to test all 16 repair kits on the poor thing. However, in the end, only 13 stab wounds were inflicted on her, since three sets were immediately rejected: the flagella in them were frankly bad, they instantly tore in the hands.
The instruments also vary quite a bit. Thus, the nice handle in the CityUp CA-793 set managed to rotate relative to the tip during the first attempt to penetrate inside the tire.
Note that some sets do not provide any “picking tools”, and in some places there is no glue. And the names of the instruments are different for almost all manufacturers - in the explanations we give exactly the “proprietary” version.
| “Pickers” of different stripes. The ones with a T-shaped handle are more convenient. It is better if the working part looks like a square rod twisted in a spiral. A rod with a diamond-shaped knurl is a little worse, and a very jagged one is very bad - it tears the cord. Ideally, the tool should simply push the cord threads apart. “Pickers” of different stripes. The ones with a T-shaped handle are more convenient. It is better if the working part looks like a square rod twisted in a spiral. A rod with a diamond-shaped knurl is a little worse, and a very jagged one is very bad - it tears the cord. Ideally, the tool should simply push the cord threads apart. | |
| "Needles" with different handles. The most convenient is the T-shape. The working end should be sharp and have an eye with rounded edges. “Needles” with different handles. The most convenient is the T-shape. The working end should be sharp and have an eye with rounded edges. | The harnesses on the left side are suitable, reinforced. But nothing good can be said about the rest of the products: they tear even when you try to insert them into the ear. The harnesses on the left side are suitable, reinforced. But we can’t say anything good about the other products: they tear even when you try to insert them into your ear. |
A tire with so many holes in the tread passed the test at speeds over a hundred for a couple of weeks without losing a drop of precious air.
For the sake of the experiment, we didn’t even cut off a few ponytails - and everyone kept it together. We also managed to deal with a small puncture in the sidewall using a flagellum.
Although the reliability of sealing is noticeably lower than in the case when the harness is kept in a thick (even a worn tire) tread layer.
| Don't understand where the air is siphoning from? A water procedure will help detect leaks. Don’t understand where the air is siphoning from? A water procedure will help detect leaks. | The tire sidewall can easily be pierced with a regular kitchen knife. A cut one and a half centimeters wide is, generally speaking, the death of the tire, but you have to get there! The sidewall of the tire can easily be pierced with an ordinary kitchen knife. A cut one and a half centimeters wide is, generally speaking, a death sentence for the tire, but you have to get there! |
| Instead of using a “needle” to repair the sidewall, it is better to use a regular slotted screwdriver: it is easier to remove it without the risk of pulling the flagellum back. We decided to use four flagella at once to repair the side cut. The seal has been restored. The flight is normal! On the first day, the tire withstood city speeds (up to 70 km/h) and did not lose pressure overnight. The next day we drove along faster roads - and, alas, after 18 km the centrifugal forces prevailed. A bunch of flagella fell out, the pressure instantly dropped, and we moored to the side of the road and began to put on the spare tire. We do not recommend repeating it! This is dangerous! Instead of using a “needle” to repair the sidewall, it is better to use a regular slotted screwdriver: it is easier to remove it without the risk of pulling the flagellum back. We decided to use four flagella at once to repair the side cut. The seal has been restored. The flight is normal! On the first day, the tire withstood city speeds (up to 70 km/h) and did not lose pressure overnight. The next day we drove along faster roads - and, alas, after 18 km the centrifugal forces prevailed. A bunch of flagella fell out, the pressure instantly dropped, and we moored to the side of the road and began to put on the spare tire. We do not recommend repeating it! Is it dangerous! |
Toward the end, they carried out another test - a kind of “everyday” one: they pierced the sidewall of the tire, like some hooligan with a knife or screwdriver. We were no longer engaged in comparative tests, but simply fought for survivability.
By the way, the same damage occurs, for example, when the tire comes into hard contact with a curb or the sharp edge of a hole.
Such a temporary repair is a priori more difficult: the sidewall is thinner than the tread, and therefore it is more difficult for the flagellum to stay in the hole.
| AVS RK-110 A 78220S, China. Repair kit for tubeless tires. AVS RK-110 A 78220S, China. Tubeless tire repair kit. Approximate price: 180 rub. Contents: spiral awl, tool for installing harnesses, strips of raw rubber (5 pieces), activator adhesive. The spiral awl destroys the cord - during installation you can hear the crackling sound of breaking threads. However, the repaired wheel runs successfully. | CityUp CA-793, China. Repair kit for tubeless tires. CityUp CA-793, China. Tubeless tire repair kit. Approximate price: 200 rub. Contents: tool for cleaning and forming a hole, an awl with an eye, reinforced strands (5 pieces), glue. The beautiful rasp handle immediately turned - the set can be removed from testing. Okay, we took an analogue of the “picker” from another set... In the end, the wheel was repaired, but I can’t even think of recommending purchasing such a first aid kit. | DoneDeal DD0320, China. Repair kit for tubeless tires. DoneDeal DD0320, China. Tubeless tire repair kit. Approximate price: 540 rub. Contents: a tool with a twisted tip, a tool with an eye, an adhesive activator for raw rubber, strips of raw rubber (8 pieces), a cutter. The spiral awl is good, the handles are comfortable. Note that the kit includes a cutter; other kits do not have it. I liked the first aid kit, but it was a bit expensive. | DoneDeal DD0324, China. Tubeless tire repair kit. DoneDeal DD0324, China. Tubeless tire repair kit. Approximate price: 330 rub. Contents: a tool with a twisted tip, a tool with an eye, an adhesive activator for raw rubber, raw rubber flagella (3 pieces) I didn’t like the “picker”: it tears the cord. But the wheel was repaired anyway. |
| Tire repair kit, country not specified. Tire repair kit, country not specified. Approximate price: 160 rub. Contents: tool with a twisted tip, tool with an eye, adhesive activator for raw rubber, harnesses (5 pieces) A tool with a hole like a needle eye has a groove that is too wide. Nevertheless, the set passed the test. | Titan T-609, country not specified. Repair kit for tubeless tires. Titan T-609, country not specified. Tubeless tire repair kit. Approximate price: 130 rub. Contents: a tool for stripping and forming a hole, an awl with an eye for installing a strand, reinforced strands (5 pieces), glue. The inexpensive set coped with the task successfully, demonstrating the best price-quality ratio. | Titan T-720, country not specified. Repair kit for tubeless tires. Titan T-720, country not specified. Tubeless tire repair kit. Approximate price: 100 rub. Equipment: rasp for cleaning and forming a hole, an awl with an eye, reinforced strands (5 pieces), glue. The handle is made sloppily. The glue feels very liquid. However, it works. | Victor Tire repair kit 00101–8, Bell Automotive Products, China.Victor Tire repair kit 00101–8, Bell Automotive Products, China. Approximate price: 220 rub. Equipment: a tool with an eye, an adhesive activator for raw rubber, conical black “plugs” (6 pieces) The stepped “wedges” broke almost immediately. Fail. |
| DoneDeal DD0328, China. Repair kit for tubeless tires. DoneDeal DD0328, China. Tubeless tire repair kit. Approximate price: 300 rub. Contents: a tool with an eye, strips of raw rubber (10 pieces), adhesive activator. The set failed quite quickly: the weak, unreinforced strips of raw rubber tore during the first attempt to push them into the workplace with the included tool. Failure! | IMG Tire Repair Toolbox V125, China. First aid kit for tire repair. IMG Tire Repair Toolbox V125, China. First aid kit for tire repair. Approximate price: 720 rub. Contents: pressure gauge, rasp, tool with eye, repair harnesses (10 pieces), glue, 4 caps, 4 spool valves, universal key for cleaning valve threads, 10 patches for the camera. The most expensive, but also the most complete set in our selection. The kit coped with the puncture. However, the tool is inconvenient. And not everyone will need most of the content. | Michelin tire repair tools kit, France (although the barcode starts with 49 - Japan). Tubeless tire repair kit. Michelin tire repair tools kit, France (although the barcode starts with 49 - Japan). Tubeless tire repair kit. Approximate price: 180 rub. Contents: rasp, needle tool, repair strips (3 pieces), glue. The glue is liquid like water. But the wheel was repaired quite quickly. | Phantom PH5243, China. Puncture repair kit for tubeless tires. Phantom PH5243, China. Puncture repair kit for tubeless tires. Approximate price: 175 rub. Contents: tool for stripping and forming holes, an awl with an eye for harnesses, harnesses for repair (5 pieces) No glue included. However, the set fulfilled its immediate function. |
| Victor Tire repair kit 00102–8, Bell Automotive Products, China.Victor Tire repair kit 00102–8, Bell Automotive Products, China. Approximate price: 270 rub. Contents: tool with eye, long black “self-vulcanizing” strands (4 pieces) No glue in the set. The bundles appear to be very thin. There is no tool for preparing the hole in the kit - you have to work straight away with a “needle”. However, we sealed the hole. | Victor Tire repair kit 00103–8, Bell Automotive Products, China.Victor Tire repair kit 00103–8, Bell Automotive Products, China. Approximate price: 270 rub. Contents: tool with eyelet, adhesive activator for raw rubber, conical red “plugs” (6 pieces) Red “plugs” of a stepped shape break even before installation in the tire. Fail. | Art. 44449, People's Republic of China. Tubeless tire repair kit. Art. 44449, People's Republic of China. Tubeless tire repair kit. Approximate price: 150 rub. Contents: spiral file, awl with eye, strands (3 pieces), glue. An inexpensive set successfully coped with the task. | AirLine, China. Repair kit for used tires with glue ATRK-3.AirLine, China. Repair kit for used tires with ATRK-3 glue. Approximate price: 240 rub. Contents: a tool with a file tip, a tool with an eye, strands of raw rubber (5 pieces), an adhesive activator. The tip of the “picking” tool is too thin. But the wheel was repaired. |
Of the listed kits, we highlight the Titan T-609 for 130 rubles - at an affordable price, it is equipped with a set of tools that did not cause any complaints from us.
Separately, we note DoneDeal DD0320 for 540 rubles - the only set that includes a cutter to trim the ends of the bundles sticking out of the tire. If not for the price, he would like to be a champion.
The most general recommendations are as follows: the flagella should be thick and reinforced, the “picker” should not be too “toothy”, and glue is still necessary.
| We determine the puncture site. If external inspection does not help, immerse the wheel in water or, at worst, spray it with water to detect air bubbles. Sometimes this requires increasing the pressure to 2-3 bar. Having found a puncture, mark it. Using pliers we remove the culprit. We take a tool [1] for stripping and opening (in common parlance - a “picker”), install it at the puncture site and release the handle - we try to determine the direction of the puncture by the angle of inclination. Apply a layer of glue to the surface of the “picker” (if it is present in the repair kit) and first screw it all the way into the tire, then pull it out. The operation must be repeated two or three times. During the last pass, we leave the tool in the recessed position. We take the tourniquet and install it in the eye of the awl (it is also called a “needle”). Apply glue to the surface of the strand. Take out the tool for stripping and shaping and quickly push the awl with the strand into the hole [2] . The ends of the tourniquet must remain on the surface. We take out the awl - the tourniquet must remain in the hole. The tire is the same, view from the inside [3] . Filmed with a hidden camera... We inflate the wheel and check the tightness with water or at least by ear. We cut off the ends of the harness protruding from the outside flush with the surface of the tire tread [4] . That's it, you can go! [5] |
We wish everyone that our advice will never be useful! Bon Voyage! |
Repairing a punctured tire - test of 16 repair kits and advice from ZR
See all the photos and videos our users love.
Subscribe to auto news on our Yandex Zen channel
Error in the text? Select it with your mouse! And press: Ctrl + Enter
Source: https://www.zr.ru/content/articles/907290-prokol-i-protokol/
Tubeless tire repair kit: instructions on how to use
One of the problems that can take a driver by surprise is a tire puncture on the road.
Such unpleasant moments can be created by an ordinary small nail or self-tapping screw that can pierce tires. What to do in this case? You shouldn’t immediately look for a service station or buy new tires.
You can easily repair your wheel yourself using a tubeless tire repair kit.
Having a special set of tools and supplies in your trunk will save you time and money. The tubeless tire repair kit is easy to use, so you don't even need to have hands-on experience repairing your vehicle.
The repair kit contains all the necessary elements needed for quick and high-quality wheel repair. The small set can easily fit into your glove compartment or trunk, allowing you to use it if necessary even on the road.
On the Internet you can find various videos about what this set of tools is and how to use it.
Often, a car tire can be punctured by a nail that you hit on the road. What to do? First of all, you need to remove the piercing object from the puncture site. But this is not so easy to do. If you pull out a nail, for example, with ordinary pliers, then in its place there will be a hole through which air will escape from the chamber, and you will not be able to use your vehicle.
Repairing tubeless tires yourself is an easy task if you use a repair kit. A tire repair kit is a set of tools and accessories, among which you can find everything you need:
- Rasp. A special tool whose main task is to create a smooth round hole at the site of a tire puncture. Using this device will simplify subsequent repairs and patching of holes in the tire.
- An awl is a sharp instrument with a hole in the needle. Use it to seal a hole in a car tire.
- The tourniquet is the main material that is designed to fill the puncture site.
- Glue.
This simple tool kit will allow you to quickly make minor repairs to your tire after a puncture. You will spend approximately 10–15 minutes for the entire work. The repair kit, which includes a set of tools, harnesses and glue, is inexpensive. You can repair your car tire yourself without the help of a tow truck.
Repairing tubeless tires yourself will allow you to save on services. Removing a nail from a wheel and sealing the resulting fistula is not difficult. It is advisable to watch a video of the work being carried out, which will allow you to get an idea of all stages of the repair. What are the stages of self-repair of a tire?
One of the first tasks is to completely remove the sharp object from the rubber of the wheel. This can be done using ordinary wire cutters. The repair kit does not have such a tool, but every driver can definitely find one in his garage. Why pull out the nail? Completing this stage of work will allow you to simplify subsequent repairs using a rasp and applying a tourniquet to the puncture site.
To eliminate the puncture site, you need to insert a tourniquet on which glue is applied. To do this, you need to prepare a hole in the rubber. Before removing a metal object from the tire, prepare a rasp. Apply glue from a tube to the metal pin of the tool. Only after this can you begin to remove the nail or screw.
One of the important points is the sequence of actions. As soon as you pull out the nail, you need to immediately insert the rasp, which is included in the repair kit, into the resulting hole. This is necessary for the tire to go flat.
After installing the tool on which the glue was applied, it is necessary to develop a hole. After watching a few videos, you will be able to understand the best way to do this.
The ribbed surface of the metal base of the tool smoothes the edges of the hole in the rubber. How is tire integrity restored? The harness on which the glue is applied is securely fixed to the rubber of the wheel, which leads to sealing of the puncture.
The videos will allow you to clearly see the process of sealing a tire puncture with a tourniquet.
To seal your tires you need:
- Pass the special harness included in the tool kit through the hole in the awl. This is easy to do because the material of the tourniquet is soft.
- Apply glue to the harness.
- After preparation, remove the rasp and insert a tourniquet into the puncture site. Pull the awl so that the material fills the entire volume of the hole.
- Pull the awl out of the tire slowly, while the tourniquet remains in place.
After completing all these steps, you will secure the special material to the tire. The tourniquet is securely fixed with glue to the inner cavity of the puncture. After this, you just need to cut off the excess material with a knife. In the video provided you will see how to correctly install the tourniquet and remove the awl from the rubber.
It is advisable for every driver to have in his arsenal a special kit for repairing tires in case of a puncture. Due to their ease of use and low price, these sets have proven themselves well on the market. The kit is designed to work in various conditions.
The advantages of using such a kit are quick and high-quality repairs of tires with your own hands. This kit can be used both in the garage and in emergency situations when a tire gets punctured on the road. Practical use of this method has shown that it takes approximately 10–15 minutes to complete the entire job. After this, the wheel can be inflated with air to the desired pressure.
Despite the sufficient reliability of this repair method, we recommend, if possible, disassembling the wheel in order to apply a patch. Such repairs can be carried out at every tire station. This repair method is considered more reliable.
Source: http://ymp3.ru/avtoremont-i-tyuning/nabor-dlya-remonta-beskamernyx-shin-instrukciya-kak-polzovatsya
Tubeless tire repair: video and photos

Finding and patching a tire puncture on your own without the help of specialists is quite a difficult task, but every motorist should be able to do it. The services of a tire repair station for tire repair are expensive, and the process takes quite a lot of time.
As a rule, a puncture of a tubeless tire is not immediately noticeable, except for those situations when the source of the cut is obvious - the head of a bolt or nail sticks out of the tire. In any case, do not rush to pull out the stuck object, since tubeless tires are designed to withstand such punctures. The same cannot be said about tube tires.
to contents ↑
The difference between a tubeless tire and a tube tire
Tubeless tires, when punctured by foreign objects stuck inside, deflate slowly, while tubeless tires deflate instantly. If you regularly inflate tubeless tires, they can be used for more than one or even two months.
It should be taken into account that when inflating a wheel, a foreign object damages the cord threads, which act as the spokes of a bicycle wheel (if they are damaged, the wheel will twist to a helical state). It is better not to delay repairs so that corrosion does not begin. Thus, the nail should be immediately pulled out and the puncture patched.
There are many modern ways to quickly repair tires with your own hands. We will discuss them.
to contents ↑
How to find the puncture site?
If you were unable to quickly find the puncture site, you should moisten the tire with water and look for the hole using the bubbles. If there is no water, you can use antifreeze from glass washer.
The advantage of tubeless tires is that the puncture site can simply be sealed with a sealing harness, sold in all car dealerships. There is no need to disassemble the wheel. In addition, for this type of front wheel repair, you will not need to remove it.
Just turn the steering wheel in the right direction and lift the car with a jack.
to contents ↑
Cord harness
The most popular type of repair harness is cord harness. Its main component is a special nylon fiber impregnated with sticky butyl rubber. To use the harness correctly, you will need an installation awl and a spiral awl.
to contents ↑
How to patch a puncture?
Using a spiral awl, go through the entire puncture, and then, turning it clockwise, clean the hole from dirt. With each turn, the awl will expand the hole more and separate the threads of the metal cord. These steps will not damage your tire.
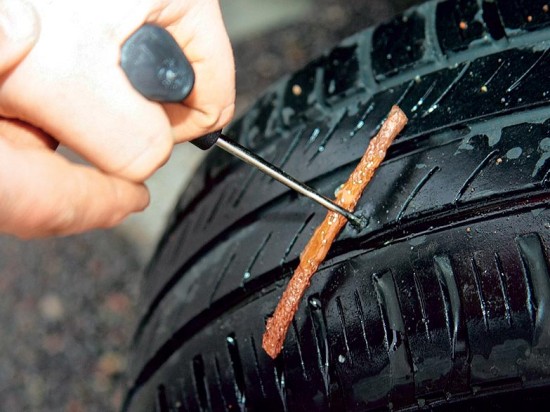
Using an installation awl, carefully insert a tourniquet into the previously prepared hole, then unscrew the spiral awl and push the awl with the tourniquet 3-4 cm deep. Slowly pull out the installation awl so that the harness remains in place.
Cut off the excess, leaving a couple of millimeters above the tread surface. We put the wheel in place and pump it up.
to contents ↑
Features of the technology
This method has obvious advantages - it is very simple and cheap. All the necessary tools (a couple of harnesses and two awls) are quite inexpensive. If you buy them separately rather than as a set, the cost of one awl can reach the price of the entire set. At the same time, you can buy repair harnesses separately if you run out of them.
The main disadvantage of this repair is its fragility. After about 5-6 months, the tourniquet will dry out and begin to leak air slightly - 0.2 barrels per week.
to contents ↑
Rubber band with adhesive coating
These products are more reliable compared to cord rope. The repair method is approximately the same, but has certain features.
First of all, it is better not to use an awl in the form of a rasp, since in the process of cleaning the hole it breaks the cord threads, and the harness may be damaged during installation. It is better to choose a tool with a side exit.
Also, before installing the harness, it should be coated with glue, which should react with the adhesive shell (the glue should be used that is recommended by the manufacturer of the harness).
The key advantage of this repair is the airtight seal of the rubber, but the disadvantages include damage to the tire frame, which is not reinforced from the inside.
to contents ↑
Common Mistakes
When using rubber harnesses, motorists made some mistakes, so manufacturers developed reinforced repair harnesses, the frame of which consisted of nylon cord threads, and the adhesive layer acted as a shell. The repair technology remains the same. The cost of reinforced harnesses is not much higher than rubber ones, but they are much more reliable. Alas, the manufacturer does not guarantee the eternal service of a repaired car tire.
to contents ↑
Anchor system
A good repair method is to use a special insert called an “anchor”. It strengthens the running surface of the tire tread from the inside with its side stripes. For the manufacture of “anchors”, high-quality porous rubber with an adhesive shell is used.
To work with such inserts, you need a special cutter 6 mm in diameter, which does not destroy the cord threads. The repair kit does not contain it, so you have to buy it separately. To install the “anchor” you will need an awl with a side exit.
If everything is done correctly, there will be no problems when operating a tire sealed in this way.
Do not forget that the inserts and harnesses described above are not intended for repairing the side parts of tires. If this is your case, it is better to turn to professionals and not take risks.
Video: Quick repair of tubeless tires on the road with a harness
Video: How to repair a tire
Source: http://Driving24.ru/remont-beskamernyx-shin-svoimi-rukami/
How to repair a tubeless tire
On modern roads, a car faces many troubles that are difficult to avoid - the formation of punctures from sharp objects: various nails and screws, pieces of wire, glass.
When hit, they get stuck in the surface of the tire and do not allow the air to escape completely. If the pressure decreases sufficiently slowly, you can try to pump up the tire at certain intervals and calmly drive to the tire fitting place.
It is believed that for this type of tire it is difficult to carry out repair work independently without specialists. Car owners often wonder how to seal a tubeless tire when they are away from the workshop. It is necessary to pay attention to the fact that self-repair is a labor-intensive and difficult process.
If you have a spare tire, you can replace it and calmly continue driving to the repair shop. , you can repair tubeless tires yourself using one of the following methods:
- using auto chemicals, but such resuscitation of the tire will be temporary, for a short period of time, and after it a major repair should still be done;
- using special patches - tourniquets.
It is possible to repair tubeless tires without even removing the wheel, using a sealant that seals the damaged area. The base of the sealant can be helium, liquid or aerosol; only aerosol ones do not work very well at low temperatures. Today, customers are presented with a large selection of sealed products that differ in quality and price.
Using this technology, a bottle of sealant is connected to a pump or wheel valve. When inflated, the contents enter the tire under strong pressure, cutting off the air flow. This is a temporary measure, so you must contact a service center, otherwise you may end up with a wheel imbalance.
More reliable puncture repair can be done using a special tubeless tire repair kit containing all the necessary tools:
- an awl to prepare the damaged area;
- harnesses made of special material;
- devices that install the tourniquet;
- knife for removing trimmings of the tourniquet.
A knife is not always included in the kit, so you can use a penknife or a stationery one, but it must be sharp.
The kits can be designed for professional use and for car enthusiasts. Naturally, repairing punctures of tubeless tires in a workshop, done by professional specialists, provides a higher guarantee after repair and longer use of the tires.
There is an express repair using a repair kit for tubeless tires, which contains fork and spiral awls, nylon bundles impregnated with butyl rubber in an amount of 5 pieces. and glue.
First you need to remove the object with pliers or remove it with a screwdriver. Then, using a spiral awl, rotating, clean the area from dirt without damaging the tire cord. Print out the rope, insert it into the hole of the fork awl and cover it with glue.
Pull the awl out of the puncture with a sharp movement, insert the prepared fork awl with a tourniquet four centimeters inside instead and quickly pull it out.
The harness will remain in the tire; carefully remove the protruding top, while keeping a small part above the surface.
Having completed the process, all that remains is to pump up the tire to normal. If the puncture is rather large, then the tourniquet must be folded four times. This repair kit is a great helper on the road, but it won’t be able to help you with a side cut. The pictures below show the sequence of the repair process using a repair kit.
In serious cases, fungi are used that are installed from the inside, so the tire must be dismantled. The puncture is processed using a drill, the diameter of which is selected according to the diameter of the fungus stem.
The surface is cleaned of dirt. The hole is treated with glue, the protective film is removed from the fungus and it is inserted into the puncture.
The cap is rolled with a tool specially designed for this purpose, and the excess parts are cut off from the outside.
Remember that tubeless tires cannot be left without repair for a long time, since metal parts of a foreign body can provoke the process of abrasion of the cord and, subsequently, its destruction, or cause a corrosive effect, which can cause the cord to burst and deformation of the tire.
Source: http://vse-dlyaavto.ru/sovety/remont-beskamernyx-shin-svoimi-rukami-nabory-dlya-remonta-shin.html