Replacing oil seals without removing the cylinder head. Management

Replacing valve stem seals begins with allowing time for the engine to cool and for the oil to drain into the sump. Once the engine has cooled down, you can begin removing the valve covers.
When removing the timing cover, be careful not to damage the gasket. To do this, do not pry it with a screwdriver if it is not removable, but rather hit it with your palm from the side.
Replacing oil seals on a diesel engine is no different from the same operation on a gasoline engine.
Purpose of valve stem seals
Since the lubrication of the gas distribution mechanism is combined (the camshaft journals are lubricated under pressure, and the remaining components and parts are lubricated by splashing), a lot of oil accumulates in the upper part of the head while the engine is running, which even covers the upper edge of the valve guides.
Therefore, through the gap between the valves and the guides, oil, if there were no valve stem seals, would flow in large quantities into the combustion chamber along the valve stems.
Due to the high temperature of the head, the rubber of the oil seals becomes hard, and their working edges over time cease to tightly cover the valve stems and begin to leak oil.
When the engine is running, the exhaust valve is at high temperature.
Therefore, the oil that gets on its working chamfer burns, and the carbon deposits from it create conditions for the valve to burn out (when a slag particle breaks off, hot exhaust gases rush into the resulting leak between the valve and the seat and the valve sometimes burns out along with the seat). The intake valve has a lower operating temperature; the oil does not burn on it, but flows from it into the cylinder. Therefore, the intake valve never burns out.
Symptoms
Signs of wear on valve seals, called valve stem seals:
- Increased oil consumption. Wear of the rings also causes oil consumption, but then the oil will definitely get into the breather pipe.
- Blueish smoke from the exhaust pipe after starting the engine. This happens because while the car is standing, oil enters the combustion chambers and burns after the engine starts.
- Equally high oil consumption when driving both in the city and on the highway (in the absence of oil in the breather pipe). Moreover, for diagnostics it is important how much oil the engine consumes in various operating modes. Higher oil consumption outside the city will indicate ring wear.
- Burnt oil on spark plugs. If the caps are worn too much, the spark plugs may splatter with oil so much that the engine will stall.
If your car has signs of cap wear, it is unlikely that additives will be able to solve the problem for you. It's worth thinking about renovation.
Tools and materials
If you don’t believe in additives, the advertising of which screams about a miraculous effect, and you decide to repair it, then you will need the appropriate equipment. To replace the caps yourself you need:
- Valve desiccant.
- Tweezers.
- Mandrel for pressing caps.
- Hammer.
- Heads with extensions and crank.
- A set of open-end and spanner wrenches.
- Collet clamp for removing caps.
- Silicone sealant, or better yet, a new timing cover gasket.
Replacement
Replacing valve stem seals with your own hands:
- Remove the timing cover.
- Align the crankshaft and camshaft to the marks. Place the appropriate markings on the parts so that there are no difficulties with their placement after repair. Write down the location of the pipes and connectors to be removed.
- When removing the camshaft, loosen its drive tensioner.
- Device for desiccation of valves. The photo shows the process of removing crackers. If the drive is chain, unscrew the drive gear and remove it from the camshaft. To avoid losing it, it is better to remove the key from the shaft groove and tidy it up. If the drive is belt driven, it is easier to remove the belt from the gear.
- Unscrew the camshaft bed fastening and remove it from the head. Determine the size of the keys yourself. While the camshaft is removed, check it for wear on the journals and cams.
- Remove the valve pushers: depending on the design, remove the rocker arms or remove the cups with hydraulic compensators.
- Since the pistons of cylinders I and IV are already at TDC, it is better to start replacing from the edges. Because in order for the valve to dry out, it needs to rest against something; in our case, it will be the bottom of the piston.
- On some models, the intake manifold interferes so much that the desiccant has to be shortened. Because it's easier than removing the manifold.
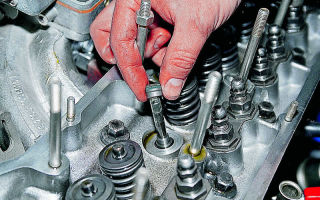
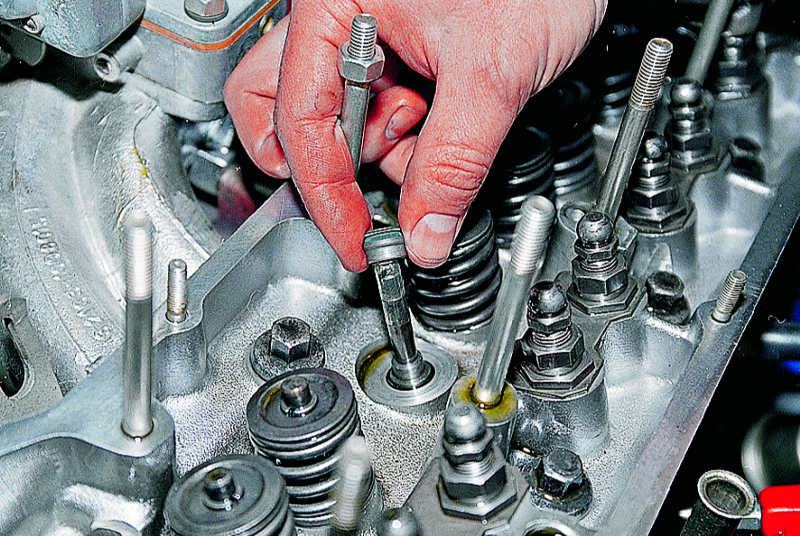
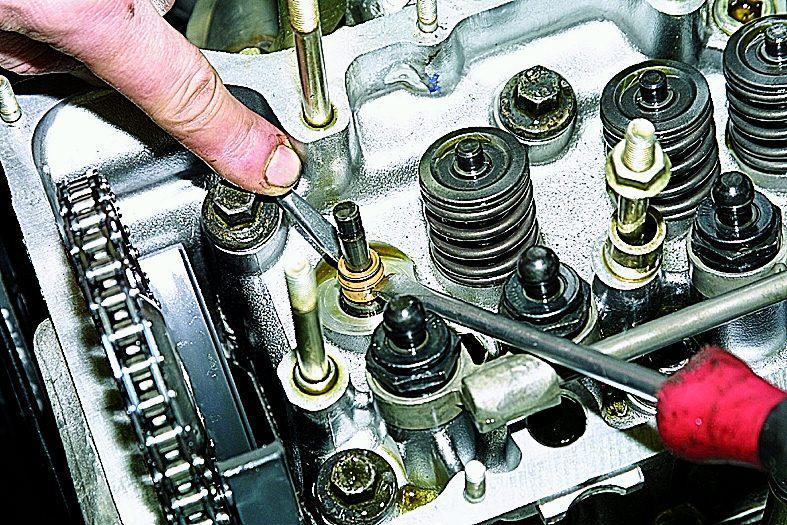
- The correct tool for removing caps: Take a desiccant. Fix its bracket, which is attached closer to the edge of the lever, to the bed fastening stud, and attach it closer to the middle with a ring on the plate covering the valve springs. With one hand, press the desiccant lever so that the valve springs are compressed and the plate moves down the rod, and with the other hand, take tweezers and use them to remove the crackers from the plate.
- Place the desiccant aside, remove both springs and the plate from the rod.
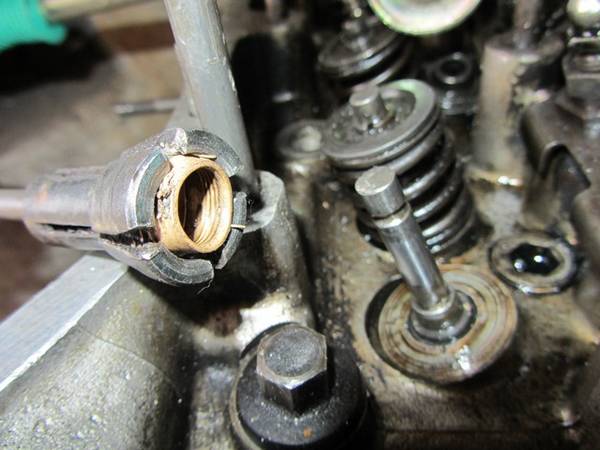
- Attach the puller collet to the cap. Moving the weight up along the puller rod, hit the upper stop with it - the removal of the unusable cap is completed.
- If you have a mandrel, it's worth using it. If it is missing, for caps on valves with a stem diameter of 8 mm, it can be replaced with a 10mm socket wrench. If the diameter of the rods is 6 mm, then a 8mm wrench will do. Valve seals must be made of fluoride rubber (so called sucking FRM).
Installation process
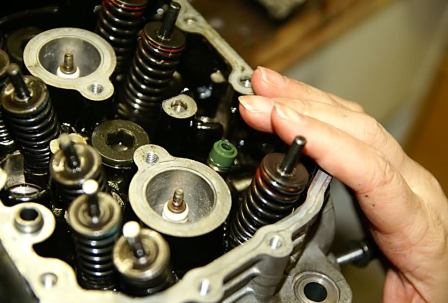
- Remove the springs from the seals.
- Insert the oil seal into the mandrel and place a drop of oil on the valve stem.
- Place the oil seal together with the mandrel on the valve stem and slide it down to the seating lug of the guide. Lightly tap the mandrel with a hammer to press it into place.
- Do not forget to put the springs on the installed caps before assembly.
- After this, install the valve components and dry using the method used to remove crackers.
- Repeat this sequence as many times as necessary and replacing the caps yourself will be done.
- Reassemble the disassembled components in the reverse order of removal. If your engine does not use hydraulic compensators, adjust the valves.
Now you know how to change valve stem seals with your own hands.
No matter how many times you perform all the procedures before, be very careful.
Useful tips
- There are additives for restoring seals. When you are tempted to use one of them instead of changing the caps, remember that there are no miracles in the operation of the internal combustion engine and natural wear and tear. These additives soften hardened rubber and supposedly restore the quality of the seals. Experience shows that these additives either have no effect on the rubber, or soften it too much, and as a result, the size of the working edge increases, and oil consumption after using the additive increases significantly. So you better think about how to change the valve stem seals. How much it will cost you depends on the type of internal combustion engine. But you will definitely be sure that the caps perform their function. Additives, alas, cannot guarantee you such an effect. You should not try such additives on your car.
- If you haven't found a device with a collet clamp for removing caps, but that hasn't stopped you. Remember that the landing step under the cap has a wall thickness of just over a millimeter and is very fragile, and when you try to remove the cap with pliers, this part of the valve guide is broken very often, and the repairs that are necessary after this (replacing the guide, milling the seat and lapping the valve) are much more expensive more expensive than replacing caps and related devices.
Source: http://AutoLirika.ru/remont/zamena-maslosemnyh-kolpachkov-bez-snyatiya-golovki.html
How to change valve stem seals on a VAZ 2107?
Oil seals (aka valve seals) are found on almost all modern cars. Their failure, even if not all of them, guarantees a lot of trouble for the car owner. This not only increases oil consumption, but also harms the piston. In this article we will answer in detail the following question - how to change valve stem seals on a VAZ 2107.
Content:
Oil seals are installed in the cylinder head on the valve guides. They are made of special oil-resistant rubber, which can also withstand high engine temperatures.
Oil seals are a metal base in the form of a cylinder covered with special rubber. On the working edge, to improve performance, there is a spring for a tighter fit to the valve.
If replacing the valve stem seals of a VAZ 2107 with your own hands is quite possible, then on more modern and imported cars, which also have 16 valves, this is a more complex operation and it is better to immediately buy a quality product so as not to redo it.
Oil under pressure lubricates the camshaft in the cylinder head and then flows down to the head and also over the valves. Under the influence of temperature, it becomes fluid and forms a suspension.
If the valve stem seals are worn, oil will be sucked into the combustion chamber, and this in turn leads to its consumption and carbon deposits on the pistons and spark plugs.
Ultimately, this can lead to oil consumption of up to 1 liter per 100 km, which is comparable to gasoline consumption, and this will hit your wallet.
Signs that the valve stem seals need to be replaced are:
- increased oil consumption;
- blue smoke and soot from the exhaust pipe;
- soot on candles.
Of course, such symptoms may also indicate other malfunctions, for example, severe piston wear or stuck rings, as well as incorrectly set ignition (for carburetor models).
But all this is determined experimentally. Piston wear can be assessed by determining compression in the cylinders.
In the book on car repair and operation, it is recommended to change the valve stem seals after 30,000 km.
To carry out repairs you will need the following tools:
- a set of keys;
- valve puller;
- tweezers (to pull out crackers);
- oil seal remover;
- a mandrel (or something similar for pressing, for example a piece of tube slightly smaller than the diameter of the oil seal);
- hammer;
- tin solder rod 8 mm.
Before changing the valve stem seals, you must:
- remove the accelerator cable and breather hose so that they do not interfere with operation;
- turn out the spark plugs;
- remove the head cover;
- when turning the crankshaft, align the mark on the camshaft sprocket with the mark on the housing;
- unscrew and remove the sprocket from the camshaft;
- remove the camshaft with bearing housing;
- fix the sprocket and chain;
- remove the rocker.
We start with the first cylinder, since it is at top dead center. - We insert a tin rod into the hole from the candle under one of the valves so that it does not fall down;
- dry the valve with a puller;
- remove the valve springs;
- remove the old oil seal;
- Remove the valve stem seals using a puller
- install a new one, having previously lubricated the seat with oil;
- install springs and crackers;
- carry out the same actions on the second valve;
- after cylinder 1, we replace it in cylinder 4;
- rotate the crankshaft 180 degrees and change on cylinders 2 and 3
- turn the crankshaft back and begin to assemble the engine in reverse order.
The order of operation of the cylinders on the VAZ 2107 is 1st-3rd-4th-2nd, while turning, watch the chain with the camshaft sprocket.
So, find out from the sellers what the valve stem seals are made of, do not skimp on such trifles and be careful when making repairs.
So, this article provides step-by-step instructions that will help you figure out how to change the valve stem seals on a VAZ 2107.
Source: http://vaztaz.ru/vaz-2107/kak-pomeniat-maslosemnye-kolpachki-na-vaz-2107.html
Replacing valve stem seals without removing the head
Valve seals perform an important function in the timing mechanism of a car; they remove excess oil from the valve stems as they move and prevent foreign substances from entering the combustion chamber.
When the valve stem seals wear out, it is very important to replace them in a timely manner in order to avoid increased oil consumption and carbon deposits on car parts and mechanisms.
Car owners with no repair experience will learn from this article how to replace the caps without removing the cylinder head.
The smooth functioning of the gas distribution mechanism is very important for the smooth operation of the internal combustion engine. The timing belt supplies the combustible mixture to the cylinders and removes exhaust gases from the combustion chamber.
Timely gas distribution is ensured by the movement of the intake and exhaust valves by transferring force to them from the camshaft through cams. In modern car models, the gas distribution mechanism also affects the power and environmental friendliness of the internal combustion engine.
Functions of valve stem seals
The non-stop operation of the mechanisms while the car is moving requires the presence of a sufficient amount of lubricant in the timing belt, which should soften the friction of the parts, but at the same time not enter the combustion chamber. Valve seals perform the function of removing excess oil during valve operation and serve as a damper that prevents lubricant from entering the chamber.
The valve stem seal consists of 3 components: - a reinforced steel bushing that serves as the base of the cap and gives it strength; — a rubber cap that removes excess lubricant from the valve stem;
— an expander spring that ensures a tight fit of the edge of the rubber cap to the rod.
Currently, the rubber part of the valve stem seal is made from acrylate or recycled rubber, in contrast to the old style caps made from polyethylene resin. The use of modern materials has extended the service life of these parts, but still sometimes they become unusable and require replacement.
Signs of cap failure
An experienced car enthusiast can assume aging and wear of the valve stem seals when the following signs appear: - oil consumption increases; — carbon deposits appear on the spark plugs;
— blue or gray smoke appears from the exhaust pipe.
Having noticed such alarming signs, the car owner should inspect the timing belt, valves and oil seals, and, if his assumptions are justified, immediately replace the damaged parts, without waiting for more serious consequences to appear.
Serious consequences of oil getting into the combustion chamber include: - the appearance of carbon deposits on the pistons and cylinders; — compression drop; — poor valve closure; — the idle speed of the car begins to malfunction;
- engine power decreases.
Carbon deposits on car mechanisms and components accelerate their wear and can lead to premature engine overhaul, so you should not delay replacing worn oil seals.
Reasons for wear of valve stem seals
The main reason for the malfunction of valve stem seals is their loss of elasticity, as well as destruction and peeling of the rubber. This is due to the fact that when the internal combustion engine is running, the caps are constantly in the elevated temperature zone and do a lot of work. Each valve operates over 1000 strokes per minute, and on each stroke the cap removes excess oil.
In addition to high temperature, rubber is constantly exposed to chemicals - oil and exhaust gases, which also shortens the service life of the product. Oil seals have their own durability, usually about 100,000 km, but in the end they still need to be replaced. Some experts believe that the caps need to be changed at much lower mileage.
How to replace the caps without removing the cylinder head?
Replacing damaged valve stem seals can be done either with or without removing the cylinder head.
Typically, replacing caps without removing the head is carried out if the wear of parts was detected in a timely manner, and significant carbon deposits did not form on the pistons and valves.
Otherwise, you will have to dismantle the cylinder head, remove carbon deposits and adjust the operation of the gas distribution mechanism.
The nuances of replacing caps without removing the head on different car models differ from each other, but several general steps can be distinguished: - let the engine cool and drain the oil from the system;
— remove the timing cover, set marks on the crankshaft and camshaft, loosen the drive and remove the camshaft;
— dry out the valves, that is, remove their push springs; — after removing the springs, remove the worn cap from the valve stem using a collet or pliers; — remove the springs from the new caps and lubricate their inner surface and the valve stem with oil;
— insert the oil seal into the mandrel and place it on the rod, press it in until it stops using light blows;
— put the springs on the caps and dry the valves in the reverse order; — assemble the disassembled units in reverse order and adjust the valves.
Replacing valve stem seals is quite labor-intensive, so it is better to schedule such car repairs on a weekend. Good luck!
Source: http://365cars.ru/remont/zamena-maslosyomnyh-kolpachkov-bez-snyatiya-golovki.html
Self-replacement of valve stem seals on a VAZ 2109
At first glance, the valve stem seal is an insignificant detail. But if it wears out, it can cause the car owner a lot of trouble. We will talk about what an oil seal is and how to replace it yourself on a VAZ 2109 engine in this article.
Valve seals for VAZ 2109
These caps are located directly on the engine valves, in the cylinder head. Another name for these caps is valve seals.
Their main task is to prevent excess oil from entering the engine. These caps are made of special rubber.
And rubber, even special ones, deteriorate over time and oil begins to flow directly into the combustion chamber of the engine. In this case, it is worth changing these parts.
Worn caps of a VAZ 2109 car
It's simple: if thick bluish smoke comes out of the car's exhaust pipe, then it's time to change the caps . As a rule, this smoke appears only when the engine starts and when it stops. But if the caps are very worn, thick smoke constantly comes out of the chimney.
However, smoke is not the only sign that the caps need to be urgently replaced. Sometimes smoke is practically not visible, but oil consumption in the car increases several times, while no external oil leaks (through various oil seals and gaskets) are observed. All this also suggests that it’s time to change the caps.
- Socket set,
- hammer (medium size),
- soft metal rod with a diameter of 8 mm (optionally made of tin),
- medical tweezers,
- pliers,
- tool for removing crackers from valves,
- pressing mandrel,
- collet for removing caps.
- There is a striker on the collet. You need to hit it accurately with a hammer. This will cause the cap to crumple and it will be possible to remove it from the collet with pliers. The valve stem seal is removed from the guide sleeve using a collet
- Once the crackers are removed, the valve plate and its spring are removed. When the spring is fixed, the valve crackers are removed using medical tweezers
- After this, a tool is installed to decompress the valves and, with its help, the valve spring is pressed.
- After the piston reaches the dead center, the spark plug is unscrewed from the cylinder, and a tin rod with a diameter of 8 mm is inserted into the opened hole. The tip of the rod should be between the valve and the bottom of the piston.
- Now the crankshaft must be turned so that the piston in the cylinder, where the caps are planned to be replaced, reaches top dead center. The camshaft is removed, then the oil seal is removed
- First of all, you need to remove the wires from the battery.
- The timing belt is removed.
- The pulley with teeth is removed from the camshaft.
- The wires are removed from the first fastening, and the nuts are unscrewed from the third fastening.
- Four nuts are unscrewed from the front cover, then the nuts from the rear cover are unscrewed (there are six of them).
- Both covers are removed.
- The camshaft is removed.
- The oil seal is removed from the camshaft. The valve spring is pressed firmly using a collet.
- After pressing the valve spring, the crackers can be removed using tweezers. First, the valve plate is removed, and then the spring located under it
- Now, using a collet, you need to remove the oil scraper cap from the guide sleeve. By hitting the handle with a hammer, the cap is compressed in the collet and removed
- The new cap is pressed into the valve plate, then a spring is installed on it.
- Similar operations are performed with all caps that need replacement.
- After replacement, the cylinder head is reassembled.
Important points
- After removing the worn cap, you should carefully inspect the walls of the guide sleeve, since any scratch on this wall left by the collet can lead to renewed oil leakage into the combustion chamber and will negate all efforts to replace the cap.
- Before installing new caps, you must remember to remove the springs from them.
- Before pressing in the new cap, the installation site is generously lubricated with oil. This helps to place the cap in place more accurately, without putting extra effort into it.
As can be seen from the article, it is quite possible to replace valve stem seals on a VAZ 2109 with your own hands.
The main thing is to be patient, follow the sequence of operations and not make much effort when pressing the new caps into place.
Source: http://autozam.ru/remont-i-obsluzhivanie/samostoyatel-naya-zamena-maslos-yomny-h-kolpachkov-na-vaz-2109.html
Replacing valve stem seals on a VAZ 2104 yourself
VAZ 2104 general view
https://www.youtube.com/watch?v=-BPS6mJlZ8Q
VAZ engines have a significant drawback. This is wear on the valve stem seals and, as a result, increased oil consumption and blue exhaust. Oil seals (also called valve seals) are designed to prevent excess oil from entering the combustion chamber along the valve stem. Valve seals are made of oil and petrol resistant rubber.
This rubber resists the aggressive properties of oil and gasoline vapors well. But over time, the rubber loses its elasticity, it becomes brittle, delaminates, the tightness of fit to the valve stem is lost and excess oil penetrates into the combustion chamber. This results in excessive oil consumption and blue smoke from the exhaust pipe. The estimated mileage until the next change of caps is 20,000 km.
If you notice that oil consumption exceeds 1 liter per 1000 km, and the exhaust turns blue, then it’s time to replace the valve stem seals. This work can be done with your own hands. To do this, in addition to the standard tool, you will need a special device for loosening valve springs.
Replacing valve stem seals on a VAZ 2104 is a rather labor-intensive operation, and having such a device will significantly speed up this process.
Set of fixtures and tools
Tools for replacing caps
The set includes:
- a device for removing crackers from valve springs;
- remover of old caps (these are modified pliers);
- mandrel for pressing valve seals;
- tin rod with a diameter of 8–10 mm and a length of 20 cm;
- device for adjusting valve clearances;
- open-end wrenches 8; 10; 17;
- socket wrenches 8; 17;
- flat screwdriver;
- hammer.
Tool for pressing old valve seals
This device has an inertial puller for old oil seals on one end, and a mandrel for pressing in new ones on the other. This device easily removes old caps and presses in new ones, without scratching the valve stem.
Preparatory work
On a VAZ 2104, replacing valve stem seals begins with disassembling the engine in order to open access to the valves:
- remove the air filter cover and disconnect its housing from the carburetor, having previously disconnected the crankcase ventilation and air supply hoses;
- remove the air filter from the carburetor;
- disconnect all hoses from the carburetor;
- remove the carburetor from the intake manifold;
To prevent dirt from getting inside the carburetor, close all holes with plugs or a clean rag.
Let's continue:
- disconnect all the hoses that pass above the valve box cover;
- unscrew the fastening nuts and remove the valve box cover, being careful not to damage the gasket;
- unscrew all spark plugs from the cylinder head;
- remove the side cover covering the camshaft drive sprocket;
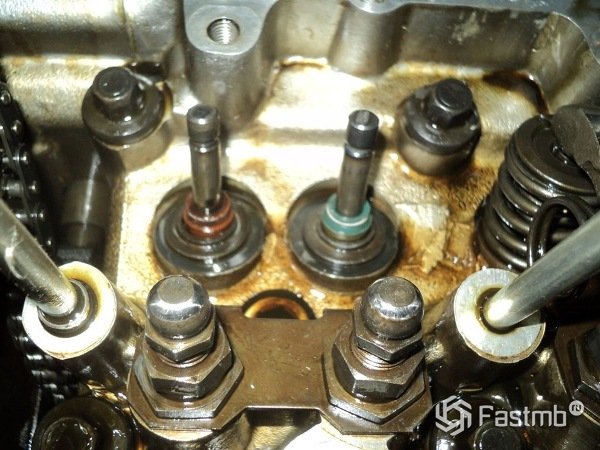
When we remove the cover, you can see through the springs which seals the oil was leaking through.
Through the valve springs you can see which caps were leaking oil.
Continuation of preparatory work
Marks on the sprocket and on the camshaft bearing housing
- turn the crankshaft and, following the marks on the sprocket and on the bearing housing, set the piston of cylinder 1 to top dead center (TDC) during the compression stroke;
- We turn on reverse gear so that the crankshaft does not turn;
Release the camshaft mount
Wring out the shoe
- bend the lock washer and unscrew the 17 bolt that secures the camshaft sprocket;
- loosen the tension of the camshaft drive chain, to do this, unscrew the nut securing the shoe, which provides tension to the chain, insert a pry bar between the chain and the shoe and, lifting it up, press out the shoe, in this position tighten the nut again;
- we tie the chain so that it does not fall down;
- With light blows with a mallet or the handle of a hammer, remove the camshaft drive sprocket;
Pay attention to the sprocket key; if it holds loosely in the groove, it is better to remove it so as not to get lost.
Removing the camshaft
Unscrew the nuts securing the camshaft bearing housings
- unscrew the nuts securing the camshaft bearings to the cylinder head;
Removing the camshaft
- remove the camshaft along with the bearings;
Disassembling valves and removing seals
Installation of a device for removing crackers
- We insert a tin rod through the spark plug hole in the head and bring it under the valve that we will dry out;
- Screw a nut onto the stud closest to the valve;
- We place the grip of the device under the nut, and rest the other end against the valve spring;
Take out the crackers
- With one hand we compress the valve springs, and with the other we take out the released crackers;
This is best done with tweezers, a magnetic screwdriver, or long, thin-nose pliers. This must be done carefully so that the crackers do not fly apart under the action of the springs.
Remove the plate and springs
- Having removed the crackers, remove the upper plate, both springs and the lower plate of springs;
Remove the oil seal
- Now you can remove the oil seal; this can be done using modified pliers or prying it off with a flat screwdriver;
- Before installing a new seal, a plastic sleeve must be placed on the valve stem. This is done so as not to damage the working edge of the oil seal. Such a sleeve should be included in the new set of valve stem seals;
- lubricate the valve stem with engine oil and put on a new oil seal;
- remove the plastic sleeve and press the oil seal into place using a mandrel;
Mandrel for pressing oil seals
Reassembly of valves and all dismantled parts
We do the same with the second valve of cylinder 1. Having finished replacing the valve seals on the first cylinder, we proceed to the same operation on the 4th cylinder as it will also be at TDC. Then we rotate the crankshaft 180˚ and bring the pistons of cylinders 2 and 3 to TDC. Having replaced the oil seals on these cylinders, we start on the side of the engine in the reverse order.
Before replacing the camshaft, the crankshaft must be set to the position in which it was when work began on cylinder 1.
This must be done so as not to disrupt the gas distribution order. We check the alignment of the marks on the camshaft sprocket and on the bearing housing.
Compress the camshaft bearing housing in the sequence indicated in the instructions.
Adjust the valve clearances in accordance with the instructions.
The cost of a set of new valve stem seals is 120 rubles
On a VAZ 2104, replacing valve stem seals at a car service center will cost you:
- with removal of the cylinder head - 3500 rubles
- without removing the cylinder head - 2000 rubles
Source: http://MasteraVaza.ru/dvigatel/obsluzhivanie-dvigatelya/zamena-maslosemnyh-kolpachkov-na-vaz-2104-186
Engine 1.8: signs of wear and replacement of valve stem seals
Every driver of a passenger car with an internal combustion engine must be able to distinguish signs of wear on valve stem seals, since otherwise the wear and hardening of valve seals is fraught with a number of consequences. If you identify the problem in time, you can easily buy a desiccant remover and replace the rubber-metal parts even without removing the head.
How valve seals work
Over time, valve seals dry out, causing engine oil to leak, forcing you to top it up more often.
Valve seals, as they are popularly called, are installed directly on the valve stems and are a combination of a rubber cage and a steel bushing designed to increase structural rigidity. When the valve opens, the cap closes it, preventing oil from flowing into the cylinder.
Of course, a certain part of the lubricant still gets under the seal, but this is the norm - the unit is naturally lubricated. Over time, the elasticity of the part decreases, it dries out, and an increase in the volume of leaking liquid is observed.
As a result, the oil “leaves”, forcing you to top it up to normal more and more often.
Signs of wear on valve stem seals: how much oil does a 1.8 engine take?
The first and main symptom of hardened, worn valve seals is excessive consumption of engine oil. True, for some engines the regulations allow noticeable deviations from the generally accepted norm of 200-300 ml per 1000 km. So, turbocharged engines 1.
8, installed on models of the Volkswagen AG automaker (Volkswagen, Audi, Skoda, Seat) legally require adding lubricant to 500-700 ml per thousand kilometers.
A similar situation arises around PSA Peugeot Citroën engines, developed jointly with BMW (also installed on Mini models) - the passport data indicates a “norm” of 1000 ml of engine oil, which must be added to the engine every 1000 km.
The second sign of oil leaving the cylinders due to the caps losing their condition is bluish-gray smoke from the exhaust pipe, which can be clearly seen in the first minutes of engine operation and then when changing gears, while pressing on the accelerator pedal. Also eloquent evidence of the above problem is oil deposits on the threaded part of the spark plug.
When pressure increases in the combustion chamber, the mixture supersaturated with oil is partially squeezed out through microscopic gaps. For example, through the thread of a candle, where the gap is no more than 0.3 mm. Under the influence of high temperature, gasoline evaporates from the mixture, leaving behind a significant “reserve” of lubricant. Indirectly indicates the end of the caps and dark deposits on the electrodes.
Exactly the same soot appears on the cylinder walls. And if you ignore the problem, then one day the valve will simply burn due to plaque.
Video tips for checking the presence of oil burner
It is very easy to confuse the signs of drying out valve seals and the deterioration of the cylinder-piston group. In both cases, the problem matures after 200,000 km; it often occurs on used cars that were purchased without proper diagnostics. Moreover, fat burning and blue smoke are characteristic of both diseases.
But hardened valve stem seals do not affect the compression ratio, which usually drops when the piston rings and the walls of the pistons and cylinders themselves wear out. If the car consumes too much oil (from 1 liter per 1000 km), but the compression in the cylinders is normal, then 90 out of 100, it’s the caps.
An additional check is carried out with the engine running with the oil filler cap unscrewed: an engine that requires repair of the CPG should see smoke from the neck, while used caps do not cause this.
The price of the "cracker" remover for Toyota, Volkswagen, Audi and the principle of its operation
An integral attribute of replacing valve stem seals on any engine, be it a Lexus or a VAZ, is the so-called desiccant.
This is a proprietary or universal (suitable for engines of various brands) tool for clamping valve springs, without which it is not possible to carry out repairs.
The principle of operation of the cracker remover is quite simple: the cracker is attached to the engine body with support points, using mechanical pressure on the plate, the valve return spring is clamped, which allows you to remove the crackers.
It should also be taken into account that universal pullers are often not so multi-tasking - some designs are suitable for engines with the ONV, ONC, HV layout, others are designed specifically for servicing Opel SOHC engines, etc. You should clarify this point before purchasing the tool.
Desiccant price:
- for overhead valve engines - from 3,500 rubles;
- for OHV, OHC, CHV engines – from 2000 rubles;
- a comprehensive set of tools for desiccation on Toyota Camry, Volkswagen Golf, Mitsubishi Lancer, etc. engines – RUB 20,000.
The desiccant, as in the photo, is an essential attribute of replacing valve stem seals on any engine.
Replace without removing the head: cost of repair kit Ford, Mazda, Nissan
In official service, specialists usually insist on the option of replacing the caps, which involves removing the cylinder head. This makes dismantling/installing oil seals much easier, and all time spent fiddling with the cylinder head is paid for by the client. Thus, a decent amount of money accumulates.
But if you don’t go as far as removing the “head,” you will need less nerves and time, and you won’t have to spend money on a cylinder head gasket and new bolts. Once you have access to a desiccant (you don’t have to buy it - you can, for example, temporarily borrow from a friend), the matter remains small.
It is necessary to purchase a set of branded or non-original valve stem seals.
Cost of the original repair kit (valve seals):
- Toyota Camry 2.4 – 1300 rubles;
- Ford Focus 1.8 – 1500 rubles;
- Volkswagen Golf 1.6 – 1800 rub.;
- Nissan Qashqai 2.0 – 1500 rub.;
- BMW X3 2.5i – 2200 rub.;
- Mazda 6 1.8 – 1600 rub.
Replacing MSC for Mitsubishi Lancer IX 1.6
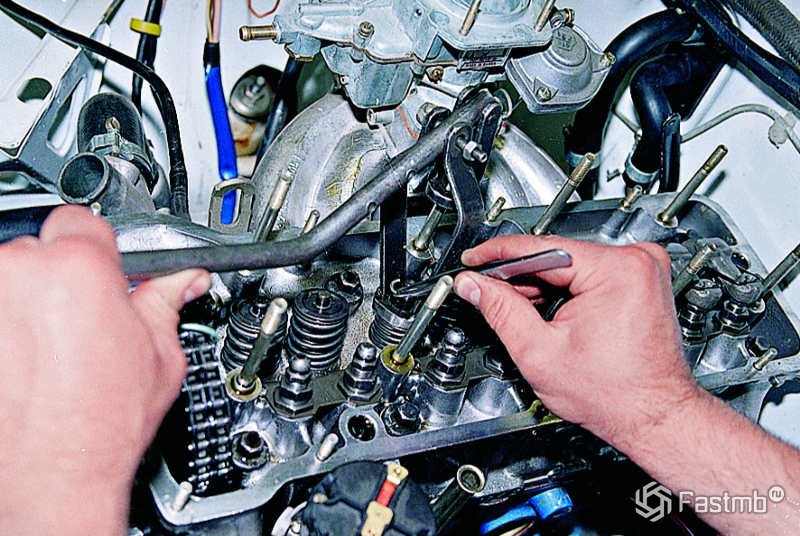
Let's consider step by step the process of replacing valve seals on the ninth generation Mitsubishi Lancer 1.6 without removing the cylinder head.
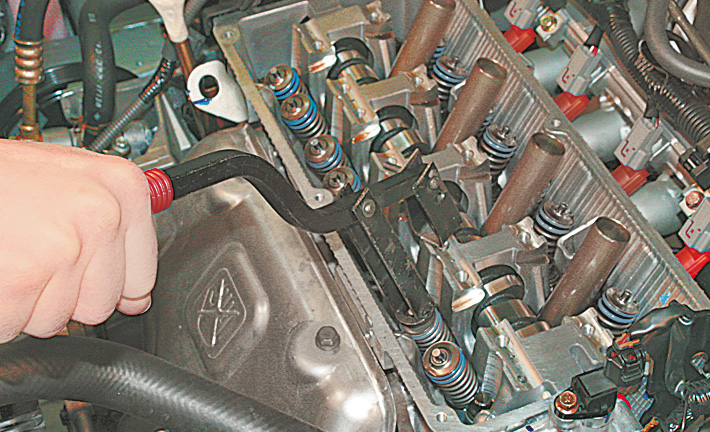
- The ignition coils are dismantled, after which the spark plugs are unscrewed.
- After unscrewing the six bolts, the valve cover is removed. The hoses are disconnected.
- To prevent hydraulic compensators from falling out, they can be secured with wire or plastic clamps.
- It is necessary to unscrew 13 bolts securing the rocker arm axles. The axles are removed as an assembly without turning over (to avoid oil leakage from the compensators).
- To prevent the crackers from falling into the pan, the engine holes are clogged with foam rubber and clean rags.
- Using marks on the pulley and head, TDC is set in the first and fourth cylinders.
- One part of the cracker remover is attached to the valve head body, the other rests against a plate, which allows you to release the crackers and remove them with tweezers.
- After removing the plate with the spring, access to the cap becomes available.
- Ideally, dismantling the cap itself should be done using a special removable device. But in the absence of one, you can get used to working with pliers. However, if you are not careful, you can easily damage the valve guide.
- Before swapping the old and new caps, it doesn’t hurt to check the valve itself for play.
- The oil-lubricated new cap is pressed on using a suitable mandrel - you can use a 10 mm nut head.
- The spring and plate are returned to their place; using tweezers and a puller, the crackers are put back.
- Replacement of the MSK in the remaining two cylinders is carried out after turning the pulley according to the marks and setting TDC.
- It is highly advisable to tighten the rocker arm axle bolts with a torque wrench in compliance with the values recommended by the car manufacturer (50 Nm).
To gain access to the caps on the Priora, you will first have to unscrew the spark plugs from the wells, remove the ignition coils, and also remove the throttle assembly.
After this, you can unscrew the valve cover bolts to remove the rocker arms and actually replace the MSC using a puller.
In general, the situation is the same as in the case of the Lancer: TDC is set in the cylinders, crackers and springs are removed, new seals are installed, and reassembly is underway. As a rule, the entire complex of work takes the performer from 8 to 12 hours.
Source: http://AvtoMotoSpec.ru/remont-avtomobilya/priznaki-iznosa-maslosemnyx-kolpachkov.html
Replacing valve stem seals without removing the head
Content
- How to solve the problem on VAZs
- Valve operation with foreign cars
- Operation price
It happens that blue smoke appears from the muffler, and the engine consumes oil excessively, but still pulls well. This is one of the sure signs that it is necessary to replace leaky valve stem seals - important parts of the valve mechanism. They begin to leak oil for the following reasons:
- natural wear and tear;
- untimely valve adjustment;
- Poor quality oil poured into the engine.
Of course, blue smoke from the exhaust pipe is one of the main symptoms indicating that the car needs this operation. But sometimes it makes sense to do it during repair of a piston unit. For example, replacing piston rings and oil seals is usually done at the same time, so as not to open the engine several times.
However, our repairs can be carried out separately without dismantling the cylinder head. In the following lines we will analyze how such a replacement is carried out on the VAZ, as well as on other brands of cars. Read also about repairing the power steering rack and replacing the fog lamp.
How to solve the problem on VAZs
Let's see how to replace the valve stem seals of a VAZ 2107.
We will need:
- wrenches;
- device for compressing valve springs;
- tin solder rod;
- screwdrivers;
- hammer, mandrel;
- pliers, tweezers.
Begin.
- We remove the air filter housing, as well as the cylinder head cover, by unscrewing the corresponding fasteners.
- We combine the marks so that the pistons of the first and fourth cylinders reach TDC.
- Having loosened the lock washer, we tear off the camshaft sprocket nut.
- Loosen the drive chain tensioner.
- We dismantle the shaft sprocket.
- After unscrewing the fasteners, remove the bearing housing.
- We unscrew the spark plug of the 1st cylinder.
- We remove the lever.
- We unscrew the adjusting bolt and instead screw in the equipment to compress the coils.
- We insert a rod of tin solder into the hole of the candle.
- Having tightened the bolt of the equipment, we take out the crackers using tweezers.
- We remove the equipment, take out the springs, washer and plate.
- Using pliers, carefully remove the worn part.
- We drive the new spare part using a mandrel and carefully hit it with a hammer.
- We reassemble the valve assembly.
- We replace the caps from the VAZ 2107 for the remaining sockets by turning the crankshaft half a turn.
- We assemble the engine.
Replacing valve stem seals on a VAZ 2106 is done in exactly the same way.
Now regarding the front-wheel drive cars of the Volzhsky Automobile Plant. Here the main difference with the described operation can be traced at the initial stage. And after they get to the crackers, they work in exactly the same way. So, when replacing the valve stem seals of a VAZ 2109, the following tools are taken:
- wrenches;
- device for compressing valve springs;
- tin solder rod;
- screwdrivers;
- hammer, mandrel;
- pliers, tweezers.
The first points differ from the previous instructions.
- Remove the camshaft pulley.
- The head cover is also removed.
- Remove the rear casing.
- Remove the ground wires from the studs.
- The bearing housings and the camshaft are unfastened and removed.
- Further steps for changing the caps on a VAZ 2109 are identical to those described in the previous instructions, starting from point 7. In this case, the piston of the cylinder with which they are working must be at TDC.
The valve stem seals of a VAZ 2110 are replaced in the same way. There are practically no differences with the “nine”.
Valve operation with foreign cars
Now let's turn to the Mitsubishi car. To replace a spare part for Lancer 9 we will need:
- wrenches;
- device for compressing valve springs;
- tin solder rod;
- screwdrivers;
- hammer, mandrel;
- pliers, tweezers.
The actions are as follows.
- We unscrew the spark plugs.
- Set the piston of the first cylinder to TDC.
- Unfasten and remove the block head cover.
- Unscrew the rocker arm fasteners.
- We remove the axles with rocker arms.
- Insert the solder rod into the spark plug hole.
- We install equipment for compressing the coils.
- We take out the crackers with tweezers.
- Remove the spring, washer and plate.
- We take out the part to be replaced with pliers and press the new one in with a mandrel.
- We repeat the operation for the remaining nests.
As you can see, the final stage of the technology differs little from the instructions for domestic cars.
Next, we will look at replacing oil scraper elements in a Peugeot 308. This car has some difficulties at the disassembly stage. The following tools need to be prepared:
- wrenches;
- device for compressing valve springs;
- tin solder rod;
- screwdrivers;
- hammer, mandrel;
- pliers, tweezers.
Actions need to begin in the engine compartment.
- Initially, it is necessary to remove the resonator, pipe, air filter housing, coil covering, and coils.
- Remove the spark plugs and remove the cylinder head cover.
- Set the first piston to TDC.
- Remove the vacuum pump, tensioner, damper, damper.
- Remove camshaft.
- Remove the rocker arms.
- And only after all this can we reinstall our part according to a well-known scenario.
Next, let's touch on the famous Japanese car. To change the caps, Toyota takes the following set of tools:
- set of wrenches;
- device for compressing valve springs;
- tin solder rod;
- Phillips screwdriver and bayonet screwdriver;
- hammer with mandrel;
- pliers, tweezers.
The following manipulations are done here.
- Unfasten the casing, and then remove the crankshaft belt.
- Unscrew the spark plugs, remove the hoses and cables.
- Remove the cylinder head cover.
- Combine marks.
- Remove the camshaft pulley.
- Remove the camshafts.
- Remove the washers.
- Next, the treasured part is reinstalled in each slot, as already described above.
Finally, let’s study how to replace the caps on a BMW M52 using a standard set of tools.
- Remove the casing and viscous coupling with the fan.
- Remove decorative panels.
- Remove the coils.
- Remove the cylinder head cover.
- Turn out the candles.
- The piston of the first cylinder is set to TDC.
- Recess the tensioner and loosen the exhaust shaft sprocket.
- The Vanos system is dismantled.
- Remove the small chain sprocket.
- Dismantle the camshaft bearings and hydraulic compensators.
- Finally, they begin the operation of replacing the oil seals, as we described, without removing the head.
Operation price
All the technologies described are quite complex - this is immediately noticeable. Not every car enthusiast dares to undertake such a feat! However, a car service center will charge a considerable amount for such work. How much it costs to replace caps in Russia is indicated in this table.
| City | Price |
| Moscow | 2000 rub. |
| St. Petersburg | 1800 rub. |
| Ekaterinburg | 1600 rub. |
Here are the average prices for foreign cars. They will charge less for Lada repairs. The cost for VAZ of this operation to replace valve stem seals is twenty percent less.
Return to top
Now watch the video of replacing the coolant temperature sensor and how to check the thermostat.
Source: http://DaciaClubmd.ru/repair/engine/zamena-maslosemnyh-kolpachkov