Toyota car radio pinout details
Toyota car radio pinout
The pinout of a Toyota car radio is practically no different from the connection diagram for other car radios. The pinout for Toyota car radios is a circuit consisting of two rows of connectors. Our article will tell you how to connect Toyota devices, what you need to know for this and how to install car radios with your own hands.
Several connection schemes
Pinout of toyota car radio connectors
It is believed that the main mistake when connecting Toyota car radios is pulling the positive wire from the cigarette lighter.
This will in no way have any effect, since the power of the head unit will drop several times (this is easy to verify if you pay attention to the flashing backlight while the device is operating at high volume).
In addition, connecting Toyota car radios through the cigarette lighter will not eliminate sound distortion, which will begin to appear noticeably earlier. On the other hand, in some cases this option may be considered suitable for implementation.
The ideal option for connecting Toyota car radios, as well as all others, is to provide the main power supply from the battery. It is advisable to use high-quality wire (it is in no case recommended to skimp on the cable) and be sure to use a fuse, which must be placed as close to the battery as possible.
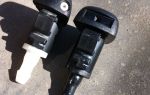
Car radio connectors
In addition, the pinout of the remaining wires:
- N* – negative wire. They are usually connected to the car body, providing ground. However, it is recommended by experts to connect it to a battery;
- C is the wire that is responsible for the amplifier or active antenna.
In addition, the car radio is also equipped with speaker wires (they go to the rear and front speakers):
Ch – black;
C – blue;
B – white;
S-th – gray;
G – green;
F – purple.
Connection according to diagram 1
Connectors for car radios
We do this:
- We connect the power wires to each other;
- We connect them to the battery.
The good thing about this scheme is that it is easy to implement. On the other hand, it is only suitable for car radios with low power consumption. If you connect a powerful device according to this scheme, then in just 2-3 days in sleep mode the car radio will completely discharge the battery.
Connection diagram 2
This circuit is suitable for any powerful car radio:
- We connect the power wires to each other;
- We connect them to the battery;
- We install an additional button (it is responsible for turning the device on and off).
This scheme involves manual control of the radio, but the settings will not go wrong and the battery will not run out in a couple of days.
Connection diagram 3
Connector for car radio
Individual scheme, implying the following:
- We connect the main power wire (yellow) to 12 V;
- We connect the additional one (red) to the side lights (via a relay, the winding of which is connected to the ashtray light bulb).
This scheme provides the following advantages:
- The device turns on simultaneously with the “dimensions” automatically;
- The driver will never forget to turn off the side lights and headlights;
- While stopping, you can listen to music without turning on the ignition;
- If you replace conventional small bulbs with LED ones, the electricity consumption will be very low.
There are many more schemes for connecting Toyota car radios, such as connecting via ACC or via an alarm. As a rule, they are not that common and are not suitable for everyone. In particular, connecting via ACC (lock) is inconvenient because the device will not function without a key in the lock.
Connecting the camera according to the pinout
Knowing the pinout of the car radio, you can easily connect the rear view camera with your own hands. Using the example of the popular Toyota Ca-Fi device, we will learn how to do this. The process itself is divided into two parts: the actual installation of the device with the connection and the connection of the rear view camera.
But connecting the camera can be difficult for some.
Here's what you need to know:
- The rear view camera for Toyota Prado is powered by 5V;
- To connect it, you will need a connector from the factory monitor, which remains free after installing the new radio;
- This same connector is 14-pin. But we only need two video signal wires and a reverse signal;
- In addition, you will need to convert the voltage from 12V to 5V.
The camera connection diagram has its own pinout. This is what she looks like.
Pinout of toyota car radio connectors
The circuit is positioned as if you were looking at it from the side of the wires.
The photo in the upper left corner is placed for clarity. So, in order to connect the camera to the Toyota car radio, you must first connect together the reverse signal and the Reverse wire on Ca-Fi. In addition, it will be necessary to install a converter and make a tulip for transmitting video data.
The photo below shows how to splice wires using tape.
Scotchlock and wires
Next we do the following:
- We start the car;
- We turn on reverse gear;
- Let's check how everything works (the monitor of the installed radio should show the image from the camera).
Thus, knowing the pinout of Toyota car radios, you can connect using any of the selected schemes.
During the work process, it is extremely useful to watch a video review. Step-by-step instructions from other sources will also help. The price of installing a car radio yourself is noticeably different from the cost of specialist services, which is several times higher.
Source: https://avtozvuk-info.ru/shemy-podklyucheniya-akusticheskoj-sistemy/podklyuchenie-avtomagnitoly/raspinovka-avtomagnitoly-tojota-141
Connecting a Toyota car radio at home: simple circuits
Today, one of the main mistakes Toyota owners make is connecting the head unit to the positive cable from the cigarette lighter. This approach will reduce the power of the audio system by at least half.
In addition, connecting the head unit to the cigarette lighter will not reduce interference distortion. In any case, the Rav4 radio or any other model should be connected only to the battery and for this you need to use only high-quality wires.
In addition, the electrical circuit of the audio system must be protected by a fuse, which should be installed as close to the battery as possible (video author - Redpower Evgeny).
It is necessary to take into account that the standard radio of a Toyota Corolla or any other model can be equipped with not one, but two power cables. Typically, the yellow wire provides the main power, and the red cable is responsible for control, usually connected to the lock.
Below is the pinout of the standard radio:
- N - negative cable, usually connected to the vehicle body, provides ground. Automotive electricians advise connecting it to the battery.
- C - antenna or amplifier power cable.
- B, C - wiring for connecting front speakers.
- Z, F - cables for connecting rear speakers.
Scheme 1
The standard radio of a Toyota Camry V40 or another model can be connected to the vehicle’s on-board network in one of three ways, consider the first:
- according to the diagram, the power wiring must be connected to each other;
- then the cables should be connected to the battery.
One of the main advantages of this Toyota head unit wiring diagram is its ease of implementation. But it should be borne in mind that it is relevant for audio systems characterized by minimal energy consumption. If you decide to connect a powerful radio according to this scheme, then after a few days it may well drain the battery.
Visual installation diagram
Scheme 2
Any powerful head unit for Prado 120 or other Toyota model can be connected using this diagram:
- As in the previous case, the power wiring should be connected.
- Then they need to be connected to the battery.
- An additional button is installed to turn the audio system on and off.
Using this option involves manual control of the audio system, but its implementation will allow you to save the entire configuration, while the likelihood of battery discharge will be minimal.
Scheme 3
Another connection option is implemented in this way:
- The yellow cable connects to the battery.
- The red wire must be connected to the side light circuit section. For this, a relay is used, and its winding must be connected to the ashtray diode.
Another connection option
It should be noted that this scheme has certain advantages:
- the head unit will always turn on with side lighting;
- the likelihood that the car owner will forget to turn off the lights is very low;
- when the car stops, the driver will be able to listen to music without having to turn on the ignition;
- When replacing side light bulbs with diode ones, the system will consume less energy.
In principle, the radio of a Camry or any other Toyota model can be connected using different circuits, for example, from the ignition or through the anti-theft system. But such options are less popular among car enthusiasts, so we will not consider them.
Connecting the camera according to the pinout
If you know the pinout of the head unit, then you can connect a rear view camera to it without any problems. Let's look at the connection procedure using the example of a Ca-Fi device, which is one of the most popular among Toyota owners.
The process of connecting the device is divided into two stages - its installation with connection, as well as connecting the rear view camera. It should be noted that in general, installing and connecting the display is similar to installing an audio system; the car owner will only need to swap the connectors.
As for directly connecting the rearview camera, it can cause difficulties, especially if a person has never encountered such a task.
Nuances that will be useful to know:
- The rear view device is powered by 5 volts;
- to properly connect the device, you will need a special connector from the standard monitor, which will remain free after installing the head unit;
- there are 14 pins on the connector itself, but for a correct connection you only need an output for transmitting a video signal, as well as reverse gear;
- Since the camera is powered by 5 volts, it is necessary to prepare a converter with 12 volts.
To connect the rear view camera to the audio system, you will first need to link the reverse speed signals, as well as the reverse cable on the Ca-Fi device. In addition, it will be necessary to install a voltage converter and build a tulip necessary for transmitting information. All these elements can be purchased without any problems at any auto store.
Loading …
Video “What must be considered when installing an audio system?”
The main nuances regarding the connection are given below (the author of the video is the AutoAndElectronics channel).
Source: http://AvtoZam.com/toyota/avtomagnitoly-toyota-raspinovka/
Pinout of the standard radio Toyota 31802
Pinout of toyota car radio connectors. To connect it, you will need a connector from the factory monitor, which remains free after installing the new radio.
TOYOTA by Fujitsu Ten (Japan) Pinout not available. TOYOTA A Matsushita. photo of the radio.
About the logo. The Toyota logo is a triple oval. Two internal ovals located perpendicularly symbolize the strong relationship between the client and the company. In addition, if you look closely and use your imagination a little, in these ovals you can see an image of all six letters of the brand name T, O, Y, O, T, A.
Toyota Land Cruiser (Toyota Land Cruiser) >. Author Topic: Head unit pinout (Read once). 0 Users and 1 Guest are viewing this topic.
TOYOTA TM CR, TOYOTA I replaced their windshield on a Mazda 3. Toyota Fujitsu Ten LEXUS Installing and connecting the monitor is no different from installing the factory head unit. A new video of the Porsche Macan has appeared online.
OEM radio pinout: Toyota, Nissan, Toyota, Ford, Hyundai
Full wiring Lexus LX Amplifier TOYOTA Model: Fujitsu Ten Limited Japan. Amplifier TOYOTA LandCruiser Model: GMzt Pioneer. CETL1C by Fujitsu Ten. TOYOTA by Fujitsu Ten Philippines. TOYOTA by Fujitsu Ten USA. TOYOTA by Fujitsu Ten Japan. TOYOTA TF by Fujitsu Ten Spain. TOYOTA TM CR, TOYOTA TOYOTA, TOYOTA Lexus Premium Sound System.
Toyota Fujitsu Ten LEXUS Remote control connector TOYOTA CD TL1D. TOYOTA R, Fujitsu Ten. TOYOTA Fujitsu Ten, made in Japan. TOYOTA CQ-LSAK, Matsushita. TOYOTA CQ-VSAK, Matsushita, made in Thailand. TOYOTA Matsushita CQ-TT TOYOTA CQ-TTA, Matsushita. TOYOTA CQ-TSA, Matsushita. TOYOTA P FX-MGzt, Pioneer, made in Japan.
TOYOTA W CQ-TSL, Matsushita, made in Germany. TOYOTA Model B CQ-YSA Made In Lapan. TOYOTA Model CQ-TTA. All connectors of the radio can be viewed. Rear panel with radio connectors. 12-disc changer with LEXUS. FUJITSU TEN CD – TM1. Toyota – FUJITSU TEN CE – TLI. TOYOTA, Fujitsu Ten – Matsushita Electric Industrial Co.
TOYOTA A30 CQ-JSA. TOYOTA DVD CX-VT SIENNA. Ceiling-mounted 7-inch monitor with DVD. MP3 player - manufacturer Matsushita. TOYOTA GMzt ULF L. Toyota part ; GMzt model. Head unit DVZ-MGzt from PIONEER. Toyota Land Cruiser Model H, REF No CQ-MSLC.
TOYOTA CQ-TSA, part No. Installer lessons Anti-theft Car audio Miscellaneous. Connection points Installation maps Determine the alarm using the key fob Emergency shutdown of the alarm Programming key fobs Selection of car lamps Pinout of connectors Directory.
Home Pinout of connectors Pinout of connectors for Toyota car radios. Other materials in this category:. Pinout for TOYOTA W part No. Receivers have W part No.
Downloads Connection points Installation maps Activating video input Installer lessons Articles Determine an alarm using a key fob Emergency shutdown of an alarm Programming key fobs Selection of car lamps Selection of lamps Pinout of connectors Dimensions of standard speakers Circuit design Car computers Textbook JBL SpeakerShop Video gallery Directory Car logos Literature.
Mechanical protection Pagers Sensors Car alarms Immobilizers. Control option for the installer. Calculation of a resistor for an LED. Color coding and sizes of automotive fuses. Zello channel for installers and auto electricians. Control the central locking with one button.
Question about Stalker NB. Jaguar E is already known: the design of the successor to the X-Type. Mazda Demio is a practical women's car. A new video of the Porsche Macan has appeared online. All logos used are the property of their respective owners.
When copying materials active link to the site is required.
Connecting a car radio. Connection diagram
- RSS subscription
- Share Vkontakte
Source: http://avtodiagnoz56.ru/race22/raspinovka-shtatnoy-magnitoli-toyota-31802.php
Toyota Corolla Car Radio Connectors Pinout
Similar and other problems can be avoided if you spend a little free time and effort installing an electric trunk drive yourself.
Car radio connectors. ISO socket, used in radios from Blaupunkt, Grundig, Philips, etc. Expansion connector - function depends on the model. Full wiring of Lexus LX 470. Photo of the painted connector Connectors for TOYOTA TOYOTA CQ- radio.
Head unit for Corolla Verso - manufacturer Matsushita Electric Industrial Co.,Ltd Toyota part Toyota - general forum Toyota Tercel/Corsa/Corolla 2/Starlet/Cynos/Paseo Toyota. TOYOTA A56817 car radio pinout. Advanced search in the question database.
Explanations: please help me find the pinout of the TOYOTA A56817 car radio connector. Pinout of car radio connectors. Toyota, 1-A+, 9-speaker RR+, 14-speaker LF-. 2-GND, 10-speaker RR- 15-speaker LR+. The situation is this: there was a Japanese Toyota radio.
The kit included an adapter from the radio connector to the ISO connector.
The long-awaited new product for 2016! Continuation of the DROID line of car radios from NaviPilot, which has proven itself among motorists! This article presents connector diagrams for connecting Toyota car radios in pictures and in accessible language.
TOYOTA WH8403 (22DC761/74, Philips, made in Germany) Pinout not available. TOYOTA W58810 Head unit for Corolla Verso. TOYOTA open model ranges. Connectors for TOYOTA car radios. Connecting OEM Changer to A/Radio Radio AUDIO Delta CC.
Connector A: 1 – Rear right speaker (+) 2 – Rear left speaker (+) 3 – Rear right speaker (-) 4 – Tel-Mute 5 – NC 6 – Rear left speaker (-) Classic connector of the original TOYOTA car radio. Here is a link to the pinouts of ALMOST all car radios. There is a Toyota 56007 CQ TS 2650A 86120-2A330 radio. But I can’t find a specific pinout for it.
3) the layout and pinout of the main connectors indicated in this photo report is typical for all TOYOTA cars after 2001, regardless of the model of the standard head unit. Tell me the pinout of the connector into which the signal comes to the radio from the buttons on the steering wheel.
I installed Car PC and need to control the volume and other joys, but I can’t figure out where to get the signal from the buttons.
22-pin rectangular connector (toyota 22 pin). FP Voltage control on the fuel pump or output for supplying voltage to the fuel pump when checking the pressure in the fuel system W Used to read engine self-diagnosis codes (circuit. Toyota - car radio pinout all radio connectors: Corolla Verso - manufacturer Matsushita Electric Industrial Co. ,Ltd.
Car: Toyota MARKII 2000, Toyota SURF, 1999, Toyota CAMI 2000, LEXUS GX470 2003. I don’t know, maybe it’s already been done, maybe it will be useful for someone! Thumbnails of attached images. Installing a Chinese car radio in a Toyota.
I took out the standard two-block, but the wires are obviously not the same colors as on the connector supplied with the radio, there is no tester, and it’s somehow scary to poke at random. Tell me what color is which wire?
Toyota Corolla 2010 release. Tell me, I look at the block and there is a connector as everyone calls it OBD2: - 4 - ground 5 - ground 6 - CAN 7 - K-line 16 - power supply. 14 - not at all, although I should. Hello everyone! Thank you very much for the pinout. But if you look closely, the connectors are different. I like the radio from Matrix better, now I’m thinking about buying and replacing it.
ISO socket, used in radios from Blaupunkt, Grundig, Philips, etc. Expansion connector - function depends on the Toyota Corolla model (3); Toyota Crown (3); Toyota FJ Cruiser (3). Pinout of toyota car radio connectors. It is believed that the main mistake when connecting Toyota car radios is pulling the positive wire from the cigarette lighter.
Source: http://softruaero.fo.ru/wiki/381922_%D0%9E%D0%B1%D1%89%D0%B8%D0%B5/1485638_%D0%A0%D0%B0%D1%81% D0%BF%D0%B8%D0%BD%D0%BE%D0%B2%D0%BA%D0%B0_%D0%A0%D0%B0%D0%B7%D1%8A%D0%B5%D0% BC%D0%BE%D0%B2_%D0%90%D0%B2%D1%82%D0%BE%D0%BC%D0%B0%D0%B3%D0%BD%D0%B8%D1%82% D0%BE%D0%BB_Toyota_Corolla
TOYOTA Club Belarus
Everything related to repair and tuning issues
Moderators: Vic, Pilot SH, LoneWolf, Patap
28 May 2011, 18:04
The car is a 2005 Toyota Corolla. Hatch. The sound of the standard radio is quite satisfactory, but there was a desire to add an input to it for connecting a player and the ability to dry music from it.
Maybe someone who has already done something like this will tell you how he did it, where he did it. Or someone could suggest places (in Brest) who could take on such work. I know that this is theoretically possible, but I’m somehow afraid to take on the practice, because...
It rarely works out well the first time and it is better to entrust this matter to specialists.
pavel.vasiliukClub member
Posts: 169 Registered: May 26, 2011, 21:03
28 May 2011, 22:23
In theory, there should be a line-in on the rear connector of the radio. Look at what connector you have, find its wiring, and stupidly connect the mini-jack socket to the line-in.
7A-FE (LB), 5-speed manual, color 199
scruogeAdministrator
Messages: 4431 Registered: 10 Jan 2011, 18:16 From: Brest
01 Jun 2011, 13:02
And who himself found this Line in in the connector of the standard radio. It's very interesting to know. ))))))
Toyota corolla, 2003, vagon, 2.0, 1CD-FTV,
UrgisClub member
Messages: 1800 Registered: June 02, 2008, 21:30 From: Minsk
01 Jun 2011, 14:19
As far as I know, this cannot be done, because...
It seems like the signal strength will not be enough. I would like reliable information, from people who did it. There are a lot of theories on the Internet, but if there is anything sensible, then for a particular radio there is very little. I can’t find mine... pavel.vasiliukClub member
Messages: 169 Registered: May 26, 2011, 21:03
01 Jun 2011, 14:29
My radio, like many Toyota ones, has a connector for connecting a CD changer.
I found a special device that connects through it and transmits a signal supposedly from the disk to it. It has the ability to read from a memory card and from a flash drive and, in fact, the linear input I need. The price of this device here on the forum is 130 USD. Here is the link. But that's a lot... I just need the entry and I was hoping to get by with 50 bucks at most (the maximum, otherwise there's no point in doing it). So I thought, maybe there is just some kind of cord that is inserted into this connector for the changer and transmits an analog signal there, and the cord can be embedded somewhere in a socket nearby the radio. pavel.vasiliukClub member
Posts: 169 Registered: May 26, 2011, 21:03
02 Jun 2011, 17:35
Are there similar things, only without any flash drives or cards, just a linear input? Is it possible to order?
pavel.vasiliukClub member
Posts: 169 Registered: May 26, 2011, 21:03
02 Jun 2011, 22:37
So maybe you have AUX on your butt as standard.
All that remains is to remove the lace. I did this to myself at Jazz.
Honda Jazz
ScorpALAdministrator
Messages: 4833 Registered: July 6, 2005, 16:25 From: Minsk - Gomel My car: Honda Jazz 2003
02 Jun 2011, 23:29
I haven’t turned on the radio itself yet, but in my opinion there is no way out to the standard one (as I understand you are talking about tulips).
Maybe I missed something?... pavel.vasiliukClub member
Messages: 169 Registered: May 26, 2011, 21:03
03 Jun 2011, 10:46
Not necessarily tulips. For me, AUX generally looked like a proprietary connector.
The main thing is to find the pinout. And then it’s a matter of technology.
Honda Jazz
ScorpALAdministrator
Messages: 4833 Registered: July 6, 2005, 16:25 From: Minsk - Gomel My car: Honda Jazz 2003
03 Jun 2011, 11:39
Eh... there is no such thing as I understand... here is a photo of the diagram of my model... maybe I misunderstood something...
pavel.vasiliukClub member
Messages: 169 Registered: May 26, 2011, 21:03
03 Jun 2011, 11:59
in your picture, look at the connector marked CN702,12P. Pins 2,3,4 and 5 are the stereo AUX audio input, apparently the connector is intended for a changer.
7A-FE (LB), 5-speed manual, color 199
scruogeAdministrator
Messages: 4431 Registered: 10 Jan 2011, 18:16 From: Brest
03 Jun 2011, 14:13
Thank you, I’ll dig around and look...
Yes, apparently it’s a changer, I need to specifically find information about whether it’s possible to connect a plug to a connector with regular cords to get the desired result...
Somehow there are big doubts about this, otherwise someone would have done something long ago without any Chinese boxes emulating a real changer.
pavel.
vasiliukClub member
Posts: 169 Registered: May 26, 2011, 21:03
03 Jun 2011, 19:37
Today I visited the services in our city that repair and install radio tape recorders. Of course, I haven’t been to all of them, but in all the places I’ve been, the experts tell me that if there is no such output in the radio itself, then nothing will come of it. And although I tell them that I read that people did it without such exits, they still stand their ground.
From this we can draw 2 conclusions: either there are such “masters” in our city, or this is really not possible and people are lying. But since I am an adherent of the idea that “nothing is impossible,” I am more inclined to the first, and to the fact that they simply do not want to delve into this... or are lazy... But they could earn money. Therefore, it’s a pity... I...
that nothing will come of it. So there seems to be only one option - a changer emulator. The truth here is that “pleasure requires capital investment”... it’s just some kind of law of the female half of humanity...
Who has used these things, what do you think? What are the disadvantages in them? Otherwise, on the Internet they are only praised... Which is very strange, knowing that this is a Chinese stray...
and they rarely do quality work, not for large companies...
pavel.vasiliukClub member
Posts: 169 Registered: May 26, 2011, 21:03
Return to Repair. Tuning. Sound
This forum is currently viewed by: no registered users and guests: 0
Source: http://www.toyota-club.by/forum/viewtopic.php?t=11459